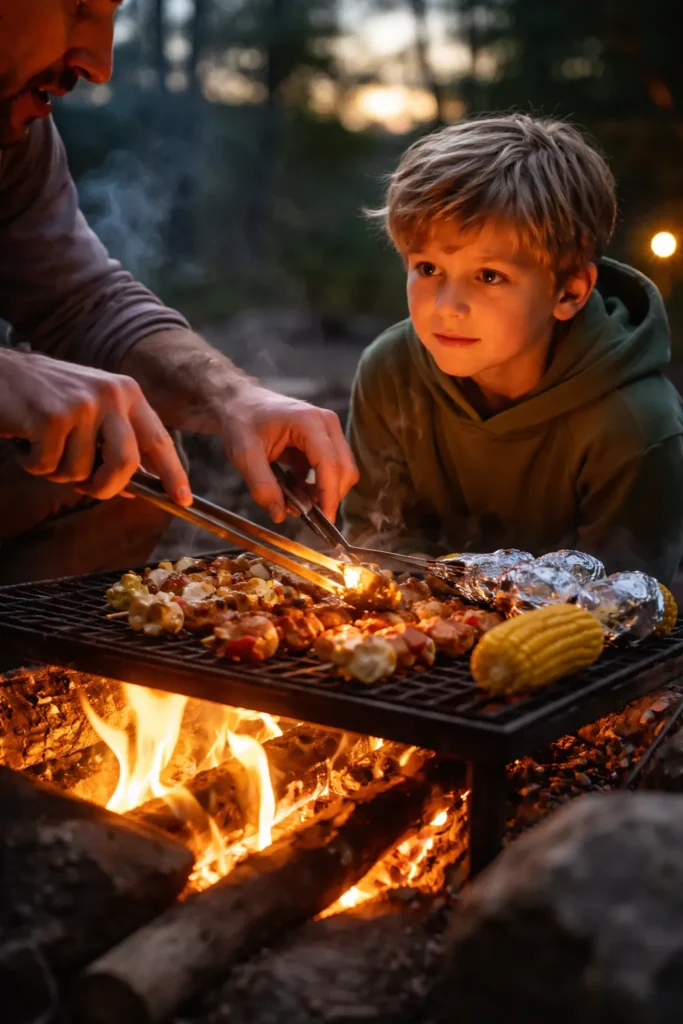
There’s a moment that happens on almost every family camping trip — the fire is crackling, the sun has dropped behind the treeline, and your kid is standing there with a stick, looking at you with pure, focused intensity, waiting to be given a job. That moment is an opportunity. Hand them the wrong thing and you get a burnt marshmallow and a meltdown. Hand them the right recipe and you get a meal they’ll talk about for years.
Campfire cooking with kids isn’t just about feeding people outdoors. It’s one of those rare activities where children are genuinely useful, where they can see the direct results of their effort, and where the reward — warm, smoky, delicious food — arrives almost immediately. Kids who help make dinner are also dramatically more likely to eat it, including things they’d normally push around a plate at home. There’s real magic in that.
The recipes collected here aren’t watered-down activities disguised as food. They’re actual meals and desserts that families genuinely want to eat, chosen specifically because every step — the threading, the wrapping, the stuffing, the stirring — can be safely handed off to a child with minimal adult intervention. Some require a hot dog stick. Some need a pie iron or Dutch oven. All of them produce something worth eating.
Before the first coal glows orange, a quick word on setup: the difference between a chaotic campfire cooking session and a smooth one is almost always preparation. Pre-measure ingredients at home. Pack everything in labeled bags. Assign each child a specific job and stick to it. When kids know their role, they stop hovering near the fire and start focusing on their task.
Table of Contents
- Why Campfire Cooking Builds More Than Hunger
- Setting Up Safe Conditions Before You Cook
- 1. Campfire Chocolate Bananas
- Why Kids Love It
- What You’ll Need
- How to Make It
- Kid Jobs for This Recipe
- 2. Grilled Ham and Pineapple Kebabs
- Why Kids Love It
- What You’ll Need
- How to Make It
- Kid Jobs for This Recipe
- 3. Dutch Oven Chocolate Cherry Dump Cake
- Why Kids Love It
- What You’ll Need
- How to Make It
- Kid Jobs for This Recipe
- 4. Campfire Pizza Rolls Cooked in the Coals
- Why Kids Love It
- What You’ll Need
- How to Make It
- Kid Jobs for This Recipe
- 5. Ham and Cheese Hobo Pie Iron Sandwiches
- Why Kids Love It
- What You’ll Need
- How to Make It
- Kid Jobs for This Recipe
- 6. Beef Sausage Wrapped in Biscuit Dough on a Stick
- Why Kids Love It
- What You’ll Need
- How to Make It
- Kid Jobs for This Recipe
- 7. Bannock Bread on a Stick
- Why Kids Love It
- What You’ll Need
- How to Make It
- Kid Jobs for This Recipe
- 8. Muffins Baked Inside Orange Peels
- Why Kids Love It
- What You’ll Need
- How to Make It
- Kid Jobs for This Recipe
- 9. Tin Foil Packet Dinners with Custom Fillings
- Why Kids Love It
- What You’ll Need (per packet)
- How to Make It
- Kid Jobs for This Recipe
- 10. Walking Tacos — Tacos Built Inside a Chip Bag
- Why Kids Love It
- What You’ll Need
- How to Make It
- Kid Jobs for This Recipe
- The Essential Gear That Makes Campfire Cooking With Kids Work
- How to Turn Picky Eaters Into Campfire Cooking Converts
- Final Thoughts
Why Campfire Cooking Builds More Than Hunger
Cooking over an open fire strips everything back to fundamentals — heat, time, and attention. For a child, that simplicity is clarifying. There’s no microwave timer, no electric burner to adjust with a dial. They have to watch the food, smell it, listen to it sizzle.
That sensory engagement does something that worksheets can’t. Kids practicing campfire cooking are naturally learning about heat transfer, chemical reactions (hello, caramelized marshmallow), and the relationship between time and texture — all without anyone calling it science. The math sneaks in too: measuring ingredients, counting briquettes for a Dutch oven, estimating portion sizes.
Beyond the learning, there’s the bonding. A shared task around a campfire — even a messy, imperfect one — creates a different kind of conversation than sitting across a dinner table at home. Kids open up. They ask questions. They feel capable. That feeling of competence is genuinely hard to manufacture, and campfire cooking delivers it almost every time.
Setting Up Safe Conditions Before You Cook
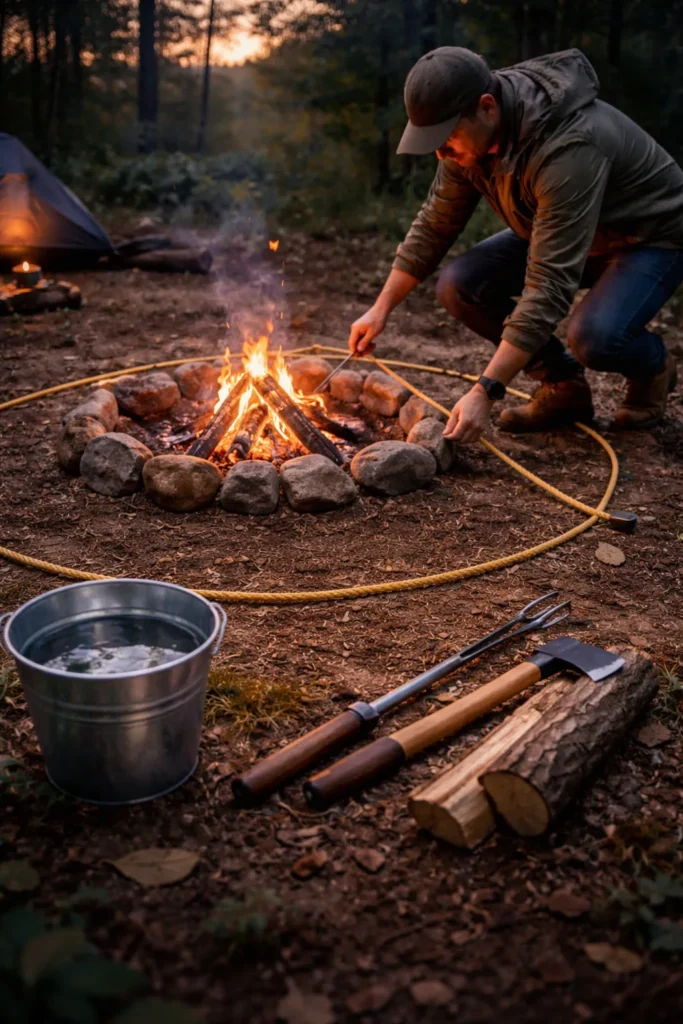
No amount of delicious food is worth a burn or a fall. Establishing a few non-negotiable rules before cooking starts makes the whole experience safer and, honestly, more relaxed for adults.
The fire zone boundary is the single most important rule. Mark a clear line — a ring of rocks, a piece of rope, a verbal understanding — that children do not cross without an adult present. Everything that requires direct contact with the fire or coals stays on the adult side. Everything that can be prepped away from the heat is the kid zone.
Long-handled tools are non-negotiable. Tongs, spatulas, and stirring spoons with handles at least 12 inches long keep small hands away from heat. Heavy oven mitts should be within reach at all times. Teach kids that anything that has been near the fire — including the ground immediately around it — can be hot enough to burn through skin.
Always have water nearby. A bucket, a water bottle, something. Emphasize that fire isn’t a toy, even when it’s producing something delicious. Kids who understand why the rules exist follow them better than kids who are just told “stay back.” A quick explanation of what a burn feels like, how hot coals stay hot long after flames die down, makes the rules feel less arbitrary.
With those basics in place — and with adults actively supervising, not just nearby — the following ten recipes give kids genuine ownership of a real outdoor meal.
1. Campfire Chocolate Bananas
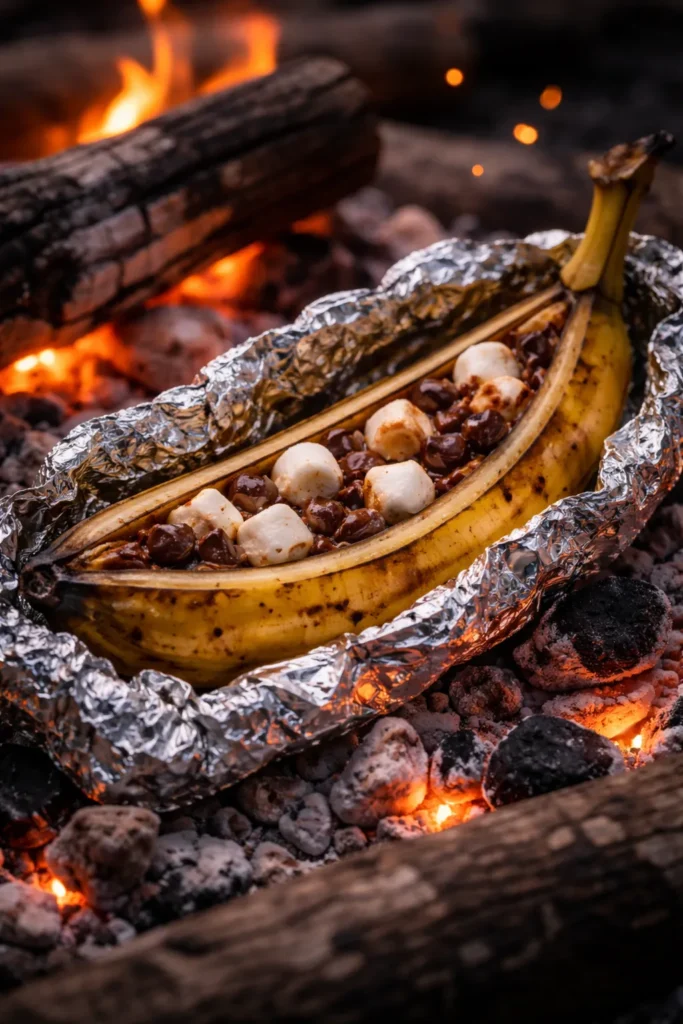
Few campfire recipes produce as much kid enthusiasm as this one. You take a banana that’s still in its peel, cut a slit down the inside curve, stuff it with chocolate chips and mini marshmallows, wrap the whole thing in foil, and tuck it into the coals. What comes out 10 to 15 minutes later is a warm, gooey, slightly smoky banana sundae eaten with a spoon.
Why Kids Love It
The whole process is hands-on from the first step to the last. Kids get to slice, stuff, and wrap — all without going near the fire. The novelty of cooking a banana in its own peel is endlessly interesting to children who’ve never seen it done before. And because the banana itself is soft and naturally sweet, even picky eaters tend to love the result.
What You’ll Need
- 1 ripe banana per person (the peel should be yellow with a few brown spots — fully green bananas won’t soften properly)
- Mini chocolate chips or broken-up chocolate bar pieces
- Mini marshmallows
- Heavy-duty aluminum foil
How to Make It
- Without peeling the banana, use a sharp knife (adults handle this part) to cut a slit lengthwise through the inner curve — cut almost but not all the way through to the bottom peel.
- Open the slit gently and let kids spoon in chocolate chips and mini marshmallows until the cavity is packed.
- Wrap the entire banana tightly in foil, sealing the edges by folding them over twice.
- Place directly in warm coals — not over active flames — for 10 to 15 minutes.
- Remove with tongs, let rest 2 minutes, then peel back the foil and eat with a spoon directly from the peel.
Worth knowing: The longer it cooks, the mushier the banana gets. Around the 10-minute mark you’ll get a soft banana with melted chocolate. At 15 minutes it’s more like warm banana pudding. Both are excellent — just depends on your preference.
Kid Jobs for This Recipe
Stuffing the banana is entirely kid territory. So is wrapping the foil. Younger kids (ages 4-6) can handle both with minimal guidance. The only adult-only step is the initial knife cut and placing the foil packet into the coals.
2. Grilled Ham and Pineapple Kebabs
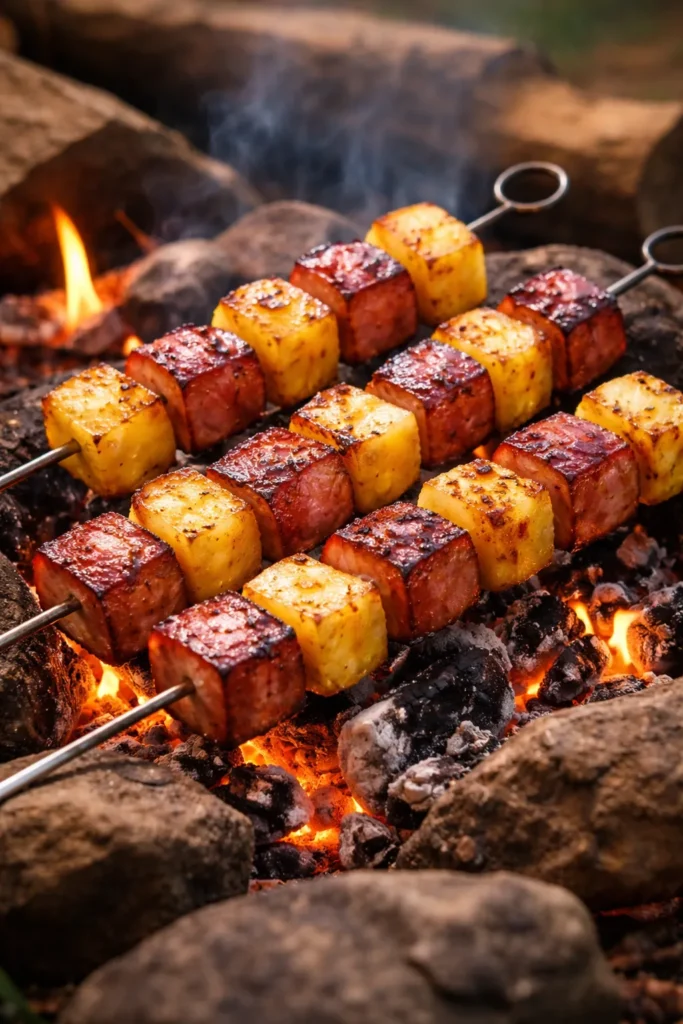
This recipe has one characteristic that makes it nearly perfect for cooking with younger children: both the ham and the pineapple can be eaten completely raw. That means there’s no pressure on cooking time, no anxiety about whether the inside is done, and no food safety concern if a skewer goes slightly undercooked. The grilling just adds color, warmth, and a caramelized edge that takes the flavor from good to great.
Why Kids Love It
Threading food onto skewers engages the same fine motor skills as stringing beads or assembling small building pieces. Kids who’ve never been interested in ham or pineapple separately often discover they love the combination once they’ve built it themselves. The sweet-salty contrast is one of those flavor pairs that children find genuinely exciting.
What You’ll Need
- Pre-cooked ham, cut into 1-inch cubes
- Canned pineapple chunks, drained (or fresh pineapple cut into similar-sized pieces)
- Metal or pre-soaked wooden skewers
- Optional: a light brush of olive oil or honey before grilling
How to Make It
- Let kids thread ham and pineapple chunks onto skewers in alternating order — this is the primary kid job and they can customize their own pattern.
- If desired, brush lightly with olive oil or a thin drizzle of honey (adds beautiful caramelization).
- Place skewers on a grate over medium-heat coals — not direct flame — turning every 2 minutes.
- Cook for 5 to 8 minutes total, until the ham is lightly golden at the edges and the pineapple has softened and picked up a few char marks.
- Let rest 1 minute before eating — the skewer will be hot.
Pro tip: If you’re using wooden skewers, soak them in water for at least 30 minutes at home before packing them. Dry skewers over a campfire catch fire surprisingly fast.
Kid Jobs for This Recipe
Threading the skewers is the main event. Even 5- and 6-year-olds can handle this confidently with blunt-tipped metal skewers. Let them create their own pattern — alternating, grouped, random — and you’ll hear a lot of creative commentary about why their arrangement is the best.
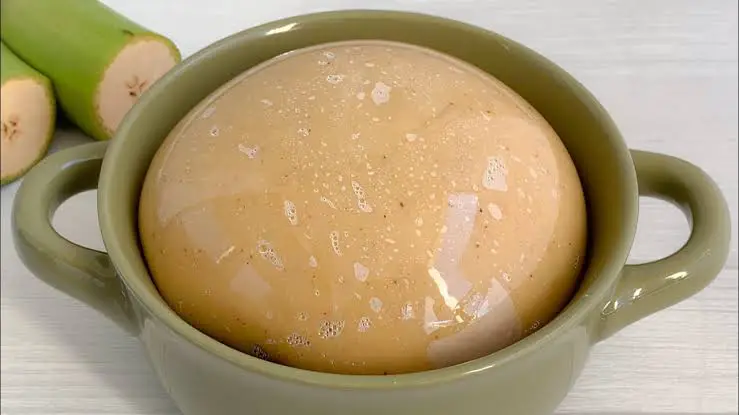
3. Dutch Oven Chocolate Cherry Dump Cake
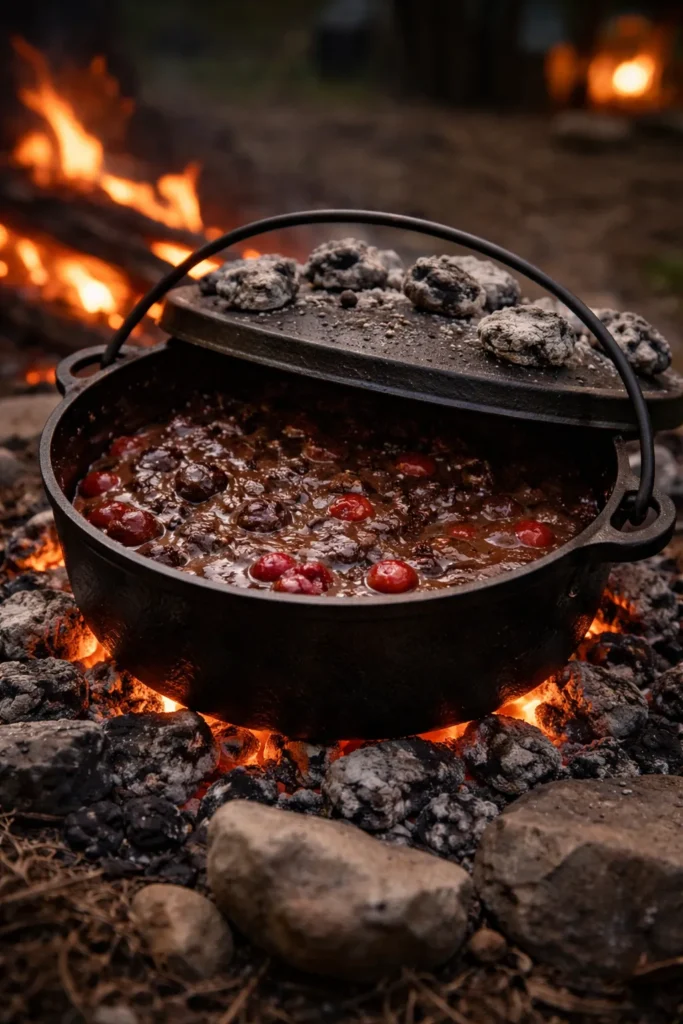
The name tells you everything you need to know about the technique. You open a can of cherry pie filling, dump it in the bottom of a greased Dutch oven, pour a box of dry chocolate cake mix directly on top without mixing it, dot butter across the surface, put the lid on, and let the coals do the work. It’s one of the most consistently successful campfire desserts in existence.
Why Kids Love It
The literal act of “dumping” is deeply satisfying. There’s no mixing technique to get right, no batter to overmix, no delicate folding. Kids are in charge of the whole process from the first can opener turn to the final butter dot. And the result — a warm, fudgy, bubbling chocolate cherry cobbler — is genuinely impressive for something that required almost no skill.
What You’ll Need
- 1 can (21 oz) cherry pie filling
- 1 box dry chocolate cake mix (or brownie mix for a fudgier result)
- ½ cup (1 stick) cold butter, sliced into thin pats
- Cooking spray or butter for greasing the Dutch oven
- Optional: a paper liner inside the Dutch oven for easier cleanup
How to Make It
- Grease the interior of your Dutch oven with cooking spray or a thin layer of butter.
- Let kids pour the cherry pie filling into the bottom and spread it roughly even with a spoon.
- Have kids open the cake mix box and pour the dry powder directly over the cherries — no mixing, no water added.
- Distribute butter pats evenly across the top of the dry cake mix.
- Put the lid on and place the Dutch oven over a bed of hot coals. Add approximately 10-12 additional coals on the lid for top heat.
- Cook for 45 to 60 minutes without lifting the lid more than once or twice to check. The cake is done when the top looks set and dry rather than powdery.
- Remove from coals, let cool 10 minutes, and serve with a spoon directly from the pot.
Worth knowing: Using a paper Dutch oven liner is one of those tips that seems minor until you’re scrubbing chocolate batter out of cast iron at a campsite with limited water. Get the liners.
Kid Jobs for This Recipe
Every step up to placing the Dutch oven on coals is kid-appropriate. Pouring the pie filling, dumping the cake mix, placing the butter pats — it’s all hands-on and forgiving. This is an ideal first baking experience for children who’ve never cooked over a fire.
4. Campfire Pizza Rolls Cooked in the Coals
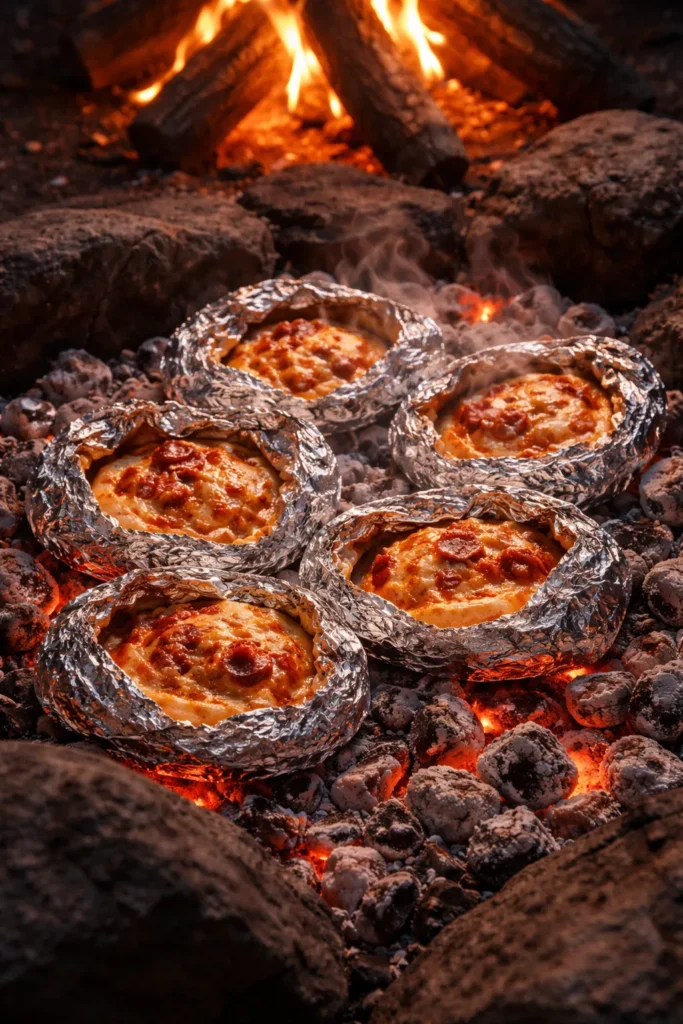
Every kid on the planet likes pizza. This recipe takes that universal enthusiasm and channels it into something they can build from scratch — a roll of dough stuffed with pizza sauce, cheese, and whatever toppings they choose, wrapped in foil, and cooked directly in the coals until the dough is golden and the filling is bubbling.
Why Kids Love It
Total customization. One child wants pepperoni only. Another wants cheese and bell pepper. A third wants to experiment with pineapple (again). Because each roll is individually assembled and wrapped, everyone gets exactly what they want. That ownership over the final product creates a level of investment that carries right through to eating — even from kids who normally claim they don’t like pizza toppings.
What You’ll Need
- Refrigerated pizza dough or crescent roll dough (one can serves 3-4 people)
- Pizza sauce
- Shredded mozzarella
- Toppings of choice — stick to pre-cooked options (mini pepperoni, sliced olives, cooked sausage crumbles, diced bell pepper)
- Heavy-duty foil
How to Make It
- Flour a flat surface (a cutting board or clean camp table works). Roll or press dough into individual rectangles roughly 6×8 inches.
- Let kids spread a thin layer of pizza sauce across the dough, leaving a ½-inch border on the edges.
- Add shredded cheese and chosen toppings — don’t overfill or rolling becomes difficult.
- Roll the dough tightly from one of the short ends, pinching the seam and ends closed firmly. Unsealed ends will leak filling into the coals.
- Wrap each roll tightly in a double layer of heavy-duty foil.
- Place in medium-heat coals — not over active flames — turning every 3 to 4 minutes for 12 to 15 minutes total.
- Let rest 2 minutes before unwrapping — the steam inside is extremely hot.
Pro tip: The coals should glow orange with white ash on the surface — that’s medium heat. Bright red or flaming coals are too hot and will burn the outside of the roll before the inside cooks through.
Kid Jobs for This Recipe
Spreading sauce, adding toppings, and rolling the dough are all kid-friendly tasks. Sealing the ends needs a slightly firmer touch, so demonstrate it once and then supervise. Wrapping in foil is entirely their job.
5. Ham and Cheese Hobo Pie Iron Sandwiches
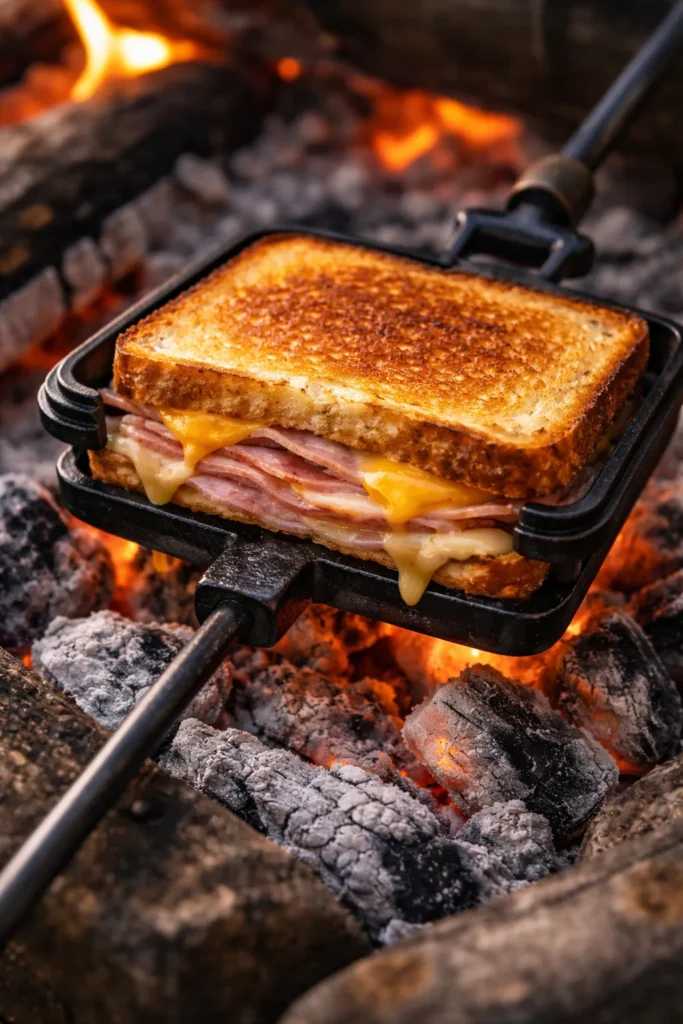
A pie iron is a hinged cast iron clam shell on a long handle — it presses two slices of bread together around a filling and toasts both sides simultaneously over the coals. The result is a crispy, golden, perfectly sealed sandwich with melted filling inside, and it’s one of the most kid-satisfying pieces of campfire equipment ever invented.
Why Kids Love It
The assembly is genuinely creative. Kids choose their own fillings, layer them between buttered bread, close the iron, and then wait — watching through the handle as it cooks. The “reveal” moment when the iron opens and produces a perfectly toasted sandwich is consistently met with genuine excitement, even from kids who’ve made it a dozen times before.
What You’ll Need
- Sliced white or sourdough bread
- Softened butter for the outside of each slice
- Fillings: sliced ham and cheddar cheese are the classic, but mozzarella and pepperoni work well, as does peanut butter and banana for a sweet version
- Pie iron (one per person makes the process faster and more engaging)
How to Make It
- Butter one side of two slices of bread per sandwich — the butter goes on the outside, the side that will contact the pie iron.
- Place one slice butter-side down into the pie iron. Let kids add their fillings in whatever order they choose.
- Top with the second slice of bread, butter-side up.
- Close the pie iron tightly and trim any bread that sticks out beyond the edge.
- Hold the closed iron over medium coals — not touching the coals directly, but close — for 3 to 4 minutes per side.
- Open carefully away from faces (steam escapes when the iron opens). The sandwich should be golden brown on both sides and the cheese fully melted.
Worth knowing: Pie irons get hot enough to cause serious burns even through fabric. Oven mitts or heat-resistant gloves are non-negotiable for the cooking and opening steps, which stay firmly in adult territory.
Kid Jobs for This Recipe
Buttering the bread, choosing and layering the fillings, and closing the iron are all kid jobs. Adults hold and turn the iron over the coals. Even young children (4-5 years old) can assemble their sandwiches and feel fully involved in the process.
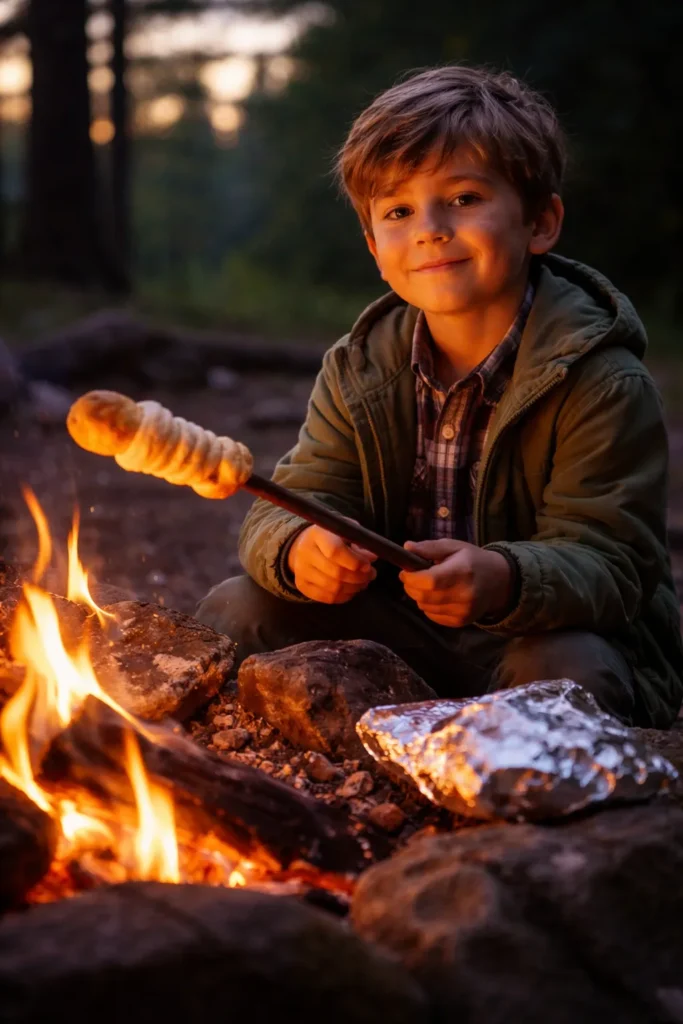
6. Beef Sausage Wrapped in Biscuit Dough on a Stick
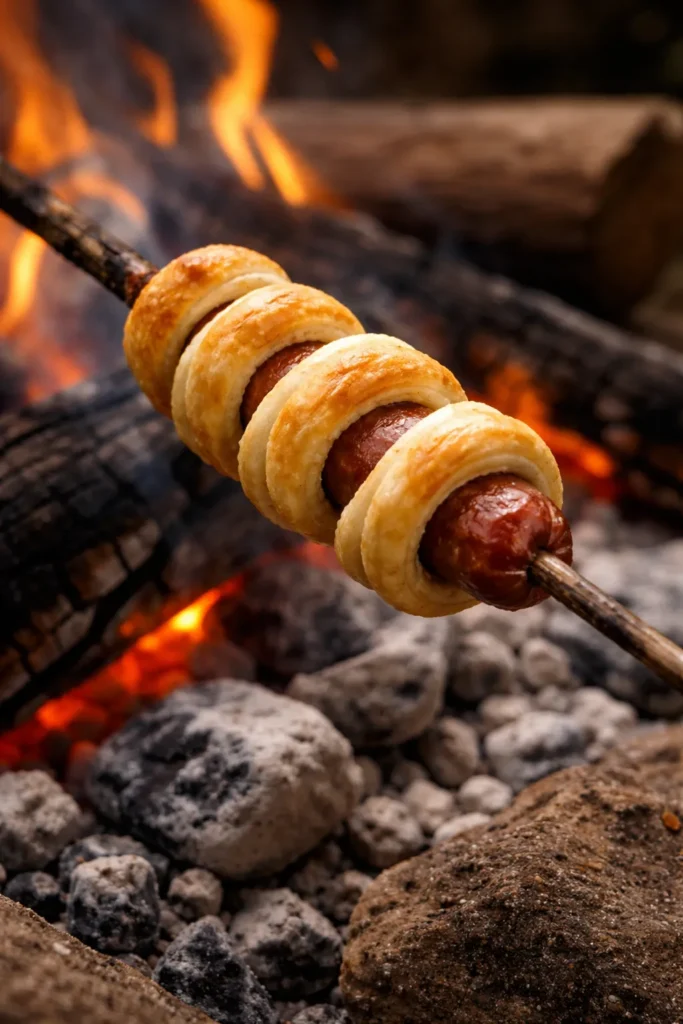
Think of this as a campfire upgrade to pigs in a blanket. A mini beef sausage — already fully cooked — gets wrapped in a spiral of refrigerated biscuit dough and threaded onto a roasting stick. Held over medium coals and rotated slowly, the dough puffs and browns around the sausage into something that’s hot, slightly crispy on the outside, and soft inside.
Why Kids Love It
Every child who has ever roasted a marshmallow already knows how to operate a roasting stick. This recipe takes that existing skill and produces something more substantial than dessert. Kids love the responsibility of managing their own stick, turning it at the right speed, and watching the dough transform.
What You’ll Need
- Mini beef sausages (fully pre-cooked varieties — check the label)
- One can of refrigerated biscuit dough
- Roasting sticks with long handles (metal skewers with wooden handles are ideal)
How to Make It
- Open the biscuit dough and separate into individual pieces. Let kids flatten each piece and tear or cut into strips roughly ½ inch wide.
- Wrap a strip of dough in a tight spiral around a mini sausage, overlapping slightly as you go and pressing the ends firmly to seal.
- Thread the wrapped sausage onto a roasting stick, threading through the sausage rather than the dough.
- Hold over medium coals — never over direct flames, which will burn the outside while leaving raw dough inside — rotating slowly and consistently.
- Cook for 8 to 12 minutes, turning every 30 seconds, until the dough is golden brown on all sides and cooked through (press lightly — it should spring back, not feel doughy).
Pro tip: If the dough slides down the stick while rotating, it means the spiral wasn’t wrapped tightly enough. Press the dough firmly onto itself when wrapping — it needs to grip the sausage, not just rest against it.
Kid Jobs for This Recipe
Wrapping the dough around the sausage is entirely kid territory and it’s a great fine motor challenge. The roasting itself can be managed by children ages 7 and up with adult supervision on distance from the coals.
7. Bannock Bread on a Stick
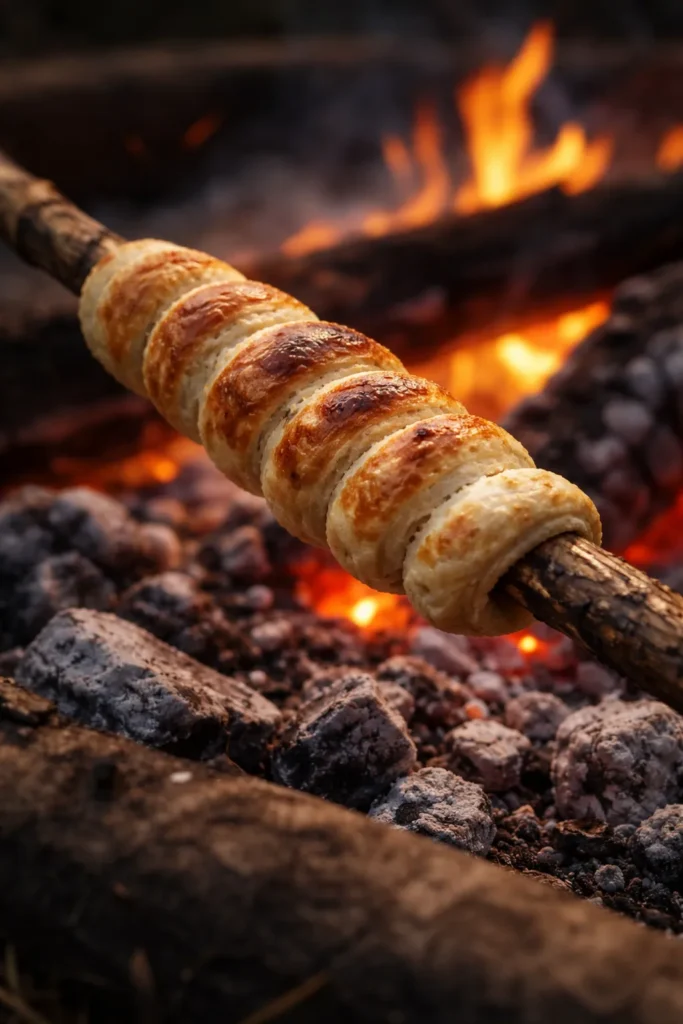
Bannock is one of the oldest campfire breads in North American history, made for centuries by Indigenous peoples using simple pantry staples. The modern campfire version uses flour, baking powder, salt, oil, and water — mixed together into a soft dough, shaped around the end of a stick, and roasted slowly over coals until it’s golden and cooked through. Eaten plain or dipped in butter and honey, it’s deeply satisfying in the way that only fresh-cooked bread can be.
Why Kids Love It
Kneading dough is tactilely irresistible for children — it’s basically playdough that turns into food. Wrapping and shaping the dough around the stick gives kids ownership of the final shape. And there’s something genuinely magical about the first time a child holds a stick over a fire and watches raw dough transform into actual bread.
What You’ll Need
Mix the dry ingredients at home and bring them in a sealed bag for easier campsite prep:
- 2½ cups all-purpose flour
- 2 tsp baking powder
- ½ tsp salt
- ½ tsp sugar
- 3 tbsp neutral oil (added at the campsite)
- ¾ to 1 cup water (added gradually at the campsite)
- Sticks, one per person — sturdy and free of sap or treated wood
How to Make It
- At the campsite, pour the dry mix into a bowl or large zip-lock bag. Add the oil and mix briefly.
- Add water a little at a time, mixing between additions, until the dough comes together and no longer sticks to your hands.
- Let the dough rest for 15 to 20 minutes — this allows the flour to fully hydrate and makes the dough easier to work with.
- Divide into portions (one per person). Let kids roll their portion into a long rope shape using both palms.
- Wind the dough rope in a tight spiral around the end of a stick, pressing firmly so it grips.
- Hold over medium coals — not flames — rotating every 20 to 30 seconds for 10 to 15 minutes, until the surface is golden brown and the bread sounds hollow when tapped.
- Let cool slightly before sliding off the stick. Eat plain or with butter and honey.
Worth knowing: Baking powder is what makes this work without yeast — it creates enough lift that the bread puffs slightly and develops a tender crumb rather than baking into a dense, chewy cylinder. Don’t skip it.
Kid Jobs for This Recipe
Measuring the ingredients at home (great for preschoolers), kneading the dough at the campsite, and winding the dough onto sticks are all age-appropriate tasks. The roasting requires adult supervision but kids can hold their own sticks from about age 6 upward.
8. Muffins Baked Inside Orange Peels
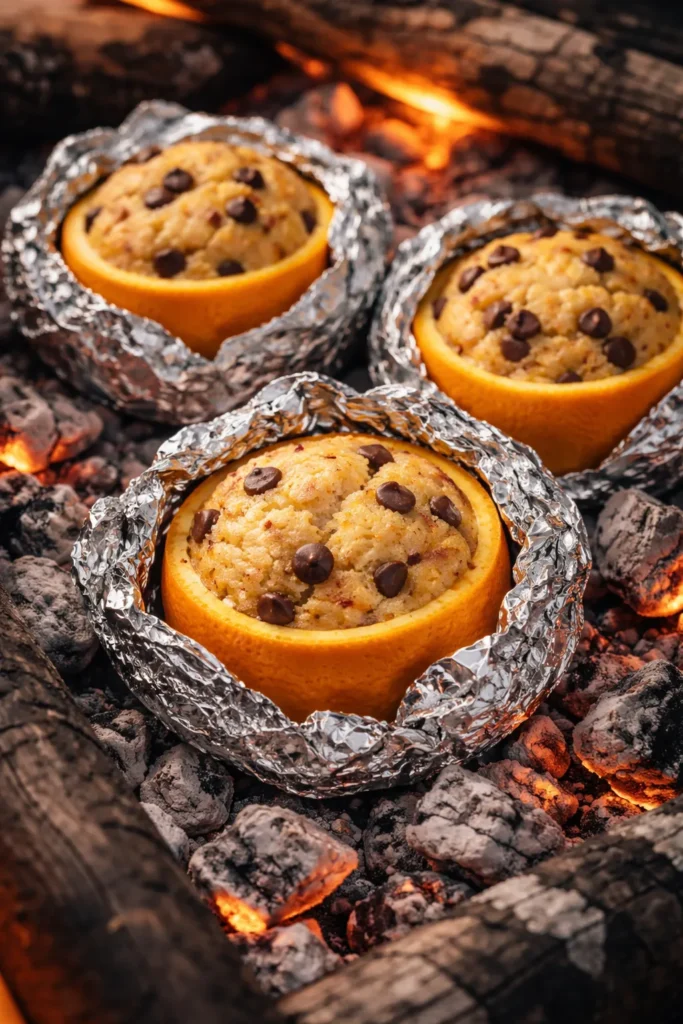
This recipe consistently produces the loudest reaction of any campfire cooking activity — the moment kids realize they’re baking a muffin inside a piece of fruit. Half an orange is scooped out, filled with muffin batter, wrapped loosely in foil, and set in warm coals until the batter rises and bakes through. The orange peel acts as a natural cooking vessel, and the finished muffin carries a subtle citrus perfume that elevates any boxed mix.
Why Kids Love It
The novelty is the hook. Kids who have baked before have almost certainly never baked inside a piece of fruit. The scooping step is satisfying and tactile. And eating the muffin straight from the orange peel — at a campsite, under open sky — is the kind of experience children remember as vividly as any gift.
What You’ll Need
- 3 large navel oranges (makes 6 muffin “cups”)
- 1 package (7 oz) blueberry muffin mix, or any flavor — prepare according to package directions for the batter
- Heavy-duty aluminum foil
How to Make It
- Cut each orange in half crosswise. Let kids use a spoon to scoop out all the fruit — save it for snacking.
- Prepare the muffin batter according to the package directions in a bowl or zip-lock bag.
- Let kids fill each orange peel cup approximately halfway with batter. Don’t overfill — the batter rises.
- Wrap each filled orange half loosely in foil, leaving some space above the batter for the muffin to rise.
- Set in warm coals with the batter side facing up — the flattest part of the orange peel should be down.
- Cook for 8 to 12 minutes, checking at 8 minutes. The muffin is done when it springs back lightly when touched and looks set rather than wet.
- Remove with tongs, let cool 3 minutes, and eat directly from the peel.
Pro tip: The foil wrapping should be loose — more of a tent than a sealed packet. You want heat to circulate around the orange and reach the batter, not trap steam so tightly that the bottom of the muffin steams instead of bakes.
Kid Jobs for This Recipe
Scooping the orange flesh is the obvious highlight and kids will fight for the job. Filling the orange peel cups with batter is another fully kid-appropriate step. This recipe works particularly well with children aged 4 to 10.
9. Tin Foil Packet Dinners with Custom Fillings
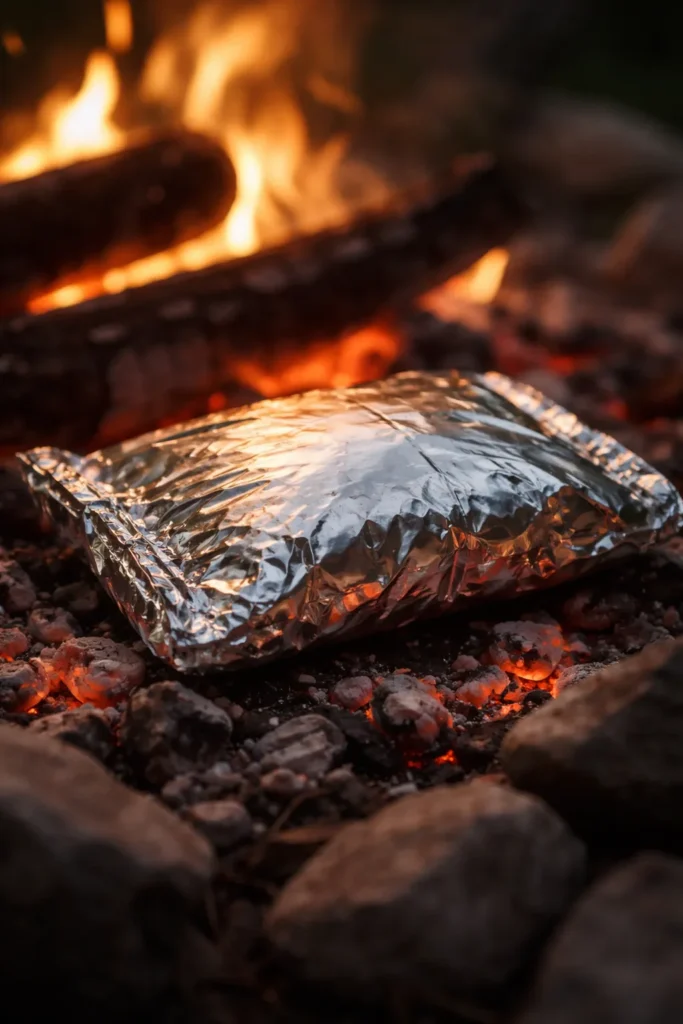
Foil packet dinners are the gold standard of campfire cooking for families because they’re infinitely customizable, they cook hands-free, and cleanup is essentially nonexistent. The basic formula: protein + vegetables + seasoning + a tablespoon of olive oil, all sealed in a double layer of heavy-duty foil and placed in coals for 20 to 30 minutes.
Why Kids Love It
Each person makes their own packet. Each packet gets their name written on the foil with a permanent marker. This single detail — ownership of a personalized packet — transforms a potentially reluctant eater into an invested chef who’s deeply curious about how their specific combination of ingredients turned out.
What You’ll Need (per packet)
- 1 hamburger patty (½ inch thick) or boneless chicken pieces
- ½ cup diced potatoes or tater tots
- ¼ cup each of 2-3 chosen vegetables: carrot coins, bell pepper strips, corn kernels, green beans, zucchini slices
- 1 tablespoon olive oil
- Salt, pepper, garlic powder to taste
- 2 tablespoons cream of mushroom soup or broth (creates steam and a light sauce inside the packet)
- 2 sheets heavy-duty foil per person
How to Make It
- Lay out two sheets of foil per person, stacked on top of each other (double layer prevents punctures and heat loss).
- Let kids arrange their protein in the center, then add vegetables around it in whatever arrangement they prefer.
- Drizzle with olive oil, season with salt and pepper, and add the spoonful of cream of mushroom soup or broth.
- Fold the foil by bringing the long sides up and rolling them together tightly, then folding in the short ends. The seal needs to be tight — any gap lets steam and juice escape.
- Write each person’s name on their packet with a permanent marker.
- Place packets directly in medium coals and cook for 25 to 35 minutes, flipping once halfway through. Ground beef is done when no pink remains; chicken reaches 165°F at the thickest point.
- Open carefully — steam burns on contact. Peel the foil back slowly away from your face.
Worth knowing: Tater tots work better than raw potato cubes in shorter cook times because they’re already par-cooked. For raw potato, cut pieces no thicker than ¼ inch so they soften fully.
Kid Jobs for This Recipe
Arranging the ingredients inside the packet, seasoning, and sealing the foil are all kid-appropriate. Let them take ownership of the folding — show the technique once and let them practice. Placing and retrieving packets from coals is adult territory.
10. Walking Tacos — Tacos Built Inside a Chip Bag
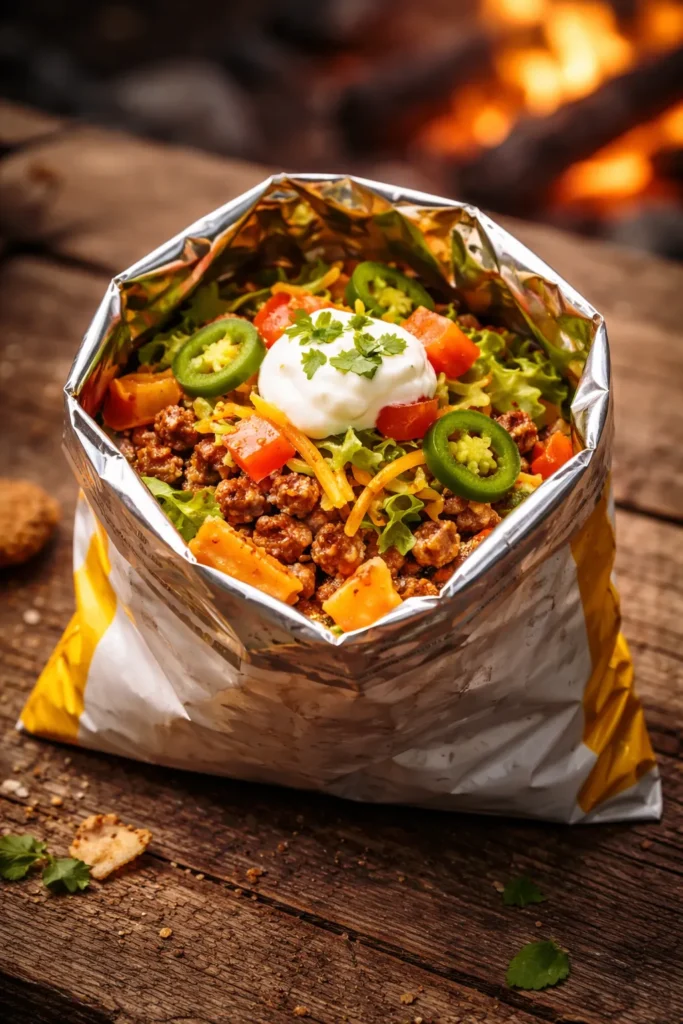
This might be the most fun dinner format for kids at a campsite, and that’s saying something in a list that includes muffins baked in oranges. Take a single-serve bag of corn chips, crush them slightly while still sealed, open the top, and spoon seasoned taco meat and toppings directly into the bag. Eat with a fork, straight from the bag, no plate needed.
Why Kids Love It
No plates means no cleanup and no “I don’t want that touching my other food.” The bags become edible serving vessels and each child’s is completely their own. The combination of crunchy chips, seasoned meat, melted cheese, and cold toppings — all in one bag — is a textural experience kids find endlessly satisfying.
What You’ll Need
- 1 lb ground beef or turkey
- 1 packet taco seasoning
- Individual-sized bags of corn chips (Fritos are the classic choice, but any corn chip works)
- Toppings set up buffet-style: shredded cheese, sour cream, salsa, shredded lettuce, diced tomato, sliced jalapeños for braver eaters
How to Make It
- Brown the ground meat in a cast iron skillet over medium campfire heat, breaking it apart as it cooks — this is an adult job.
- Once the meat is fully cooked and no pink remains, drain any excess fat carefully. Stir in the taco seasoning packet and 2 tablespoons of water per package directions. Simmer 2 minutes.
- Set out all toppings in separate containers so kids can see their options.
- Let kids crush their chip bags by pressing from the outside — this takes about 10 seconds and is enormously satisfying.
- Open each bag at the top and let kids spoon in warm taco meat — adults can help with this step for younger children since the meat and skillet are hot.
- Each person adds their own toppings directly to their bag.
- Hand out forks and eat straight from the bag.
Pro tip: The chips absorb moisture from the toppings over time, so walking tacos are best assembled and eaten immediately rather than prepared ahead. Set everything up assembly-line style and work through them quickly.
Kid Jobs for This Recipe
Crushing the chip bags, choosing toppings, and building their walking tacos are all entirely kid territory. The only adult step is cooking the meat and ladling it into the bags.
The Essential Gear That Makes Campfire Cooking With Kids Work
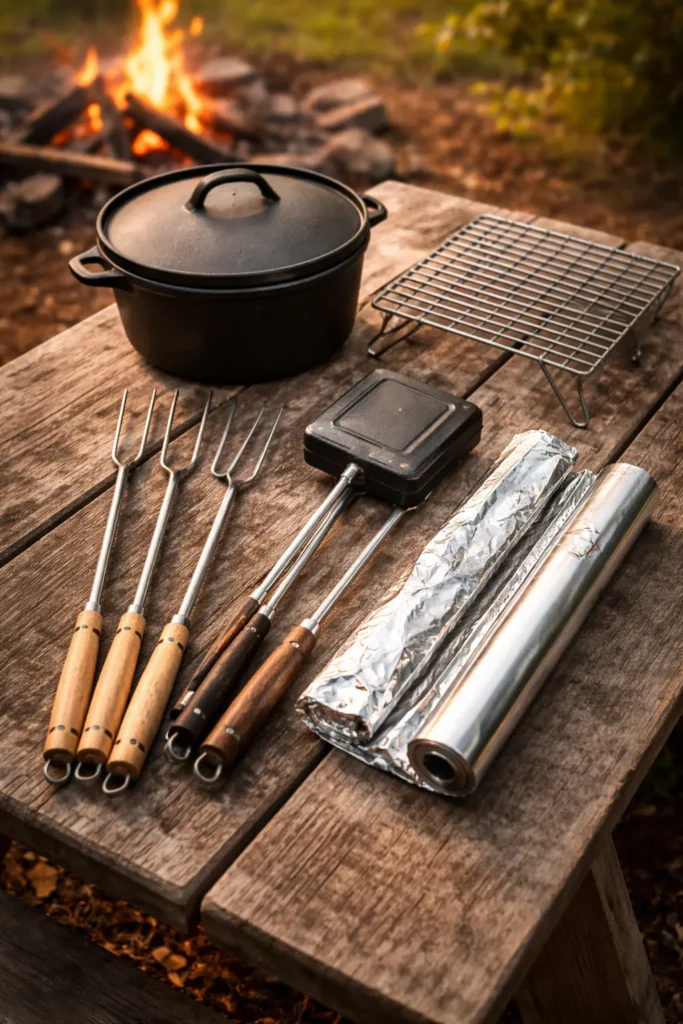
A camping trip can go sideways quickly if you arrive without the right tools. These are the pieces of equipment that directly affect whether campfire cooking with kids feels manageable or chaotic.
A long-handled roasting fork or stick set — ideally with wooden handles that don’t conduct heat — is essential for any stick-based cooking. Metal handles get hot fast, which is a problem when a child needs to hold something for 10 consecutive minutes.
A cast iron Dutch oven with lid opens up baking, stewing, and one-pot dinners that would otherwise be impossible over an open fire. The weight is a commitment, but no other piece of campfire equipment is as versatile.
A pie iron (or two) transforms basic sandwiches into an experience kids actually get excited about. Look for one with at least a 24-inch handle.
Heavy-duty aluminum foil — the kind labeled “heavy duty” or “extra strength” at the store — is the workhorse of campfire cooking. Regular foil tears too easily against rough coal surfaces and hot grates.
A folding campfire grate gives you a stable, adjustable cooking surface that sits over the coals rather than touching them directly. This provides far more control over heat and prevents food from falling into the fire.
How to Turn Picky Eaters Into Campfire Cooking Converts
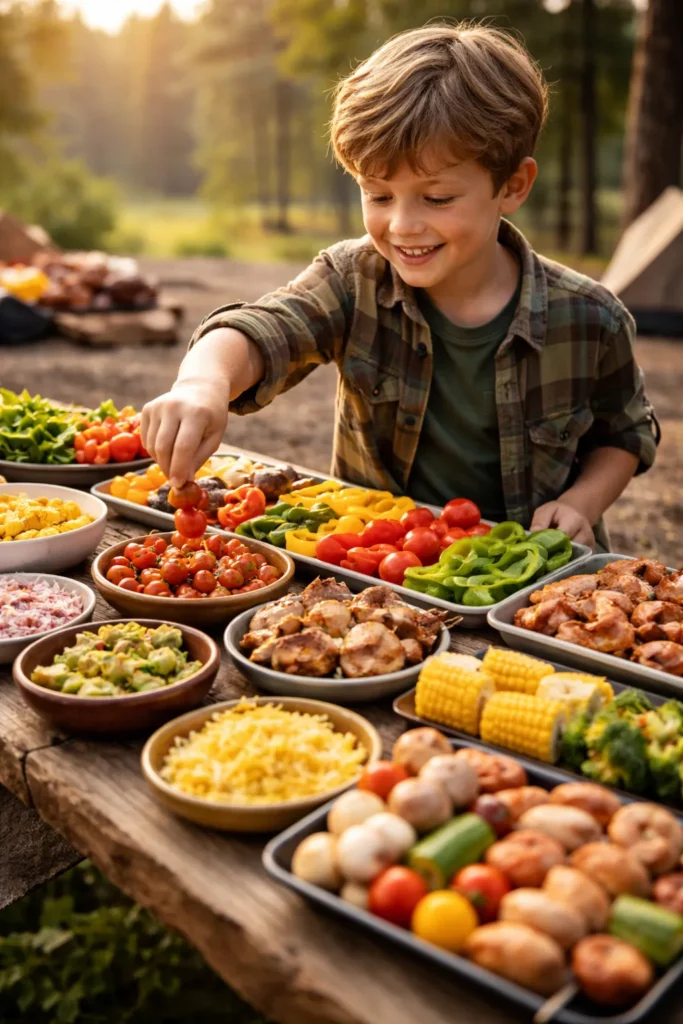
The single most effective strategy isn’t choosing the right recipe — it’s giving kids control over what goes into their food. Picky eaters who refuse a vegetable at the dinner table will thread that same vegetable onto a kebab themselves, cook it, and eat it without complaint. The act of making the food changes the relationship with it.
Set up ingredients buffet-style wherever possible. Give kids explicit choices rather than presenting a finished meal. “Do you want ham or chicken in your foil packet?” is infinitely more effective than “here’s your foil packet.” That small difference in approach changes a child from a passive recipient to an active decision-maker.
Don’t negotiate or explain nutritional value while they’re cooking. Let the experience speak for itself. A child who has just watched something they built transform over a fire is already motivated to try it — you don’t need to add persuasion.
Final Thoughts
The best campfire cooking sessions aren’t the ones where everything goes perfectly. They’re the ones where a marshmallow catches fire and everyone laughs, where the foil packet leaks a little but the potatoes still taste incredible, where a child roasts their biscuit dough stick with enormous concentration and emerges with something slightly lopsided and enormously proud.
Give kids real jobs — not pretend tasks that an adult quietly redoes afterward. Let them measure the wrong amount of seasoning, re-wrap the foil packet twice before it’s sealed properly, and arrange their kebab ingredients in an order that makes no visual sense. That’s how they learn.
The recipes here are reliable, kid-friendly, and genuinely delicious. But the real outcome of a campfire cooking session isn’t the food. It’s a child who walked away believing they made dinner — because they actually did.