There’s a particular kind of satisfaction that comes from making Mexican food completely from scratch — and it’s not the kind you get from tearing open a seasoning packet or using a jar of pre-made sauce. It’s the satisfaction of rendering pork until it’s crisp at the edges and impossibly tender inside, of coaxing dried chiles into a sauce that smells like it’s been simmering for generations, of biting into something and knowing every layer of flavor is yours.
Mexican cuisine is one of the most complex and regionally diverse cooking traditions in the world. UNESCO recognized it as Intangible Cultural Heritage of Humanity, and for good reason — this is a cuisine built on ancient techniques, indigenous ingredients like dried chiles, hominy, masa, and achiote, and cooking methods that evolved over centuries. What many people experience as “Mexican food” in restaurants across the U.S. barely scratches the surface of what this cuisine actually offers.
The dishes on this list aren’t quick weeknight shortcuts. They’re the ones worth clearing your schedule for. Some take hours. Some require a trip to a specialty market for dried guajillo chiles or masa harina. But every single one rewards the effort with flavors that a shortcut simply cannot replicate. These are the dishes that, once you make them from scratch, you’ll never want to eat any other way.
Table of Contents
- 1. Tamales
- Choosing Your Filling
- Getting the Masa Right
- 2. Mole Negro
- The Charring Step That Changes Everything
- Building the Sauce in Layers
- 3. Carnitas
- The Lard Question
- The Final Crisp Step
- 4. Pozole Rojo
- Working With Dried Hominy vs. Canned
- The Garnishes Are Non-Negotiable
- 5. Birria Tacos
- The Chile Backbone
- Assembling the Perfect Birria Taco
- 6. Chiles Rellenos
- Charring and Peeling the Poblanos
- Making the Egg Batter
- 7. Chilaquiles
- The Tortilla Texture Question
- Essential Toppings
- 8. Cochinita Pibil
- Making Achiote Paste From Scratch
- Serving Cochinita Pibil the Right Way
- 9. Tacos al Pastor
- Replicating the Vertical Spit at Home
- What Makes Al Pastor Tacos Distinctive
- 10. Homemade Tortillas
- Corn Tortillas: The Two-Ingredient Miracle
- Flour Tortillas: The Technique That Matters
- Final Thoughts
1. Tamales
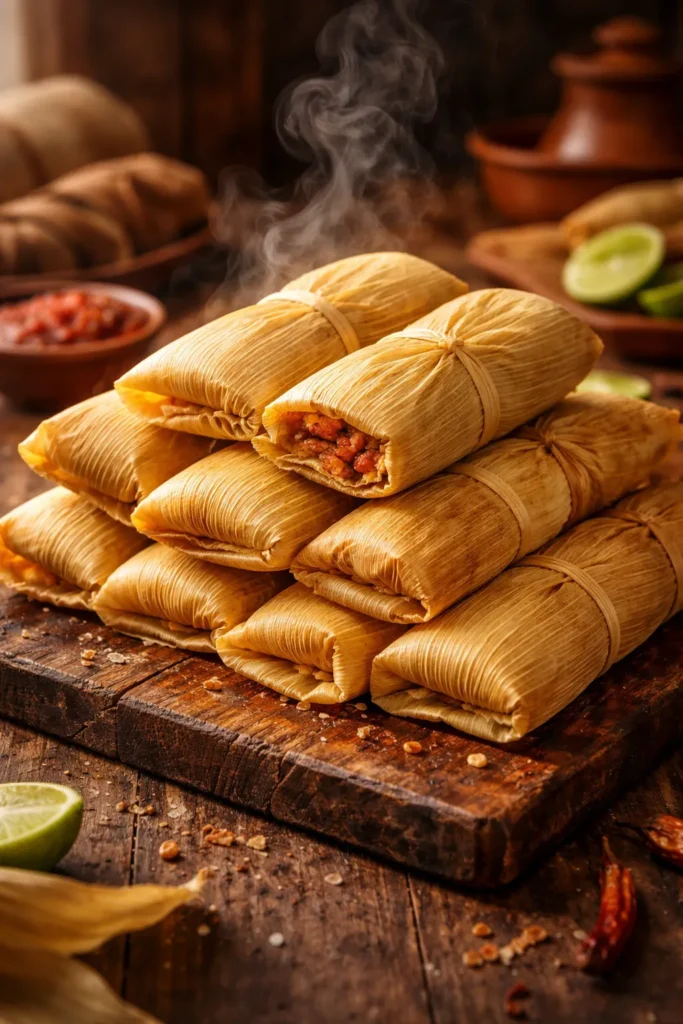
If there’s one dish that defines the spirit of Mexican cooking — the patience, the community, the love folded into every layer — it’s tamales. Made from masa (corn dough) filled with savory meat or cheese, then wrapped in corn husks and steamed, tamales are a labor of love that Mexican families traditionally make together in large groups called tamaladas. The process is long, but the result is unlike anything you’ve ever eaten from a can or a food truck steam table.
What makes a scratch tamale extraordinary is the masa itself. When you build your dough from masa harina, lard, broth, and a pinch of baking powder beaten until a small ball floats in water, you’re creating a texture that is simultaneously light and rich. Store-bought versions often taste dense and gummy by comparison.
Choosing Your Filling
Chicken in salsa verde is one of the most popular fillings, and for good reason — the bright, tangy tomatillo sauce cuts through the richness of the masa beautifully. Red chile pork carnitas is another classic, deeply savory and complex. For a vegetarian option, roasted poblano and cheese hits every note you want from a tamale.
Getting the Masa Right
The traditional test for masa readiness is the float test: drop a small ball of dough into a glass of cold water. If it floats, it’s ready. This means enough air has been beaten into the lard-masa mixture to give the steamed tamale a light, tender crumb. If it sinks, beat the dough for another 2 to 3 minutes and test again.
- Spread masa about ¼-inch thick on soaked corn husks — too thin and it tears, too thick and it turns gummy
- Use a steamer basket with the tamales standing upright, open-side up
- Steam for 75 to 90 minutes, then let them rest for 15 minutes before unwrapping — they firm up as they cool
- Freeze extras in a single layer, then bag them; they reheat perfectly in a steamer in 20 minutes
Worth knowing: Tamales taste even better the next day. The flavors meld overnight, and the masa firms into a more sliceable texture.
2. Mole Negro
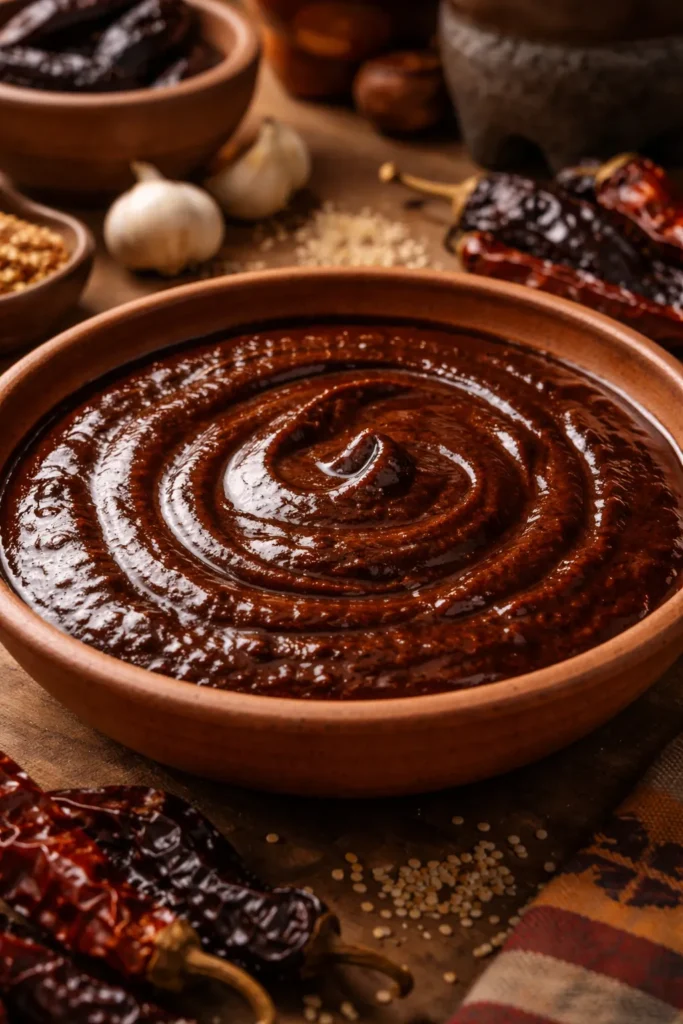
Mole negro is arguably the most complex sauce in all of Mexican cooking. Originating from Oaxaca, this dark, brooding sauce is made from a combination of dried chiles (chilhuacle, mulato, and pasilla negro are traditional), toasted seeds, charred onion, raisins, plantain, spices, and Mexican chocolate. Traditional mole negro can contain more than 30 ingredients and takes two to three days to prepare.
Making it from scratch at home is a commitment — but you don’t need to do it in one session. The sauce keeps beautifully in the fridge for up to a week and freezes for several months, so the effort pays dividends across multiple meals.
The Charring Step That Changes Everything
One thing most recipes skip explaining is why you char the dried chiles, onion, and garlic directly on a dry comal before adding them to the blender. Charring adds a subtle smokiness and bitter edge that keeps the finished sauce from tasting sweet or one-dimensional. Push it further than you think you should — you want actual blackened spots on the onion, not just softened edges.
Building the Sauce in Layers
The key to mole’s depth is that each component is cooked separately before being blended and combined. You fry the blended chile paste in hot lard until it darkens and thickens. You toast the spices separately. You fry the raisins and plantain separately. Each step takes time and cannot be rushed.
- Grind the toasted seeds (sesame, pepitas) in a spice grinder before adding to the blender — pre-ground is fine but you lose some of the nutty edge
- Use authentic Mexican chocolate like Ibarra or Abuelita — these have cinnamon and sugar already incorporated, which is part of the sauce’s character
- Thin the sauce gradually with turkey or chicken broth until it coats a spoon without dripping off immediately
- Serve over turkey, chicken thighs, or enchiladas, with a sprinkle of sesame seeds
Pro tip: Make a double batch. Mole freezes brilliantly in ice cube trays for single-serving portions you can add to braises, stews, or pasta sauce.
3. Carnitas
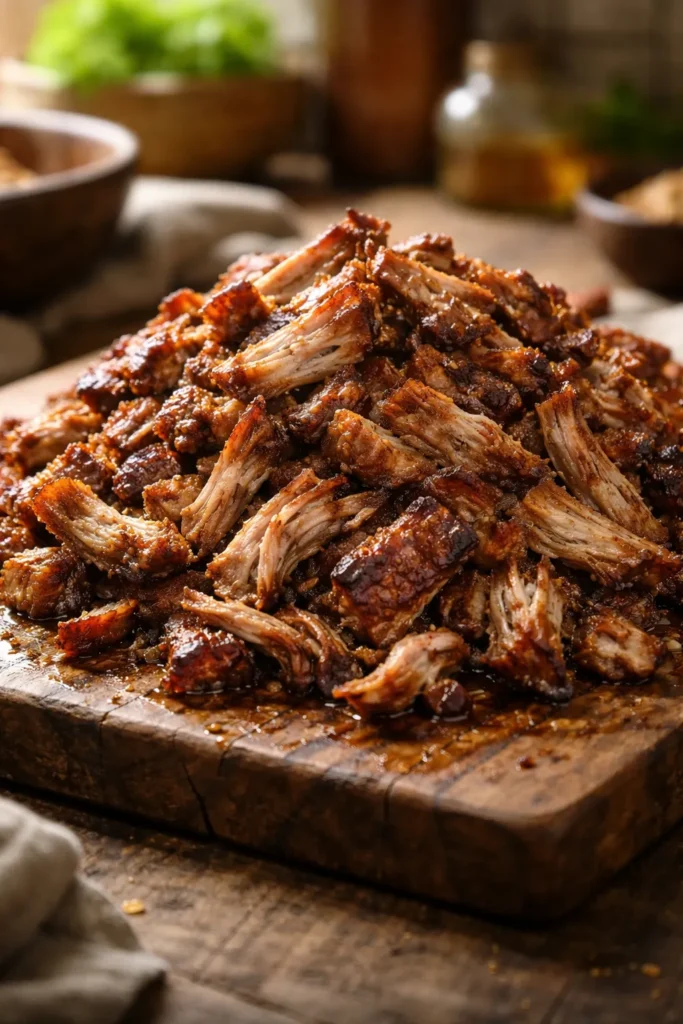
Carnitas from Michoacán — the style most people know and love — are made by cooking pork shoulder or butt in lard at a low, steady heat until the fat renders and the meat essentially confit-cooks in its own fat. The result is pork that is meltingly tender on the inside with deeply browned, crispy bits on the outside. No other cooking method produces quite that combination.
The store-bought version, or the shredded pork from a slow cooker recipe, is fine. But it doesn’t have the textural contrast that makes authentic carnitas so compelling. The magic is in the final crisping step.
The Lard Question
Many home cooks balk at using lard. But here’s the thing: lard is what creates that characteristic flavor. The pork essentially self-bastes in its own rendered fat, picking up an incomparable richness that vegetable oil can’t replicate. If you’re making carnitas once, make them right.
The traditional recipe also includes orange juice, garlic, bay leaves, oregano, and occasionally a splash of milk or Coke — the sugar aids browning and adds a subtle caramelized sweetness that balances the pork’s richness.
The Final Crisp Step
Once the pork is tender and falling apart (2 to 3 hours of low cooking), don’t skip the final blast of high heat. Spread the shredded meat on a baking sheet and broil for 5 to 8 minutes until the edges char and crisp. That textural contrast is non-negotiable in good carnitas.
- Pull the meat while it still has structure — don’t shred it so fine that it loses all its texture
- Warm corn tortillas directly over a gas flame for 15 to 20 seconds per side before serving
- Serve with white onion, fresh cilantro, lime wedges, and salsa verde — nothing more is needed
- Leftover carnitas reheat best in a dry cast iron skillet, not a microwave, which turns them rubbery
4. Pozole Rojo
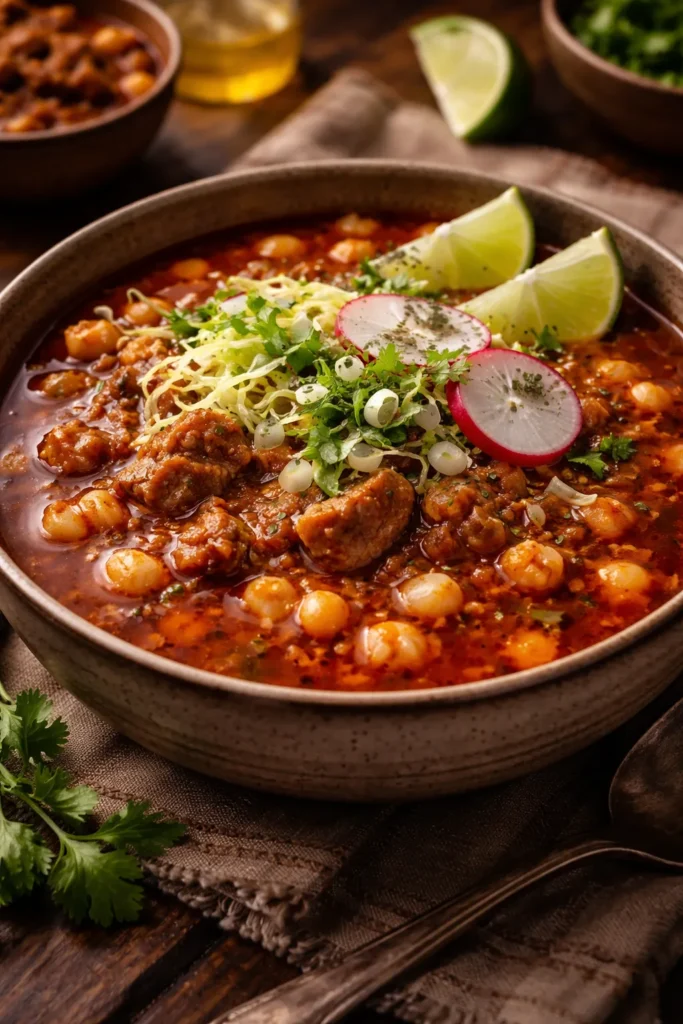
Pozole is one of Mexico’s oldest dishes, with roots that trace back to pre-Columbian times. The base is hominy — dried maize kernels that have been nixtamalized (treated with calcium hydroxide), which transforms their flavor and nutritional profile. Combined with a rich red chile broth and slow-cooked pork, pozole rojo is one of the most deeply satisfying soups you’ll ever eat.
What separates a made-from-scratch pozole from a shortcut version is the broth. When you build it from dried guajillo and ancho chiles that you’ve rehydrated, blended, strained, and fried in the pot with aromatics, you get a broth with a brick-red color and a complex, layered flavor that no store-bought base can touch.
Working With Dried Hominy vs. Canned
Both work, but dried hominy that you soak overnight and cook from scratch has a chewier, more satisfying texture and a more pronounced corn flavor. Canned hominy is perfectly acceptable and saves about 90 minutes of cooking time — a reasonable trade-off when you’re already spending time on the broth.
The Garnishes Are Non-Negotiable
Pozole is not complete without its traditional garnish spread. The garnishes aren’t decorative — they’re structural. Each one adds a distinct texture and flavor dimension.
- Shredded cabbage — crunchy, cooling contrast to the rich broth
- Dried oregano (rub between your fingers to release the oils before sprinkling)
- Thinly sliced radishes — peppery bite and visual pop
- Fresh lime wedges — the acid wakes up every other flavor
- Diced white onion and fresh cilantro — brightness and freshness
- Toasted tostadas on the side for scooping and dipping
5. Birria Tacos
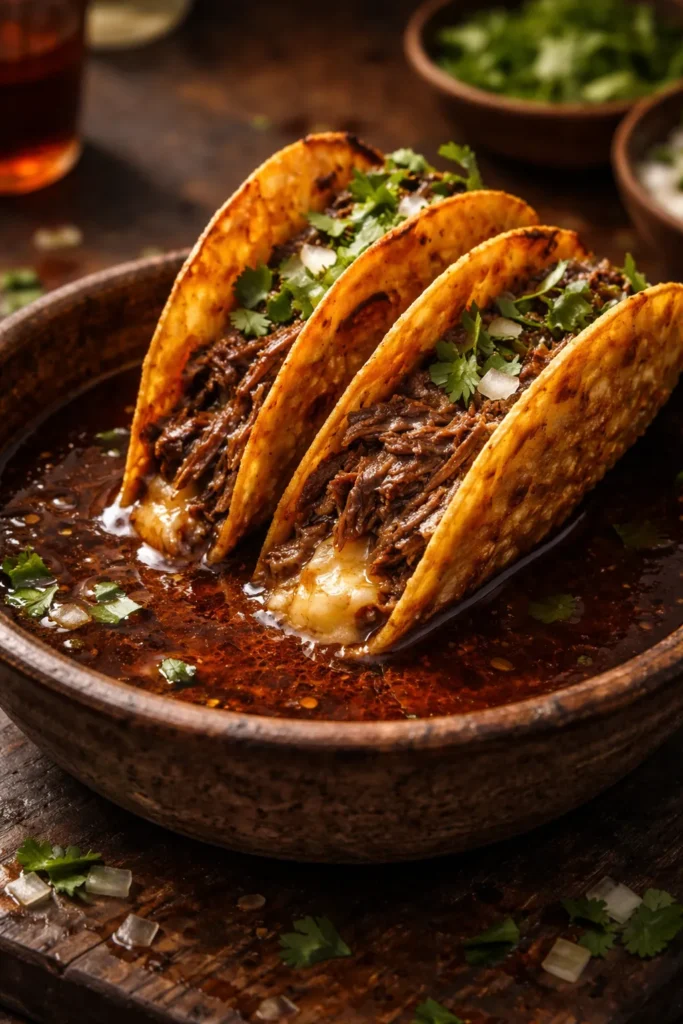
Birria began as a goat stew from Jalisco. The version that has taken on a life of its own — quesabirria tacos — uses beef short ribs or chuck, braised low and slow in a deeply spiced consommé of dried chiles, tomatoes, cinnamon, cloves, and dried herbs. The tortillas are dipped in the rendered fat floating on top of the broth, filled with shredded birria meat and melted cheese, then pan-seared until crispy and served alongside a bowl of consommé for dipping.
Making birria from scratch requires building that consommé from the ground up — and nothing about it can be faked.
The Chile Backbone
The flavor complexity of good birria comes almost entirely from its dried chile base. A combination of ancho chiles (dried poblanos, fruity and mild), guajillo chiles (slightly tangy with moderate heat), and pasilla chiles (earthy, with hints of dried fruit and dark chocolate) creates a sauce that’s rich but not one-dimensional.
Toast each chile type separately on a dry comal for 30 seconds per side until fragrant. Then rehydrate in hot water for 20 minutes. The soaking liquid from guajillo chiles can be added back to the blender for extra depth — the liquid from ancho is slightly bitter and is better discarded.
Assembling the Perfect Birria Taco
- Skim the orange-red fat that floats to the top of your finished birria broth — this is your tortilla fat
- Dip corn tortillas into the fat and place in a hot, dry cast iron skillet
- Add a spoonful of shredded birria meat and a pinch of Oaxacan cheese or Monterey Jack
- Fold the tortilla and press gently — cook 2 minutes per side until the outside is crispy and the cheese is fully melted
- Serve immediately with consommé for dipping, diced onion, cilantro, and lime
Pro tip: The consommé from birria is phenomenal on its own as a soup. Add cooked chickpeas, rice, or roasted vegetables and it becomes a full meal.
6. Chiles Rellenos
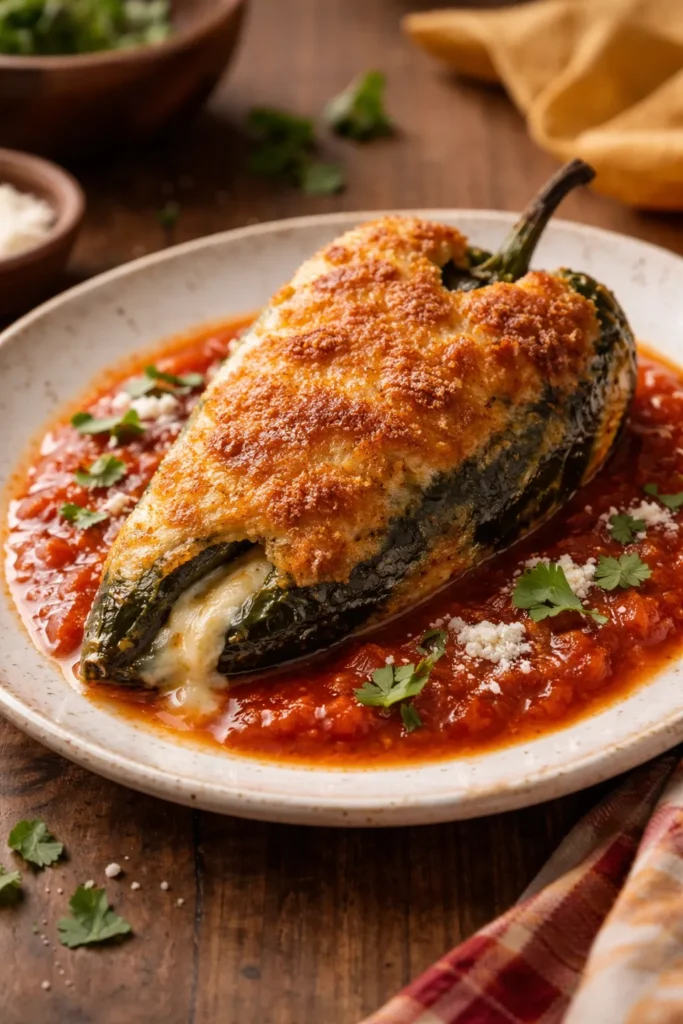
Chiles rellenos — stuffed and battered poblano chiles — require more technique than almost any other dish on this list. The chile must be charred and peeled without tearing. The batter is an egg white foam folded with yolks, which creates a light, airy coating that fries to a golden puff around the chile. The filling traditionally alternates between cheese (queso Oaxaqueño or queso fresco) or picadillo (a savory mixture of spiced ground meat, raisins, and almonds).
Getting all three components right at the same time — properly peeled chile, light batter, hot oil — is the challenge. But when it works, it’s spectacular.
Charring and Peeling the Poblanos
Hold each poblano directly over a gas flame or under a broiler, turning every 30 seconds, until the skin is blackened and blistered all over. Place immediately in a zip-top bag or cover with plastic wrap and let steam for 15 minutes. The steam loosens the skin so it peels off cleanly. Work gently — poblanos tear easily and a torn chile means the filling escapes into the oil.
Making the Egg Batter
Separate 4 eggs. Beat the whites to stiff peaks. Fold in the yolks one at a time until just combined — you want the batter airy and mousse-like, not deflated. Dredge each stuffed chile in flour first (this gives the egg batter something to grip), then dip in the egg batter and lower gently into 375°F oil.
- Fry two at a time maximum to maintain oil temperature
- Each chile needs about 3 minutes per side — the batter should be deeply golden, not pale yellow
- Drain on a rack, not paper towels — paper towels trap steam and make the batter soggy
- Serve immediately with salsa ranchera (a cooked tomato-chile sauce) spooned over the top
7. Chilaquiles
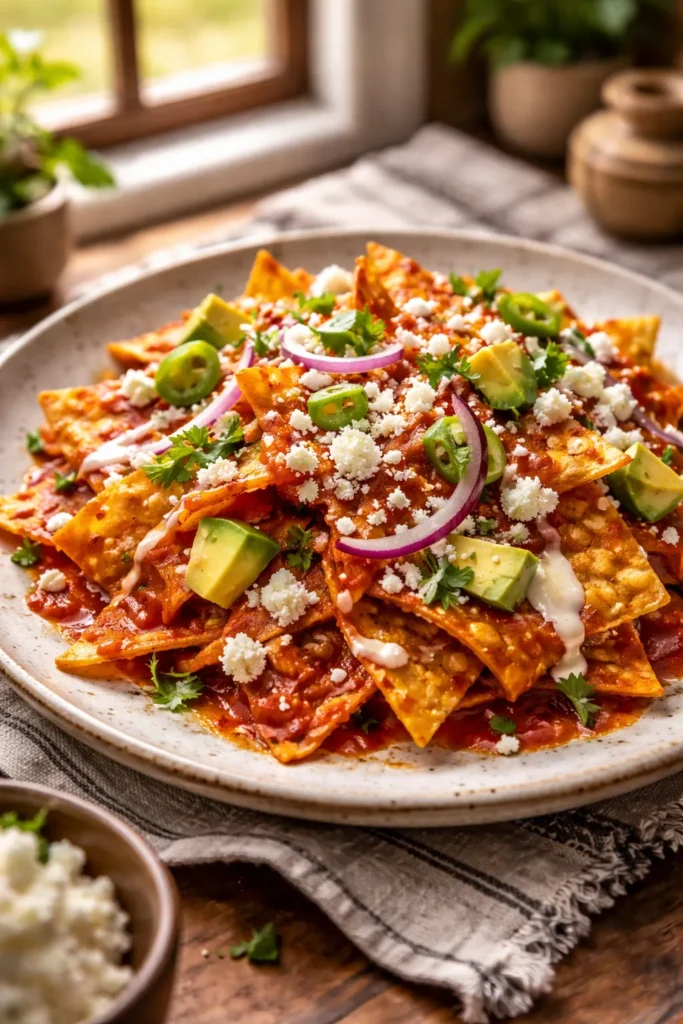
Chilaquiles are a traditional Mexican breakfast built from yesterday’s corn tortillas. The tortillas are fried or baked until crispy, then simmered briefly in either red (roja) or green (verde) salsa until they’ve softened just enough to absorb the sauce without disintegrating. The contrast between the sauce-soaked interior and the slightly resistant exterior of each chip is the whole point of the dish.
What you cannot fake is the salsa. A chilaquiles rojo made with a from-scratch sauce of rehydrated guajillo and arbol chiles, charred tomatoes, garlic, and cumin will taste completely different from one made with jarred salsa — richer, smokier, and more complex.
The Tortilla Texture Question
The eternal debate in chilaquiles: how soft should the chips be? The answer depends on your region of Mexico. In some areas, the chips are barely kissed by the sauce — still crunchy, the salsa more of a coating than a braise. In others, the chips are soft and yielding, almost like a savory bread pudding. Cook them less (2 minutes in the sauce) for crunch, longer (4 to 5 minutes) for soft. Both are correct. Neither is wrong.
Essential Toppings
Chilaquiles without their toppings are incomplete. The dish is built in layers, and each element matters.
- Crema mexicana or crème fraîche — thinner and tangier than American sour cream, it balances the chile heat
- Queso fresco crumbled generously over the top — salty, fresh, and creamy
- Thinly sliced white onion — raw, not cooked, for crunch and sharpness
- Fried or poached egg on top — the broken yolk becomes a third sauce
- Avocado slices or guacamole on the side, always
8. Cochinita Pibil
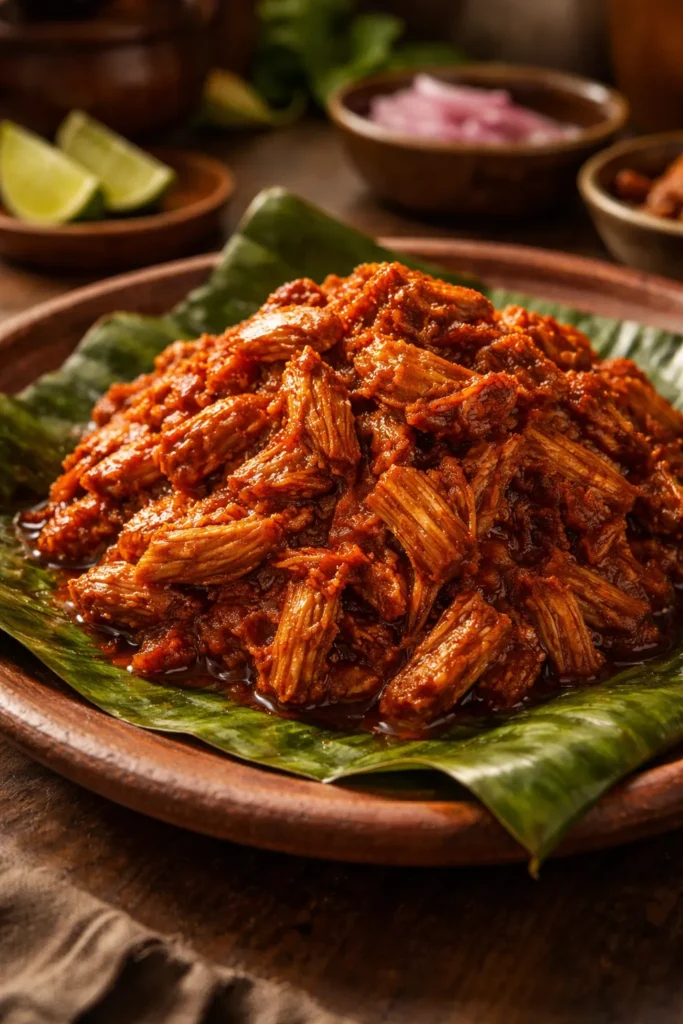
Cochinita pibil is one of the most distinctive regional dishes in all of Mexico. From the Yucatán Peninsula, this slow-roasted pork is marinated in achiote paste (crushed annatto seeds blended with citrus juice, garlic, and spices) and traditionally cooked wrapped in banana leaves underground over a wood fire. The annatto gives the pork a vivid brick-red color and a subtly earthy, slightly peppery flavor that has no substitute.
At home, you achieve the same result by wrapping achiote-marinated pork shoulder in banana leaves and cooking it low and slow — 325°F for 3 to 4 hours — in a covered Dutch oven or roasting pan. The banana leaves infuse the meat with a faint, grassy sweetness during cooking.
Making Achiote Paste From Scratch
You can buy achiote paste at most Latin grocery stores, and it’s decent. But making it from scratch is worthwhile if you want the full flavor. Grind dried annatto seeds in a spice grinder with cumin, black pepper, allspice, oregano, and dried chipotle. Blend with fresh orange juice, lime juice, garlic, and white vinegar into a thick paste. The result is a marinade with far more complexity than the store-bought block.
Serving Cochinita Pibil the Right Way
- Pickled red onions with habanero are mandatory — they cut through the richness and add the acidic contrast the dish requires
- Serve on small corn tortillas, not flour — the earthy flavor of corn tortillas pairs better with the achiote-marinated pork
- The juices that collect in the bottom of the roasting pan are incredibly flavorful — spoon them over the pork before serving
- Black beans alongside, cooked simply with epazote if you can find it
9. Tacos al Pastor
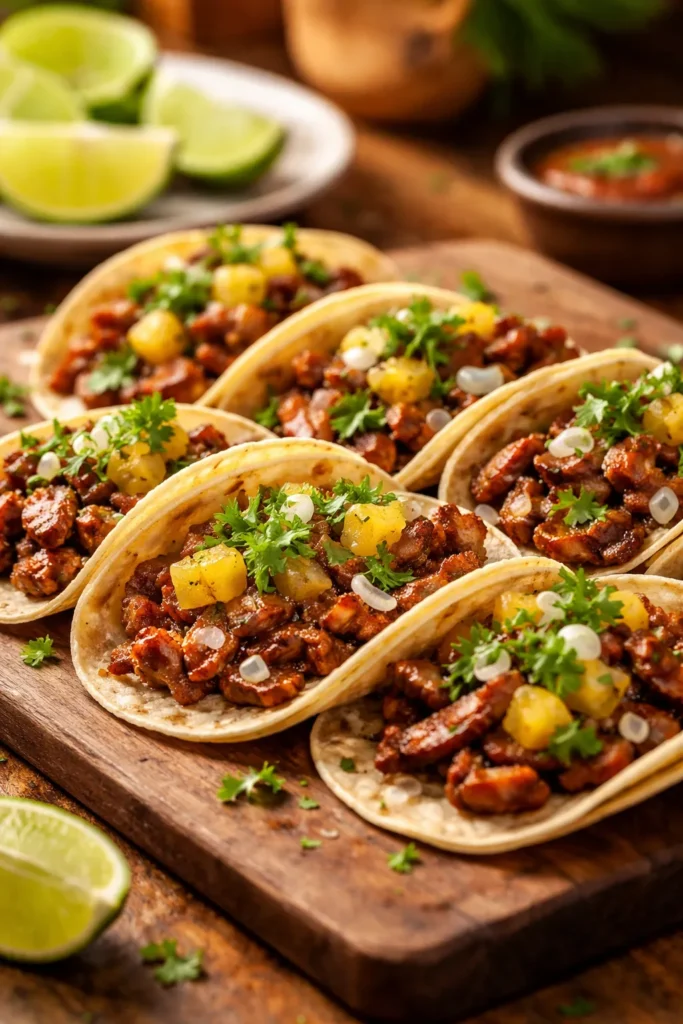
Tacos al pastor have a fascinating culinary origin story. Lebanese immigrants brought the technique of shawarma — vertical spit-roasted meat — to Mexico City, where Mexican cooks adapted it using pork, dried chiles, and pineapple instead of lamb and Middle Eastern spices. The result became one of the most beloved street foods in the country.
Authentic al pastor requires the pork to marinate in a blended paste of rehydrated guajillo and ancho chiles, achiote, pineapple juice, garlic, and cumin for a minimum of 4 hours — ideally overnight. The acidity of the pineapple juice begins to tenderize the meat, and the chile paste penetrates every layer.
Replicating the Vertical Spit at Home
Without a trompo (the rotating vertical spit), you have two good home options. The first is thin-sliced marinated pork shoulder cooked in a screaming-hot cast iron skillet in batches, finishing with a quick caramelized pineapple added to the same pan. The second is skewering stacked pork slices and cooking them under a broiler, rotating every few minutes.
The cast iron method gives you the best char-to-tenderness ratio in a home kitchen and takes about 8 to 10 minutes total.
What Makes Al Pastor Tacos Distinctive
- Pineapple is non-negotiable — a small piece of fresh pineapple served with each taco cuts the chile richness and adds sweetness; canned works in a pinch but fresh is noticeably better
- Small corn tortillas, warmed directly on the flame
- White onion and cilantro only — al pastor tacos are not dressed in salsa, guacamole, or cheese; the meat is the star
- Salsa verde on the side for dipping, not piled on top
Pro tip: Slice the pork shoulder as thin as possible — 3mm to 5mm — before marinating. Thinner slices pick up more marinade and char faster, giving you that crispy exterior that defines good al pastor.
10. Homemade Tortillas
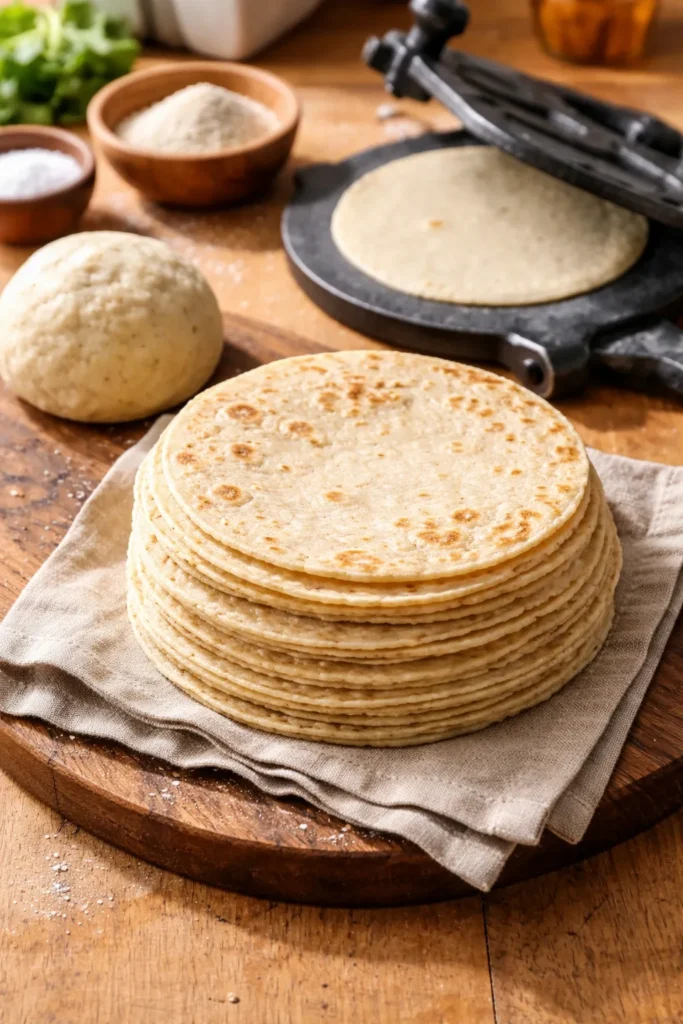
Every dish on this list gets measurably better when served with tortillas you’ve made yourself. That’s not hyperbole — it’s just the reality of the difference between a tortilla pressed from fresh masa and one that’s been sitting in a plastic bag at a grocery store for two weeks.
Corn tortillas require just two ingredients: masa harina and water. Flour tortillas need five: flour, salt, fat (lard or shortening for the most authentic result, though butter works), water, and a little baking powder. Neither recipe is complicated. The technique — particularly for corn tortillas — takes 20 to 30 minutes of practice before you feel confident, but the learning curve is short.
Corn Tortillas: The Two-Ingredient Miracle
Mix masa harina with warm water until the dough comes together like soft clay — it should not crack when pressed, but shouldn’t stick to your hands either. Divide into golf ball-sized portions (about 30g each), cover with a damp towel to prevent drying, and press each one between two pieces of plastic in a tortilla press. Cook on a dry comal or cast iron skillet over medium-high heat for 45 seconds per side, then flip back to the first side for another 15 to 20 seconds — this final touch causes them to puff slightly and finish cooking through.
Flour Tortillas: The Technique That Matters
The key difference with flour tortillas is resting time. After mixing and kneading the dough for 3 to 4 minutes until smooth, divide it into balls and let it rest, covered, for 30 minutes. This relaxes the gluten so that when you roll, the dough doesn’t spring back. Roll on a lightly floured surface to about 7 to 8 inches in diameter, then cook on a very hot dry skillet — no oil — for 60 to 90 seconds per side until golden spots appear.
- A cast iron skillet at medium-high heat is the best surface for both types
- Keep cooked tortillas stacked in a folded dish towel — the steam keeps them pliable
- Flour tortillas stay fresh at room temperature for up to two days; corn tortillas are best eaten within a few hours but reheat well in a dry skillet
- Never microwave tortillas in a stack — the steam makes them gummy; reheat one at a time in a dry pan for 20 seconds per side
Final Thoughts
Making Mexican food from scratch is less about following rules and more about understanding how flavors are built — through toasting, charring, rehydrating, slow cooking, and layering. The techniques that feel intimidating at first (beating egg whites for chiles rellenos, working with dried chiles for birria) become second nature quickly.
Start with whichever dish calls to you most, and give it proper time. Don’t rush the braise on the birria. Don’t skip the float test on the tamale masa. Don’t compromise on the charring step for mole. These aren’t arbitrary instructions — each one exists because someone figured out, through years of cooking, that it made the dish better.
The best Mexican cooking is patient cooking. And once you taste what patience produces — a bowl of pozole rojo with its brick-red, chile-rich broth, or birria tacos dipped into warm consommé — you’ll understand exactly why these dishes have endured for centuries.