Buying a pressure cooker — whether it’s a stovetop model or an Instant Pot — is one of those genuinely exciting kitchen decisions. Then it sits on the counter for three weeks while you try to figure out what to actually make first.
Sound familiar? The problem isn’t motivation. It’s that most beginner resources throw you straight into complicated braises or multi-step recipes that feel more intimidating than a regular stovetop dinner. That’s the wrong starting point. The best way to build confidence with a pressure cooker is to start with recipes where the process is forgiving, the ingredient lists are short, and the results are the kind of food that makes your family ask, “Wait, you made this?”
The ten recipes below were chosen specifically with new pressure cooker owners in mind. Each one teaches you something slightly different about how your appliance works — natural release versus quick release, sautéing before sealing, cooking pasta directly in sauce, building flavor with liquid — without overwhelming you with technique. By the time you’ve worked through this list, you’ll understand your pressure cooker well enough to tackle almost anything.
One thing worth knowing before you start: pressure cookers reward patience on the front end. Spend two minutes reading through a recipe completely before you begin. That habit alone saves most beginners from their first “why did it burn?” moment.
Table of Contents
- 1. Pressure Cooker Chicken Tikka Masala
- Why It Works for Beginners
- What to Know Before You Cook
- 2. Instant Pot Beef Stew
- Learning Natural Release With This Recipe
- What to Know Before You Cook
- 3. Pressure Cooker Mac and Cheese
- The Cheese Matters More Than Anything
- What to Know Before You Cook
- 4. Pressure Cooker Chicken Tortilla Soup
- Building Flavor From a Simple Base
- What to Know Before You Cook
- 5. Instant Pot Ground Beef Stroganoff
- Why Ground Beef Works So Well Here
- What to Know Before You Cook
- 6. Pressure Cooker Lentil Soup
- The Spice Factor
- What to Know Before You Cook
- 7. Instant Pot Baked Beans
- No Soaking Required — With a Caveat
- What to Know Before You Cook
- 8. Pressure Cooker Mushroom Risotto
- Getting the Texture Right
- What to Know Before You Cook
- 9. Instant Pot Short Ribs
- Choosing Your Short Ribs
- What to Know Before You Cook
- 10. Pressure Cooker Bone-In Pork Chops with Potatoes and Carrots
- Building the Broth That Becomes Your Sauce
- What to Know Before You Cook
- Final Thoughts
1. Pressure Cooker Chicken Tikka Masala
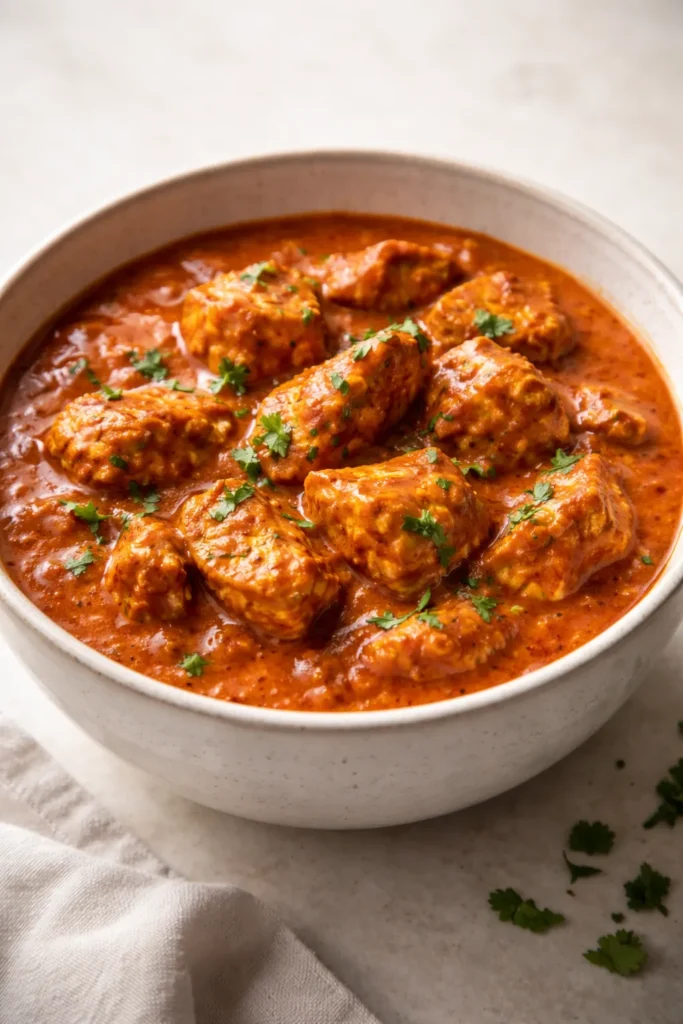
Few dishes feel as impressive as a restaurant-quality curry that came together in under 45 minutes on a Tuesday night. Chicken tikka masala is one of the pressure cooker’s absolute greatest hits — the sealed, pressurized environment does something extraordinary to the spices, forcing them deep into the chicken in a way that normally takes hours of marinating and slow simmering.
What makes this an ideal beginner recipe is that the technique is almost embarrassingly simple. You sauté aromatics directly in the pot, add your chicken and sauce ingredients, seal the lid, and let the machine do the heavy lifting. There’s no browning every surface, no standing over the stove stirring. The sauce comes out velvety and rich with almost no hands-on effort.
Why It Works for Beginners
The tomato-and-cream base in tikka masala is extremely forgiving. Unlike dairy-only sauces that can sometimes curdle under pressure, the high tomato content here acts as a buffer. You’ll also learn the most fundamental skill in pressure cooking: sautéing directly in the pot before sealing. Doing this with onions, garlic, and ginger first builds a flavor foundation that elevates every other element in the dish.
What to Know Before You Cook
- Use boneless, skinless chicken thighs over breasts — they stay juicy under pressure where breasts can sometimes turn stringy
- Add the cream or coconut milk after pressure cooking, not before, to prevent any curdling risk
- A ready-to-use tikka masala spice blend works perfectly; no need to source individual spices your first time
- The sauce reduces and thickens noticeably once you open the lid and stir — don’t panic if it looks thin right after releasing pressure
Worth knowing: Leftovers from this recipe taste even better the next day as the flavors continue to develop overnight in the fridge.
2. Instant Pot Beef Stew
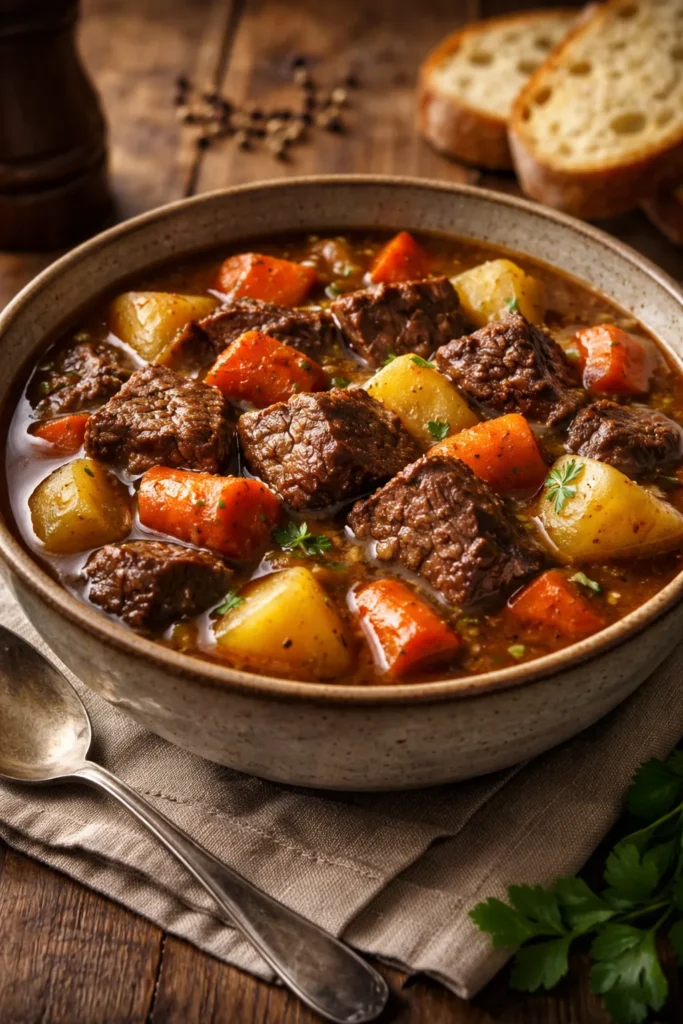
Beef stew is the recipe that converts the most skeptics. A dish that usually needs three hours in a Dutch oven comes out of a pressure cooker in about 45 minutes — and the beef is genuinely fall-apart tender, not just cooked through. It’s the kind of result that makes you do a small victory lap around the kitchen.
Chuck roast is the cut to use here. The connective tissue and fat content that make chuck tough when cooked quickly are exactly what make it meltingly soft under pressure. The high heat breaks down collagen into gelatin, giving the broth a body and richness that’s impossible to fake with store-bought shortcuts.
Learning Natural Release With This Recipe
Beef stew is a perfect vehicle for understanding natural pressure release — where you turn off the heat and let the pressure drop on its own over 10-15 minutes before opening the lid. Meat cooked with natural release stays noticeably more tender and juicy than meat hit with a sudden quick release. Think of it as a built-in resting period. This recipe will teach you exactly when natural release matters, which carries over to every meat-based dish you make going forward.
What to Know Before You Cook
- Cut the beef into 1.5 to 2-inch chunks — smaller pieces overcook and turn grainy under pressure
- Add root vegetables like potatoes and carrots in the last few minutes using the sauté function, or accept they’ll be very soft (which, honestly, is fine in a stew)
- Deglaze the pot with beef broth or red wine after browning the meat — this prevents a burn warning and adds serious depth
- A tablespoon of tomato paste stirred in before sealing adds umami without any tomato flavor
3. Pressure Cooker Mac and Cheese

Don’t underestimate this one. Pressure cooker mac and cheese is genuinely one of the most crowd-pleasing beginner recipes in existence — the pasta cooks directly in water inside the pot, absorbs the liquid fully, and the starchy cooking liquid left behind helps the cheese sauce cling to every noodle in a way that boxed mac and cheese can’t touch.
The method here is called pasta absorption cooking, and it’s a technique specific to pressure cookers that you’ll use again and again. Instead of boiling pasta separately and draining it, you add just enough liquid to cook the pasta fully and leave almost none behind to drain away. The result is starchy, saucy pasta that holds sauce more effectively.
The Cheese Matters More Than Anything
Sharp cheddar is the non-negotiable here. Pre-shredded bagged cheese is coated in anti-caking agents (usually potato starch or cellulose) that prevent it from melting smoothly. Buy a block and shred it yourself — it takes two minutes and the difference in texture is significant. Adding a small spoonful of cream cheese or a splash of evaporated milk alongside the shredded cheddar creates a sauce that stays creamy as it cools rather than turning grainy.
What to Know Before You Cook
- Use the 1:1 ratio of pasta to water as a starting baseline — about 1 cup of liquid per cup of uncooked pasta
- Elbow macaroni works best; thick pasta shapes need slightly more liquid and time
- Add cheese only after releasing pressure and with the pot off heat — residual warmth is enough to melt it perfectly
- Season aggressively with salt, mustard powder, and black pepper once the cheese is stirred in
4. Pressure Cooker Chicken Tortilla Soup

This is the recipe that proves pressure cookers aren’t just for cold-weather comfort food. Chicken tortilla soup comes out bright, lightly spiced, and deeply flavorful — and because the pressure cooker extracts so much from the chicken and aromatics, the broth tastes like something that’s been simmering for hours.
The technique here introduces you to one of the pressure cooker’s most useful tricks: cooking chicken breasts directly in broth and shredding them. Boneless chicken breasts, which can dry out so easily on the stovetop, come out pull-apart tender under pressure. You cook them whole, then shred directly in the pot with two forks. It’s efficient, quick, and the chicken shreds absorb the spiced broth as they cool.
Building Flavor From a Simple Base
Dump-and-cook recipes get a bad reputation, but chicken tortilla soup is genuinely one where the pressure cooker does the flavor-building work for you. A can of fire-roasted tomatoes, chicken broth, black beans, frozen corn, cumin, chili powder, and garlic — that’s essentially the whole recipe. What the pressure cooker does is fuse all of those ingredients into something that tastes coordinated and complex rather than like a collection of canned goods.
What to Know Before You Cook
- Fire-roasted tomatoes make a noticeably bigger difference here than regular diced tomatoes — the char adds smokiness
- Add the corn and beans before pressure cooking, not after — they absorb flavor better this way
- A squeeze of fresh lime juice and a handful of fresh cilantro added right before serving lifts the entire dish
- Top with crushed tortilla chips, shredded cheese, sour cream, and avocado — the toppings are half the experience
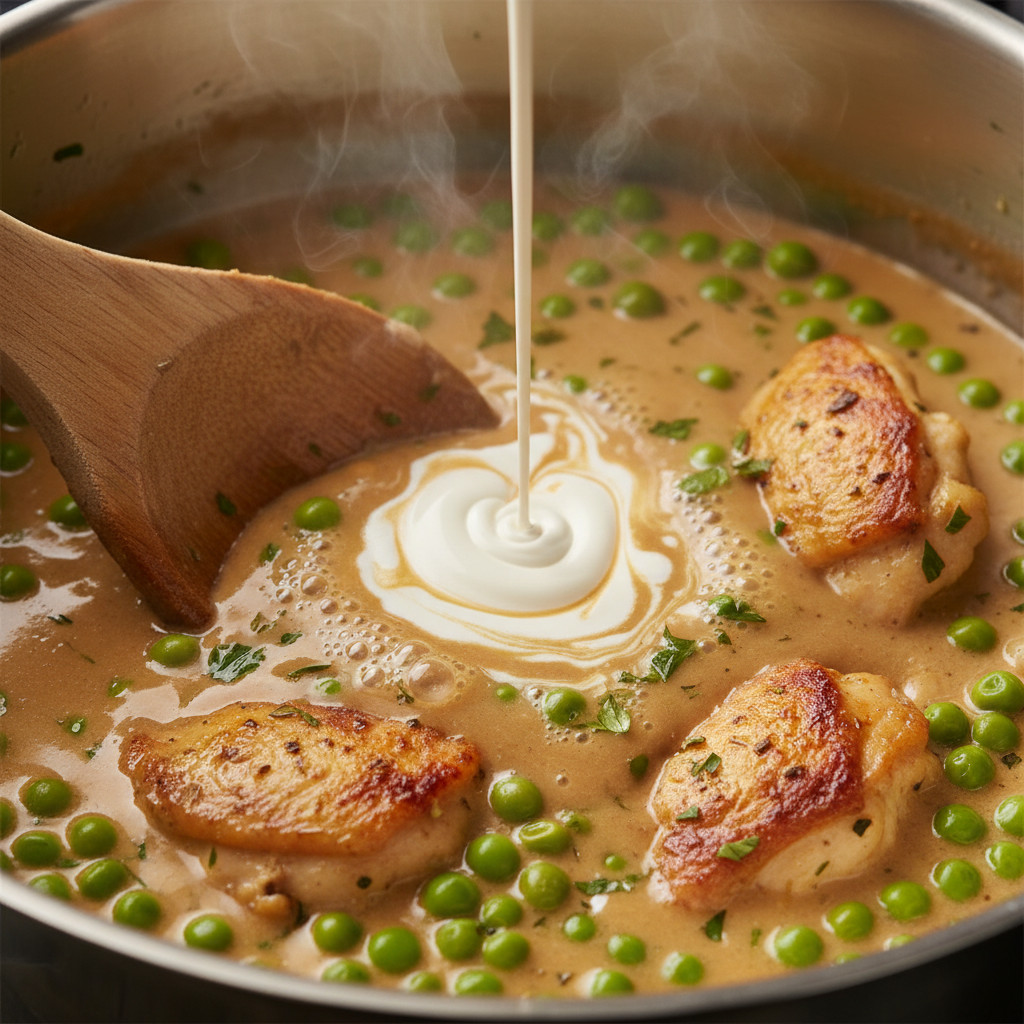
5. Instant Pot Ground Beef Stroganoff
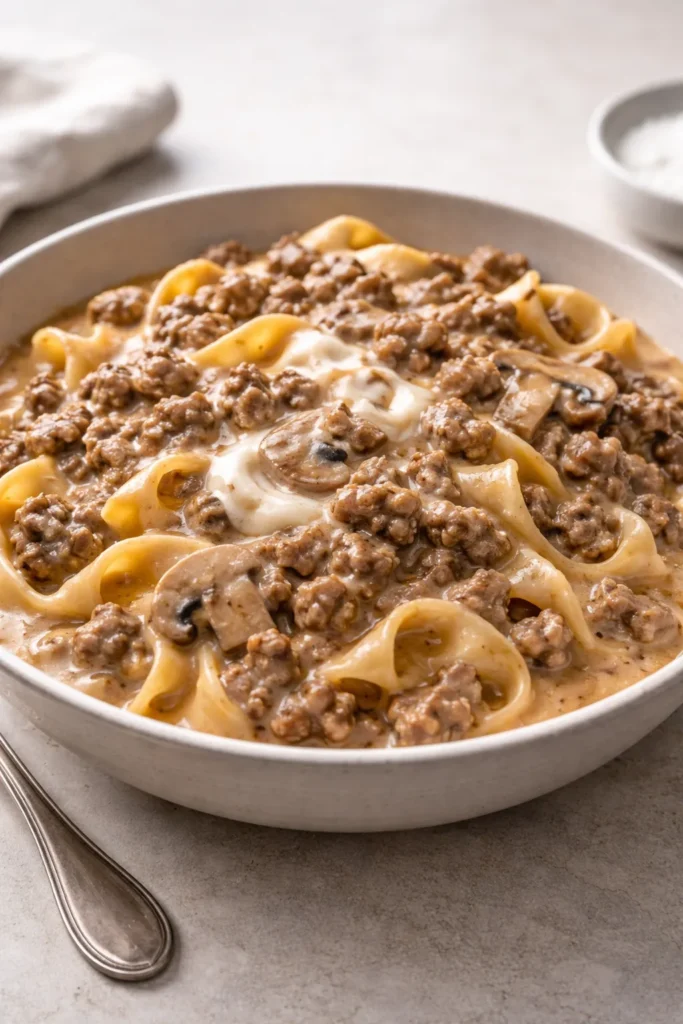
Ground beef stroganoff is the pressure cooker recipe that genuinely surprises people. It comes together in about 35 minutes start to finish, serves a family of four easily, and tastes like something that required considerably more effort than it did. The egg noodles cook directly in the sauce, soaking up the beefy, mushroomy broth as they soften.
Stroganoff in a pressure cooker teaches you how to build a sauce that starts thin and finishes thick — the pasta absorbs liquid during cooking, and the sour cream stirred in at the end adds body and that signature tangy richness. It’s a technique called finishing off-heat, and it’s one you’ll use constantly once you understand it.
Why Ground Beef Works So Well Here
Traditional stroganoff uses sliced beef tenderloin or sirloin, but ground beef is a smarter choice for beginners. It browns faster, costs less, and distributes evenly throughout the dish. Browning the ground beef using the sauté function before sealing the lid develops a Maillard crust on the meat that adds flavor and prevents the dish from tasting flat — this is the one step that absolutely cannot be skipped.
What to Know Before You Cook
- Brown the beef and sauté the mushrooms and onions before adding any liquid — this double-sauté step is worth every extra minute
- Add uncooked egg noodles directly to the pot; they’ll absorb the broth and cook to a slightly starchy, sauce-gripping texture
- Stir in sour cream after releasing pressure with the heat off — cooking sour cream under pressure causes it to separate
- A teaspoon of Worcestershire sauce and a tablespoon of Dijon mustard added to the broth gives the dish its depth without any complicated ingredients
6. Pressure Cooker Lentil Soup
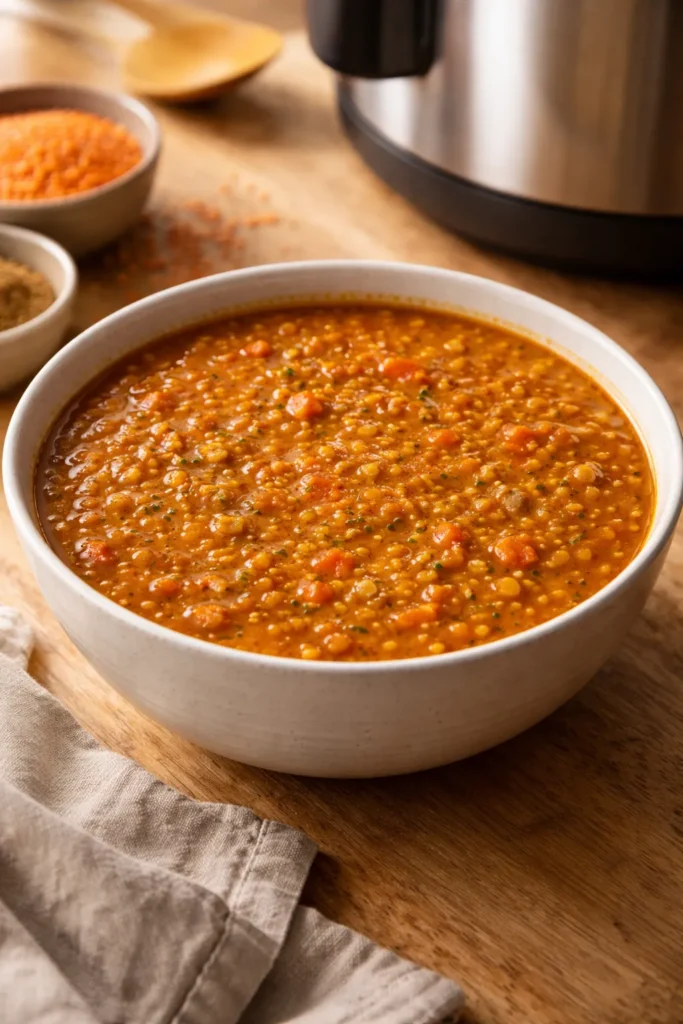
Lentil soup is perhaps the single most beginner-friendly pressure cooker recipe that exists — and also one of the most underrated. No soaking required, no expensive cuts of meat, no complex technique. You dump aromatics, lentils, broth, and spices into the pot, cook for about 15 minutes under pressure, and end up with a thick, hearty, protein-rich soup that tastes like it came from a serious kitchen.
Red lentils are the best starting point. They break down completely under pressure, creating a naturally creamy, almost porridge-like texture without any blending required. Green or brown lentils hold their shape more, giving you a brothier, chunkier result. Both work — it’s simply a matter of what texture you prefer.
The Spice Factor
What separates a forgettable lentil soup from one people ask for the recipe is the spice layering. Bloom your cumin, coriander, smoked paprika, and turmeric in a little olive oil using the sauté function before adding anything liquid. This 90-second step releases the fat-soluble flavor compounds in the spices and makes the entire soup taste more vibrant and cohesive.
What to Know Before You Cook
- No need to soak lentils — they cook beautifully from dried in 12-15 minutes under high pressure
- A can of diced tomatoes adds both acidity and body; stir it in before sealing
- Red lentils dissolve into the soup naturally; green lentils stay in distinct pieces — choose based on your texture preference
- Finish with fresh lemon juice and a drizzle of good olive oil right before serving; these two additions brighten everything
Insider note: Lentil soup freezes exceptionally well. Make a full batch and freeze individual portions in quart containers for effortless weeknight meals later.
7. Instant Pot Baked Beans
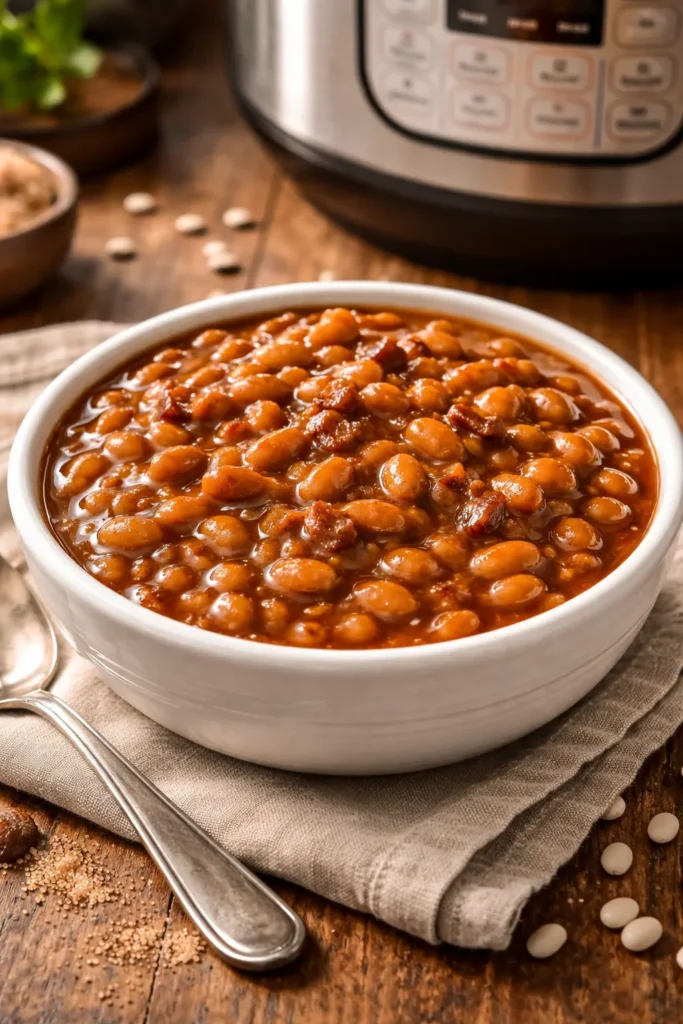
Homemade baked beans from dried beans — without an all-day bake in the oven — is one of those pressure cooker achievements that feels almost too good to be true. Dried navy or great northern beans cook from completely dry to creamy and tender in about 40-45 minutes under pressure, then absorb a savory-sweet sauce that no canned version can match.
The flavor profile is built from pantry staples: molasses, brown sugar, mustard, apple cider vinegar, and either bacon or smoked paprika for smokiness. Together they create a sauce that caramelizes slightly around the beans, giving them the deep, slow-cooked character that traditional baked beans are known for.
No Soaking Required — With a Caveat
The pressure cooker makes dried bean soaking optional, which is genuinely convenient. Unsoaked beans take slightly longer under pressure and produce more foam during cooking, but they work. If you do have time to soak beans overnight in cold water, they cook more evenly, have a better texture, and cause significantly less digestive discomfort. Soaking is worth it when you have the time, but skipping it won’t ruin the dish.
What to Know Before You Cook
- Use dry beans only — canned beans turn to mush under pressure; they don’t need any cooking
- Add the molasses and sugar after pressure cooking; sugary sauces can prevent beans from softening properly if added at the start
- Do a natural release rather than quick release — sudden depressurization causes bean skins to blow out
- Taste and adjust the sweet-to-savory balance after opening: a splash more cider vinegar cuts through any sweetness that feels heavy
8. Pressure Cooker Mushroom Risotto
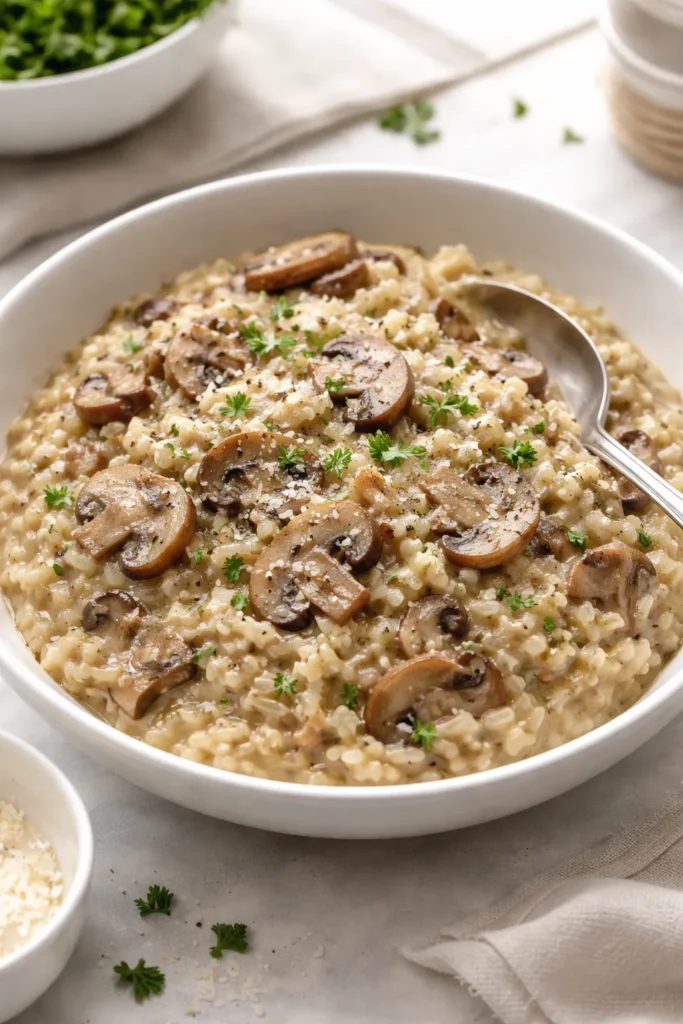
Traditional risotto requires 20-25 minutes of constant stirring at the stove — adding ladle after ladle of warm broth, never walking away. Pressure cooker risotto throws that rulebook out entirely. You seal the lid, cook for about 6 minutes under high pressure, open, stir in butter and parmesan, and end up with risotto that is genuinely creamy and properly cooked through.
The pressure cooker forces liquid into the starchy Arborio grains at a rate that mimics the gradual absorption of traditional risotto, without the manual labor. The starch releases as the grains cook, creating that characteristic creamy, thick consistency that defines good risotto.
Getting the Texture Right
The biggest mistake beginners make with pressure cooker risotto is adding too much liquid. The sealed environment retains all moisture — nothing evaporates — so you need about 20-25% less broth than a stovetop recipe would call for. A standard ratio is roughly 1 cup of Arborio rice to 2.5 cups of warm broth. Using warm or hot broth rather than cold also matters; cold liquid slows the pressure build-up and can lead to uneven cooking.
What to Know Before You Cook
- Arborio or Carnaroli rice only — long-grain rice varieties won’t release enough starch to create the creamy texture
- Sauté the mushrooms and shallots first with a splash of white wine; let the wine absorb before sealing
- Open the lid carefully — risotto releases a significant amount of steam all at once
- Stir in cold, cubed butter and freshly grated parmesan vigorously once opened; this is the technique called mantecatura and it’s what makes risotto glossy
9. Instant Pot Short Ribs
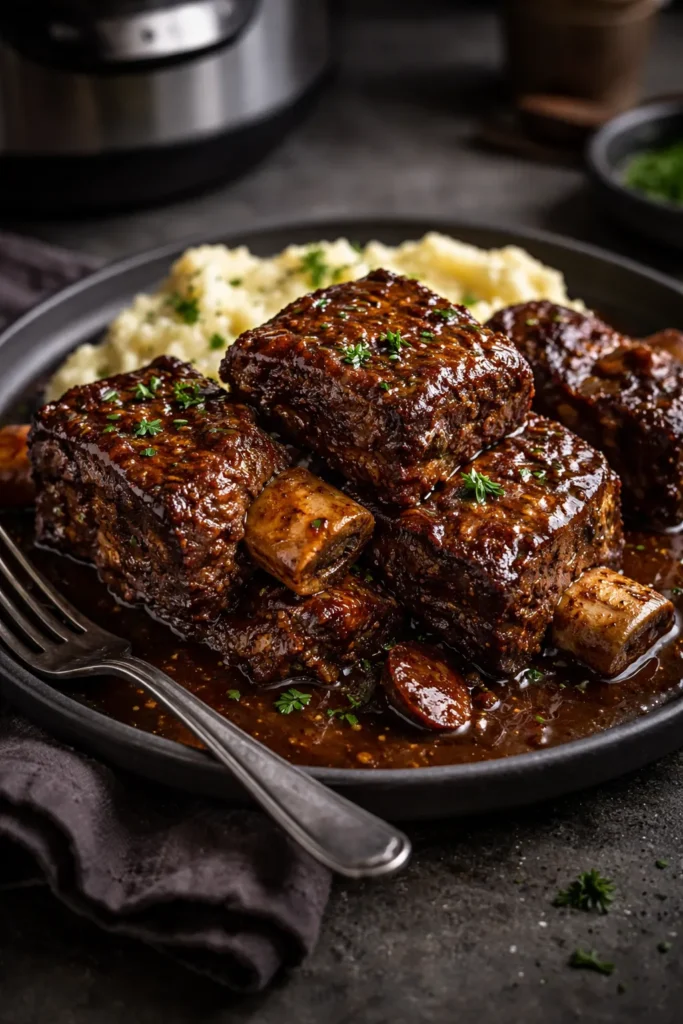
Short ribs are the dish that makes a pressure cooker feel like a genuine luxury appliance. Traditionally, braised short ribs require 2.5 to 3 hours in a 325°F oven. Under pressure, they reach the same fall-off-the-bone tenderness in about 45-50 minutes. The resulting braising liquid reduces into a glossy, intensely savory sauce that’s worthy of a special occasion dinner.
For beginners, this recipe is a masterclass in the sear-then-braise method — you brown the meat hard on all sides using the sauté function first, build a braising liquid in the same pot, then seal and let the pressure do the rest. Everything happens in one vessel, which means all that fond (the browned bits stuck to the bottom) gets incorporated into your sauce automatically.
Choosing Your Short Ribs
English-cut short ribs — the thick rectangular pieces with a single bone — are the better choice over flanken-cut (the thin cross-cut pieces) for pressure cooking. They’re meatier, they hold together better under pressure, and they present beautifully on a plate. Look for pieces with a good marbling of fat running through the meat — that’s what bastes the beef internally as it cooks.
What to Know Before You Cook
- Sear the ribs in batches — crowding the pot causes steaming rather than browning, and pale ribs have a flat flavor
- Deglaze with a full cup of red wine or beef broth immediately after removing the ribs; scrape every bit of fond off the bottom
- Natural release is non-negotiable here — quick release can cause the meat to seize up and toughen slightly at the surface
- After opening, transfer the ribs to a plate and simmer the braising liquid on the sauté setting for 5-10 minutes to concentrate it into a proper sauce
10. Pressure Cooker Bone-In Pork Chops with Potatoes and Carrots
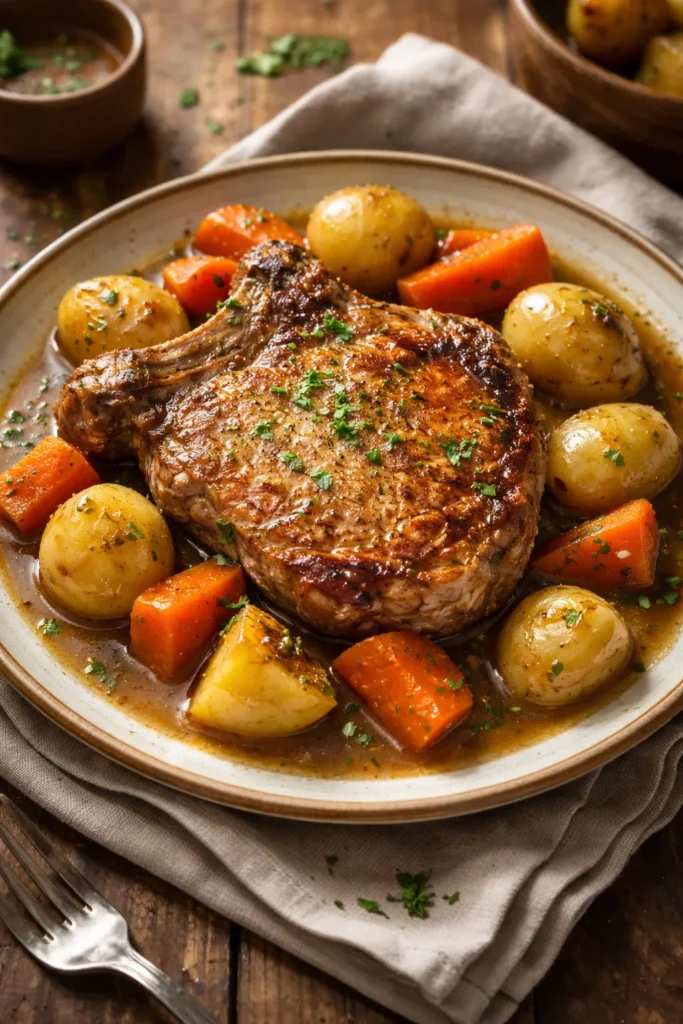
This one-pot meal is the beginner recipe that might get the most regular rotation in your weekly cooking. Bone-in pork chops, potatoes, and carrots cook together in a seasoned broth, and everything comes out perfectly cooked at the same time — the pork is juicy and tender (not the dried-out version most people have been served their whole lives), and the vegetables are soft without turning to mush.
The key to getting the pork right is understanding that pressure cooking and high-heat searing are two different tools for two different purposes. The pressure cooker makes pork tender and moist; it doesn’t create a crust. Searing the chops on the sauté setting for 90 seconds per side before sealing adds color and flavor without drying the meat out. Skip the sear and the chops taste pale and steamed — do it and they taste finished.
Building the Broth That Becomes Your Sauce
The broth you cook everything in serves a dual purpose: it provides the steam that builds pressure, and it becomes a light pan sauce when you’re done. Season it well from the start — chicken broth, garlic, Dijon mustard, a little thyme, and salt. When everything is done cooking, the liquid in the pot has absorbed flavor from the pork and vegetables. Spoon it directly over the plated chops and vegetables. It doesn’t need any reducing or additional finishing.
What to Know Before You Cook
- Bone-in chops fare better than boneless here — the bone conducts heat and keeps the meat juicy
- Cut potatoes and carrots into similar-sized pieces so they finish cooking at the same rate; uneven cuts mean some pieces are overdone while others are still firm
- Use quick release for this recipe — the vegetables need that pressure drop to stop cooking immediately
- Resting the pork chops on a plate loosely covered with foil for 5 minutes after cooking makes a noticeable difference in juiciness
Final Thoughts

The ten recipes above aren’t just a list of things to cook — they’re a practical curriculum for learning what a pressure cooker actually does and how to use it with real confidence. Each one introduces a different technique: blooming spices, searing before sealing, absorption cooking, natural versus quick release, and finishing with dairy off-heat. Work through them in order, or jump around based on what sounds good this week.
A few things worth reinforcing as you get started: read your recipe completely before beginning, make sure your sealing ring is properly seated before every cook, and always add at least half a cup of liquid to the pot so the machine can build pressure properly. These three habits prevent the vast majority of beginner problems.
The other thing pressure cooking does — and this is genuinely underappreciated — is change the flavor profile of spiced dishes in a way that stovetop cooking can’t replicate. The sealed, pressurized environment forces liquid and flavor into food at a molecular level. Soups taste deeper, braised meat tastes richer, and lentils taste like they’ve been simmering with aromatics for hours. Once you experience that, you’ll understand why so many home cooks treat this appliance as irreplaceable.
Start with the chicken tikka masala or the mac and cheese if you want an immediate win. Then challenge yourself with the short ribs or the risotto once you’ve got a few cooks under your belt. The machine has a much higher ceiling than most beginners realize — and you’ll hit it faster than you expect.