If there’s one ingredient that transforms an ordinary dessert into something utterly irresistible, it’s cream cheese. That tangy, velvety texture and subtle sweetness work magic in everything from frosting to fillings to entire no-bake treats. The best part? You don’t need to be a pastry chef to make cream cheese desserts that taste like they came from a professional bakery. Most of the recipes below come together with straightforward ingredients and simple techniques that even a beginner baker can master.
Cream cheese has this remarkable ability to add richness and moisture to baked goods while keeping them from feeling heavy. It’s the secret that makes pound cakes stay tender for days, what gives frosting its signature tang that cuts through sweetness, and the foundation of desserts that require zero oven time. Whether you’re craving something decadent or light and airy, fruity or chocolatey, you’ll find a cream cheese dessert in this collection that fits your mood.
What makes these recipes especially approachable is that they rely on ingredients you likely already have on hand. No specialty equipment needed. No obscure flavor combinations to hunt down at specialty shops. Just cream cheese, sugar, butter, and a few simple additions that create desserts people genuinely crave. Many of these can be made the night before a gathering, which means less stress on the day you’re serving them.
Let’s dig into 15 cream cheese dessert recipes that will become your go-to options for potlucks, weeknight cravings, and impressive dinner party finales.
Table of Contents
- 1. No-Bake Lemon Cream Cheese Pie
- What Makes This Recipe So Easy
- Why Lemon and Cream Cheese Are Perfect Together
- 2. Cream Cheese Brownies
- The Magic of the Marble Swirl
- How to Swirl Without Making a Mess
- 3. Cherry Cream Cheese Dessert Cups
- Why Individual Cups Elevate This Dessert
- Building Your Layers for Maximum Flavor
- 4. Cream Cheese Pound Cake
- Why Cream Cheese Changes Everything in Pound Cake
- The Mixing Method That Prevents Dense Results
- 5. Easy Cheesecake Mousse
- The Science of Folding in Whipped Cream
- Making This Mousse Your Own
- 6. Strawberry Cream Cheese Bars
- Building a Crust That Stays Crispy
- Assembling Without Soggy Results
- 7. Cream Cheese Spritz Cookies
- Why Cream Cheese Makes Spritz Cookies Better
- Working with Spritz Gun Success
- 8. Pumpkin Cheesecake Bars
- The Flavor Architecture of Pumpkin and Cream Cheese
- Preventing Cracks and Ensuring Clean Slices
- 9. Sopapilla Cheesecake Bars
- Why Crescent Dough Is a Secret Weapon
- Layering for Maximum Texture
- 10. Cream Cheese Chocolate Chip Cookies
- The Chemistry of Adding Cream Cheese to Cookie Dough
- Baking for Chewy Results
- 11. Red Velvet Cheesecake Brownies
- Understanding Red Velvet Flavor
- Marbling Red Velvet and Cream Cheese
- 12. Carrot Cake with Cream Cheese Frosting
- Why This Pairing Is Timeless
- Building Your Frosting Layer
- 13. Mini No-Bake Cheesecake Cups
- Why No-Bake Cheesecake Actually Works
- Assembling Your No-Bake Cups
- 14. Banana Cake with Cream Cheese Frosting
- Why Brown Bananas Matter
- Preventing Dense, Heavy Cake
- 15. Dirt Dessert
- Understanding the Layering Strategy
- Making This Dessert Your Own
- Final Thoughts
1. No-Bake Lemon Cream Cheese Pie
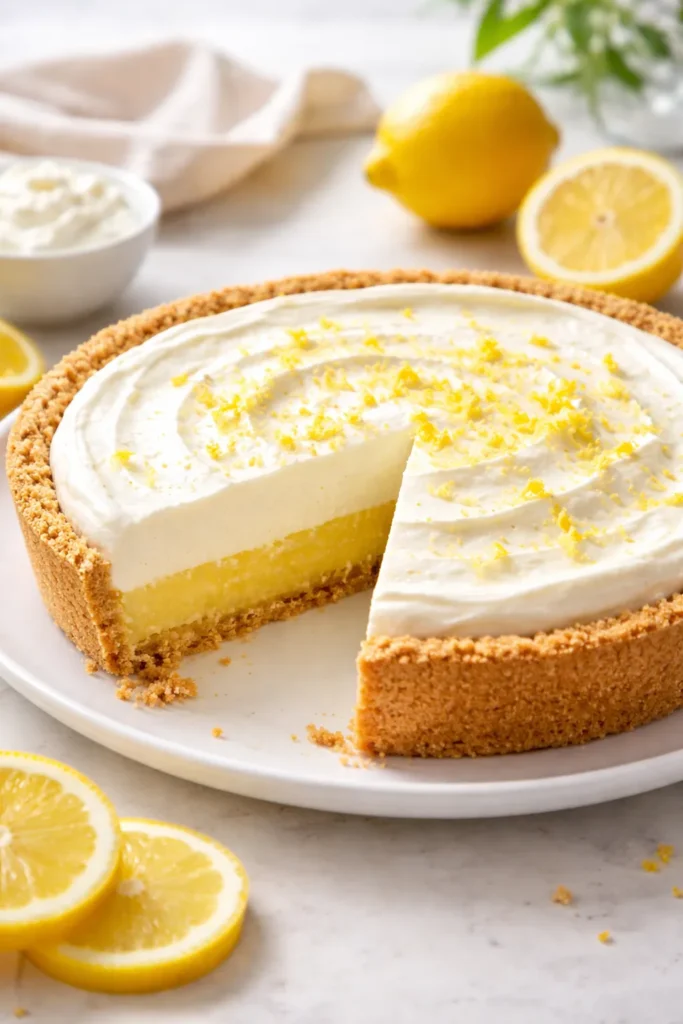
This is the dessert that doesn’t heat up your kitchen but tastes like you spent hours on it. A bright, zesty lemon flavor paired with silky cream cheese creates a pie that feels both elegant and utterly simple to assemble. The best part is that it’s completely no-bake, meaning you can pull it together on the hottest day of summer without breaking a sweat.
What Makes This Recipe So Easy
The beauty of a no-bake pie is that there are only a few steps between you and dessert. You don’t need to blind-bake a crust or worry about a soggy bottom. The filling comes together in minutes with just a hand mixer, and the chilling time happens overnight whether you’re sleeping or working. This recipe proves that easy doesn’t mean boring—the lemon-cream cheese combination is sophisticated enough for dinner parties but requires zero baking skills.
Why Lemon and Cream Cheese Are Perfect Together
- The tanginess of cream cheese balances the bright acidity of lemon juice, creating a flavor that’s both bold and refined
- The tartness prevents the dessert from tasting one-dimensional or overly sweet, leaving your palate refreshed after each bite
- Lemon zest adds aromatic intensity that makes the filling taste complex despite the simple ingredient list
- The contrast between the creamy filling and crispy crust provides textural interest that keeps you wanting another forkful
Pro tip: Chill the pie in the coldest part of your refrigerator for at least 8 hours—a quick 3-hour chill will leave the filling too soft to slice cleanly.
2. Cream Cheese Brownies

Transform a classic brownie into something extra fudgy and decadent by swirling in a cream cheese layer. These brownies have all the chewy richness you want in a brownie, but with pockets of tangy cheesecake throughout that elevate them to something special. The visual marbling alone is Instagram-worthy, but it’s the flavor combination that keeps people coming back.
The Magic of the Marble Swirl
A cream cheese swirl isn’t just decoration—it fundamentally changes the texture and flavor of the finished brownie. The cream cheese layer stays slightly softer and creamier than the surrounding brownie, creating an unexpected contrast. As the brownies cool, the cream cheese sets just enough to give structure while maintaining that signature tang that cuts through the chocolate richness. This isn’t a difficult technique despite how impressive it looks.
How to Swirl Without Making a Mess
- Spread half the brownie batter into your prepared pan first, then dollop the cream cheese mixture across it in an even grid pattern
- Use a knife or thin spatula to swirl through both layers in one direction, then repeat in the opposite direction for classic crisscross patterns
- Don’t over-swirl—three or four passes with your knife creates better definition than excessive swirling, which muddles the layers together
- Bake immediately after swirling before the batters start to set, which would make the marble effect less pronounced
Worth knowing: Cream cheese brownies actually taste better the next day as the flavors meld and the texture sets, making them perfect for baking ahead.
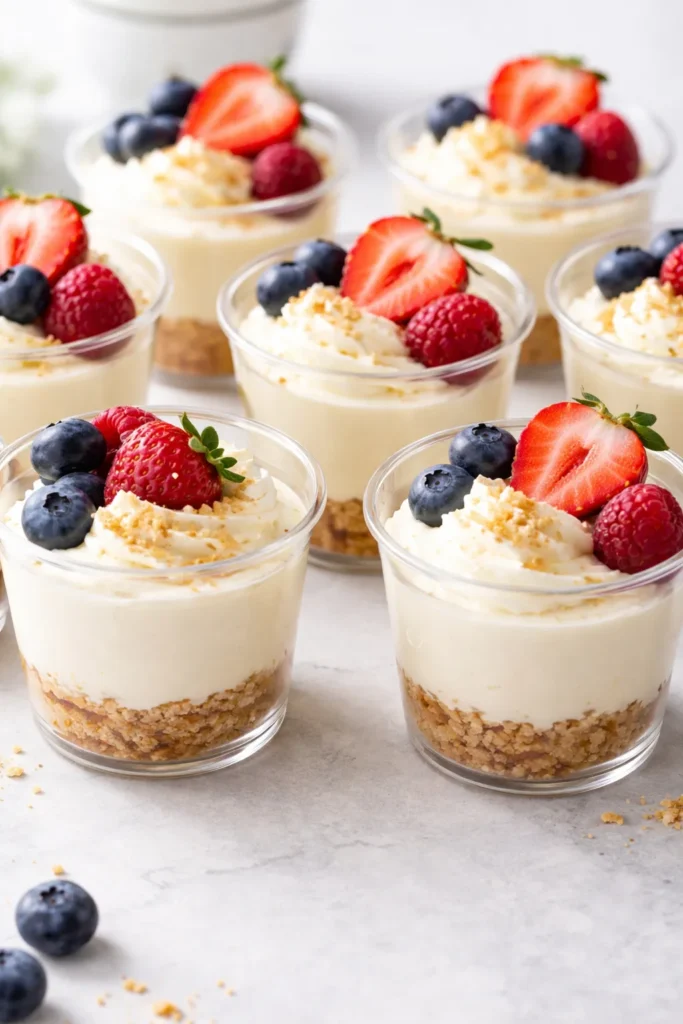
3. Cherry Cream Cheese Dessert Cups
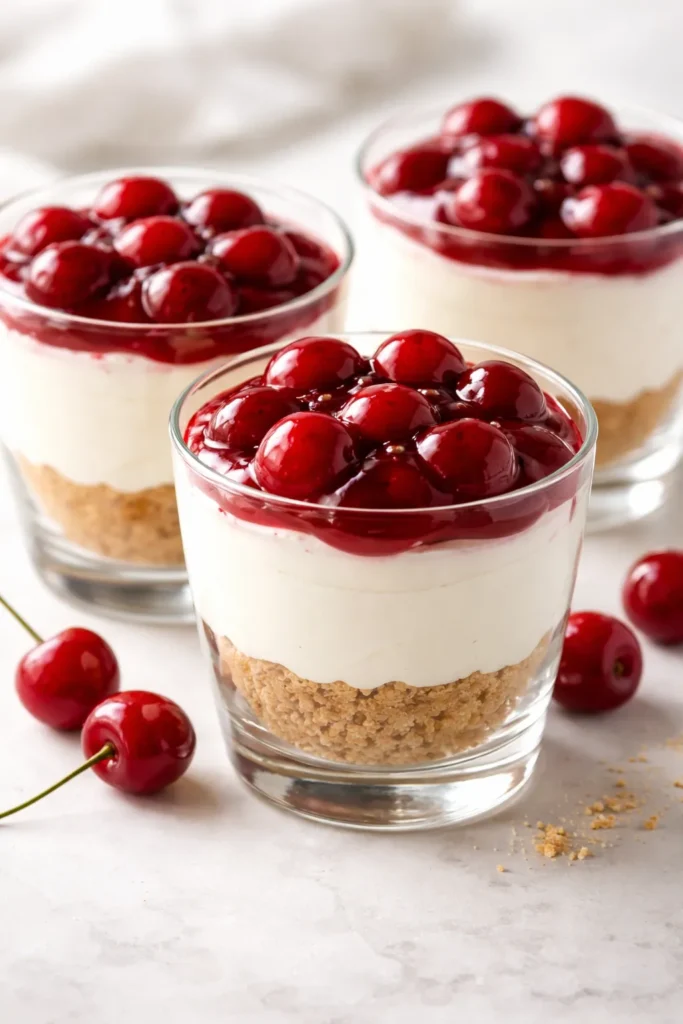
Layer buttery graham cracker crumbs, tangy cream cheese filling, and bright red cherry topping in individual serving glasses for a dessert that looks like you spent hours plating it. This is assembly-only comfort—no baking required, and no fancy pastry skills necessary. Yet the presentation is elegant enough to impress dinner guests or add sophistication to a casual buffet.
Why Individual Cups Elevate This Dessert
Serving in clear glass dishes automatically makes any layered dessert feel more refined than the same ingredients served from a bowl. The visual appeal of distinct layers becomes part of the experience, and guests feel special eating from an individual vessel rather than sharing from a communal dish. Beyond aesthetics, individual portions also make serving effortless—no spooning and portioning at the table, just grab a cup and a spoon.
Building Your Layers for Maximum Flavor
- Start with a thin base of graham cracker crumb crust (about 4 rounded teaspoons per cup), which provides structural support and adds subtle sweetness
- Layer the cream cheese filling next (roughly ¼ cup per cup), making sure it comes up the sides evenly for visual appeal
- Top with cherry pie filling (another ¼ cup), letting some of that glossy red juice drip down through the white layer for contrast
- The weight of the toppings prevents the cream cheese layer from floating up, so this stacking order matters
Pro tip: Use red wine glasses, martini glasses, or vintage parfait glasses for authentic retro presentation—clear glass matters here.
4. Cream Cheese Pound Cake
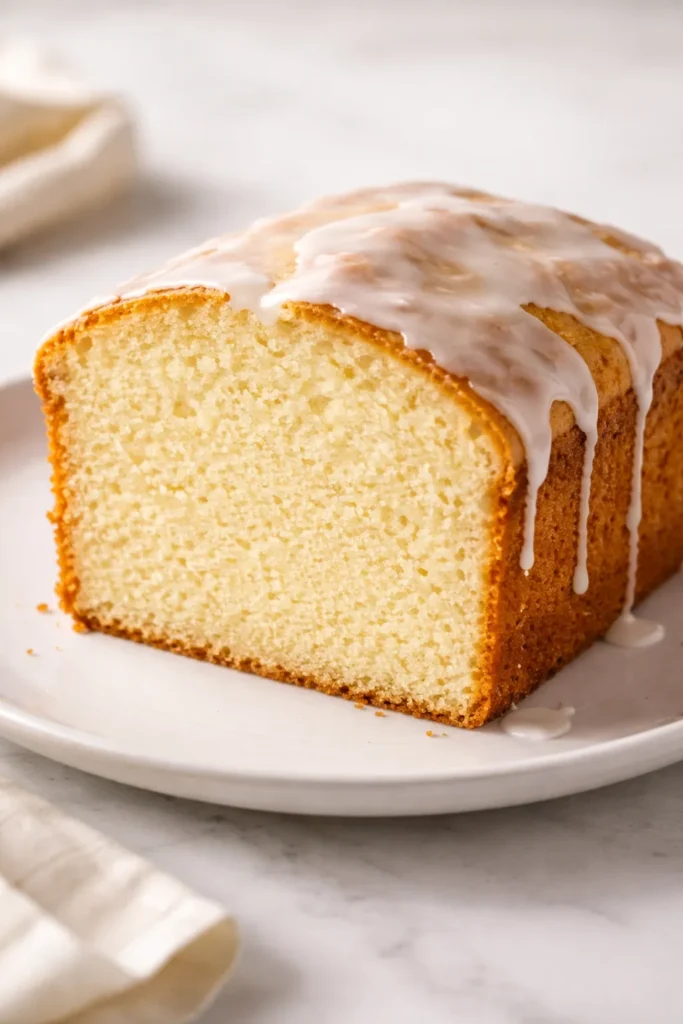
A tender, moist pound cake where cream cheese is the secret ingredient creates a crumb so fine and velvety that people will ask if you’re hiding some special technique. The truth is that cream cheese adds moisture and tang that keeps this cake fresher longer than traditional pound cake. You’re not just making a dessert; you’re making something that will still be delicious three days later.
Why Cream Cheese Changes Everything in Pound Cake
Traditional pound cake relies on the ratio of a pound each of butter, sugar, eggs, and flour. Cream cheese disrupts that equation in the best way, replacing some of the butter while adding both moisture and acidity. The result is a cake with deeper flavor and superior crumb—it won’t dry out even if you forget to cover it. The slight tang becomes more pronounced over time, meaning the cake actually improves a day after baking.
The Mixing Method That Prevents Dense Results
- Cream the softened butter and cream cheese together first until the mixture is pale and fluffy—this step is non-negotiable and takes at least 3-4 minutes
- Add sugar gradually while beating, which incorporates air into the batter for a lighter crumb
- Add eggs one at a time with pauses to scrape the bowl, preventing lumpy, curdled-looking batter
- Alternate adding dry ingredients with liquid ingredients in three additions each, beginning and ending with dry—this technique ensures even distribution
Worth knowing: The slightly longer baking time (often 55-65 minutes) allows the cake to set fully while staying incredibly moist.
5. Easy Cheesecake Mousse

For when you want cheesecake flavor without the commitment of a full baked cheesecake, this mousse delivers everything you crave in just five ingredients and 10 minutes of active work. It’s light, airy, and creamy—like someone whipped air into cheesecake filling and made it float on your spoon. Serve it plain or dress it up with fruit, cookie crumbles, or chocolate sauce.
The Science of Folding in Whipped Cream
The transformation happens when you fold whipped heavy cream into the cream cheese mixture. The whipped cream is mostly air, which lightens the dense cream cheese base dramatically. Unlike mixing, which would deflate all those carefully created bubbles, gentle folding preserves the airiness. This is the same technique used in chocolate mousse, soufflés, and other airy desserts—it’s simple once you understand the principle.
Making This Mousse Your Own
- Fold in fruit purees (strawberry, raspberry, lemon) to match seasonal preferences or pantry staples you have available
- Swirl in melted chocolate or cocoa powder for a chocolate cream cheese mousse experience
- Add instant espresso powder or strong brewed coffee to create a mocha-flavored version
- Mix in cookie crumbles throughout the mousse or use them as a crunchy topping for textural contrast
- Sprinkle citrus zest on top before serving to add brightness and a pop of color
Pro tip: Make the mousse a few hours ahead and refrigerate—it actually firms up slightly and tastes even better as flavors meld.
6. Strawberry Cream Cheese Bars
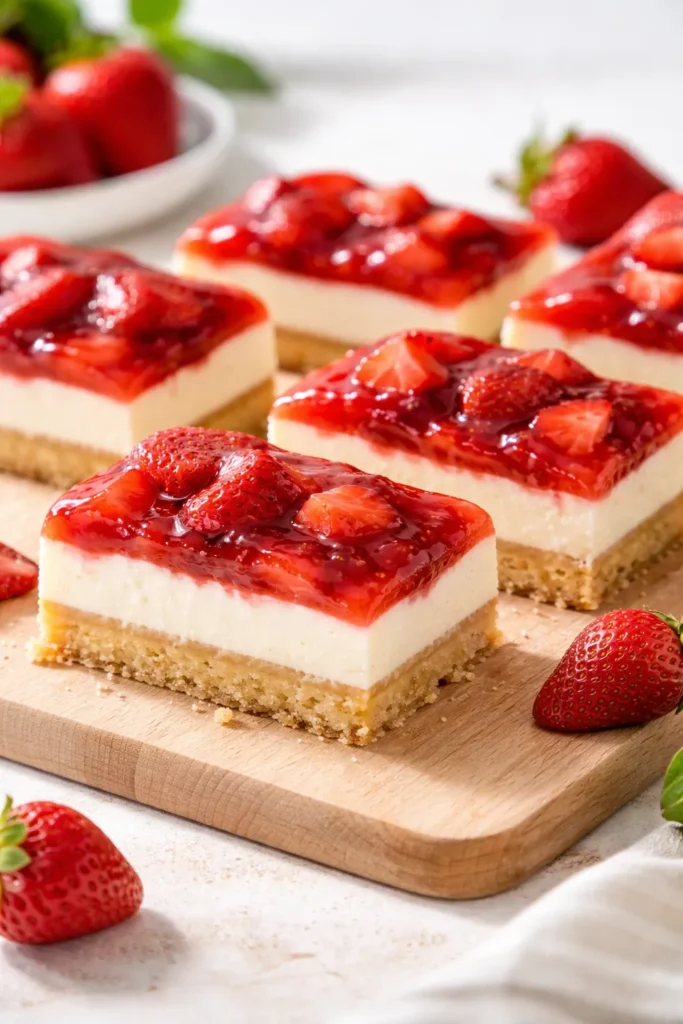
Buttery shortbread crust meets tangy cream cheese filling meets fresh strawberry topping in these bars that deliver bakery-quality results with minimal fuss. The combination is so naturally perfect that it barely needs explanation—but the execution matters. Getting the filling texture right and preventing a soggy crust are the only techniques worth mastering here.
Building a Crust That Stays Crispy
The foundation of any great dessert bar is a crust that provides structure and textural contrast. A simple shortbread made from butter, flour, and sugar bakes until golden, creating a barrier that shields the bars from moisture seeping up from below. Baking the crust partially before adding the cream cheese layer helps set this moisture barrier further. This extra step takes just 10 minutes but makes an enormous difference in the final texture.
Assembling Without Soggy Results
- Pre-bake the crust at 350°F for 10 minutes until lightly golden and set but not fully cooked through
- Spread the cream cheese mixture evenly over the warm crust, which helps it adhere and seal the surface
- Cool the filling completely before adding the strawberry topping—if the bars are still warm, strawberry juice will seep into the cream cheese layer
- Add strawberries no more than a few hours before serving, as prolonged contact with their liquid will soften the filling
Worth knowing: These bars actually freeze beautifully before adding the strawberry topping, so you can bake them ahead and assemble just before serving.
7. Cream Cheese Spritz Cookies
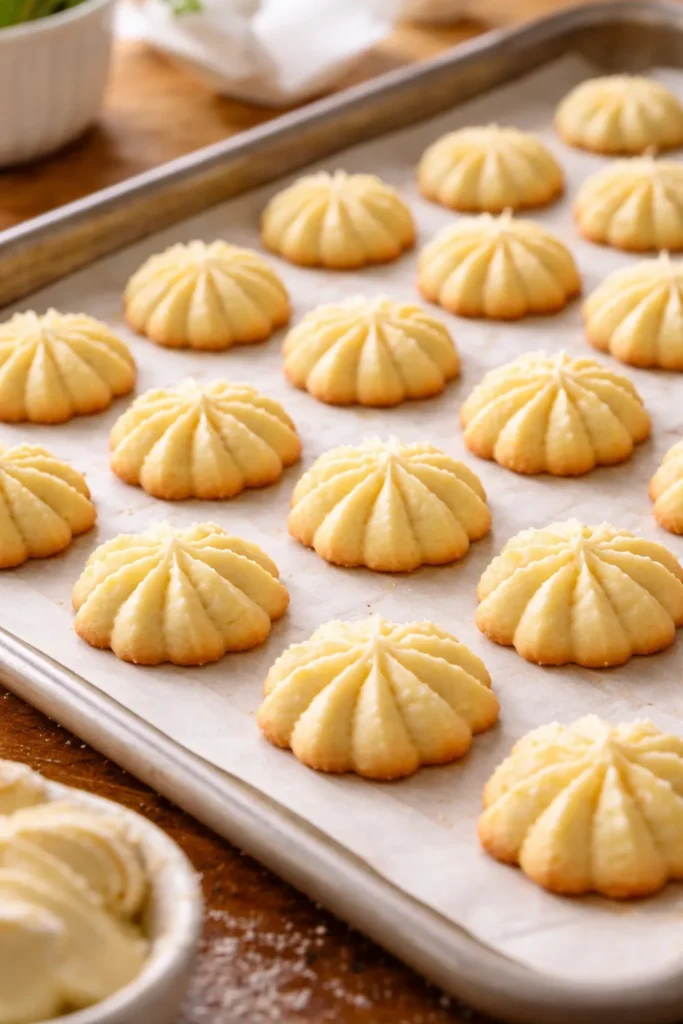
Buttery, delicate, melt-in-your-mouth cookies made even more tender thanks to cream cheese in the dough. A spritz gun shapes them into pretty little forms that look far more complicated than they actually are. These are the kind of cookies that make you look like a baking expert, even if you just discovered them this year.
Why Cream Cheese Makes Spritz Cookies Better
Traditional spritz cookie dough relies on butter and eggs for structure and richness. Adding cream cheese to the mix makes the dough even more tender while adding subtle tang that balances the buttery sweetness. The cream cheese also helps the dough hold its shape when pressed through the spritz gun, giving cleaner definition to whatever design you’re creating. You get professional-looking results from a simple dough.
Working with Spritz Gun Success
- Chill the dough for at least an hour before working with it—warm dough won’t hold shape when pressed through the gun
- Keep the dough at cool room temperature while working (not cold from the fridge, or it will be too stiff to press easily)
- Press designs directly onto parchment-lined baking sheets in one smooth motion, then release the trigger to cut the dough cleanly
- If the dough becomes too soft during piping, pop it back in the fridge for 15 minutes to firm up
Pro tip: Decorate with sprinkles, cinnamon sugar, or small candies immediately after piping but before baking, so they adhere properly.
8. Pumpkin Cheesecake Bars
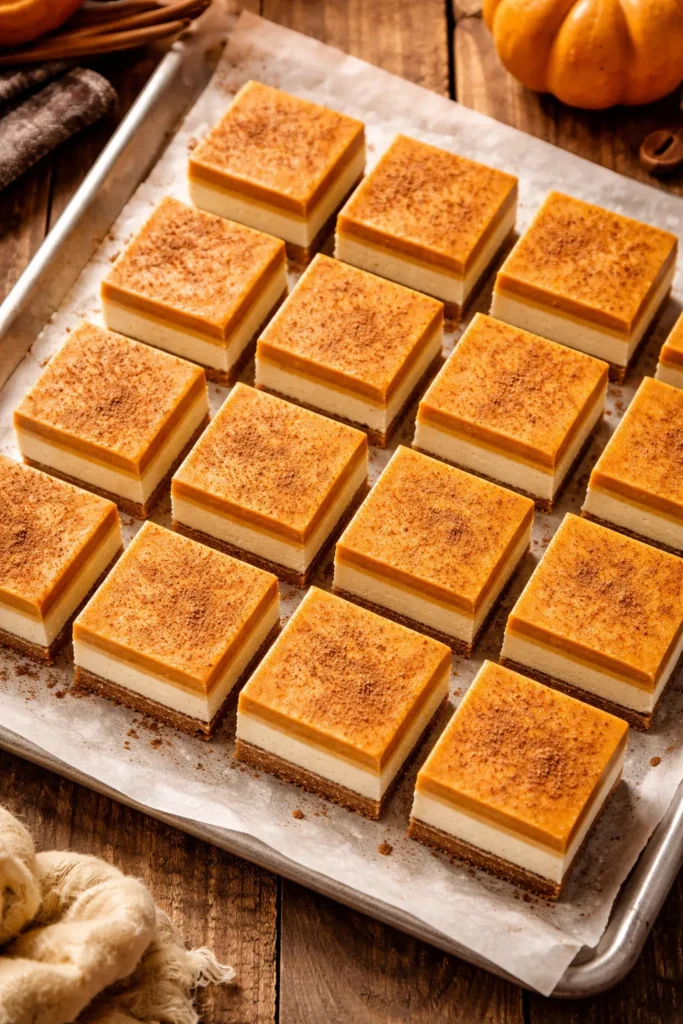
Layers of spiced pumpkin and tangy cream cheese combine in bars that deliver all the fall comfort without the fussy waiter-required presentation of a whole cheesecake. These are part pumpkin bread, part cheesecake, and entirely craveable. Serve them warm or at room temperature—both have their own appeal.
The Flavor Architecture of Pumpkin and Cream Cheese
Pumpkin’s earthy warmth pairs beautifully with cream cheese’s tartness, creating a balance that prevents either flavor from overpowering. The spices (cinnamon, nutmeg, ginger) add complexity that makes the bars taste sophisticated despite their humble ingredient list. Cream cheese provides moisture that keeps these bars from drying out, which is important since pumpkin puree can sometimes create a dense crumb if you’re not careful with ratios.
Preventing Cracks and Ensuring Clean Slices
- Let the baked bars cool completely in the pan before cutting—if they’re still warm, the cream cheese layer will be too soft to support clean cuts
- Chill the entire pan in the refrigerator for at least 2 hours, preferably overnight, which sets everything firmly and makes slicing much cleaner
- Use a hot, damp knife for cutting, wiping it clean between each cut to prevent dragging cream cheese across the surface
- Store covered in the refrigerator—the cream cheese layer makes these more perishable than standard pumpkin bars
Worth knowing: These taste even better the next day as all the flavors marry together and the texture sets perfectly.
9. Sopapilla Cheesecake Bars
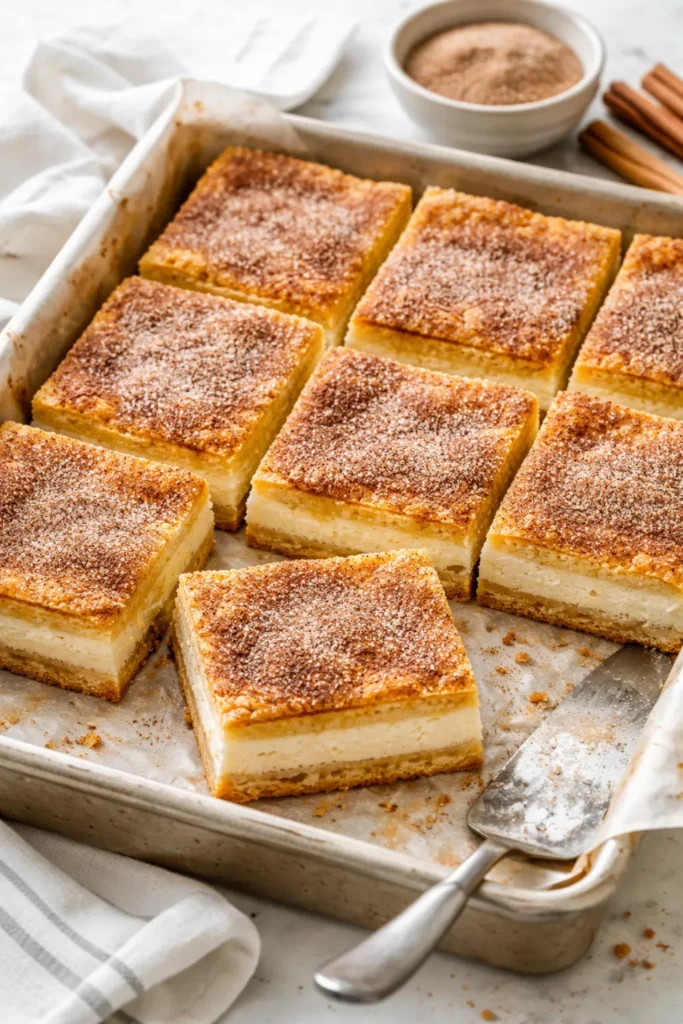
If you love the fried pastries served at Mexican restaurants but want something you can make at home without a deep fryer, these bars deliver that same cinnamon-sugar-cinnamon-cream cheese experience in bar form. Flaky crescent dough, creamy filling, and a crunchy cinnamon-sugar topping create multiple textures in every bite.
Why Crescent Dough Is a Secret Weapon
Refrigerated crescent dough is one of those convenience products that doesn’t sacrifice quality. The dough is already laminated (folded multiple times with butter), which gives you flaky, professional texture without the work of rolling and folding. It bakes up golden and buttery, creating a crust that’s sturdy enough to support the cheesecake filling but delicate enough to be enjoyable in bar form. Baking the bottom crust partially before adding the filling prevents sogginess.
Layering for Maximum Texture
- Unroll one can of crescent dough and press it into a 9×13-inch baking pan, sealing all the perforations so it bakes as a cohesive sheet
- Bake this base crust at 375°F for 8-10 minutes until it’s set but still pale (not golden yet, since it will bake further)
- Spread the cream cheese mixture evenly over the warm crust, then top with another layer of crescent dough
- Once the top crust is golden, brush it with melted butter and sprinkle generously with cinnamon sugar while still warm so it adheres
Pro tip: Make these bars a day ahead—they’re actually easier to cut cleanly after sitting overnight, and the flavors develop even more.
10. Cream Cheese Chocolate Chip Cookies
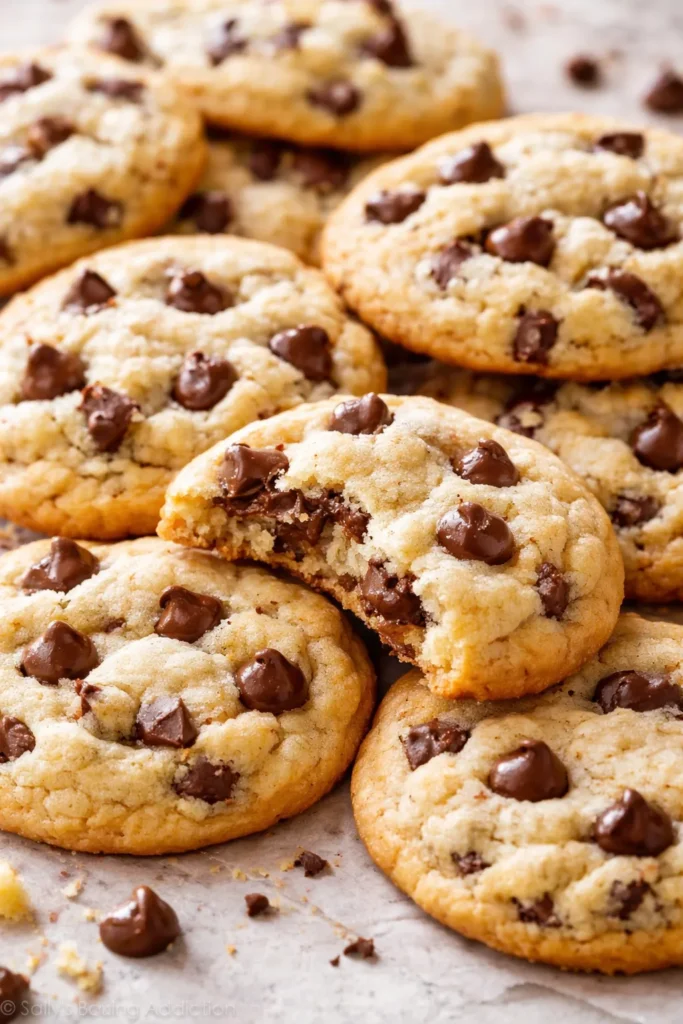
Soft, chewy cookies that stay moist for days thanks to the cream cheese in the dough. The flavor profile is subtle—you don’t taste cream cheese explicitly, but something keeps these cookies from being ordinary. That something is the tender crumb and slightly tangy background note that keeps you reaching for another.
The Chemistry of Adding Cream Cheese to Cookie Dough
Cookie dough is typically just butter, sugar, eggs, and flour. Cream cheese replaces some of the butter (keeping the total fat content similar) while adding moisture from its water content. This higher moisture content allows you to slightly under-bake the cookies without them becoming dry. The result is cookies that bake up soft and stay soft, rather than hardening as they cool.
Baking for Chewy Results
- Cream the butter and cream cheese together thoroughly before adding sugar—this ensures even distribution of the cream cheese throughout the dough
- Don’t skip the chill time; at least 30 minutes in the refrigerator prevents excessive spreading during baking
- Bake at 375°F for 10-12 minutes, pulling them out when the edges are set but the center still looks slightly underbaked
- They’ll continue cooking on the baking sheet for another minute or two after removal from the oven, so don’t wait until they look completely done
Worth knowing: These freeze beautifully, both as dough (scoop and freeze on a tray) and as baked cookies (up to 3 months in an airtight container).
11. Red Velvet Cheesecake Brownies
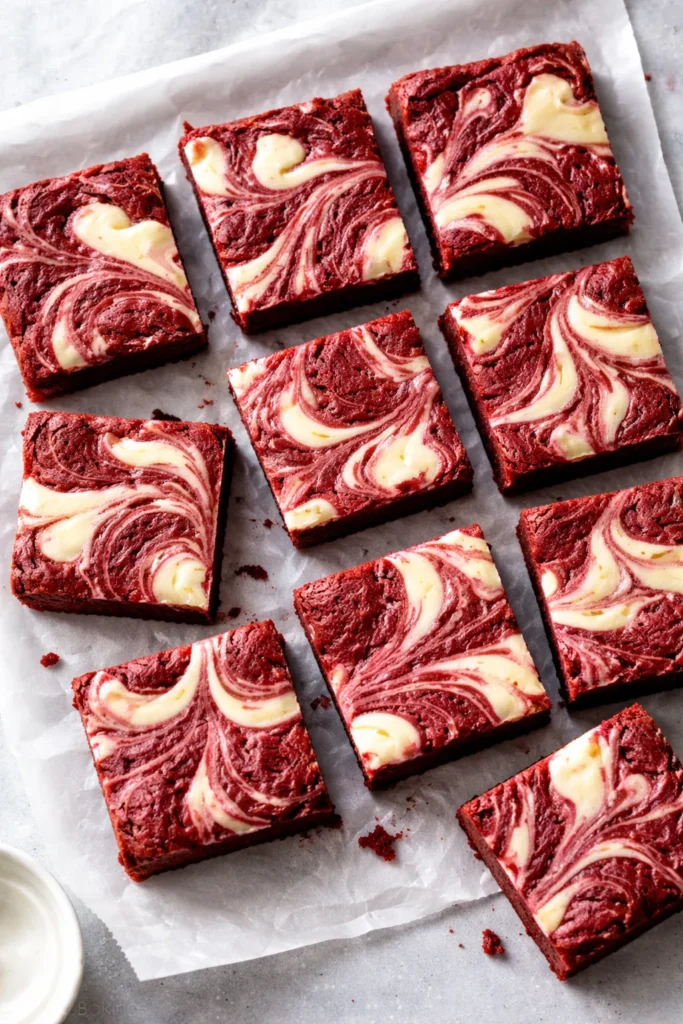
The celebration of red velvet cake flavors meets the indulgence of brownies in bars that look almost too beautiful to eat. The deep red color of the red velvet layer contrasts strikingly with the white cheesecake swirl, making these as much about visual impact as flavor. But the taste is what keeps people coming back.
Understanding Red Velvet Flavor
Red velvet isn’t chocolate—it’s a subtle blend of cocoa, vanilla, and buttermilk that creates a tender, tender crumb with an ever-so-slightly tangy flavor. When paired with cream cheese (which has its own tangy profile), you get a flavor that’s sophisticated without being overwhelming. The cocoa is there, but barely—it’s more about the texture and the hint of chocolate than full chocolate decadence.
Marbling Red Velvet and Cream Cheese
- Spread half the red velvet batter in your prepared pan, then drop cream cheese mixture by spoonfuls across the surface
- Use a knife or skewer to swirl through the layers in both directions, creating a marble effect that looks professionally done
- Keep swirling minimal—too much mixing muddles the contrast between the red and white layers
- Bake immediately so the swirled pattern stays defined rather than baking into a uniform texture
Pro tip: These brownies taste noticeably better the second day, so make them the day before serving when you have time.
12. Carrot Cake with Cream Cheese Frosting
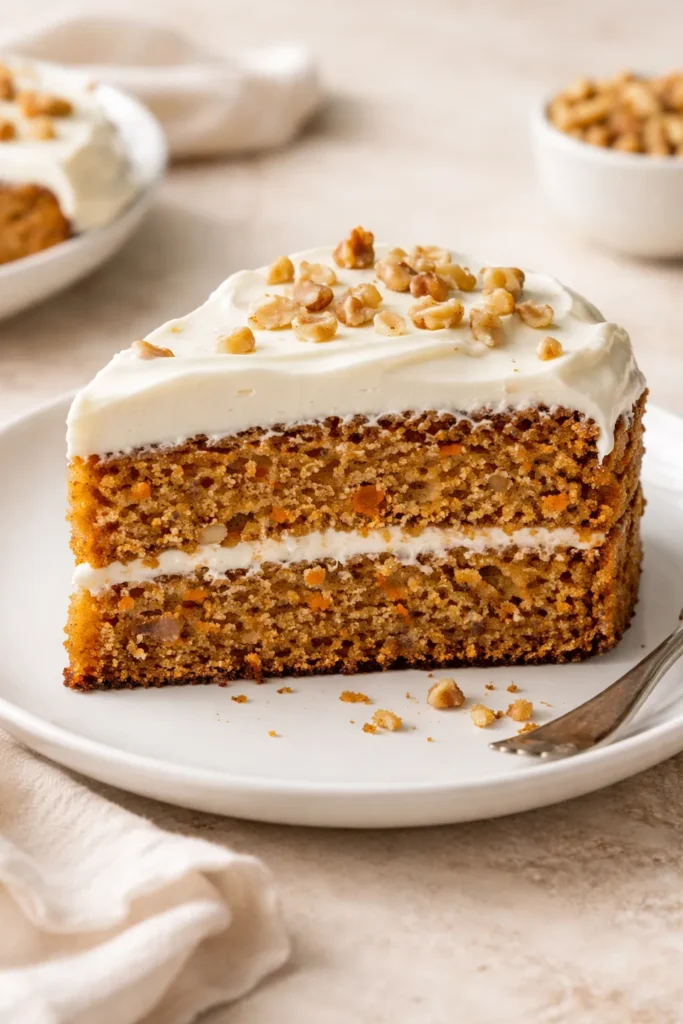
Moist, spiced carrot cake topped with silky cream cheese frosting creates a flavor combination that’s been beloved for decades. The beauty of this pairing is that the frosting’s tartness balances the cake’s subtle sweetness and warming spices. Cream cheese frosting has become almost synonymous with carrot cake for good reason.
Why This Pairing Is Timeless
Carrot cake has a dense, moist crumb from both the shredded carrots and oil-based dough. This richness pairs beautifully with cream cheese frosting’s tang and slight acidity. The frosting’s subtle sourness prevents the combination from tasting one-dimensional or overly sweet. Additionally, cream cheese frosting has a slight firmness that holds decorative swirls better than buttercream, making these cakes look professionally finished even when you frost them at home.
Building Your Frosting Layer
- Ensure both butter and cream cheese are at room temperature—this prevents lumpy frosting and ensures silky smoothness
- Beat the butter and cream cheese together for at least 2-3 minutes until the mixture is pale and fluffy, incorporating air for lighter texture
- Add powdered sugar gradually (not all at once), mixing on low speed to prevent a sugar cloud explosion
- Add vanilla extract and a tiny pinch of salt, which enhances the cream cheese flavor and balances sweetness
- If the frosting seems too soft, refrigerate for 15 minutes before frosting the cake
Worth knowing: You can make this frosting up to 2 days ahead and refrigerate it in an airtight container—just let it come to room temperature and re-whip briefly before using.
13. Mini No-Bake Cheesecake Cups
Individual cheesecake portions in cups or ramekins, completely no-bake and perfectly portioned for easy serving. These have all the flavor and creaminess of full-sized cheesecake but with built-in portion control. They’re elegant enough for dinner parties, easy enough for weeknight cravings, and portable enough to bring to potlucks.
Why No-Bake Cheesecake Actually Works
Many people assume that real cheesecake must be baked, but no-bake versions are just as valid—they’re simply constructed differently. Instead of setting through heat and the slight coagulation that baking causes, no-bake cheesecake relies on gelatin (or sometimes just chilling) to set the filling. The result is a lighter, more mousse-like texture than baked cheesecake, but it’s equally delicious and often preferred by those who like a more delicate crumb.
Assembling Your No-Bake Cups
- Make a simple crust from crushed cookies (Oreos, graham crackers, digestive biscuits) mixed with melted butter, pressing firmly into the bottom of each cup
- Chill while you prepare the filling so the crust has time to set and firm up
- Make the filling by beating cream cheese with powdered sugar, then folding in whipped cream (and gelatin if desired for extra stability)
- Spoon the filling evenly into cups, then top with fresh fruit, fruit compote, or chocolate ganache
- Refrigerate for at least 4 hours (or overnight) before serving
Pro tip: These actually freeze well if made without fresh fruit topping—freeze solid, then add fresh toppings right before serving.
14. Banana Cake with Cream Cheese Frosting
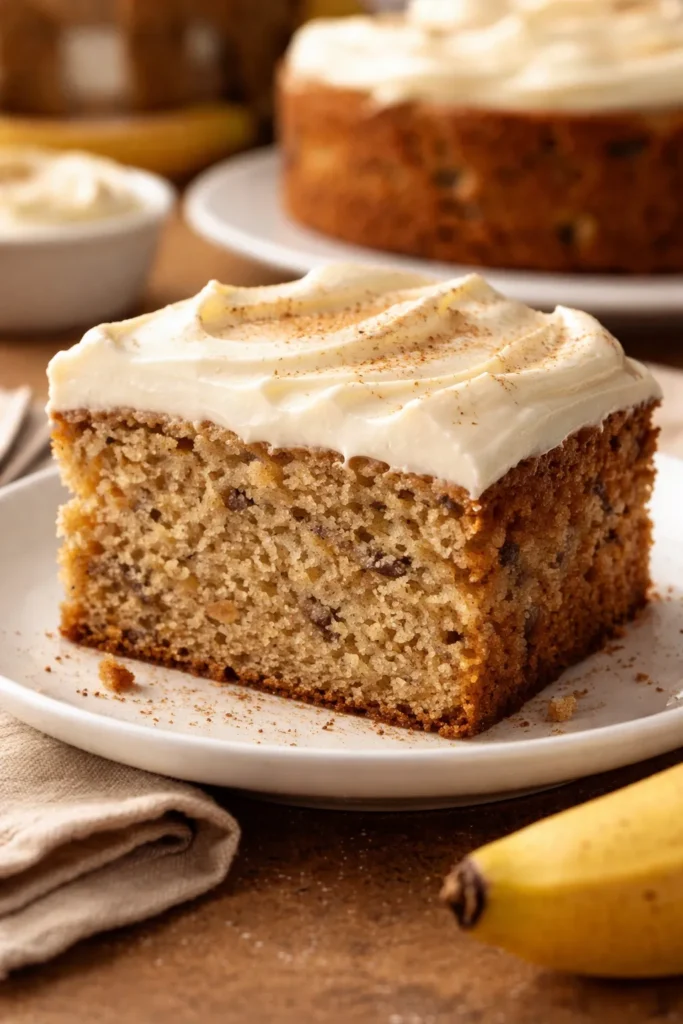
Dense, moist banana cake that uses very ripe (almost black) bananas for maximum flavor pairs perfectly with tangy cream cheese frosting. The sweetness of the bananas combines with the tartness of the frosting to create a flavor that’s both decadent and balanced. This is the kind of cake that people eat a slice of and immediately ask for the recipe.
Why Brown Bananas Matter
The browning of banana skin indicates that the starches have converted to sugars, making overripe bananas dramatically sweeter than yellow ones. These sugars are also more concentrated, giving the cake deeper banana flavor from fewer bananas. If your bananas aren’t dark enough, you’ll need more of them and possibly additional sugar, which can make the cake taste one-dimensional. Use bananas that are freckled or nearly black for the richest flavor.
Preventing Dense, Heavy Cake
- Mash the bananas thoroughly but not aggressively—you want them broken down but not completely smooth, as some small bits add texture
- Don’t overmix the batter once you add the dry ingredients, as this develops gluten and creates a tough, dense crumb
- Add baking soda to the dry ingredients, which reacts with the acidic bananas to create lift and a tender structure
- Don’t skip the acid (buttermilk or a mixture of milk and lemon juice), which tenderizes the crumb and enhances banana flavor
Worth knowing: This cake actually improves a day after baking as the banana flavor becomes more pronounced and the crumb sets perfectly.
15. Dirt Dessert
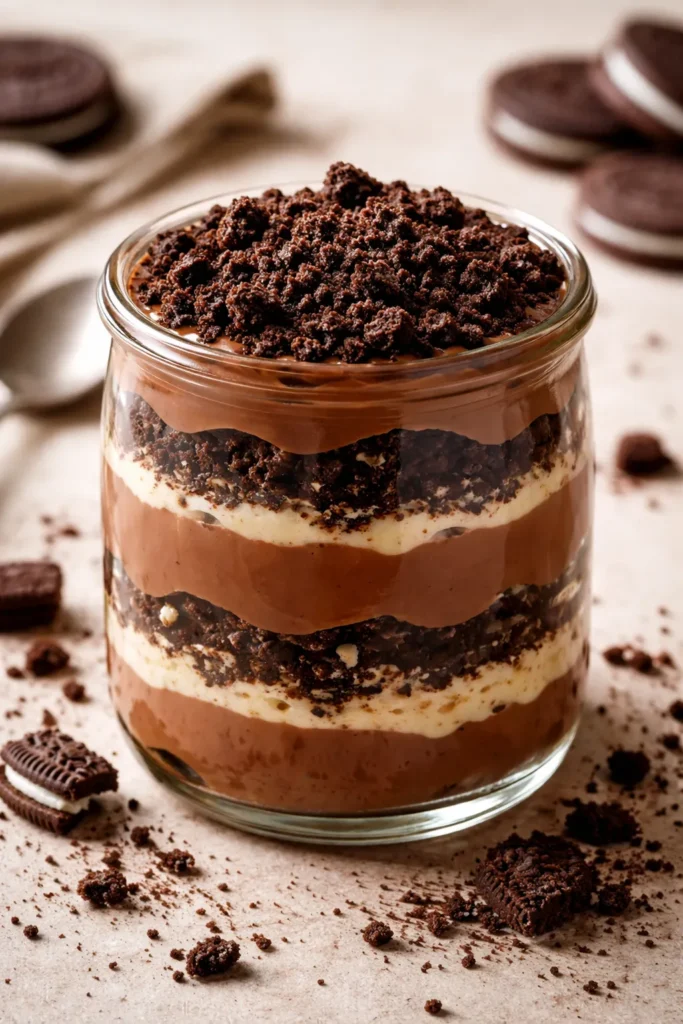
A no-bake layered dessert that’s part pudding, part crushed-cookie crumbles, part whipped cream, creating multiple textures in every spoonful. Despite the somewhat off-putting name, this is a beloved dessert that appears at potlucks and family gatherings across the country. The appeal is obvious once you taste it—it’s simple, delicious, and easy enough for kids to help make.
Understanding the Layering Strategy
The “dirt” layers are actually crushed Oreos mixed with melted butter that creates a cookie-crumb texture. These alternate with creamy pudding-based layers, creating contrast between crunch and smoothness. The final layer of crushed cookies on top provides visual appeal and that all-important textural interest. This isn’t a refined dessert; it’s comfort food that happens to look rustic and homey.
Making This Dessert Your Own
- Use chocolate pudding for classic dirt dessert, but butterscotch, vanilla, or banana pudding work beautifully too
- Substitute the Oreos with crushed graham crackers, digestive biscuits, or even brownie crumbles for different flavor profiles
- Mix crushed cookies with a small amount of melted butter so they clump together rather than staying powdery
- Whipped cream or Cool Whip creates the creamy layers—whipped cream will deflate slightly over time, while Cool Whip stays stable longer
- Make this dessert in a large trifle bowl for visual impact, in individual cups for easy serving, or in a 9×13-inch pan for slicing
Pro tip: Assemble this dessert just a few hours before serving rather than a day ahead, as the crushed cookies will absorb moisture and become soggy over extended time in the refrigerator.
Final Thoughts
Cream cheese truly is the secret weapon of easy dessert making. Whether you’re looking for something that requires zero oven time, a simple frosting that transforms cakes and cupcakes, or a filling that makes bars and brownies taste bakery-quality, this ingredient delivers. The recipes above all share something in common: they taste far more impressive than the effort required to make them.
Start with whichever appeals to you most—the no-bake options if you’re looking for minimal effort, the bars and brownies if you want something portable for gatherings, or the cakes and frostings if you’re celebrating something special. Once you start working with cream cheese desserts, you’ll find yourself reaching for them again and again. These aren’t recipes you’ll make once; they’re the ones that become staples, the ones people request, the ones you’ll be making for years to come.