Cream cheese fillings transform an ordinary layer cake into something genuinely spectacular — the kind of dessert that makes people close their eyes after that first bite and ask for the recipe. What makes them so irresistible is that balance of tangy richness and smooth creaminess that can’t be replicated with buttercream alone, no matter how hard you try.
The beauty of cream cheese fillings is that they’re incredibly forgiving to make, which means even if you’re new to baking, you can create professional-level results. Unlike traditional cheesecake, which demands a water bath and precise oven temperatures and a whole list of things that can go wrong, a cream cheese filling comes together in minutes with basic equipment. You beat, you chill, and you’re done.
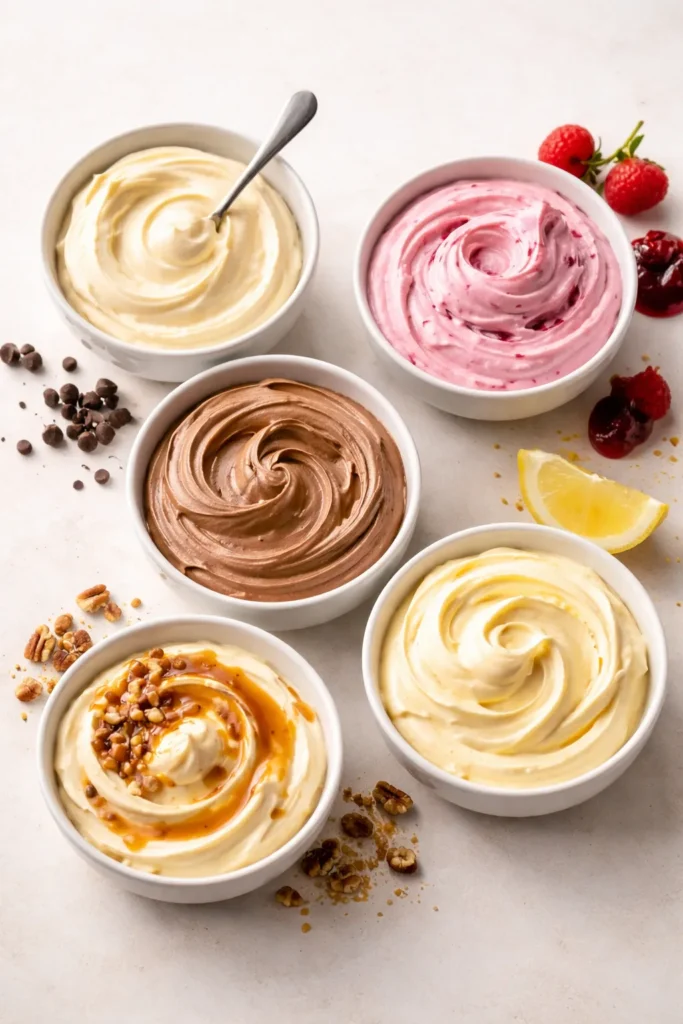
Over the years, bakers have developed different formulas for cream cheese fillings, each with its own personality and best use. Some are thick and stable enough to hold up in a wedding cake in a warm kitchen. Others are lighter and airier, perfect for a tender everyday cake. Some bake directly into the cake layers themselves, while others remain unbaked and luxuriously smooth. What’s wonderful is that once you understand the basic building blocks — cream cheese, sweetener, and sometimes a binding or lightening agent — you can adapt these fillings endlessly to match any cake flavor you’re working with.
This guide covers five distinct cream cheese filling formulas that work beautifully for layer cakes. Each one brings something different to the table, and I’ll walk you through how to make them, which cakes they pair best with, and how to get the most reliable results every single time.
Table of Contents
- 1. Classic Whipped Cream Cheese Filling
- Why This Filling Stands Out
- Best Cakes to Pair With
- 2. Marshmallow Fluff and Cream Cheese Filling
- Why This Filling Stands Out
- Best Cakes to Pair With
- 3. Stabilized No-Bake Cheesecake Filling
- Why This Filling Stands Out
- Best Cakes to Pair With
- 4. Baked Cream Cheese Filling
- Why This Filling Stands Out
- Best Cakes to Pair With
- 5. Citrus-Infused Cream Cheese Filling
- Why This Filling Stands Out
- Best Cakes to Pair With
- Tips for Perfect Cream Cheese Fillings
- How to Assemble Layer Cakes with Cream Cheese Filling
- Storage and Make-Ahead Guidance
- Flavor Variations and Adaptations
- Final Thoughts
1. Classic Whipped Cream Cheese Filling
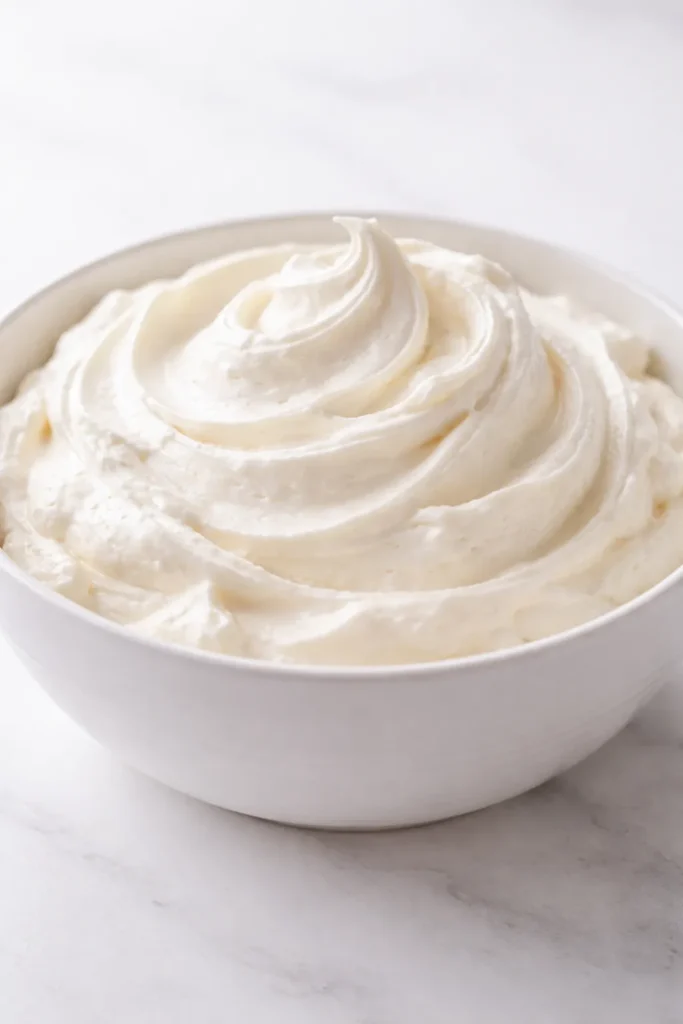
This is the filling that started it all for many home bakers. It’s the one you’ll see on trendy bakery cakes and Pinterest boards — light, fluffy, and so creamy it practically melts on your tongue. The secret to this version’s success is the addition of heavy whipping cream, which transforms simple cream cheese into something that feels almost cloud-like without being overly sweet.
What makes this filling special is the ratio. It’s not just cream cheese whipped on its own (which would be dense and grainy). Instead, you’re creating a hybrid that uses the structure of whipped cream to lift the cream cheese while keeping that distinctive tangy flavor front and center. The result is a filling that’s stable enough to use between cake layers but still has that delicate, mousse-like texture.
This filling works beautifully with chocolate cakes, vanilla cakes, and especially with fruit-based cakes where that tang cuts through richness perfectly. It’s also the most versatile — you can pipe it into cupcakes, spread it thick between layers, or even pipe decorative dollops on top of the finished cake.
Yield: 2½ cups filling (enough for a 2-3 layer 8-inch cake)
Prep Time: 15 minutes
Cook Time: 0 minutes (no baking required)
Total Time: 15 minutes active + 30 minutes chilling
Difficulty: Beginner — Just basic mixing with an electric mixer and proper folding technique.
For the Filling:
- 8 ounces cream cheese, softened to room temperature
- ⅓ cup powdered sugar, sifted to remove lumps
- 1 teaspoon pure vanilla extract
- ½ cup heavy whipping cream, cold
Instructions:
-
In the bowl of an electric mixer fitted with the paddle attachment (or using a hand mixer), beat the softened cream cheese on medium speed for about 1 minute, until it becomes completely smooth and creamy. Scrape down the sides and bottom of the bowl to ensure no lumps remain.
-
Add the sifted powdered sugar and vanilla extract to the cream cheese, and beat on medium speed for 2 minutes until the mixture is light and well combined. Scrape the bowl again.
-
Pour the cold heavy whipping cream into the mixture and, with the mixer on medium-high speed, whip the entire mixture together for 3-5 minutes. You’re looking for thick, stiff peaks that hold their shape — do not overmix or you risk turning it into butter-like chunks. The finished filling should look like thick whipped cream and hold firm when you lift the whisk.
-
Cover the bowl with plastic wrap and refrigerate for at least 30 minutes before using. This allows the filling to set slightly and become more spreadable.
Why This Filling Stands Out
The whipped cream technique creates a filling that’s stable enough to pipe and spread, yet tender enough to feel luxurious in your mouth. Unlike some cream cheese fillings that stay dense even when chilled, this one has a light, airy quality that makes your cake feel less heavy, even though it’s incredibly creamy. The tang of the cream cheese is still very present, but softened by the subtle sweetness of powdered sugar.
Best Cakes to Pair With
- Rich chocolate cakes (the tang balances the intensity)
- Vanilla or white cake (the filling becomes the star)
- Strawberry or raspberry cake (the creamy and fruity flavors complement each other)
- Lemon or other citrus cakes (creates a sophisticated flavor combination)
Pro tip: Use cold heavy whipping cream straight from the refrigerator. Cold cream whips faster and holds stiff peaks more reliably than cream that’s been sitting out on the counter.
2. Marshmallow Fluff and Cream Cheese Filling
If you want a cream cheese filling that’s noticeably sweeter and fluffier, this is the one. Marshmallow fluff is a secret weapon that many professional cake decorators rely on, and for good reason. It adds incredible volume and a slight bounce to the filling while cutting down on the tangy edge of straight cream cheese — making it more approachable for people who find traditional cream cheese frosting a bit too tart.
What’s brilliant about this formula is that it requires no whipping of cream. You’re not trying to capture air yourself; the marshmallow fluff already has that lightness built in. You simply mix, and the filling comes together fluffy and spreadable with minimal effort. This filling also tends to be more stable in warm conditions than the whipped cream version, which makes it practical for outdoor events or warm-weather baking.
The marshmallow element also lends itself beautifully to flavor variations. You can swirl in fruit preserves, add extracts, or incorporate melted chocolate without throwing off the texture the way you might with a more delicate filling.
Yield: 1½ cups filling (enough for a 2-3 layer 6-inch or 8-inch cake)
Prep Time: 10 minutes
Cook Time: 0 minutes
Total Time: 10 minutes active + 15 minutes chilling
Difficulty: Beginner — straightforward mixing with no special techniques required.
For the Filling:
- 8 ounces cream cheese, softened to room temperature
- 7 ounces marshmallow fluff (about ¾ of a standard jar)
- 1 teaspoon pure vanilla extract
- Pinch of fine sea salt
Instructions:
-
Place the softened cream cheese in the bowl of an electric mixer fitted with the paddle attachment. Beat on medium-high speed for 1 minute until smooth and creamy. Scrape down the bowl.
-
Add the marshmallow fluff to the cream cheese and beat on medium speed for 2-3 minutes. The mixture will look slightly streaky at first, but keep beating — it will come together into a uniform, fluffy mixture. Do not overbeat, or the filling may become grainy.
-
Add the vanilla extract and salt, and beat for just 20-30 seconds until combined. The salt is crucial — it brightens the sweetness and keeps the filling from tasting one-dimensional.
-
Transfer the filling to a bowl, cover with plastic wrap, and refrigerate for at least 15 minutes before using. This filling is immediately spreadable but becomes easier to work with when chilled.
Why This Filling Stands Out
The marshmallow fluff creates a filling that’s notably lighter in texture than the whipped cream version, with a slightly bouncy, cloud-like quality. It’s less tangy than traditional cream cheese fillings, making it a better choice if you’re pairing it with very sweet cakes or if you’re serving to people who prefer milder flavors. The filling is also incredibly easy to make — no special techniques, no timing tricks. Just mix and you’re done.
Best Cakes to Pair With
- Sweeter cakes like carrot cake or pumpkin cake
- Chocolate cakes where you want sweetness to balance richness
- Vanilla or white cake for a classic combination
- Red velvet cake (the filling’s sweetness complements the subtle spice)
Pro tip: If you find your marshmallow fluff filling becoming weepy or separating in the fridge, it usually means the cream cheese wasn’t quite soft enough when you started. Next time, let it sit on the counter for a full 30-40 minutes before mixing to ensure it’s completely pliable.
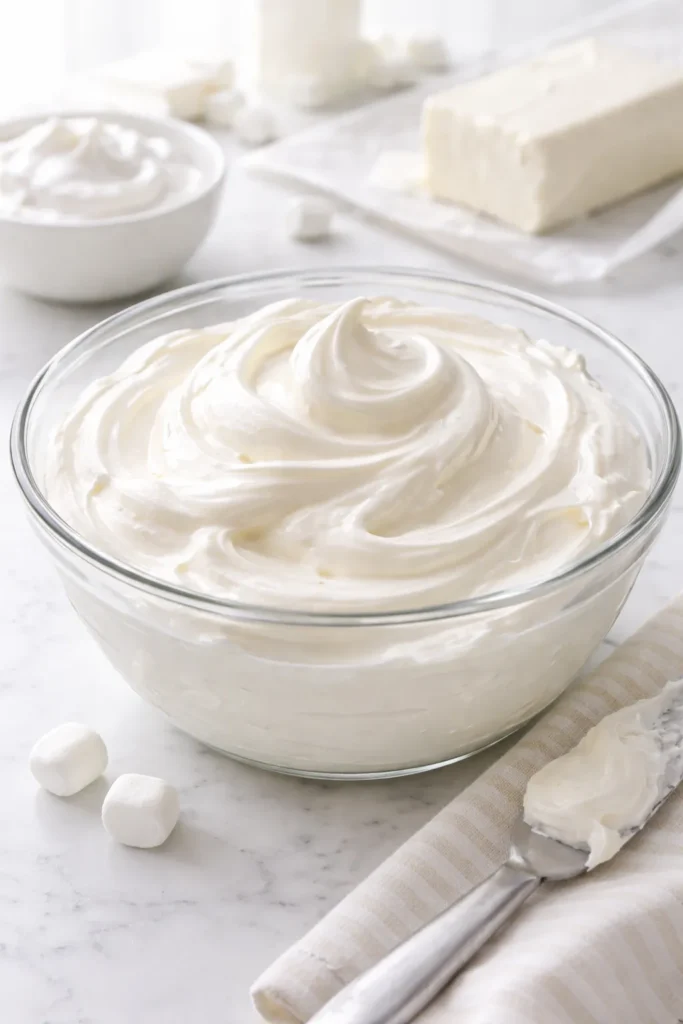
3. Stabilized No-Bake Cheesecake Filling
This filling exists in that perfect middle ground — it has the richness of a traditional cheesecake but requires zero baking. It’s made with sweetened condensed milk rather than eggs, which keeps things simple and foolproof. The condensed milk serves dual purposes: it sweetens the filling and adds body that helps it stay firm when chilled, without the need for gelatin or cornstarch (which can sometimes create an odd texture).
This filling is particularly popular among cake decorators who need something that holds up in warm conditions or that won’t ooze out the sides of stacked layers. The sweetened condensed milk creates a denser, more stable final product than whipped cream versions, making it ideal for cakes that need to hold their shape during assembly, transport, or display.
The flavor is distinctly cheesecake — rich, creamy, and tangier than the marshmallow fluff version but less intensely so than straight cream cheese. It bridges that gap between indulgent and approachable.
Yield: 1½ cups filling (enough for a 2-3 layer 8-inch cake)
Prep Time: 10 minutes
Cook Time: 0 minutes
Total Time: 10 minutes active + 1 hour chilling
Difficulty: Beginner — just mixing and chilling, though it does require an hour in the refrigerator to reach optimal consistency.
For the Filling:
- 8 ounces cream cheese, softened to room temperature
- ⅔ cup sweetened condensed milk
- 1 tablespoon fresh lemon juice (or lime juice for variation)
- 1 teaspoon pure vanilla extract
- Tiny pinch of fine sea salt
Instructions:
-
Place the softened cream cheese in the bowl of a stand mixer fitted with the paddle attachment (or use a hand mixer in a large bowl). Beat on medium-high speed for 1-2 minutes until the cream cheese is completely smooth and creamy. Scrape down the sides.
-
With the mixer on medium speed, slowly pour in the sweetened condensed milk and beat for 2-3 minutes. The mixture should look uniform and thick. Scrape the bowl again to ensure everything is fully combined.
-
Add the lemon juice, vanilla extract, and salt. Beat on medium speed for just 30 seconds until combined. The lemon juice adds brightness and helps prevent the filling from tasting one-dimensionally sweet.
-
Cover the bowl with plastic wrap and refrigerate for at least 1 hour. This filling is quite soft immediately after mixing and needs time to firm up to a spreadable consistency. You can refrigerate it for up to 5 days before using.
Why This Filling Stands Out
The sweetened condensed milk creates a filling that’s noticeably firmer and more stable than whipped cream-based versions, yet still creamy and indulgent. It won’t ooze out from between cake layers, making it practical for multi-layer cakes or cakes that need to be transported. The flavor is distinctly cheesecake-like without being as intensely tangy as straight cream cheese, and it accepts flavor variations beautifully.
Best Cakes to Pair With
- Chocolate cake (the sweetness balances bitter cocoa)
- Vanilla or white cake with fruit toppings
- Coffee-flavored cakes
- Any cake where you want a cheesecake flavor without making an actual cheesecake
Pro tip: The lemon juice isn’t for flavor — most people won’t detect it. It actually helps the filling achieve better texture by reacting with the cream cheese. Don’t skip it, even if you don’t like lemon.
4. Baked Cream Cheese Filling
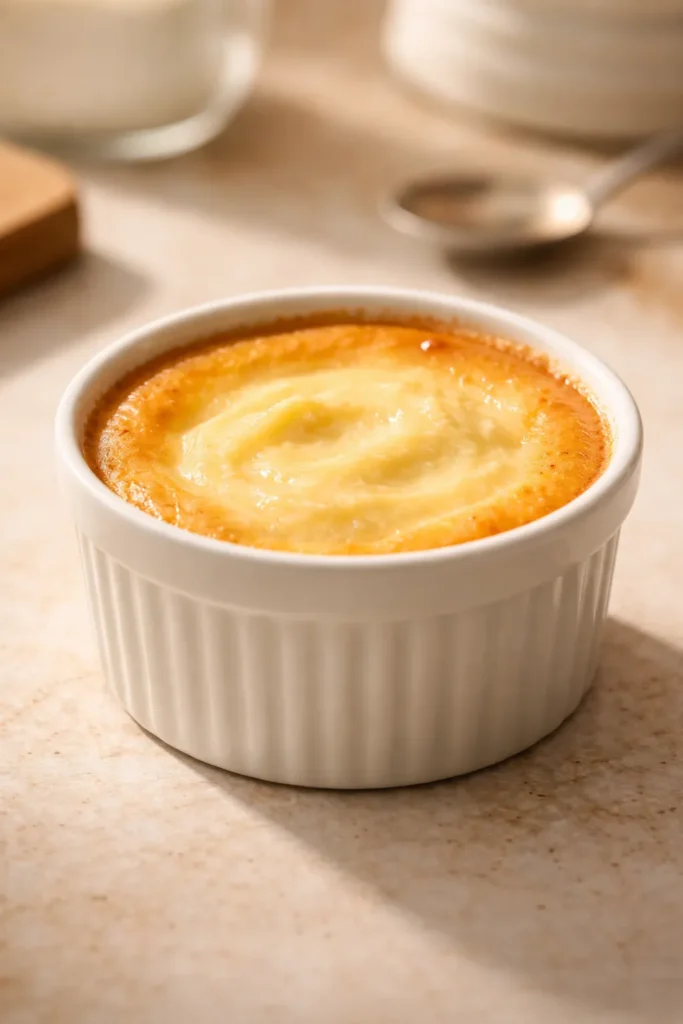
This is the formula for people who want their filling to bake directly into the cake. Instead of spreading a prepared filling between layers, you spoon dollops of this filling into the cake batter itself before baking, and it creates beautiful pockets of cheesecake richness throughout. It’s the secret behind those stunning cream cheese-filled coffee cakes and the chocolate cake with a creamy surprise in the middle.
The key to this version is the egg yolk. Without it, the filling would stay liquid during baking. The egg yolk helps it set into a creamy, custard-like texture that’s distinctly different from unbaked versions. It’s firmer, denser, and has that characteristic cheesecake richness that you get from baking.
This filling also works beautifully as a regular filling if you prefer to bake it in a separate pan (like a springform pan) and then slice it, or you can bake it and then use it as you would any other filling. It’s remarkably versatile.
Yield: 1½ cups filling (enough for one 9×13 or two 8-inch round cakes)
Prep Time: 10 minutes
Cook Time: 30-35 minutes (when baked in a cake)
Total Time: 40-45 minutes including baking time
Difficulty: Beginner — the mixing is simple, though using an egg yolk means this filling must be baked and cannot be eaten raw.
For the Filling:
- 8 ounces cream cheese, softened to room temperature
- ¼ cup granulated sugar
- 1 large egg yolk, room temperature
- 1 teaspoon pure vanilla extract
- 1 tablespoon fresh lemon juice or orange zest (optional but recommended)
Instructions:
-
In a medium mixing bowl, beat the softened cream cheese and sugar together with an electric mixer on medium speed for about 2 minutes, until light and creamy. Scrape down the sides.
-
Add the egg yolk and vanilla extract to the cream cheese mixture and beat on medium speed for 2 minutes until fully combined. The mixture should look smooth and homogeneous.
-
If using lemon juice or citrus zest, mix it in on low speed for just 15-20 seconds.
-
To use in a cake: Prepare your cake batter as directed. Pour half the batter into the prepared pan. Drop spoonfuls of this cream cheese filling over the batter, distributing it evenly. Pour the remaining cake batter over the top, spreading it gently to cover the filling. The filling will rise slightly during baking and create pockets throughout the cake.
-
Bake according to your cake recipe instructions. A toothpick inserted into the center should come out clean. The filling sets completely as the cake bakes.
-
Cool the cake completely before slicing. Do not eat any raw filling — the egg yolk means this filling must be baked to be safe.
Why This Filling Stands Out
This formula creates texture and flavor directly within the cake structure, rather than between layers. As it bakes, the filling creates a creamy surprise that feels luxurious, and the egg yolk gives it a custard-like richness that feels more decadent than unbaked versions. It’s also the only filling here that must be baked, which means it won’t separate or weep the way some fillings can when you stack a heavy cake on top.
Best Cakes to Pair With
- Coffee cakes and streusel cakes
- Chocolate cakes where you want a creamy contrast
- Blueberry, raspberry, or other berry cakes
- Carrot cake (the cream cheese pairs beautifully with warm spices)
Pro tip: Make sure your egg yolk is at room temperature before mixing. A cold yolk can cause the filling to seize up or become lumpy. Let it sit on the counter for 10 minutes before using.
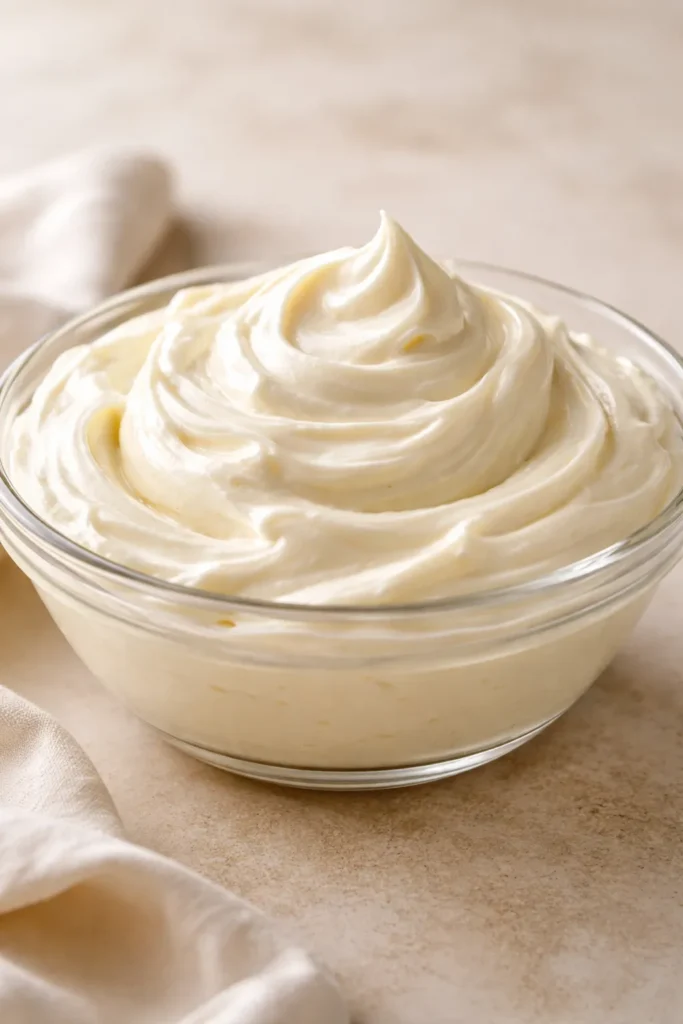
5. Citrus-Infused Cream Cheese Filling
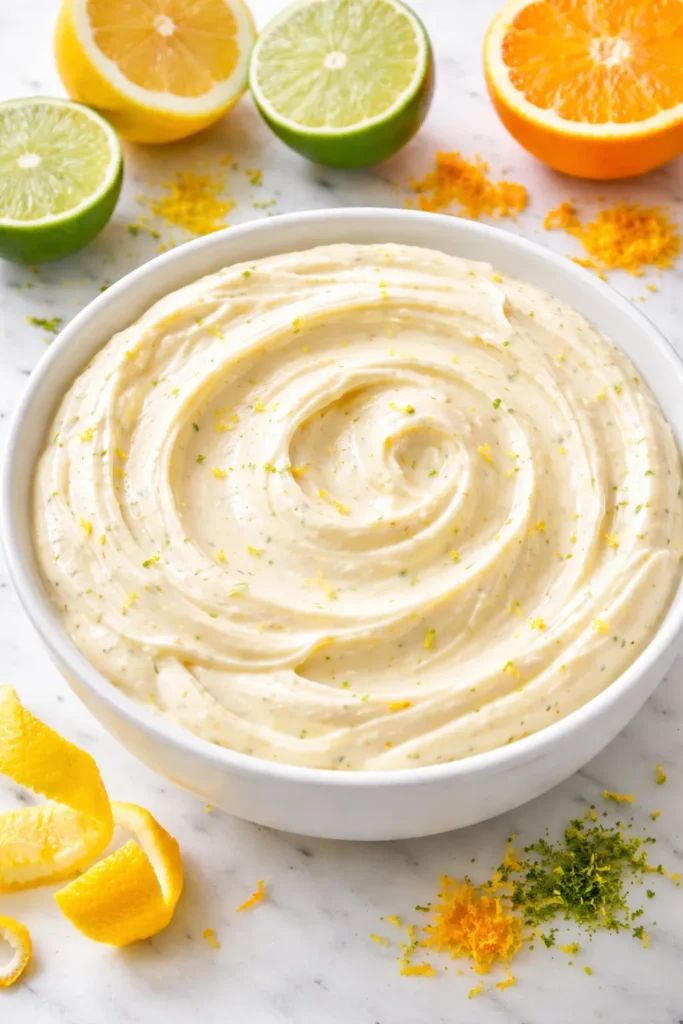
This is where cream cheese fillings become truly personal. By infusing the filling with lemon, lime, orange, or even grapefruit, you create something that tastes sophisticated and special without requiring advanced technique. The citrus cuts through the richness of the cream cheese and adds a brightness that makes you take another bite immediately.
What’s wonderful about this approach is that it starts with the stabilized no-bake filling formula but then takes it in a direction all its own. You can add anything from fresh citrus juice and zest to citrus extracts to make the flavor pop. The filling remains creamy and spreadable, but now it has personality and nuance.
This filling is particularly stunning on vanilla or white cakes, where the citrus can shine. It’s also spectacular with berry cakes, where the flavors echo each other. You could even layer a citrus filling with a berry cake and create something that tastes like a proper bakery creation.
Yield: 1½ cups filling (enough for a 2-3 layer 8-inch cake)
Prep Time: 10 minutes
Cook Time: 0 minutes
Total Time: 10 minutes active + 1 hour chilling
Difficulty: Beginner — the base is simple, and flavor additions are just variations on a theme.
For the Filling:
- 8 ounces cream cheese, softened to room temperature
- ⅔ cup sweetened condensed milk
- ¼ cup fresh lemon juice, or lime juice, or orange juice (or 3 tablespoons juice + 1 tablespoon zest)
- ½ teaspoon pure vanilla extract
- 1 teaspoon citrus zest (lemon, lime, or orange — optional but highly recommended)
- Tiny pinch of fine sea salt
Instructions:
-
Beat the softened cream cheese in a stand mixer fitted with the paddle attachment (or with a hand mixer) on medium-high speed for 1-2 minutes until completely smooth. Scrape down the bowl.
-
With the mixer on medium speed, slowly add the sweetened condensed milk and beat for 2-3 minutes until combined and uniform.
-
Add the fresh citrus juice, vanilla extract, citrus zest (if using), and salt. Beat on medium speed for just 30 seconds. Be careful not to overmix once you add the citrus juice — the acid in the juice can cause the filling to separate if overworked.
-
Taste the filling on the tip of a spoon. If you want more pronounced citrus flavor, add ¼ teaspoon of citrus extract (lemon, lime, or orange) and beat for just 10 seconds.
-
Cover with plastic wrap and refrigerate for at least 1 hour before using. The filling firms up as it chills.
Why This Filling Stands Out
By incorporating fresh citrus juice and zest, you’re creating a filling that tastes restaurant-quality and utterly refined. The bright, tart notes of citrus complement the rich tanginess of cream cheese in a way that feels both elegant and comforting. It’s substantial enough to serve as the main filling in a two-layer cake, yet sophisticated enough for a special occasion.
Best Cakes to Pair With
- Vanilla or white cake (lets the citrus shine)
- Almond or polenta cake (the flavors are naturally compatible)
- Strawberry, raspberry, or blueberry cake (citrus and berry are a classic pairing)
- Cardamom or rose-flavored cake (citrus adds complexity)
- Coconut cake (lime in particular creates a tropical vibe)
Pro tip: Fresh citrus juice is crucial here. Bottled lemon juice has a different character and can taste plasticky in a delicate filling like this. If you need to use bottled juice, use slightly less (start with 3 tablespoons instead of ¼ cup) and taste before using.
Tips for Perfect Cream Cheese Fillings
Getting the best results with cream cheese fillings requires attention to a few key details that seem small but make an enormous difference in texture and stability.
Temperature matters more than you think. Softened cream cheese is the foundation. If it’s too cold, it’ll be lumpy and resist combining with other ingredients. If it’s too warm, the filling can become grainy and separate. The sweet spot is genuine softness — you should be able to press your finger into it without resistance, but it shouldn’t be melting or oily. Leave it on the counter for 30-45 minutes before starting.
Sift your powdered sugar. This is non-negotiable if you want a smooth filling. Powdered sugar often contains lumps that don’t dissolve on their own, and they create a grainy texture in your finished filling. Take the 30 seconds to sift it directly into your mixer bowl.
Don’t overmix once you add dairy. This is especially true for the whipped cream version. Once you add the cold cream, stop mixing as soon as stiff peaks form. The friction from the mixer can break down those peaks and turn your filling into grainy butter-like chunks. This happens faster than you’d expect, so be vigilant.
Acid is your friend. Lemon juice, lime juice, or a tiny pinch of salt brightens cream cheese fillings and prevents them from tasting one-dimensional and overly rich. Even a tablespoon of fresh lemon juice in a filling you don’t intend to taste lemony is worth the addition. Most people won’t identify it as lemon; they’ll just notice the filling tastes better.
Chill before using. Even if a filling is technically spreadable immediately after mixing, it becomes easier to work with and holds better once chilled. This is especially true for the whipped cream and marshmallow versions. A chilled filling won’t squish out from between cake layers as much.
How to Assemble Layer Cakes with Cream Cheese Filling
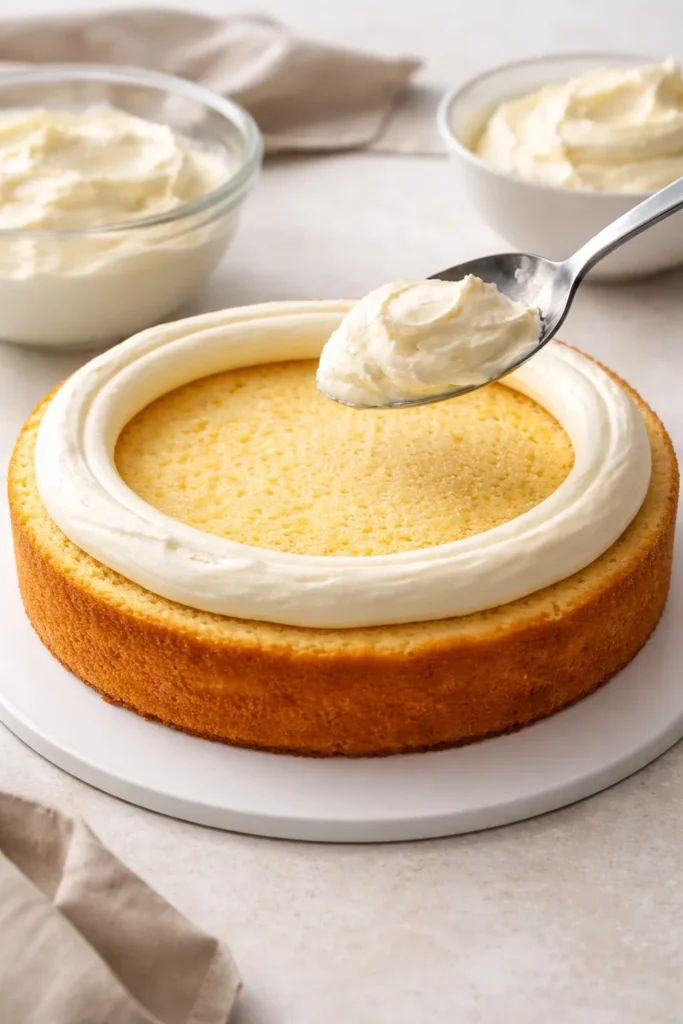
The assembly technique matters as much as the filling itself. If you simply spread filling on a naked cake layer and stack another layer on top, gravity and the weight of the cake will squeeze filling out the sides. Professional bakers use a simple technique that prevents this entirely.
The frosting dam method is the secret. Before adding your cream cheese filling, pipe a thick ring of stiff buttercream around the outer edge of the cake layer, creating a border that serves as a dam to contain the softer filling. This is especially important for whipped cream and marshmallow versions, which are softer than the condensed milk versions.
Pipe the frosting ring about ½ inch away from the edge of the cake, making it about ½ inch tall. This creates a sealed barrier. Then spoon your cream cheese filling into the center of that ring and smooth it with an offset spatula, spreading it right up to the frosting dam. Place your next cake layer on top, and the frosting acts as a seal, keeping the filling from squishing out.
For stiffer fillings like the condensed milk version, you can sometimes skip the dam if you’re careful and confident, but it’s still a smart safety measure. The buttercream dam doesn’t interfere with the taste or texture of the final cake — it’s invisible once you’ve frosted the exterior.
Storage and Make-Ahead Guidance

Unbaked fillings (whipped cream, marshmallow fluff, and stabilized no-bake versions) last for 5 days refrigerated, covered tightly with plastic wrap. Store them in an airtight container if you have one, as cream cheese can absorb odors from the refrigerator.
You can also freeze unbaked fillings for up to 3 months. Let them thaw in the refrigerator overnight before using. They may separate slightly as they thaw — if so, give them a gentle stir with a spatula until they come back together. Don’t use a mixer, as that can overwork the filling.
Assembled cakes with cream cheese filling should be refrigerated and stay fresh for 3-4 days, covered tightly with plastic wrap or in a cake box. The cream cheese filling contains dairy, so it’s not shelf-stable.
You can freeze assembled cakes with cream cheese filling. Wrap them tightly in plastic wrap (multiple layers) and place them in a freezer bag. They’ll keep for 2-3 months. Thaw in the refrigerator overnight or for several hours at room temperature before serving. The filling may look slightly wet or weepy as it thaws — this is normal and won’t affect the taste.
Unfrosted cakes with cream cheese filling can be frozen for up to 1 month (freeze them before frosting the exterior for best results). This is helpful if you want to assemble and decorate when you’re ready.
The baked filling in cakes stays fresh for 4-5 days refrigerated and can be frozen for 2-3 months.
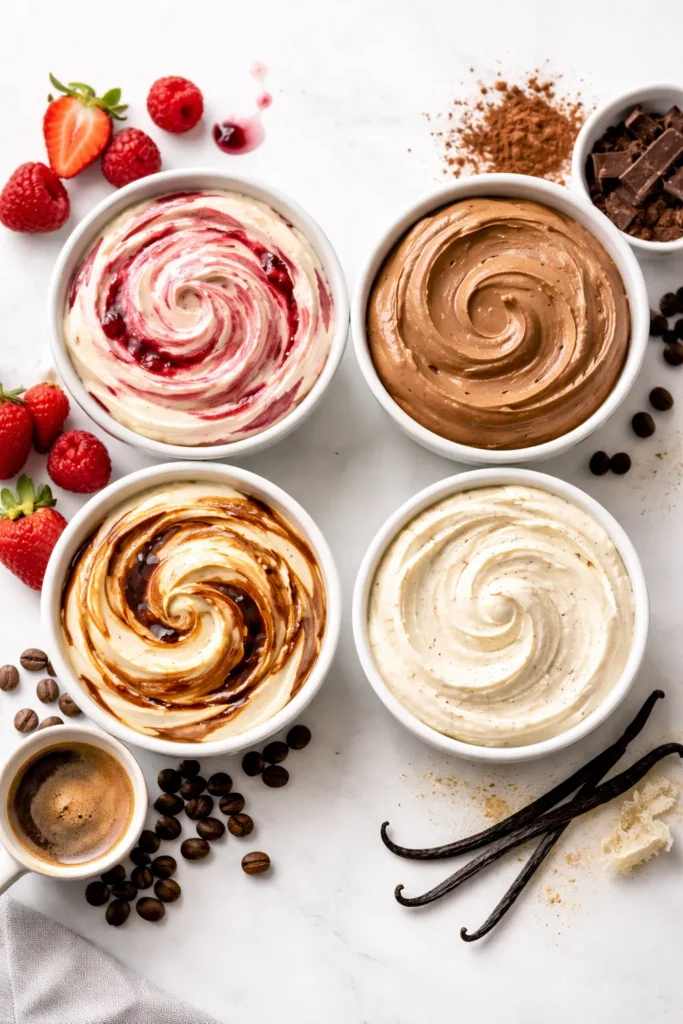
Flavor Variations and Adaptations
Once you understand the basic formulas, you can adapt them endlessly. Here are some approaches that work beautifully:
Fruit variations: Swirl in ¼ cup of fruit preserves (strawberry, raspberry, or cherry) into any of these fillings. Add ½ teaspoon of matching extract if you want more pronounced flavor. The fruit adds both flavor and visual interest.
Chocolate: Mix 2-3 tablespoons of unsweetened cocoa powder into the cream cheese before adding other ingredients. This works especially well with the marshmallow fluff version, creating something like a chocolate cream cheese filling.
Coffee: Add 1-2 teaspoons of instant espresso powder (dissolved in ½ teaspoon of hot water and cooled) to create a coffee-flavored filling that’s sophisticated and pairs beautifully with chocolate cake.
Vanilla bean: Replace regular vanilla extract with vanilla bean paste, or scrape the seeds from a vanilla bean and fold them in. The tiny black specks and richer vanilla flavor create a noticeably more luxurious filling.
Brown sugar: Substitute brown sugar for half the granulated sugar in any recipe for deeper, more complex sweetness. This works beautifully with cinnamon or spice cakes.
Maple: Add 1-2 tablespoons of pure maple syrup to the filling. This creates a warm, subtle sweetness that pairs wonderfully with carrot cake or pound cake.
Almond extract: Replace half the vanilla extract with almond extract for a more sophisticated, slightly floral flavor.
Final Thoughts

The beauty of cream cheese fillings is that once you master one formula, you’ve essentially learned the technique for all of them. Each variation is just a different balance of ingredients, serving different purposes and pairing with different cakes. Keep some of these formulas in your mental recipe box, and you’ll never make a boring layer cake again. A simple vanilla cake becomes something memorable when filled with a citrus-infused cream cheese filling. A chocolate cake becomes elegant and indulgent with a whipped cream cheese filling. These fillings elevate everything they touch, and they’re far easier to execute than they look. Start with whichever formula speaks to you, master it through making it a few times, and then branch out into the others. Before long, you’ll have a repertoire of fillings that feels natural and instinctive, and you’ll be creating cakes that make people ask for your secrets.