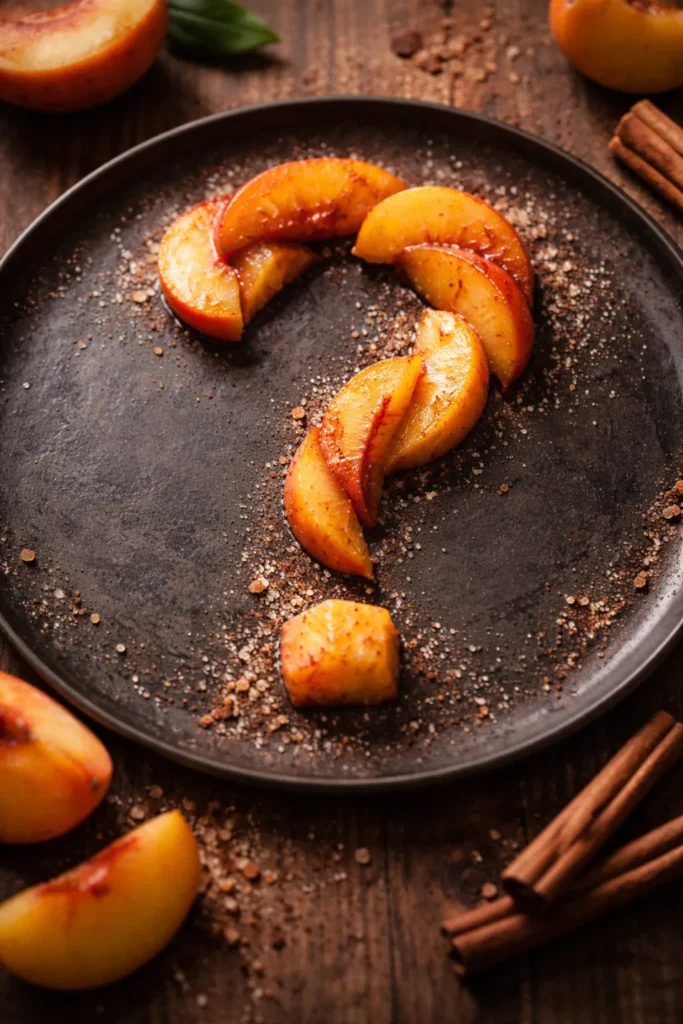
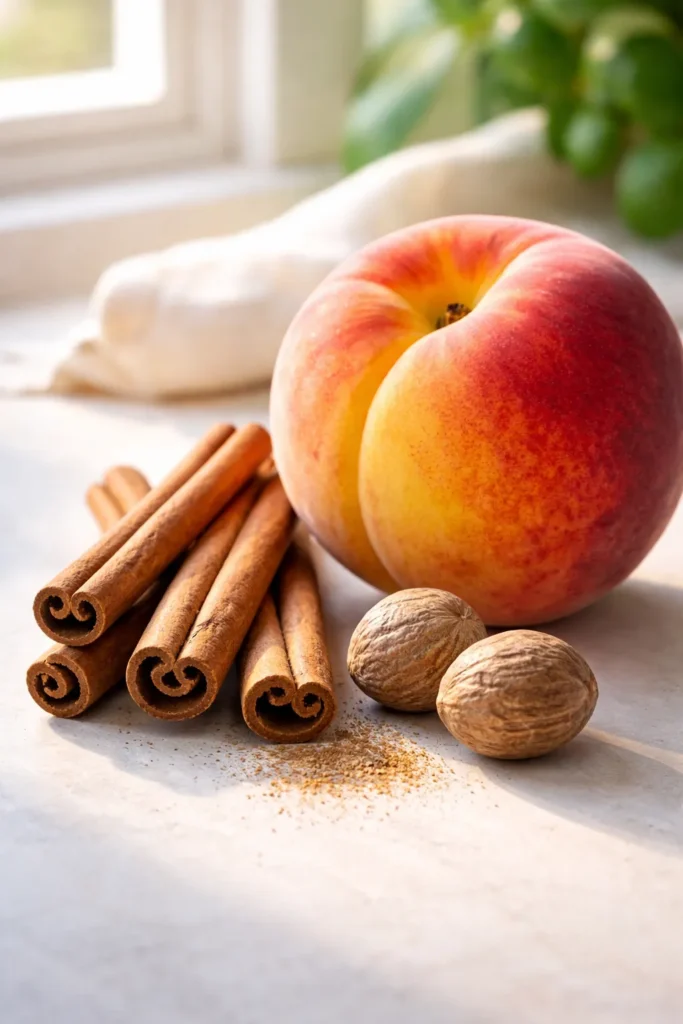
There’s something almost magical about pulling a golden-brown peach cobbler from the oven on a warm evening—the bubbling filling oozing from beneath a crispy, buttery topping, the aroma of cinnamon and caramelized peaches filling your kitchen. For years, I thought peach cobbler was complicated, something that required serious baking skills and hours of prep work. Then I discovered the truth: the best peach cobbler recipes are the simplest ones, and frozen peaches are actually your secret weapon to making this dessert anytime you want it, not just during peach season.
This five-step approach strips away all the unnecessary complexity and delivers exactly what makes a peach cobbler irresistible: soft, juicy peaches with just enough spice, and a tender-yet-crispy topping that feels like buttery cake. No fancy techniques. No temperamental fresh peaches that need peeling and pitting. No excuse to skip making dessert because peaches aren’t in season where you live. Frozen peaches are picked at peak ripeness, flash-frozen at their sweetest moment, and then available year-round in your freezer aisle. They’re honestly better for baking than fresh peaches that have traveled thousands of miles and sat in storage.
What I’m about to share with you is a recipe that’s been tested dozens of times, refined based on real feedback from home bakers, and proven to work reliably whether you’re a complete beginner or someone who bakes regularly. The whole process takes about an hour from start to finish, most of which is passive oven time while you relax. The actual hands-on work? Closer to 15 minutes. That’s the kind of dessert that changes how you think about weeknight cooking.
Table of Contents
- Why Frozen Peaches Are Actually Perfect for Cobbler
- Understanding What Makes a Cobbler Different from Other Fruit Desserts
- Fresh, Frozen, or Canned: Which Peaches Should You Use
- The Frozen Peach Cobbler Advantage: Why This Method Works So Well
- What You’ll Need: Equipment and Ingredients
- Serving and Timing Information
- Ingredients for the Frozen Peach Cobbler
- How to Prepare Frozen Peaches: The Critical First Step
- Step 1: Preheat Your Oven and Prepare Your Baking Dish
- Step 2: Cook the Peaches and Build the Filling
- Step 3: Mix the Cobbler Topping
- Step 4: Assemble and Prepare for Baking
- Step 5: Bake Until Golden Brown and Bubbling
- Cooling, Slicing, and Serving Your Cobbler
- Expert Tips to Avoid Common Mistakes
- Variations and Creative Adaptations
- How to Know When Your Cobbler Is Perfectly Done
- Storage, Make-Ahead, and Reheating Instructions
- Pairing and Serving Suggestions
- Frequently Asked Questions
- Can I use fresh peaches instead of frozen?
- My cobbler came out watery. What went wrong?
- Can I use a different type of sugar for the filling?
- Is the cinnamon and nutmeg essential, or can I skip the spices?
- What’s the difference between this topping and a biscuit topping?
- Can I make this cobbler on a grill or in a Dutch oven over a campfire?
- Final Thoughts
Why Frozen Peaches Are Actually Perfect for Cobbler
Most people think fresh is always better, but that assumption falls apart when it comes to peach cobbler. Fresh peaches sold in most grocery stores have usually traveled from orchards in other states or countries, which means they’re often picked slightly underripe so they can survive shipping and storage. By the time they reach your kitchen, their flavor is a shadow of what it could be. Frozen peaches, on the other hand, are picked when they’re perfectly ripe—at maximum sugar content and flavor intensity—and frozen within hours of harvest to lock in that peak ripeness.
The practical advantages are significant. You don’t need to peel them (the skins come off during processing), there’s no pitting required, and they’re already sliced and ready to use straight from the bag. No waste. No bruised fruit. No waiting around for hard peaches to ripen on your counter. You open a bag, thaw them under running water for a few minutes, drain the excess liquid, and you’re ready to bake. That convenience factor alone has made me reach for frozen peaches even when fresh ones are technically in season, because the quality is genuinely better and the effort is a fraction of what fresh requires.
Another hidden benefit: frozen peaches release their juices more readily as they thaw and cook, which creates that thick, jammy filling that makes cobbler so satisfying. Fresh peaches sometimes hold their juice too tightly, leaving you with a watery cobbler if you’re not careful. With frozen peaches, this problem essentially solves itself.
Understanding What Makes a Cobbler Different from Other Fruit Desserts

Before we dive into the recipe, it helps to understand what actually defines a cobbler—because it’s easier to master once you know what you’re aiming for. A cobbler is, at its heart, a fruit dessert with a thick, chunky fruit filling topped with a biscuit-like or cake-like batter that bakes over the fruit and develops that characteristic rustic, slightly cobbled appearance. The name comes from that uneven, textured top that looks like cobblestones.
This distinguishes it from other desserts you might make with peaches. A peach pie has pastry crust both underneath and on top—it’s more structured, more precise. A peach crisp or crumble has a crunchy topping made from oats, nuts, and brown sugar mixed with flour and butter, and it’s usually baked on top of the fruit without mixing. A peach cake has peaches baked into the batter itself throughout. A cobbler sits somewhere in the middle—the topping is more tender and cake-like than a crisp’s crumb topping, but it’s dropped or spread over the fruit rather than enclosed like in a pie.
The beauty of the cobbler format is flexibility. Because the topping isn’t a delicate crust that requires rolling out and fitting to exact dimensions, you have much more room for error. Slightly lumpy topping? It just adds to the rustic charm. Topping unevenly distributed? Bakes beautifully regardless. The peaches shift around a little as they cook? That’s exactly what’s supposed to happen. This is why cobblers are so forgiving and reliable, especially for home bakers who aren’t working with professional equipment.
Fresh, Frozen, or Canned: Which Peaches Should You Use

While this recipe is specifically designed around frozen peaches, it’s helpful to understand how each option performs so you can make the best choice for your situation.
Frozen peaches are my top recommendation for most home bakers, and honestly, they’re what I use even when I have access to fresh ones. They’re picked at peak ripeness, flash-frozen to preserve quality, and available year-round. Thaw them under cold running water, pat them dry, and they’re ready to use. The skins are already removed. They release their juices beautifully as they cook, creating that signature peach cobbler syrup. The only consideration is draining them well before using—excess water will make your filling runny and your topping soggy.
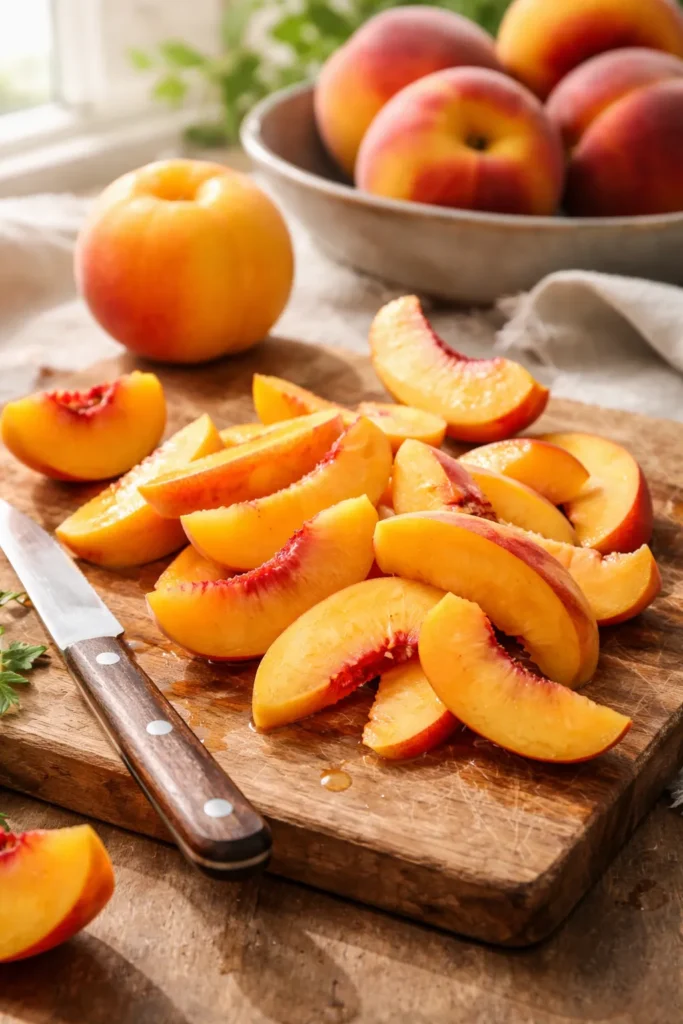
Fresh peaches are wonderful when you have access to truly ripe, high-quality ones from a farmers market or local orchard. However, they require significantly more prep work: washing, peeling (which involves blanching in hot water, then shocking in ice water), pitting, and slicing. You’ll need about 5-6 medium peaches to yield roughly 4 cups of sliced fruit. The quality absolutely depends on how ripe they are when you buy them—rock-hard peaches won’t taste great, but overly soft peaches can fall apart during baking. Fresh peaches also tend to release juice more slowly, so you may need to add a bit of water when cooking them on the stovetop to develop the syrup before baking. If you choose fresh peaches, select ones that yield slightly to pressure at the stem end but are still quite firm overall.
Canned peaches are convenient and available year-round, but they’re my least favorite option for cobbler because they tend to create a slightly gummy texture, and they’re often packed in heavy corn syrup that adds an artificial quality to the flavor. If you do use canned peaches, choose ones packed in juice rather than syrup, drain them very thoroughly, and reduce the added sugar in your recipe since canned peaches are already heavily sweetened. A 29-ounce can of peaches provides roughly the same amount of fruit as a 2-pound bag of frozen peaches.
The Frozen Peach Cobbler Advantage: Why This Method Works So Well
The approach in this recipe is built around a principle that separates mediocre cobblers from exceptional ones: you pre-cook the peaches on the stovetop before assembling the cobbler. This is a game-changer because it accomplishes several critical things simultaneously.
First, cooking the peaches for just 7-10 minutes on medium heat allows them to release their natural juices and begin breaking down slightly, which creates that thick, syrupy filling that makes a cobbler so satisfying. You’re not just topping raw fruit with batter and hoping the best happens—you’re developing flavor and texture proactively. Second, by the time the peaches go into the oven, they’re already partway cooked, which means they’ll finish baking through and become tender without the top burning or browning too much. Third, this method ensures the filling won’t be watery or runny, which is one of the most common complaints about cobbler recipes that skip this step.
The other key to success is the addition of cornstarch to the cooked peaches. Cornstarch is a thickening agent that transforms peach juices into a thick, jammy sauce without making the filling taste starchy or muddy. Just a tablespoon stirred in at the end of stovetop cooking is enough to give you a filling that’s thick enough to hold its shape but still juicy and delicious.
What You’ll Need: Equipment and Ingredients
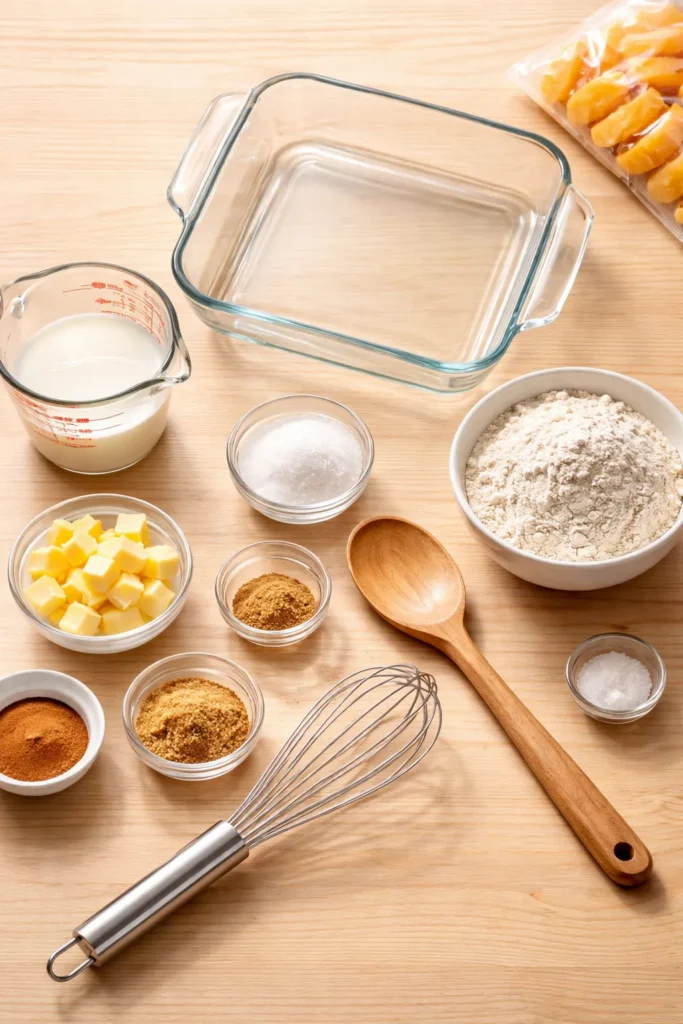
Before you start, gather these tools. Nothing fancy is required—you’re working with basic kitchen equipment that most home cooks already have. A large skillet or saucepan for cooking the peaches, a small mixing bowl for the dry ingredients, a larger mixing bowl for the topping batter, a wooden spoon or spatula, a 9-inch pie dish or 8-by-10-inch baking dish (either works—adjust baking time slightly if using a deeper dish), and measuring cups and spoons.
One small but meaningful choice: use a glass or ceramic baking dish rather than metal if possible. Glass allows you to see when the peaches are bubbling underneath the topping, which helps you judge doneness more accurately. If you only have metal, that works too—just watch the edges and listen for gentle bubbling sounds.
Serving and Timing Information
Yield: Serves 6 to 8 | Makes one 9-inch cobbler
Prep Time: 15 minutes (mostly thawing and draining frozen peaches)
Cook Time: 45 to 50 minutes
Total Time: 1 hour 5 minutes
Difficulty: Beginner — This recipe requires no special skills or technique knowledge. All steps are straightforward, the ingredients are pantry staples, and there’s tremendous room for variation and adjustment as you learn.
Ingredients for the Frozen Peach Cobbler
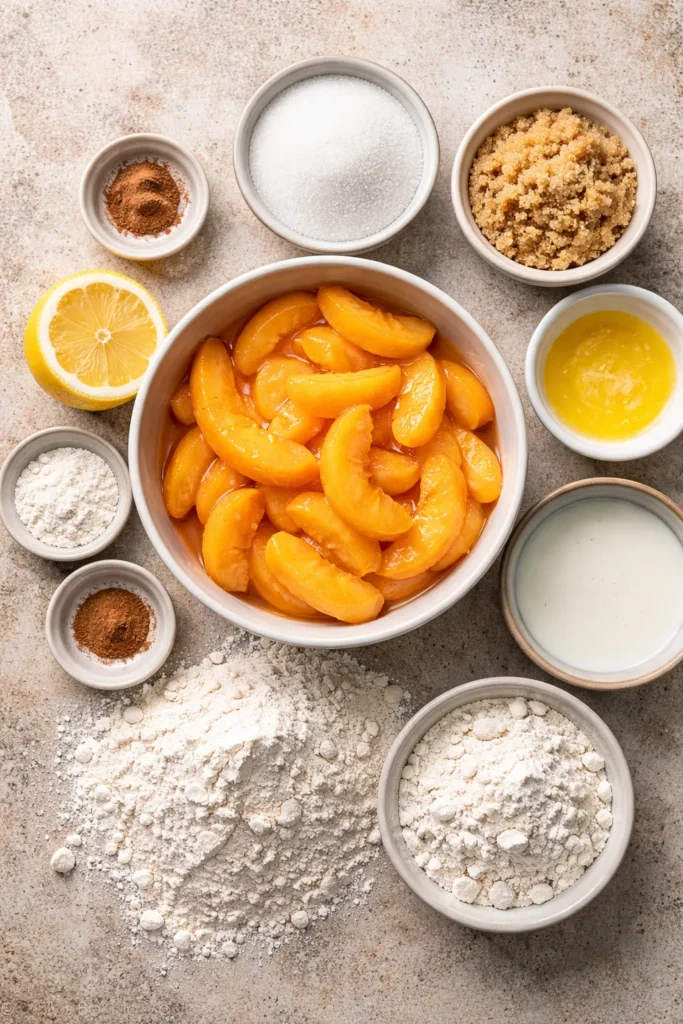
For the Peach Filling:
- 32 ounces frozen sliced peaches (two 16-ounce bags), thawed and well-drained
- ⅓ cup granulated white sugar
- ¼ cup light brown sugar
- ½ teaspoon ground cinnamon
- ¼ teaspoon ground nutmeg
- 2 teaspoons fresh lemon juice
- 1 tablespoon cornstarch
- Pinch of fine salt
For the Cobbler Topping:
- 1 cup all-purpose flour
- ¾ cup granulated white sugar
- 1½ teaspoons baking powder
- ½ teaspoon fine salt
- ½ cup whole milk, cold
- 6 tablespoons unsalted butter, melted
- 1 teaspoon vanilla extract (optional but recommended)
For Finishing:
- 2 tablespoons coarse sugar (turbinado or sanding sugar), optional but highly recommended
- Vanilla ice cream for serving
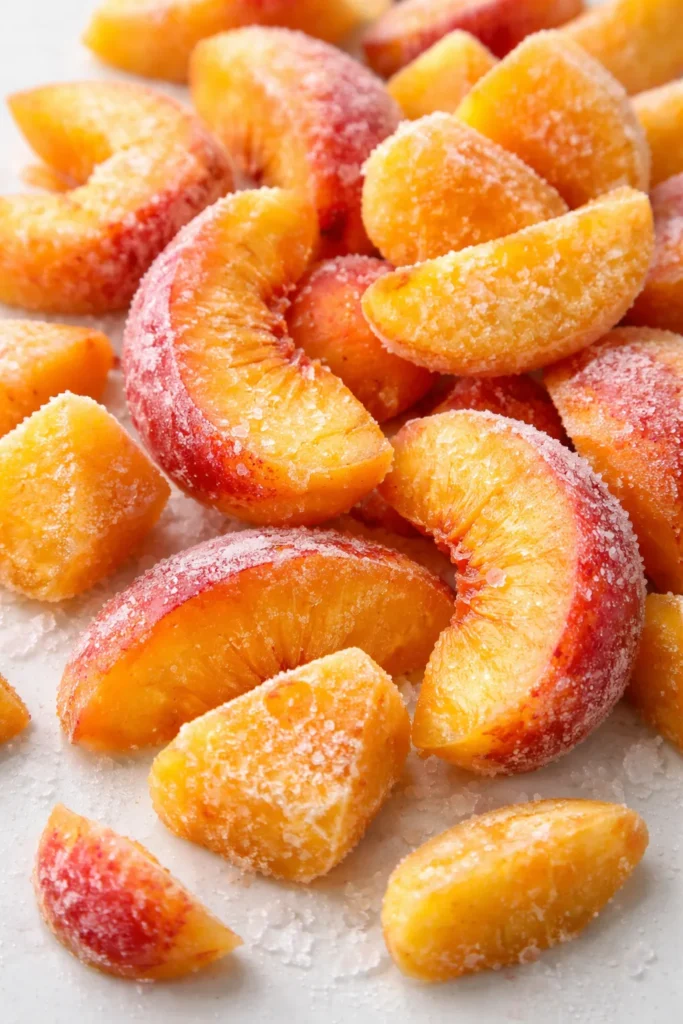
How to Prepare Frozen Peaches: The Critical First Step
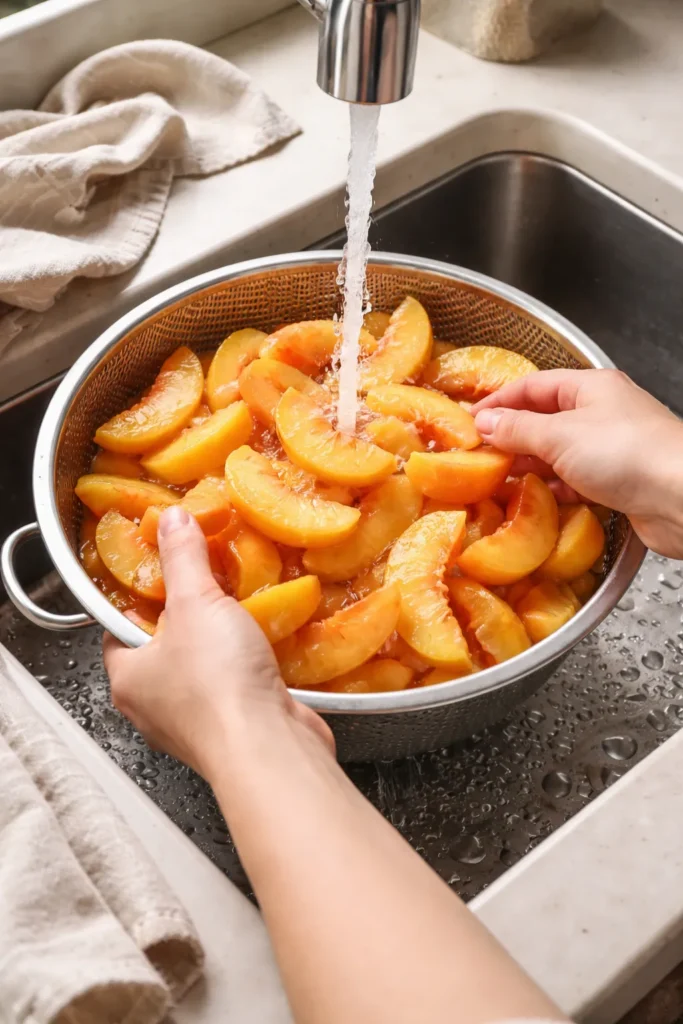
Don’t skip this step or rush through it—how you handle the frozen peaches sets the foundation for everything that follows. Remove the frozen peaches from the freezer 30 to 45 minutes before you plan to start cooking. You want them to thaw completely but stay cold.
The traditional way most recipes recommend is leaving them on the counter, but I prefer a gentler method: place the frozen peaches in a colander and run them under cold running water for 2-3 minutes, gently stirring them occasionally with your fingers until they’re fully thawed. This keeps them cold (which maintains texture) and gives you immediate, controlled thawing. Pat them completely dry with paper towels or a clean kitchen towel—this is non-negotiable. Excess moisture on the peaches is the number one reason people end up with watery cobbler filling. Spin them in a salad spinner if you have one, or just be thorough with the paper towels.
Transfer the drained, dry peaches to a medium bowl and set aside until you’re ready to start cooking.
Step 1: Preheat Your Oven and Prepare Your Baking Dish
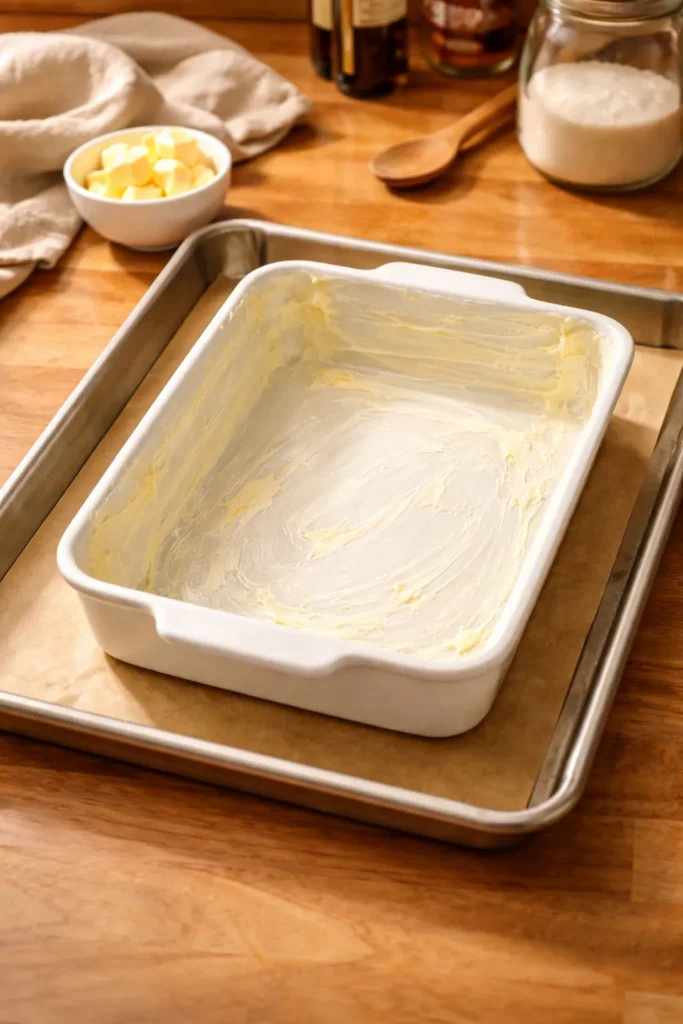
Preheat your oven to 375°F (190°C) and position the rack in the center of the oven. This takes about 10 minutes, which is enough time to handle the other prep work. While the oven preheats, lightly butter the inside of your baking dish (9-inch pie dish or 8-by-10-inch baking dish). You want enough butter to coat all surfaces but not so much that there’s a visible slick of it. A thin coating is ideal.
Here’s a professional tip: place a baking sheet on the rack below the one where your cobbler will bake. This catches any spills or drips from the filling, which almost always bubble up and over the edge as the cobbler bakes. It saves cleanup and saves your oven from burnt-on peach juice that’s a nightmare to clean. If you don’t have room for a sheet pan below, just use a sheet of aluminum foil on the rack below to catch drips.
The reason we’re preheating to 375°F instead of a lower temperature is that this temperature creates a beautiful golden-brown topping while cooking the peaches through without drying them out. Lower temperatures work too (350°F gives you a slightly gentler bake and a lighter topping), but 375°F is the sweet spot for achieving that slightly crispy, deeply golden exterior with a tender cake-like interior.
Step 2: Cook the Peaches and Build the Filling
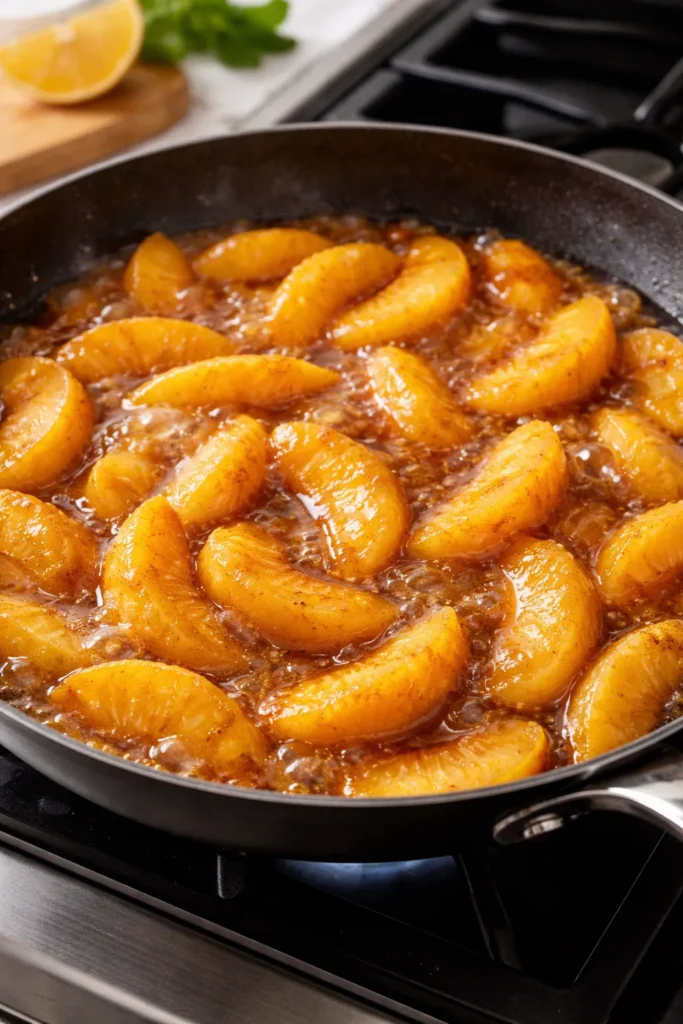
This is where the magic starts to happen, and where you begin developing the signature flavor and texture that separates a really good cobbler from a mediocre one.
In your medium skillet or saucepan, combine the thawed, drained peaches with both sugars (granulated and brown), the cinnamon, nutmeg, salt, and lemon juice. The combination of white and brown sugar is important: white sugar dissolves quickly and sweetens, while brown sugar adds molasses notes that deepen the peach flavor and create that rich, caramel-like undertone that makes people say “wow, that tastes like real peach.”
Place the skillet over medium heat and stir gently with a wooden spoon or silicone spatula. You’re not trying to break down the peaches into mush—you’re just combining the ingredients evenly so the sugar and spices coat all the fruit.
Cook for 7 to 10 minutes, stirring occasionally, until the peaches have released their juices and are bubbling gently. You’ll see liquid accumulating around the peaches and the juices taking on a slight amber color from the brown sugar caramelizing. The peaches themselves should still hold their shape—you’re not making peach sauce, you’re developing peach filling. If you break them down too much here, you’ll end up with a mushy filling instead of chunks of tender fruit.
At the 7-minute mark, stir in the cornstarch and cook for 1 more minute. The cornstarch will thicken the liquid and transform it from thin and watery into thick and syrupy. You’ll see it visibly coat the back of your spoon and cling to the peach slices. This is exactly what you want—the filling should look thick enough to hold its shape when you scoop it with a spoon, with juices that barely run.
Remove from heat and set aside while you prepare the topping.
Step 3: Mix the Cobbler Topping
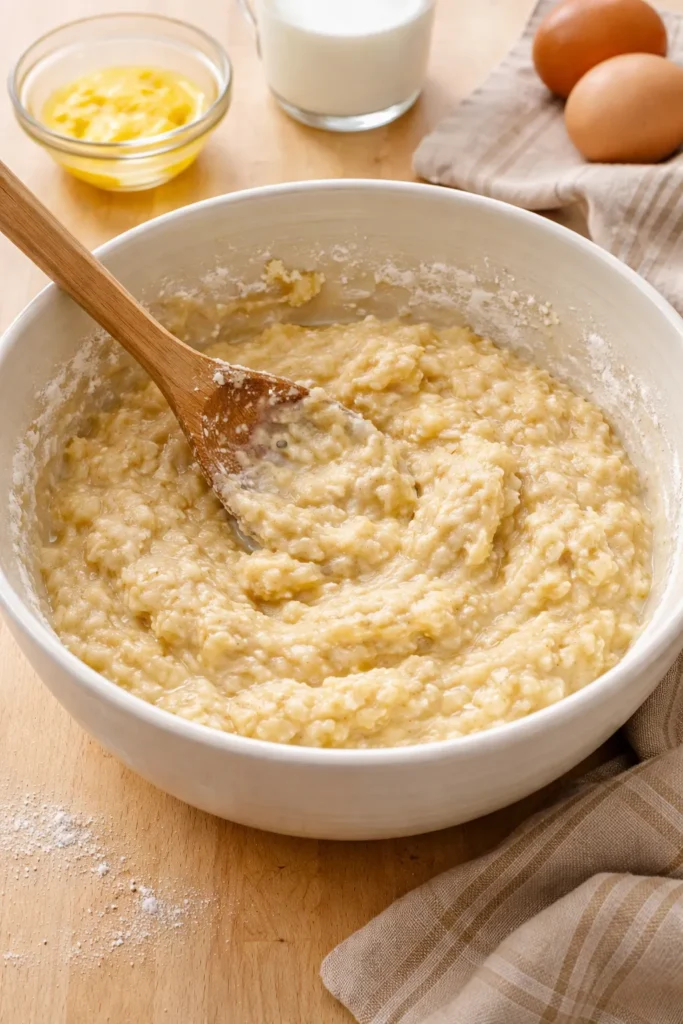
The cobbler topping is remarkably simple—it’s really just a basic cake batter that bakes up tender and slightly crispy on top. There’s no creaming butter with sugar, no separating eggs, no complicated technique. You’re literally mixing wet and dry ingredients together.
In a medium mixing bowl, whisk together the flour, sugar, baking powder, and salt. You’re just combining them evenly so the baking powder is distributed throughout. If you see any small lumps of baking powder, break them up with your fingers or the back of a spoon.
In a small bowl or measuring cup, combine the cold milk, melted butter, and vanilla extract. Whisk them together briefly—they don’t need to be perfectly emulsified, just combined.
Pour the wet mixture into the dry mixture and stir gently with a wooden spoon or spatula until the flour is just moistened and everything is barely combined. This is the critical moment where you need to exercise restraint. The batter should look slightly lumpy and thick—almost like a drop biscuit dough. Do not overmix. If you stir it too much, you’re developing gluten in the flour, which makes the topping tough and dense instead of tender and crumbly. Stir just until you don’t see any dry flour streaks, then stop immediately.
The batter at this point should be thick enough to hold its shape when dropped from a spoon, but loose enough to spread slightly in the baking dish. If it seems too thick, add a tablespoon of milk. If it seems too thin, add a tablespoon of flour. You’re looking for something between a thick batter and a stiff dough.
Step 4: Assemble and Prepare for Baking
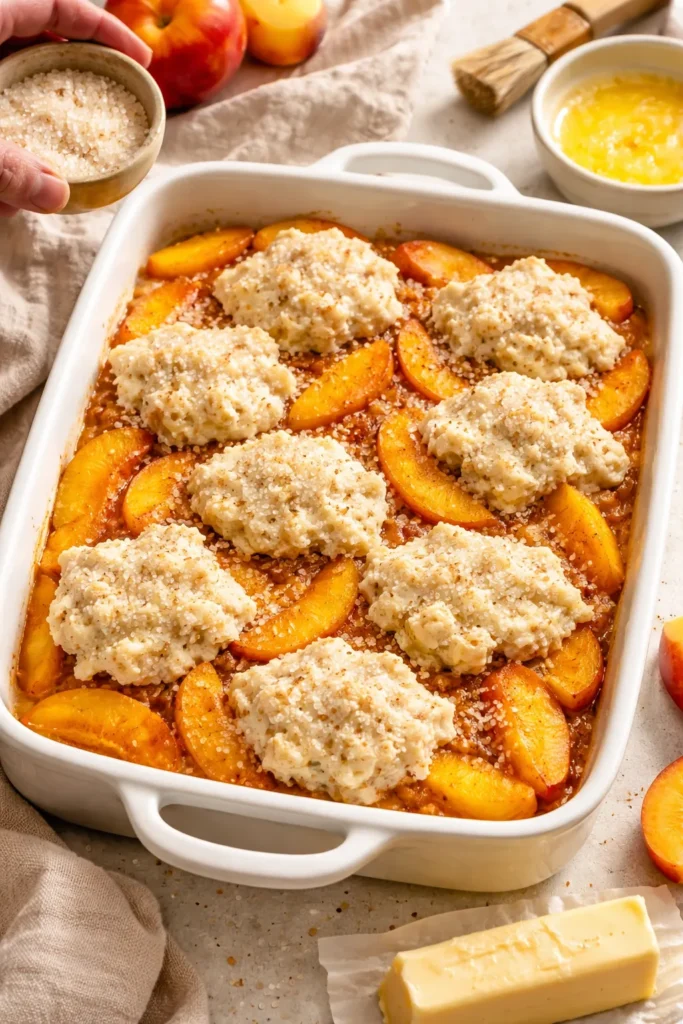
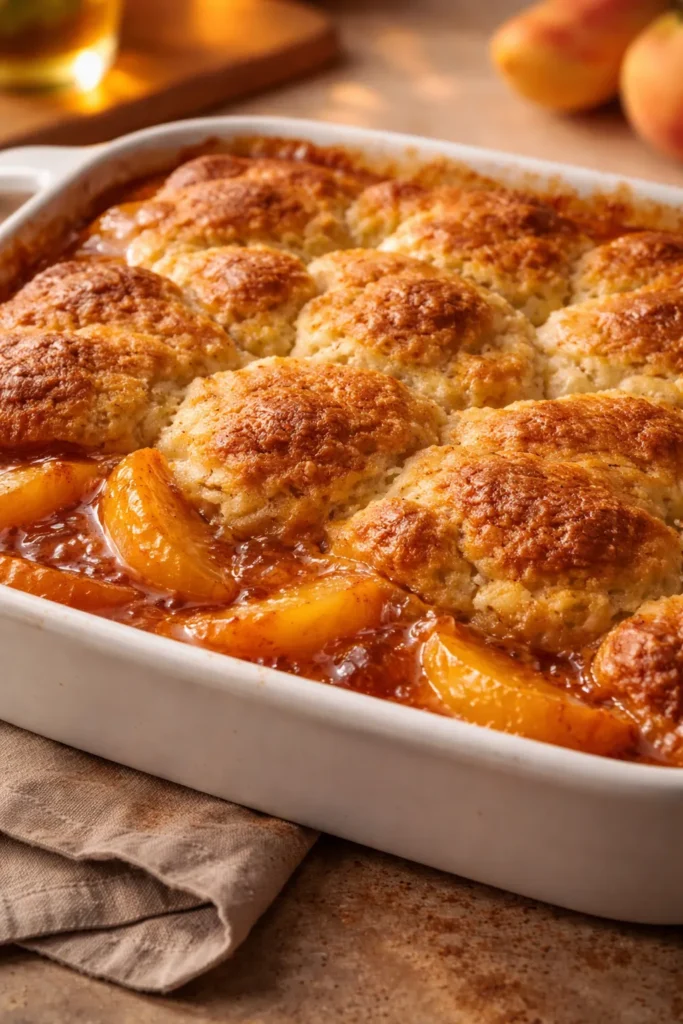
Pour the prepared peach filling into your buttered baking dish, spreading it into a relatively even layer. Don’t worry if it’s not perfectly smooth—the filling will settle and bubble as it bakes.
Drop spoonfuls of the cobbler topping over the peaches, spacing them roughly evenly. Leave some gaps between the spoonfuls—this serves two purposes. First, it allows steam to escape as the cobbler bakes, which prevents a soggy bottom layer. Second, it looks rustic and intentional, which is exactly what a cobbler should look like. You’re not trying to create a seamless top crust; you’re creating a rustic, cobbled appearance with peach filling peeking through.
Don’t spread the topping to cover every single inch. If you do, it’s not a cobbler anymore—it becomes more like a cake with fruit filling, and you lose that texture contrast. Aim for the topping to cover about 70-75% of the surface, with visible peach filling in the gaps.
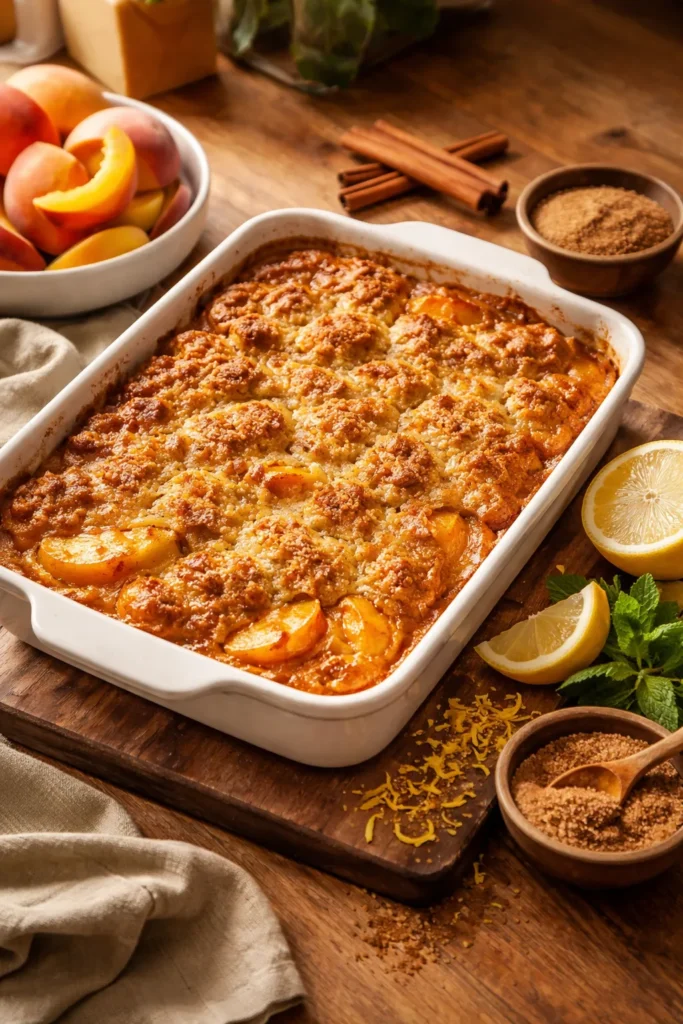
If you have coarse sugar (turbinado or sanding sugar) on hand, sprinkle about 2 tablespoons evenly over the top of the cobbler batter. This adds a beautiful sparkle and creates a slightly crunchy, caramelized exterior that contrasts gorgeously with the tender cake underneath. This is optional but genuinely transformative—if you try it once, you’ll always do it. Regular granulated sugar works too if that’s what you have, but coarse sugar holds up better to the heat and doesn’t dissolve completely into the batter.
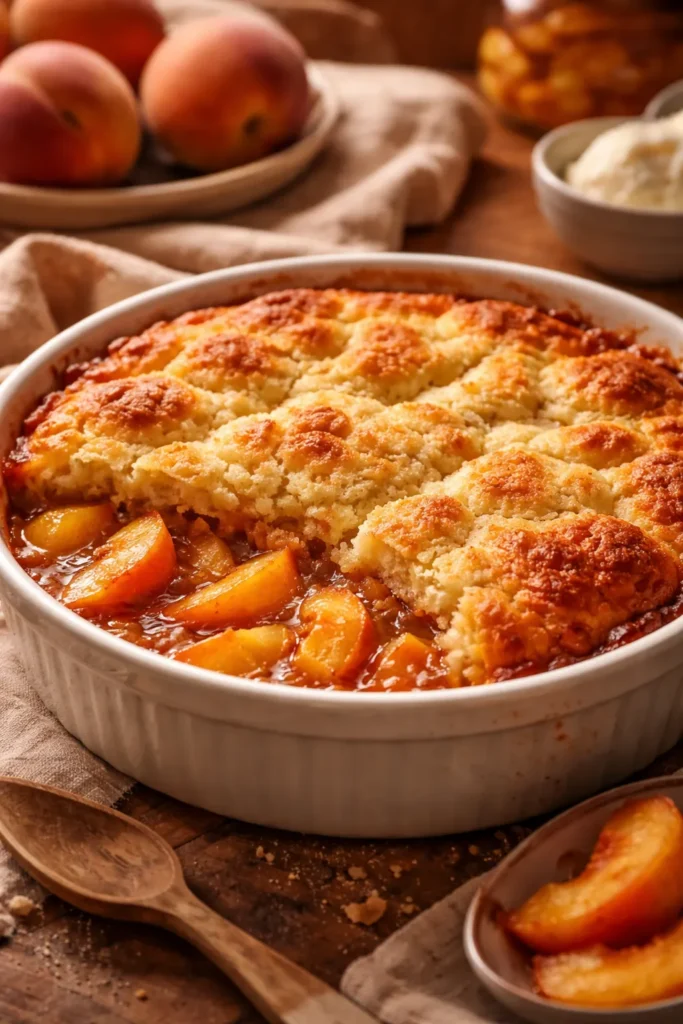
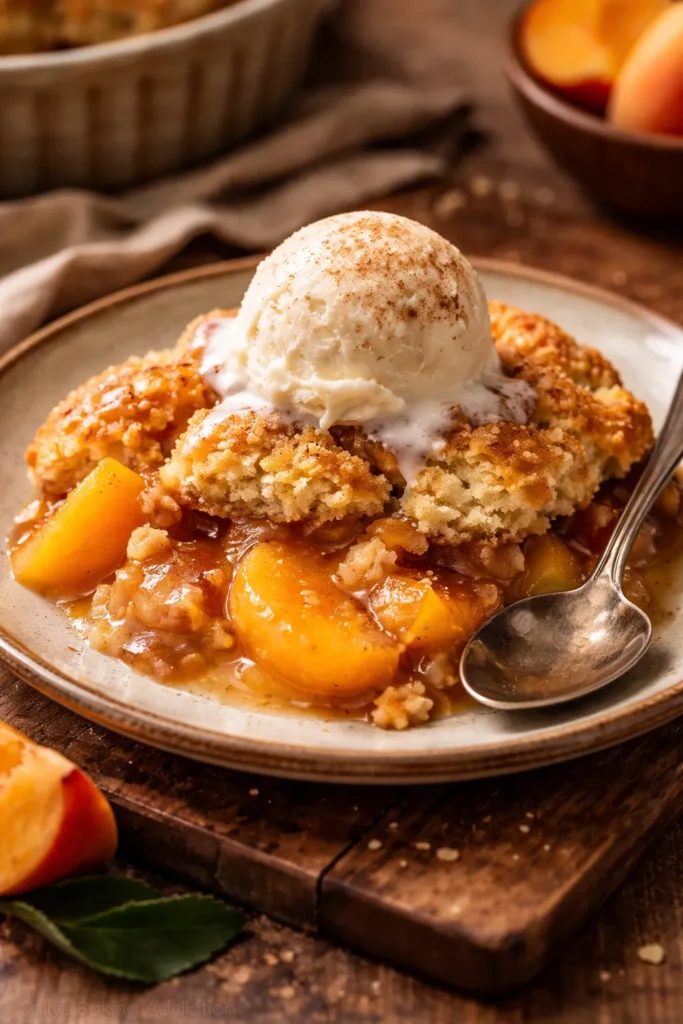
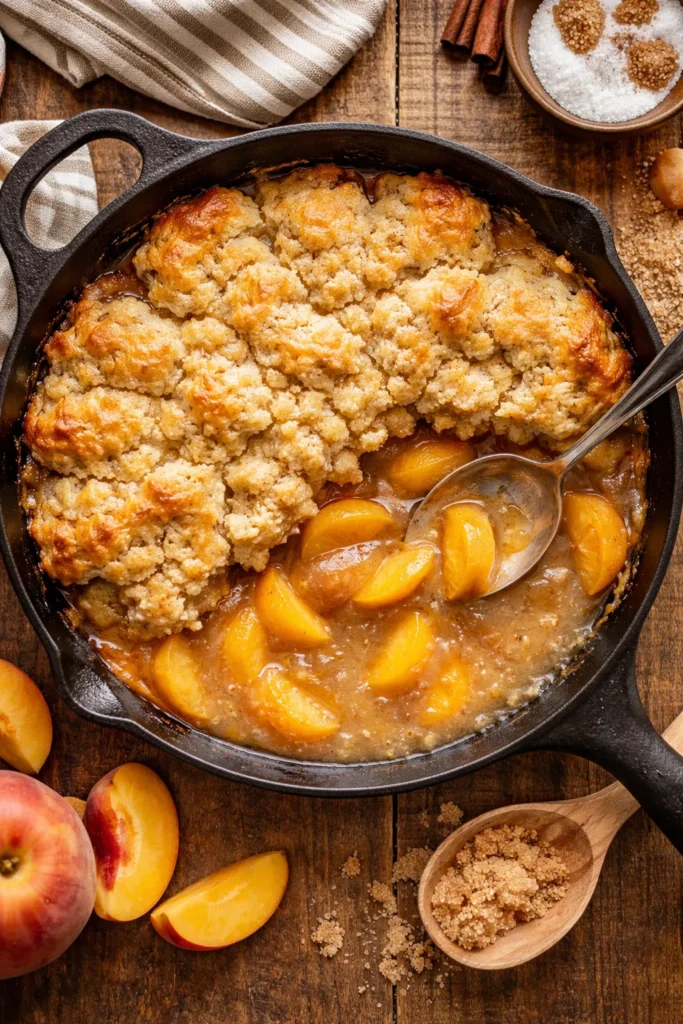
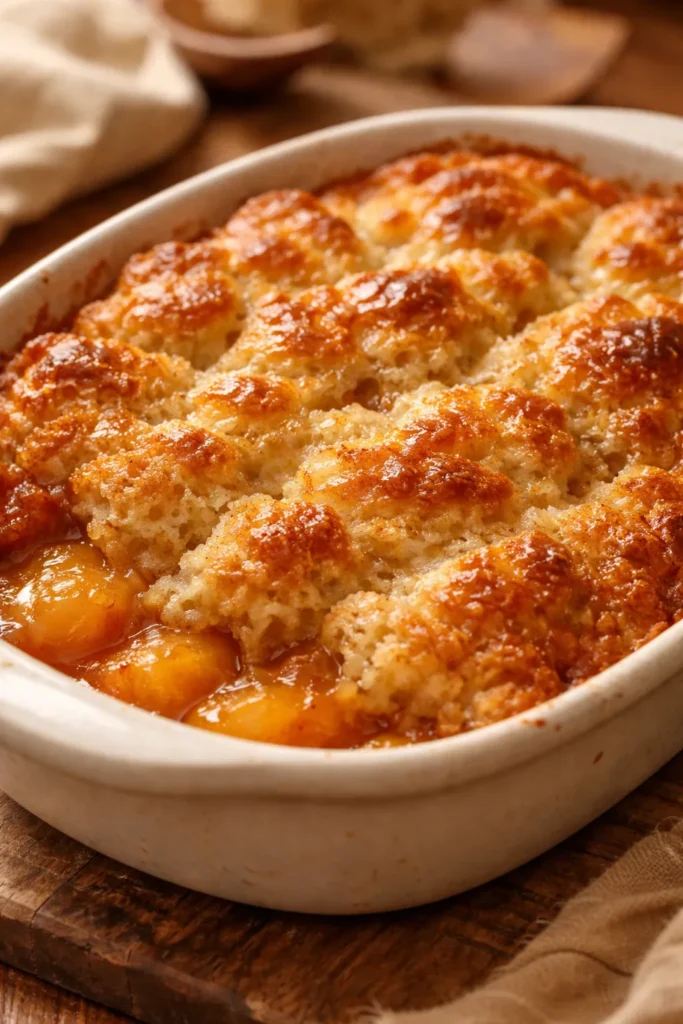
Step 5: Bake Until Golden Brown and Bubbling

Carefully place your assembled cobbler in the preheated 375°F oven. Bake for 40 to 45 minutes, rotating the baking dish halfway through (at about 20-22 minutes). Rotating ensures even browning and prevents one side from over-browning while the other stays pale.
You’ll know the cobbler is approaching doneness when you see peach filling bubbling vigorously around the edges of the topping. The topping itself should be deep golden brown—not pale yellow, but a rich, well-baked gold. If you tap the center of the topping gently with a finger, it should feel firm and spring back slightly, not doughy or soft. A toothpick inserted into the thickest part of the topping should come out clean or with just a few crumbs clinging to it.
If the topping is golden and bubbly but feels slightly soft when you touch it, it’s done. Some recipes call for baking until it’s rock-hard, but that’s actually overbaking—you want the interior to stay tender and cake-like, not dense and dry.
If after 40 minutes the topping is still pale and not browning, don’t panic. Some ovens just run cooler or have uneven heat distribution. Close the oven door, keep baking, and check again at 45 minutes. In very rare cases, you might need to go to 50 minutes, but most ovens finish the job right around the 40-45 minute mark.
Cooling, Slicing, and Serving Your Cobbler
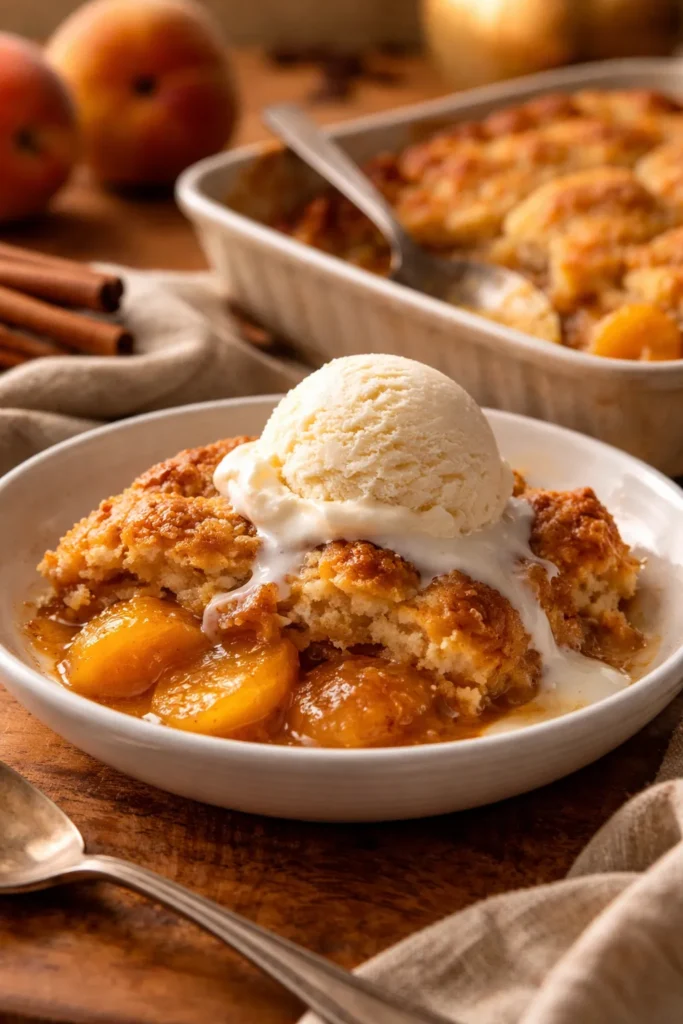
As tempting as it is to dive right in, allow your cobbler to rest for at least 10 minutes after removing it from the oven before serving. This isn’t just about preventing burned mouths (though that’s important). The filling needs time to set slightly, which transforms it from molten fruit sauce into thick, spreadable filling that holds its shape on a spoon. The topping also firms up and becomes less fragile.
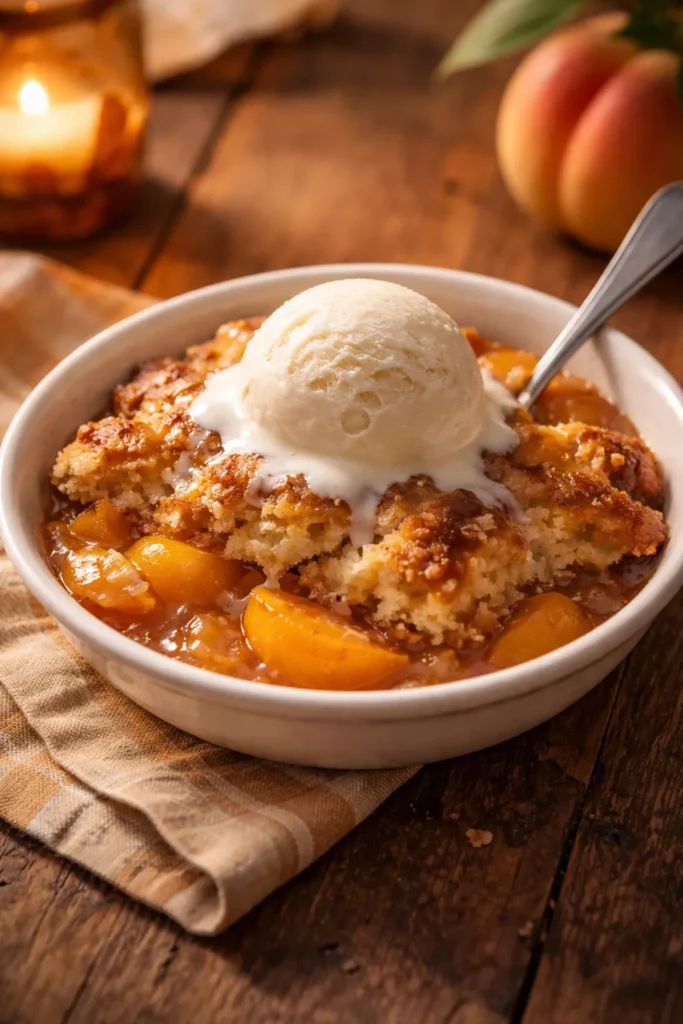
Scoop the cobbler directly from the baking dish with a sturdy spoon or small ice cream scoop, making sure each serving gets both topping and filling. Serve warm—not piping hot, but warm enough that you can still taste all the subtle flavors.
The absolute perfect way to serve peach cobbler is with a generous scoop of vanilla ice cream melting on top. The cold, creamy ice cream against the warm cobbler creates a contrast that’s almost magical. A dollop of whipped cream works too, or even a drizzle of custard. Honestly, it’s delicious on its own, but ice cream is the classic pairing and exists for good reason.
Expert Tips to Avoid Common Mistakes

Drainage is everything. The single most common reason for watery cobbler is frozen peaches that weren’t drained properly. Even though you drained them initially, sometimes a bit more liquid seeps out as they sit. Before adding them to the skillet, give them one final gentle squeeze with paper towels.
Don’t skip the stovetop cooking. Some recipes try to save time by dumping frozen peaches directly into the baking dish with the topping. This creates a watery, soupy filling because the peaches haven’t had a chance to release and concentrate their juices. The 10-minute stovetop step is non-negotiable for proper texture.
Use the cornstarch confidently. It won’t make the filling taste starchy—it’ll simply transform thin juice into thick syrup while keeping the peach flavor pure and bright. A tablespoon is the right amount. Less than that won’t thicken adequately, and more than that starts to create a gummy texture.
Watch for bubbling at the edges as your timer guide, not just the timer itself. Every oven is different. Some run hot, some run cold. When you see peach filling bubbling around the edges of the topping, you’re very close to done. If your timer goes off and you don’t see bubbling yet, give it a few more minutes. If you see bubbling at 35 minutes, it’s probably done even if the timer says you have 5 minutes left.
Don’t overmix the topping batter. The temptation is to stir it until it’s perfectly smooth, but that’s exactly the wrong instinct. Overmixing develops gluten and makes the topping tough and dense. Lumpy is good. Lumpy becomes tender and crumbly. Smooth becomes tough and chewy.
The topping will sink slightly into the filling. This is normal and correct. The peaches release steam, that steam rises, and the topping settles down slightly into the juices. Some of it will disappear under the filling, and that’s part of what creates the cake-like crumb that absorbs all those delicious peach juices.
Variations and Creative Adaptations
The beauty of this recipe is how easily it adapts to your preferences and what you have on hand.
Add extra spice: If you love warm baking spice flavors, increase the cinnamon to ¾ teaspoon and add ⅛ teaspoon ground ginger or a pinch of ground cloves. These aromatics deepen the peach flavor and add complexity.
Use fresh peaches: If you have access to truly ripe, high-quality fresh peaches, use 4 to 5 cups of sliced fresh peaches (about 5-6 medium peaches). Peel them using the hot water blanching method described earlier, slice them, and cook them on the stovetop exactly as you would frozen peaches. Fresh peaches might release slightly less juice, so you may need to add 1 tablespoon of water when cooking them to ensure adequate liquid develops. Otherwise, the method is identical.
Substitute brown sugar for white sugar: Use ⅔ cup brown sugar and skip the white sugar entirely. The cobbler will taste deeper and richer, with molasses notes that pair beautifully with peaches. The filling will be slightly darker in color, which is purely aesthetic and doesn’t change the flavor profile.
Add fresh lemon zest: In addition to the lemon juice, add ¼ to ½ teaspoon of finely grated lemon zest to the filling. This adds a bright, citrusy top note that elevates the whole dessert and prevents it from tasting one-note sweet.
Mix in berries: Reduce the peaches to 24 ounces and add 8 ounces of fresh or frozen raspberries, blackberries, or blueberries to the filling. This creates a beautiful mixed-fruit cobbler with more complex flavor. Blueberries especially are stunning with peaches.
Make it in a larger pan: This recipe easily doubles. Use 64 ounces (4 pounds) of frozen peaches, double all filling ingredients, and double all topping ingredients. Bake it in a 9-by-13-inch baking dish at the same temperature for 45 to 50 minutes. It serves 12 to 16 people and makes a stunning centerpiece for a potluck or summer gathering.
Add vanilla pudding mix for extra richness: Whisk 1 tablespoon of instant vanilla pudding mix into the dry ingredients for the topping. This adds moisture and creates a slightly richer, more custardy crumb.
How to Know When Your Cobbler Is Perfectly Done
This is important because the difference between perfectly baked and slightly overbaked is relatively small, but it dramatically affects the eating experience.
Visually, look for these signs: The topping should be deep golden brown—not pale, not dark brown, but a beautiful rich gold. The filling should be bubbling visibly around the edges, with peach juice oozing around the gaps in the topping. A few small bubbles might even appear in the center if you look closely.
The touch test: Gently press the center of the topping with your fingertip. It should feel firm and spring back slightly, like a baked cake would. If it still feels soft and doughy, bake for another 3 to 5 minutes. If it feels hard and dense, you’ve overbaked slightly (though it’ll still taste good).
The toothpick test: Insert a toothpick into the thickest part of the topping, not through the filling but into the actual cobbler crust part. It should come out clean or with just a few moist crumbs clinging to it. If it comes out with wet batter, the topping isn’t done. If it comes out completely clean and dry, you’re likely slightly overbaked, but it’s not the end of the world.
The smell test: When it’s truly done, your kitchen will smell absolutely incredible—warm peaches, cinnamon, caramelized brown sugar, buttery baked goods all mingling together. That’s your nose telling you it’s time.
Storage, Make-Ahead, and Reheating Instructions
Serving fresh from the oven: Peach cobbler is absolutely best served warm from the oven, which is 10 to 30 minutes after baking. The topping is still slightly warm and tender, the filling is still bubbling gently underneath, and the contrast of temperature and texture is at its peak.
Cooling to room temperature: If you’re not serving immediately, let the cobbler cool on a wire rack or trivet for at least an hour before cutting. It will firm up and slice much more cleanly once completely cool. Room-temperature cobbler is still delicious, especially with cold ice cream on top.
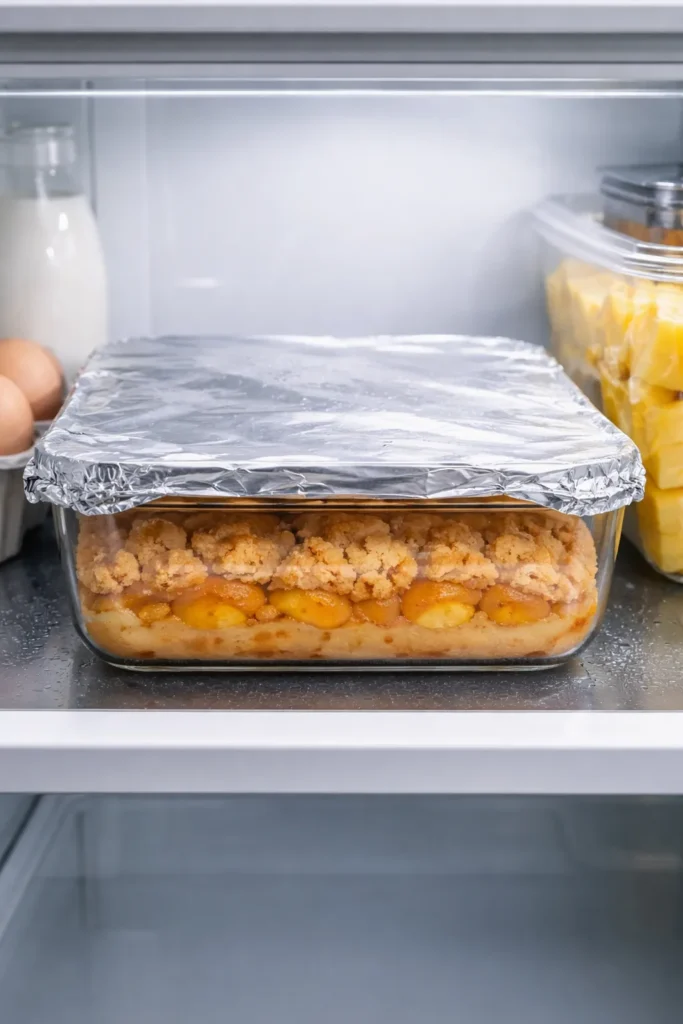
Refrigerator storage: Cover the baking dish tightly with plastic wrap or transfer cooled cobbler to an airtight container. It keeps beautifully in the refrigerator for 3 to 5 days. The topping will gradually soften and absorb some of the peach juices—some people think this creates an even better texture as flavors meld. Others prefer it fresh. Either way, it doesn’t go bad or turn unpleasant; it just changes texture slightly.
Reheating: For best results, reheat in a 325°F oven for 12 to 15 minutes, covered loosely with foil to prevent over-browning. The cobbler will warm through and the topping will regain some of its crispy texture. You can also microwave individual servings for 30 to 45 seconds to take the chill off, though this doesn’t restore crispiness to the topping. The microwave is convenient for a quick weeknight reheating, but the oven is worth the extra time if you can swing it.
Freezer storage: Cool the cobbler completely, cover it tightly with plastic wrap and then aluminum foil (the dual layer prevents freezer burn), and freeze for up to 3 months. Thaw overnight in the refrigerator, then reheat in a 325°F oven covered with foil for 15 to 20 minutes, until warmed through.
Make-ahead assembly: You can assemble the entire cobbler—peaches in the dish, topping dropped over them—up to 12 hours in advance. Cover it tightly with plastic wrap and refrigerate. When you’re ready to serve, let it sit on the counter for about 30 minutes to bring it to room temperature (this prevents the topping from being dry and the filling from being cold and thick when it goes into the oven), then bake it exactly as directed. The texture might be slightly more cake-like since the filling will have time to release extra liquid, but it will still be delicious.
Pairing and Serving Suggestions
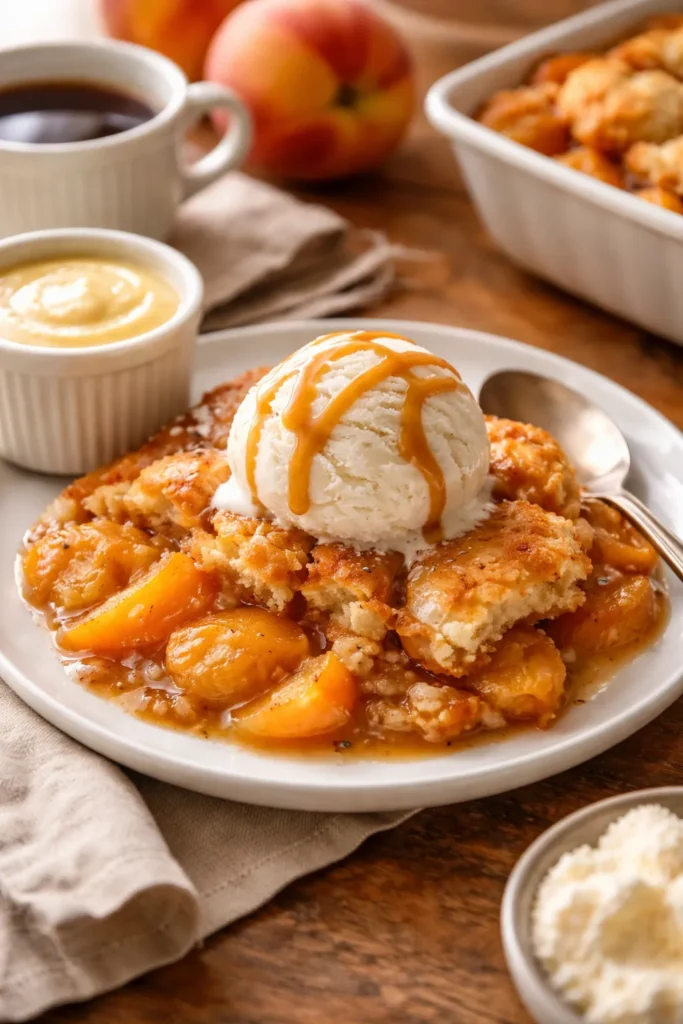
With vanilla ice cream: This is the gold standard. The cold, smooth creaminess of vanilla ice cream melting into warm peach cobbler is perfect balance. Specifically, look for real vanilla ice cream with visible vanilla bean flecks—the difference between that and imitation vanilla is noticeable.
With whipped cream: Whip heavy cream with a tablespoon of powdered sugar and a splash of vanilla extract until soft peaks form. The lightness of whipped cream provides a different texture contrast than ice cream, and it’s wonderful if you want something less heavy.
With custard or vanilla sauce: A warm, pourable vanilla custard or anglaise sauce is indulgent and sophisticated. Pour it warm over the cobbler and let it mingle with the peach juices.
Standalone: Peach cobbler is genuinely delicious on its own, with no accompaniment. The filling and topping complement each other perfectly.
With coffee or tea: Peach cobbler pairs beautifully with strong black coffee or an afternoon tea. The warmth and slight bitterness of the coffee or the floral notes of tea balance the sweetness of the cobbler.
For a crowd: This cobbler is a spectacular centerpiece dessert for summer gatherings, potlucks, and family dinners. It serves a crowd, looks rustic and welcoming, and tastes like comfort. Bring it in the baking dish, set it on a trivet, and let people scoop their own portions.
Frequently Asked Questions
Can I use fresh peaches instead of frozen?
Absolutely. Use 4 to 5 cups of sliced fresh peaches (about 5-6 medium peaches). Peel them by blanching in hot water for 30 seconds and shocking in ice water, then slice and pit them. Follow the exact same stovetop cooking instructions as you would for frozen peaches. Fresh peaches might release slightly less juice, so add 1 tablespoon of water if the mixture seems dry. The rest of the recipe stays identical.
My cobbler came out watery. What went wrong?
The most common reason is insufficient drainage of the frozen peaches. They release moisture as they thaw, and if that liquid isn’t removed, it ends up in your filling. Drain them thoroughly both after thawing and just before adding them to the skillet. The second reason could be skipping the stovetop cooking step, which concentrates the juices. Always cook the peaches on the stove before baking.
Can I use a different type of sugar for the filling?
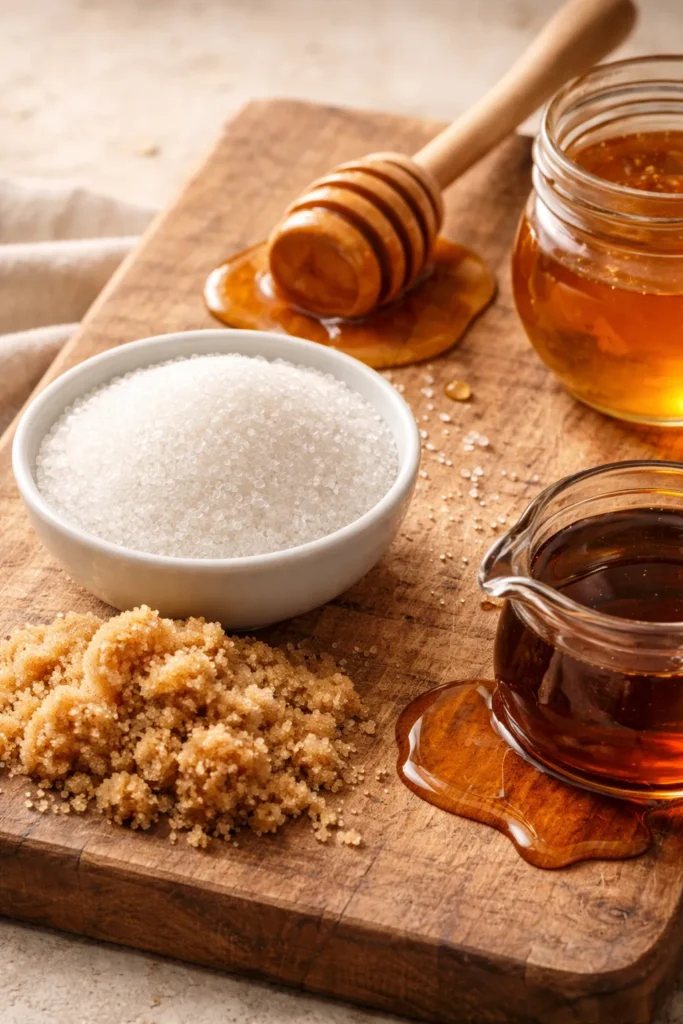
Yes, though results vary slightly. Honey, maple syrup, or agave nectar can replace some of the sugar, but use slightly less since they’re sweeter than granulated sugar. Brown sugar is wonderful if you want deeper molasses notes. Muscovado sugar (a type of brown sugar with extra molasses) creates an incredibly rich flavor. Avoid artificial sweeteners, as they don’t caramelize or develop flavor the same way real sugar does.
Is the cinnamon and nutmeg essential, or can I skip the spices?
You can absolutely make peach cobbler without cinnamon and nutmeg—the peach flavor stands on its own. However, the spices aren’t there to mask anything; they enhance the natural peach flavor and add warmth and complexity. If you’re not a spice person, reduce them to ¼ teaspoon each instead of skipping entirely. If you prefer a completely plain peach cobbler, just omit them.
What’s the difference between this topping and a biscuit topping?
Biscuit toppings typically contain butter that’s cut into the flour (creating a laminated, flaky texture) and less liquid, yielding a tender but slightly crumbly topping. This cobbler topping has melted butter mixed directly into the batter and uses more milk, creating a cake-like crumb that’s more tender and uniform. Both are correct for cobblers; this version is just simpler for home bakers because there’s no need to cut cold butter into flour.
Can I make this cobbler on a grill or in a Dutch oven over a campfire?
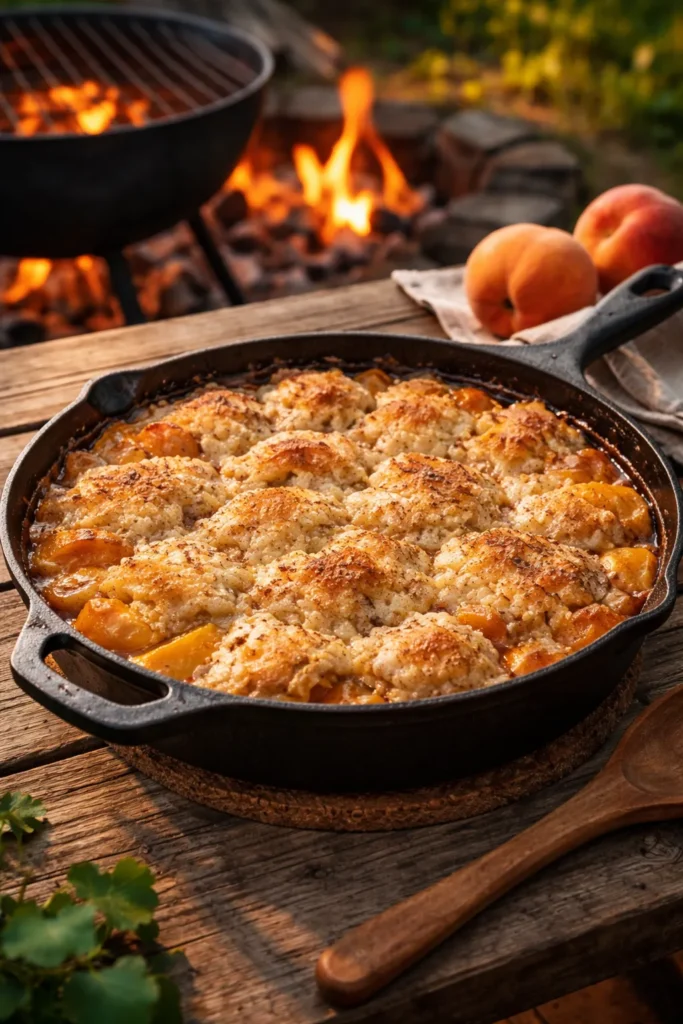
Yes, though you’ll need to adjust the heat source. For a grill, create an indirect heat zone at 375°F and place your cobbler on the cooler side. Use a grill thermometer to monitor temperature. For a Dutch oven over a campfire, this becomes more challenging and requires experience with campfire cooking. It’s absolutely possible, but grill is much more reliable for home bakers.
Final Thoughts
The magic of this five-step peach cobbler isn’t really about the number of steps—it’s about understanding what makes each step matter and why you’re doing it. You’re cooking the peaches to concentrate their flavor and create proper texture. You’re keeping the topping batter simple so it stays tender. You’re baking at the right temperature to achieve golden-brown perfection.
What you end up with is a dessert that tastes like summer, feels like home, and looks impressive enough to serve guests without being complicated enough to stress about. Frozen peaches make it possible to make this literally any day of the year, and honestly, they deliver more consistent results than fresh peaches because they’re always at peak ripeness.
The best part? Once you’ve made this recipe once and understand how it works, you can adapt it endlessly. Different spices, different fruits, different serving dishes, different pan sizes. It’s a foundation that supports creativity. Start here, master the basics, and then make it your own.
Pull that golden cobbler from the oven, let it rest for 10 minutes, scoop it into bowls, top it with ice cream, and taste what happens when simplicity meets delicious results. That’s peach cobbler done right.