There’s a particular kind of satisfaction that only cheese can deliver — that slow, dramatic pull as you lift a slice of lasagna from the pan, or the way a bubbling crust of mozzarella on a casserole catches the light before it collapses into something soft and irresistible. Cheese transforms dinner from ordinary to extraordinary, and it does so without asking much of you in return.
What makes cheesy dinners so universally beloved isn’t just the flavor. It’s the texture, the warmth, the way melted cheese acts as a kind of edible glue that holds everything together — both on the plate and in the memory. A bubbling mac and cheese or a golden-topped chicken parm doesn’t just feed a family; it gathers them around the table and keeps them there.
The eight recipes below represent the best of what cheese can do in a dinner context. Each one leans into a different style — baked, sauced, stuffed, smothered — and each one delivers that signature melt and pull that makes people reach for seconds before they’ve finished their first serving. Whether you’re cooking for a weeknight crowd or a leisurely weekend gathering, these are the dinners worth making.
Table of Contents
- Why Melted Cheese Behaves the Way It Does
- The Fat Content Factor
- Why Some Cheeses Don’t Melt
- Choosing the Right Cheese for Each Dinner Style
- 1. Classic Baked Ziti with Mozzarella and Ricotta
- The Cheese Layer Strategy
- What Makes It Better
- 2. Creamy Stovetop Mac and Cheese with Sharp Cheddar
- Getting the Béchamel Right
- Making It a Full Dinner
- 3. Chicken Parmesan with Homemade Tomato Sauce
- Breading That Stays Crispy
- The Two-Cheese Finish
- 4. Beef and Ricotta Lasagna with Béchamel
- Building the Meat Sauce
- Assembly Order That Matters
- 5. Three-Cheese Stuffed Shells with Spinach
- Getting the Filling Right
- The Sauce and Top Layer
- 6. French Onion Soup with Gruyère Crouton Lid
- Deglazing and Building Depth
- Why Gruyère Specifically
- 7. Cheesy Chicken and Broccoli Casserole
- The Sauce That Makes It
- The Top Crust
- 8. Skillet Cheesy Beef and Rice with Pepper Jack
- Cooking the Rice Right in the Skillet
- Serving and Finishing
- Tips for Maximizing the Cheese Pull in Any Dinner
- Final Thoughts
Why Melted Cheese Behaves the Way It Does
Before getting into the recipes themselves, it helps to understand why cheese melts the way it does — because that knowledge makes you a genuinely better cook when working with it.
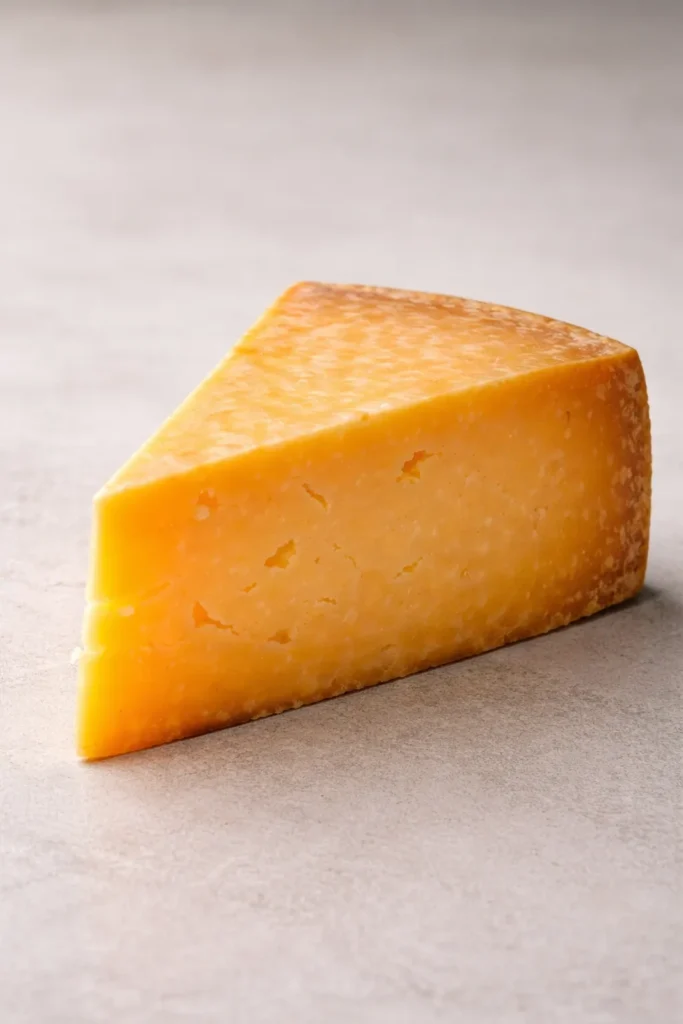
Cheese is a protein-and-fat matrix held together by a calcium network. When heat is applied, the fat softens first, then the protein structure loosens, and the cheese transitions from solid to that glorious molten state. The key variable is moisture content. High-moisture cheeses like fresh mozzarella melt into pools of creamy softness. Aged cheeses like Parmesan or Gruyère, which have lost most of their moisture during the aging process, melt more slowly and contribute concentrated flavor rather than runny stretch.
Acid also plays a role. A splash of white wine in a fondue or a squeeze of lemon in a béchamel helps break down the protein network so the cheese melts smoothly instead of seizing into greasy clumps. This is why the best mac and cheese sauces often include a small amount of cream cheese or a touch of dry mustard — both act as emulsifiers that keep the sauce cohesive.
The Fat Content Factor
Fat percentage directly influences melt quality. Part-skim mozzarella melts with a slightly rubbery texture compared to whole-milk mozzarella, which goes silkier and more stretch-forward. For baked dishes where you want maximum pull, full-fat is always the better choice.
Why Some Cheeses Don’t Melt
Fresh cheeses like ricotta, cottage cheese, and queso fresco don’t melt in the same way. Their protein structure has been set differently during production, which means they soften and become creamy but won’t turn into a flowing sauce. This makes them ideal as fillings inside stuffed shells or lasagna, where you want distinct, creamy pockets rather than a uniform cheese layer.
Choosing the Right Cheese for Each Dinner Style
Not every cheese works in every application, and swapping one for another without understanding why can lead to disappointing results.
Mozzarella is the workhorse of cheesy dinners — mild enough to complement without overpowering, stretchy enough to deliver that iconic pull. It performs best in baked dishes like ziti, lasagna, and pizza-adjacent recipes. Fresh mozzarella adds richness; low-moisture shredded mozzarella builds better structure in casseroles.
Cheddar brings sharpness and depth to stovetop sauces and casseroles. The sharper the cheddar, the more flavor you get per gram, which means you can use a smaller quantity without sacrificing taste. It pairs well with American cheese in mac and cheese sauces because cheddar provides the flavor while American provides the melt.
Gruyère is your best friend for anything French-inspired — gratins, French onion soup, croque monsieurs. It melts beautifully, has a nutty, slightly sweet flavor, and turns a magnificent golden-brown under the broiler.
Ricotta works as a filling, not a sauce. Parmesan finishes and seasons. Pepper Jack adds heat. Fontina provides a buttery, earthy melt that pairs well with vegetables and earthy proteins. Understanding the role of each cheese before you start cooking saves considerable frustration mid-recipe.
1. Classic Baked Ziti with Mozzarella and Ricotta
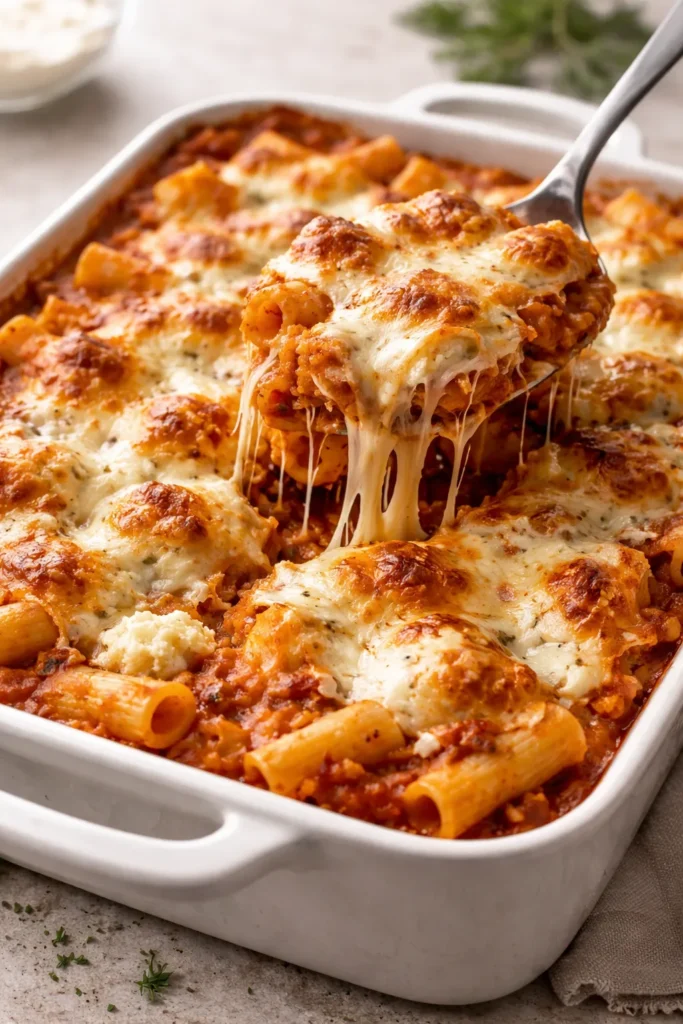
Baked ziti is the dish that makes people believe you spent the whole afternoon in the kitchen — even when you didn’t. It has that casserole-style depth and bubbling golden top that signals serious cooking, but the actual process is remarkably straightforward. A good baked ziti relies on three distinct textures: the firm pasta, the creamy ricotta pockets, and the melted mozzarella crust. Get all three right and you’ve got one of the most crowd-pleasing dinners in existence.
The key mistake most people make is overcooking the pasta before it goes into the oven. Since it will continue cooking during the bake, pull the ziti at least two minutes before it reaches al dente on the stovetop. Slightly underdone pasta going into the oven comes out perfectly cooked. Pasta that’s already fully cooked before baking comes out mushy.
The Cheese Layer Strategy
Don’t mix all the cheese into the sauce. Instead, drop spoonfuls of ricotta throughout the assembled dish so each serving gets distinct creamy pockets. Use whole-milk ricotta rather than part-skim — the texture is noticeably smoother and it doesn’t release as much water during baking, which keeps the dish from becoming soggy.
Layer half the ziti, dollop all the ricotta, add half the mozzarella, repeat with the remaining pasta and sauce, then finish with a generous blanket of shredded mozzarella and a sprinkle of Parmesan. Cover with foil for the first 25 minutes to trap steam and heat everything through, then uncover for the final 10-15 minutes to brown the top.
What Makes It Better
A tablespoon of fresh basil torn and scattered over the top immediately after coming out of the oven brightens the whole dish. The heat from the cheese releases the basil’s oils without cooking it into bitterness. A drizzle of good olive oil over the finished top adds richness that the sauce alone doesn’t provide.
2. Creamy Stovetop Mac and Cheese with Sharp Cheddar
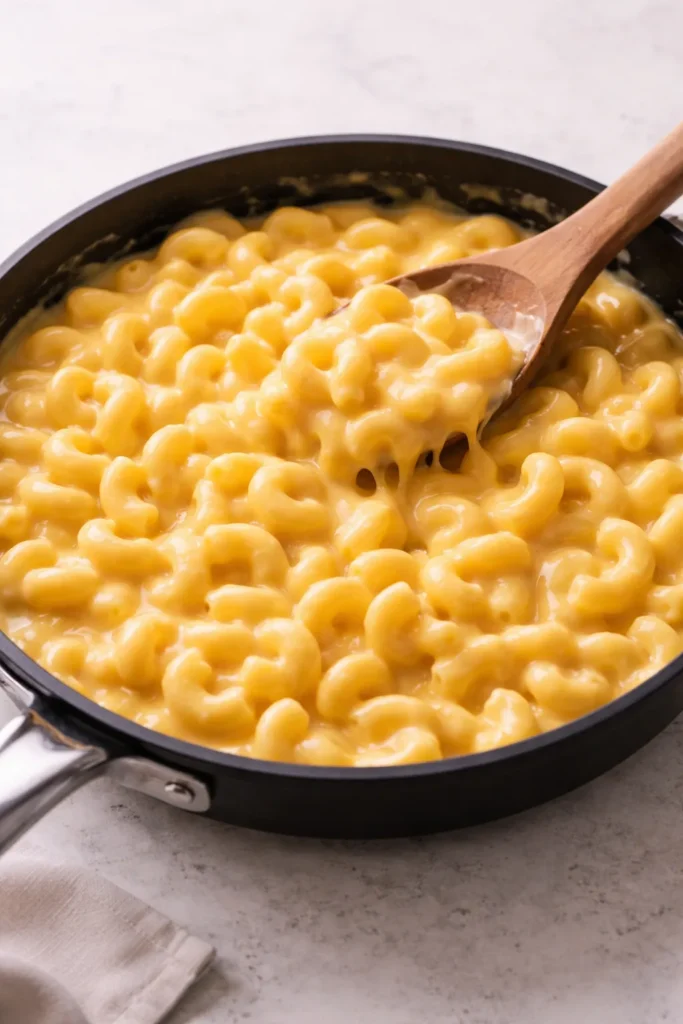
Stovetop mac and cheese gets a bad reputation from its boxed counterpart, but a from-scratch version made correctly is in an entirely different league. The sauce comes together in under 15 minutes and produces a result that’s velvety, sharp, and deeply satisfying in a way no powdered cheese packet can replicate.
The two-cheese approach used by serious home cooks — and confirmed by multiple test kitchen experiments from outlets like Serious Eats and Food Network’s development team — combines sharp cheddar with a small amount of American cheese. Cheddar contributes the bold, tangy flavor you want. American cheese, which contains emulsifying salts, prevents the sauce from breaking and gives it that signature smooth, glossy texture.
Getting the Béchamel Right
Start with a butter-flour roux cooked for 60-90 seconds over medium heat until it smells nutty and slightly toasted — this eliminates the raw flour taste. Whisk in whole milk gradually, keeping the heat at medium and stirring constantly until the sauce thickens enough to coat the back of a spoon. Remove from heat before adding the cheese so the residual warmth melts it gently without causing the proteins to seize.
Season with dry mustard powder (about half a teaspoon per pound of pasta) and a few drops of hot sauce. Both enhance the cheddar’s sharpness without making the dish noticeably spicy.
Making It a Full Dinner
Mac and cheese crosses into dinner territory with the right additions. Stir in crispy bacon, sautéed caramelized onions, or roasted broccoli florets just before serving. Top individual bowls with toasted breadcrumbs for textural contrast. A cast-iron skillet full of mac and cheese slid briefly under the broiler develops a golden crust that makes it feel like something worth sitting down for.
3. Chicken Parmesan with Homemade Tomato Sauce
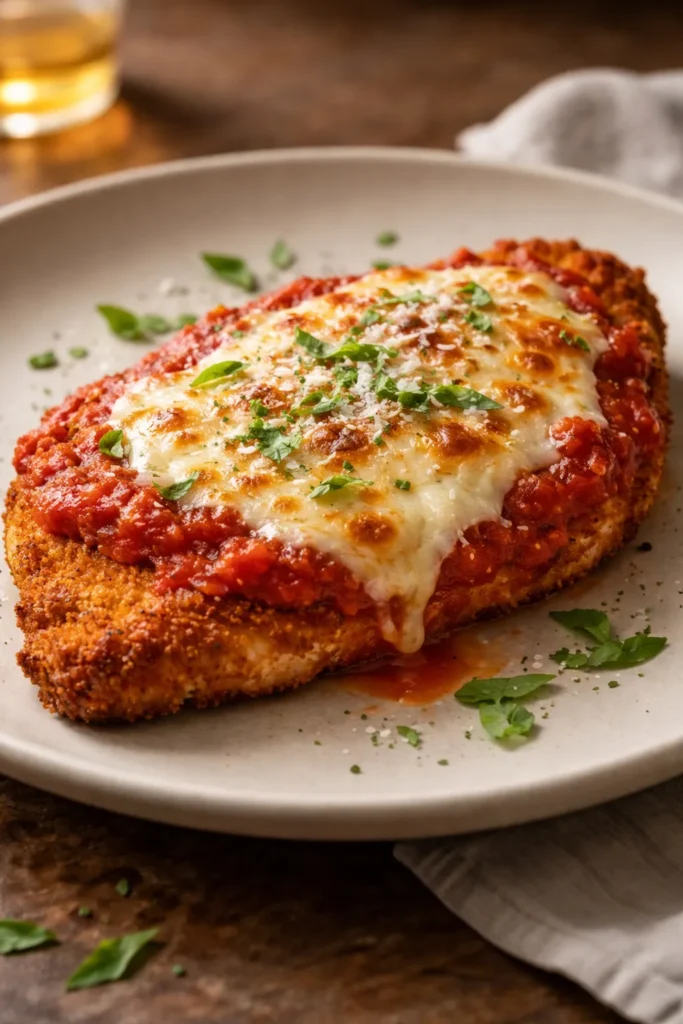
Chicken parm is one of those dishes that somehow manages to be simultaneously humble and impressive. The combination of crispy breaded chicken, rich tomato sauce, and a molten cap of mozzarella and Parmesan has made it a permanent fixture on restaurant menus and home dinner tables for good reason — it’s genuinely delicious from every angle.
The most common problem with homemade chicken parm is soggy breading. After the fried cutlet gets topped with sauce and cheese and goes back into the oven, the steam from the sauce can soften the crust you worked to achieve. The fix is simple: sauce only the center of the cutlet, leaving the outer edges dry so they stay crisp. Place the sauced, cheese-topped chicken on a wire rack set over a baking sheet rather than directly on a pan — this allows air to circulate underneath and keeps the bottom from steaming.
Breading That Stays Crispy
A buttermilk marinade (even 30 minutes makes a difference) before the flour-egg-breadcrumb dredge produces significantly more tender chicken. Use homemade breadcrumbs made from day-old bread processed in a food processor rather than store-bought panko for a finer, more cohesive coating that adheres better and fries more evenly.
Add a generous handful of finely grated Parmesan directly into the breadcrumbs. The Parmesan browns and crisps beautifully during frying, adding a savory depth to the coating itself that the chicken underneath can’t deliver alone.
The Two-Cheese Finish
Use both fresh mozzarella and low-moisture shredded mozzarella on top. The fresh mozzarella provides those gorgeous pools of creamy melt; the shredded mozzarella builds structure and stretch. A dusting of Parmesan over the top before the final broil creates a spotted golden crust that looks as good as it tastes.
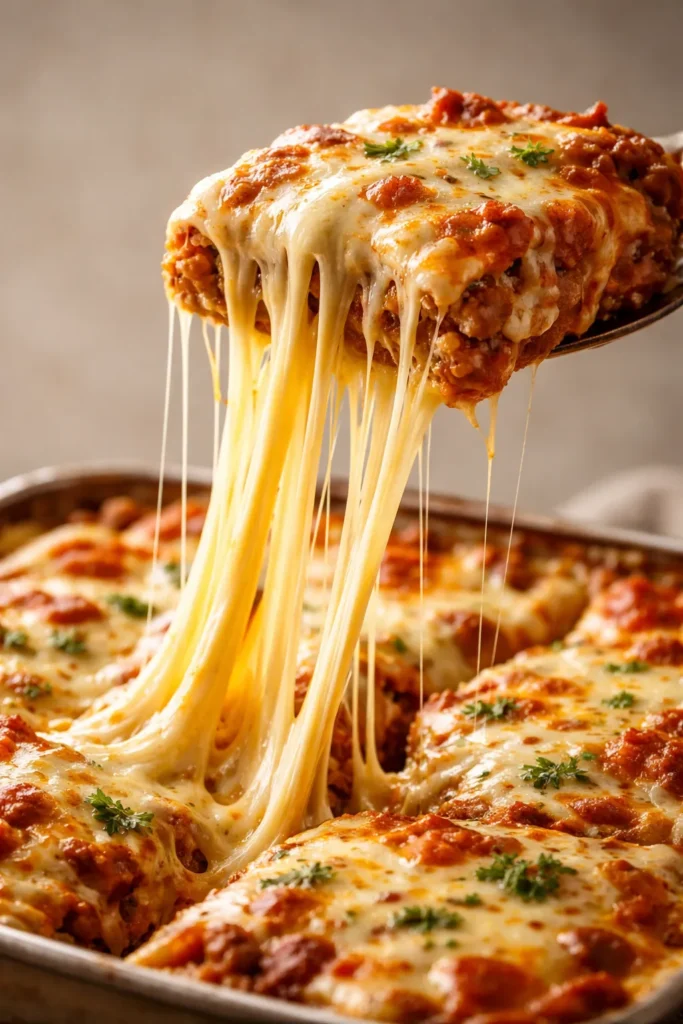
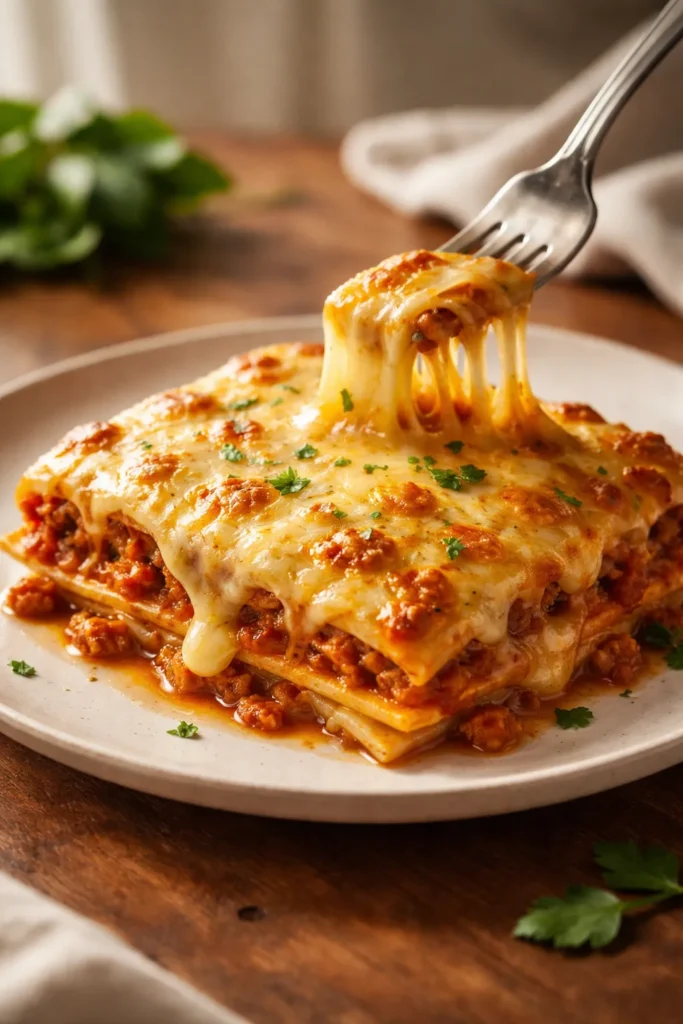
4. Beef and Ricotta Lasagna with Béchamel
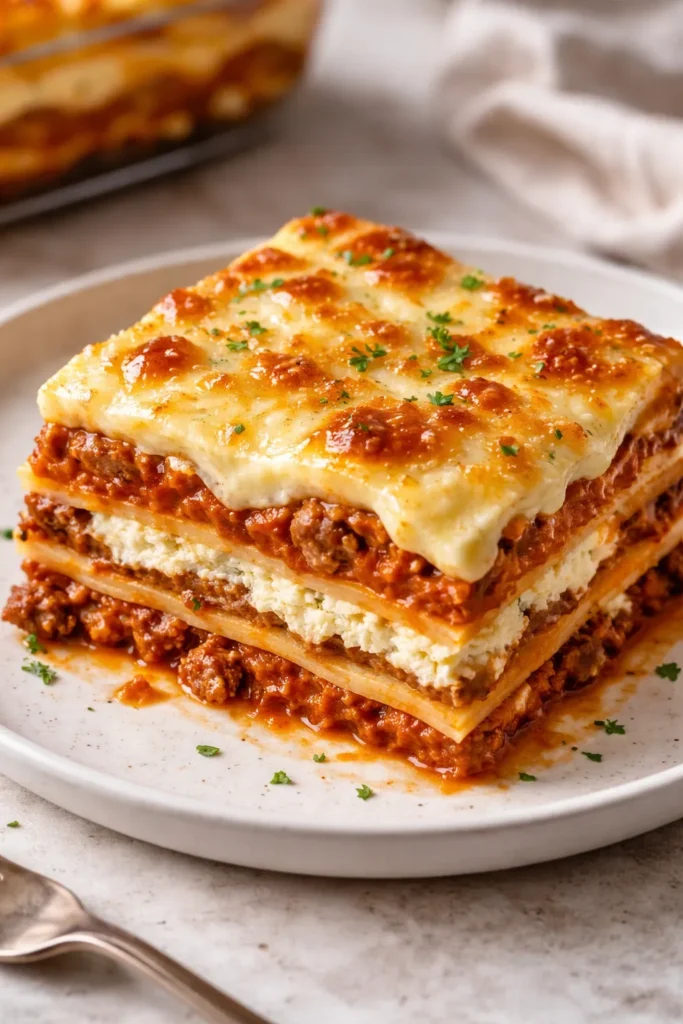
Lasagna is the project dinner — the one you make on a Sunday afternoon when you have time to layer, assemble, and let the whole thing come together slowly in the oven. The effort is front-loaded, which means that by the time it comes out golden and bubbling, all you have to do is cut it and serve it. Leftovers, if any survive, are widely considered to be even better the next day.
The debate between all-ricotta and béchamel-based lasagna is real and ongoing, but the answer most experienced cooks land on is: use both. A thin layer of béchamel between the pasta sheets creates a silkier, more cohesive structure. The ricotta-and-egg filling provides those distinct creamy pockets that make each bite interesting. Together, they build a lasagna with more depth than either element provides alone.
Building the Meat Sauce
Don’t rush the meat sauce. Brown the beef in batches so it actually develops color rather than steaming in its own juices. Add crushed tomatoes, a parmesan rind (if you have one — it dissolves into the sauce and adds an extraordinary savory depth), and let the whole thing simmer for at least 45 minutes. A meat sauce that has cooked down and thickened is dramatically better than one used immediately after combining.
Assembly Order That Matters
The order of layers affects the final result more than most recipes acknowledge. Start with a thin spread of meat sauce on the bottom of the pan to prevent sticking. Then: pasta, béchamel, meat sauce, ricotta, mozzarella. Repeat. The final layer should be pasta topped generously with meat sauce and mozzarella, with a finishing shower of Parmesan. That top layer of Parmesan browns and crisps while everything below stays moist — texture contrast built right into the structure.
5. Three-Cheese Stuffed Shells with Spinach
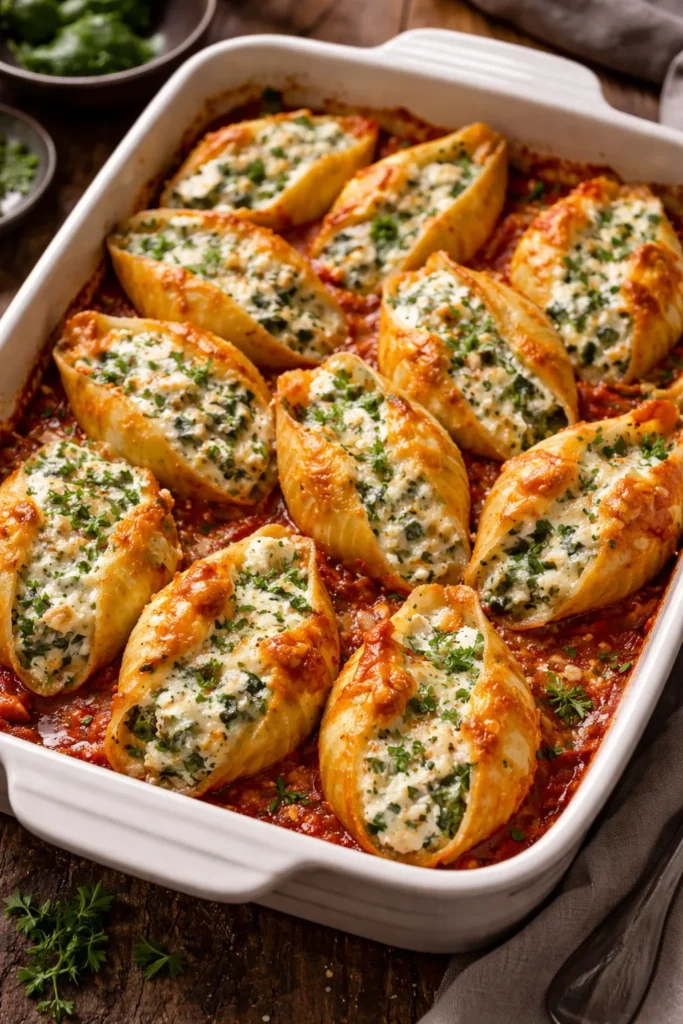
Jumbo pasta shells stuffed with a ricotta, mozzarella, and Parmesan filling represent one of the more underrated comfort dinners. They look involved — individual shells, each filled carefully and arranged in a baking dish — but the actual work is gentle and forgiving, and the finished dish has a rustic elegance that makes it work for guests and family dinners alike.
The filling benefits from spinach, which adds color, nutritional density, and a slight earthiness that balances the richness of the three cheeses. Drain the spinach aggressively — squeeze it in a clean kitchen towel until no more water comes out. Excess moisture from spinach is the single most common reason stuffed shells turn watery.
Getting the Filling Right
Combine whole-milk ricotta, shredded mozzarella, finely grated Parmesan, one whole egg (which binds the filling so it holds its shape during baking), the squeezed spinach, a pinch of nutmeg, and salt. Mix until uniform. The nutmeg is not optional — it’s a traditional addition to ricotta-based fillings that amplifies the cheese’s creaminess in a subtle, hard-to-identify way that makes tasters wonder what you added.
Use a piping bag or a zip-lock bag with the corner cut off to fill the shells cleanly. It’s faster and neater than spooning, and it reduces the number of shells that crack during filling.
The Sauce and Top Layer
Spread a generous layer of tomato sauce in the baking dish before arranging the shells. This prevents sticking and ensures every shell is surrounded by sauce during baking, which keeps them moist. Cover the arranged shells with more sauce, then a heavy layer of shredded mozzarella. The shells on the edges will bubble and brown more quickly than the center ones, which is exactly what you want for textural variety.
6. French Onion Soup with Gruyère Crouton Lid
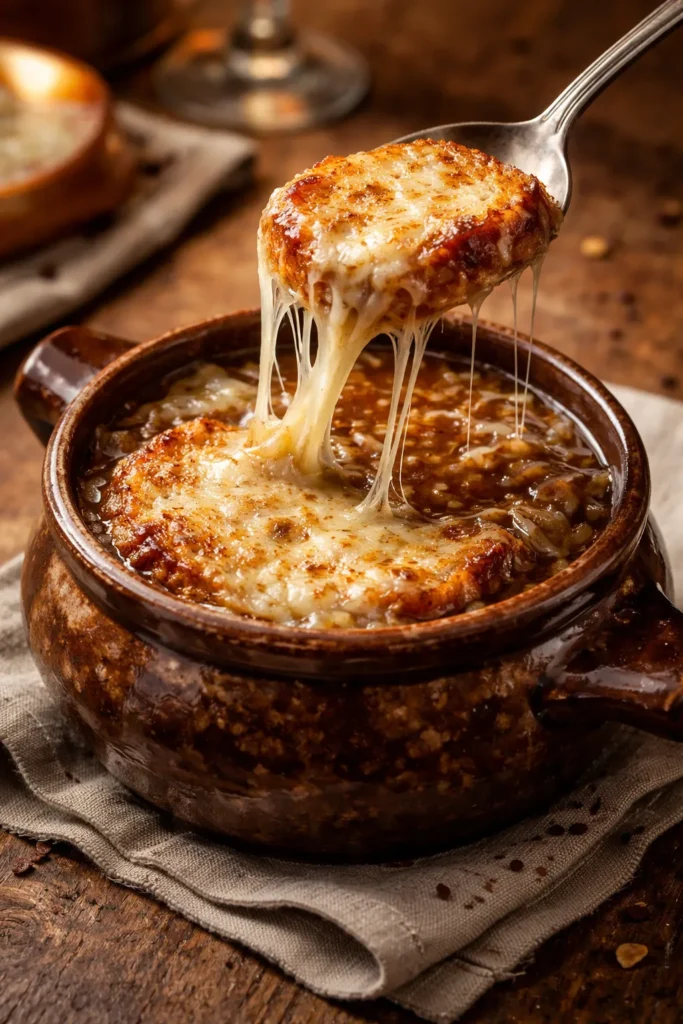
French onion soup occupies a unique position in the cheesy dinner category — it’s technically a soup, but the thick, broiled Gruyère crust that seals each bowl makes it something more. When you break through that molten cheese lid with a spoon and it stretches and pulls before finally separating, you understand exactly why this dish has survived centuries of changing food fashions.
The onions are the soul of this dish, and they cannot be rushed. Caramelizing onions properly takes 45-60 minutes over medium-low heat, stirring occasionally, until they transform from sharp and pungent to silky, deeply brown, and sweet. The color you’re looking for is a deep amber that borders on mahogany. Anything lighter lacks the complexity that makes this soup what it is.
Deglazing and Building Depth
Once the onions are properly caramelized, deglaze the pan with dry white wine or dry sherry — this lifts the fond (the dark, flavorful bits stuck to the pan) and adds brightness. Follow with beef broth and a few sprigs of fresh thyme. A bay leaf. Let it simmer together for 20 minutes so the flavors marry.
Ladle the hot soup into oven-safe bowls. Place a slice of toasted baguette on top of each bowl — it should fit snugly so it doesn’t sink. Pile Gruyère generously on top of the bread, letting some fall onto the edges of the bowl. Under a hot broiler for 3-4 minutes, the cheese melts, bubbles, and turns spotted golden-brown at the edges.
Why Gruyère Specifically
Gruyère is the cheese for this dish because it melts exceptionally well, has the structural integrity to form a cohesive crust (rather than breaking into oily puddles), and its nutty, slightly sweet flavor is the perfect counterpart to the savory, deeply caramelized onion base. Emmentaler can supplement it for a slightly milder result, but don’t substitute cheddar — it breaks differently under the broiler and lacks the required flavor profile.
7. Cheesy Chicken and Broccoli Casserole
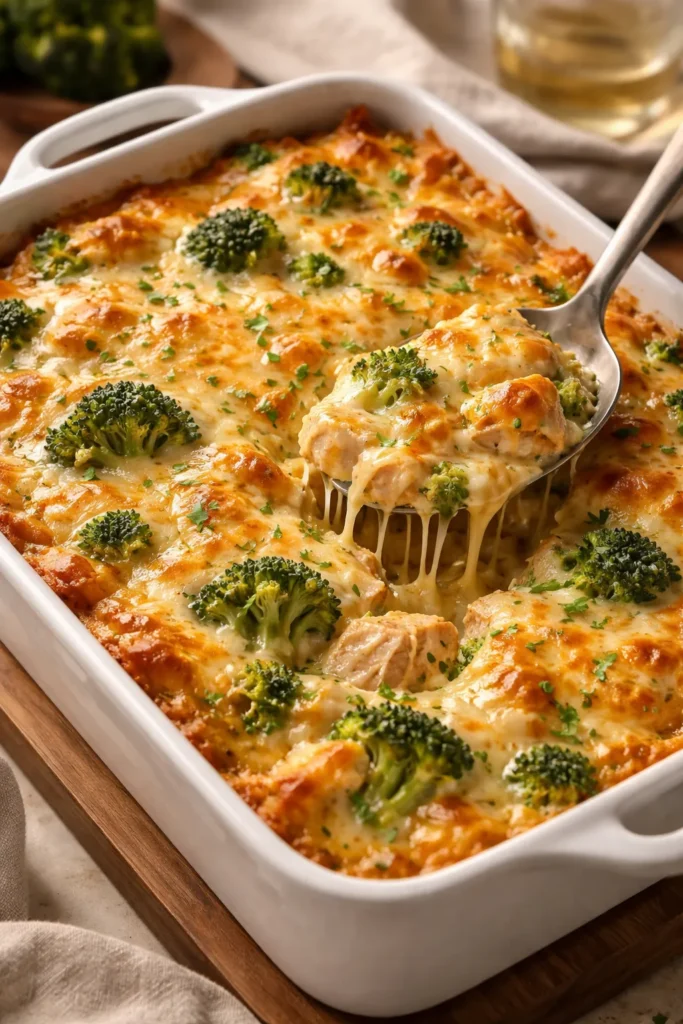
The casserole format exists specifically to make cheesy dinners accessible on a weeknight, and a chicken-broccoli version done properly is far more interesting than its reputation might suggest. What tends to go wrong with casseroles is either a sauce that’s too thin and watery, or a cheese topping that’s gummy rather than golden. Both are entirely avoidable.
Use rotisserie chicken or poached chicken thighs rather than breast meat — thighs stay juicier and more flavorful under the prolonged heat of casserole cooking. Cut broccoli into small florets and blanch them briefly before assembling; raw broccoli needs more oven time than the rest of the casserole can provide without overcooking everything else.
The Sauce That Makes It
Resist the temptation to use canned cream of mushroom soup as the base — it produces a dish that tastes exactly like canned cream of mushroom soup. A simple cheese sauce made from butter, flour, milk, and sharp cheddar takes only 10 minutes and produces something that actually tastes like food. Season it well with garlic powder, onion powder, and a generous pinch of smoked paprika.
The secret move that separates a great chicken-broccoli casserole from a mediocre one: mix some of the shredded cheese directly into the casserole filling, then reserve the rest for the top. This distributes cheese throughout every layer rather than concentrating it only on the surface.
The Top Crust
Combine panko breadcrumbs with melted butter and a handful of Parmesan, then spread in an even layer over the top of the casserole before baking. This creates a crispy, savory crust that contrasts with the creamy filling beneath — the same textural principle that makes good mac and cheese so satisfying. Bake uncovered at 375°F for 25-30 minutes until the topping is golden and the edges are visibly bubbling.
8. Skillet Cheesy Beef and Rice with Pepper Jack
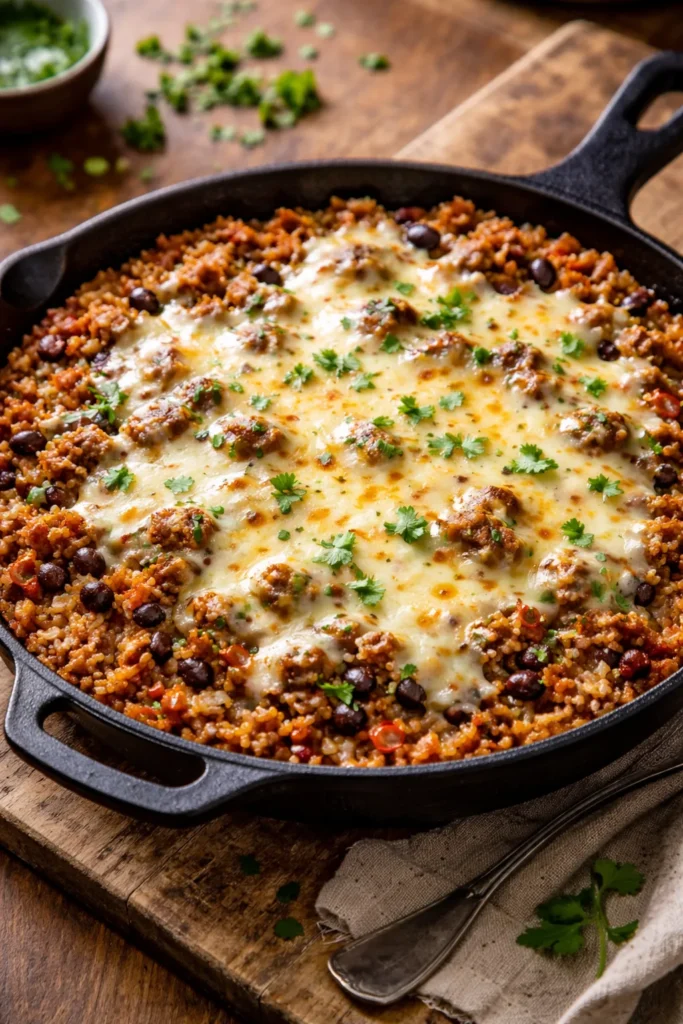
A skillet dinner that comes together in one pan and finishes with a layer of melted pepper jack cheese is the kind of weeknight meal that gets repeated on a tight rotation — and for good reason. Ground beef, long-grain rice cooked directly in seasoned broth, black beans, and a generous handful of shredded cheese make this a genuinely satisfying dinner that requires minimal cleanup.
Brown the ground beef with diced onion and garlic until the beef is fully cooked and showing some brown color on the edges. Drain excess fat if using higher-fat ground beef — leaving too much grease prevents the rice from cooking properly and makes the finished dish slick rather than saucy. Season generously with cumin, chili powder, and smoked paprika before adding the rice.
Cooking the Rice Right in the Skillet
Add chicken or beef broth — roughly 2 cups for 1 cup of raw rice — and bring to a simmer before covering and reducing the heat to medium-low. The rice absorbs the seasoned broth and the flavor from the beef and aromatics as it cooks, which is fundamentally different from cooking rice separately. It becomes part of the dish rather than a neutral side element alongside it.
After about 18-20 minutes, when the rice is tender and the liquid is absorbed, remove the lid. This is the moment for the cheese. Scatter shredded pepper jack generously over the entire surface of the skillet. Return the lid for 3-4 minutes off the heat, letting the residual steam melt the cheese into a cohesive, slightly stretchy blanket over the rice and beef.
Serving and Finishing
Serve straight from the skillet, topped with sour cream, diced fresh tomatoes, sliced scallions, and a few pickled jalapeño rings. The cool toppings against the hot, melted cheese create a temperature and texture contrast that makes the whole thing feel more complete than a skillet dinner has any right to. It’s the kind of dish that surprises people.
Tips for Maximizing the Cheese Pull in Any Dinner
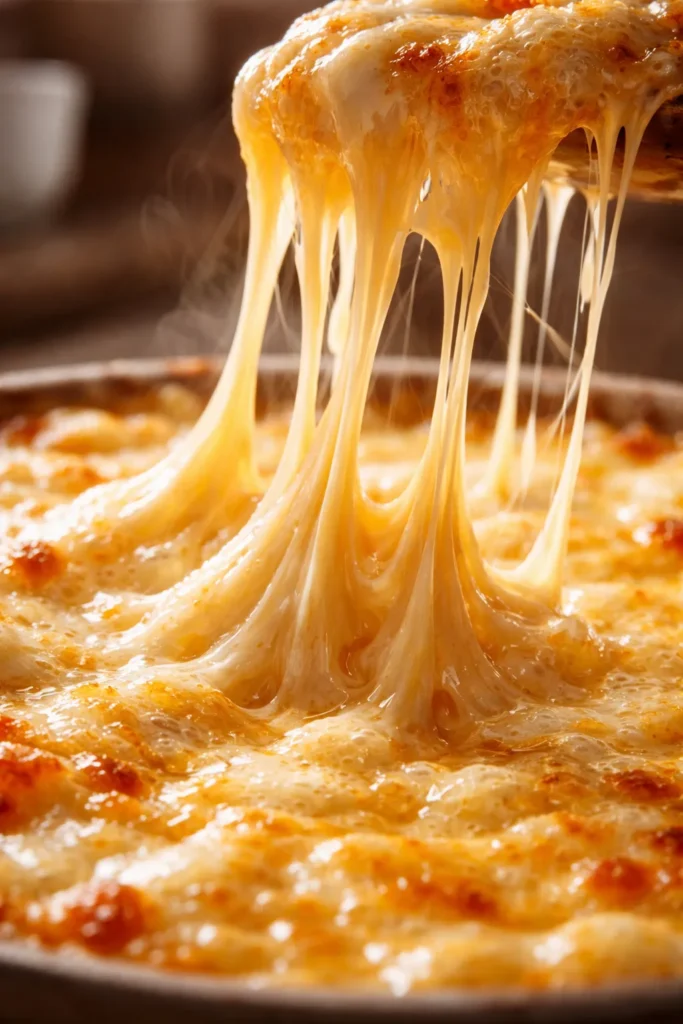
The cheese pull — that dramatic stretch when you lift a slice of lasagna or pull apart a stuffed shell — isn’t an accident. It’s the result of specific choices made throughout the cooking process.
Temperature of the cheese matters. Cold cheese melts unevenly and tends to produce a rubbery result. Let shredded cheese come to room temperature for 15-20 minutes before using it in a dish that requires a beautiful melt.
Don’t skimp on quantity. Cheese cooks down more than you expect. What looks like too much before it goes in the oven is often exactly right when it comes out. The Food Network Kitchen team, in developing their cheesiest recipe collection, consistently noted that the most common error home cooks make is under-cheesing baked dishes because it looks excessive before baking.
The broiler is your friend. The difference between fully melted cheese and beautifully browned, slightly blistered cheese is two to three minutes under the broiler. Keep a close eye — cheese goes from perfect to burnt in under a minute under high heat — but don’t skip this step. The browning creates new flavor compounds through the Maillard reaction that flat, just-melted cheese simply doesn’t have.
Let it rest. Just like meat, baked cheesy dishes benefit from a 5-10 minute rest after coming out of the oven. The internal temperature continues to rise slightly, the cheese sets enough to hold its shape when cut, and the whole dish is easier to serve without falling apart.
Final Thoughts
Cheese is one of the most forgiving and rewarding ingredients in a home cook’s kitchen. It responds well to heat, it covers a multitude of cooking imperfections, and it has a near-universal appeal that makes it the safest bet when feeding a mixed crowd.
The eight dinners covered here span a wide range of styles and effort levels — from the quick weeknight skillet to the weekend lasagna project — but they share a common thread: cheese is not a garnish in any of them. It’s a structural ingredient, a sauce component, a filling, a crust. It earns its place in every dish.
Start with whichever recipe matches your current energy level, and pay attention to the cheese-specific details: the right variety, the right temperature, the right moment to add it. Those small choices make the difference between cheese that’s merely present and cheese that’s the undeniable star of the plate. Once you cook a few of these well, you’ll start applying those instincts to everything else you make — and your dinners will be better for it.