There’s a moment at almost every party where someone walks in carrying a warm dish wrapped in a kitchen towel, sets it on the table, and within ten minutes the entire room has quietly migrated toward it. That dish is almost always a dip. No other appetizer category pulls people together quite so effortlessly — there’s something deeply satisfying about sharing a bowl, dunking a chip, and eating something that required zero formal table manners.
Dips are also the great equalizer of party food. They work for a Super Bowl spread just as well as they do for a casual weeknight snack. They’re forgiving to make, easy to customize, and most of them improve by sitting in the fridge overnight. A bowl of something warm and cheesy or cool and herb-packed signals hospitality without the stress of a three-course meal.
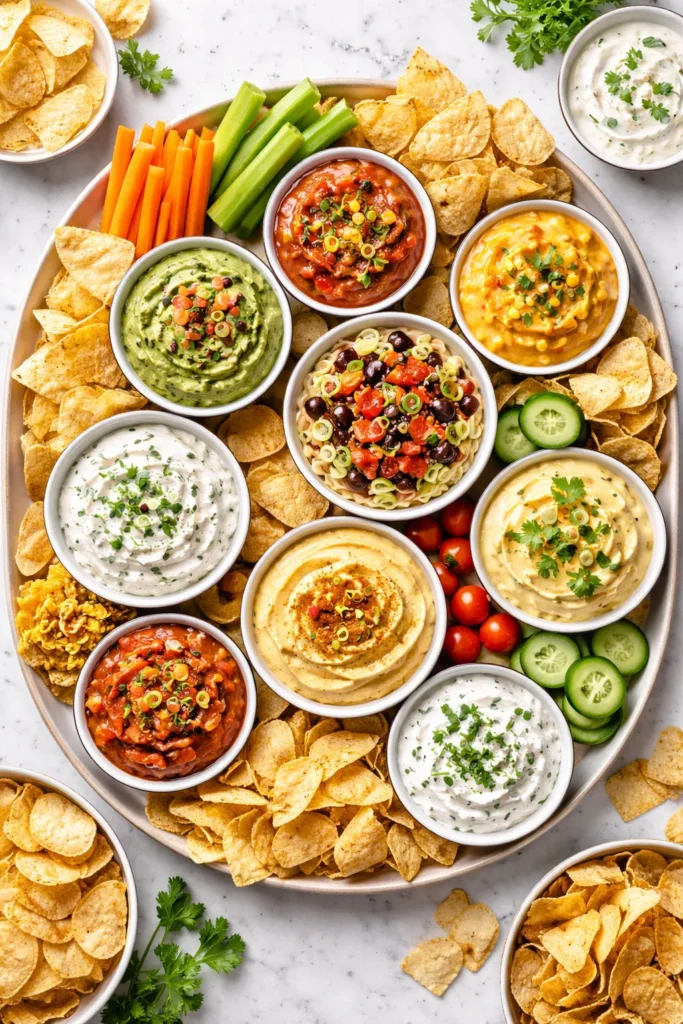
What separates a forgettable dip from one people are still talking about on the drive home? Balance, texture, and a little bit of technique. A good dip has to have contrast — creamy against tangy, spicy against cool, salty against something bright. The eight recipes below cover every mood and occasion, from baked hot dips that bubble straight out of the oven to effortless cold dips that come together in five minutes flat. Every single one has been built for maximum flavor with minimal fuss.
Table of Contents
- 1. Creamy Spinach Artichoke Dip
- Ingredients
- Instructions
- Tips, Variations, and Storage
- 2. Buffalo Chicken Dip
- Ingredients
- Instructions
- Tips, Variations, and Storage
- 3. French Onion Dip From Scratch
- Ingredients
- Instructions
- 4. The Best Guacamole
- Ingredients
- Instructions
- Tips, Variations, and Storage
- 5. Jalapeño Popper Dip
- Ingredients
- Instructions
- 6. Whipped Feta Dip with Honey and Herbs
- Ingredients
- Instructions
- Storage
- 7. Cowboy Caviar (Texas Caviar)
- Ingredients
- Instructions
- Storage and Make-Ahead
- 8. Classic Homemade Hummus
- Ingredients
- Instructions
- Variations and Storage
- Choosing Your Dippers Wisely
- How Much Dip to Make for a Party
- Storing and Transporting Dips
- Final Thoughts
1. Creamy Spinach Artichoke Dip
Few dips have earned their permanent spot on the party table quite like spinach artichoke dip. It’s warm, deeply savory, and has that particular combination of stretchy cheese and tangy artichoke that makes it almost impossible to stop eating. What makes this version work — and work well — is the layering of two types of cheese and the choice to use whole-milk cream cheese instead of the reduced-fat version, which tends to turn watery when baked.
The trick most recipes skip is squeezing every drop of moisture out of the spinach before it goes into the bowl. Frozen spinach holds a shocking amount of water, and if you skip this step, your dip will be soupy instead of thick and scoopable. Wrap the thawed spinach in a clean dish towel and wring it out over the sink — you’ll be surprised by how much liquid comes out.
This dip is best served straight from the oven when the top is golden and spotted with bubbles around the edges. Have your dippers ready before it goes in, because you won’t want to wait.
Yield: Serves 10 to 12 | Makes about 3 cups Prep Time: 15 minutes Cook Time: 25 minutes Total Time: 40 minutes Difficulty: Beginner — everything goes into one bowl, stirs together, and bakes until bubbly with no special technique required. Best Served: Hot, straight from the oven.
Ingredients
- 10 ounces frozen chopped spinach, thawed and squeezed completely dry
- 1 can (14 ounces) artichoke hearts, drained and roughly chopped
- 8 ounces cream cheese, softened to room temperature
- ½ cup sour cream
- ½ cup mayonnaise
- 1 cup shredded mozzarella cheese, divided
- ½ cup freshly grated Parmesan cheese
- 3 garlic cloves, finely minced
- ½ teaspoon onion powder
- ½ teaspoon kosher salt
- ¼ teaspoon black pepper
- Pinch of crushed red pepper flakes (optional, for a gentle kick)
Instructions
Prep and Mix:
-
Preheat the oven to 375°F (190°C). Lightly grease a 9-inch baking dish, a shallow cast iron skillet, or an oven-safe ceramic dish with a thin layer of butter or cooking spray.
-
In a large mixing bowl, combine the softened cream cheese, sour cream, and mayonnaise. Stir vigorously with a wooden spoon or rubber spatula until the mixture is completely smooth with no lumps — this takes about 2 minutes of real effort. Do not rush this step; lumps of cream cheese will remain grainy after baking.
-
Add the minced garlic, onion powder, salt, black pepper, and red pepper flakes. Stir to combine.
-
Fold in the squeezed-dry spinach, chopped artichoke hearts, ¾ cup of the mozzarella, and all of the Parmesan. Mix until the vegetables are evenly distributed throughout the cheese mixture.
Bake:
-
Transfer the mixture to the prepared baking dish and spread it into an even layer using an offset spatula or the back of a spoon.
-
Scatter the remaining ¼ cup of mozzarella evenly over the top.
-
Bake for 22 to 28 minutes, until the edges are actively bubbling and the top is golden in spots. For a more deeply browned top, switch the oven to broil for the final 2 minutes — watch it closely so it doesn’t burn.
-
Remove from the oven and let it sit for 3 to 4 minutes before serving. It will be extremely hot in the center. Serve directly in the baking dish to keep it warm longer.
Tips, Variations, and Storage
Fresh spinach works beautifully here — sauté about 12 ounces in a dry skillet until wilted, then squeeze out the moisture the same way. The flavor is slightly brighter than frozen.
For storage, press plastic wrap directly against the surface of any leftovers and refrigerate for up to 3 days. Reheat in a 350°F oven for 15 minutes, covered loosely with foil, until warmed through. The microwave works in a pinch but tends to make the texture uneven.
Serve with: Toasted crostini, pita chips, sturdy crackers, sliced baguette, or sliced bell peppers for a lower-carb option.
2. Buffalo Chicken Dip
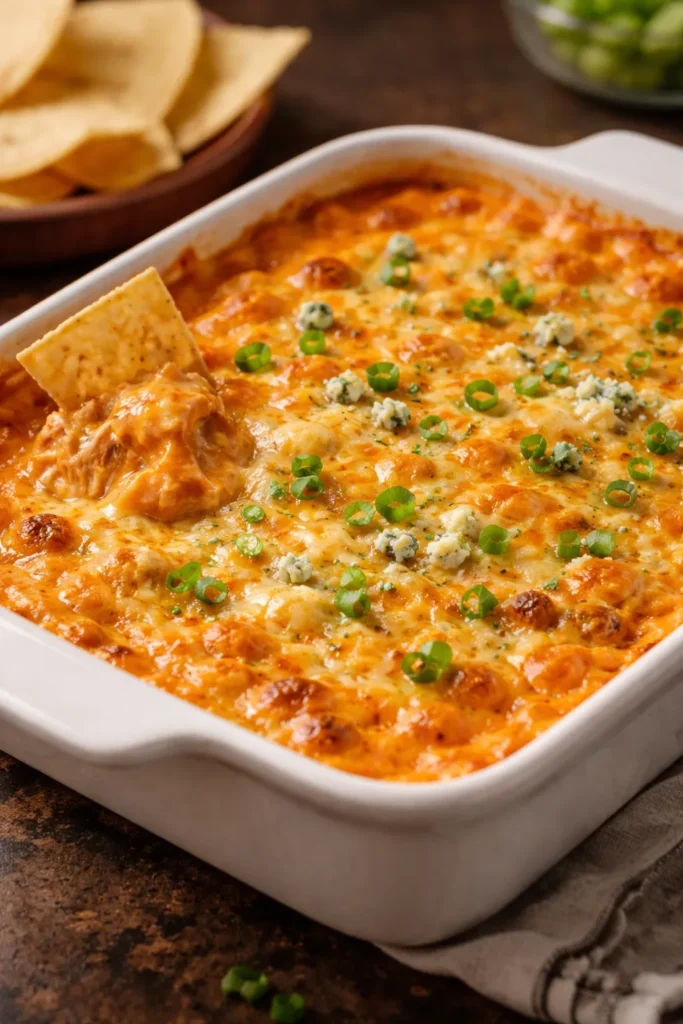
Buffalo chicken dip is the dip that converts people who claim they don’t like dip. It has everything a crowd craves — heat, creaminess, the tang of hot sauce, and enough shredded chicken to make it feel like a full meal in disguise. It’s also one of the most flexible recipes in this lineup: you can bake it in the oven, make it in a slow cooker, or throw it together in an Instant Pot if you’re working against the clock.
The hot sauce choice matters more than people realize. Frank’s RedHot is the classic choice for good reason — it has the right vinegar-forward tang and medium heat that works with the cream cheese without overwhelming it. Tabasco runs hotter and thinner, so if you use it, start with half the amount and taste as you go.
Ingredients
- 2 cups cooked shredded chicken (rotisserie chicken works perfectly here)
- 8 ounces cream cheese, softened
- ½ cup hot sauce (Frank’s RedHot is the standard)
- ½ cup ranch dressing (store-bought or homemade)
- 1 cup shredded sharp cheddar cheese, divided
- ½ cup crumbled blue cheese (optional, but strongly recommended)
- 2 stalks celery, finely diced (for garnish)
- 2 green onions, thinly sliced (for garnish)
Yield: Serves 10 to 14 | Makes about 4 cups Prep Time: 10 minutes Cook Time: 20 minutes Total Time: 30 minutes Difficulty: Beginner — stir, spread, bake, done. Best Served: Hot, immediately out of the oven or directly from a slow cooker on the warm setting.
Instructions
Assemble and Bake:
-
Preheat your oven to 375°F (190°C). Lightly grease an 8×8-inch baking dish or equivalent oven-safe dish.
-
In a large bowl, combine the softened cream cheese, hot sauce, and ranch dressing. Stir until completely smooth — use a hand mixer on low speed if the cream cheese is resisting. The mixture should be creamy with no visible lumps.
-
Fold in the shredded chicken, ¾ cup of the cheddar, and the blue cheese if using. Stir until the chicken is coated evenly and everything is well combined.
-
Spread the mixture into the prepared dish in an even layer. Scatter the remaining ¼ cup of cheddar over the top.
-
Bake for 18 to 22 minutes, until the dip is bubbling vigorously around the edges and the cheese on top has melted and started to turn golden.
-
Garnish with diced celery and sliced green onions immediately before serving. Serve hot with tortilla chips, celery sticks, carrot sticks, or sliced baguette.
Tips, Variations, and Storage
Slow cooker method: Combine all ingredients in a 3-quart slow cooker, stir, and cook on LOW for 2 hours or HIGH for 1 hour, stirring once halfway through. Switch to the WARM setting to keep it hot during the party.
For a lighter version that doesn’t sacrifice creaminess, replace the cream cheese with an equal amount of cottage cheese blended smooth — the texture is remarkably similar and the protein content jumps significantly.
Leftovers keep well, covered, in the refrigerator for up to 4 days. Reheat in the microwave in 30-second intervals, stirring between each, until hot.
3. French Onion Dip From Scratch
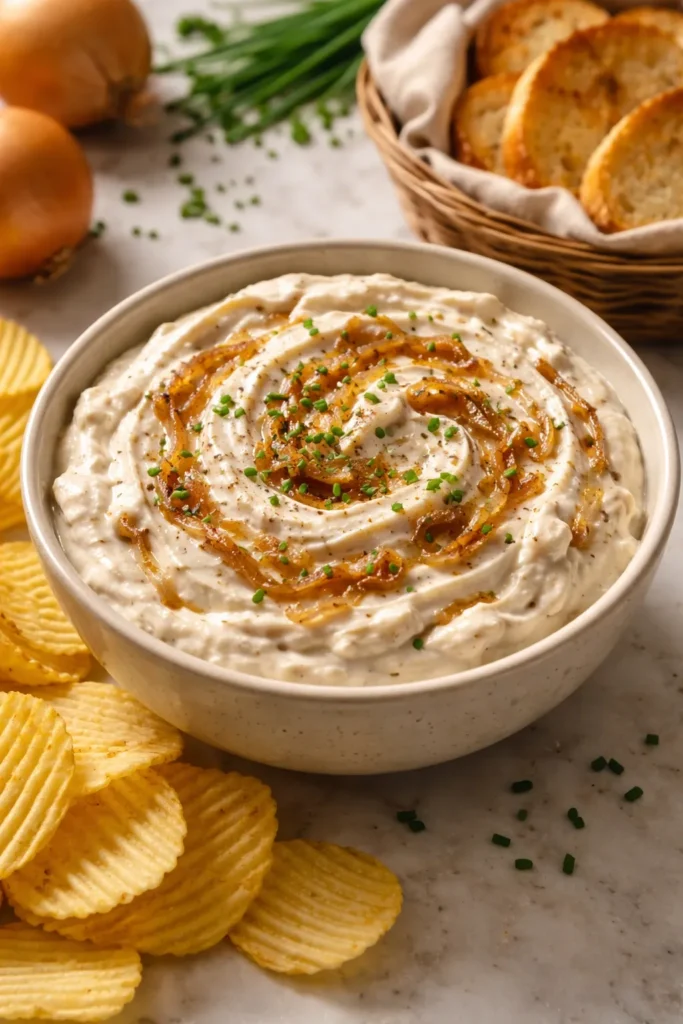
The store-bought version in a plastic tub is fine. This version is in a completely different league. Slowly caramelizing onions transforms their sharp, pungent bite into something deeply sweet, savory, and complex — and that’s the entire flavor engine of a proper French onion dip. It takes patience, about 40 minutes of low-and-slow heat, but the result tastes like something from a restaurant.
Don’t rush the onions. High heat will brown their edges before the natural sugars have time to develop, giving you bitter, inconsistently cooked onion instead of silky, amber-golden sweetness. Medium-low heat, a pinch of salt early, and occasional stirring is the only technique you need.
Ingredients
- 2 large yellow onions, halved and thinly sliced into half-moons
- 2 tablespoons unsalted butter
- 1 tablespoon olive oil
- ½ teaspoon kosher salt (added early to help the onions release moisture)
- 1 teaspoon Worcestershire sauce
- 1 teaspoon soy sauce (adds umami depth)
- 1 cup sour cream
- ½ cup cream cheese, softened
- ¼ cup mayonnaise
- ½ teaspoon garlic powder
- ¼ teaspoon black pepper
- Fresh chives, thinly sliced, for garnish
Yield: Serves 8 to 10 | Makes about 2½ cups Prep Time: 10 minutes Cook Time: 45 minutes (for caramelizing onions) + 10 minutes assembly Total Time: About 1 hour (plus 1 hour chilling time recommended) Difficulty: Intermediate — the caramelized onions require time and attention, but the technique is straightforward. Best Served: Cold or at room temperature, the next day after chilling overnight for maximum flavor.
Instructions
Caramelize the Onions:
-
Heat the butter and olive oil together in a large, wide skillet over medium-low heat until the butter melts and the foam subsides.
-
Add the sliced onions and the kosher salt. Stir to coat the onions in the fat. Spread them out into an even layer.
-
Cook over medium-low heat for 35 to 45 minutes, stirring every 5 to 7 minutes. The onions will first turn translucent, then begin to turn golden, then deepen into a rich amber-brown. If the onions are sticking, add 2 tablespoons of water and scrape up the fond from the bottom of the pan. The fond (those dark bits) is where the flavor lives — don’t let it burn.
-
Once the onions are deeply golden, add the Worcestershire sauce and soy sauce. Stir and cook for another 2 minutes, then remove from heat. Let the onions cool completely to room temperature before proceeding.
Make the Dip:
-
In a large bowl, combine the sour cream, softened cream cheese, and mayonnaise. Stir until completely smooth.
-
Add the garlic powder and black pepper. Stir to combine.
-
Fold in the cooled caramelized onions. Taste and adjust seasoning — it may need a small pinch more salt depending on your sour cream brand.
-
Transfer to a serving bowl, cover, and refrigerate for at least 1 hour. Overnight chilling intensifies the flavor significantly. Garnish with fresh chives before serving.
Serve with: Ruffled potato chips, kettle chips, crudités, or sliced baguette.
4. The Best Guacamole
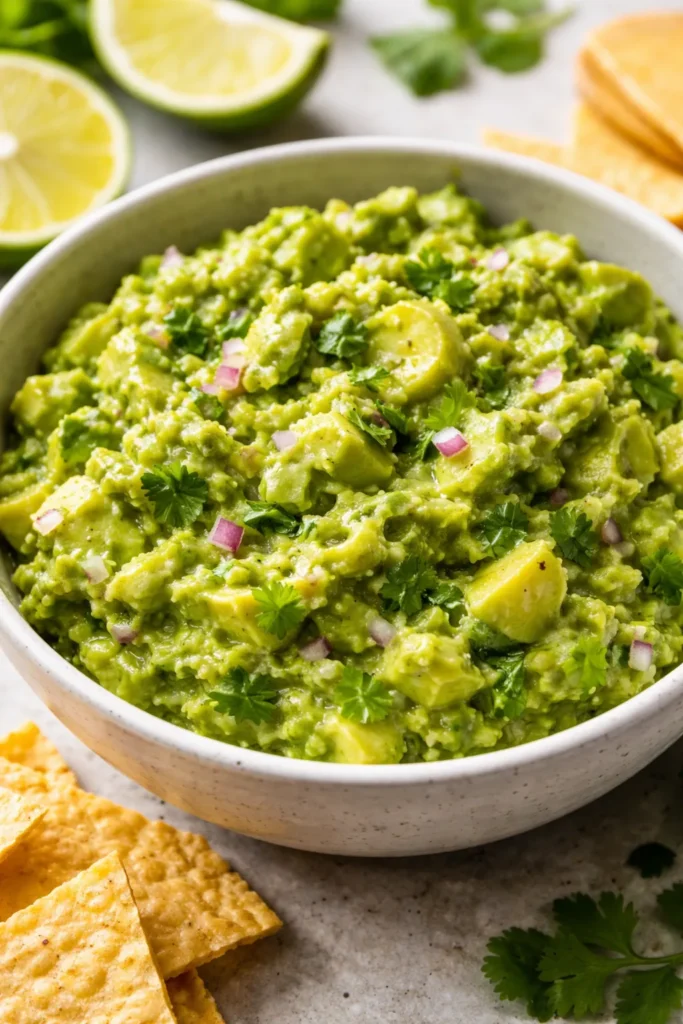
Guacamole is one of those recipes where the ingredient list is short, which means every single component actually matters. Under-seasoned guacamole tastes flat and forgettable. Over-mashed guacamole loses the textural contrast that makes it satisfying. The sweet spot is a chunky-but-creamy base where some pieces of avocado are fully mashed and others are left in ½-inch chunks for texture.
Ripe avocados are non-negotiable. A ripe avocado gives slightly but doesn’t collapse when you press it gently — the skin will also be very dark, almost black, with a bit of give at the stem end. An under-ripe avocado is starchy and bitter, and no amount of lime juice or seasoning will fix it.
Ingredients
- 3 large ripe Hass avocados
- Juice of 2 limes (about 3 tablespoons), plus more to taste
- ½ teaspoon kosher salt, plus more to taste
- 1 small jalapeño, seeds and membranes removed, finely minced (leave seeds in for more heat)
- ¼ cup white or red onion, finely diced
- 2 tablespoons fresh cilantro leaves, roughly chopped
- 1 small clove garlic, very finely minced or grated on a microplane (optional — purists skip it)
- ½ teaspoon ground cumin (optional, adds earthiness)
Yield: Serves 6 to 8 | Makes about 2 cups Prep Time: 10 minutes Cook Time: 0 minutes Total Time: 10 minutes (plus optional 15-minute resting time) Difficulty: Beginner — this is technique over ingredient complexity; mastering the ripeness check and mashing level is everything. Best Served: Within 30 minutes of making, though pressing plastic wrap against the surface and refrigerating keeps it green for several hours.
Instructions
-
Halve the avocados lengthwise, remove the pits, and scoop the flesh into a medium mixing bowl using a large spoon.
-
Add the lime juice and salt immediately. This prevents browning and starts flavoring the avocado right away.
-
Using a fork or potato masher, mash the avocados to your preferred texture. For chunky guacamole, mash until about half the avocado is smooth and the rest remains in pieces. For smoother guacamole, mash more thoroughly, leaving only occasional small chunks.
-
Add the minced jalapeño, diced onion, cilantro, and garlic if using. Fold gently with a rubber spatula until evenly distributed — don’t overmix or the whole batch turns paste-like.
-
Taste and adjust: more lime juice for brightness, more salt for depth, more jalapeño for heat. The dip should taste boldly seasoned — it will be eaten with chips, which dilute the flavor.
-
Transfer to a serving bowl. If not serving immediately, press a piece of plastic wrap directly against the surface of the guacamole (no air pockets) and refrigerate. Remove 10 minutes before serving to take the chill off.
Tips, Variations, and Storage
Adding diced mango or pomegranate arils alongside a squeeze of orange juice gives guacamole a completely different personality — sweeter, fruitier, and excellent with grilled fish tacos.
For a make-ahead trick that actually works: leave the avocado pits in the bowl of guacamole when refrigerating. The pits don’t magically prevent browning across the whole batch, but the lime juice does — as long as plastic wrap makes direct contact with the surface.
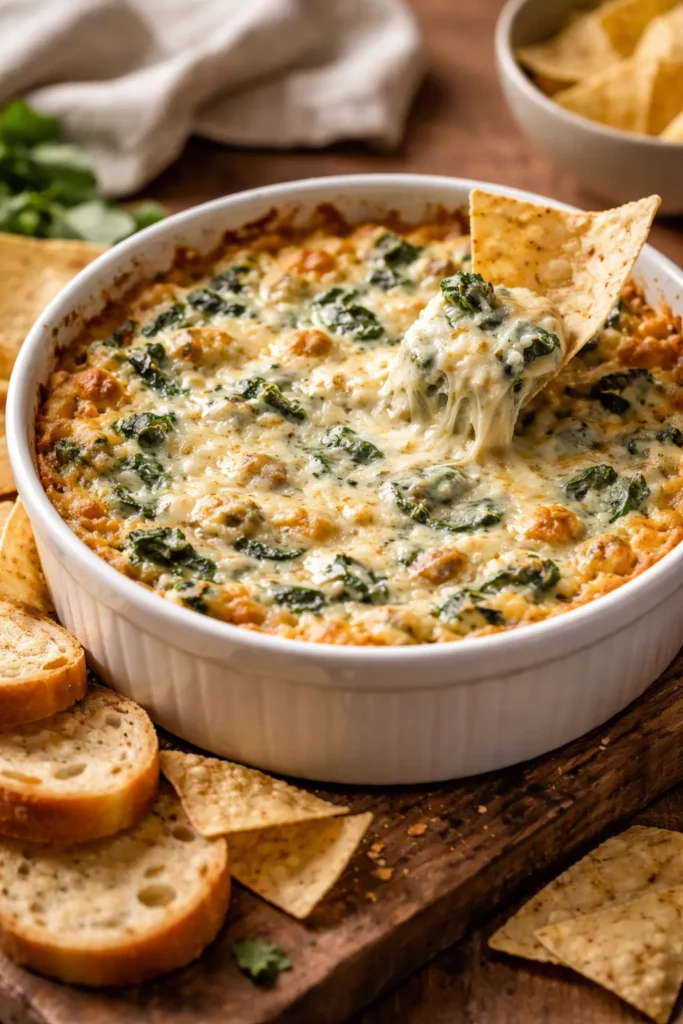
5. Jalapeño Popper Dip
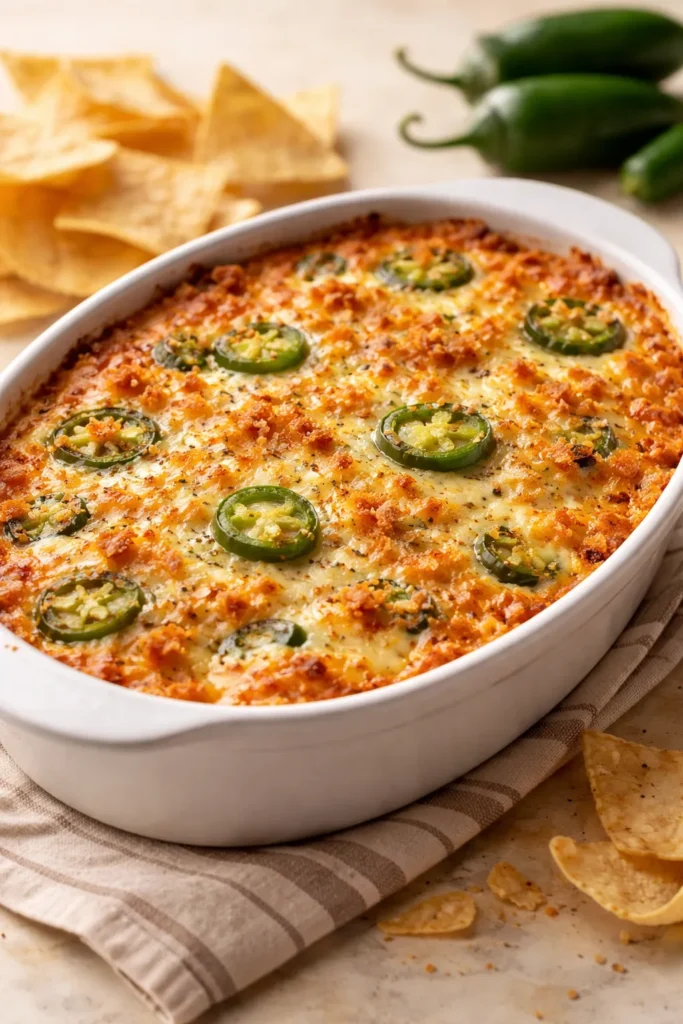
Jalapeño popper dip takes everything people love about jalapeño poppers — the creamy filling, the spicy heat, the rich cheese — and delivers it in a format that requires zero individual assembly. It bakes up into a bubbly, golden-topped casserole of flavor that pairs beautifully with sturdy crackers, corn chips, or sliced baguette. The cream cheese base absorbs the heat from the jalapeños without completely muting it, so every bite has that signature popper kick.
For deeper flavor, char the jalapeños under the broiler first. Place whole jalapeños directly under a hot broiler for 5 to 6 minutes, turning once, until the skin blisters and blackens in spots. Let them cool, then peel, seed, and chop them. The charred skin adds a subtle smokiness that elevates the whole dip.
Ingredients
- 4 to 6 fresh jalapeños, finely diced (seeds removed for medium heat, kept in for hot)
- 8 ounces cream cheese, softened
- 1 cup sour cream
- 1 cup shredded sharp cheddar cheese, divided
- ½ cup shredded Monterey Jack cheese
- 4 strips bacon, cooked crispy and crumbled (reserve some for topping)
- ¼ teaspoon garlic powder
- ¼ teaspoon smoked paprika
- ¼ teaspoon kosher salt
- ½ cup panko breadcrumbs (for topping)
- 1 tablespoon melted butter (to mix with panko)
Yield: Serves 10 to 12 | Makes about 3 cups Prep Time: 15 minutes Cook Time: 25 minutes Total Time: 40 minutes Difficulty: Beginner — mix, top, and bake. The panko crust adds a satisfying crunch that sets this apart from standard versions. Best Served: Hot, directly from the oven.
Instructions
-
Preheat the oven to 375°F (190°C). Lightly grease a 9-inch baking dish or cast iron skillet.
-
In a large bowl, beat the softened cream cheese until smooth. Add the sour cream and mix until fully incorporated.
-
Fold in three-quarters of the cheddar, all of the Monterey Jack, the diced jalapeños, most of the crumbled bacon (reserve about 2 tablespoons for topping), garlic powder, smoked paprika, and salt. Stir until evenly combined.
-
Spread the mixture into the prepared baking dish.
-
In a small bowl, combine the panko breadcrumbs with the melted butter and toss to coat evenly. Scatter the buttered panko, remaining cheddar, and reserved bacon crumbles over the top of the dip.
-
Bake for 22 to 25 minutes, until the filling is bubbling actively at the edges and the panko topping is deeply golden. If the top is not browning sufficiently, broil for 2 additional minutes.
-
Let cool for 3 minutes before serving — the center will be extremely hot.
Serve with: Corn chips, sturdy crackers, sliced crusty bread, or celery sticks for cooling contrast.
6. Whipped Feta Dip with Honey and Herbs
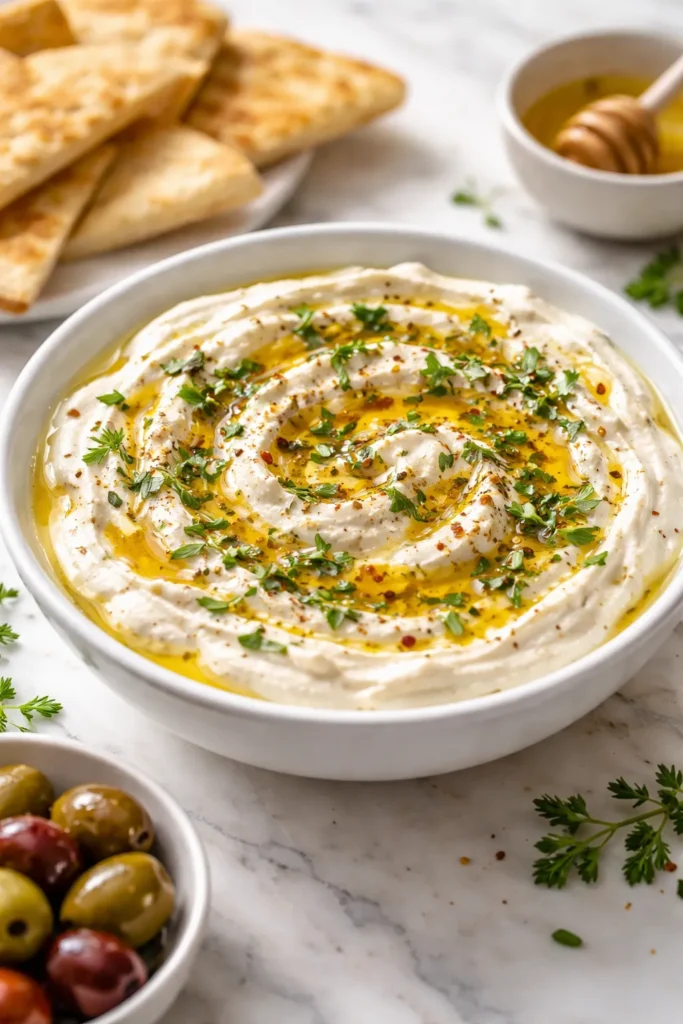
Whipped feta dip belongs in the category of appetizers that look far more impressive than the effort required to make them. Five minutes, a food processor, and a handful of ingredients produce a silky, cloud-like dip with a beautiful salty-tangy punch. The drizzle of honey over the top isn’t decoration — it’s a critical flavor contrast that makes the whole thing pop. Sweet and salty together in one bite is genuinely hard to resist.
Block feta is essential here, not the pre-crumbled variety sold in pouches. Pre-crumbled feta has anti-caking agents added that prevent it from whipping smooth. A block of feta in brine has a creamier, more supple texture and far cleaner flavor.
Ingredients
For the Dip:
- 8 ounces block feta cheese (packed in brine), drained and broken into chunks
- 4 ounces cream cheese, softened
- 3 tablespoons extra-virgin olive oil, plus more for drizzling
- 1 tablespoon fresh lemon juice
- 1 small clove garlic (optional — adds a gentle savory underpinning)
- 2 to 3 tablespoons whole milk or heavy cream (to reach desired consistency)
For Topping:
- 2 tablespoons good-quality honey
- 2 tablespoons fresh thyme leaves or chopped fresh rosemary
- Pinch of crushed red pepper flakes
- Drizzle of extra-virgin olive oil
- Optional: pomegranate arils for color and a burst of tart sweetness
Yield: Serves 6 to 8 | Makes about 1½ cups Prep Time: 5 minutes Cook Time: 0 minutes Total Time: 5 minutes Difficulty: Beginner — the food processor does all the work in under 2 minutes. Best Served: At room temperature, immediately after topping with honey and herbs.
Instructions
-
Add the drained feta chunks, softened cream cheese, olive oil, lemon juice, and garlic (if using) to the bowl of a food processor.
-
Process on high for 60 seconds, then scrape down the sides of the bowl with a rubber spatula.
-
With the machine running, add the milk or cream one tablespoon at a time through the feed tube until the dip reaches a light, fluffy, spreadable consistency. Stop adding liquid before it becomes runny — the texture should be like a thick, whipped cream cheese.
-
Taste and adjust: more lemon for brightness, a pinch of salt if needed (feta varies in saltiness by brand — some need none, others need a touch more).
-
Spread the whipped feta into a wide, shallow serving bowl or onto a rimmed plate, using the back of a spoon to create swoops and divots in the surface. These shallow pockets hold the toppings beautifully.
-
Drizzle honey generously over the top, scatter fresh thyme or rosemary, add a pinch of red pepper flakes, and finish with a drizzle of olive oil. Add pomegranate arils if using.
-
Serve immediately with warm pita, flatbread, or sliced baguette.
Storage
Store the whipped feta base (without toppings) in an airtight container in the refrigerator for up to 5 days. Re-whip briefly with a spoon before serving, and always add fresh toppings right before it hits the table.
7. Cowboy Caviar (Texas Caviar)
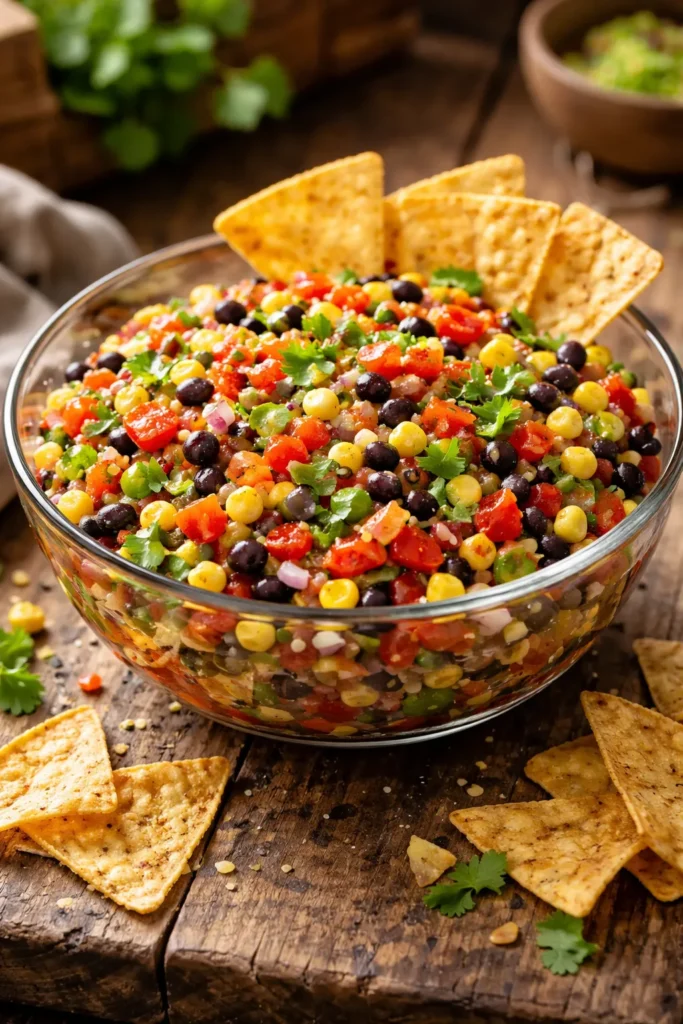
Cowboy caviar is technically a salsa, but it functions as a dip, a salad, a taco topping, and a rice bowl accompaniment all in one. Made with black-eyed peas, black beans, corn, diced vegetables, and a bright lime-based dressing, it’s the most protein-packed option on this list — and it’s completely vegan, which makes it a welcome presence on any party table where dietary preferences vary.
The flavor of cowboy caviar deepens significantly the longer it sits. Making it several hours ahead — or even overnight — gives the dressing time to soak into the beans and the vegetables time to release a little of their moisture into the mix, creating a more cohesive, complex flavor. Add the avocado no more than 30 minutes before serving, since it will oxidize and turn brown if it sits in the acidic dressing too long.
Ingredients
For the Dip:
- 1 can (15 ounces) black-eyed peas, drained and rinsed
- 1 can (15 ounces) black beans, drained and rinsed
- 1½ cups corn kernels (fresh, frozen and thawed, or canned and drained)
- 1 red bell pepper, finely diced
- 1 orange or yellow bell pepper, finely diced
- ½ red onion, finely diced
- 2 jalapeños, finely diced (seeds removed for medium heat)
- ½ cup fresh cilantro, roughly chopped
- 2 large ripe avocados, diced into ½-inch pieces (add right before serving)
For the Dressing:
- 3 tablespoons olive oil
- 3 tablespoons fresh lime juice (about 2 limes)
- 1 tablespoon apple cider vinegar
- 1 teaspoon ground cumin
- ½ teaspoon chili powder
- 1 teaspoon honey or agave
- ¾ teaspoon kosher salt
- ¼ teaspoon black pepper
Yield: Serves 12 to 16 | Makes about 6 cups Prep Time: 20 minutes Cook Time: 0 minutes Total Time: 20 minutes active + at least 1 hour chilling Difficulty: Beginner — all chopping, no cooking. Best Served: Cold or at room temperature, at least 1 hour after making (overnight is even better).
Instructions
-
In a large mixing bowl, combine the black-eyed peas, black beans, corn, red bell pepper, orange or yellow bell pepper, red onion, and jalapeños. Toss gently to mix.
-
In a small bowl or jar, whisk together all the dressing ingredients: olive oil, lime juice, apple cider vinegar, cumin, chili powder, honey, salt, and black pepper. Taste and adjust — it should be tangy, slightly sweet, and well-seasoned.
-
Pour the dressing over the bean and vegetable mixture. Add the cilantro and fold everything together until evenly coated.
-
Cover the bowl and refrigerate for at least 1 hour, or up to 24 hours. The flavors develop substantially with time.
-
Right before serving, fold in the diced avocado gently — you want it to stay in distinct pieces rather than mashing into the dip. Taste one more time and add a pinch of salt or an extra squeeze of lime if needed.
-
Transfer to a wide serving bowl and serve with tortilla chips, pita chips, or sturdy crackers.
Storage and Make-Ahead
Without the avocado, cowboy caviar keeps in the refrigerator for up to 4 days. The avocado portion should be added fresh each time you serve it. This is genuinely one of the best make-ahead dips in the category — it only gets better.
8. Classic Homemade Hummus
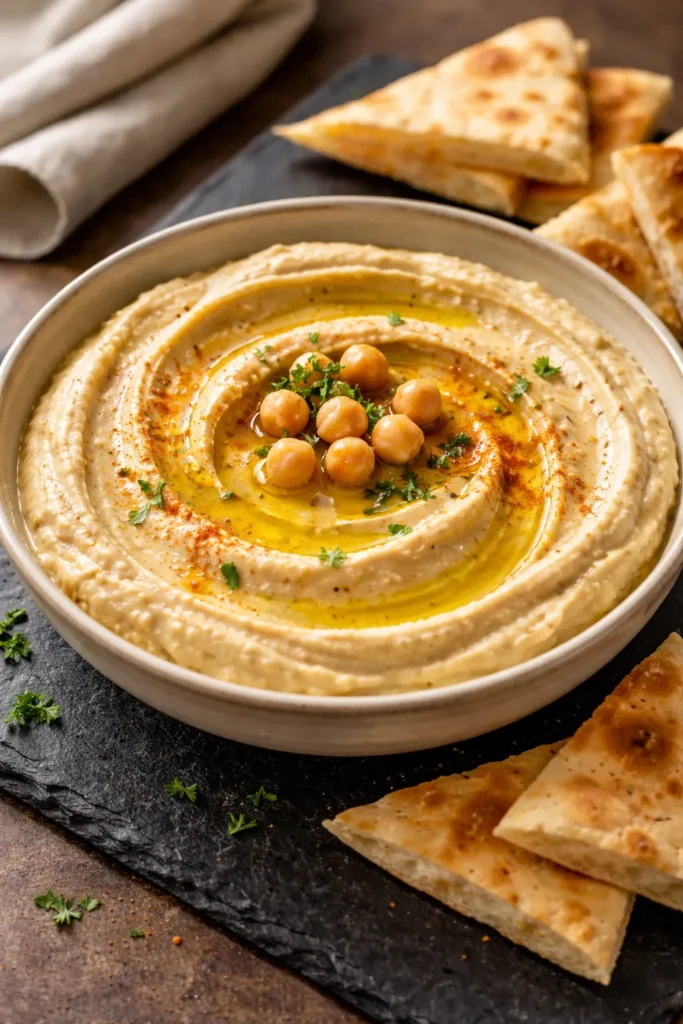
Homemade hummus and store-bought hummus share a name, but they’re not really the same food. The homemade version, made with properly cooked or well-rinsed chickpeas and good tahini, has a silky, almost cloud-like texture and a clean, nutty flavor that the refrigerated plastic tubs simply can’t match. The technique that separates okay hummus from exceptional hummus is one most recipes don’t mention: removing the chickpea skins.
This sounds fussy, but it takes about 3 minutes and makes a dramatic difference in texture. After draining canned chickpeas, gently rub them between two clean kitchen towels — the papery skins slide right off. You don’t need to get every single one, but removing most of them produces a noticeably smoother result.
Ingredients
- 2 cans (15 ounces each) chickpeas, drained and rinsed (skins removed for best texture)
- ½ cup good-quality tahini, well-stirred (the oil separates in the jar — stir thoroughly before measuring)
- 3 tablespoons fresh lemon juice, plus more to taste
- 2 garlic cloves, minced or grated on a microplane
- ½ teaspoon ground cumin
- ¾ teaspoon kosher salt, plus more to taste
- 3 to 5 tablespoons ice-cold water (the ice-cold temperature is key for a light texture)
- 2 tablespoons extra-virgin olive oil, plus more for serving
For Topping:
- A generous drizzle of extra-virgin olive oil
- ½ teaspoon smoked paprika or sumac
- A small handful of whole cooked chickpeas (from the can)
- Fresh flat-leaf parsley, roughly chopped
Yield: Serves 8 to 10 | Makes about 2½ cups Prep Time: 10 minutes Cook Time: 0 minutes Total Time: 10 minutes Difficulty: Beginner — the food processor does the heavy lifting. The skin-removal step adds 3 minutes but pays off noticeably in texture. Best Served: At room temperature, within a few hours of making, though it keeps well refrigerated for up to a week.
Instructions
-
Add the drained, rinsed chickpeas (skins removed) to the bowl of a food processor. Process alone for 60 seconds until a rough paste forms.
-
Add the tahini, lemon juice, minced garlic, cumin, salt, and olive oil. Process for another 60 seconds, scraping down the sides as needed.
-
With the machine running, drizzle in the ice-cold water, one tablespoon at a time, processing for 30 seconds between each addition. The cold temperature causes the tahini to emulsify and lighten, transforming the hummus from dense and paste-like to airy and smooth. Stop adding water when the hummus reaches a consistency slightly looser than you want — it will firm up slightly after chilling.
-
Taste carefully. Add more lemon juice for brightness, more salt for depth, or more garlic for punch. Process for another 30 seconds after any adjustments.
-
Transfer the hummus to a wide, shallow serving bowl. Use the back of a spoon in a circular motion to spread it into an even layer with a gentle well in the center.
-
Fill the well with a generous drizzle of extra-virgin olive oil. Dust with smoked paprika or sumac, scatter whole chickpeas and fresh parsley over the top.
Serve with: Warm pita bread, pita chips, carrot sticks, sliced cucumbers, bell pepper strips, or olives.
Variations and Storage
Roasted garlic hummus: Roast a full head of garlic in the oven until soft and sweet, then squeeze the cloves out and use them in place of raw garlic. The flavor is mellower, sweeter, and deeply complex.
Roasted red pepper hummus: Add 2 jarred roasted red peppers (drained and patted dry) to the food processor with the chickpeas. Finish with a drizzle of chili oil instead of olive oil.
Hummus keeps covered in the refrigerator for up to 7 days. The flavor actually improves after 24 hours as the garlic mellows and the lemon integrates. Always bring it back to room temperature before serving — cold hummus straight from the fridge tastes flat and dense.
Choosing Your Dippers Wisely
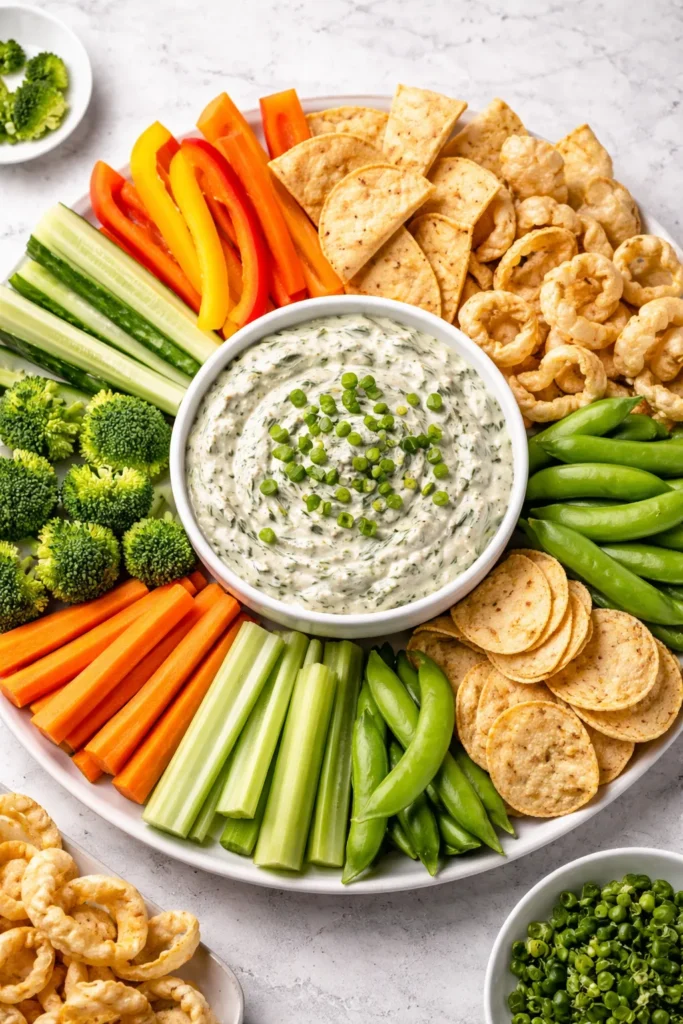
The best dip in the world is only as good as what you dunk into it. Match the dipper to the dip’s texture — thin, liquid-leaning dips like cowboy caviar or fresh salsa need a rigid, scoopable chip like a thick tortilla chip or corn chip. Dense, thick dips like hummus or whipped feta pair better with something that has a bit of structural integrity: warm pita, crostini, sliced baguette, or thick-cut crackers.
For guests managing dietary preferences, veggie dippers are universally welcome. Carrot sticks, sliced cucumbers, bell pepper strips, celery, broccoli florets, and sugar snap peas work with every dip on this list. They also add color to the table, which makes the whole spread look more inviting without any extra effort.
One often-overlooked pairing: pork rinds hold up beautifully to thick, creamy hot dips and bring their own salty crunch. They’re a natural fit for the jalapeño popper dip or the buffalo chicken dip, and they’re a welcome option for guests avoiding gluten or carbohydrates.
How Much Dip to Make for a Party
One of the most common party planning mistakes is running out of dip halfway through the event. A general rule of thumb: budget ¼ cup of dip per person when you’re serving multiple options alongside other appetizers, or closer to ⅓ to ½ cup per person if the dip table is the primary food offering.
If you’re serving two or three dips from this list together, that math means a batch of spinach artichoke dip and a batch of cowboy caviar comfortably covers 20 guests when paired with other snacks. For a crowd of 30 or more where the dips are the main event, consider doubling at least two of the recipes.
Cold dips are your lowest-stress option for large gatherings — they can be made the day before and refrigerated with no reheating required. Buffalo chicken dip and spinach artichoke dip are better made the day of, though both can be assembled ahead and baked just before guests arrive.
Storing and Transporting Dips
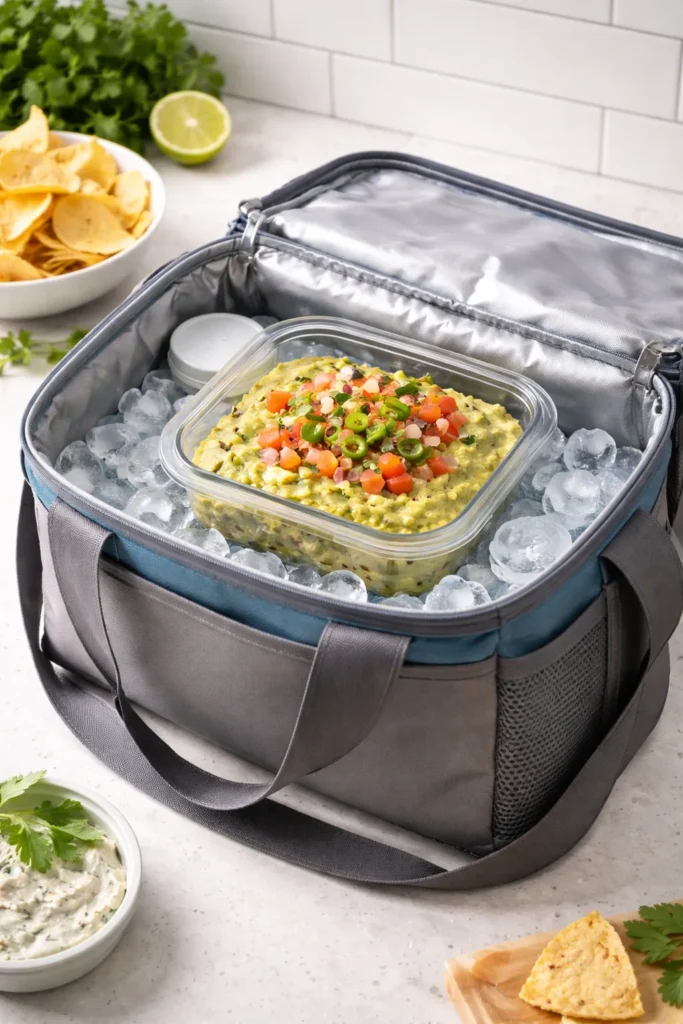
Cold dips travel easily in airtight containers nested inside a bag of ice or a cooler. Press plastic wrap directly against the surface of any cream cheese or avocado-based dip before sealing the container — this prevents oxidation and a dried-out surface layer.
Hot dips transport best in a cast iron skillet (which retains heat well) wrapped in a kitchen towel. Alternatively, assemble the dip in your baking dish, cover it with foil, and bake it at your destination — just bring the uncooked assembled dish and pop it in the host’s oven 30 minutes before serving. For slow cooker dips like buffalo chicken, simply transport the fully cooked dip in the slow cooker insert and plug it back in on the warm setting when you arrive.
Leftovers from most of these recipes keep for 3 to 4 days in the refrigerator. Hummus and whipped feta actually improve with a day of rest. Guacamole and cowboy caviar (without avocado) keep well too, though fresh avocado should always be added at the time of serving.
Final Thoughts
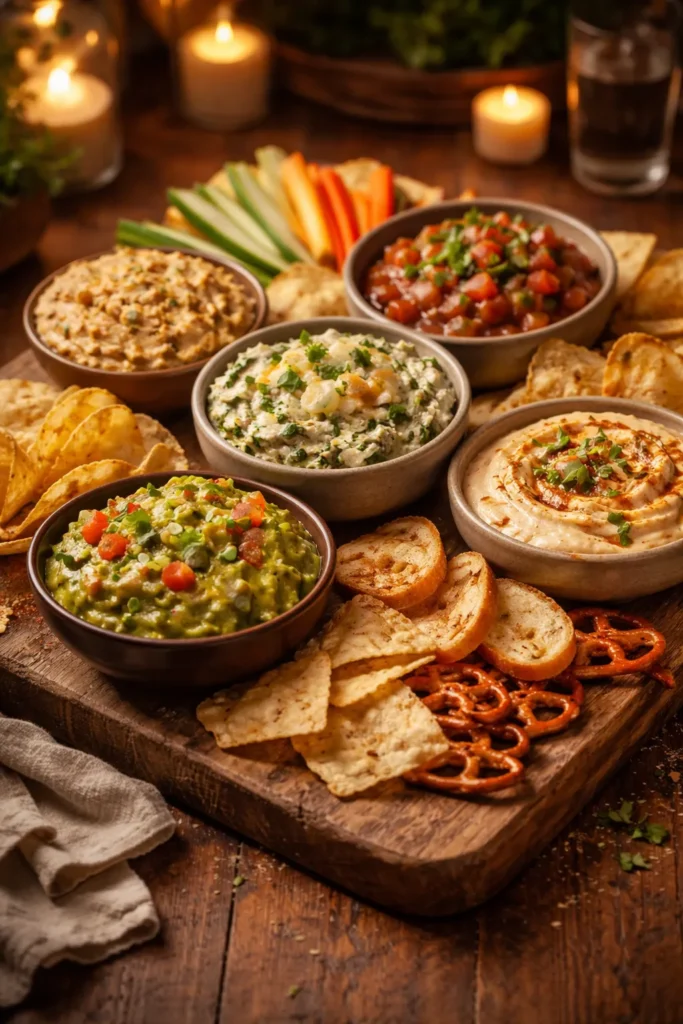
A great dip is one of the simplest ways to make people feel genuinely taken care of at a gathering. Whether you go with something warm and indulgent like the jalapeño popper dip or something bright and fresh like the cowboy caviar, the recipes above are built to impress without demanding hours of your time.
Start with whichever dip fits your crowd and your comfort level — the guacamole and whipped feta are ideal entry points because they require no cooking at all. Once you have one or two of these in your regular rotation, the others will follow naturally.
The underlying principle across all eight recipes is the same: balance your flavors, match your dippers to your dip, and make as much as you think you’ll need — then make a little more. Dip always disappears faster than expected.