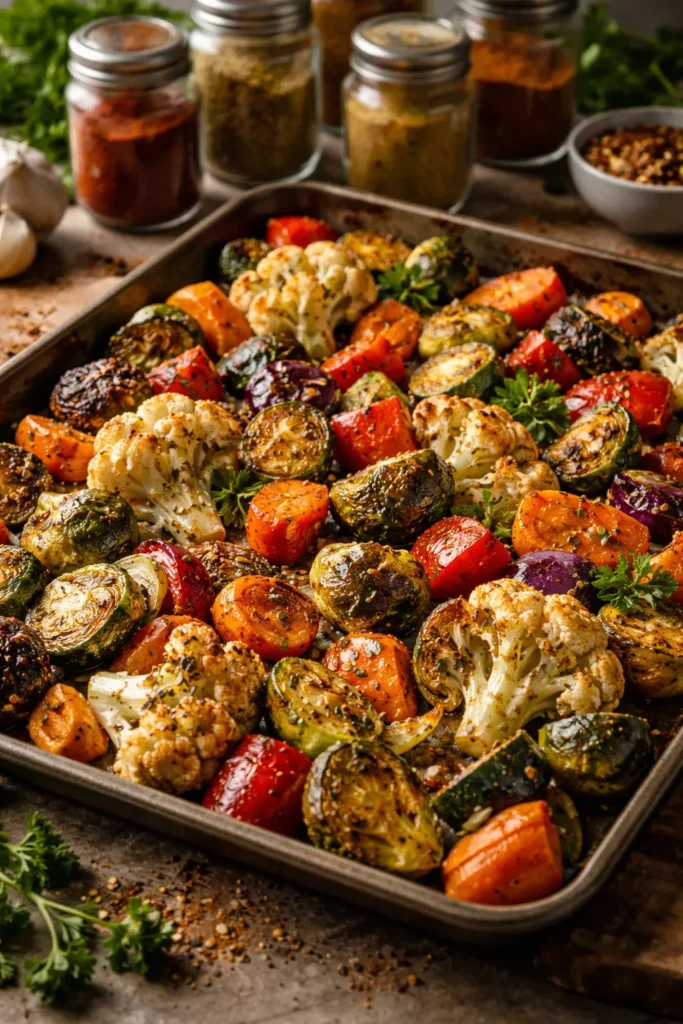
Sheet pan in hand, oven cranked to 425°F, and a pile of fresh vegetables waiting on the cutting board — there are few weeknight dinner moves more satisfying than this one. Roasting is the cooking method that transforms ordinary vegetables into something genuinely crave-worthy: caramelized edges, tender centers, and concentrated flavor that steaming or boiling simply can’t touch.
The science behind it is straightforward. High, dry heat draws moisture out of the vegetable’s surface and triggers the Maillard reaction — the same browning process behind a perfect sear on a steak. Sugars caramelize, cell walls soften, and the overall flavor deepens in a way that converts even the most reluctant vegetable eaters. Ask anyone who grew up eating soggy boiled Brussels sprouts and then tasted roasted ones for the first time — the reaction is always the same.
What makes these sides so perfect for dinner is the near-zero active cooking time. You do about 10 minutes of prep, slide the pan into the oven, and go set the table, finish a sauce, or pour a glass of wine while the heat does all the real work. Every one of the eight sides here follows that same rhythm, and each one pairs beautifully with chicken, fish, pork, or a grain bowl on a meatless night.
Table of Contents
- What Makes a Roasted Vegetable Side Actually Great
- The Staggered-Start Trick for Mixed Vegetable Sides
- 1. Crispy Roasted Brussels Sprouts with Balsamic and Parmesan
- What Makes This Side Work
- How to Make Them
- Tips for This Side
- 2. Harissa-Maple Roasted Carrots
- Building the Glaze
- Roasting and Finishing
- Why These Work as a Dinner Side
- 3. Garlic-Herb Roasted Potatoes with Crispy Edges
- The Smashed Garlic Method
- Getting the Texture Right
- Finishing Touches
- 4. Roasted Cauliflower with Lemon, Capers, and Fresh Herbs
- Cutting for Maximum Surface Area
- The Lemon-Caper Dressing
- What to Serve It With
- 5. Roasted Cherry Tomatoes with Garlic and Burst Herb Oil
- The Best Setup for Burst Tomatoes
- Using Every Drop of the Pan Juices
- 6. Smoky Roasted Sweet Potatoes with Smoked Paprika and Lime
- Getting the Dice Right
- The Seasoning Blend
- 7. Roasted Broccoli with Toasted Garlic and Parmesan
- Cutting Broccoli for Better Roasting
- The Toasted Garlic Technique
- 8. Roasted Butternut Squash with Brown Butter and Fresh Sage
- Skipping the Peeling Entirely
- Making the Brown Butter and Sage Finish
- How to Mix, Match, and Serve These Sides All Week
- Seasoning Your Roasted Vegetables Beyond the Basics
- Final Thoughts
What Makes a Roasted Vegetable Side Actually Great
Before getting into the specific sides, it’s worth pausing on the fundamentals — because even a simple sheet pan of vegetables can go sideways if a few basic rules get ignored.
Oven temperature is the single biggest variable. Most recipes call for 400°F to 425°F, and that range exists for good reason. At 400°F you get even, gentle caramelization that works beautifully for denser root vegetables like potatoes and carrots, which need more time in the heat to soften all the way through. At 425°F, you get faster, more aggressive browning — perfect for broccoli, Brussels sprouts, and cauliflower that you want crispy at the edges without turning to mush in the middle.
Pan crowding is the second most common mistake. When vegetables are packed tightly together, steam gets trapped between them and they end up soft and soggy rather than golden and caramelized. Each piece needs its own real estate on the pan. If your vegetable mixture is generous, split it across two sheet pans rather than squishing everything onto one.
Moisture is the enemy of crispiness. Pat vegetables dry before tossing them in oil. Any residual water will steam instead of roast. Similarly, don’t skip the oil — a thin, even coat of olive oil is what conducts the heat and makes caramelization possible. Too little oil and your vegetables will dry out and burn; too much and they’ll turn greasy. The target coating is glossy, not pooling.
Finally, the halfway-through stir matters. It gives the underside a chance to crisp up, exposes new surfaces to the direct heat, and prevents any corners from burning while the center is still cooking.
The Staggered-Start Trick for Mixed Vegetable Sides
One piece of practical advice that elevates every roasted vegetable side: not all vegetables cook in the same time, and pretending otherwise is what leads to mushy zucchini next to raw potatoes.
Dense root vegetables — potatoes, carrots, butternut squash, beets — need 40 to 45 minutes at 425°F. Medium-density vegetables like broccoli, cauliflower, and Brussels sprouts hit their sweet spot at 25 to 30 minutes. Quick-cooking vegetables like cherry tomatoes, bell peppers, zucchini, and mushrooms are done in 15 to 20 minutes.
When you want to combine vegetables with different cook times on a single pan, give the slower ones a head start. Put the potatoes and carrots in first, set a timer for 15 minutes, then add the broccoli. Set another timer for 10 more minutes, then add the cherry tomatoes. Everyone finishes at roughly the same time, nothing is overdone, and the whole pan comes out of the oven looking deliberate rather than chaotic.
For the eight sides below, each one uses vegetables with similar enough cook times that you won’t need to stagger — but knowing this trick means you can start mixing and matching with confidence.
1. Crispy Roasted Brussels Sprouts with Balsamic and Parmesan
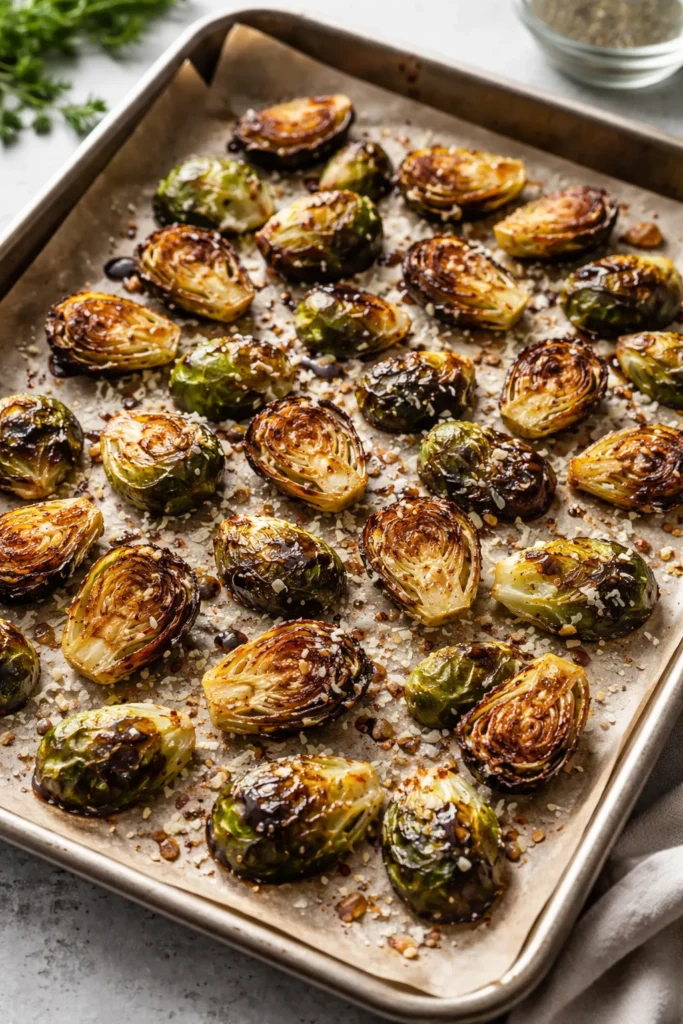
Brussels sprouts have a reputation problem they don’t deserve. Properly roasted — not steamed, not boiled — they turn into something almost addictive: crispy, slightly charred outer leaves, a tender core, and a natural nuttiness that deepens beautifully in a hot oven. Adding balsamic and Parmesan at the end takes them over the top without any extra effort.
What Makes This Side Work
The key to truly crispy Brussels sprouts is cutting each one in half through the stem. This gives you two flat cut faces that sit directly against the hot pan surface, which is where the best caramelization happens. The outermost leaves that fall off during prep are not waste — scatter them on the pan alongside the halved sprouts and they’ll roast into thin, papery crisps that taste like vegetable chips.
How to Make Them
Toss halved Brussels sprouts with 3 tablespoons of olive oil, ½ teaspoon salt, and ¼ teaspoon black pepper. Spread cut-side down on a parchment-lined sheet pan — and don’t move them for the first 15 minutes. That initial undisturbed contact with the hot pan is what builds the seared, golden crust. Roast at 425°F for 20 to 22 minutes total, flipping once at the 15-minute mark.
When they come out, drizzle with 1 tablespoon of balsamic glaze (not vinegar — the glaze is thicker and won’t make things soggy) and shower with freshly grated Parmesan. Serve immediately while the Parmesan is still slightly warm and starting to melt into the crevices.
Tips for This Side
- Don’t skip the cut-side-down start. Every time you fight the urge to move them early, the crust improves.
- Add a pinch of crushed red pepper flakes before roasting for gentle heat that plays well against the sweet balsamic.
- These pair best with chicken thighs, pork tenderloin, or a creamy pasta.
2. Harissa-Maple Roasted Carrots
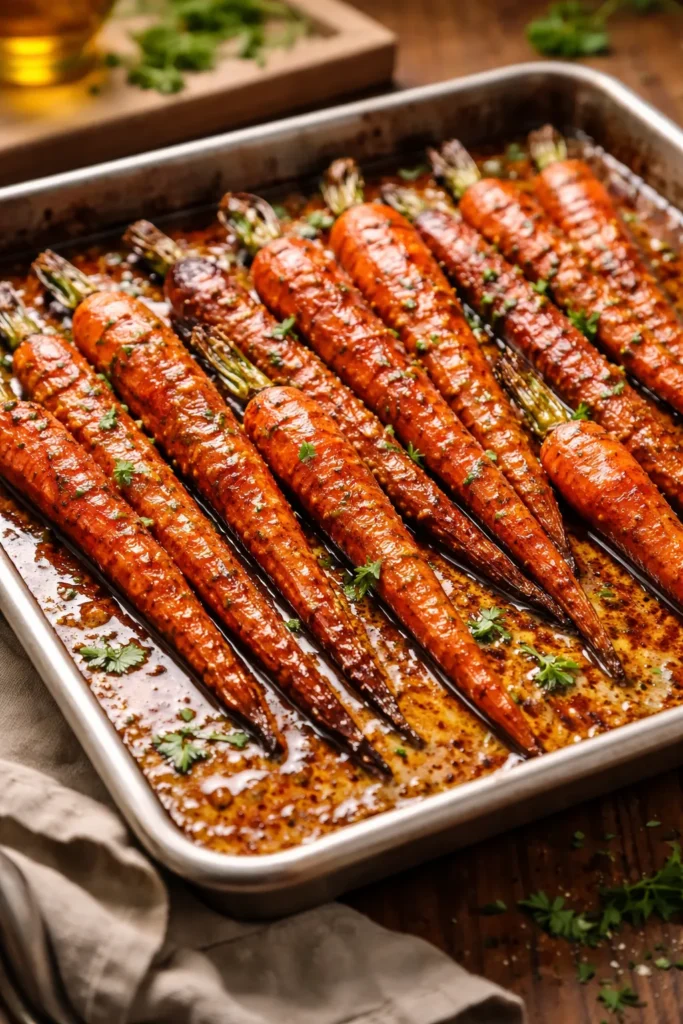
Harissa — a North African chili paste made with roasted peppers, cumin, coriander, and caraway — might seem like an unusual partner for sweet maple syrup. Believe it or not, the combination is one of the most compelling things you can put on a carrot. The heat from the harissa and the sweetness of the maple create a glaze that caramelizes on the carrot’s surface into something lacquered and deeply savory.
Building the Glaze
Use 2 tablespoons of harissa paste (not harissa powder, which behaves differently), 1 tablespoon of real maple syrup, and 2 tablespoons of olive oil. Whisk them together in a bowl until the mixture is smooth and uniform. Toss in your carrots — either whole baby carrots or medium carrots cut on alternating diagonals, which increases surface area and creates more caramelization per bite.
Roasting and Finishing
Spread the glazed carrots in a single layer at 400°F. They need about 25 to 30 minutes, flipped once halfway through, until the glaze has darkened and the carrots are fork-tender with slightly charred tips. A scatter of fresh cilantro or flat-leaf parsley over the top right before serving brightens everything up and cuts through the richness of the glaze.
Why These Work as a Dinner Side
- Carrots are one of the most forgiving vegetables to roast — they hold their shape, don’t weep moisture, and absorb flavors well.
- The spicy-sweet profile pairs with everything from roast chicken to lamb chops to baked salmon.
- You can make the glaze up to 3 days ahead and keep it refrigerated, then toss and roast when needed.
Worth knowing: If harissa paste is hard to find at your local grocery store, a combination of 1 tablespoon sriracha + ½ teaspoon each of ground cumin and smoked paprika makes a reasonable substitute.
3. Garlic-Herb Roasted Potatoes with Crispy Edges
Roasted potatoes are a dinner side hall-of-famer for obvious reasons — they go with everything, everyone likes them, and a well-made one is genuinely satisfying in a way that feels grounding and complete. The challenge is getting every piece genuinely crispy rather than soft and pale, which is where most home cooks go slightly wrong.
The Smashed Garlic Method
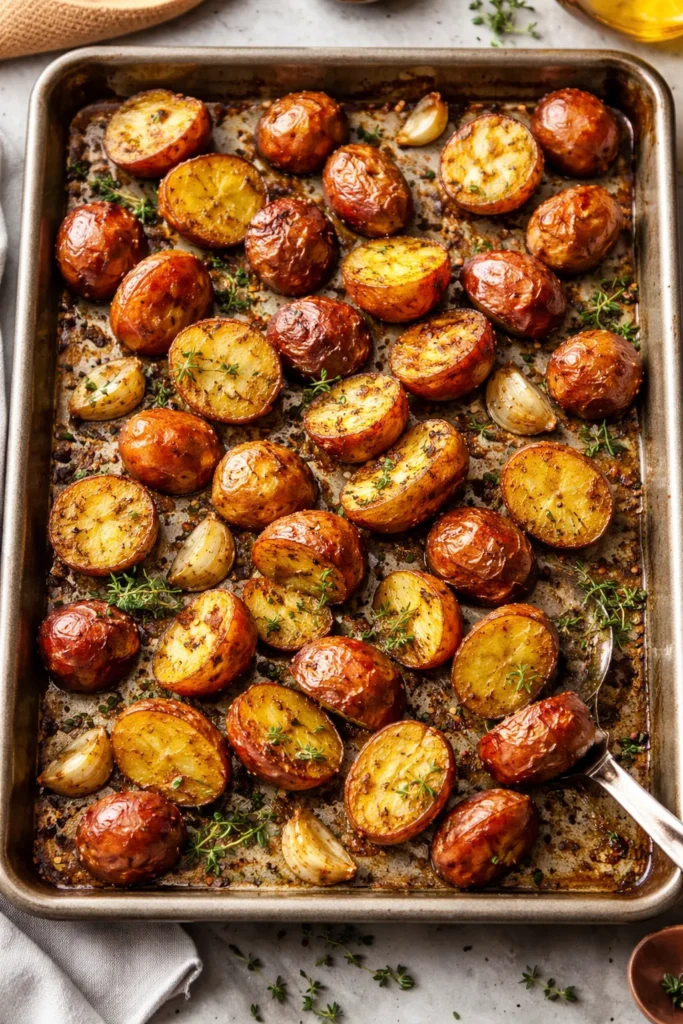
Instead of mincing garlic and tossing it with the potatoes (where it inevitably burns into bitter, dark bits), use whole smashed cloves. Place an unpeeled garlic clove on your cutting board, lay the flat side of a chef’s knife on top, and press down firmly with the heel of your palm. The clove bursts open but stays mostly intact. These roast slowly alongside the potatoes, becoming golden, sweet, and spreadable — and they release a gentle garlic perfume throughout the whole pan without any risk of burning.
Getting the Texture Right
Small red potatoes or fingerlings work best because they don’t need peeling and they have a thin skin that crisps up beautifully. Cut them in half, toss with 3 tablespoons of olive oil, 5 to 6 smashed garlic cloves, fresh thyme sprigs, salt, and pepper. Roast cut-side down at 425°F for 35 to 40 minutes without disturbing them for the first 25 minutes. That extended contact builds a crust you can actually hear when you pick one up off the pan.
Finishing Touches
A wire rack placed inside the sheet pan elevates the potatoes slightly and allows hot air to circulate underneath each piece, making them even crispier than pan-only roasting. This trick, borrowed from Bon Appétit’s Parmesan-roasted potato technique, is worth the extra 30 seconds of setup. Finish with flaky salt and chopped fresh parsley.
4. Roasted Cauliflower with Lemon, Capers, and Fresh Herbs
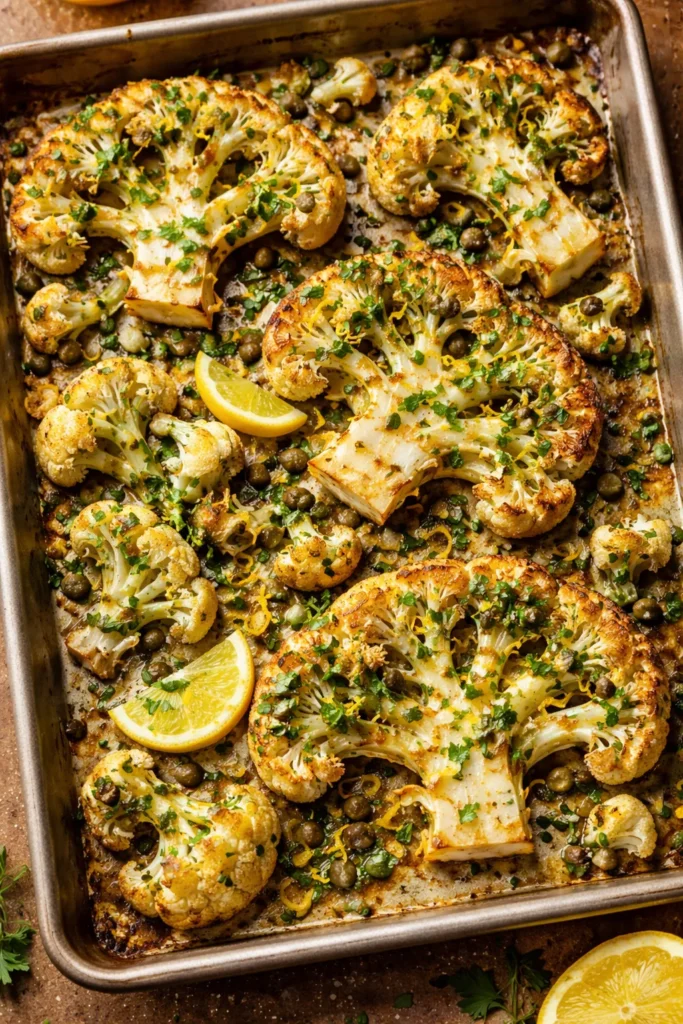
Cauliflower is one of those vegetables that roasting completely reinvents. Raw, it’s mild to the point of blandness. Roasted at high heat until the cut faces turn deep golden and the florets develop dark, caramelized edges, it becomes meaty, slightly sweet, and complex — a legitimate centerpiece vegetable that holds its own next to any protein.
Cutting for Maximum Surface Area
The way you cut cauliflower determines how much caramelization you’ll get. Instead of breaking it into round florets, cut the head into flat, ½-inch-thick slices — sometimes called “cauliflower steaks.” The flat surfaces roast more aggressively than rounded ones, giving you a broader, more deeply browned crust on each piece. Cut the smaller florets that inevitably fall away and add them to the pan too; their irregular edges will turn almost crispy.
The Lemon-Caper Dressing
While the cauliflower roasts, whisk together 2 tablespoons of extra virgin olive oil, the juice and zest of one lemon, 1 tablespoon of drained capers (roughly chopped), a minced garlic clove, and a small handful of fresh flat-leaf parsley leaves. This dressing goes on after roasting — not before — which keeps the lemon bright and the parsley green rather than both turning bitter in the oven heat.
Roast at 425°F for 20 to 25 minutes, flipping once. Pull from the oven, pour the dressing over while still hot, and serve immediately. The residual heat from the cauliflower blooms the garlic slightly and makes the whole dressing taste like it’s been cooking all along.
What to Serve It With
This bright, acidic side cuts through rich proteins beautifully. It belongs next to braised short ribs, seared salmon, or a creamy risotto where you need something sharp and clean on the plate.
5. Roasted Cherry Tomatoes with Garlic and Burst Herb Oil
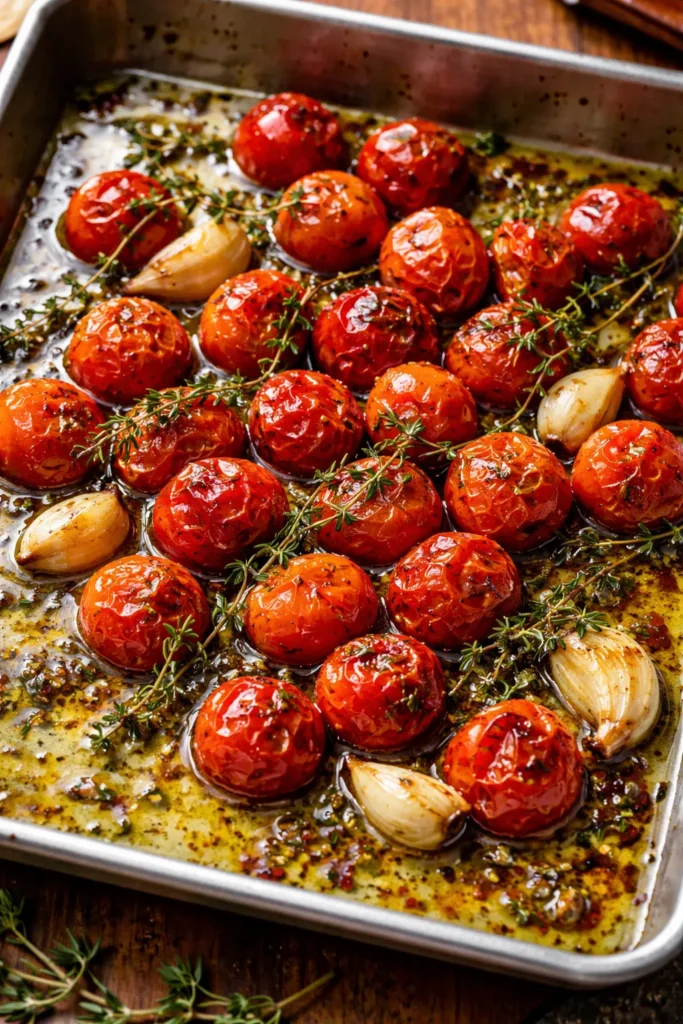
Roasted cherry tomatoes are one of those sides that seems almost too simple — and then you taste them and wonder why you’re not making them every single week. High heat concentrates the tomatoes’ natural sugars, bursts their skins, and turns their juices into a thick, almost jammy sauce that pools on the pan and begs to be soaked up with bread or spooned over grilled chicken.
The Best Setup for Burst Tomatoes
Leave cherry tomatoes whole. This is important — cut them and they lose their juice to the pan immediately before caramelization can happen. Toss whole tomatoes with 3 tablespoons of olive oil, 4 smashed garlic cloves, and a generous pinch of flaky sea salt. Add 4 to 5 fresh thyme sprigs or a few sprigs of rosemary directly to the pan.
Roast at 400°F for 20 to 25 minutes. At this temperature, most of the tomatoes will split and begin to collapse, but they won’t fully disintegrate. The skins will blister and char in spots. The garlic cloves will turn golden and soft. The olive oil and tomato juice will meld into a glossy, intensely flavored oil that coats everything on the pan.
Using Every Drop of the Pan Juices
Don’t throw away what’s left on the pan. Use a silicone spatula to scrape up every bit of the caramelized tomato-garlic oil and pour it over the finished side. This is where all the flavor concentration lives. Finish with torn fresh basil leaves added at the very last second — never add basil to a hot oven, as it blackens immediately.
These roasted tomatoes are brilliant over simple pasta, alongside a poached egg on toast, or next to grilled fish. The Mediterranean Dish’s approach of pairing them with Italian-seasoned vegetables is worth borrowing — the tomato juices act almost like a built-in sauce for everything on the plate.
6. Smoky Roasted Sweet Potatoes with Smoked Paprika and Lime
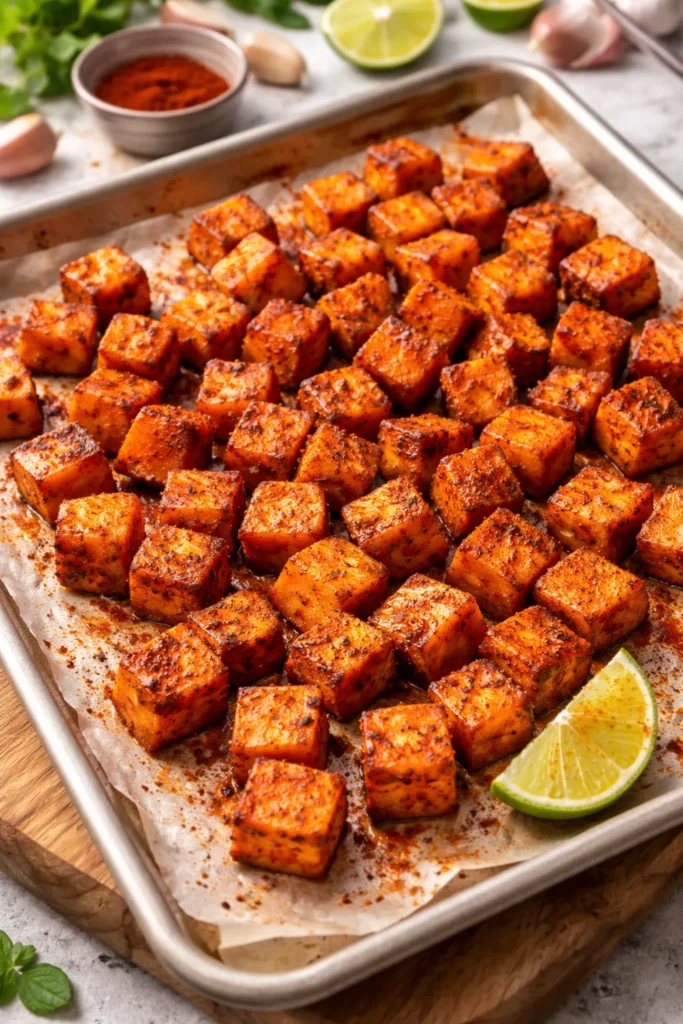
Sweet potatoes are the workhorse of the roasted vegetable world — versatile, naturally sweet, and satisfying in a way that feels substantial enough to anchor a dinner plate. Most preparations lean into their sweetness with honey or maple. This version goes the other direction, coating them in smoked paprika, cumin, garlic powder, and a finish of fresh lime juice that plays against the natural sweetness with smoke and acid.
Getting the Dice Right
Cut sweet potatoes into ¾-inch cubes — no larger. Larger pieces take forever to cook through without burning on the outside, and you want the sweet potato interior fully soft and almost creamy while the exterior caramelizes. No need to peel; the skin roasts to a pleasant, chewy texture and adds a small amount of structural integrity that helps each cube hold its shape.
The Seasoning Blend
Toss the cubed sweet potatoes with 3 tablespoons of olive oil, 1 teaspoon of smoked paprika, ½ teaspoon of ground cumin, ½ teaspoon of garlic powder, ½ teaspoon of salt, and a pinch of cayenne. The smoked paprika is doing two jobs here: it adds a light smokiness that reads almost like the vegetable spent time on a grill, and its deep red color intensifies as it caramelizes on the cut edges of the sweet potato.
Roast at 425°F for 30 to 35 minutes, flipping once halfway through. When they’re done, the edges should be deep orange-brown, the interiors pierced easily with a fork, and the whole pan should smell like something you’d order at a restaurant.
Finish with fresh lime juice — about half a lime squeezed over the whole pan right before serving. This is not optional. The acidity wakes up every single flavor that the heat has concentrated.
7. Roasted Broccoli with Toasted Garlic and Parmesan
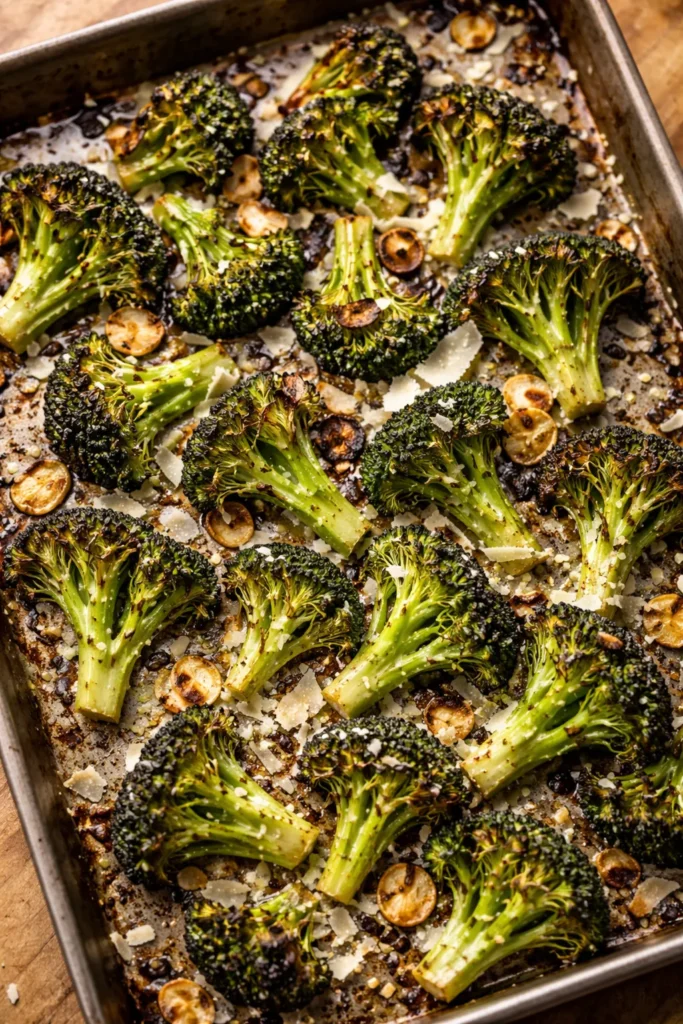
Broccoli might be the vegetable most improved by a hot oven. When florets roast until their edges turn dark and slightly crispy — some cooks call it “charred broccoli” — they develop a nutty, almost smoky flavor that has almost nothing in common with the steamed version most of us grew up with. The darker you’re willing to let it go, the better it gets — as long as you pull it before it crosses from charred to burnt.
Cutting Broccoli for Better Roasting
Don’t cut broccoli into round puffs if you can help it. Instead, cut each crown into flat florets by slicing through the stem rather than snapping the head apart. Flat-cut florets give you more surface contact with the pan and a better overall crust. Bon Appétit specifically recommends keeping a generous amount of stalk attached to each floret — it’s pretty, it increases your yield, and the stem caramelizes into a sweet, tender bite that most people leave behind unnecessarily.
The Toasted Garlic Technique
Slice 4 garlic cloves into thin rounds rather than mincing them. Toss with the broccoli, oil, salt, and pepper. Thin-sliced garlic toasts in the oven rather than burning, turning golden and crispy in the same 18 to 20 minutes the broccoli needs. These toasted garlic chips scattered throughout the pan are small nuggets of flavor that punch well above their weight.
Roast at 425°F for 18 to 22 minutes, without stirring for the first 15 minutes. Finish with freshly grated Parmesan and a squeeze of lemon juice. The Parmesan doesn’t melt so much as cling to the florets in crumbly, salty bits — which is exactly what you want.
8. Roasted Butternut Squash with Brown Butter and Fresh Sage
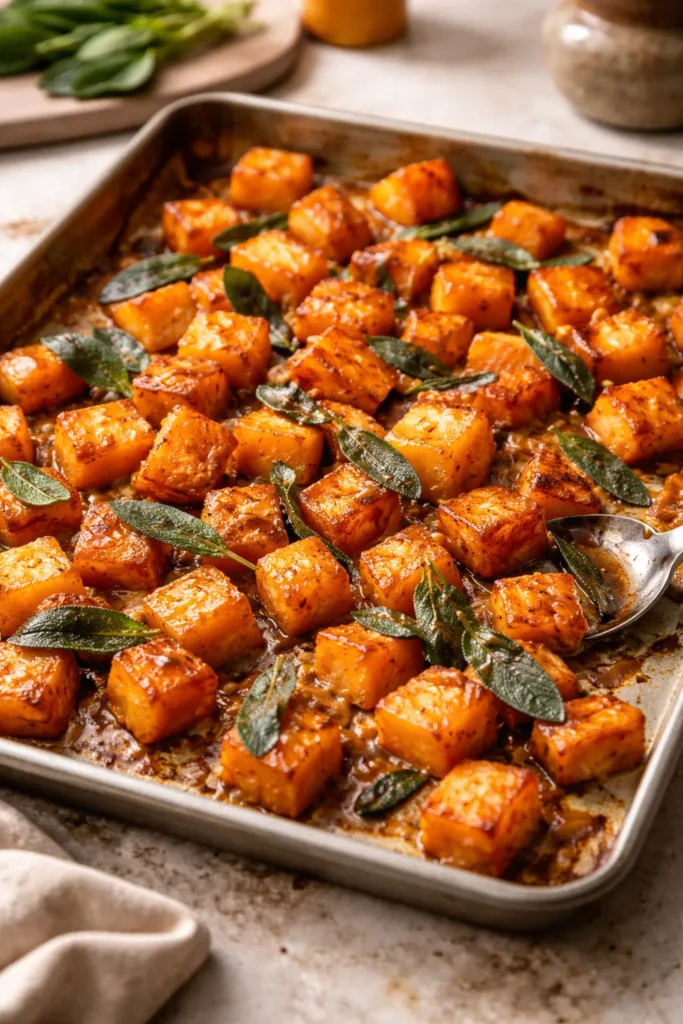
Butternut squash roasting is one of the easiest paths to a side dish that looks and tastes like it required far more effort than it did. The squash’s flesh has a natural creaminess and sweetness that intensifies dramatically in the oven, and when you pair it with nutty brown butter and crispy sage, the result is a deeply autumnal, savory-sweet side that works alongside roast chicken, pork chops, or a hearty grain dish.
Skipping the Peeling Entirely
Peeling and cubing a raw butternut squash is one of the more tedious kitchen tasks — the skin is hard and the squash is slippery. One clever shortcut that Bon Appétit champions: roast the whole squash. Pierce it a few times with a knife, place it on a sheet pan, and roast at 400°F for 45 to 55 minutes until completely tender when pierced. Split it open, discard the seeds, and tear or scoop the flesh into rough chunks. The skin peels away cleanly after roasting, and the texture is extraordinarily silky.
For a faster weeknight version, buy pre-cubed butternut squash (widely available) and roast the cubes directly at 425°F for 25 to 30 minutes.
Making the Brown Butter and Sage Finish
Brown butter takes about 4 minutes and transforms the entire side. Melt 2 tablespoons of unsalted butter in a small light-colored saucepan over medium heat. Let it foam, then watch it closely. When the foam subsides and small golden-brown specks appear at the bottom of the pan, add 8 fresh sage leaves. They’ll sizzle and crisp up in about 30 seconds. Pull from the heat immediately and pour the whole thing — butter, browned milk solids, crispy sage — over the roasted squash. The nutty, slightly caramel flavor of the butter against the sweet squash is one of those combinations that feels greater than the sum of its parts.
Season with flaky salt after adding the brown butter. The salt at the end is not interchangeable with salt added before roasting — finishing salt adds texture and a clean brightness that disappears into the dish during cooking.
How to Mix, Match, and Serve These Sides All Week
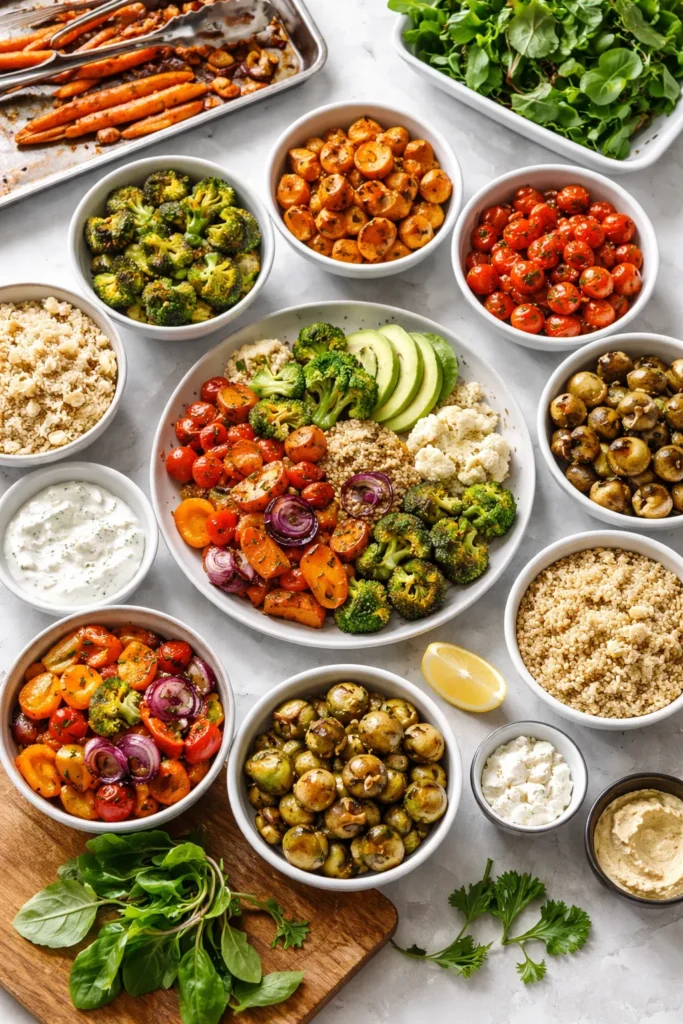
One of the quiet advantages of roasted vegetable sides is how well they repurpose throughout the week. Freshly roasted, they’re the side dish at dinner. By day two, they become something else entirely.
Leftover roasted vegetables tossed with warm farro or quinoa, a drizzle of tahini or lemon vinaigrette, and a handful of fresh herbs become a grain bowl that genuinely satisfies. The roasted tomatoes from side five can be stirred into pasta with a splash of pasta water for a fast, intensely flavored sauce. Cold roasted sweet potatoes and Brussels sprouts can go into a lunch wrap with hummus and arugula. Roasted broccoli and cauliflower are brilliant folded into scrambled eggs or a frittata the next morning.
Storage for any of these sides: an airtight container in the refrigerator keeps them well for 3 to 4 days. Reheat in a 400°F oven for 8 to 10 minutes (not the microwave, which steams them back to sogginess) or in an air fryer at 375°F for 5 to 6 minutes. Freezing is not recommended — the cell walls of roasted vegetables break down in the freezer and they come out waterlogged and textureless.
For meal prep specifically, one of the most effective approaches is roasting two or three of these sides on a Sunday. Use them as building blocks for four or five different meals across the week, rotating proteins and sauces to keep things from feeling repetitive.
Seasoning Your Roasted Vegetables Beyond the Basics
Every side in this list can be adapted with different seasoning profiles depending on what protein you’re pairing or what kind of flavor you’re craving. A few tried-and-tested variations worth having in your rotation:
- Mediterranean: Olive oil, dried oregano, minced garlic, and a finish of crumbled feta and a squeeze of lemon. Works on broccoli, cauliflower, potatoes, and zucchini.
- Balsamic glaze: Drizzle over any roasted vegetable in the last 5 minutes of cooking. The heat thickens it into a sticky, sweet-savory coating. Brussels sprouts and carrots respond especially well.
- Curry spice: Turmeric, cumin, coriander, and garam masala tossed with cauliflower and sweet potato before roasting. Finish with plain yogurt and fresh cilantro.
- Asian-inspired: Toasted sesame oil, soy sauce, and a pinch of chili flakes work beautifully on broccoli and green beans. Add sesame seeds after roasting.
- Herb and cheese: Any combination of fresh hardy herbs (rosemary, thyme, sage) added before roasting, with Parmesan or Pecorino added after. Applies to virtually every vegetable on this list.
The core technique stays the same across all of these variations — the seasoning profile is just the flavor layer you dial up or down based on the rest of the meal.
Final Thoughts

Roasted vegetables are one of the most reliably good ideas in weeknight cooking. The investment in time is minimal, the technique is forgiving, and the results improve in a predictable, satisfying way as you get a feel for your oven and your preferred level of caramelization.
The eight sides here — from the crispy Parmesan Brussels sprouts to the brown butter butternut squash — each have their own personality, but they all follow the same honest logic: good vegetables, enough oil, a hot oven, and the patience to leave them alone long enough to actually brown.
If you make only one change to how you approach vegetable sides after reading this, make it this: stop crowding the pan. Give every piece of vegetable its own space, use two pans when the recipe calls for it, and watch how dramatically the quality of the outcome changes. That single habit is responsible for more restaurant-quality home cooking than almost any other trick in the book.
Start with whatever vegetable you like most from this list, master the approach, and then start mixing, adapting, and making them your own.