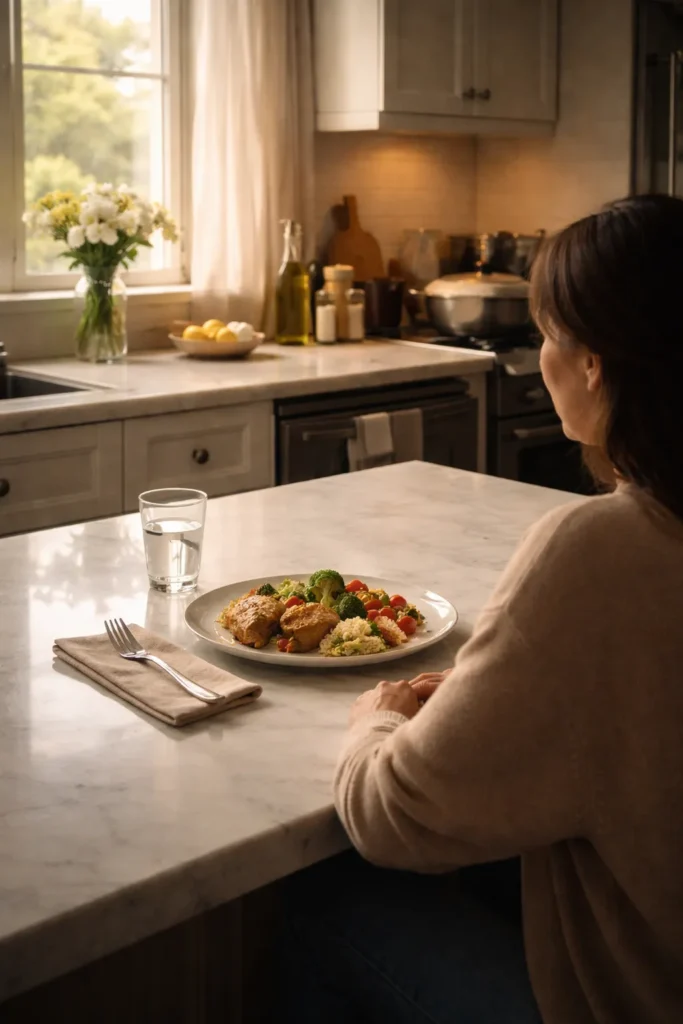
There’s a specific kind of exhaustion that hits around 5:30 on a Tuesday night — you’ve just walked through the door, your brain is fried, and someone in the house is already asking what’s for dinner. The answer you want to give is “it’s already done,” and with the right make-ahead dinners in your rotation, that answer becomes entirely possible.
Make-ahead cooking isn’t about spending your entire weekend chained to the stove. It’s about strategic, intentional cooking — putting in an extra hour when you have the time so that you don’t have to scramble when you don’t. A pot of chili simmered on a Sunday afternoon is Tuesday’s dinner. A lasagna assembled the night before is Wednesday’s effortless win. A tray of assembled enchiladas waiting in the fridge is Thursday’s relief.
The eight dinners in this article were chosen for a very specific reason: they all hold beautifully, reheat without losing their soul, and deliver the kind of satisfaction that makes everyone at the table feel genuinely fed. Each one has been crafted with practicality at its center — realistic prep, straightforward ingredients, and honest guidance on how far ahead you can take them. Whether you’re cooking for a family of six or feeding yourself through a busy week, these are the recipes that actually follow through on the promise of making your life easier.
Table of Contents
- 1. Classic Beef Chili With Dark Beer and Black Beans
- Why This Version Works
- Make-Ahead Storage Guide
- How to Make It
- 2. Spinach and Mushroom Lasagna With Ricotta and Mozzarella
- The No-Boil Noodle Advantage
- The Mushroom Technique That Changes Everything
- Make-Ahead Storage Guide
- 3. Slow Cooker White Chicken Chili
- Building Flavor in a Slow Cooker
- The Cream Cheese Finish
- Make-Ahead Storage Guide
- 4. Baked Ziti With Italian Sausage and Three Cheeses
- The Cheese Architecture That Matters
- Sausage Over Ground Beef
- Make-Ahead Storage Guide
- 5. Shepherd’s Pie With Beef, Root Vegetables, and Smashed Potato Crust
- Why the Potato Crust Matters
- Building the Filling With Real Depth
- Make-Ahead Storage Guide
- 6. Sheet Pan Chicken Thighs With Roasted Root Vegetables
- Why Bone-In, Skin-On Thighs Are Non-Negotiable
- The Marinade That Does Double Duty
- Make-Ahead Storage Guide
- 7. Stuffed Cabbage Rolls in Tomato and Herb Sauce
- The Blanching Step You Can’t Skip
- What Goes Inside
- Make-Ahead Storage Guide
- 8. French Onion Soup Mac and Cheese
- The Caramelized Onion Commitment
- What Makes It Bake-Ahead Friendly
- Make-Ahead Storage Guide
- Smart Storage and Reheating Rules That Apply to All Eight
- Making This System Work for Your Week
- Final Thoughts
1. Classic Beef Chili With Dark Beer and Black Beans
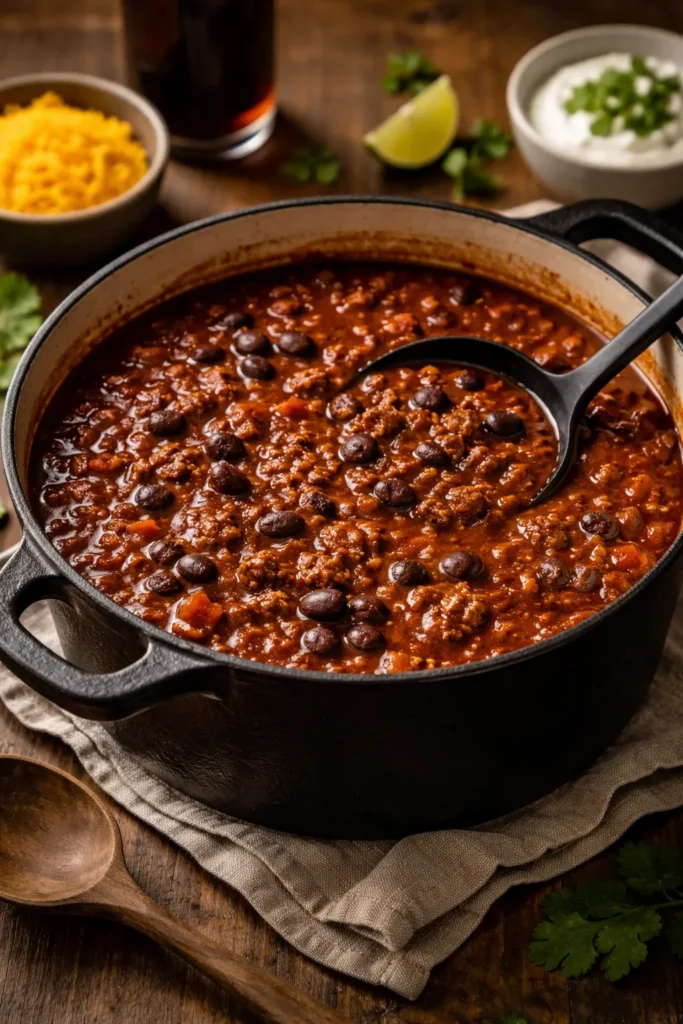
Chili might be the single best argument for make-ahead cooking ever invented. It gets better with time — the spices deepen, the beans absorb the broth, and the whole pot develops a rounded, cohesive flavor that a freshly made batch simply can’t replicate. Make it Sunday, eat it better on Wednesday.
Why This Version Works
The foundation here is ground beef browned hard in a hot Dutch oven — not gray-steamed, but genuinely caramelized with good color on it, which translates directly to flavor in the finished pot. A dark beer added to deglaze the pan scrapes up all those browned bits and contributes a subtle roasted bitterness that balances the sweetness of the tomatoes. Most chili recipes skip this step and wonder why their batch tastes flat.
Black beans hold up better over multiple days than kidney beans, which tend to get mushy after a few rounds of refrigeration. That matters when you’re planning to eat this chili three days from now.
Make-Ahead Storage Guide
- Refrigerator: Keeps well for up to 5 days in an airtight container
- Freezer: Freeze in quart-sized freezer bags, laid flat, for up to 3 months
- Reheating: Simmer gently on the stovetop with a splash of water or broth to loosen it — microwaving works in a pinch but tends to dry out the beans
How to Make It
Yield: Serves 6 to 8 Prep Time: 20 minutes Cook Time: 1 hour Total Time: 1 hour 20 minutes Difficulty: Beginner — one pot, no special equipment, straightforward technique throughout
Ingredients:
- 2 lbs ground beef (80/20 blend for flavor)
- 1 large yellow onion, diced
- 4 garlic cloves, minced
- 2 jalapeños, seeds removed for mild, seeds in for heat, finely diced
- 2 tablespoons tomato paste
- 1 bottle (12 oz) dark beer — a stout or porter works best
- 1 can (28 oz) crushed fire-roasted tomatoes
- 2 cans (15 oz each) black beans, drained and rinsed
- 2 teaspoons ground cumin
- 2 tablespoons chili powder
- 1 teaspoon smoked paprika
- 1 teaspoon dried oregano
- 1½ teaspoons kosher salt, plus more to taste
- 2 tablespoons neutral oil
Instructions:
-
Heat the oil in a large Dutch oven over high heat until shimmering. Add the ground beef in a single layer and let it cook without stirring for 3 to 4 minutes, until a deep brown crust forms on the bottom. Break it apart and cook another 3 minutes. Transfer to a plate, leaving the fat in the pot.
-
Reduce heat to medium. Add the onion and jalapeños and cook for 5 to 6 minutes, stirring occasionally, until the onion is soft and beginning to turn golden at the edges. Add the garlic and tomato paste and cook for 2 minutes, stirring constantly, until the paste darkens slightly and smells fragrant.
-
Pour in the beer and scrape the bottom of the pot firmly with a wooden spoon to release all the browned bits. Let it reduce for 2 minutes.
-
Return the beef to the pot. Add the crushed tomatoes, black beans, cumin, chili powder, smoked paprika, oregano, and salt. Stir everything together.
-
Bring to a boil, then reduce to a low simmer. Cook uncovered for 45 to 50 minutes, stirring occasionally, until the chili has thickened and the flavors have melded. Taste and adjust salt.
-
Cool completely before portioning into storage containers.
Pro tip: If you’re making this specifically to freeze, hold off on adding the beans until you reheat — they’ll have a noticeably better texture in the final bowl.
2. Spinach and Mushroom Lasagna With Ricotta and Mozzarella
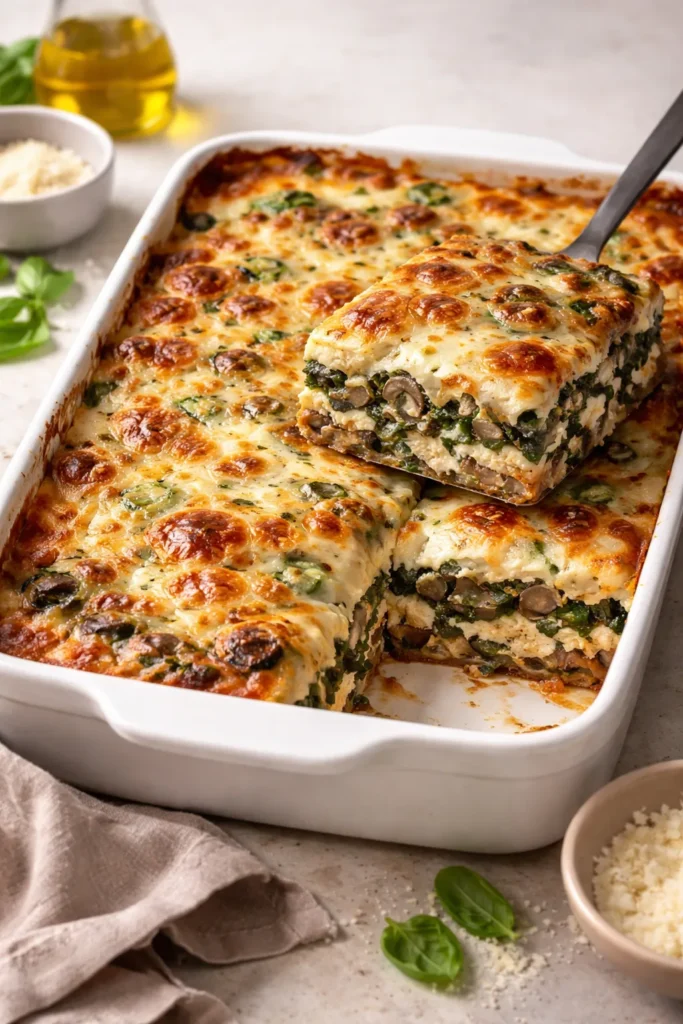
A vegetarian lasagna that genuinely satisfies the carnivores at the table too — that’s the bar this one clears. The secret is building deep, savory flavor from the mushrooms, which need to be cooked down properly, until they’re dark, concentrated, and slightly caramelized. Wet, under-cooked mushrooms make lasagna watery and disappointing.
The No-Boil Noodle Advantage
No-boil lasagna noodles are the make-ahead cook’s best friend. They absorb moisture from the sauce during baking, which means the lasagna actually benefits from being assembled ahead of time — the noodles have a chance to hydrate fully before they even hit the oven. Assemble this lasagna the night before, cover tightly, and refrigerate. Add 10 extra minutes to the covered baking time and you’re done.
The Mushroom Technique That Changes Everything
Use a mix of cremini and shiitake mushrooms — cremini for body, shiitake for that deeper, earthier note. Cook them in batches in a hot, dry skillet. No crowding, no oil at first, no stirring every 30 seconds. Let them release their moisture and then cook until that moisture evaporates and the mushrooms start to brown in their own fat. That is the flavor you’re after.
Make-Ahead Storage Guide
- Refrigerator (assembled, unbaked): Up to 2 days before baking
- Refrigerator (baked): Keeps for 4 days; individual portions reheat in the microwave in 3 minutes
- Freezer (assembled, unbaked): Wrap tightly in plastic wrap and then foil; freeze for up to 3 months. Bake from frozen, covered, at 375°F for 60 minutes, then uncovered for 15 more
Yield: Serves 8 to 10 Prep Time: 35 minutes Cook Time: 55 minutes Total Time: 1 hour 30 minutes Difficulty: Intermediate — multiple components to prepare, but each one is simple on its own
Ingredients:
For the mushroom filling:
- 1 lb cremini mushrooms, sliced
- 8 oz shiitake mushrooms, stems removed and caps sliced
- 3 tablespoons olive oil, divided
- 4 garlic cloves, minced
- ½ teaspoon crushed red pepper flakes
- Salt and black pepper to taste
For the ricotta layer:
- 32 oz whole-milk ricotta
- 2 large eggs
- ½ cup grated Parmesan cheese
- 1 teaspoon dried Italian seasoning
- ½ teaspoon kosher salt
For assembly:
- 12 no-boil lasagna noodles
- 5 oz fresh baby spinach
- 3 cups marinara sauce (homemade or a high-quality jarred variety)
- 3 cups shredded low-moisture mozzarella
- ¼ cup grated Parmesan, for topping
Instructions:
-
Preheat the oven to 375°F (190°C). Lightly grease a 9×13-inch baking dish.
-
Heat a large skillet over high heat. Add the cremini mushrooms with no oil — let them cook for 3 to 4 minutes, undisturbed, until they release their moisture and start to brown. Add 2 tablespoons of olive oil, the shiitake mushrooms, and a generous pinch of salt. Cook for another 5 to 6 minutes until everything is deeply browned and the pan is mostly dry. Add the garlic and red pepper flakes, stir for 1 minute, then remove from heat. Set aside.
-
In a large bowl, combine the ricotta, eggs, Parmesan, Italian seasoning, and salt. Stir until smooth.
-
Spread ½ cup of marinara sauce in an even layer on the bottom of the baking dish. Lay 3 noodles over the sauce. Spread one-third of the ricotta mixture over the noodles, then scatter one-third of the mushroom filling and a generous handful of spinach. Spoon on ½ cup of sauce and top with ¾ cup of mozzarella. Repeat this layering process two more times.
-
Add a final layer of noodles, the remaining marinara sauce, and the remaining mozzarella. Sprinkle with the ¼ cup Parmesan.
-
Cover tightly with foil and bake for 40 minutes. Remove the foil and bake for an additional 15 minutes, until the cheese is golden and bubbling. Let the lasagna rest for at least 15 minutes before cutting — a rested lasagna holds its layers instead of sliding apart.
3. Slow Cooker White Chicken Chili

White chicken chili has a devoted following for good reason: it’s lighter than traditional beef chili, endlessly customizable with toppings, and it practically makes itself in a slow cooker. Start it before you leave the house and come home to dinner.
Building Flavor in a Slow Cooker
The main challenge with slow cooker meals is that wet-cooking can mute certain flavors. The fix is blooming your spices — ground cumin, chili powder, and dried oregano cooked briefly in a skillet with a little oil before they go into the pot. This 90-second step wakes up the dried spices and ensures they contribute real depth rather than faint background flavor.
The Cream Cheese Finish
Stir two cubes of softened cream cheese directly into the chili in the final 30 minutes of cooking. It melts in completely, adds a silky richness without making the chili feel heavy, and helps the liquid thicken naturally. This is the step that separates a good white chicken chili from a great one.
Make-Ahead Storage Guide
- Refrigerator: Up to 4 days — the flavor improves noticeably after a full day of resting
- Freezer: Freeze without the cream cheese addition; stir it in when reheating for best texture
- Slow cooker timing: 6 to 7 hours on low, or 3 to 4 hours on high
Yield: Serves 6 to 8 Prep Time: 15 minutes Cook Time: 6 to 7 hours (slow cooker, low heat) Total Time: 6 hours 15 minutes active + hands-off cooking Difficulty: Beginner — minimal hands-on work; the slow cooker does most of the heavy lifting
Ingredients:
- 2 lbs boneless, skinless chicken breasts or thighs
- 3 cans (15 oz each) white beans (cannellini or Great Northern), drained and rinsed
- 2 cans (4 oz each) diced green chiles
- 4 cups low-sodium chicken broth
- 1 large yellow onion, diced
- 4 garlic cloves, minced
- 2 teaspoons ground cumin (bloomed — see method)
- 1½ teaspoons chili powder (bloomed)
- 1 teaspoon dried oregano (bloomed)
- 4 oz cream cheese, cubed and softened
- Juice of 1 lime
- Salt and black pepper to taste
For serving: Sour cream, shredded Monterey Jack, sliced jalapeños, cilantro, tortilla chips
Instructions:
-
In a small skillet over medium heat, add a drizzle of oil and the cumin, chili powder, and oregano. Cook, stirring, for 60 to 90 seconds until fragrant. Watch carefully — spices go from bloomed to burnt fast. Remove from heat.
-
Place the chicken in the bottom of the slow cooker. Add the white beans, green chiles, chicken broth, onion, garlic, and bloomed spices. Season generously with salt and black pepper. Stir to combine.
-
Cover and cook on low for 6 to 7 hours, or on high for 3 to 4 hours.
-
Remove the chicken and shred it using two forks. Return it to the pot.
-
Add the cubed cream cheese and stir well. Re-cover and cook on high for 20 to 30 minutes, stirring occasionally, until the cream cheese is fully melted and incorporated and the chili has thickened.
-
Stir in the lime juice, taste for salt, and serve with your toppings of choice.
4. Baked Ziti With Italian Sausage and Three Cheeses
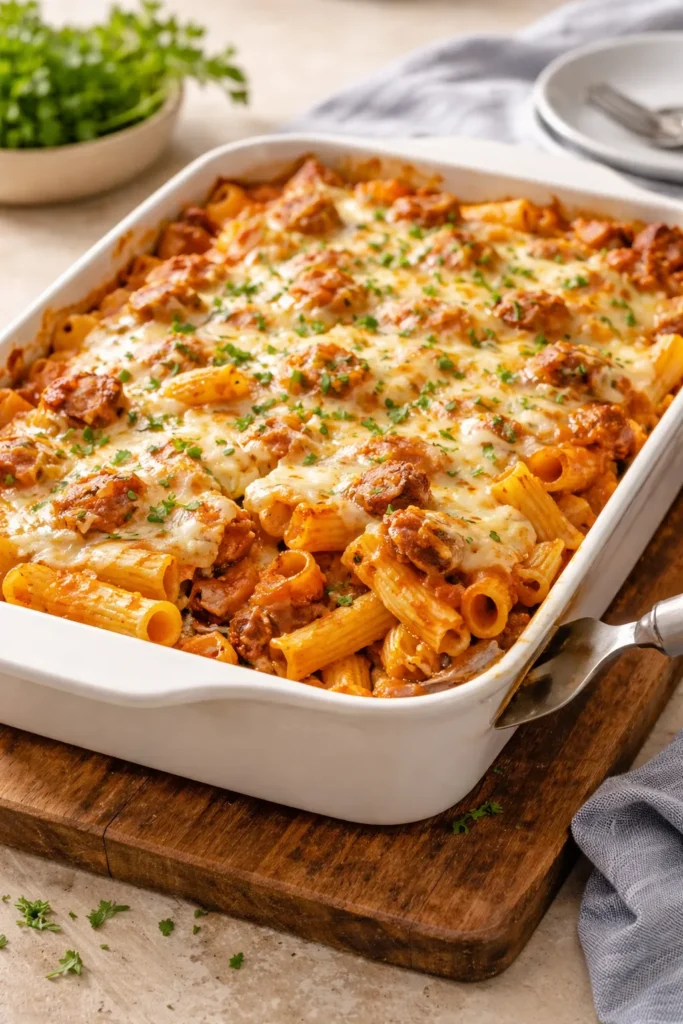
Baked ziti is the ultimate crowd-pleaser in make-ahead form. It assembles in about 20 minutes, bakes beautifully, and a single pan feeds a hungry table of eight without breaking a sweat. It’s also one of those dishes that reheats almost as well as it bakes fresh.
The Cheese Architecture That Matters
Three cheeses, three jobs. Ricotta gives the baked ziti its creamy body. Low-moisture mozzarella provides that pull-apart, stretchy layer everyone’s after. Pecorino Romano (sharper and saltier than Parmesan) gives the whole dish a savory backbone. Don’t substitute all three for a single cheese blend — each one brings something different to the pan.
Sausage Over Ground Beef
Italian sausage — removed from its casings and crumbled — brings a built-in seasoning advantage over plain ground beef. Fennel seed, garlic, and red pepper are already in there. That means the sauce develops character even if you keep the other ingredients simple. Use a mix of sweet and hot sausage if you want a gentle kick without committing to full heat.
Make-Ahead Storage Guide
- Refrigerator (assembled, unbaked): Cover tightly with foil and refrigerate for up to 2 days; add 10 to 15 minutes to covered baking time
- Refrigerator (baked): Keeps for 4 to 5 days
- Freezer: Freeze assembled and unbaked, well-wrapped, for up to 3 months
Yield: Serves 8 Prep Time: 25 minutes Cook Time: 45 minutes Total Time: 1 hour 10 minutes Difficulty: Beginner — straightforward assembly with simple layering
Ingredients:
- 1 lb ziti pasta
- 1 lb Italian sausage (sweet, hot, or a mix), casings removed
- 1 jar (24 oz) marinara sauce — or homemade tomato sauce
- 15 oz whole-milk ricotta
- 1 large egg
- 2½ cups shredded low-moisture mozzarella, divided
- ½ cup grated Pecorino Romano, divided
- 1 teaspoon dried basil
- ½ teaspoon garlic powder
- Salt and black pepper to taste
- Fresh basil, for serving
Instructions:
-
Preheat the oven to 375°F (190°C). Grease a 9×13-inch baking dish.
-
Cook the ziti in well-salted boiling water until 2 minutes shy of al dente — it will finish cooking in the oven. Drain and set aside.
-
In a large skillet over medium-high heat, cook the sausage, breaking it up with a wooden spoon, until no pink remains and the edges are browned, about 8 minutes. Drain excess fat. Add the marinara sauce, stir to combine, and simmer for 5 minutes.
-
In a medium bowl, stir together the ricotta, egg, 1 cup of the mozzarella, ¼ cup of the Pecorino, dried basil, garlic powder, salt, and black pepper.
-
Add the drained ziti to the skillet with the sausage sauce and toss to coat.
-
Pour half the ziti mixture into the baking dish. Dollop the ricotta mixture across the top in large spoonfuls. Add the remaining ziti and spread evenly.
-
Top with the remaining 1½ cups mozzarella and the remaining Pecorino. Cover with foil.
-
Bake covered for 25 minutes. Remove the foil and bake for another 15 to 20 minutes, until the cheese is golden and bubbling at the edges. Rest for 10 minutes before serving.
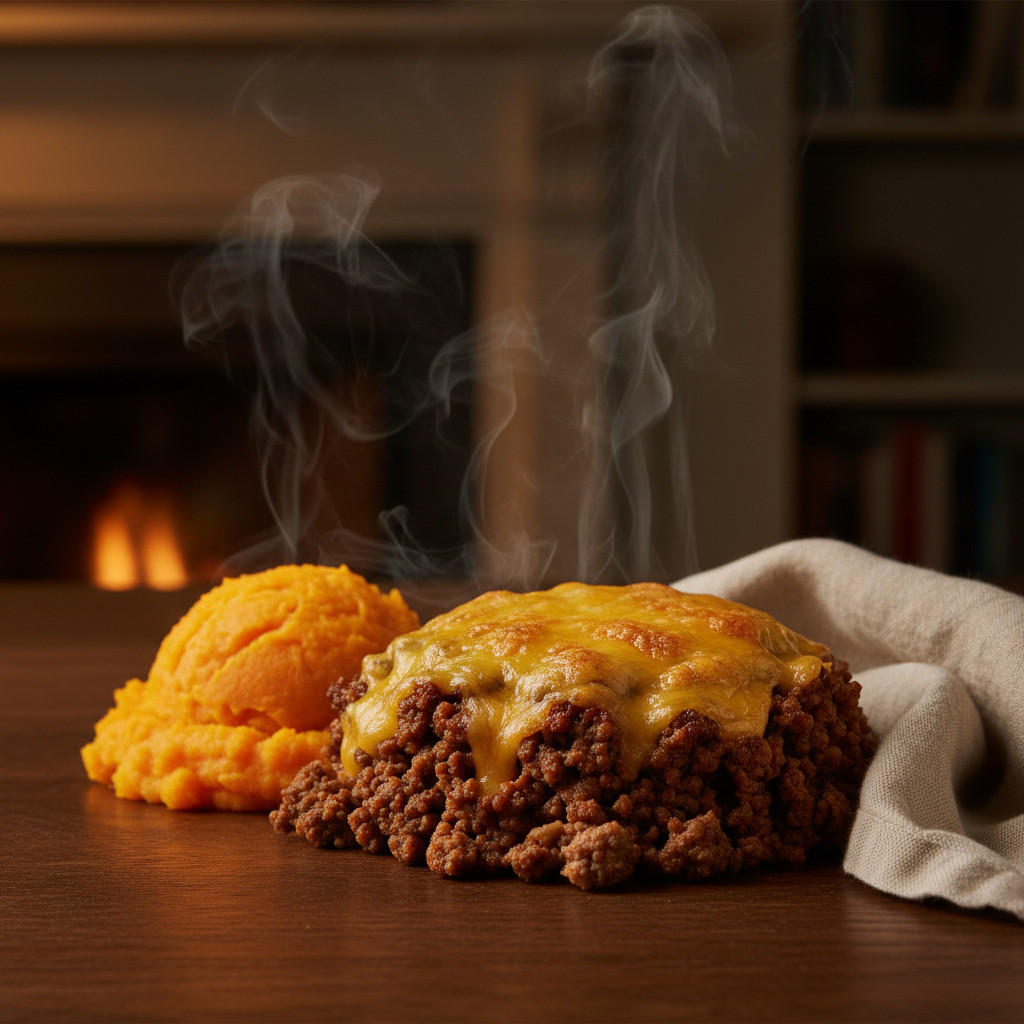
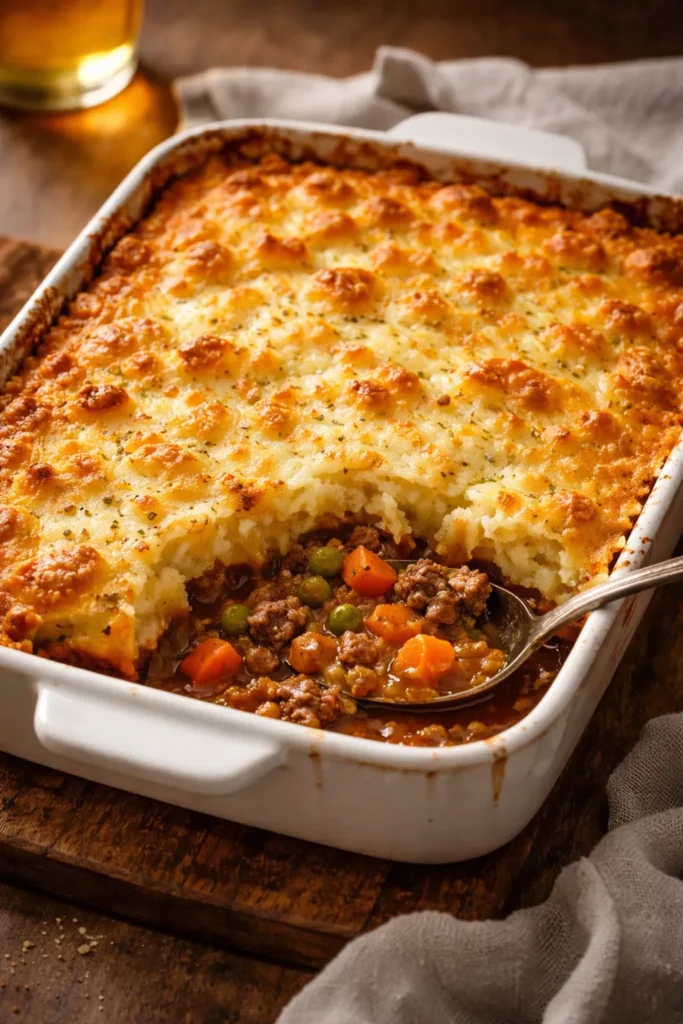
5. Shepherd’s Pie With Beef, Root Vegetables, and Smashed Potato Crust
Shepherd’s pie earns its reputation as one of the best make-ahead dinners because it’s a complete meal in a single baking dish — protein, vegetables, and starchy topping, all in one. The flavors deepen and meld beautifully overnight, making the next-day version arguably better than the first.
Why the Potato Crust Matters
The mashed potato topping isn’t just a lid — it’s a textural contrast. The top should go golden and slightly crisp in the oven while the interior stays fluffy and creamy. That crisp-to-creamy contrast is what makes every spoonful satisfying. Use Yukon Gold potatoes — their natural butteriness and lower starch content make for a crust that browns better than Russets.
Building the Filling With Real Depth
A splash of red wine, a tablespoon of tomato paste, and a good pour of Worcestershire sauce are the three flavor-builders that separate a proper shepherd’s pie filling from something that just tastes like stew. The tomato paste should cook in the pan for at least 2 minutes before anything else goes in — this step is what turns it from sharp and raw to sweet and rich.
Make-Ahead Storage Guide
- Refrigerator: Assembled and unbaked, up to 2 days; assembled and baked, up to 4 days
- Freezer: Wrap assembled, unbaked pie in plastic wrap and foil; freeze for up to 3 months. Bake from frozen at 350°F covered for 1 hour, then uncover for 20 minutes
Yield: Serves 6 Prep Time: 35 minutes Cook Time: 40 minutes Total Time: 1 hour 15 minutes Difficulty: Intermediate — multiple components, but each step is manageable
Ingredients:
For the filling:
- 1½ lbs ground beef (or a 50/50 mix of beef and lamb)
- 1 large yellow onion, finely diced
- 3 medium carrots, peeled and diced small
- 3 celery stalks, diced small
- 4 garlic cloves, minced
- 1 tablespoon tomato paste
- ½ cup dry red wine
- 1 cup frozen peas
- 1 cup beef broth
- 1½ tablespoons Worcestershire sauce
- 1 tablespoon all-purpose flour
- Salt, black pepper, and fresh thyme to taste
For the potato crust:
- 2½ lbs Yukon Gold potatoes, peeled and cut into 2-inch chunks
- 4 tablespoons unsalted butter
- ½ cup warm whole milk
- ½ cup sour cream
- Salt to taste
Instructions:
-
Boil the potatoes in well-salted water until completely tender when pierced with a fork, about 18 minutes. Drain thoroughly and return to the hot pot for 2 minutes over low heat, shaking occasionally, to drive off excess moisture. Mash with the butter, warm milk, and sour cream until smooth and creamy. Season with salt. Set aside.
-
Preheat the oven to 400°F (205°C).
-
In a large oven-safe skillet or Dutch oven over medium-high heat, cook the ground beef, breaking it up, until browned. Drain excess fat, leaving about 1 tablespoon in the pan.
-
Add the onion, carrots, and celery. Cook for 7 minutes, stirring occasionally, until softened. Add the garlic and tomato paste and cook, stirring, for 2 minutes until the paste darkens.
-
Pour in the red wine and cook for 2 minutes, scraping up the browned bits. Add the beef broth, Worcestershire, and flour. Stir well and simmer for 5 to 7 minutes until the sauce has thickened enough to coat a spoon. Stir in the frozen peas and fresh thyme. Season to taste.
-
Transfer the filling to a 9×13-inch baking dish if not using an oven-safe skillet. Spoon the mashed potato topping over the filling in large dollops, then spread evenly with a spatula. Run a fork across the surface to create texture — the ridges will crisp up and brown in the oven.
-
Bake uncovered for 30 to 35 minutes, until the potato crust is golden and the filling is bubbling around the edges. Let it rest for 10 minutes before serving.
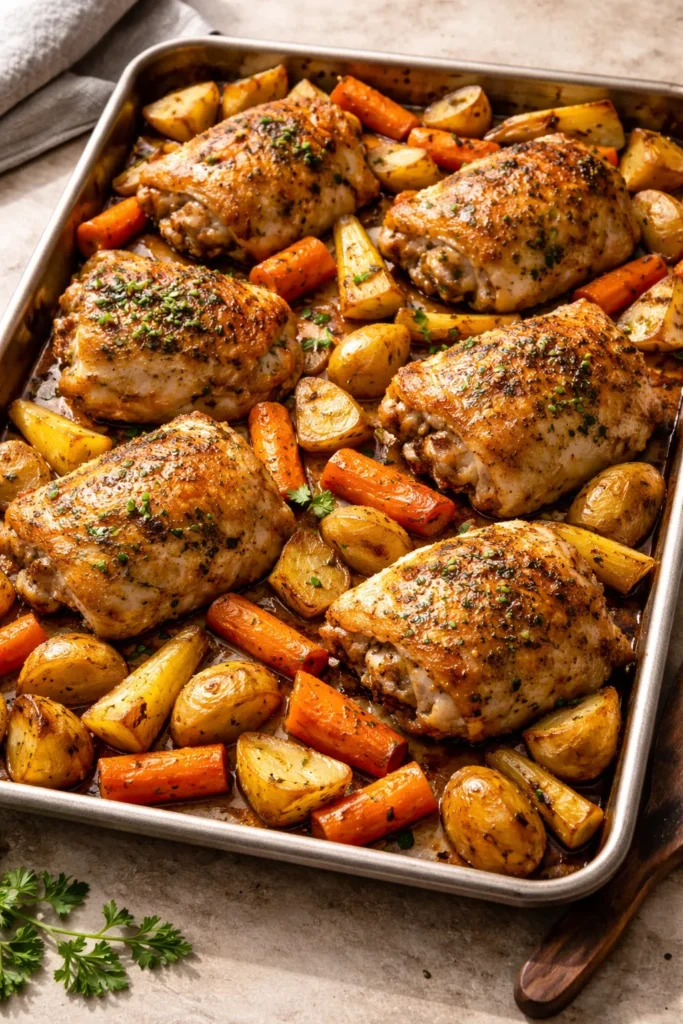
6. Sheet Pan Chicken Thighs With Roasted Root Vegetables
Sheet pan dinners are the workhorse of practical weeknight cooking, and this version with bone-in, skin-on chicken thighs hits the make-ahead sweet spot beautifully. You can marinate the chicken up to 24 hours ahead, prep and cut the vegetables the night before, and have everything oven-ready in under 10 minutes when you walk through the door.
Why Bone-In, Skin-On Thighs Are Non-Negotiable
Boneless chicken breasts dry out fast, especially when reheated. Bone-in, skin-on thighs stay moist and flavorful through initial cooking and reheating. The skin also creates a natural barrier that keeps the meat from drying out in the fridge. If you’re planning to eat this over multiple days, this choice of cut makes a meaningful difference.
The Marinade That Does Double Duty
A marinade of olive oil, lemon zest, garlic, smoked paprika, and dried herbs does two things: it seasons the chicken deeply and it coats the vegetables in enough fat to ensure proper caramelization at high heat. Roast at 425°F — at lower temperatures, the vegetables steam instead of roast, and you lose the caramelized edges that make them worth eating.
Make-Ahead Storage Guide
- Marinate the chicken: Up to 24 hours in the fridge — flavor only improves
- Prep the vegetables: Cut and refrigerate up to 2 days ahead in an airtight container
- Cooked leftovers: Refrigerate for up to 4 days; reheat in a 375°F oven for 15 minutes to re-crisp the skin
Yield: Serves 4 to 6 Prep Time: 15 minutes (plus marinating time) Cook Time: 40 minutes Total Time: 55 minutes active + up to 24 hours marinating Difficulty: Beginner — one pan, simple technique, minimal active involvement
Ingredients:
- 6 bone-in, skin-on chicken thighs
- 3 medium carrots, peeled and cut into 1-inch pieces
- 2 medium parsnips, peeled and cut into 1-inch pieces
- 1 lb small Yukon Gold potatoes, halved
- 1 large red onion, cut into wedges
- 4 tablespoons olive oil
- 4 garlic cloves, minced
- Zest of 1 lemon
- 2 teaspoons smoked paprika
- 1 teaspoon dried thyme
- 1 teaspoon dried rosemary
- 1 teaspoon kosher salt
- ½ teaspoon black pepper
Instructions:
-
In a large bowl or zip-top bag, combine 3 tablespoons of the olive oil, garlic, lemon zest, smoked paprika, thyme, rosemary, salt, and pepper. Add the chicken thighs and toss to coat completely. Marinate in the refrigerator for at least 1 hour and up to 24 hours.
-
Preheat the oven to 425°F (220°C). Line a large rimmed baking sheet with foil for easy cleanup.
-
In a bowl, toss the carrots, parsnips, potatoes, and red onion with the remaining tablespoon of olive oil and a pinch of salt and pepper. Spread them across the baking sheet in a single layer. Don’t pile them up — crowded vegetables steam instead of roast.
-
Nestle the marinated chicken thighs skin-side up among the vegetables. Scrape any remaining marinade from the bowl over the top.
-
Roast for 35 to 40 minutes, until the chicken skin is deep golden and crisp and an instant-read thermometer inserted into the thickest part of the thigh reads 165°F (74°C). The vegetables should be tender and caramelized at the edges.
-
Let rest 5 minutes before serving.
7. Stuffed Cabbage Rolls in Tomato and Herb Sauce

Cabbage rolls take some patience to assemble, but the payoff — a pot of tender, herb-scented rolls bathed in a rich tomato sauce — is genuinely worth the effort. More importantly, they refrigerate and freeze exceptionally well, making them one of the best weekend-to-weeknight investments in this entire list.
The Blanching Step You Can’t Skip
Before you can roll them, the cabbage leaves need to be blanched in boiling water for 2 to 3 minutes until pliable. Skip this and you’ll end up tearing the leaves when you try to fold them, which means falling-apart rolls and frustration. A head of cabbage in the freezer the night before — then thawed — works just as well as blanching if you want to save time.
What Goes Inside
A mixture of ground beef (or a beef and pork blend), cooked white rice, finely diced onion, garlic, fresh dill, and a whisked egg to bind it all together. The key is not overstuffing — about 3 tablespoons of filling per leaf gives you a compact roll that holds together through cooking and reheating.
Make-Ahead Storage Guide
- Refrigerator: Fully assembled and baked, keeps for 4 to 5 days — flavor improves significantly by day two
- Freezer: Freeze in the sauce in a covered baking dish for up to 3 months; reheat covered in a 350°F oven for 45 minutes from frozen
- Assemble ahead: Rolls can be assembled (unbaked, in sauce) and refrigerated up to 2 days before baking
Yield: Serves 6 (makes 12 rolls) Prep Time: 45 minutes Cook Time: 1 hour 15 minutes Total Time: 2 hours Difficulty: Intermediate — requires assembly patience, but the technique is forgiving
Ingredients:
For the rolls:
- 1 large head green cabbage (about 12 outer leaves)
- 1 lb ground beef
- ½ lb ground pork (or use 1½ lbs beef total)
- 1 cup cooked white rice, cooled
- 1 small yellow onion, finely grated or diced very small
- 3 garlic cloves, minced
- 2 tablespoons fresh dill, chopped (or 2 teaspoons dried)
- 1 large egg
- 1 teaspoon kosher salt
- ½ teaspoon black pepper
For the tomato sauce:
- 1 can (28 oz) crushed tomatoes
- 1 can (15 oz) diced tomatoes
- 1 tablespoon olive oil
- 1 small onion, diced
- 3 garlic cloves, minced
- 1 tablespoon red wine vinegar
- 1 teaspoon sugar
- 1 teaspoon dried oregano
- Salt to taste
Instructions:
-
Bring a large pot of water to a boil. Carefully remove 12 outer cabbage leaves and blanch them in batches for 2 to 3 minutes per batch until pliable. Transfer to a towel-lined surface to drain and cool.
-
Make the sauce: In a medium saucepan, heat olive oil over medium heat. Add the diced onion and cook for 5 minutes. Add garlic and cook 1 minute. Add crushed tomatoes, diced tomatoes, vinegar, sugar, and oregano. Simmer for 15 minutes. Season with salt.
-
Preheat the oven to 350°F (175°C).
-
In a large bowl, combine the ground beef, pork, cooked rice, grated onion, garlic, dill, egg, salt, and pepper. Mix gently with your hands until just combined — overworking makes the filling dense.
-
Place a cabbage leaf flat on your work surface. Spoon about 3 tablespoons of filling near the base of the leaf. Fold the sides inward, then roll up tightly from the bottom. Place seam-side down in a 9×13-inch baking dish. Repeat with all remaining leaves and filling.
-
Pour the tomato sauce over and around the rolls, making sure the tops are mostly covered.
-
Cover the baking dish tightly with foil. Bake for 1 hour, until the filling is cooked through and the cabbage is completely tender. Let rest for 10 minutes uncovered before serving.
8. French Onion Soup Mac and Cheese
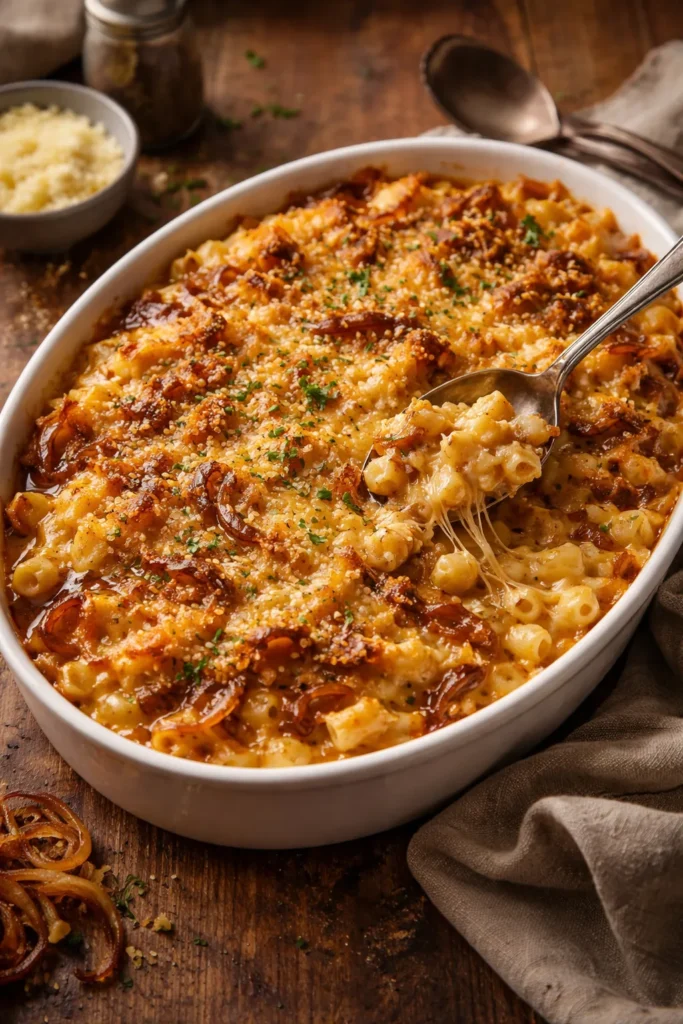
This is the kind of unexpected mashup that sounds like a gimmick right up until you taste it, and then it makes complete and obvious sense. Deeply caramelized onions, nutty Gruyère, rich béchamel, and pasta — it’s French onion soup in baked pasta form, and it reheats with remarkable grace.
The Caramelized Onion Commitment
The non-negotiable centerpiece of this dish is properly caramelized onions — and that means 45 to 55 minutes over medium-low heat, stirring every 5 to 10 minutes, until they collapse into a deep amber, jammy tangle. Not 15 minutes. Not 25 minutes. Forty-five. This is the step that makes the dish, and it cannot be rushed without sacrificing the entire flavor profile. Plan ahead: caramelized onions can be made up to a week in advance and refrigerated, making the rest of the assembly fast.
What Makes It Bake-Ahead Friendly
The béchamel-based sauce — made with Gruyère and finished with a spoonful of concentrated beef bouillon paste — holds beautifully in the fridge for two days before baking. The panko breadcrumb topping goes on just before it hits the oven, ensuring it stays crisp and golden. Don’t add the topping in advance or it’ll absorb moisture and turn soggy.
Make-Ahead Storage Guide
- Caramelized onions: Up to 7 days in the fridge, or frozen for 3 months
- Assembled (unbaked): Up to 2 days in the refrigerator before baking
- Baked leftovers: Refrigerate for up to 4 days; reheat individual portions with a splash of milk stirred in to revive the sauce
Yield: Serves 8 Prep Time: 20 minutes (plus 50 minutes caramelizing onions) Cook Time: 35 minutes Total Time: About 1 hour 45 minutes Difficulty: Intermediate — the caramelized onions require patience, but the rest is straightforward
Ingredients:
For the caramelized onions:
- 4 large yellow onions, thinly sliced
- 3 tablespoons unsalted butter
- 1 tablespoon olive oil
- ½ teaspoon kosher salt
- 3 tablespoons dry sherry or dry white wine
- 1 tablespoon fresh thyme leaves (or 1 teaspoon dried)
For the mac and cheese:
- 1 lb elbow macaroni or medium shells
- 4 tablespoons unsalted butter
- ¼ cup all-purpose flour
- 2½ cups whole milk, warmed
- 1 cup low-sodium beef broth
- 1 tablespoon beef bouillon paste (such as Better Than Bouillon)
- 2½ cups shredded Gruyère cheese
- ½ cup grated Parmesan
- Salt and white pepper to taste
For the topping:
- ¾ cup panko breadcrumbs
- 2 tablespoons melted butter
- ¼ cup fried shallots or crispy onions (store-bought works perfectly here)
Instructions:
-
Make the caramelized onions: Melt the butter with the olive oil in a wide, heavy skillet over medium-low heat. Add the onions and salt. Cook for 45 to 55 minutes, stirring every 5 to 10 minutes, until deeply golden and jammy. Add the sherry and thyme in the final 5 minutes and cook until the liquid absorbs. Remove from heat.
-
Preheat the oven to 375°F (190°C). Grease a 9×13-inch baking dish.
-
Cook the pasta in heavily salted boiling water until 2 minutes shy of al dente. Drain and set aside.
-
In the same pot, melt the butter over medium heat. Whisk in the flour and cook for 2 minutes, stirring constantly. Slowly pour in the warm milk and beef broth, whisking constantly to prevent lumps. Add the bouillon paste. Cook, stirring frequently, for 6 to 8 minutes until the sauce is thick enough to coat the back of a spoon cleanly.
-
Remove from heat. Stir in the Gruyère and Parmesan until completely melted. Fold in the caramelized onions. Season with salt and white pepper.
-
Add the cooked pasta to the sauce and fold together until every piece is coated. Transfer to the baking dish.
-
Combine the panko with the melted butter and scatter evenly over the top along with the crispy onions.
-
Bake uncovered for 25 to 30 minutes, until the top is deeply golden and the sauce is bubbling at the edges. Rest for 10 minutes before serving.
Smart Storage and Reheating Rules That Apply to All Eight
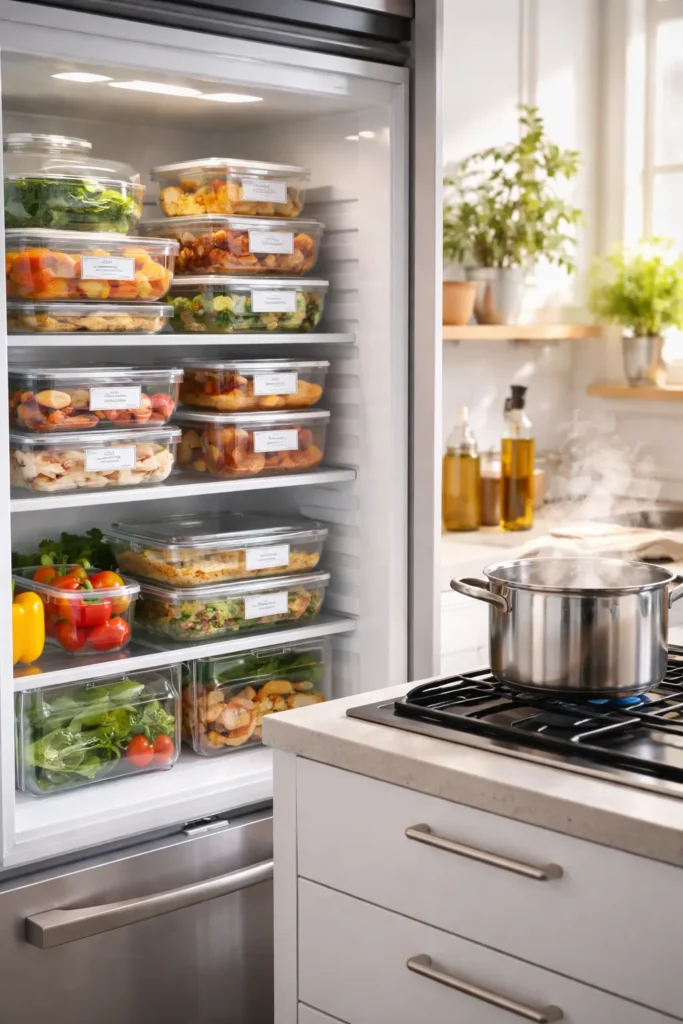
Getting the cooking right is only half the equation. How you store and reheat these dinners determines whether they taste as good on day four as they did when they came out of the oven.
Cool completely before refrigerating or freezing. Putting hot food directly into the fridge traps steam inside the container, which turns into condensation that waters down the dish and accelerates spoilage. Give everything at least 30 to 45 minutes at room temperature before lidding and storing.
Label everything with the dish name and the date made. This sounds obvious until you’re staring into a freezer at three identical foil-covered pans at 6 PM on a Thursday. A piece of masking tape and a marker takes 10 seconds and saves real frustration.
Reheat saucy dishes gently and low. High-heat reheating — especially in the microwave on full power — causes sauces to separate and proteins to turn rubbery. For stovetop reheating, use medium-low heat with a splash of water or broth and a lid to trap steam. For oven reheating, keep the dish covered with foil until the last 10 minutes.
Freezer meals should thaw overnight in the refrigerator, not on the counter. Countertop thawing creates uneven temperature zones that can allow the outer layers to enter the bacterial danger zone while the interior is still frozen solid.
Making This System Work for Your Week
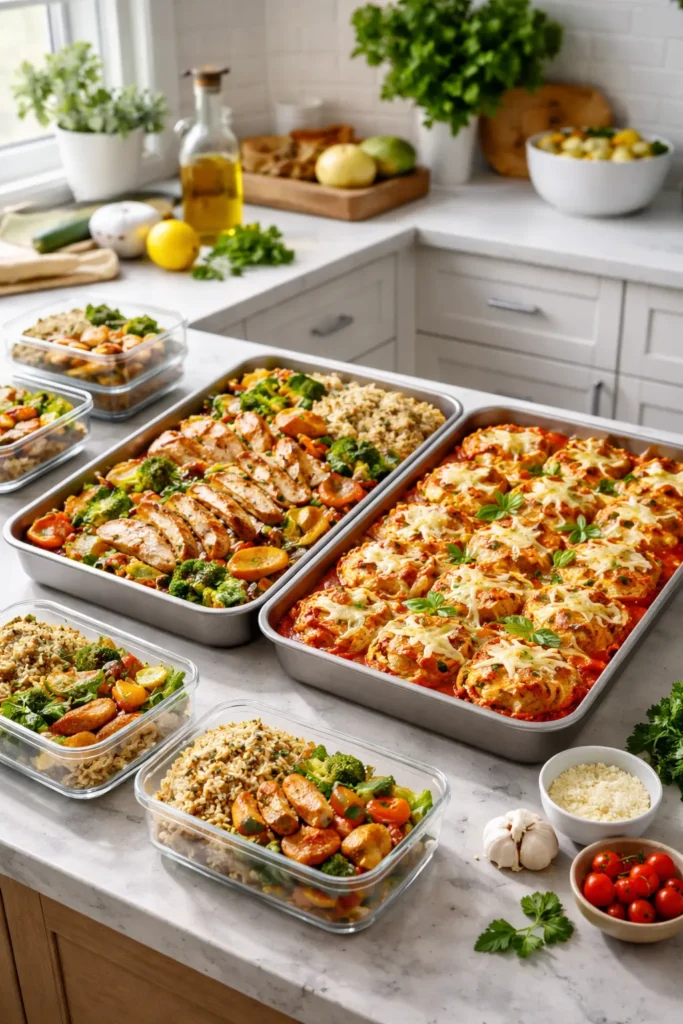
The eight dinners above are designed to give you options, not obligations. You don’t need to make all eight in one weekend marathon session — that approach leads to burnout fast. Instead, pick two dinners per week to make ahead, doubling the recipe where it makes sense. A doubled pot of chili gives you dinner on Sunday night and a full container for the freezer. A full tray of baked ziti feeds dinner for four with enough portions left over to carry you through two more weeknight lunches.
The other pattern that works well is staggering your make-ahead sessions — make the lasagna or shepherd’s pie on Saturday when you have a bit of time, and make the sheet pan chicken or the chili on Sunday in under 30 minutes of active prep. By Monday evening you already have two complete dinners waiting for you, and the stress of the week’s cooking is significantly reduced before it even starts.
Batch cooking proteins separately is another layer of this system. A tray of roasted chicken thighs, made in bulk, can feed into the white chicken chili, top a simple grain bowl, or get folded into pasta mid-week. That kind of ingredient flexibility means your make-ahead sessions do double or triple duty.
Final Thoughts
Make-ahead cooking isn’t a trend or a food influencer strategy — it’s just the practical application of cooking smarter instead of cooking harder. Every one of these eight dinners has been designed to hold up over days, travel well to the freezer, and deliver real satisfaction when you finally sit down to eat.
The biggest shift happens when you stop thinking of cooking as a daily obligation and start treating it as occasional, intentional effort that pays forward into the week ahead. One focused hour on a Sunday afternoon is worth four stress-free weeknight dinners — and that math makes the whole system worth embracing.
Pick one recipe from this list to make this week. Get familiar with the process, see how it holds in your fridge, notice how much easier that particular night becomes. Then add another one the following week. Within a month, you’ll have a personal rotation of dinners that practically run themselves.