There’s a particular kind of hunger that strikes around 9 PM. Not the kind that leads you to the refrigerator for leftovers — the kind that demands something sweet, something satisfying, and something that doesn’t require pulling out a stand mixer or consulting a three-page recipe. You know the feeling. The craving hits, patience is short, and the idea of waiting an hour for a cake to bake feels almost offensive.
The good news is that some of the most satisfying desserts on the planet come together in under 30 minutes. Not because they cut corners on flavor, but because their designs are genuinely simple — built around bold ingredients and clever techniques that do the heavy lifting fast. A tablespoon of butter melting in a skillet, a ripe banana caramelizing at the edges, bittersweet chocolate going glossy and smooth in a bowl — these are desserts that reward you quickly and taste like you planned the whole thing.
What follows are eight quick desserts worth keeping in your back pocket: the ones that solve a craving without drama, impress guests without stress, and work reliably whether you’re an experienced home cook or someone who mostly uses the oven as a storage drawer for sheet pans.
Table of Contents
- The Pantry Habits That Make Quick Desserts Possible
- 1. Chocolate Mug Cake
- The Core Recipe Breakdown
- Ways to Customize It
- 2. Bananas Foster
- What Makes the Sauce Work
- Serving Options Beyond Ice Cream
- 3. Three-Ingredient Peanut Butter Cookies
- Choosing the Right Peanut Butter
- Variations That Add One or Two More Ingredients
- 4. Chocolate-Covered Strawberries
- Getting the Dipping Right
- Chocolate Selection Matters
- 5. Stovetop Rice Pudding
- The Flavor Additions That Elevate It
- Serving It Warm vs. Chilled
- 6. Skillet Brownie
- Reading the Doneness Cues
- What to Put on Top
- 7. Five-Minute Fruit Ice Cream
- The Ratios That Work
- Making It Richer Without an Ice Cream Machine
- 8. Rocky Road No-Bake Fudge
- Setting and Slicing
- Variations Worth Trying
- Stocking Your Kitchen for Last-Minute Sweetness
- Final Thoughts
The Pantry Habits That Make Quick Desserts Possible
Before getting into the desserts themselves, it’s worth talking about the setup that makes all of them work. Quick desserts aren’t really about luck — they’re about keeping the right things on hand.
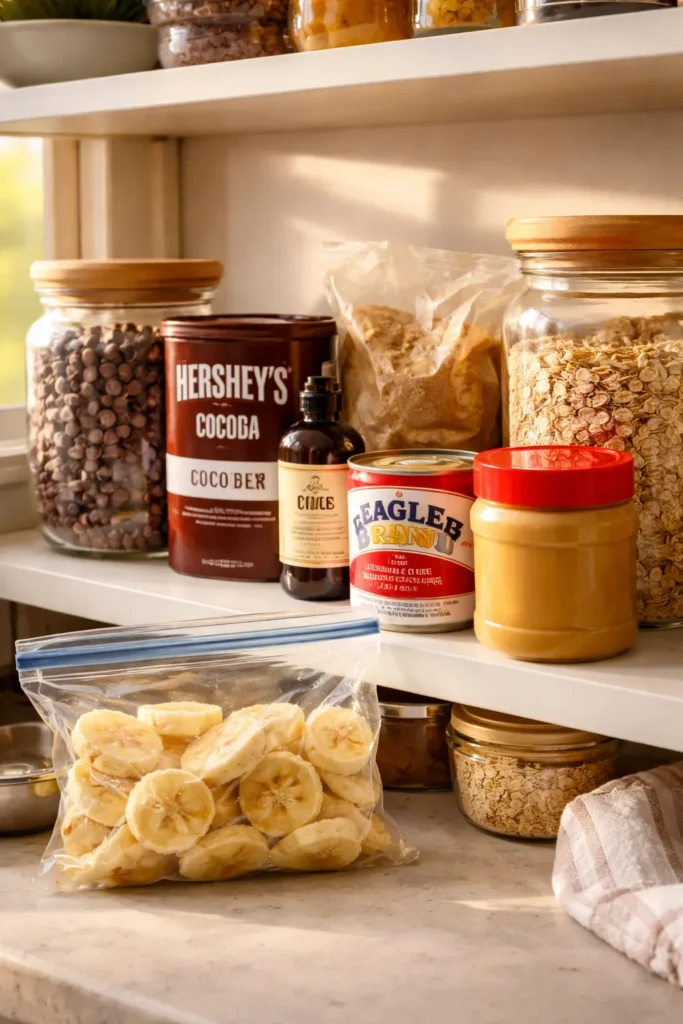
A well-stocked dessert pantry doesn’t need to be elaborate. Bittersweet or semisweet chocolate (either chips or a good bar), peanut butter, sweetened condensed milk, brown sugar, vanilla extract, and quality cocoa powder cover the base of probably 80% of fast desserts. In the freezer, ripe bananas sliced and stored in a zip-lock bag are a secret weapon for everything from quick ice cream to warm skillet desserts.
Canned goods carry more weight than people expect, too. Canned fruit filling can become a cobbler in minutes. Sweetened condensed milk can become fudge, ice cream, or a silky caramel sauce with almost no effort. Keep a bag of rolled oats and a few bags of frozen fruit, and you’re never more than 20 minutes away from something genuinely good.
The desserts below are built around ingredients like these — things that are already sitting in most kitchens, waiting to become something worth eating.
1. Chocolate Mug Cake

Few things in the dessert world are more satisfying on a deadline than a chocolate mug cake. You mix everything in the vessel you eat from, cook it in the microwave in under two minutes, and end up with a warm, fudgy, single-serving cake that scratches every chocolate craving with zero cleanup. It’s the kind of dessert that feels like a trick — until you realize how genuinely good a properly made version tastes.
The key distinction between a great mug cake and a rubbery, dense disappointment comes down to two things: don’t overmix the batter, and don’t overcook it. Most mug cake disasters happen because people blast the microwave at full power for two full minutes. Thirty seconds too long and you’ve got a hockey puck. Stop the microwave when the center still looks ever so slightly underdone — it finishes cooking from residual heat in about 30 seconds.
The Core Recipe Breakdown
The base formula that works every time: 3 tablespoons all-purpose flour, 3 tablespoons granulated sugar, 2 tablespoons unsweetened cocoa powder, 1 egg, 2 tablespoons milk, 2 tablespoons vegetable oil, and a small pinch of salt. Stir until just combined — a few small lumps are fine — and microwave on high for 60 to 90 seconds. Drop a few chocolate chips into the center before cooking and they melt into a gooey pocket that makes the whole thing feel far more indulgent than it is.
Ways to Customize It
- Add a tablespoon of peanut butter pressed into the center before cooking for a molten PB-chocolate core
- Swap the milk for strong brewed coffee to deepen the chocolate flavor without a mocha taste
- Top with a spoonful of vanilla ice cream immediately after cooking — the contrast of hot cake and cold ice cream is the whole point
- A pinch of espresso powder stirred into the dry ingredients intensifies the chocolate without any coffee flavor coming through
Worth knowing: Use a 12-ounce or larger mug — the batter rises as it cooks and a small cup will overflow in the microwave.
2. Bananas Foster
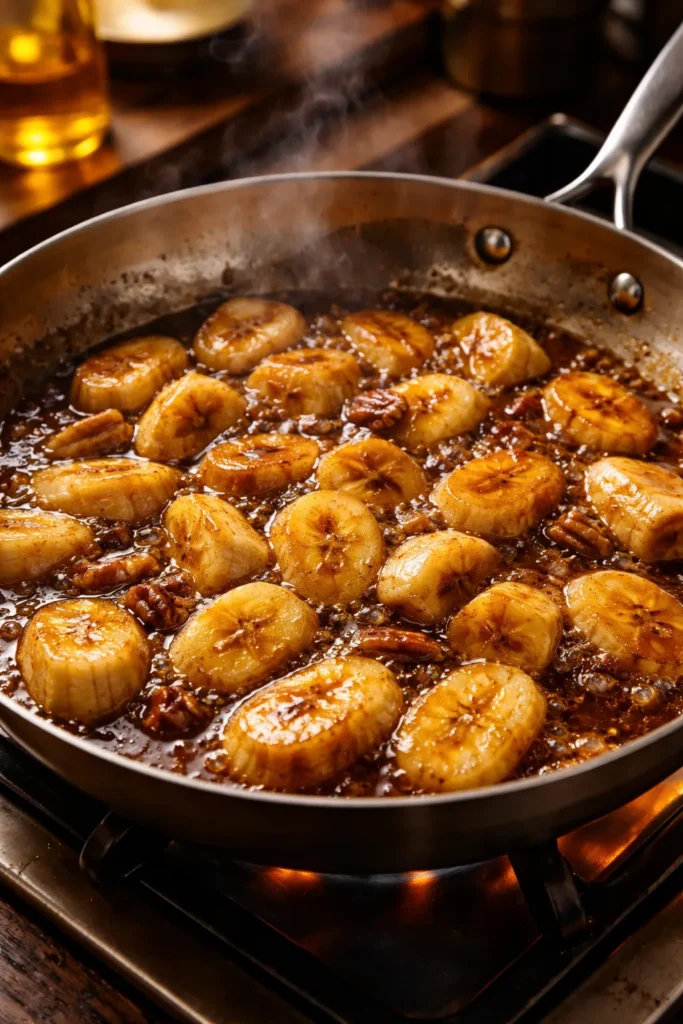
Bananas Foster is a New Orleans classic that has no business being as fast as it is. From start to finish, you’re looking at 15 to 20 minutes — most of which is passive — and what you get at the end is warm, caramel-coated bananas in a buttery rum sauce spooned over vanilla ice cream. It looks dramatic. It tastes extraordinary. The effort level sits somewhere between “barely trying” and “casually impressive.”
The dish was created at Brennan’s Restaurant in New Orleans, and the original version involves flambéing the rum for theatrical effect. The flambé step is optional — skipping it doesn’t affect the final flavor — but if you’re cooking for guests and want a moment of drama, carefully tilting the pan toward the gas flame (or using a long lighter) while everyone watches from a safe distance is absolutely worth it.
What Makes the Sauce Work
The sauce builds in layers. Butter goes into the pan first, then brown sugar melts into it until it starts to bubble. Cinnamon joins next, then banana slices cut on the diagonal so they caramelize in the sauce instead of breaking down. The rum (or banana liqueur if you have it) goes in last, either flambéed or simply simmered for 60 seconds until the alcohol cooks off and leaves behind a deep, warm flavor.
Serving Options Beyond Ice Cream
Vanilla ice cream is the classic pairing, but Bananas Foster is genuinely excellent spooned over:
- Thick slices of French toast or waffles for a brunch-worthy dessert hybrid
- Pound cake — store-bought works perfectly here
- Crepes filled with sweetened ricotta
- A bowl of oatmeal, for people who like their breakfast aggressively good
The sauce keeps in the refrigerator for up to four days and reheats gently in a small saucepan over low heat. Make a double batch and thank yourself later.
3. Three-Ingredient Peanut Butter Cookies
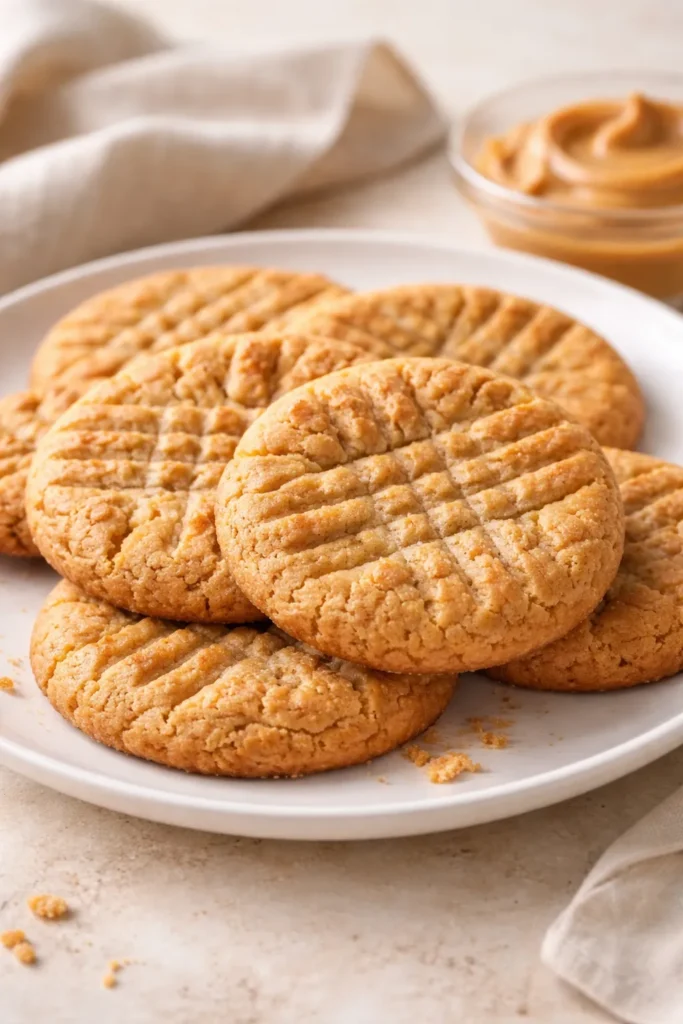
The skepticism around three-ingredient peanut butter cookies is understandable. A cookie with no flour, no butter, and no baking soda sounds like it shouldn’t work — and yet it does, consistently and deliciously. One cup of peanut butter, one cup of granulated sugar, and one large egg is genuinely all it takes. Mix, roll into balls, press with a fork to make the classic criss-cross pattern, and bake at 350°F for 10 to 12 minutes.
What you get is a cookie with crispy edges, a slightly chewy center, and an intensely concentrated peanut butter flavor that no flour-based cookie can quite replicate. They’re naturally gluten-free, which makes them a reliable option when you’re baking for people with dietary restrictions. The batch takes about 30 minutes from start to finish, and the recipe scales up easily.
Choosing the Right Peanut Butter
This is where the recipe lives or dies. Use a standard, commercial creamy peanut butter — Jif, Skippy, or Peter Pan all work. Natural peanut butter (the kind where the oil separates and you have to stir it) will make the cookies greasy and prone to spreading into flat discs. The stabilizers in commercial peanut butter give the cookies their structure, so this isn’t a place to swap for artisan.
Crunchy peanut butter works if you prefer texture, but the cookies will be a bit more fragile at the edges.
Variations That Add One or Two More Ingredients
- Press a chocolate kiss into the center of each cookie right out of the oven for a peanut butter blossom
- Stir 1/2 cup of mini chocolate chips into the dough before rolling
- Add 1 teaspoon of vanilla extract and a pinch of sea salt for a slightly more complex flavor
- Roll the dough balls in cinnamon sugar before pressing with a fork
Pro tip: These cookies continue to firm up as they cool. Pull them from the oven when they look just barely set — they should still look slightly underdone in the center. If they look done in the oven, they’ll be overdone by the time they cool.
4. Chocolate-Covered Strawberries
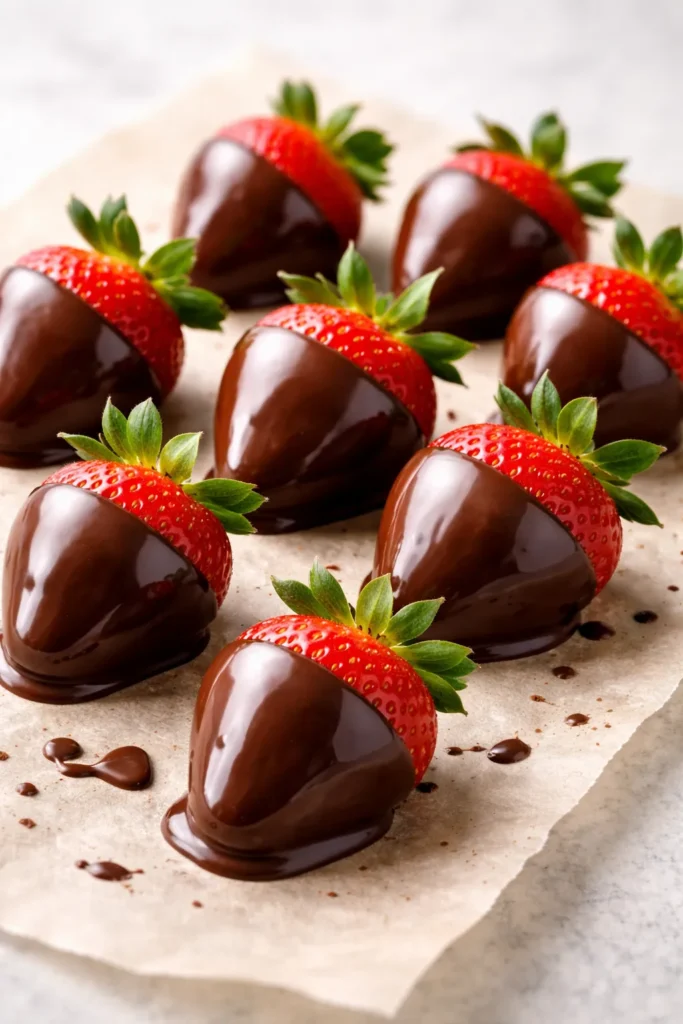
Chocolate-covered strawberries have a reputation for being fancy, which makes it almost funny how little effort goes into them. Melt good chocolate — either in a double boiler or in 30-second microwave bursts, stirring between each — dip the strawberries, and set them on a parchment-lined sheet pan to harden. Done. The whole process takes under 20 minutes, and the result looks like it came from a specialty chocolatier.
The secret to a smooth, shiny coating is adding a small amount of fat to the melted chocolate. A teaspoon of coconut oil or vegetable shortening whisked into the melted chocolate keeps it fluid enough for clean dipping and gives the set coating that professional-looking glossy finish. Without it, the coating can look dull or develop a white bloom as it cools.
Getting the Dipping Right
Strawberries must be completely dry before dipping — even a single drop of water will cause the chocolate to seize. Wash them well ahead of time and pat dry thoroughly, then let them air dry at room temperature for at least 30 minutes before you start melting chocolate. Hold each berry by the stem or leaves, dip, let the excess drip off, and lay it on parchment.
If you want to add a topping — flaky sea salt, crushed pistachios, freeze-dried raspberries, or a drizzle of white chocolate — do it immediately while the coating is still wet.
Chocolate Selection Matters
The type of chocolate changes the entire character of the dessert:
- Bittersweet or dark chocolate (60-70% cacao): Rich, slightly complex, balances the sweetness of the strawberry
- Milk chocolate: Sweeter, crowd-pleasing, works especially well for kids
- White chocolate: Sweet and creamy, pairs with a sprinkle of crushed graham cracker or coconut flakes
Store finished strawberries at room temperature for up to four hours, or loosely covered in the refrigerator for up to a day. Avoid airtight containers — condensation makes the chocolate coating weep.
5. Stovetop Rice Pudding
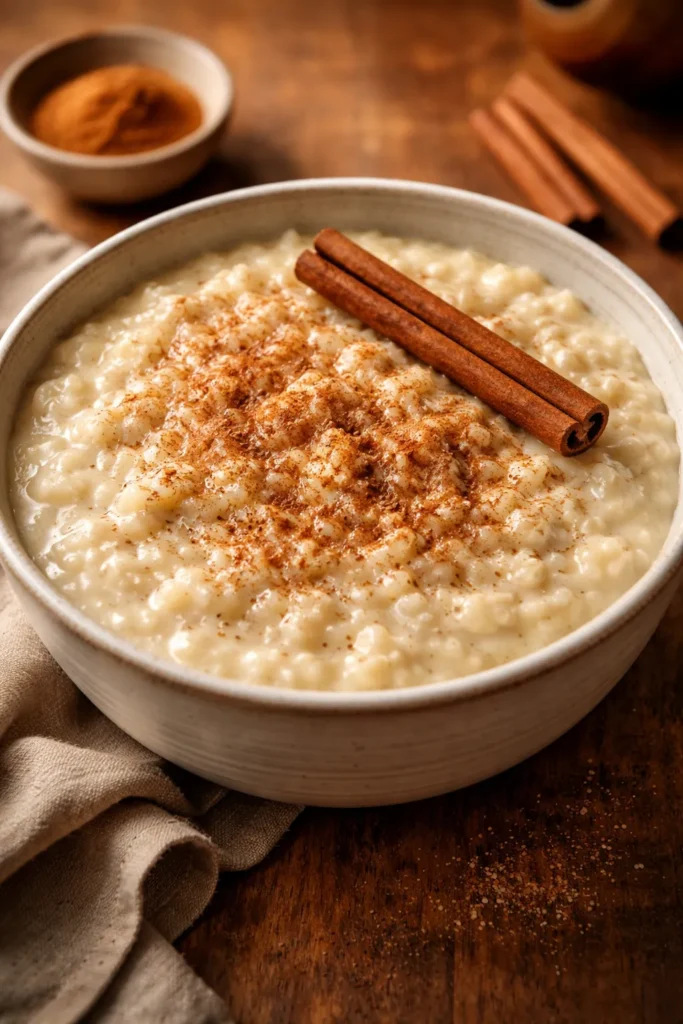
Rice pudding sounds humble, but a well-made version — creamy, lightly spiced, with a vanilla depth that makes it feel genuinely comforting — is one of the most satisfying quick desserts in existence. The key is using already-cooked rice. Leftover white rice from dinner becomes a lush dessert in about 20 minutes on the stovetop, which makes this one of the smartest pantry desserts around.
Combine the cooked rice with whole milk or a mix of whole milk and heavy cream, a pinch of salt, sugar to taste, and vanilla extract. Cook over medium heat, stirring frequently, until the mixture thickens into a porridge-like consistency that coats the back of a spoon. The starch from the rice naturally thickens the liquid without any additional thickeners needed.
The Flavor Additions That Elevate It
A basic rice pudding is good. An embellished one is memorable. The add-ins that make the biggest difference:
- A cinnamon stick simmered in the milk while the pudding cooks, then removed before serving, gives warmth without overwhelming spice
- Freshly grated nutmeg over the top at serving adds a floral, faintly peppery note
- A strip of lemon or orange zest cooked in the milk and removed adds brightness that cuts the richness
- For a coconut version, swap half the whole milk for full-fat coconut milk and add a handful of toasted coconut flakes on top
Serving It Warm vs. Chilled
Warm rice pudding straight from the pot, topped with a knob of butter and a dusting of cinnamon, is a different dessert than chilled rice pudding from the fridge. Both are worth making. Warm it’s deeply comforting and velvety. Cold, it thickens considerably — stir in a splash of milk when reheating to bring it back to the right consistency, or serve it cold as-is with jam or fresh fruit spooned on top.
Worth knowing: Rice pudding keeps in the refrigerator for four days. It actually improves overnight as the flavors meld.
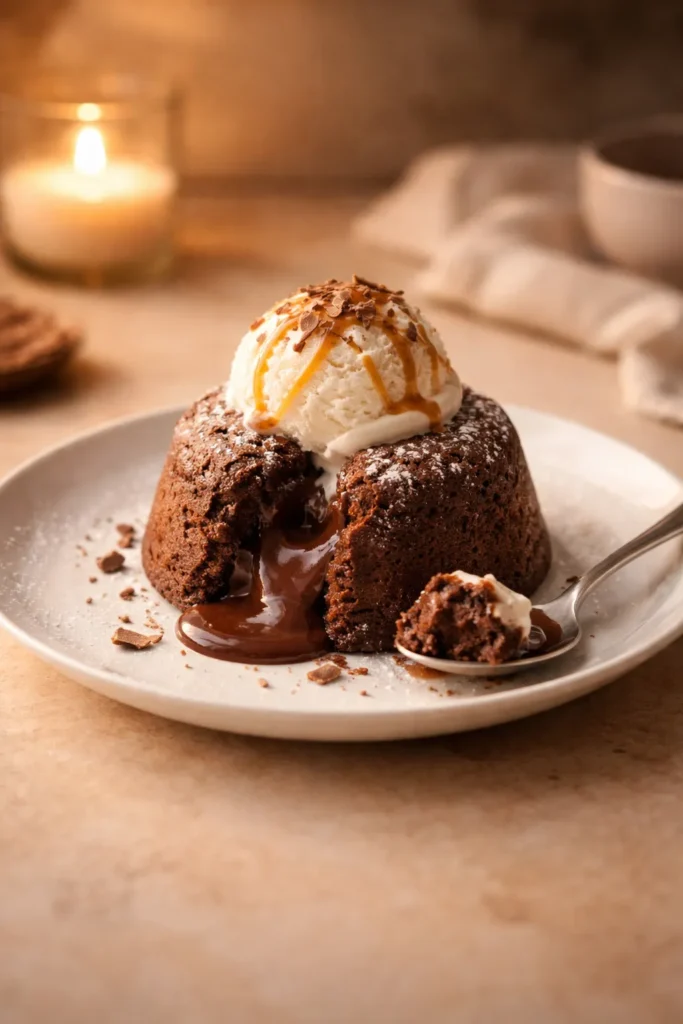
6. Skillet Brownie
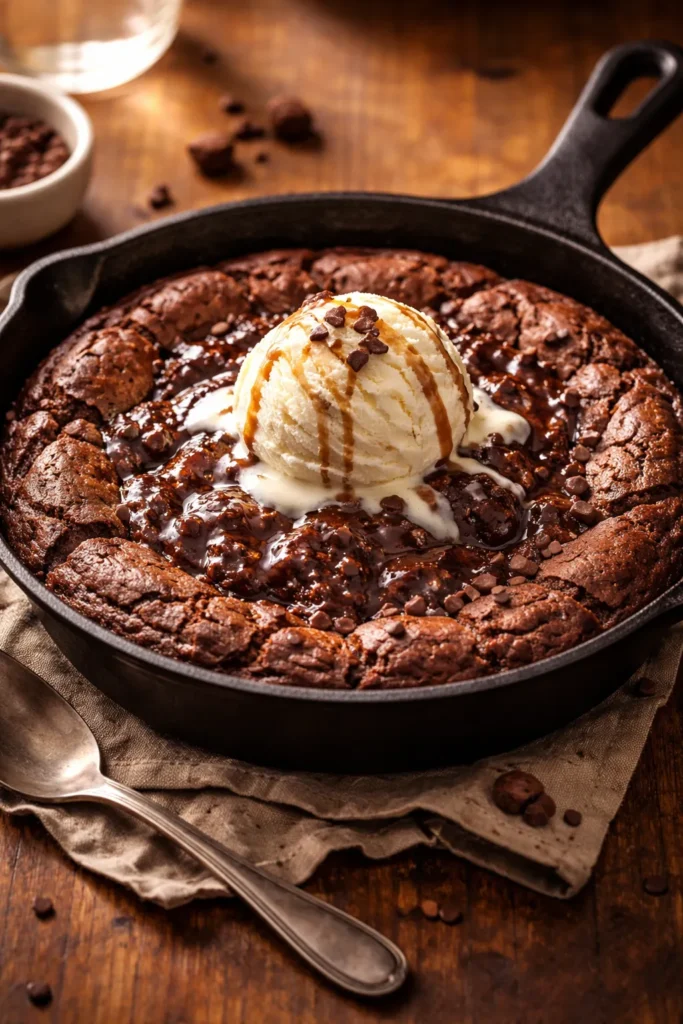
A skillet brownie — one large brownie baked directly in a cast iron or oven-safe skillet — is faster than a pan of brownies for one important reason: you don’t have to wait for it to cool before serving. The whole point is to eat it warm, directly from the skillet, with a scoop of ice cream melting over the top. The edges get crispy and caramelized against the hot iron, while the center stays fudgy and barely set. It’s one dessert, one pan, no slicing required.
Most skillet brownie recipes come together in about 35 to 40 minutes total, with less than 10 minutes of actual hands-on work. Melt butter and chocolate together (either in the microwave or in the skillet itself over low heat), whisk in sugar, eggs, vanilla, and a small amount of flour, then bake at 350°F for 20 to 25 minutes.
Reading the Doneness Cues
The trickiest part of a skillet brownie is pulling it at the right moment. The edges should be set and pulling away slightly from the pan, while the center — when you gently shake the skillet — still wobbles like loosely set Jello. A toothpick inserted in the center should come out with moist crumbs, not wet batter, but definitely not clean. If it comes out clean, it’s already overcooked.
The brownie finishes cooking from residual heat in the skillet after it leaves the oven. Giving it 5 minutes to rest before serving is enough — the center will firm up just slightly while the edges stay crispy.
What to Put on Top
- A scoop of good vanilla ice cream, placed in the center so it melts into the brownie as you eat
- Flaky sea salt scattered over the top right before serving
- A drizzle of store-bought or homemade caramel sauce
- Crushed pretzels for sweet-salty crunch
7. Five-Minute Fruit Ice Cream
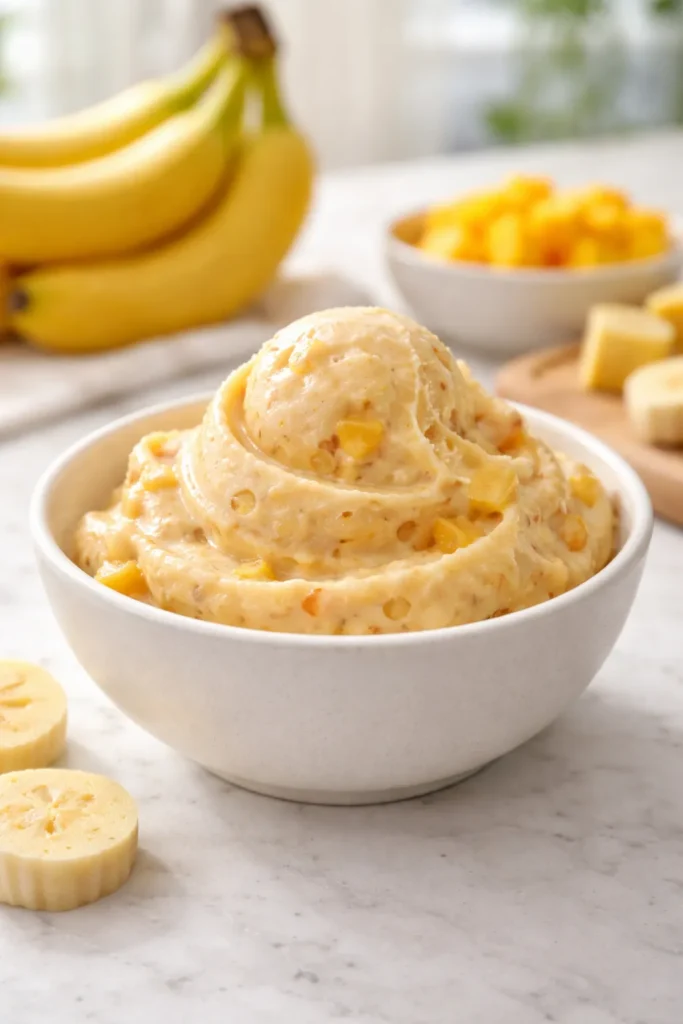
No ice cream machine, no churning, no advance planning — this method turns frozen fruit into a smooth, creamy dessert in under five minutes using a blender or food processor. The technique works because frozen fruit, when blended with just enough liquid to get things moving, breaks down into a texture that’s remarkably similar to soft-serve ice cream. No additional freezing required. You blend it and eat it immediately.
Frozen bananas are the most popular base because their natural sugars and high pectin content create an exceptionally creamy result — the so-called “nice cream” effect. But frozen mango, raspberries, blueberries, and cherries all work beautifully, either solo or combined. Add a splash of milk or coconut cream to help the blender move, and that’s genuinely all the technique involved.
The Ratios That Work
- Pure banana ice cream: 2 to 3 frozen bananas, broken into chunks, blended with 1 to 2 tablespoons of milk. That’s it.
- Mango: 2 cups frozen mango, 2 tablespoons coconut cream, squeeze of lime juice
- Berry: 2 cups frozen mixed berries, 3 tablespoons whole milk, 1 tablespoon honey
- Chocolate banana: 2 frozen bananas, 2 tablespoons cocoa powder, 1 tablespoon peanut butter
Making It Richer Without an Ice Cream Machine
For a creamier, more indulgent result that still requires no churning, blend frozen fruit with sweetened condensed milk instead of plain milk. The condensed milk adds sweetness, richness, and body simultaneously. If you want to freeze the mixture into a firmer ice cream rather than eating it immediately as soft-serve, pour it into a loaf pan, smooth the top, and freeze for two to three hours — no churning required, and the condensed milk prevents icy crystallization.
Pro tip: Don’t try to use a standard blender without enough liquid — you’ll burn out the motor. A food processor handles frozen fruit much better at low liquid ratios.
8. Rocky Road No-Bake Fudge
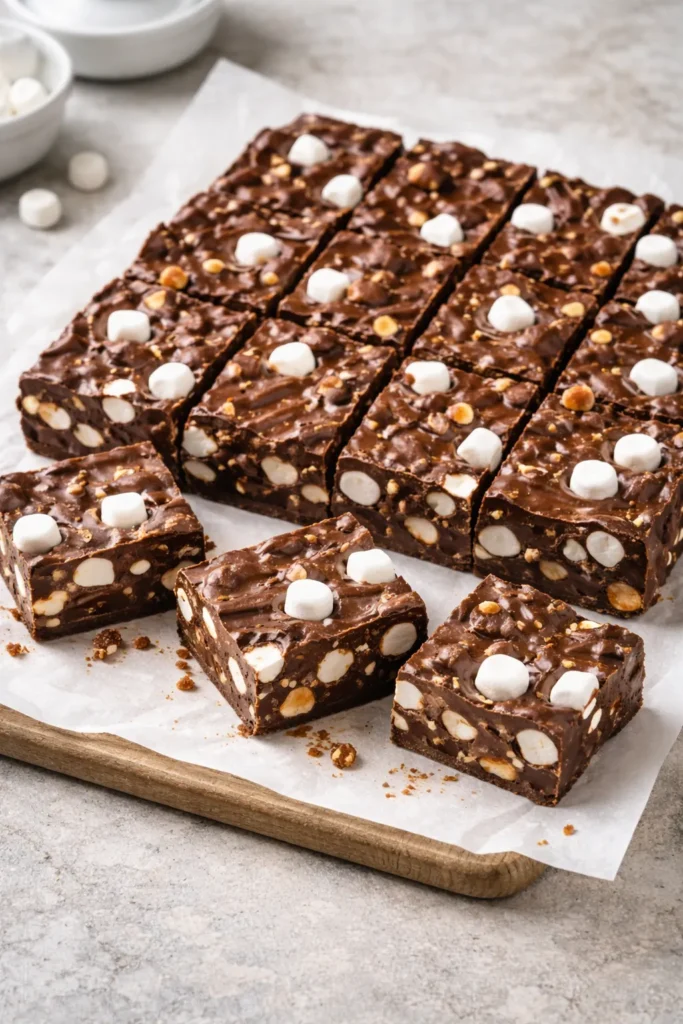
Rocky road fudge requires no oven, no candy thermometer, and no specialized equipment. The entire process involves melting chocolate chips and peanut butter together in a saucepan over low heat, stirring until smooth, removing from the heat, folding in mini marshmallows, pouring into a lined pan, and letting it set. The result is a dense, intensely chocolaty, chewy-in-all-the-right-ways confection that slices cleanly once chilled and tastes exactly like the childhood candy bar it’s named after.
The ratio that works best: two cups of semisweet chocolate chips to half a cup of peanut butter, melted together over low heat and stirred constantly until completely smooth. Remove from heat before adding the marshmallows — if the chocolate is too hot, the marshmallows will dissolve rather than staying in distinct pockets. Two cups of mini marshmallows folded in gives the right distribution without overwhelming the chocolate.
Setting and Slicing
Pour the mixture into an 8×8-inch pan lined with parchment paper (the overhang makes lifting the whole slab out effortless) and spread into an even layer with a spatula. Refrigerate for at least two hours until completely firm. Lift the entire slab out by the parchment, peel it back, and cut into squares using a sharp knife wiped clean between cuts for neat edges.
The fudge keeps in an airtight container in the refrigerator for up to two weeks, or in the freezer for up to three months — making it one of the better make-ahead quick desserts in this list.
Variations Worth Trying
- Add 1 cup of salted peanuts or cashews along with the marshmallows for crunch
- Swap peanut butter for almond butter or sunflower seed butter for a different flavor profile
- Use white chocolate chips instead of semisweet for a sweeter, butterscotch-adjacent result
- Press a thin layer of crushed graham crackers into the bottom of the pan before pouring the fudge for a s’mores-inspired base
Worth knowing: Dark chocolate (60% cacao or higher) makes a more sophisticated, less sweet version of this fudge that pairs particularly well with a cup of espresso or strong black tea.
Stocking Your Kitchen for Last-Minute Sweetness
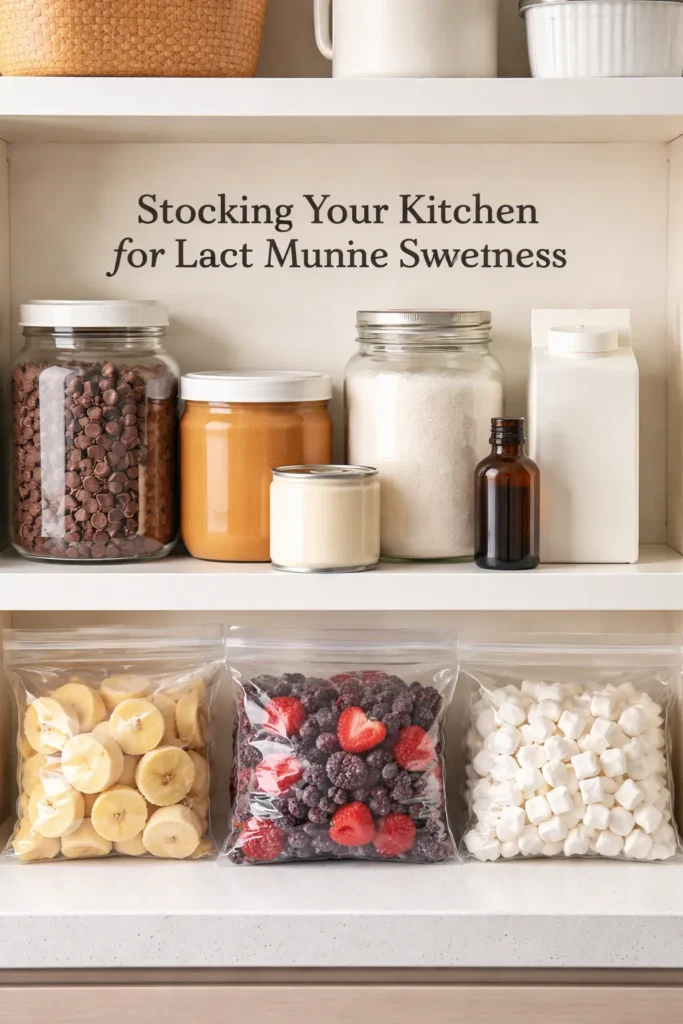
Having the ingredients for any of these eight desserts on hand at all times requires less pantry real estate than you’d think. The overlap between recipes is significant — many of the same ingredients power multiple desserts across this list.
The short list of what to keep stocked:
- Semisweet chocolate chips (they melt, they dip, they go into brownies and fudge)
- Creamy peanut butter, commercial brand
- Sweetened condensed milk
- Brown sugar and granulated sugar
- Unsweetened cocoa powder
- Vanilla extract
- Whole milk or a small carton of heavy cream
- Frozen ripe bananas (peel, slice, freeze in zip-lock bags)
- Frozen mixed berries
- Mini marshmallows
Organized properly, these ingredients take up one shelf and a small section of your freezer. But they give you the raw material for everything from chocolate-dipped strawberries to a five-minute fruit sorbet to a full batch of no-bake fudge, all without a grocery run.
The psychological shift that matters most: stop thinking of quick desserts as a lesser category. These aren’t compromises. A perfect skillet brownie eaten warm from the pan with ice cream is genuinely more satisfying than a mediocre layer cake that took three hours to assemble. Speed and quality aren’t opposites — they just require you to understand which techniques deliver both.
Final Thoughts
The best dessert for any given moment isn’t the most technically demanding one — it’s the one you’ll actually make. All eight of these come together when the craving is real and the patience is limited, which is exactly when a reliable, fast dessert matters most.
Start with the mug cake if you want immediate chocolate gratification with one bowl and two minutes. Go with the skillet brownie when you have 40 minutes and want something shareable. The no-bake rocky road fudge is the one to make on a Sunday when you want dessert ready for the entire week without turning the oven on.
What makes quick desserts genuinely work isn’t just speed — it’s understanding the few techniques that produce outsized results: melting chocolate correctly, not overcooking mug cakes, keeping peanut butter cookies underdone in the oven. Master those small details and every one of these eight recipes becomes not just fast, but consistently good.
The craving will come back. It always does. Now you’re ready for it.