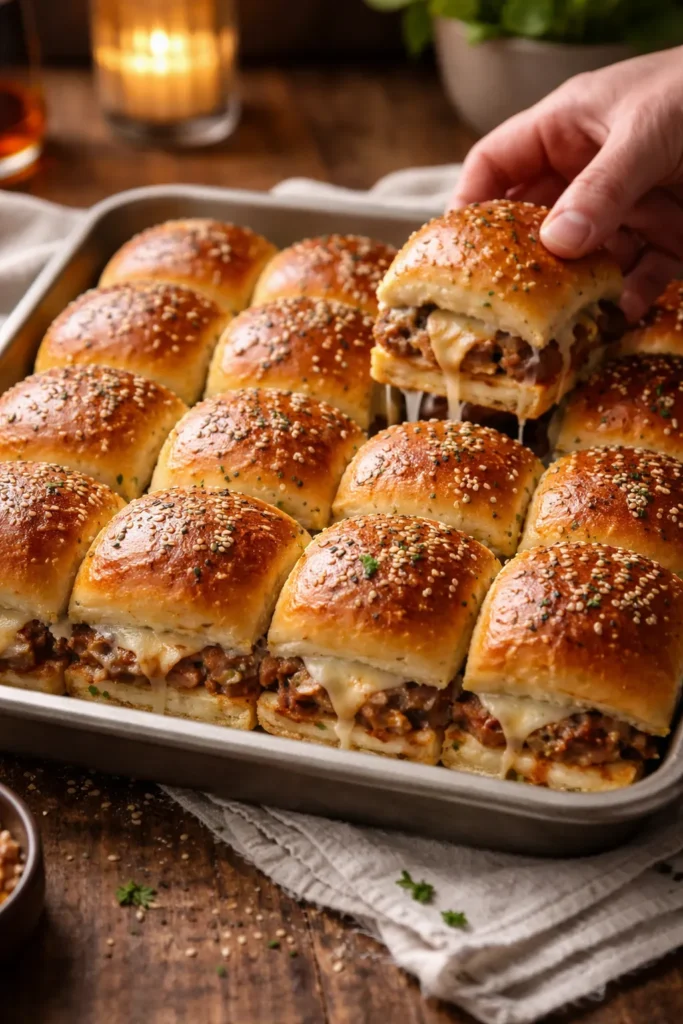
Few things disappear from a party table faster than a tray of warm, golden-topped sliders fresh out of the oven. There’s something almost magnetic about them — the soft, pillowy rolls, the melted cheese pulling apart as you grab one, the way they’re just the right size to eat in two bites without making a mess. Whether you’re hosting a game night watch party or bringing a dish to a friend’s potluck, sliders solve the eternal problem of feeding a crowd without standing over a stove all day.
The genius of slider recipes is how forgiving and flexible they are. You can go classic with seasoned beef and cheddar, swing bold with buffalo chicken, or lean into comfort with saucy meatballs and marinara. The method is almost always the same — assemble, brush, bake — and the results are consistently crowd-pleasing. Hawaiian rolls are the gold standard for good reason: their slight sweetness plays off savory fillings brilliantly, and they stay soft inside while crisping gently on top.
Each recipe below has been designed to feed a standard crowd of 10 to 12, takes minimal hands-on prep, and can largely be assembled ahead of time. Some need a little marinating or slow-cooking for the filling, but the actual assembly is always quick. The payoff is a tray of warm, cheesy, saucy bites that vanish before halftime ends.
Table of Contents
- 1. Classic Cheeseburger Sliders
- 2. Ham and Cheese Sliders with Dijon Butter
- 3. Buffalo Chicken Sliders
- 4. Meatball Marinara Sliders
- 5. BBQ Pulled Pork Sliders
- 6. Philly Cheesesteak Sliders
- 7. Chicken Bacon Ranch Sliders
- 8. Pizza Sliders
- Tips for Making All These Slider Recipes Better
- The Case for Hawaiian Rolls (and When to Deviate)
- How to Keep Sliders from Getting Soggy
- Make-Ahead Strategy for Party Stress-Free Hosting
- Doubling the Recipe
- Final Thoughts
1. Classic Cheeseburger Sliders
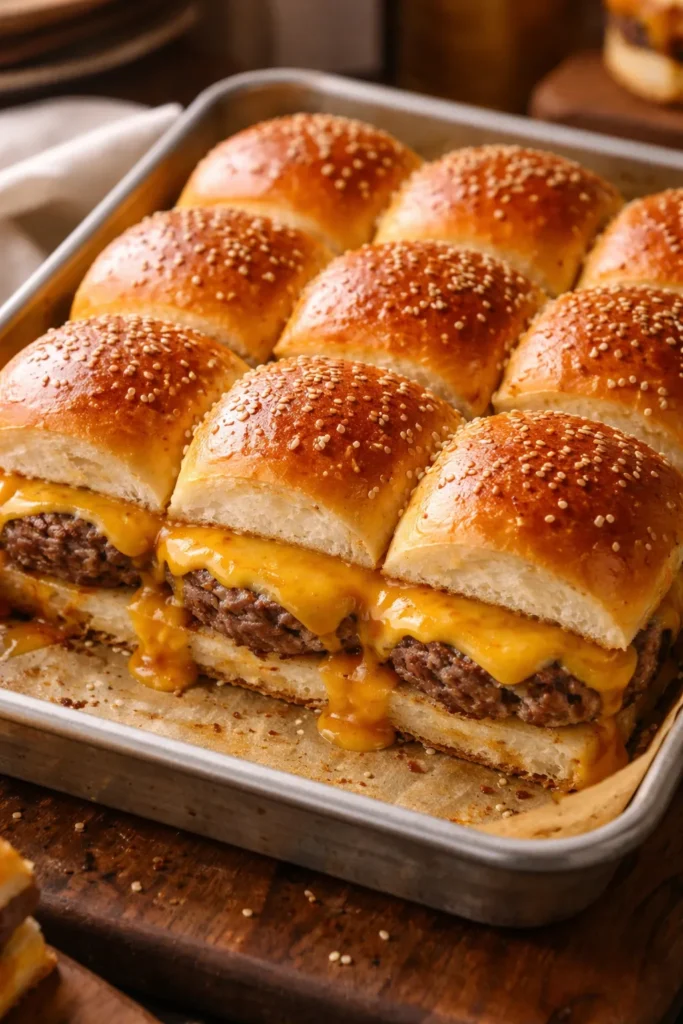
These are the ones that started the slider obsession for a reason. A flat, seasoned beef patty baked right into the bottom of a connected roll creates that iconic smash-burger texture — crispy on the outside edges, juicy in the middle — and a blanket of American cheese melts over the whole thing in the oven. They taste like the best version of a fast-food cheeseburger, made entirely at home with better ingredients and no drive-through required.
The trick most people miss is pressing the raw beef directly into the pan in one flat layer before laying the rolls on top. This is what gives you even coverage across every slider, and it means no patty-flipping, no individual shaping. One pan, one step, done.
Yield: 12 sliders Prep Time: 15 minutes Cook Time: 20 minutes Total Time: 35 minutes Difficulty: Beginner — no special equipment needed, and the flat-pan method makes this one of the easiest slider recipes to pull off.
For the Sliders:
- 1½ lbs ground beef (80/20 blend for best flavor)
- 1 teaspoon garlic powder
- 1 teaspoon onion powder
- 1 teaspoon kosher salt
- ½ teaspoon black pepper
- 12 Hawaiian slider rolls, kept connected
- 6 slices American cheese (or sharp cheddar)
- ½ cup diced white onion
- ½ cup dill pickle chips
For the Butter Glaze:
- 4 tablespoons unsalted butter, melted
- 1 teaspoon Worcestershire sauce
- 1 teaspoon sesame seeds
- ½ teaspoon garlic powder
Prepare the Beef and Bake:
- Preheat the oven to 350°F (175°C). Lightly grease a 9×13-inch baking dish with cooking spray.
- In a large bowl, combine the ground beef, garlic powder, onion powder, salt, and pepper. Mix just until the seasonings are evenly distributed — do not overwork the meat or the texture will turn dense and rubbery.
- Press the seasoned beef in an even, flat layer across the bottom of the prepared baking dish, covering the entire surface from edge to edge.
- Bake the beef uncovered for 12 minutes, until mostly cooked through but not yet browned on top. Remove from the oven and carefully drain any excess fat by tilting the pan and soaking it up with paper towels.
- Lay the cheese slices over the hot beef in an even layer, slightly overlapping. Scatter the diced onion evenly over the cheese.
- Using a serrated knife, slice the connected rolls horizontally in one clean cut to separate the tops from the bottoms. Place the bottom half of the rolls directly on top of the cheese and onions — yes, you’re putting the buns on top of the filling at this stage. Then flip the entire pan contents: carefully invert onto a cutting board so the beef ends up on top of the buns. (Alternatively, simply assemble in a second pan: place roll bottoms in a clean dish, add the cooked beef sheet on top, then the cheese.)
- Easier method: Place the bottom rolls in a separate greased baking dish. Lay the beef (cut to fit) on top, add the cheese, scatter pickles, then top with the roll tops.
- Whisk together the melted butter, Worcestershire sauce, sesame seeds, and garlic powder. Brush generously over the tops of the rolls.
- Cover the pan tightly with foil and bake for 10 minutes. Remove the foil and bake for another 5 minutes, until the tops are golden brown and the cheese is fully melted.
- Let rest for 3 minutes, then cut along the roll seams to separate into individual sliders. Serve immediately with ketchup, mustard, and extra pickles on the side.
Pro tip: Lay a sheet of parchment over the beef before pressing it into the pan to keep your hands clean and get a perfectly even layer without tearing.
2. Ham and Cheese Sliders with Dijon Butter
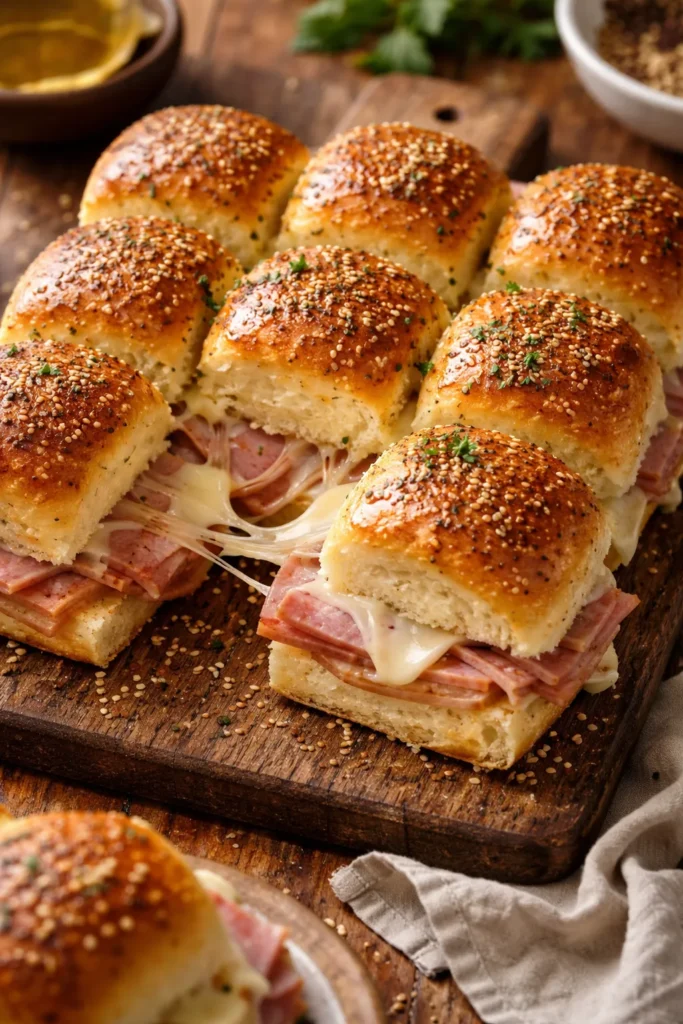
Ham and cheese sliders are the definition of a reliable crowd-pleaser — and that reliability comes entirely from the butter glaze. The glaze is what transforms a simple deli sandwich into something people ask for the recipe of. A mix of melted butter, Dijon mustard, poppy seeds, and a touch of honey soaks into the tops of the rolls as they bake, creating a slightly sticky, deeply savory crust that makes these impossible to eat just one of.
Use thinly sliced deli ham — Black Forest or honey ham both work beautifully — and Swiss cheese for the most authentic flavor. If you want a sharper bite, provolone is a great swap.
Yield: 12 sliders Prep Time: 10 minutes Cook Time: 25 minutes Total Time: 35 minutes Difficulty: Beginner — assemble and bake with no cooking required beyond the oven. Best Served: Hot from the oven, immediately after cutting.
For the Sliders:
- 12 Hawaiian slider rolls, kept connected
- ¾ lb thinly sliced Black Forest or honey ham
- 6 slices Swiss cheese (or provolone)
- 1 tablespoon yellow mustard (for spreading on the rolls)
For the Dijon Butter Glaze:
- 4 tablespoons unsalted butter, melted
- 1 tablespoon Dijon mustard
- 1 tablespoon honey
- 1 teaspoon poppy seeds
- ½ teaspoon Worcestershire sauce
- ¼ teaspoon garlic powder
Assemble and Bake:
- Preheat the oven to 350°F (175°C). Lightly grease a 9×13-inch baking dish.
- Slice the connected rolls horizontally with a serrated knife. Place the bottom half in the prepared baking dish.
- Spread the yellow mustard in a thin, even layer over the cut surface of the bottom rolls.
- Layer the ham evenly across the rolls, folding the slices to build up 2 to 3 layers of thickness — don’t be skimpy here; a thin filling is the most common slider mistake.
- Lay the cheese slices over the ham, covering fully.
- Place the top half of the rolls on and press down gently.
- In a small bowl, whisk together the melted butter, Dijon, honey, poppy seeds, Worcestershire, and garlic powder until smooth. Pour and brush the mixture evenly over the tops and sides of the rolls, letting it drip down into the seams.
- Cover the dish tightly with aluminum foil. Bake for 15 minutes covered, then remove the foil and bake for an additional 8 to 10 minutes until the tops are golden and the cheese is bubbling around the edges.
- Cool for 2 minutes, then slice along the roll seams and serve.
Worth knowing: These can be fully assembled the night before (glaze and all), covered tightly, and refrigerated. Add 5 extra minutes to the covered baking time if going straight from the fridge to the oven.
3. Buffalo Chicken Sliders

These are the slider for anyone who loves heat. Shredded chicken tossed in tangy buffalo sauce and topped with creamy, cooling ranch or blue cheese dressing — the contrast between spicy and creamy is exactly what makes each bite so addictive. They hit all the same flavor notes as buffalo wings without the mess of bones and napkins, which makes them far more practical for a game night spread.
Chicken thighs hold up better than breasts here. They shred more easily, stay moister through baking, and carry the buffalo sauce without drying out. You can cook them in a slow cooker during the day or simmer them on the stovetop in 20 minutes if you’re short on time.
Yield: 12 sliders Prep Time: 20 minutes Cook Time: 30 minutes (stovetop) or 6 hours (slow cooker) Total Time: 50 minutes active Difficulty: Beginner to Intermediate — the stovetop method is quick; the slow cooker method is almost entirely hands-off.
For the Buffalo Chicken Filling:
- 1½ lbs boneless, skinless chicken thighs
- ½ cup Frank’s RedHot Original sauce (or your preferred buffalo sauce)
- 2 tablespoons unsalted butter
- 1 teaspoon garlic powder
- 1 teaspoon onion powder
- ½ teaspoon smoked paprika
- Salt and black pepper to taste
For the Sliders:
- 12 Hawaiian slider rolls, kept connected
- 6 slices Monterey Jack cheese (or mozzarella)
- ¼ cup ranch or blue cheese dressing
- ¼ cup thinly sliced celery (optional, for crunch)
For the Butter Topping:
- 3 tablespoons unsalted butter, melted
- ½ teaspoon garlic powder
- ½ teaspoon dried parsley
Make the Filling and Assemble:
- Stovetop method: Place chicken thighs in a medium saucepan and cover with water or chicken broth by about 1 inch. Bring to a boil over medium-high heat, then reduce to a gentle simmer. Cook for 18 to 20 minutes, until the chicken reads 165°F internal temperature and shreds easily with two forks.
- Slow cooker method: Place the chicken thighs in the slow cooker with ¼ cup of buffalo sauce poured over. Cook on low for 5 to 6 hours or high for 3 to 3.5 hours, until fork-tender.
- Shred the cooked chicken using two forks directly in the pot or a large bowl. Add the remaining buffalo sauce, butter, garlic powder, onion powder, smoked paprika, and a pinch of salt and pepper. Toss to coat thoroughly — the chicken should be generously coated and glossy, not dry.
- Preheat the oven to 350°F (175°C). Grease a 9×13-inch baking dish.
- Slice the rolls horizontally and place the bottoms in the prepared dish.
- Drizzle ranch or blue cheese dressing over the bottom rolls, then pile the buffalo chicken on top in an even layer. Add sliced celery if using, then lay cheese slices over the chicken.
- Place the tops of the rolls on. Whisk the melted butter with garlic powder and parsley, then brush over the roll tops.
- Cover with foil and bake for 12 minutes. Uncover and bake for 5 to 7 more minutes until the tops are lightly golden and the cheese has melted completely.
- Slice and serve with extra buffalo sauce and dressing on the side.
4. Meatball Marinara Sliders
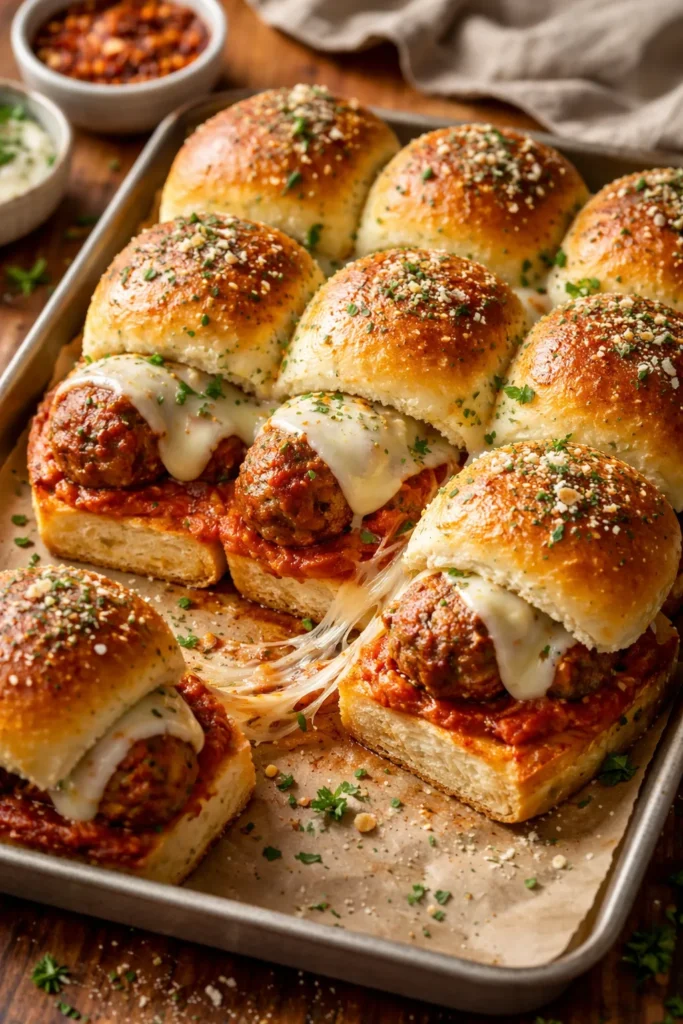
Think of these as Italian meatball subs in miniature form — saucy, cheesy, and deeply comforting. They’re one of the heartier slider recipes in this collection, which makes them a smart choice when you need something that’ll actually fill people up. A tray of meatball sliders alongside a green salad is a complete dinner, not just a snack.
You can absolutely use frozen pre-cooked meatballs to save time, and no one will judge you for it. A good jarred marinara sauce works beautifully here too. The real difference-maker is the garlic-herb butter on top and the provolone or mozzarella that melts down over the edges of the rolls.
Yield: 12 sliders Prep Time: 15 minutes Cook Time: 25 minutes Total Time: 40 minutes Difficulty: Beginner — especially if using frozen meatballs and jarred sauce.
For the Sliders:
- 12 Hawaiian slider rolls, kept connected
- 24 small frozen meatballs (about 1 oz each), cooked according to package directions (or homemade)
- 1½ cups marinara sauce (store-bought or homemade)
- 6 slices provolone cheese (or whole-milk mozzarella)
- ¼ cup freshly grated Parmesan cheese
For the Garlic Herb Butter:
- 4 tablespoons unsalted butter, melted
- 2 cloves garlic, finely minced (or ½ teaspoon garlic powder)
- 1 teaspoon Italian seasoning
- ½ teaspoon dried parsley
- Pinch of red pepper flakes (optional)
Assemble and Bake:
- Preheat the oven to 350°F (175°C). Grease a 9×13-inch baking dish with cooking spray or butter.
- Cook frozen meatballs according to package directions until heated through. While warm, toss them in ¾ cup of the marinara sauce until fully coated.
- Slice the connected rolls horizontally and place the bottom half in the prepared baking dish.
- Spread a thin layer of the remaining marinara sauce across the cut surface of the bottom rolls.
- Arrange 2 sauced meatballs per roll slot across the bottom buns. Press down gently so the meatballs don’t roll around when you add the tops — this is the most important step for keeping these sliders tidy.
- Spoon any remaining marinara sauce over the meatballs. Lay the provolone slices over the top, covering as much of the filling as possible.
- Sprinkle half of the Parmesan over the cheese layer, then place the top halves of the rolls on.
- Whisk together the melted butter, minced garlic, Italian seasoning, dried parsley, and red pepper flakes. Brush the mixture generously over the tops of the rolls, getting into the crevices between rolls. Sprinkle the remaining Parmesan over the glazed tops.
- Cover the dish tightly with foil and bake for 15 minutes. Remove the foil and bake for 8 to 10 more minutes until the tops are deep golden and the cheese is fully melted and bubbling.
- Rest for 3 minutes before cutting. Serve with a small bowl of warm marinara for dipping.
5. BBQ Pulled Pork Sliders
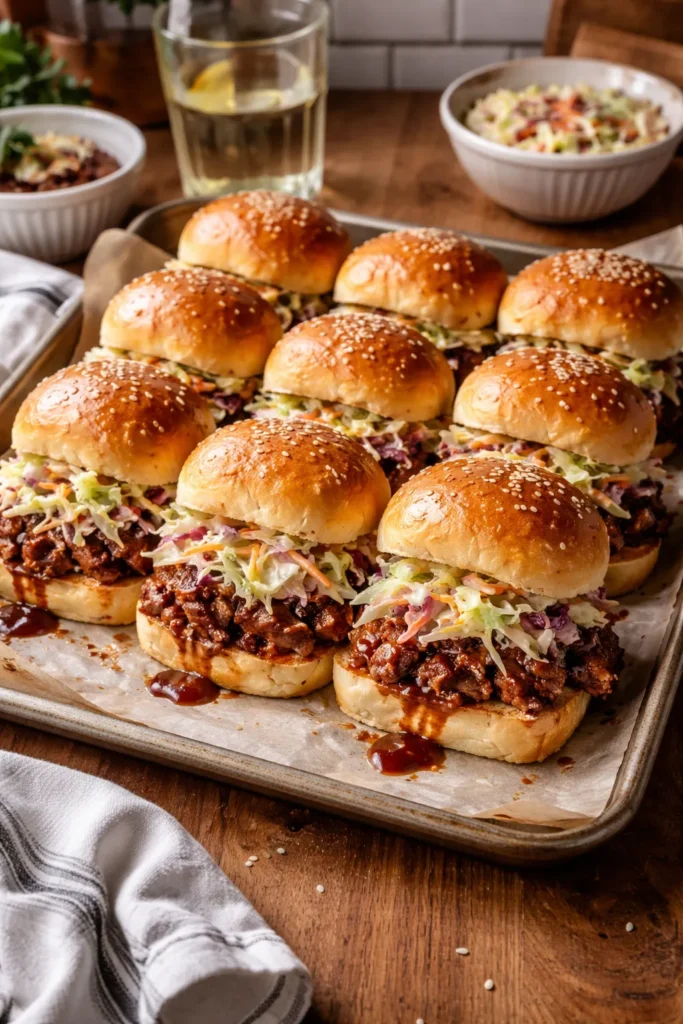
Low-and-slow pulled pork is about as crowd-friendly as a filling gets. You can cook the pork a day or two ahead, shred it, refrigerate it in its sauce, and then just assemble and bake the sliders when your guests arrive. The filling actually improves overnight as the flavors meld — so making it ahead isn’t a compromise, it’s a strategy.
A simple apple cider vinegar slaw on top adds crunch and acidity that cuts through the richness of the pork perfectly. Don’t skip it.
Yield: 12 sliders Prep Time: 20 minutes active + overnight or 8-hour cook time Cook Time: 8 hours (slow cooker) + 20 minutes (oven) Total Time: 8 hours 20 minutes (mostly hands-off) Difficulty: Intermediate — the slow cooker does the heavy lifting, but planning ahead is key. Make Ahead: Pork can be cooked and shredded up to 3 days in advance.
For the Pulled Pork:
- 2½ lbs boneless pork shoulder (also called pork butt)
- 1 teaspoon smoked paprika
- 1 teaspoon garlic powder
- 1 teaspoon onion powder
- 1 teaspoon kosher salt
- ½ teaspoon black pepper
- ½ teaspoon cumin
- ¾ cup your favorite BBQ sauce, plus more for serving
- 2 tablespoons apple cider vinegar
For the Quick Slaw:
- 2 cups pre-shredded coleslaw mix
- 2 tablespoons mayonnaise
- 1 tablespoon apple cider vinegar
- 1 teaspoon sugar
- Salt and pepper to taste
For Assembly:
- 12 Hawaiian slider rolls, kept connected
- 4 tablespoons unsalted butter, melted
Cook, Assemble, and Bake:
- In a small bowl, combine smoked paprika, garlic powder, onion powder, salt, pepper, and cumin. Rub the spice mixture all over the pork shoulder, covering every surface.
- Place the rubbed pork in the slow cooker. Whisk together the BBQ sauce and apple cider vinegar, then pour over the pork.
- Cook on low for 8 hours (or high for 4 to 5 hours) until the pork pulls apart easily with two forks. Shred directly in the slow cooker and stir to combine with the cooking juices.
- While the pork cooks (or just before assembling), make the slaw: toss the coleslaw mix with mayonnaise, apple cider vinegar, sugar, salt, and pepper. Taste and adjust seasoning. Refrigerate until ready to use — the slaw holds for up to 24 hours.
- Preheat the oven to 350°F (175°C). Slice the rolls horizontally and place the bottoms in a greased 9×13-inch baking dish.
- Pile the pulled pork generously over the bottom rolls. Top with a spoonful of slaw per slider, then place the roll tops on.
- Brush melted butter over the tops of the rolls. Cover with foil and bake for 15 minutes, then uncover and bake for 5 more minutes until the tops are golden.
- Slice and serve with extra BBQ sauce on the side.
6. Philly Cheesesteak Sliders
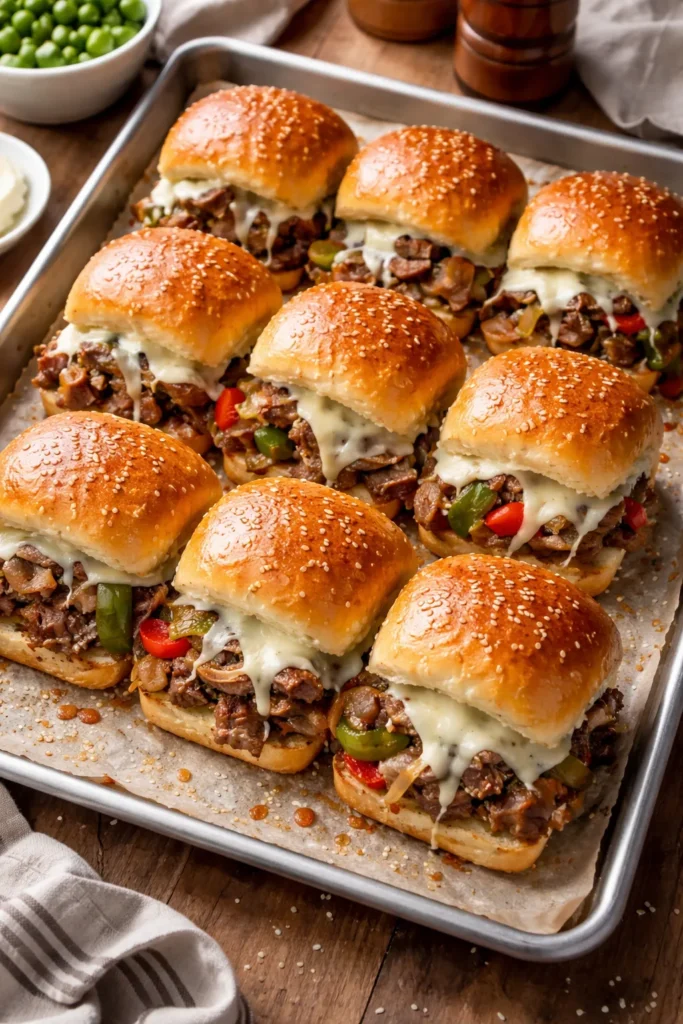
Shaved ribeye steak, caramelized peppers and onions, and gooey provolone on a soft roll — all the flavors of a proper Philly cheesesteak, scaled down to handheld size and baked as a group for convenience. The caramelization on the peppers and onions is non-negotiable here. Give them the full 12 to 15 minutes they need in the pan; rushing them produces limp, watery vegetables instead of the sweet, jammy layer that makes this filling sing.
Shaved steak can usually be found at the butcher counter or in the freezer section of most grocery stores. If you can’t find it, thinly sliced sirloin or even thin-cut deli roast beef work as substitutes.
Yield: 12 sliders Prep Time: 20 minutes Cook Time: 30 minutes Total Time: 50 minutes Difficulty: Intermediate — the stovetop filling takes attention, but the technique is straightforward.
For the Filling:
- 1 lb shaved ribeye steak (or thinly sliced sirloin)
- 1 medium green bell pepper, thinly sliced
- 1 medium yellow onion, thinly sliced
- 2 cloves garlic, minced
- 2 tablespoons olive oil
- 1 tablespoon Worcestershire sauce
- Salt and black pepper to taste
For the Sliders:
- 12 Hawaiian slider rolls, kept connected
- 6 slices provolone cheese (or white American cheese)
For the Butter Glaze:
- 3 tablespoons unsalted butter, melted
- 1 teaspoon garlic powder
- ½ teaspoon dried Italian seasoning
Cook the Filling and Assemble:
- Heat olive oil in a large skillet over medium-high heat. Add the sliced onion and bell pepper with a pinch of salt. Cook, stirring occasionally, for 12 to 15 minutes until the vegetables are soft, lightly golden at the edges, and caramelized. Don’t rush this step — high heat will steam them instead of caramelize them.
- Push the vegetables to one side of the pan. Add the shaved steak to the empty side and cook for 2 to 3 minutes, breaking it apart with a spatula, until no longer pink.
- Add the minced garlic and Worcestershire sauce. Toss everything together and cook for 1 more minute. Season with salt and black pepper. Remove from heat.
- Preheat the oven to 350°F (175°C). Grease a 9×13-inch baking dish.
- Slice the rolls horizontally and place the bottoms in the prepared dish.
- Spoon the steak and vegetable filling evenly across the bottom rolls, distributing the steak and peppers equally across all 12 spots.
- Lay the provolone slices over the filling. Place the roll tops on.
- Whisk together the melted butter, garlic powder, and Italian seasoning. Brush over the tops of the rolls.
- Cover with foil and bake for 12 minutes. Uncover and bake for 6 to 8 more minutes until the cheese is melted and the roll tops are lightly golden.
- Rest for 2 minutes, slice, and serve. A small ramekin of warm au jus on the side turns these into something genuinely special.
7. Chicken Bacon Ranch Sliders

Everything about this combination works. Tender shredded chicken, crispy bacon, tangy ranch, and melted cheese — it covers every texture and flavor you want in one bite. These sliders are consistently the first to disappear at any party, and they work equally well as a casual weeknight dinner when you make a double batch.
Use rotisserie chicken here if you want to save time. It shreds in minutes and has great flavor from the seasoning it’s cooked with. A packet of ranch seasoning stirred into the filling amplifies the ranch flavor without needing to measure out individual spices.
Yield: 12 sliders Prep Time: 15 minutes Cook Time: 25 minutes Total Time: 40 minutes Difficulty: Beginner — rotisserie chicken makes this one of the fastest slider recipes to assemble.
For the Filling:
- 2 cups cooked shredded chicken (rotisserie chicken works perfectly)
- 6 strips bacon, cooked until crispy and crumbled
- ⅓ cup ranch dressing
- 1 teaspoon ranch seasoning mix (or ½ teaspoon garlic powder + ½ teaspoon onion powder + ½ teaspoon dried dill)
- Salt and black pepper to taste
For the Sliders:
- 12 Hawaiian slider rolls, kept connected
- 6 slices Colby Jack or cheddar cheese
For the Butter Glaze:
- 4 tablespoons unsalted butter, melted
- 1 tablespoon fresh chives, finely chopped (or ½ teaspoon dried chives)
- 1 teaspoon garlic powder
- ½ teaspoon onion powder
Assemble and Bake:
- Preheat the oven to 350°F (175°C). Grease a 9×13-inch baking dish.
- In a medium bowl, combine the shredded chicken, crumbled bacon, ranch dressing, and ranch seasoning. Toss to combine thoroughly. Taste and adjust salt and pepper.
- Slice the rolls horizontally with a serrated knife and place the bottoms in the prepared baking dish.
- Spread the chicken-bacon-ranch mixture evenly across the bottom rolls in a generous, even layer. Every roll slot should have a good pile of filling — sliders with skimpy filling are always a disappointment.
- Lay the cheese slices over the filling, covering as much surface area as possible.
- Place the tops of the rolls on.
- Whisk the melted butter with chives, garlic powder, and onion powder. Pour and brush the glaze evenly over the tops, letting it drip into the seams between rolls.
- Cover with foil and bake for 15 minutes. Remove the foil and bake for 8 to 10 more minutes until the tops are golden and the cheese is fully melted.
- Slice and serve immediately. Extra ranch dressing on the side for dipping is always a good idea.
Variation: Add a thin drizzle of hot sauce over the chicken filling before topping with cheese for a spicy ranch version that balances heat and creaminess.
8. Pizza Sliders
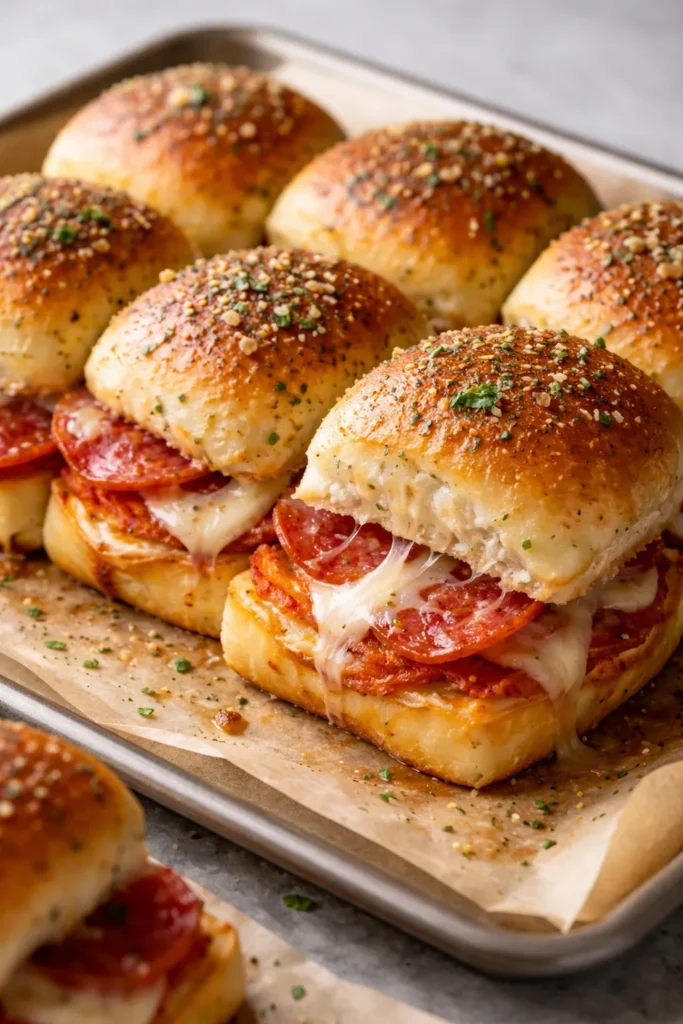
These are the slider version of everyone’s favorite Friday night food, and they’re genuinely one of the most fun things you can bring to a game night. The filling is endlessly customizable — pepperoni is the classic, but you can go any direction you want — and the herbed garlic butter glaze on top gives the rolls that unmistakable pizza-delivery smell that gets everyone in the kitchen immediately.
The key to not ending up with soggy bottoms is a thin layer of sauce on the rolls — not a flood of it — and baking uncovered for the last stretch to dry out and crisp up the tops. Don’t skip the foil step at the beginning though; it’s what gets the cheese melted without burning the bread.
Yield: 12 sliders Prep Time: 10 minutes Cook Time: 20 minutes Total Time: 30 minutes Difficulty: Beginner — the simplest and fastest recipe in this collection, with no stovetop cooking required if using pre-sliced toppings.
For the Sliders:
- 12 Hawaiian slider rolls, kept connected
- ¾ cup pizza sauce (store-bought or homemade)
- 4 oz pepperoni slices (about 40 to 48 slices)
- 1 cup shredded whole-milk mozzarella cheese
- ¼ cup sliced black olives (optional)
- ¼ cup sliced mushrooms (optional)
For the Garlic Herb Butter:
- 4 tablespoons unsalted butter, melted
- 1 teaspoon Italian seasoning
- ½ teaspoon garlic powder
- ¼ teaspoon dried oregano
- 2 tablespoons freshly grated Parmesan cheese
Assemble and Bake:
- Preheat the oven to 350°F (175°C). Line a rimmed baking sheet with parchment paper or lightly grease a 9×13-inch baking dish.
- Slice the connected rolls horizontally with a serrated knife, keeping the top and bottom halves intact. Place the bottom half on the prepared pan.
- Spread the pizza sauce in a thin, even layer across the cut surface of the bottom rolls. Use a thin layer, not a thick one — too much sauce makes the bottoms soggy and the filling unstable.
- Arrange the pepperoni slices in an even layer over the sauce, slightly overlapping. Add any additional toppings (olives, mushrooms) evenly at this stage.
- Sprinkle the shredded mozzarella generously over the toppings, covering fully.
- Place the top half of the rolls on.
- Whisk together the melted butter, Italian seasoning, garlic powder, oregano, and half the Parmesan. Brush generously over the tops of the rolls, getting into every seam and gap. Sprinkle the remaining Parmesan over the top.
- Cover the pan tightly with foil and bake for 12 minutes. Remove the foil and bake for 6 to 8 more minutes until the cheese is fully melted, the edges are bubbling, and the roll tops are deep golden brown.
- Rest for 2 minutes before slicing. Serve with a small bowl of warm pizza sauce for dipping.
Customization ideas: Swap pepperoni for cooked Italian sausage, roasted red peppers, or fresh basil leaves added after baking. A sprinkle of red pepper flakes over the butter glaze before baking adds a gentle heat that pairs beautifully with the sweet rolls.
Tips for Making All These Slider Recipes Better

The Case for Hawaiian Rolls (and When to Deviate)
King’s Hawaiian rolls are the undisputed go-to for slider recipes, and the reason is simple: their slight sweetness plays against savory fillings in a way that genuinely enhances the flavor of the whole sandwich. They’re also the right size — not too thick, not too thin — and they maintain their structure through the bake without going tough on the outside.
That said, pretzel rolls add a great chew and slight saltiness that pairs particularly well with spicier fillings like buffalo chicken. Brioche dinner rolls bring a buttery richness that suits the more indulgent options like Philly cheesesteak. Don’t feel locked into one option; the roll choice is part of the recipe.
How to Keep Sliders from Getting Soggy
The soggy-bottom problem plagues a lot of slider recipes, and it almost always comes from one of three things: too much sauce, assembling too far in advance, or skipping the toasting step.
Spread sauce thinly and deliberately. For any recipe that uses a wet filling or liquid-heavy topping (BBQ chicken, pulled pork, marinara), the sauce should coat the filling — not pool on the bread. A thin layer on the roll itself is fine; soaking the bread before it even hits the oven is not.
Toasting the bottom halves of the rolls before adding the filling is a smart move for the wetter recipes. Pop them in the oven at 350°F for 5 minutes before assembling, and that toasted layer acts as a moisture barrier. For sliders with drier fillings like ham and cheese or chicken bacon ranch, this isn’t necessary.
Make-Ahead Strategy for Party Stress-Free Hosting
Every recipe here can be assembled several hours in advance. Cover the unbaked dish tightly with plastic wrap or foil and refrigerate until needed, then bake just before guests arrive — add 5 to 7 extra minutes to the covered baking time if they’re going straight from a cold fridge.
The fillings for pulled pork, buffalo chicken, and any slow-cooked protein can be made 2 to 3 days ahead and refrigerated. Assemble the sliders the day of the party. This is what separates a stressful hosting experience from an easy one.
Doubling the Recipe
All eight recipes scale up cleanly. For 24 sliders, simply double every ingredient and use two baking dishes side by side in the oven. The baking time stays the same — no adjustment needed for double batches as long as you’re using two pans rather than one overloaded one.
Final Thoughts
A tray of sliders is genuinely one of the easiest ways to feed a crowd well. These eight recipes cover the full range — something for meat-lovers, something for those who want a spicy kick, something comforting and classic, and something that brings the flavors of a full Italian meal into a handheld bite.
The biggest thing working in your favor with all of these is the make-ahead flexibility. Assemble before guests arrive, refrigerate, and bake fresh when it’s time. That approach means you spend the party actually enjoying it rather than shuttling between the kitchen and the living room.
Start with whichever filling sounds most like your crowd, nail that one, and then build your slider rotation from there. Once you’ve made a couple of these, the method becomes muscle memory — slice, fill, glaze, bake — and you’ll find yourself making them for occasions far beyond game night.