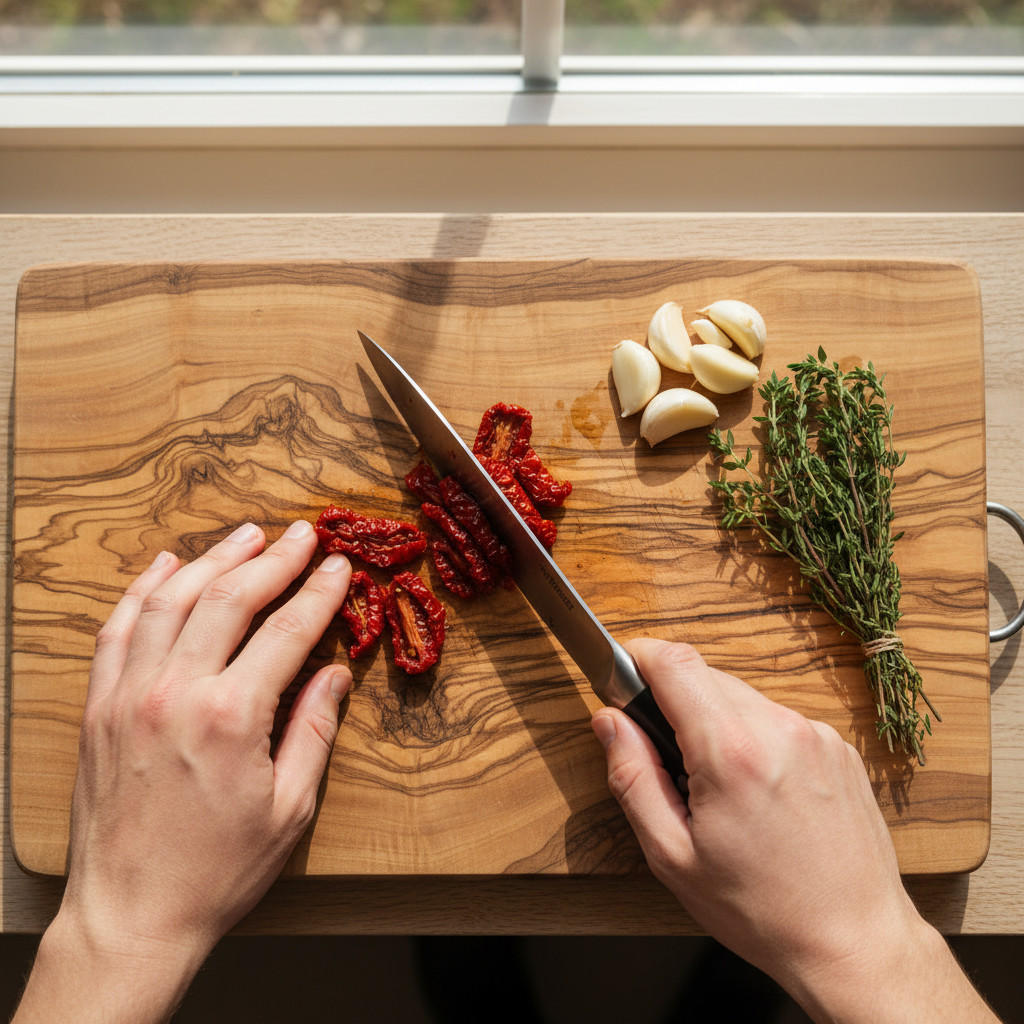
There’s a particular kind of disappointment that comes from making “healthy” fried food — the kind where you bake something in the oven, hoping for crunch, and pull out a sad, pale, slightly rubbery version of what you actually wanted. You eat it anyway, but you know. You always know.
That’s what makes the air fryer such a genuinely useful appliance. It doesn’t try to fake deep frying — it achieves something different through rapid hot air circulation, reaching temperatures that cause Maillard browning on the exterior of food without the food sitting in oil. The result isn’t identical to deep frying, but in many cases, it’s better. Crispier edges, less grease pooling at the bottom of the basket, and food that stays crunchy longer because it isn’t absorbing oil as it cools.
What follows is a collection of 12 air fryer dinners built around that principle: maximum crunch, minimum oil. Some use no added oil at all. Others use a light spray or a tablespoon at most — compared to the half-cup or more that deep frying demands. Each recipe is a complete dinner in its own right, built on ingredients that actually benefit from high-heat air circulation, rather than just being tossed into the basket and hoped for the best.
These aren’t simplified versions of disappointing food. They’re the real thing.
Table of Contents
- How the Air Fryer Actually Creates That Crispy Texture
- Why Oil Still Plays a Role — Even in Small Amounts
- The Basket Matters More Than You Think
- 1. Air Fryer Buttermilk Fried Chicken
- The Coating That Actually Stays Crispy
- Cooking Method and Timing
- 2. Air Fryer Korean Fried Chicken with Gochujang Glaze
- Building the Gochujang Glaze
- Getting That Double-Fried Texture Without the Oil
- 3. Crispy Air Fryer Sweet Potato Fries
- Cutting and Seasoning for Best Results
- Flavor Variations Worth Trying
- 4. Air Fryer Spring Rolls with Crispy Rice Paper
- Filling That Holds Up to the Heat
- Cooking Instructions
- 5. Air Fryer Stuffed Mushrooms with Garlic and Parmesan
- The Filling Ratio That Works
- Variations for a Full Dinner
- 6. Air Fryer Coconut Shrimp with Sweet Chili Sauce
- The Three-Step Breading Process
- Making the Sweet Chili Sauce From Scratch
- 7. Crispy Air Fryer Tofu with Soy-Ginger Marinade
- The Marinade and Coating
- 8. Air Fryer Onion Rings That Actually Crunch
- The Breading System That Holds
- 9. Air Fryer Cauliflower Buffalo Bites
- Cooking in Two Stages for Maximum Crunch
- 10. Air Fryer Turkey Legs with Herb Rub
- Temperature and Timing
- 11. Air Fryer Eggplant Fries with Marinara Dipping Sauce
- Breading and Cooking
- 12. Air Fryer Crispy Chickpeas as a Dinner Bowl Base
- Seasoning and Cooking
- Building the Dinner Bowl
- Tips for Getting Maximum Crispiness Every Time
- Common Air Fryer Mistakes That Ruin the Crunch
- Scaling Recipes and Cooking in Batches
- Final Thoughts
How the Air Fryer Actually Creates That Crispy Texture

Before getting into the recipes, it’s worth understanding why the air fryer works so well for crispy food — because that knowledge changes how you cook in it.
A standard air fryer is essentially a compact convection oven with a powerful fan positioned close to the heating element. The fan circulates hot air at high speed around and underneath the food, which does two things simultaneously: it rapidly dries the surface moisture off the food (the enemy of crispiness), and it creates the dry, consistent heat needed for browning reactions to occur.
Moisture is the main obstacle to crispiness. Whether you’re working with chicken, vegetables, or tofu, any surface moisture creates steam instead of a crust. The air fryer combats this more effectively than a standard oven because the fan keeps evaporating that moisture away continuously, rather than letting it linger around the food.
Why Oil Still Plays a Role — Even in Small Amounts
Completely oil-free cooking in the air fryer is possible for some foods, but a light coating of oil significantly improves results for anything breaded or coated. Oil helps conduct heat more evenly across the surface, speeds up browning, and creates that shatteringly crisp outer layer that makes fried food feel indulgent.
The key word is light. A single tablespoon of oil — or a few sprays from an oil mister — is enough to coat most batches of food adequately. Anything more than that begins to pool in the basket and create steaming rather than crisping.
The Basket Matters More Than You Think
Crowding the basket is the single most common mistake air fryer users make. Food needs space around it for the hot air to circulate properly. When pieces overlap or stack, the areas where they touch steam instead of crisp. A single layer is non-negotiable — it’s better to cook in two batches than to crowd one.
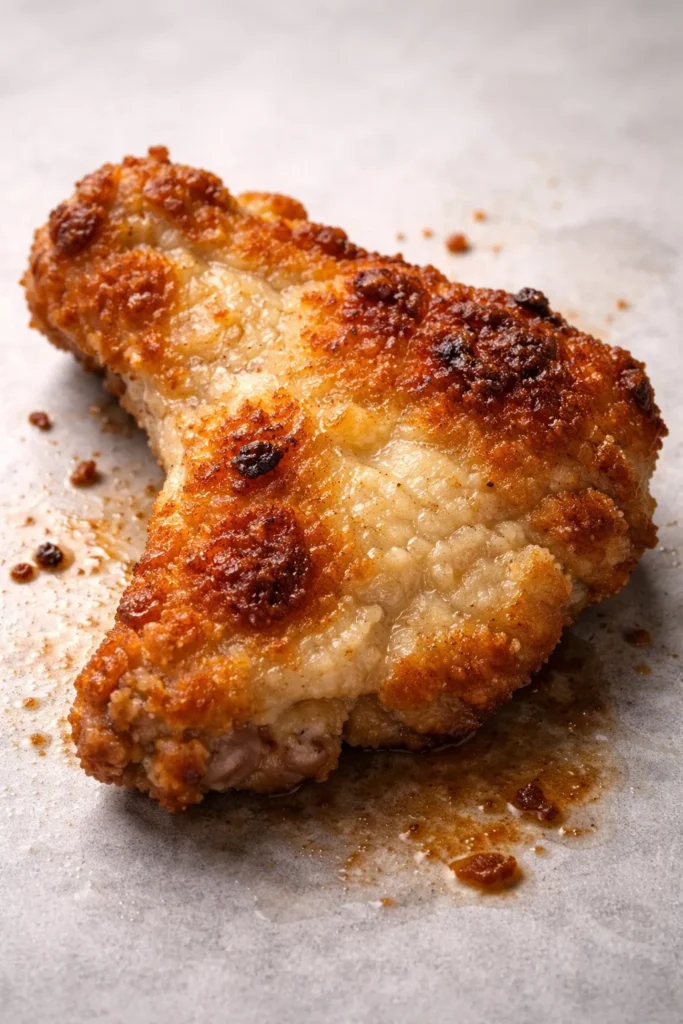
1. Air Fryer Buttermilk Fried Chicken
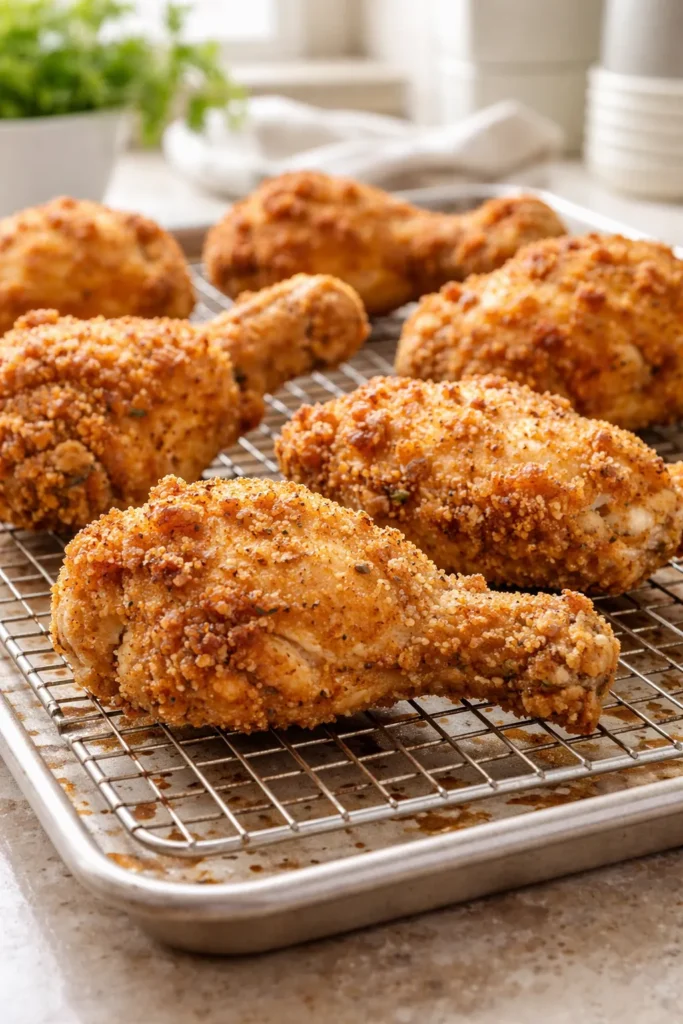
Few things test an air fryer’s capabilities like Southern fried chicken — a dish defined by its shatteringly crisp, deeply seasoned crust and the juicy, tender meat beneath it. Done right in the air fryer, it holds up remarkably well against its deep-fried counterpart.
The secret here is the buttermilk soak. A minimum of one hour — overnight if you can manage it — allows the acid in the buttermilk to tenderize the meat while the salt starts seasoning it from the outside in. Don’t skip this step or rush it. It’s doing quiet, important work.
The Coating That Actually Stays Crispy
A seasoned flour dredge works, but adding a tablespoon of cornstarch to the flour mixture improves the final crunch significantly. Cornstarch absorbs surface moisture faster than flour alone and creates a lighter, crispier shell. Paprika, garlic powder, onion powder, black pepper, and a pinch of cayenne build the flavor.
After dredging each piece, let it rest on a wire rack for 5 minutes before placing it in the basket. That brief rest lets the coating hydrate slightly and adhere more firmly to the chicken — which means less coating falling off during cooking.
Cooking Method and Timing
- Preheat the air fryer to 400°F (200°C) for at least 3 minutes before adding the chicken
- Lightly spray the coated chicken with cooking spray on both sides
- Cook bone-in thighs and drumsticks for 22–25 minutes, flipping once at the halfway mark
- Chicken breasts: 18–20 minutes, flipping at 9 minutes
- Internal temperature must reach 165°F (74°C) at the thickest point — check with a thermometer, not by feel
Worth knowing: The skin on bone-in, skin-on pieces crisps dramatically better than boneless, skinless pieces. If you want the most impressive results, use thighs with the skin on.
2. Air Fryer Korean Fried Chicken with Gochujang Glaze
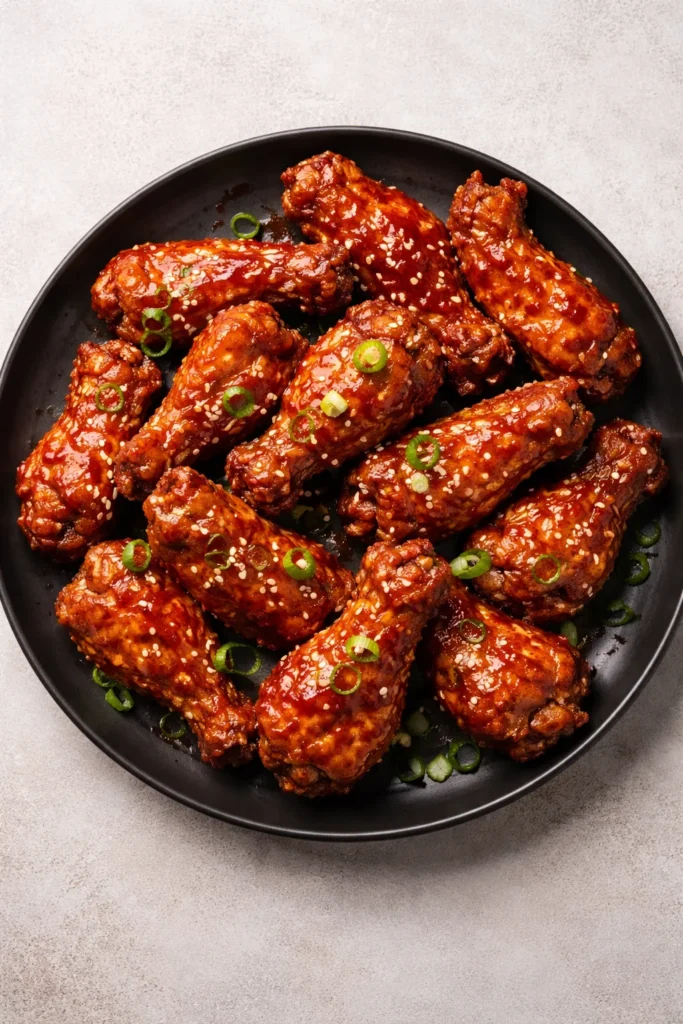
Korean fried chicken is traditionally double-fried to achieve its signature crunch — a lacquered, shatter-crisp exterior that somehow manages to be both sticky and crunchy at the same time. The air fryer, with its continuous hot air circulation, replicates the result of that second fry without requiring any additional oil.
Start with a dry brine. Salt the chicken pieces and let them sit uncovered in the refrigerator for at least 30 minutes. This draws out surface moisture and seasons the meat, setting up a better crust from the start.
Building the Gochujang Glaze
The glaze is where the flavor lives. Combine 2 tablespoons gochujang paste, 1 tablespoon honey, 1 tablespoon soy sauce, 1 teaspoon rice vinegar, and 1 teaspoon sesame oil. Whisk until smooth. This glaze goes on during the last 3–4 minutes of cooking — not before. Adding it too early causes the sugars to burn before the chicken finishes cooking.
Getting That Double-Fried Texture Without the Oil
After the first 15 minutes at 380°F (193°C), flip each piece and increase the temperature to 400°F (200°C) for the final 8–10 minutes. This two-stage approach mimics the temperature jump of double frying — the initial lower heat cooks the meat through, and the final blast crisps the exterior.
- Brush glaze onto chicken at the 20-minute mark
- Return to the air fryer for 3–4 minutes until glaze caramelizes and turns sticky
- Finish with toasted sesame seeds and thinly sliced scallions
- Serve immediately — the crunch window is about 10 minutes before the glaze softens the coating
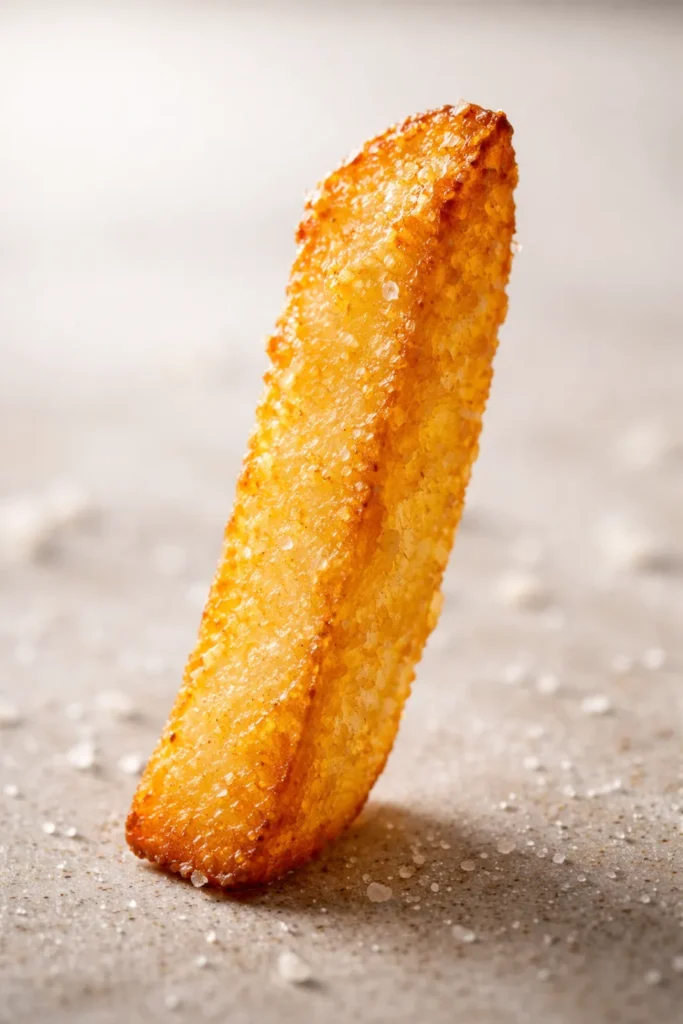
3. Crispy Air Fryer Sweet Potato Fries
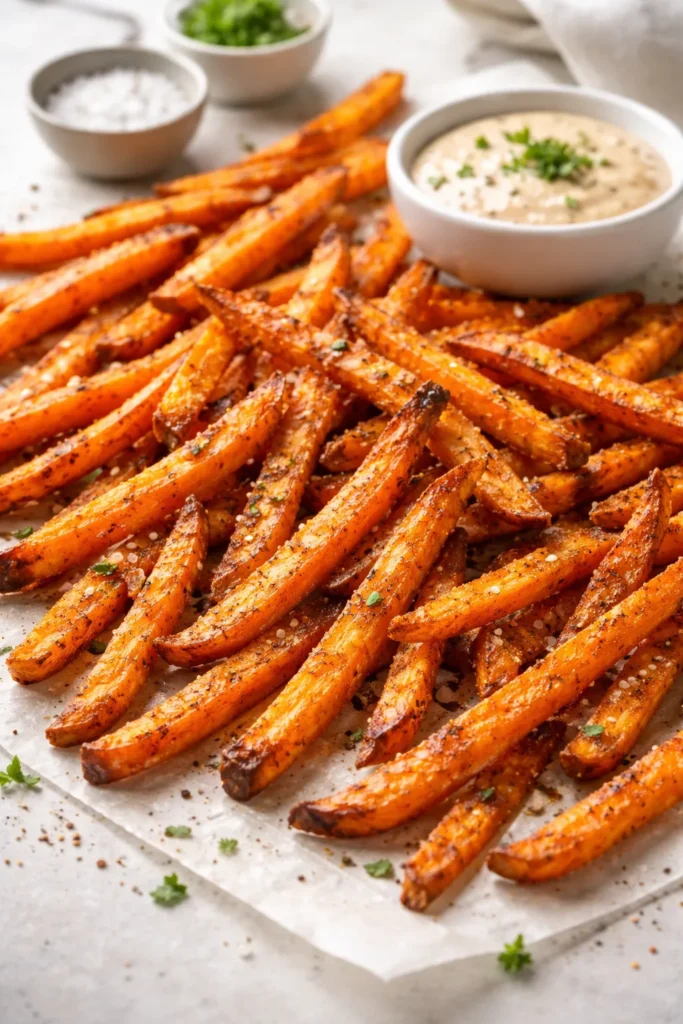
Sweet potato fries are notoriously difficult to get right. The high sugar content in sweet potatoes means they brown quickly on the outside but can remain underdone in the center, or they go limp within minutes of leaving the oven. The air fryer solves both problems — the continuous airflow keeps moisture moving away from the surface while the high heat caramelizes the natural sugars evenly.
The key preparation step is cornstarch coating. Toss the cut fries with half a teaspoon of cornstarch per pound of potatoes before adding any oil or seasoning. The cornstarch creates a thin barrier that crisps beautifully in the air fryer and keeps the exterior crunchy significantly longer than unseasoned fries.
Cutting and Seasoning for Best Results
- Cut fries to a uniform ¼-inch thickness — thicker cuts steam instead of crisping
- Soak cut fries in cold water for 20 minutes to remove excess starch, then pat completely dry
- Toss with 1 teaspoon avocado oil, ½ teaspoon cornstarch, smoked paprika, garlic powder, and sea salt
- Cook at 380°F (193°C) for 12–15 minutes, shaking the basket every 5 minutes
- Spread in a single layer — stacking even two layers of fries will result in soft, steamy fries on the bottom
Flavor Variations Worth Trying
Sweet potato fries are a blank canvas. Beyond the classic salted version, try:
- Cinnamon-brown sugar with a pinch of cayenne for a sweet-heat contrast
- Curry powder and lime zest for an unexpected but genuinely good combination
- Za’atar and lemon for a Mediterranean direction that pairs beautifully with yogurt dip
- Parmesan and rosemary, added in the last 2 minutes so the cheese doesn’t burn
4. Air Fryer Spring Rolls with Crispy Rice Paper
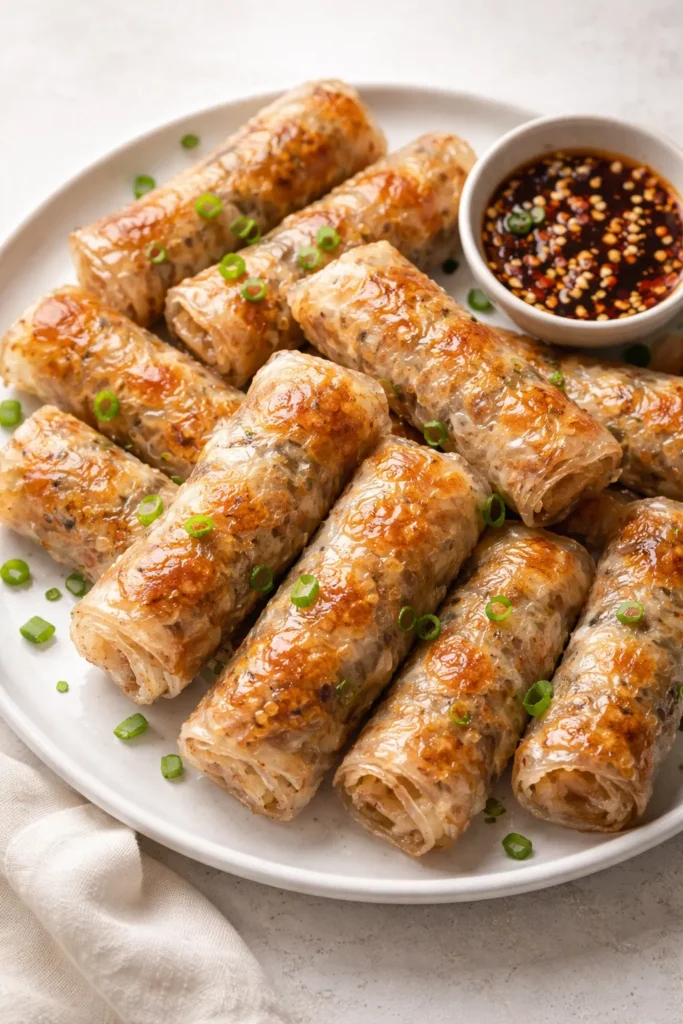
Spring rolls cooked in the air fryer skip the splattering oil bath entirely, yet the rice paper wrappers blister and crisp into something that crackles between your teeth. The trick is in handling the wrappers correctly — they should be dipped in water just long enough to become pliable (about 8–10 seconds), not fully soft, before filling.
Overly wet wrappers tear easily during rolling and don’t crisp up properly in the air fryer. You want them flexible enough to fold without cracking, but still firm enough to hold their shape.
Filling That Holds Up to the Heat
Overfilled spring rolls burst in the air fryer. Use about 3 tablespoons of filling per roll and leave a 1-inch border on all edges. Classic filling combinations:
- Shredded cabbage, julienned carrots, bean sprouts, and glass noodles seasoned with soy sauce and sesame oil
- Cooked shrimp or minced pork with ginger, garlic, and five-spice powder
- Tofu, shiitake mushrooms, and shredded Chinese cabbage for a fully plant-based version
Cooking Instructions
Brush each assembled roll lightly with avocado oil using a pastry brush — a spray tends to be uneven on smooth rice paper. Place seam-side down in the air fryer basket and cook at 390°F (199°C) for 10–12 minutes, flipping once at the 6-minute mark. The wrappers should be deeply golden and feel firm when tapped.
Serve immediately with a dipping sauce of equal parts soy sauce, rice vinegar, and a drizzle of chili oil. The crunch genuinely rivals deep-fried versions.
5. Air Fryer Stuffed Mushrooms with Garlic and Parmesan

Stuffed mushrooms are often the forgotten appetizer that deserves dinner promotion. In the air fryer, the mushroom caps become perfectly tender while their moisture evaporates cleanly away — no soggy bottoms, no watery filling, no collapsed caps sliding filling all over the baking sheet.
Use cremini mushrooms rather than white button mushrooms. They’re sturdier, have a deeper flavor, and hold their shape better during the 12–14 minutes of cooking time.
The Filling Ratio That Works
The filling should be dense enough to hold its shape but moist enough that it doesn’t dry out. A base of cream cheese, grated Parmesan, minced garlic, fresh parsley, and finely diced shallots works consistently well. The cream cheese binds everything together and stays creamy even at high heat.
For the breadcrumb topping, combine panko with a tablespoon of melted butter and a pinch of Italian seasoning. This topping goes on top of the filling before the mushrooms go into the air fryer — the butter ensures it browns rather than just drying out.
Variations for a Full Dinner
To turn stuffed mushrooms into a complete dinner:
- Add cooked and crumbled Italian sausage to the filling for a meat-forward version
- Stuff larger portobello caps instead of cremini and serve over a simple arugula salad
- Add sun-dried tomatoes and chopped kalamata olives for a Mediterranean filling
- Cook at 370°F (188°C) for 12 minutes — the caps should be tender and the tops golden
6. Air Fryer Coconut Shrimp with Sweet Chili Sauce

The coconut crust on these shrimp — a combination of shredded coconut and panko breadcrumbs — toasts in the air fryer to a deep, nutty golden color that looks and tastes more indulgent than it is. The shrimp themselves cook in about 8 minutes, which makes this one of the fastest dinners in the collection.
Use large or jumbo shrimp (21/25 count or larger) for the best result. Smaller shrimp cook too fast for the coating to properly brown, and they’re harder to handle during the breading process.
The Three-Step Breading Process
- Dredge shrimp in flour seasoned with salt, pepper, and garlic powder
- Dip in beaten egg
- Press firmly into a mixture of ½ cup sweetened shredded coconut + ½ cup panko breadcrumbs
The pressing motion in step three matters — don’t just dip. Press the shrimp down into the coating mixture, flip, and press again. The coconut needs to adhere firmly or it falls off in the basket.
Cook at 400°F (200°C) for 8 minutes, flipping once at 4 minutes. The coconut should be deep golden — almost amber — rather than pale. Pale coconut means undercooked and chewy.
Making the Sweet Chili Sauce From Scratch
Store-bought sweet chili sauce works fine, but the homemade version takes 5 minutes and is significantly better. Combine ¼ cup rice vinegar, 3 tablespoons honey, 1 tablespoon soy sauce, 1 minced garlic clove, ½ teaspoon red pepper flakes, and 1 teaspoon cornstarch dissolved in 2 tablespoons cold water. Simmer in a small saucepan over medium heat for 3–4 minutes until slightly thickened.
7. Crispy Air Fryer Tofu with Soy-Ginger Marinade
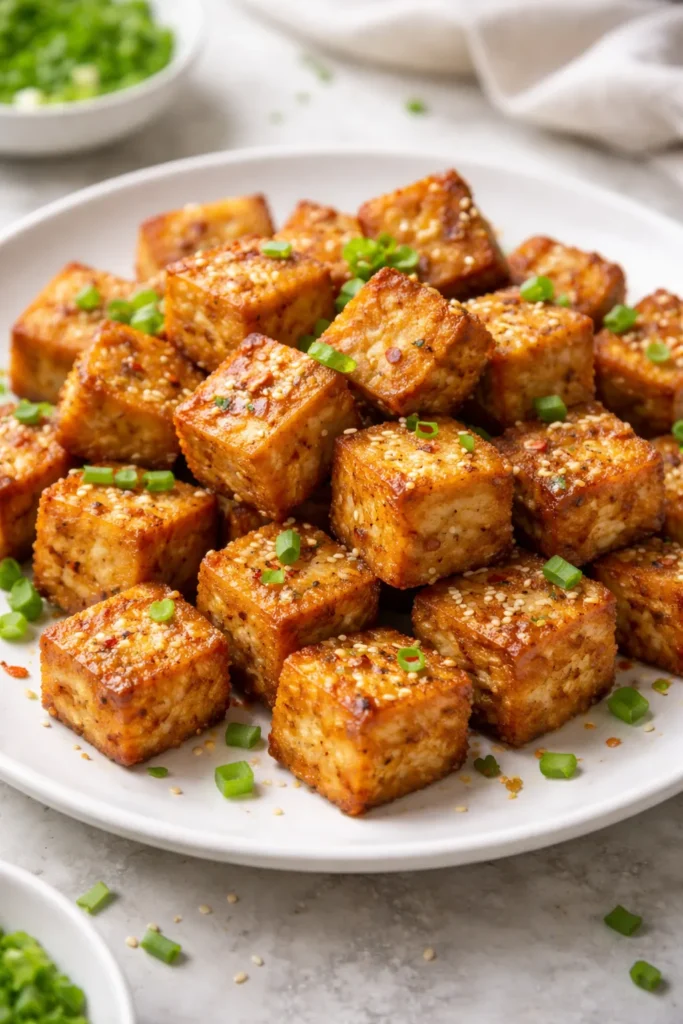
Tofu has a reputation for being difficult to cook — specifically, for being impossible to make genuinely crispy without deep frying. The air fryer changes that equation completely. With proper preparation, air-fried tofu develops a golden, firm crust and a chewy interior that holds its shape in stir-fries, grain bowls, and salads.
The preparation step that cannot be skipped: Press the tofu. Extra-firm tofu still contains enough moisture to prevent crisping if you don’t press it first. Wrap the block in a clean kitchen towel, place a heavy pan on top, and leave it for at least 20 minutes. A full hour produces noticeably better results.
The Marinade and Coating
After pressing, cut tofu into ¾-inch cubes and toss with:
- 2 tablespoons soy sauce (or tamari for gluten-free)
- 1 teaspoon sesame oil
- 1 teaspoon fresh grated ginger
- 1 teaspoon rice vinegar
- 1 tablespoon cornstarch
The cornstarch is not optional. It’s what creates the crispy outer shell. Toss the tofu in the marinade first, let it absorb for 10 minutes, then sprinkle the cornstarch over and toss again until every surface is coated.
Cook at 400°F (200°C) for 15–18 minutes, shaking the basket every 5 minutes. The exterior should feel firm and look deeply golden before you pull it out. Soft-feeling cubes need more time — don’t rush this.
8. Air Fryer Onion Rings That Actually Crunch
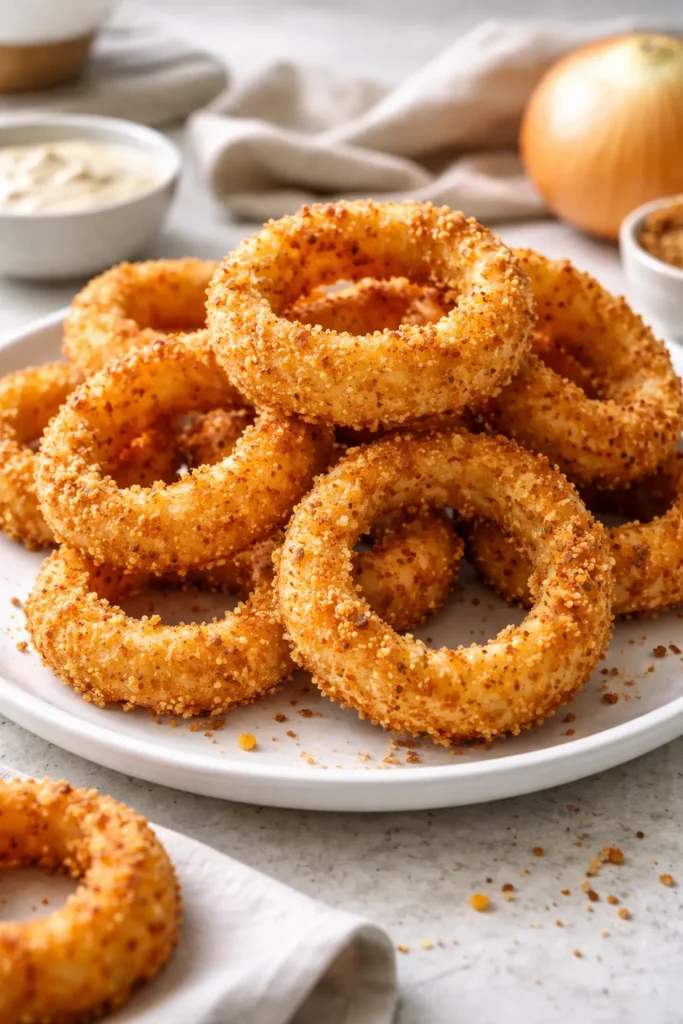
Onion rings made in the air fryer are one of the most convincing arguments for the appliance. The buttermilk soak — the same technique used in buttermilk fried chicken — tenderizes the onion and gives the breading something to cling to, resulting in rings that crack when you bite them rather than pulling out in one rubbery piece.
Use sweet onions (Vidalia or Walla Walla varieties) when possible. They caramelize more readily than yellow onions and the sweetness balances the savory crust.
The Breading System That Holds
The problem with most baked or air-fried onion rings is that the coating slides right off as you bite into them. Two adjustments prevent this:
- Double dredge — after the first flour coating and buttermilk dip, go back to the flour, then to the buttermilk again, then into the panko
- Rest the breaded rings for 5 minutes before cooking — this lets the coating form a thin, dry outer layer that adheres better
Season the panko with garlic powder, smoked paprika, salt, black pepper, and a pinch of cayenne. Spray both sides lightly with cooking spray.
Cook at 375°F (190°C) for 10–12 minutes, flipping once at 6 minutes. They’re ready when the panko is deep golden and the tip of a knife slides into the onion without resistance.
9. Air Fryer Cauliflower Buffalo Bites
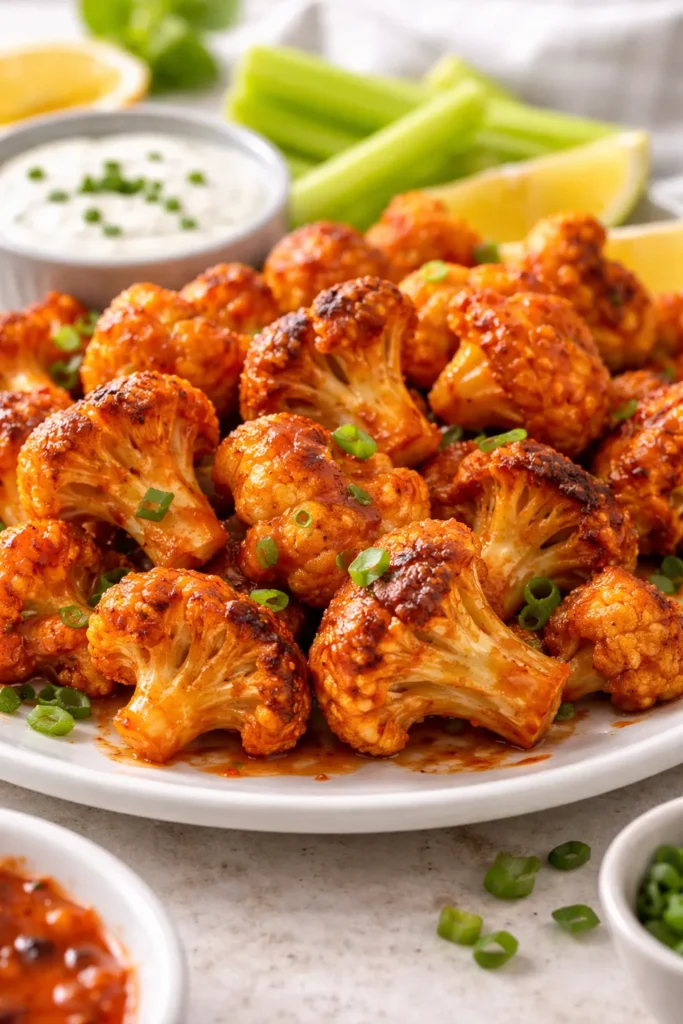
These bites do something that takes most people by surprise: they scratch the itch for spicy chicken wings without any chicken involved. The cauliflower florets crisp at the edges while staying tender in the center, and the buffalo sauce caramelizes in the final minutes of cooking into a sticky, tangy coating that clings without making the florets soggy.
The flour batter is what separates these from the versions that disappoint. Dust florets in a thin batter of flour, garlic powder, onion powder, smoked paprika, and enough water or plant-based milk to make a consistency slightly thicker than heavy cream. Shake off the excess before cooking.
Cooking in Two Stages for Maximum Crunch
Stage 1: Cook battered florets at 390°F (199°C) for 12 minutes, shaking at the 6-minute mark, until the batter is set and lightly golden.
Stage 2: Toss cooked florets in buffalo sauce (Frank’s RedHot combined with a tablespoon of melted butter or vegan butter), return to the air fryer for 3–4 minutes at the same temperature. This final stage caramelizes the sauce and locks the flavor into the crust rather than just coating the outside.
Serve with celery sticks and a blue cheese or ranch dipping sauce. They hold their crunch for about 15 minutes — serve them fast.
10. Air Fryer Turkey Legs with Herb Rub
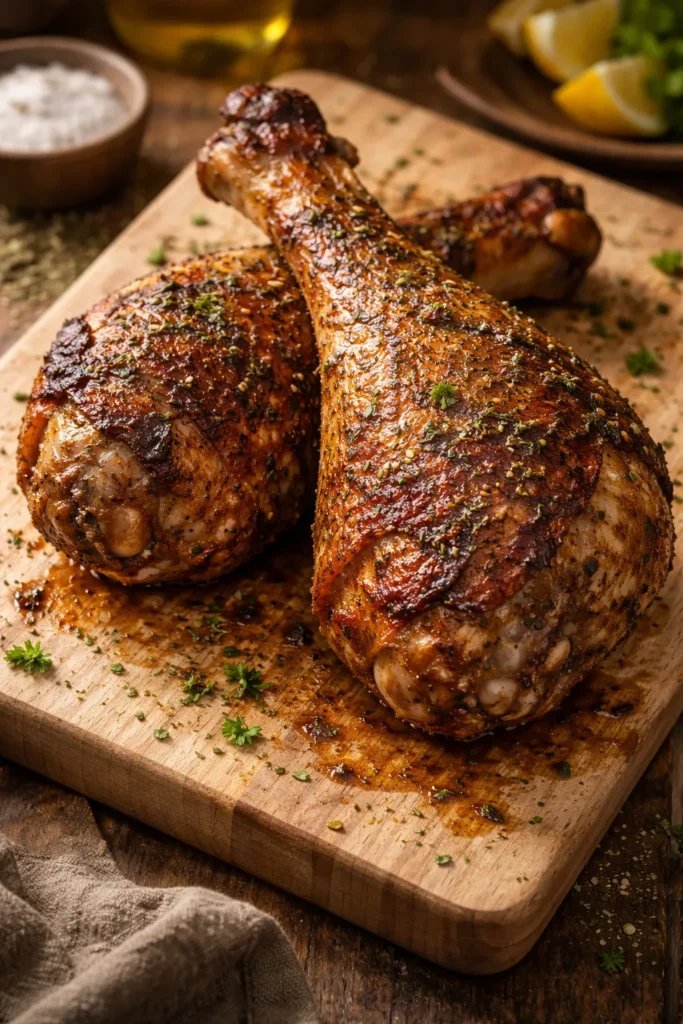
Turkey legs cooked in the air fryer develop something remarkable: skin that crackles like parchment and pulls away from the meat at the leg bone, exposing deeply seasoned, juicy meat beneath. The secret is a dry rub applied at least 4 hours before cooking — ideally the night before.
A dry rub of smoked paprika, garlic powder, dried thyme, dried rosemary, brown sugar, kosher salt, black pepper, and a pinch of allspice covers all the flavor bases. The brown sugar promotes browning and provides a subtle sweetness that balances the savory herbs. Pat the skin completely dry before applying the rub — moisture under the rub creates steam rather than bark.
Temperature and Timing
Turkey legs are denser than chicken and need slightly more care with temperature management:
- Start at 375°F (190°C) for 20 minutes to cook the meat through
- Increase to 400°F (200°C) for the final 10–15 minutes to crisp the skin
- Target internal temperature: 180°F (82°C) at the thickest point of the leg
- Rest for 5 minutes before serving — the juices redistribute dramatically during this window
One leg fits comfortably in a standard 5.8-quart air fryer. Two legs require careful placement so they don’t touch each other — any contact point will steam instead of crisp.
11. Air Fryer Eggplant Fries with Marinara Dipping Sauce
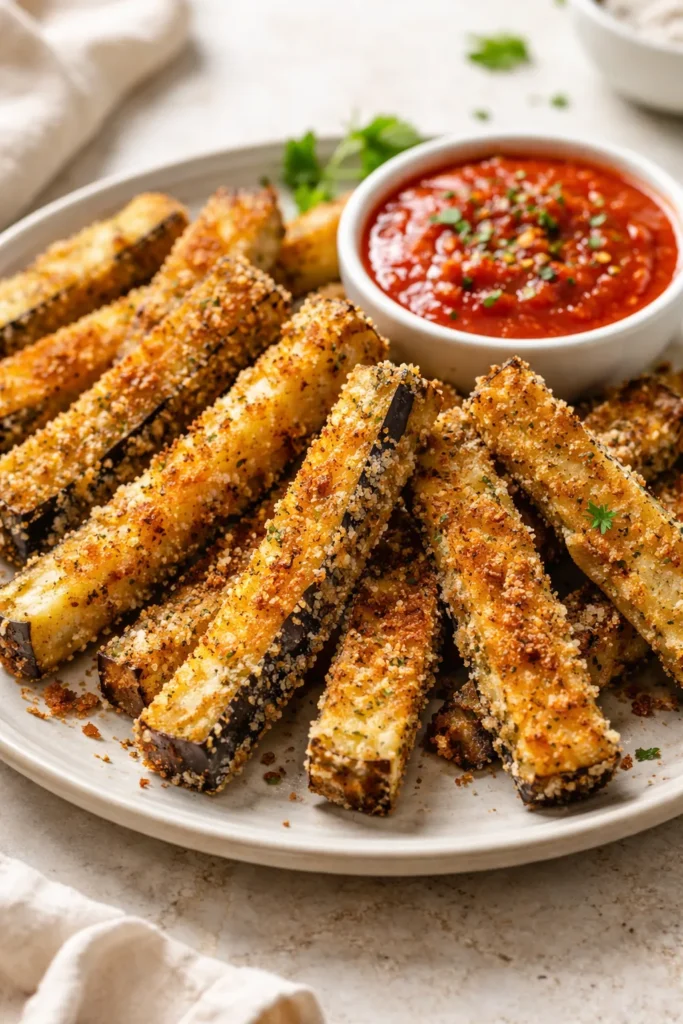
Eggplant cooked in the air fryer loses its spongy, oil-absorbing quality — which is exactly what makes eggplant frustrating to cook on the stovetop — and becomes firm, creamy inside with a golden, breadcrumb exterior that doesn’t fall apart when you pick it up.
The preparation step that matters most here is salting. Slice eggplant into ½-inch-thick strips, arrange on a paper towel-lined tray, salt generously on both sides, and let it sit for 20 minutes. Moisture will bead up on the surface — blot it dry before breading. This step removes bitterness and, more importantly, removes excess water that would prevent browning.
Breading and Cooking
The breading for eggplant fries works best with a combination of panko and finely grated Parmesan — about a 3:1 ratio. The Parmesan adds salt, umami, and helps the coating brown faster. Season with Italian seasoning, garlic powder, and black pepper.
- Dredge salted, dried eggplant strips in flour → beaten egg → panko-Parmesan mixture
- Spray both sides lightly with olive oil spray
- Cook at 400°F (200°C) for 10–12 minutes, flipping at 6 minutes
- The exterior should feel firm and sound slightly hollow when tapped lightly
Serve immediately with warmed marinara sauce. These don’t reheat as well as the meat-based recipes in this collection, so cook only as many as you plan to eat immediately.
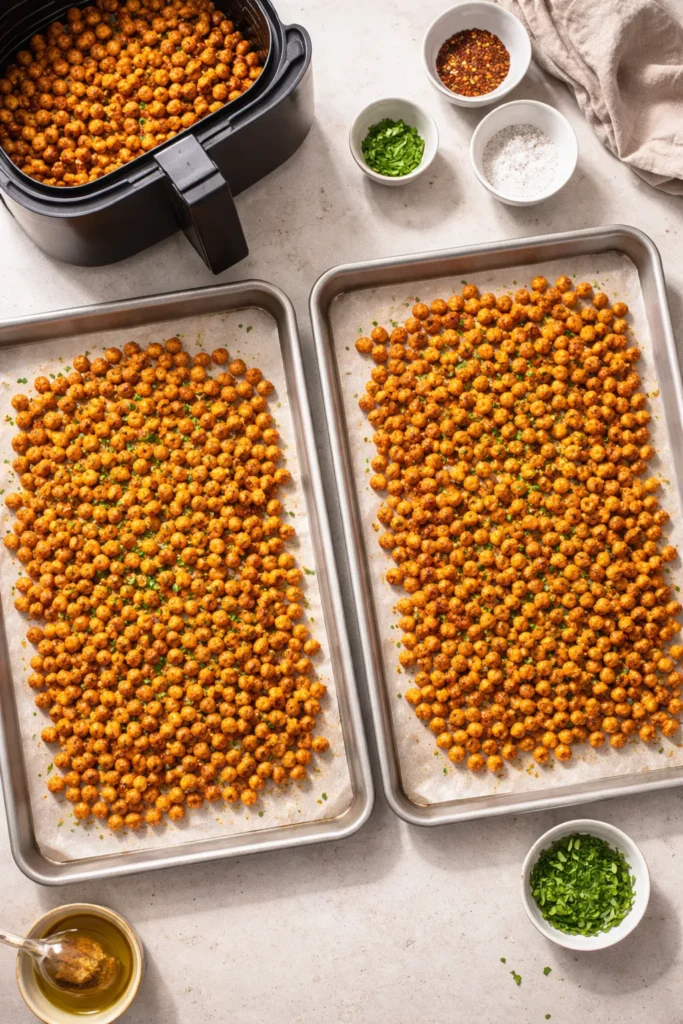
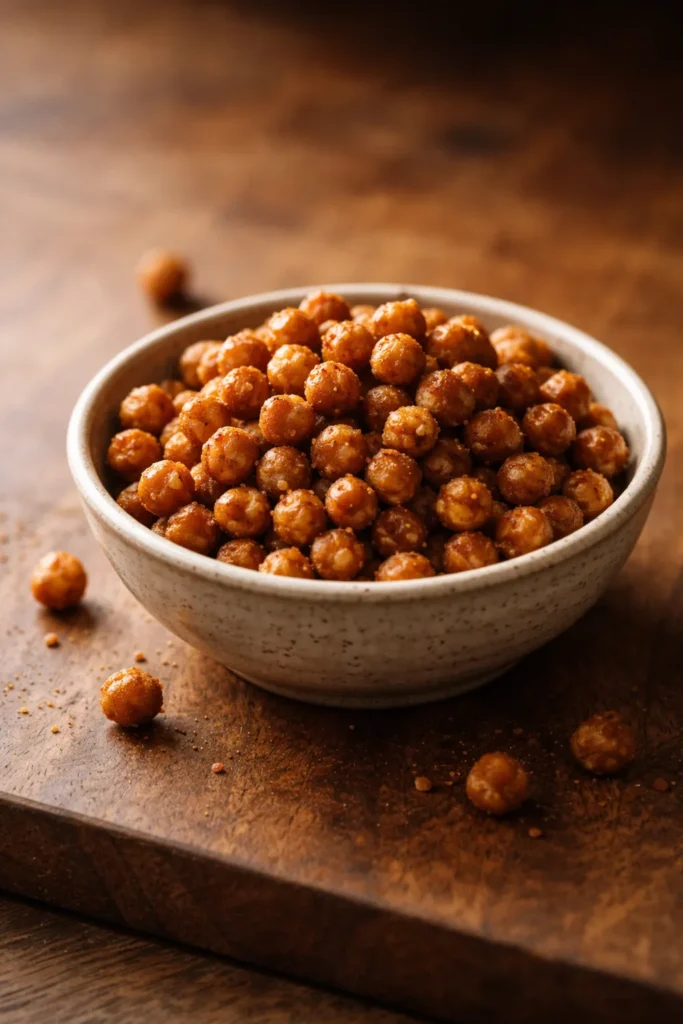
12. Air Fryer Crispy Chickpeas as a Dinner Bowl Base
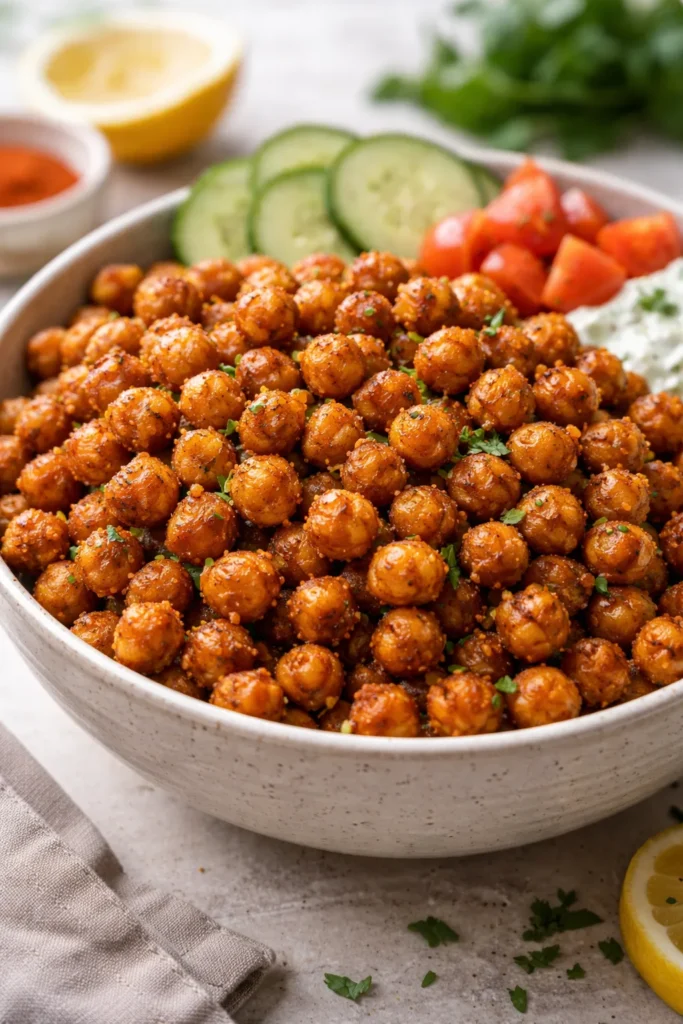
Crispy chickpeas occupy an interesting position — they work as a standalone snack, but they really shine as the protein centerpiece of a dinner bowl. When air-fried properly, they develop a crunch that genuinely surprises people who associate chickpeas only with their soft, hummus-bound form.
The preparation is straightforward: drain a can of chickpeas, rinse thoroughly, and spread them on a clean kitchen towel. Roll them around to dry them, then leave them uncovered on the towel for at least 15 minutes. This drying step is what separates crispy chickpeas from rubbery ones. The outer membrane of the chickpea will slip off during this process — pick those membranes off. They prevent crisping.
Seasoning and Cooking
Toss dried chickpeas with 1 teaspoon of oil and your chosen spice blend. Strong, bold spices work best:
- Smoky: smoked paprika + cumin + garlic powder + sea salt
- Spicy: cayenne + chili powder + lime zest + salt
- Indian-inspired: garam masala + coriander + turmeric + salt
- Za’atar: dried thyme + sumac + sesame seeds + salt
Cook at 390°F (199°C) for 15–18 minutes, shaking the basket every 5 minutes. They’re ready when they feel completely firm and have shrunk noticeably from their raw size.
Building the Dinner Bowl
To turn crispy chickpeas into a full dinner:
- Base: cooked farro, brown rice, or quinoa
- Greens: baby spinach, kale, or arugula added while the grain is still warm
- Roasted vegetables from the air fryer (sweet potato, zucchini, or red peppers cooked in a separate batch)
- Tahini dressing: 2 tablespoons tahini + 1 tablespoon lemon juice + 1 garlic clove + water to thin
- Top with the crispy chickpeas immediately before serving
Tips for Getting Maximum Crispiness Every Time
Getting consistently good results from an air fryer requires understanding a few principles that apply across every recipe in this collection.
Temperature preheating matters. Most air fryers benefit from 3–5 minutes of preheating before food goes in. Adding food to a cold basket essentially steams the exterior for the first few minutes rather than crisping it.
Pat everything dry before it goes in. Marinades, washes, and wet coatings all benefit from a brief patting before cooking. Even a buttermilk-soaked piece of chicken should be allowed to drain for 30 seconds before dredging — excess liquid makes coatings slide off and creates steam.
Shake the basket, but not obsessively. For loose items like fries, chickpeas, or vegetable bites, shaking every 4–5 minutes promotes even browning. For breaded or coated items, excessive shaking damages the coating. Flip breaded items once — gently, using tongs — rather than shaking.
Use a light oil spray rather than pouring. An oil mister or aerosol cooking spray distributes a thin, even coating across the food surface. Pouring oil creates puddles that steam instead of crisp.
Common Air Fryer Mistakes That Ruin the Crunch
Even with a solid recipe, a few common habits consistently undermine results.
Skipping the pat-dry step is the most frequent mistake. Any recipe involving marinated protein or soaked vegetables needs thorough drying before it goes into the basket. The air fryer can evaporate surface moisture, but starting with wet food adds several minutes to the cooking time and often results in uneven browning.
Opening the basket too frequently disrupts the airflow cycle and drops the internal temperature, which means the appliance spends the first minute or two of the next cycle getting back up to temperature rather than crisping food. Check on food at the midpoint, flip if needed, and leave it alone for the rest of the cooking time.
Washing the basket immediately and putting it back while wet causes rust over time and creates uneven cooking surfaces. Dry the basket thoroughly before storing or reusing.
Using parchment paper that blocks the basket holes prevents hot air from circulating underneath the food. If you’re using parchment to prevent sticking, use perforated parchment designed for air fryers — or skip it entirely and use a light oil spray on the basket instead.
Expecting identical results from different air fryer models leads to consistent confusion. A 3.5-quart model runs hotter and cooks faster than a 6-quart countertop oven-style unit. Every timing in this collection is a starting point — check food 2–3 minutes before the listed time until you know how your specific model behaves.
Scaling Recipes and Cooking in Batches
Every recipe here is written for a standard 5–6 quart basket-style air fryer. Scaling up for larger families requires thinking about batching rather than just doubling — you cannot double the amount of food in the basket and expect the same result.
For entertaining or meal prep situations:
- Cook the first batch fully, then transfer to a wire rack set over a baking sheet in a 200°F (93°C) oven to keep warm
- Don’t cover the food with foil — trapped steam will destroy the crunch you just created
- The oven holding method works for up to 30 minutes without significant quality loss
- Crispy chickpeas, however, hold their crunch at room temperature for up to an hour without any special treatment
Meal prep in general works well with air fryer food, but with one important caveat: reheat everything in the air fryer rather than the microwave. The microwave introduces steam, which collapses any crunchy coating within 90 seconds. A 3–4 minute reheat at 375°F (190°C) in the air fryer restores most of the original texture.
Final Thoughts
The through-line connecting all 12 of these recipes is the same principle the air fryer is built on: remove moisture, apply consistent dry heat, and let the browning reactions do their work. Once you understand that, you start approaching the appliance differently — prepping food drier, seasoning more boldly, and trusting the process rather than opening the basket every two minutes to check.
If you’re starting out, the crispy chickpeas and sweet potato fries are the most forgiving — low risk, fast cooking, and genuinely impressive results. Once you’ve developed a feel for your specific model, the buttermilk fried chicken and the Korean fried chicken are the most rewarding.
The basket’s capacity is your only real constraint. Work with it rather than against it, and the air fryer becomes one of the most reliable tools in the kitchen.