Eating well with an autoimmune condition shouldn’t feel like a punishment. And yet, if you’ve spent any time researching the Autoimmune Protocol (AIP), you’ve probably had at least one moment where you stared at the list of restricted foods — no grains, no eggs, no nightshades, no dairy, no nuts, no seeds, no legumes — and wondered what, exactly, you’re supposed to eat for dinner.
The answer, it turns out, is a lot. The AIP framework is built around genuinely nourishing whole foods: quality meats, wild-caught fish, a wide spectrum of vegetables, healthy fats, and herbs that do serious anti-inflammatory work in your body. The challenge isn’t the ingredients themselves — it’s knowing how to build flavor, depth, and satisfying texture without the usual shortcuts.
The eight recipes below do exactly that. Each one follows strict AIP elimination phase guidelines while delivering the kind of dinner that makes you forget you’re eating therapeutically at all. A rich beef stew that tastes like something your grandmother would’ve made. A lemon-kissed salmon that comes together in under 30 minutes. A pork bake that fills the kitchen with a scent so good your family will wander in asking what’s for dinner. These aren’t compromise meals — they’re good meals that happen to be AIP-compliant.
Before cooking, one note worth keeping in mind: the AIP diet is an elimination protocol, not a permanent way of eating. The goal of the strict elimination phase — typically four to six weeks — is to calm immune activity and allow the gut lining to repair. After that, foods are reintroduced one by one to identify your personal triggers. Working with a registered dietitian experienced in autoimmune conditions makes this process significantly more effective and less stressful.
Table of Contents
- What Makes a Recipe Truly AIP-Compliant
- How to Build AIP Flavor Without Nightshades or Common Spices
- The “No-Mato” Foundation
- Coconut Aminos as Your Umami Anchor
- The Power of Layered Aromatics
- 1. Creamy Coconut Beef Stew
- Ingredients
- Instructions
- Why This Stew Works
- 2. Lemon and Garlic Baked Salmon with Asparagus
- Ingredients
- Instructions
- Making It a Complete Meal
- 3. Garlic Shrimp and Asparagus Skillet
- Ingredients
- Instructions
- Variations Worth Trying
- 4. Hearty Pork and Apple Bake with Sweet Potato
- Ingredients
- Instructions
- What to Serve Alongside
- 5. AIP-Compliant Nightshade-Free “Chili”
- Ingredients
- Instructions
- Make-Ahead and Freezer Notes
- 6. AIP Shepherd’s Pie with Cauli-Sweet Potato Mash
- Ingredients
- Instructions
- 7. Coconut Ginger Chicken Thighs with Roasted Carrots
- Ingredients
- Instructions
- Storage and Reheating
- 8. AIP Egg Roll in a Bowl with Ground Pork
- Ingredients
- Instructions
- Customizing This Recipe
- AIP Meal Prep Strategies That Actually Save Time
- Batch-Cook Your Bases
- One-Pan and Sheet Pan Meals Are Your Best Friend
- Freeze in Portions You’ll Actually Use
- Key Takeaways
What Makes a Recipe Truly AIP-Compliant
Before getting into the recipes, it helps to understand where most “AIP recipes” go wrong. The most common mistake is missing hidden offenders — spice blends that contain seed-derived spices like cumin, paprika, or mustard, or store-bought sauces that sneak in tomato paste, soy sauce, or canola oil.
On the AIP elimination phase, you’re working with these core building blocks:
- Proteins: Grass-fed beef, pastured pork, organic poultry, wild-caught fish, shellfish, organ meats
- Vegetables: Nearly all non-nightshade vegetables — think leafy greens, cruciferous vegetables, root vegetables, squash, asparagus, mushrooms, beets, zucchini, carrots, and celery
- Healthy fats: Olive oil, avocado oil, coconut oil, lard, tallow, duck fat
- Flavor builders: Garlic, onion, leeks, fresh and dried herbs (thyme, oregano, rosemary, sage, cilantro, dill, tarragon, basil, parsley), ginger, turmeric, cinnamon, cloves
- Liquid foundations: Bone broth, coconut milk, coconut aminos (in place of soy sauce), apple cider vinegar, lemon juice
The nightshade restriction trips people up the most. No tomatoes, no peppers, no eggplant, no white potatoes, and no spices derived from peppers — which eliminates paprika, cayenne, red pepper flakes, and chili powder at a single stroke. Recipes that would normally rely on these for heat and depth need to be rebuilt from the ground up, and the eight recipes below show exactly how to do that without losing an ounce of flavor.
How to Build AIP Flavor Without Nightshades or Common Spices
This deserves its own section because it’s the skill that separates mediocre AIP cooking from dinner you’d genuinely choose to eat even without dietary restrictions.
The “No-Mato” Foundation
Tomatoes provide acid, body, and color to dozens of classic recipes. A mixture of beets, butternut squash, and apple cider vinegar creates a remarkably similar profile. Beets bring the rich color and earthy sweetness; the squash provides bulk and natural sugars; the vinegar contributes the bright acidity that tomatoes normally deliver. Once you’ve tasted a nightshade-free chili made this way, it’s hard to miss the original.
Coconut Aminos as Your Umami Anchor
Coconut aminos — the fermented sap of coconut blossoms — tastes surprisingly similar to soy sauce, carrying the same savory, slightly sweet depth that makes Asian-inspired dishes so satisfying. It’s AIP-approved and increasingly easy to find in mainstream grocery stores. Use it anywhere a recipe calls for soy sauce, tamari, or Worcestershire sauce.
The Power of Layered Aromatics
Garlic, ginger, onion, and good-quality bone broth are the backbone of AIP flavor. Don’t rush the aromatics — sautéing garlic and onion for a full five to seven minutes before adding anything else develops a sweetness and complexity that’s impossible to replicate by dumping everything in at once. This one technique alone transforms a mediocre AIP dish into a deeply satisfying one.
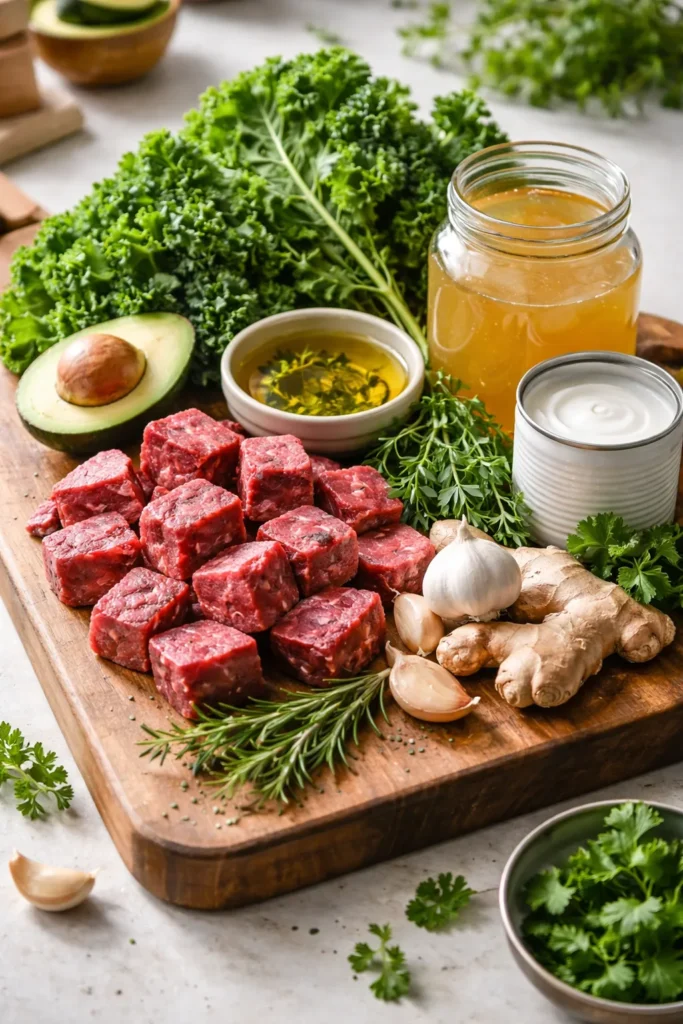
1. Creamy Coconut Beef Stew
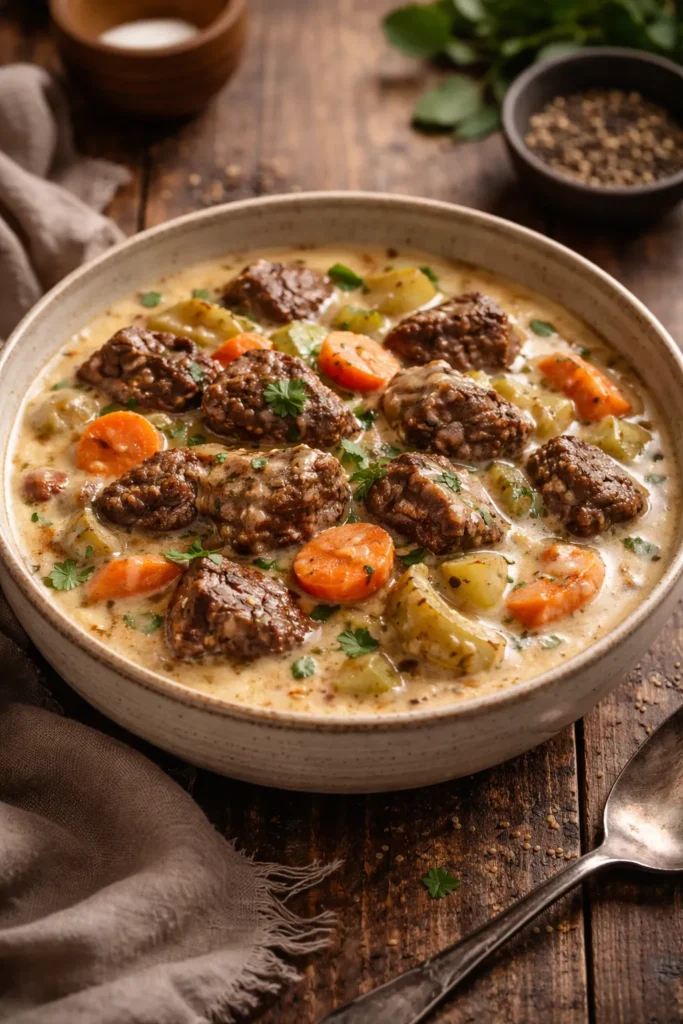
Few things beat a proper beef stew when the temperature drops or when you need something deeply comforting after a hard day. This version replaces the traditional wine and tomato base with bone broth and full-fat coconut milk, which creates a silky, subtly sweet sauce that clings beautifully to the slow-cooked beef.
The key to this stew is patience with the sear. Getting a proper caramelized crust on each cube of beef before anything else goes in the pot is what builds the deep, savory bottom notes that make this taste complex rather than thin. Don’t skip this step and don’t crowd the pan — work in batches if needed.
Yield: Serves 4 to 6 Prep Time: 20 minutes Cook Time: 2 hours Total Time: 2 hours 20 minutes Difficulty: Beginner — the steps are straightforward and the long cook time does most of the work.
Ingredients
- 1.5 lbs stewing beef, cut into 1-inch cubes and patted very dry
- 2 tablespoons coconut oil or avocado oil, divided
- 1 large yellow onion, diced
- 3 celery stalks, sliced into ½-inch pieces
- 3 large carrots, peeled and sliced into ½-inch rounds
- 5 cloves garlic, minced
- 4 cups good-quality bone broth (chicken or beef)
- 1 (13.5 oz) can full-fat coconut milk, shaken
- 1 teaspoon dried thyme
- ½ teaspoon ground ginger
- 1 bay leaf
- Sea salt, to taste
- 1 large sweet potato, peeled and cut into 1-inch cubes
- 2 cups baby spinach or chopped kale
- Fresh chives, finely sliced, for garnish
Instructions
Sear the Beef:
-
Pat the beef cubes thoroughly dry with paper towels — surface moisture is the enemy of a proper sear. Season generously with sea salt.
-
Heat 1 tablespoon of coconut oil in a large, heavy-bottomed pot or Dutch oven over high heat until just smoking. Add the beef in a single layer, working in two batches to avoid crowding. Sear for 2 to 3 minutes per side, undisturbed, until a deep brown crust forms. Do not stir during searing — the crust is everything here. Transfer the seared beef to a plate and set aside.
Build the Base:
-
Reduce the heat to medium. Add the remaining tablespoon of oil. Add the diced onion and celery and cook, stirring occasionally, for 6 to 7 minutes until softened and the onion is translucent with lightly golden edges.
-
Add the garlic, thyme, and ginger and stir for 1 minute until fragrant. The pot should smell incredible at this point.
-
Return the seared beef (and any resting juices) to the pot. Pour in the bone broth and coconut milk. Add the bay leaf. Stir to combine, scraping any browned bits off the bottom of the pot — those are pure flavor.
Simmer and Finish:
-
Bring the stew to a gentle boil, then reduce the heat to low, cover, and simmer for 1 hour and 30 minutes.
-
Add the sweet potato cubes and continue simmering, covered, for a further 20 to 25 minutes until the sweet potato is fork-tender and the beef pulls apart easily when pressed with a spoon.
-
Remove the bay leaf. Stir in the baby spinach or kale and cook for 2 minutes until just wilted. Taste and adjust salt.
-
Ladle into bowls and garnish with fresh chives. Serve as-is or with cauliflower rice to soak up every drop of the sauce.
Why This Stew Works
The coconut milk does something remarkable here — it rounds out any sharpness from the vegetables and creates a sauce texture that feels genuinely indulgent without any dairy. The sweet potato, added in the final 25 minutes rather than at the start, holds its shape and adds a natural creaminess to each spoonful.
Tip: If the stew feels too thin toward the end, mix 1 tablespoon of arrowroot starch with 2 tablespoons of cold water and stir the slurry into the simmering stew for 2 to 3 minutes. It’ll thicken up beautifully.
2. Lemon and Garlic Baked Salmon with Asparagus

Salmon is one of the most valuable proteins on the AIP diet — rich in omega-3 fatty acids that actively support immune regulation and reduce inflammatory markers. But it’s also one of the easiest proteins to overdo, leaving you with a dry, chalky fillet that smells up the kitchen without delivering much pleasure at the table.
This recipe works because it marries the salmon’s natural richness with bright lemon, fresh dill, and a roasted asparagus base that adds texture and a slightly grassy, green flavor contrast. The whole thing goes on one sheet pan and comes out of the oven in under 25 minutes.
Yield: Serves 4 Prep Time: 10 minutes Cook Time: 18 minutes Total Time: 28 minutes Difficulty: Beginner — minimal prep and one pan to clean.
Ingredients
- 4 wild-caught salmon fillets (about 6 oz each), skin-on
- 1 bunch asparagus (approximately 1 lb), tough ends snapped off
- 3 cloves garlic, finely minced
- 3 tablespoons good-quality olive oil, divided
- Juice of 1 large lemon, plus additional lemon slices for serving
- 1 teaspoon dried dill (or 2 tablespoons fresh dill, chopped)
- 1 teaspoon dried thyme
- Sea salt, to taste
- Fresh parsley, chopped, for garnish
Instructions
Prepare and Roast:
-
Preheat the oven to 400°F (200°C) and line a large sheet pan with parchment paper.
-
Arrange the asparagus spears in a single layer on one half of the sheet pan. Drizzle with 1 tablespoon of olive oil and season with sea salt. Toss briefly to coat.
-
In a small bowl, whisk together the remaining 2 tablespoons of olive oil, minced garlic, lemon juice, dill, and thyme.
-
Place the salmon fillets skin-side down on the other half of the sheet pan, leaving at least 1 inch of space between each fillet. Spoon the herb and lemon mixture evenly over each fillet, letting it pool slightly on top.
-
Lay 2 to 3 lemon slices over the salmon for extra brightness during roasting.
-
Roast for 14 to 18 minutes, depending on the thickness of the fillets, until the salmon flesh flakes easily when pressed gently with a fork and the asparagus tips have crisped and started to char slightly at the edges. A 1-inch thick fillet will need closer to 14 minutes; 1.5 inches will need 18. Overcooked salmon loses its silkiness quickly, so err on the side of checking early.
-
Transfer to plates, garnish with fresh parsley, and serve immediately with the roasted asparagus alongside.
Making It a Complete Meal
For a more substantial dinner, add cubed sweet potato to the sheet pan alongside the asparagus — just toss it with oil and get it into the oven 10 minutes before the salmon goes in, giving it a head start. The sweet potato’s natural sugar caramelizes against the high heat and pairs beautifully with the lemon-dill salmon.
3. Garlic Shrimp and Asparagus Skillet
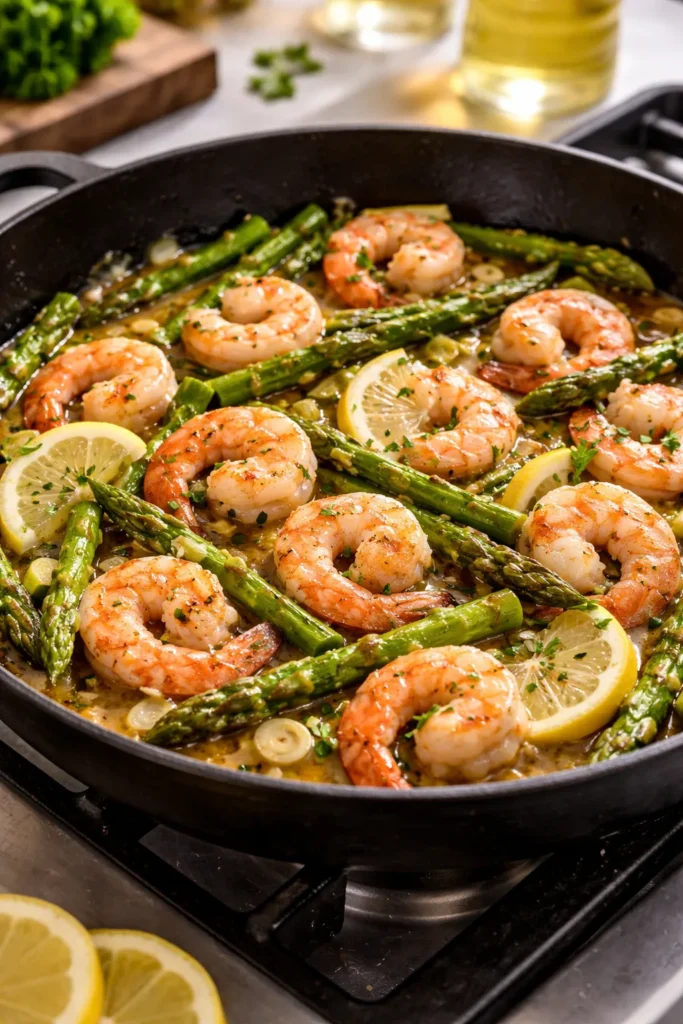
This weeknight skillet dinner is exactly the kind of AIP recipe that earns its keep — it requires 15 minutes, one pan, and ingredients that most AIP cooks already have on hand. The shrimp picks up the garlic and lemon beautifully, and the asparagus gets just enough time in the pan to become tender-crisp without turning limp.
The bone broth deglazes the pan and creates a light, savory sauce that coats everything. It’s not a thick, heavy sauce — it’s a bright, clean pan drizzle that elevates each bite without competing with the natural sweetness of the shrimp.
Yield: Serves 3 to 4 Prep Time: 10 minutes Cook Time: 12 minutes Total Time: 22 minutes Difficulty: Beginner — the entire dish cooks faster than you’d expect, so have everything prepped before the pan gets hot.
Ingredients
- 1 lb large shrimp (21/25 count), peeled and deveined, tails on or off based on preference
- 1 bunch asparagus (about ¾ lb), trimmed and cut into 1½-inch pieces on the diagonal
- 5 large cloves garlic, thinly sliced (not minced — sliced garlic browns more evenly here)
- 3 tablespoons olive oil
- ¼ cup bone broth
- Juice of ½ lemon
- ½ teaspoon dried thyme
- Sea salt, to taste
- Fresh dill or parsley, roughly chopped, for garnish
Instructions
-
Pat the shrimp dry with paper towels and season lightly with sea salt. Set aside.
-
Heat the olive oil in a large skillet over medium heat. Add the sliced garlic and cook, stirring frequently, for 1 to 2 minutes until lightly golden at the edges. Watch this carefully — garlic goes from golden to bitter in under 30 seconds.
-
Increase the heat to medium-high. Add the asparagus to the skillet and cook, tossing occasionally, for 4 to 5 minutes until bright green and just starting to take on color at the tips.
-
Push the asparagus to the edges of the pan. Add the shrimp in a single layer to the center of the skillet. Cook for 1½ to 2 minutes per side, until the shrimp are just pink and curled. Pull them from the heat as soon as the center turns opaque — residual heat finishes the job.
-
Add the bone broth and lemon juice to the pan and scrape up any browned garlic bits from the bottom. Let everything simmer together for 1 minute to let the sauce develop.
-
Season with thyme and additional sea salt as needed. Garnish generously with fresh herbs and serve immediately.
Variations Worth Trying
Replace the asparagus with zucchini cut into half-moons, broccoli florets, or a combination of both. The cook times change slightly — broccoli needs 6 to 7 minutes, zucchini needs 3 to 4 — but the flavor profile holds up beautifully across all variations. This recipe also works well over cauliflower rice if you want to stretch it into a more filling meal.
4. Hearty Pork and Apple Bake with Sweet Potato
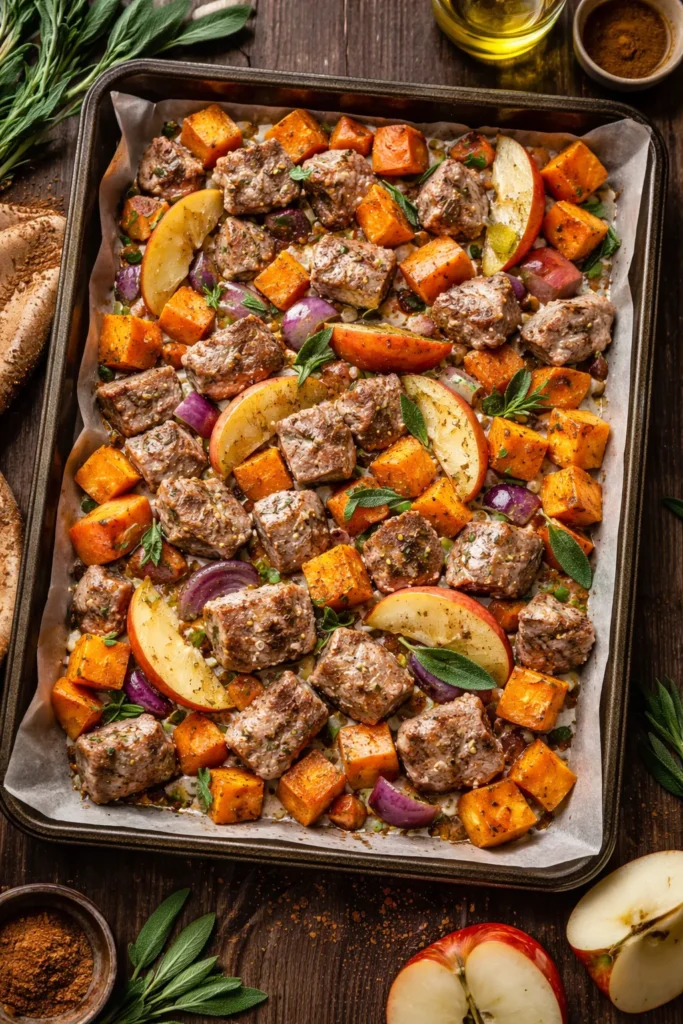
Pork and apple is a pairing that goes back centuries, and for good reason — the natural acidity and sweetness of apple cuts through the richness of pork in a way that almost nothing else can. Add sweet potato and a hint of cinnamon and sage, and this simple one-pan bake starts to taste like it took considerably more effort than it actually did.
The sweet potato absorbs the cooking juices from the pork and becomes almost custardy on the inside with slightly caramelized edges. The apple softens into jammy, fragrant pieces that double as a built-in sauce. This dish feels festive enough for a special dinner but simple enough for a Tuesday night.
Yield: Serves 4 to 5 Prep Time: 15 minutes Cook Time: 38 minutes Total Time: 53 minutes Difficulty: Beginner — assembling everything takes minutes, and the oven does the rest.
Ingredients
- 1.5 lbs pork tenderloin, cut into 1-inch pieces (or bone-in pork chops, about 4 medium)
- 2 medium firm apples (such as Granny Smith or Honeycrisp), peeled, cored, and sliced into ½-inch wedges
- 1 large sweet potato, peeled and cut into ¾-inch cubes
- 1 medium red onion, cut into wedges
- 2 tablespoons olive oil
- 1 teaspoon dried sage
- ½ teaspoon dried thyme
- ¼ teaspoon ground cinnamon
- Sea salt, to taste
- Fresh rosemary sprigs (optional, for roasting fragrance)
Instructions
-
Preheat the oven to 375°F (190°C) and lightly oil a large roasting pan or oven-safe baking dish.
-
Add the pork, apple wedges, sweet potato cubes, and red onion to the pan. Drizzle with olive oil and toss to coat everything evenly.
-
Sprinkle the sage, thyme, cinnamon, and sea salt over the entire pan. Toss once more so the spices distribute across the pork and vegetables. Tuck any rosemary sprigs in between the pieces if using.
-
Spread the mixture into a single layer as much as possible — some overlap is fine, but avoid piling things on top of each other or the sweet potato won’t caramelize properly.
-
Roast for 35 to 40 minutes, turning everything once at the 20-minute mark, until the pork is cooked through (internal temperature of 145°F / 63°C), the sweet potato is completely tender when pierced with a fork, and the apple wedges have softened and started to caramelize around the edges.
-
Let the pan rest for 5 minutes before serving — the juices settle and the flavors sharpen.
What to Serve Alongside
This bake is filling on its own, but steamed broccoli or a simple green salad with olive oil and lemon rounds it out nicely. Leftover pork and apple bake also makes a surprisingly good lunch the next day — the flavors deepen overnight and the apple integrates further into the pan drippings.
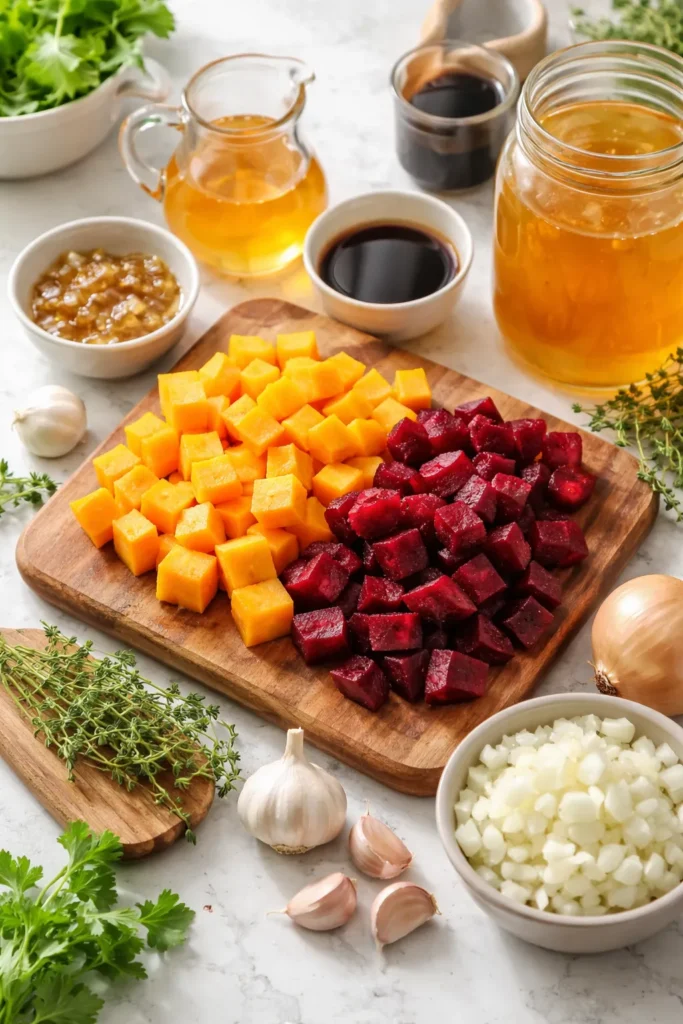
5. AIP-Compliant Nightshade-Free “Chili”
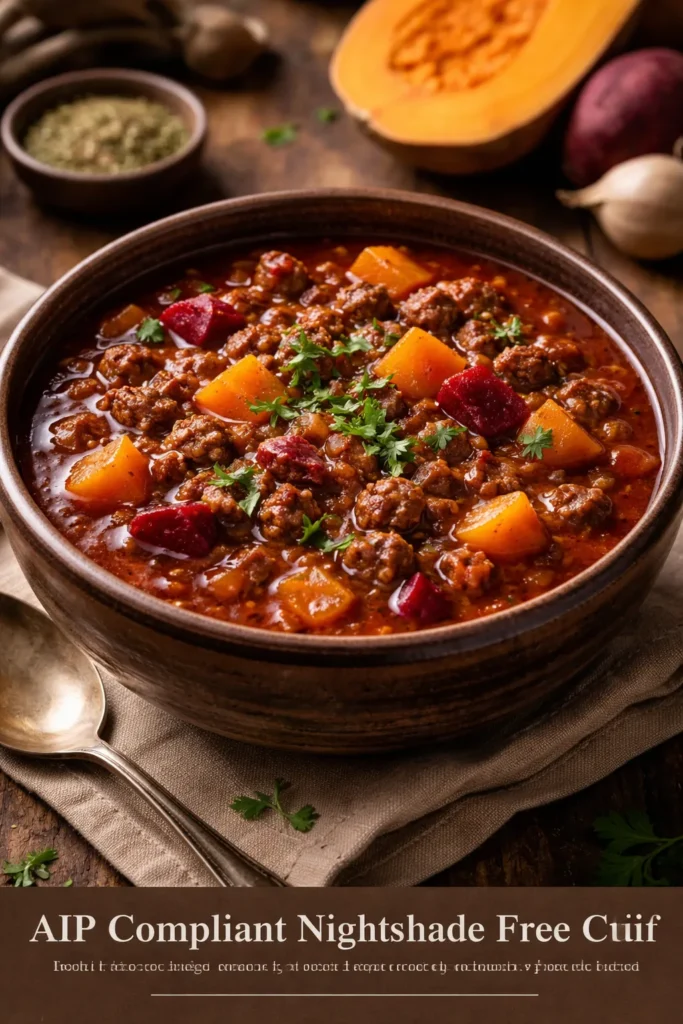
Here’s the thing about making chili without tomatoes, beans, peppers, or chili powder: it sounds like it should be impossible. And the first time you make this version, you’ll probably expect it to taste like a pale imitation of the real thing. Instead, it tastes like a rich, warming, deeply savory stew that any chili lover would actually enjoy.
The secret is the beet and butternut squash base. Beets provide the deep color and earthy sweetness that tomatoes normally contribute; butternut squash adds body and natural sugar; apple cider vinegar brings the bright acidity. Combined with good grass-fed beef, garlic, onion, and warming spices, this bowl of “chili” delivers everything the comfort food classic promises.
Yield: Serves 5 to 6 Prep Time: 20 minutes Cook Time: 35 minutes Total Time: 55 minutes Difficulty: Beginner — straightforward stovetop cooking with no technical steps.
Ingredients
- 1.5 lbs ground grass-fed beef
- 1 tablespoon avocado oil
- 1 medium yellow onion, diced
- 4 cloves garlic, minced
- 2 cups butternut squash, peeled and cut into ½-inch cubes
- 1 medium beet, cooked and roughly chopped (about ½ cup once processed)
- ½ cup pumpkin purée (canned, 100% pumpkin with no additives)
- 2½ cups beef bone broth
- 1 tablespoon apple cider vinegar
- 1 teaspoon dried oregano
- ½ teaspoon ground cinnamon
- ¼ teaspoon ground cloves
- ¼ teaspoon turmeric
- ½ teaspoon sea salt, plus more to taste
- 1 bay leaf
- Avocado slices and fresh cilantro, for serving
Instructions
-
Heat the avocado oil in a large Dutch oven over medium-high heat. Add the diced onion and cook for 5 to 6 minutes until softened and lightly golden.
-
Add the garlic and stir for 1 minute until fragrant.
-
Add the ground beef to the pot, breaking it apart with a wooden spoon. Cook for 6 to 7 minutes until browned all the way through with no pink remaining. Drain any excess fat if necessary.
-
In a blender, combine the cooked beet and pumpkin purée with ½ cup of the bone broth. Blend until completely smooth — this creates the “no-mato” base that gives the chili its color and body.
-
Pour the beet-pumpkin mixture into the pot along with the remaining bone broth. Add the butternut squash, apple cider vinegar, oregano, cinnamon, cloves, turmeric, salt, and bay leaf. Stir to combine.
-
Bring to a gentle boil, then reduce the heat to medium-low and simmer, covered, for 20 to 25 minutes until the butternut squash is completely tender.
-
Remove the bay leaf. Taste and adjust salt and vinegar as needed. The vinegar brings brightness — if the chili tastes flat, a small extra splash wakes everything up.
-
Serve topped with sliced avocado and fresh cilantro. A squeeze of lime over the top just before serving adds a final pop of freshness.
Make-Ahead and Freezer Notes
This chili improves overnight — the spices and the beet-squash base meld together beautifully after a night in the refrigerator. It keeps well refrigerated for up to four days and freezes for up to three months in airtight containers. Reheat gently on the stovetop over low heat with a small splash of bone broth to loosen the texture if it’s thickened during storage.
6. AIP Shepherd’s Pie with Cauli-Sweet Potato Mash
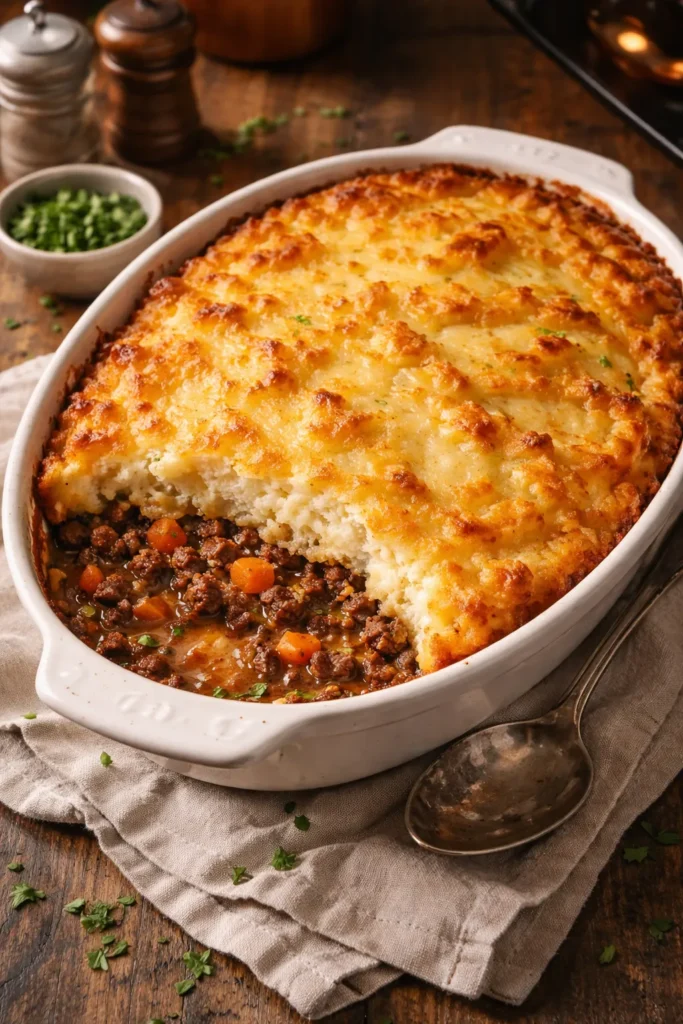
Shepherd’s pie is one of those deeply satisfying one-dish dinners that manages to feel both rustic and celebratory at the same time. This AIP version swaps the traditional mashed potato topping for a blend of cauliflower and sweet potato — which, honest to goodness, may be better than the original. It’s lighter in texture, slightly sweet, and turns a gorgeous golden color under the broiler.
The filling is built on ground beef (technically making this a cottage pie, but the name matters less than the fact that it’s delicious), carrots, celery, parsnips, and mushrooms, all bound together with a savory bone broth gravy thickened with arrowroot.
Yield: Serves 6 Prep Time: 25 minutes Cook Time: 45 minutes Total Time: 1 hour 10 minutes Difficulty: Intermediate — multiple components are cooked separately before assembling, but none of the steps are complicated.
Ingredients
For the Filling:
- 1.5 lbs ground grass-fed beef
- 1 tablespoon coconut oil
- 1 medium yellow onion, finely diced
- 3 medium carrots, peeled and diced small
- 2 celery stalks, diced small
- 2 medium parsnips, peeled and diced small
- 8 oz white or cremini mushrooms, finely chopped
- 4 cloves garlic, minced
- 1½ cups beef bone broth
- 1 tablespoon coconut aminos
- 1 teaspoon dried thyme
- 1 teaspoon dried rosemary
- 2 teaspoons arrowroot starch dissolved in 2 tablespoons cold water
- Sea salt, to taste
For the Cauli-Sweet Potato Topping:
- 1 large head cauliflower, cut into florets
- 1 large sweet potato, peeled and cut into chunks
- 2 tablespoons coconut oil or avocado oil
- Sea salt, to taste
Instructions
Make the Topping:
-
Bring a large pot of salted water to a boil. Add the sweet potato chunks and cook for 10 minutes. Add the cauliflower florets and continue cooking for a further 8 to 10 minutes until both are completely tender when pierced with a fork.
-
Drain well and return to the pot. Add the coconut oil and sea salt. Mash together with a potato masher, or blend with an immersion blender for a smoother, creamier result. Taste and adjust salt. Set aside.
Make the Filling:
-
Preheat the oven to 400°F (200°C).
-
Heat the coconut oil in a large oven-safe skillet or Dutch oven over medium-high heat. Add the onion, carrots, celery, and parsnips. Cook for 7 to 8 minutes until softened and starting to brown at the edges.
-
Add the mushrooms and garlic and cook for 3 to 4 minutes until the mushrooms have released their liquid and most of it has evaporated.
-
Add the ground beef, breaking it apart as it cooks. Sauté for 5 to 6 minutes until no pink remains.
-
Pour in the bone broth and coconut aminos. Add the thyme and rosemary. Stir to combine, then simmer for 5 minutes.
-
Stir the arrowroot slurry into the filling and cook for 2 minutes, stirring constantly, until the gravy thickens enough to coat the back of a spoon. Season with sea salt. The filling should be moist but not soupy — if it’s too wet, let it simmer uncovered for a few extra minutes.
Assemble and Bake:
-
Spoon the cauli-sweet potato mash over the top of the filling in an even layer. Use a fork to create texture across the surface — the ridges will brown under the oven heat.
-
Bake uncovered for 20 to 25 minutes until the top is golden and the edges of the filling are bubbling. For extra color, switch to the broiler for the final 3 minutes.
-
Allow the pie to rest for 10 minutes before serving — this helps the filling set and makes it considerably easier to portion cleanly.
7. Coconut Ginger Chicken Thighs with Roasted Carrots
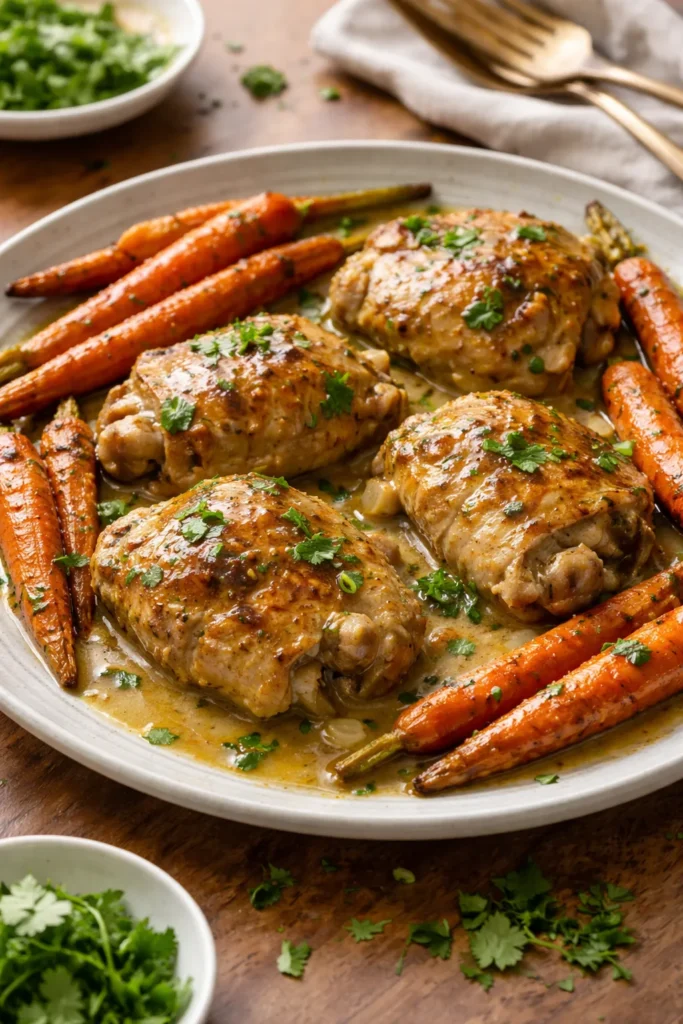
Chicken thighs are one of the most underrated proteins on the AIP diet. They’re more forgiving than breast meat, far more flavorful thanks to the higher fat content, and they braise beautifully in liquid — making them ideal for the kind of deeply sauced, aromatic dish that feels genuinely special without requiring much technique.
This recipe draws on ginger, garlic, lemongrass, and coconut milk to create a fragrant, Thai-inspired sauce that transforms during cooking from a simple liquid into a silky, concentrated coating. The carrots roast alongside the chicken, picking up the sauce and developing caramelized edges that add a subtle sweetness to every bite.
Yield: Serves 4 Prep Time: 15 minutes Cook Time: 45 minutes Total Time: 1 hour Difficulty: Beginner to intermediate — the braising technique is straightforward, though the lemongrass prep takes a minute to understand the first time.
Ingredients
- 8 bone-in, skin-on chicken thighs (about 3 lbs total)
- 1 tablespoon coconut oil
- 1 medium yellow onion, thinly sliced
- 5 cloves garlic, minced
- 1 tablespoon fresh ginger, finely grated
- 1 stalk lemongrass, outer layers removed, inner stalk bruised and cut into 3 pieces
- 1 (13.5 oz) can full-fat coconut milk
- ½ cup chicken bone broth
- 1 tablespoon coconut aminos
- 1 tablespoon apple cider vinegar
- ½ teaspoon turmeric
- Sea salt, to taste
- 4 large carrots, peeled and cut into 2-inch batons
- Fresh cilantro and lime wedges, to serve
Instructions
-
Pat the chicken thighs very dry with paper towels and season both sides generously with sea salt.
-
Heat the coconut oil in a large, deep oven-safe skillet or Dutch oven over medium-high heat. Place the chicken thighs skin-side down and sear for 6 to 7 minutes without moving them, until the skin is golden brown and releases cleanly from the pan. Flip and sear for 3 minutes on the other side. Transfer to a plate.
-
Preheat the oven to 375°F (190°C).
-
Reduce the heat to medium. Add the sliced onion to the same pan and cook in the chicken fat for 4 to 5 minutes until softened. Add the garlic, ginger, and lemongrass pieces and stir for 1 to 2 minutes until fragrant.
-
Pour in the coconut milk, bone broth, coconut aminos, apple cider vinegar, and turmeric. Stir to combine, scraping up any browned bits from the bottom of the pan.
-
Nestle the seared chicken thighs back into the pan, skin-side up, alongside the carrot batons. The liquid should come about halfway up the sides of the chicken — not covering the skin.
-
Transfer the pan to the oven and cook uncovered for 30 to 35 minutes until the chicken skin is crisp and deeply golden and the internal temperature reads 165°F (74°C). The sauce will reduce and concentrate during this time.
-
Remove and discard the lemongrass pieces. Taste the sauce and adjust salt as needed.
-
Serve immediately over cauliflower rice with fresh cilantro and a wedge of lime alongside for squeezing.
Storage and Reheating
These chicken thighs store beautifully for up to three days in the refrigerator. Reheat covered in a 325°F oven for 15 minutes, adding a splash of bone broth to the pan to re-loosen the sauce. The skin won’t recover its full crispness, but the flavor deepens even further overnight — one of those dishes that’s arguably better as a leftover.
8. AIP Egg Roll in a Bowl with Ground Pork
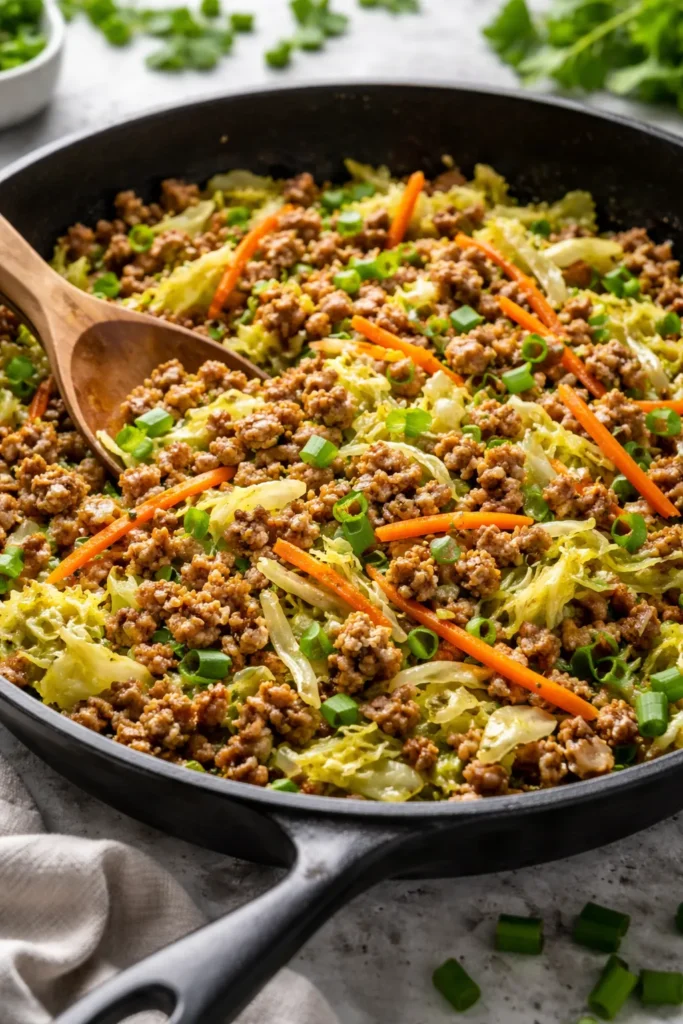
The egg roll bowl has become a staple across multiple dietary frameworks, and for good reason — it delivers the flavors of a classic takeout egg roll without the wrapper, the deep frying, or any of the usual AIP-unfriendly ingredients. Shredded cabbage, ground pork, garlic, and ginger cook together into a warm, savory skillet meal that comes together in under 30 minutes.
The coconut aminos are the linchpin here. They contribute the sweet-savory depth that would normally come from soy sauce, and combined with a splash of apple cider vinegar and fresh ginger, the result is a sauce that tastes genuinely authentic. This is the kind of recipe you make once and add to a permanent rotation.
Yield: Serves 4 Prep Time: 12 minutes Cook Time: 18 minutes Total Time: 30 minutes Difficulty: Beginner — everything cooks in one skillet in sequence, and the timing is very forgiving.
Ingredients
- 1.5 lbs ground pork (pastured if available)
- 1 tablespoon coconut oil or avocado oil
- 1 medium yellow onion, thinly sliced
- 5 cloves garlic, minced
- 1 tablespoon fresh ginger, grated
- ½ small head green cabbage, shredded (about 4 cups)
- 2 large carrots, peeled and julienned or shredded
- 3 tablespoons coconut aminos
- 1 tablespoon apple cider vinegar
- ½ teaspoon ground ginger (in addition to fresh)
- Sea salt, to taste
- 3 green onions, thinly sliced, for garnish
- Fresh cilantro, for garnish
- Sesame-free drizzle: a few drops of avocado oil mixed with a pinch of turmeric (optional, for color and richness)
Instructions
-
Heat the coconut oil in a large skillet or wok over medium-high heat. Add the sliced onion and cook for 4 to 5 minutes, stirring often, until softened and the edges are beginning to turn golden.
-
Add the ground pork to the skillet, breaking it up with a wooden spoon. Cook for 6 to 7 minutes until fully cooked through and lightly browned in places. Resist the urge to stir constantly — letting the pork sit against the hot pan for 30 to 60 seconds at a time builds a light caramelization that adds tremendous flavor.
-
Add the garlic, fresh ginger, and ground ginger to the pan and stir for 1 minute until fragrant.
-
Add the shredded cabbage and julienned carrots. Toss everything together and cook for 4 to 5 minutes, stirring occasionally, until the cabbage has wilted slightly but still holds some texture. You want tender-crisp here, not fully soft.
-
Pour in the coconut aminos and apple cider vinegar. Toss to coat everything evenly and cook for 1 to 2 minutes until the sauce has absorbed into the cabbage and pork. Taste and adjust salt.
-
Serve immediately in bowls topped with sliced green onions and fresh cilantro. Finish with a drizzle of avocado oil if using.
Customizing This Recipe
This bowl adapts well to whatever AIP vegetables need using up. Mushrooms added with the garlic bring an extra layer of umami. Zucchini sliced into matchsticks adds bulk without altering the flavor profile. For a lower-carb version, skip the carrots and double the cabbage. And if ground pork isn’t available, ground chicken or turkey works equally well — though pork brings a richness the other proteins don’t quite match.
AIP Meal Prep Strategies That Actually Save Time
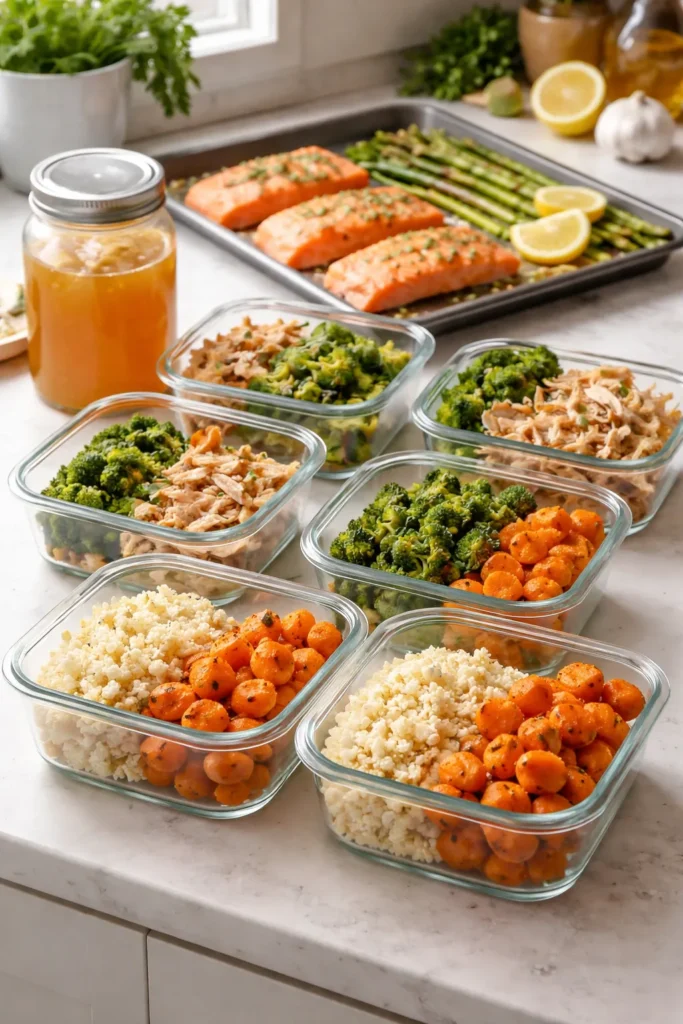
Cooking from scratch seven nights a week is unrealistic for most people, and the AIP diet’s restrictions on packaged foods make that challenge even more pronounced. The good news is that smart prep on one or two days can make the rest of the week dramatically easier.
Batch-Cook Your Bases
Riced cauliflower, roasted sweet potato chunks, and a large pot of bone broth are the three most versatile AIP foundations you can have ready in the refrigerator. Cauliflower rice takes 10 minutes to steam or sauté; a whole tray of sweet potato cubes roasts in 25 minutes; bone broth can simmer in the slow cooker overnight. With those three things ready, most AIP dinners become a matter of cooking a protein and combining it with what’s already prepped.
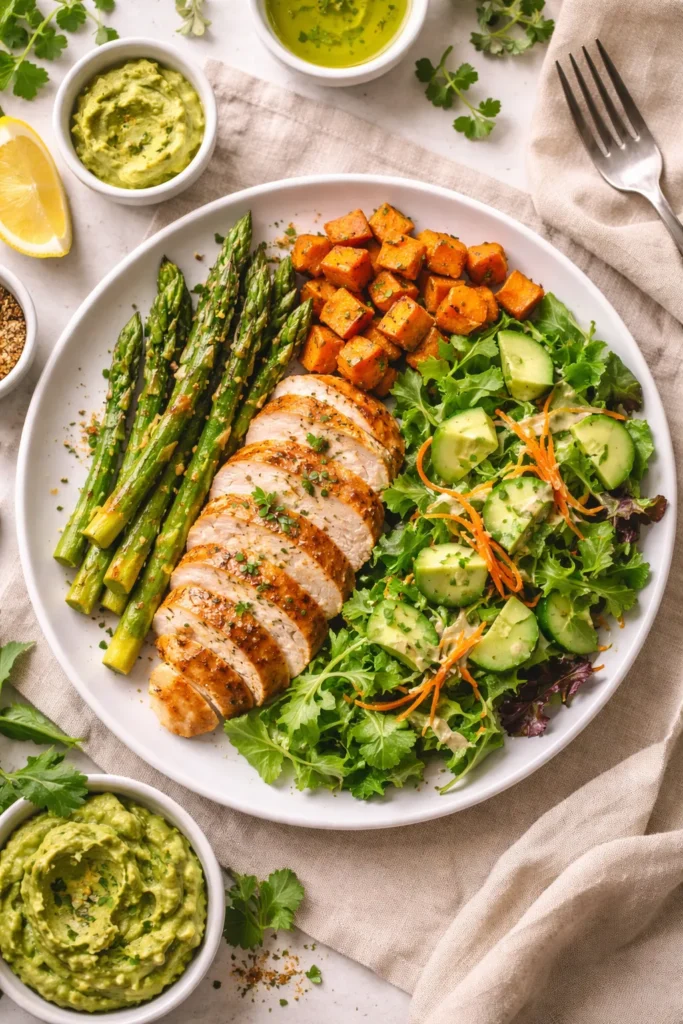
One-Pan and Sheet Pan Meals Are Your Best Friend
The easiest AIP dinners by a significant margin are the ones that cook on a single sheet pan or in one skillet. The garlic shrimp skillet, the salmon with asparagus, and the pork and apple bake in this list all follow this model — and the cleanup is as minimal as the prep. If you can build your weekly AIP menu around primarily one-pan meals, the diet becomes far more sustainable long-term.
Freeze in Portions You’ll Actually Use
The creamy coconut beef stew and the nightshade-free chili both freeze exceptionally well. Making a double batch and freezing half in single-serving containers means you have a compliant, home-cooked dinner available on any night where cooking simply isn’t happening. Label each container with the recipe name and date and aim to use frozen AIP meals within three months for best quality.
Key Takeaways
The hardest part of the AIP elimination phase isn’t the cooking itself — it’s the initial mental adjustment of relearning what “flavor” means without your usual pantry shortcuts. Once you’ve stocked your kitchen with coconut aminos, bone broth, arrowroot starch, full-fat coconut milk, and a solid collection of AIP-safe herbs, you’ll find that the recipes above stop feeling like workarounds and start feeling like your actual cooking style.
These eight dinners demonstrate one consistent truth about AIP cooking: the food doesn’t have to be sad to be healing. Rich beef stew, crispy baked salmon, fragrant coconut chicken, deeply savory shepherd’s pie — none of these require apology or asterisks. They just require different ingredient choices than what most of us grew up cooking with.
One final note worth taking seriously: the AIP is a short-term elimination protocol, not a permanent dietary identity. The goal isn’t to eat this way indefinitely — it’s to reduce inflammation enough to begin carefully identifying which specific foods trigger your personal immune response. Reintroducing foods methodically, ideally with a registered dietitian’s guidance, is how you eventually build a long-term diet that supports your health without being more restrictive than it needs to be. These recipes are a tool to get you through that elimination phase well-fed, satisfied, and genuinely enjoying your meals along the way.