Chocolate and cherries are a match made in dessert heaven. The rich depth of chocolate paired with the bright tartness of cherries creates a flavor combination that feels both indulgent and refreshing at the same time. Whether you’re dealing with a sudden sweet craving after dinner or you need to bring something impressive to a potluck, easy chocolate cherry desserts are your answer. The beauty of these recipes is that they don’t require advanced baking skills or exotic ingredients—most use pantry staples and simple techniques that come together in under an hour.
The magic of chocolate-cherry combinations is that they work in nearly every dessert format imaginable. You can find them in layered no-bake treats, warm cobblers with fluffy toppings, elegant upside-down cakes, creamy mud cake variations, and even quick bar recipes that taste far more complicated than they actually are. What makes these desserts so approachable is that many leverage shortcuts—boxed cake mixes, canned cherry pie filling, and store-bought chocolate components—without sacrificing homemade flavor and texture.
If you’re looking to satisfy that craving without spending hours in the kitchen, this collection covers the desserts that deliver the most impact with the least effort. Each recipe brings something different to the table, from no-bake convenience to warm, gooey comfort food vibes. You’ll find options that feed a crowd, single-serve treats, make-ahead desserts that actually improve overnight, and showstoppers that will have people asking for your recipe.
Table of Contents
- 1. No-Bake Chocolate Cherry Lush
- Why It’s Perfect for Last-Minute Cravings
- How to Build It Like a Pro
- 2. Easy Chocolate-Covered Cherry Cake with Ganache
- What Makes This Version So Easy
- Step-by-Step Path to Success
- 3. Individual Chocolate Cherry Muddy Buddies (Dump Cake Style)
- Why This Works So Well
- The Actual Method Is Surprisingly Simple
- 4. Chocolate Cherry Crepes for Fancy-Looking Ease
- What Makes Crepes Surprisingly Manageable
- How to Build a Crepe Dessert That Impresses
- 5. Chocolate Cherry Upside-Down Cake
- Why Upside-Down Cakes Are Underrated
- The Assembly and Baking Process
- 6. Chocolate Cherry Cobbler with Biscuit Topping
- What Makes Cobblers Better Than Pies
- Building Your Chocolate Cherry Cobbler
- 7. Chocolate Cherry Bars (Blondies with Fruit)
- Why These Bars Are Dangerously Easy
- The Actual Recipe Is Refreshingly Simple
- 8. Chocolate-Cherry Tart with Pastry Crust
- What Makes Tarts Feel Fancy Without Being Complicated
- Building a Chocolate Cherry Tart
- 9. Chocolate-Cherry Icebox Cake (No-Bake Layers)
- Why Icebox Cakes Are the Secret Weapon
- The Layer-and-Chill Method
- 10. Individual Chocolate-Cherry Parfaits for Elegant Simplicity
- Why Parfaits Are Underrated Entertainment Desserts
- Building Individual Parfait Layers
- Final Thoughts
1. No-Bake Chocolate Cherry Lush
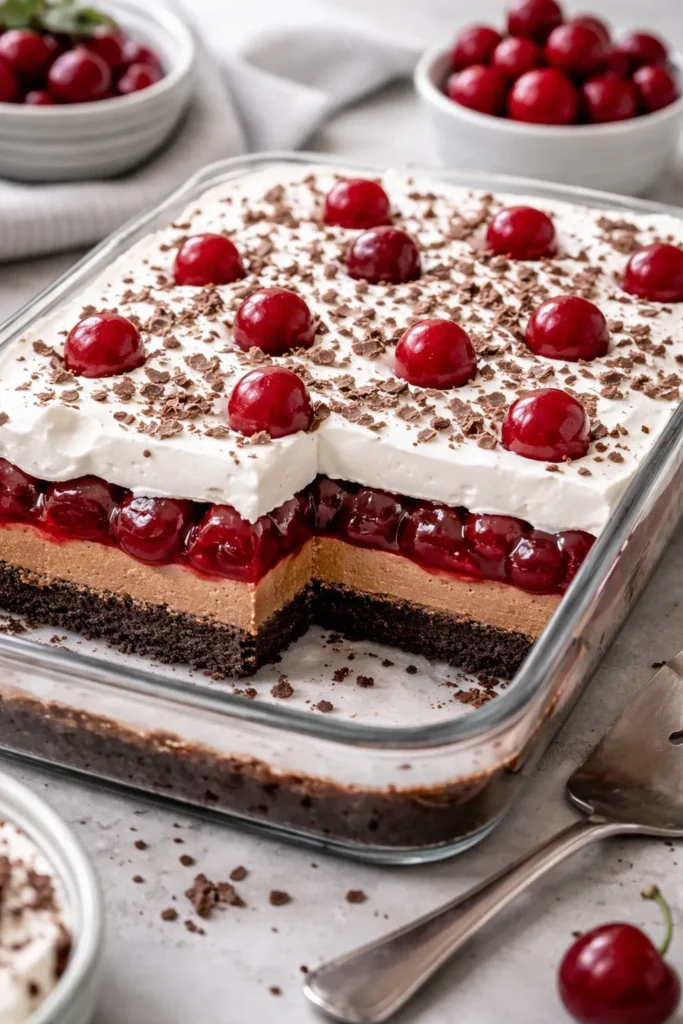
The no-bake chocolate cherry lush is the definition of effortless elegance. This layered dessert sits somewhere between a cheesecake and a mousse, with a Oreo or cookie crumb crust on the bottom, followed by a rich chocolate cheesecake layer, bright cherry pie filling in the middle, and a fluffy whipped cream topping. Because there’s zero baking involved, you can assemble this dessert in about 20 minutes, then pop it in the refrigerator to chill while you handle other tasks. The beauty of this approach is that it actually improves as it sits—the layers meld together and the flavors deepen over several hours or overnight.
Why It’s Perfect for Last-Minute Cravings
The no-bake structure means you don’t need to preheat an oven or time anything carefully. You’re simply layering ready-made components and letting gravity and cold temperatures do the work. The cherry pie filling provides natural juiciness and tartness that cuts through the richness of the chocolate and cream cheese beautifully. This dessert is also naturally freezer-friendly, so you can make it days in advance and simply thaw it slightly before serving.
How to Build It Like a Pro
- Start with a crushed Oreo or chocolate wafer crust mixed with melted butter, pressed into a 9×13-inch baking dish, then chill for 15 minutes
- Beat softened cream cheese with powdered sugar and unsweetened cocoa powder until smooth and fluffy, then spread evenly over the crust
- Layer canned cherry pie filling directly over the chocolate cheesecake layer—don’t try to spread it aggressively or you’ll disrupt the layer below
- Top with thawed Cool Whip and garnish with chocolate sprinkles, shaved chocolate, or fresh cherries if desired
- Refrigerate for at least 2 hours (or freeze for up to 3 months) before cutting into squares and serving
Pro tip: If the cheesecake layer seems too soft to support the next layer, freeze the assembled dessert for 15 minutes between each layer addition. This prevents the layers from sliding or mixing together and creates cleaner, more defined slices when you cut it.
2. Easy Chocolate-Covered Cherry Cake with Ganache
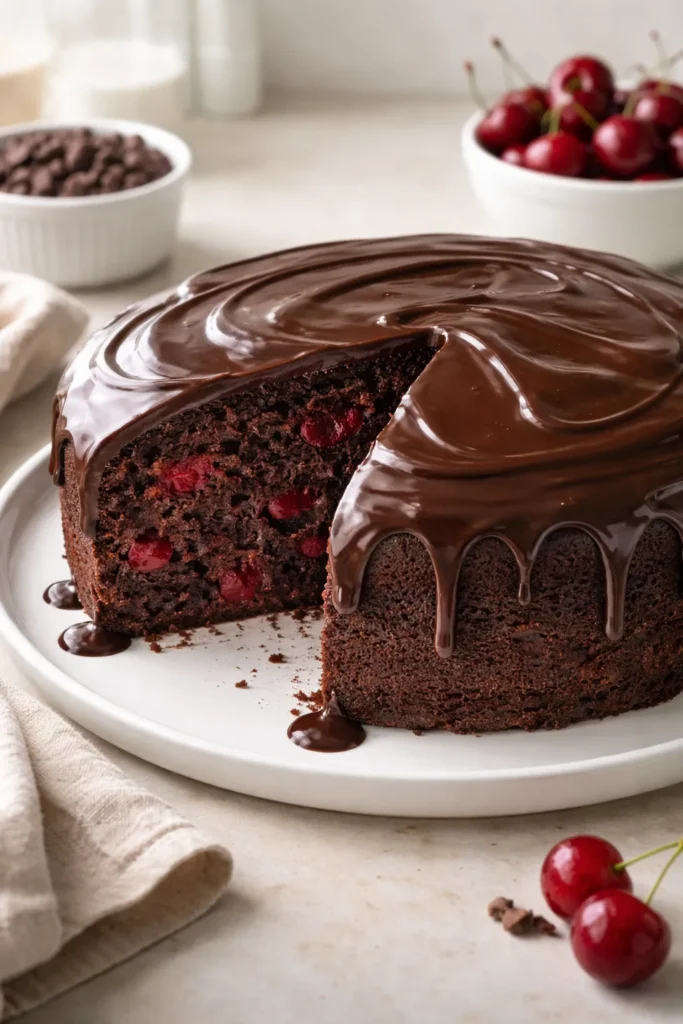
This simplified take on a classic uses a chocolate cake mix as the base, plus canned cherry pie filling mixed directly into the batter—a technique that keeps the cake incredibly moist while infusing it with cherry flavor throughout. Unlike traditional cakes that require separate frosting, this version is topped with a homemade chocolate ganache that you make in a saucepan with just three ingredients: butter, milk, and chocolate chips. The result is a dessert that tastes completely homemade and bakery-quality, yet comes together in about 2 hours from start to finish, including cooling time.
What Makes This Version So Easy
The secret is combining the cake mix dry (not prepared as directed on the box) with the pie filling and eggs. This creates a thick, fudgy batter that bakes up with pockets of juicy cherries throughout. The cherry juice releases during baking and keeps the cake from drying out, making this nearly impossible to overbake. The ganache is equally foolproof—heat milk and butter until steaming, pour over chocolate chips, let it sit for one minute, then stir until glossy and smooth.
Step-by-Step Path to Success
- Preheat oven to 350°F and grease a 9×13-inch baking pan
- In a large bowl, combine one 15-ounce box chocolate cake mix (dry), one 21-ounce can cherry pie filling, 2 eggs, and 1 teaspoon almond extract; stir by hand until well blended (the batter will be thick)
- Spread into prepared pan and bake for 25-30 minutes until a toothpick inserted in the center comes out clean
- While cake cools slightly, combine 1 cup sugar, ⅓ cup milk, and 5 tablespoons butter in a small saucepan; bring to a boil over medium heat
- Boil for exactly 1 minute, stirring constantly, then remove from heat and stir in 1 cup bittersweet chocolate chips until completely smooth
- Pour ganache over the warm cake and allow it to cool completely (at least 90 minutes) before cutting
Pro tip: The almond extract isn’t just flavoring—it’s an important ingredient that amplifies the chocolate-cherry pairing and adds depth that most people can’t quite identify, making them ask for your recipe.
3. Individual Chocolate Cherry Muddy Buddies (Dump Cake Style)
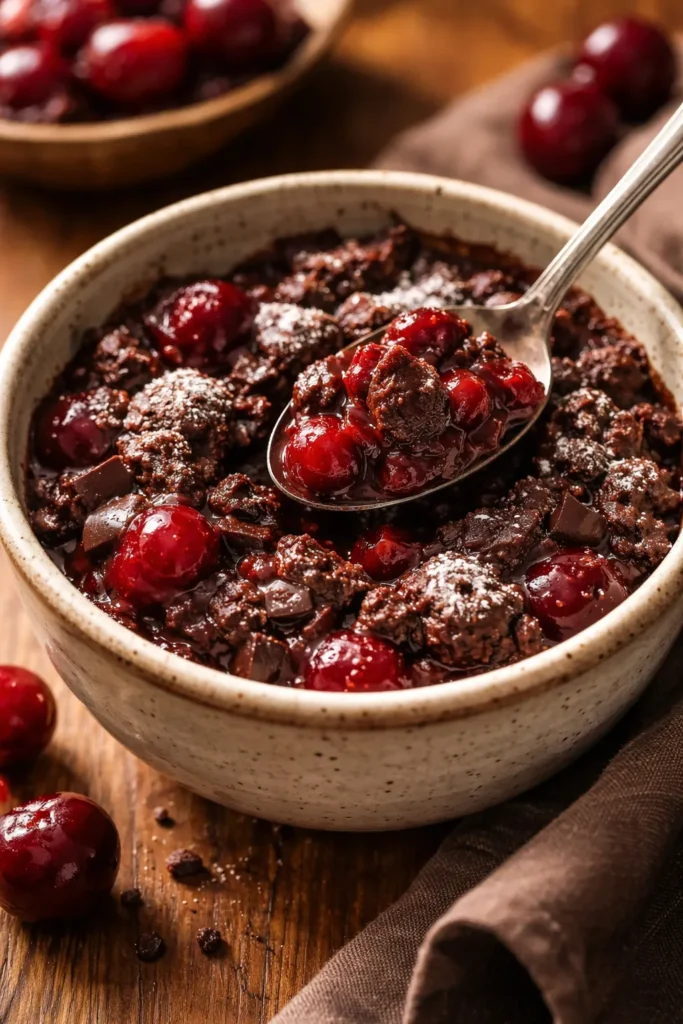
This is a souped-up version of a traditional mud cake that uses a single baking dish and minimal mixing. The concept is beautifully simple: frozen pitted cherries go in the bottom of a baking dish, then you sprinkle chocolate cake mix directly over them (just 1.5 cups worth—you don’t prepare it first), pour sparkling water over everything, give it a gentle stir, and bake until the top is set but the center remains gloriously fudgy. The result is something between a warm pudding, a gooey brownie, and a lava cake—it’s not a traditional cake that slices neatly, but rather a spoonable dessert that you serve warm in bowls.
Why This Works So Well
The frozen cherries thaw and release their juices as the cake bakes, creating a naturally moist environment that keeps the center tender and fudgy. The sparkling water (whether you use cherry, berry, or plain) adds just enough moisture to activate the cake mix and create the pudding-like texture. There’s no creaming of butter, no whisking of eggs, no complicated layering—just a one-pan dessert that’s ready to eat in about an hour.
The Actual Method Is Surprisingly Simple
- Preheat oven to 350°F and lightly spray a 9×13-inch baking dish
- Spread 4 cups frozen pitted cherries (no thawing necessary) evenly across the bottom
- Sprinkle 1.5 cups chocolate cake mix evenly over the cherries
- Pour 1 cup berry or cherry-flavored sparkling water (not the entire can—just one cup) over the top
- Gently stir everything together right in the dish until the cake mix is fully moistened and combined (this takes a few minutes and the mixture will be thick)
- Bake for about 50 minutes until the top is set and the center remains fudgy and gooey
- Cool for 10-15 minutes, then scoop into bowls and serve warm with whipped cream, vanilla ice cream, or a drizzle of chocolate sauce
Pro tip: The baking time might vary slightly depending on the moisture content of your frozen cherries and how cold they were when they went into the oven. Start checking for doneness at 45 minutes, but remember that a toothpick won’t come out clean—you’re looking for the edges to pull away slightly from the pan sides and the center to jiggle just slightly when you give the pan a gentle shake.
4. Chocolate Cherry Crepes for Fancy-Looking Ease
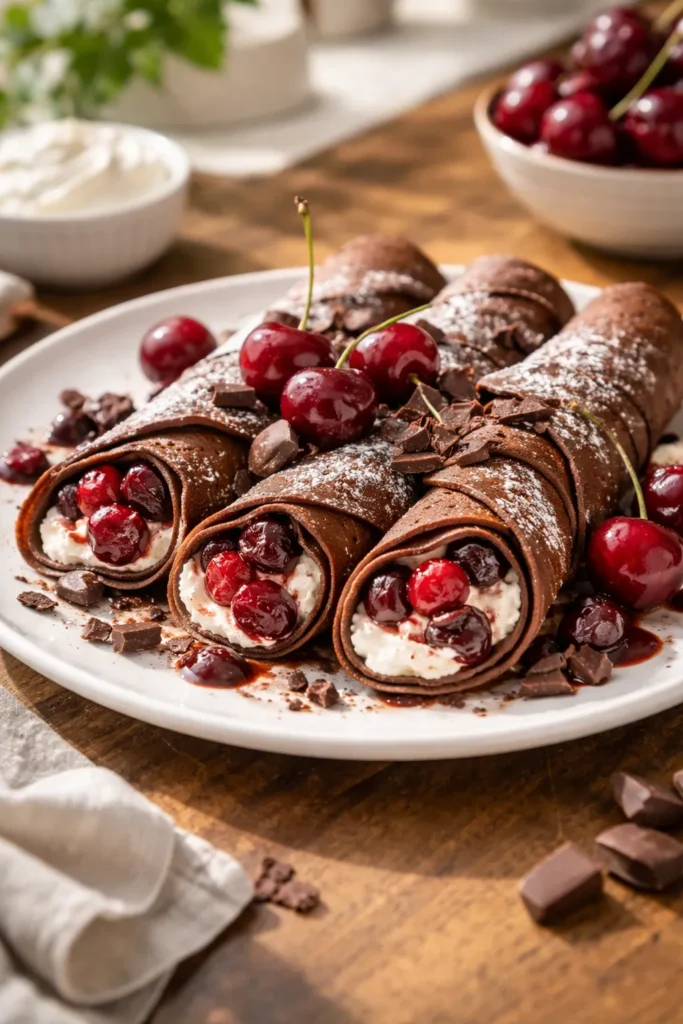
Crepes sound fancy and complicated, but they’re genuinely one of the easiest desserts to master once you understand the basic technique. The batter is just eggs, flour, milk, and a pinch of salt whisked together, then cooked in a nonstick pan for mere seconds on each side. What elevates this into a showstopping chocolate-cherry dessert is the filling: a simple mixture of cherries (fresh, frozen, or from pie filling), dark chocolate, and whipped cream layered inside and folded or rolled. You can prepare the crepes and filling components hours ahead, then assemble just before serving.
What Makes Crepes Surprisingly Manageable
The key is not overthinking the process. Crepes are supposed to be thin and delicate, but they don’t need to be perfect—tears and irregular edges are completely fine and won’t affect taste. A good nonstick pan and medium-high heat are essential. Once you make your first batch, you’ll realize crepes are faster to cook than pancakes and infinitely more elegant. The chocolate-cherry filling can be as simple as folding chopped dark chocolate and a few spoonfuls of cherry pie filling into whipped cream.
How to Build a Crepe Dessert That Impresses
- Whisk together 1 cup flour, 2 eggs, ½ cup milk, ½ cup water, and a pinch of salt until smooth (let batter rest 30 minutes if possible)
- Heat a lightly buttered nonstick 8-inch pan over medium-high heat; pour in ¼ cup batter and tilt the pan to spread thinly
- Cook for about 30 seconds until the bottom is light golden, then flip and cook the other side for about 15 seconds
- Stack finished crepes on a plate and cool to room temperature
- For the filling, chop ½ cup dark chocolate and fold it into 1 cup whipped cream along with ½ cup drained cherry pie filling
- Place a crepe on your plate, add 3 tablespoons filling slightly off-center, then fold the crepe in half or quarters
- Dust with cocoa powder and garnish with a fresh cherry or chocolate shaving
Pro tip: Make your crepes earlier in the day and stack them with parchment paper between each one, then wrap the stack in foil and refrigerate. They’ll keep for up to 2 days and actually become more tender as they sit. Bring them to room temperature before filling so they’re pliable.
5. Chocolate Cherry Upside-Down Cake
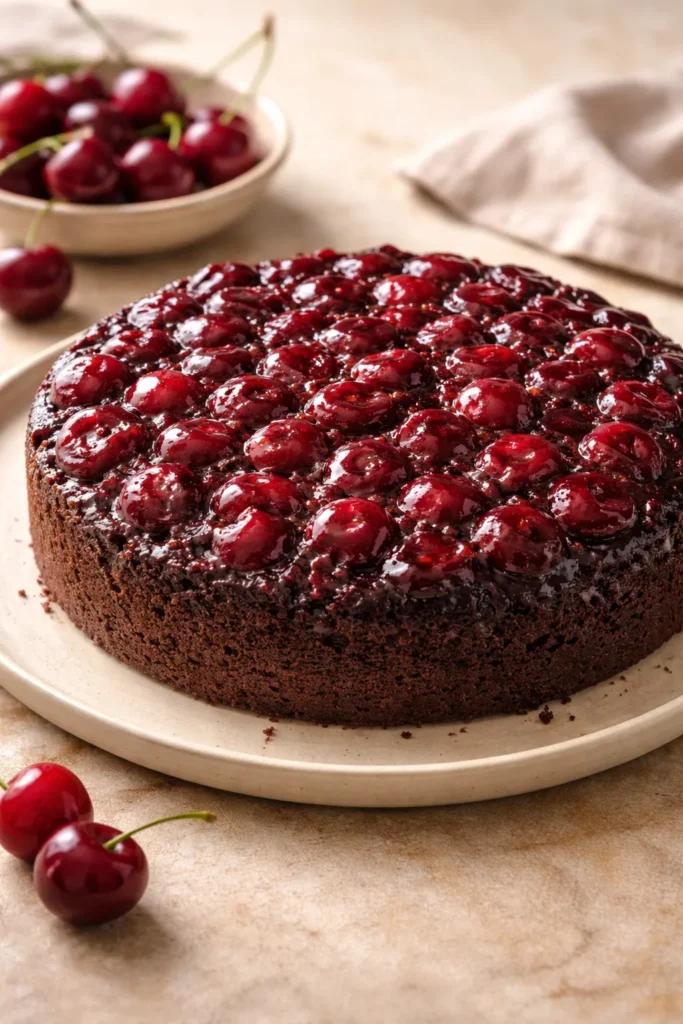
An upside-down cake is a brilliant structure for the chocolate-cherry combination because the cherries caramelize slightly on the bottom as they bake, then flip to the top as the finished presentation—beautiful and glossy without any additional frosting required. The chocolate cake batter is straightforward (cocoa, flour, eggs, coffee for depth), and the cherry layer is just fresh or frozen pitted cherries tossed with a tiny bit of cornstarch and sugar to thicken their juices. The whole thing bakes in about 35 minutes and requires no decorating skills whatsoever.
Why Upside-Down Cakes Are Underrated
They’re foolproof because the fruit layer acts as insulation, keeping the cake moist and forgiving of slight overbaking. The caramelization that happens to the cherry layer creates a naturally gorgeous glaze without any extra work. You can make these in a round pan or a square baking dish, and they’re equally impressive. The texture of an upside-down cake is always tender and moist because the fruit juices soak into the crumb as everything cools.
The Assembly and Baking Process
- Preheat oven to 350°F and grease a 9-inch round or 8×8-inch square baking pan
- Toss 2 cups fresh or thawed frozen pitted cherries with ⅓ cup sugar and 1 teaspoon cornstarch
- Spread the cherry mixture evenly across the bottom of the prepared pan
- In a mixing bowl, combine 1 cup sugar, 1 cup flour, ⅓ cup plus 1 tablespoon cocoa powder, 1 teaspoon baking powder, ½ teaspoon baking soda, ¼ teaspoon salt, 2 eggs, ½ cup soured milk (milk plus 1 teaspoon vinegar), ½ cup brewed black coffee, ¼ cup vegetable oil, and ½ teaspoon vanilla extract
- Beat with an electric mixer for exactly 2 minutes until smooth
- Pour the batter slowly and evenly over the cherries (don’t stir—the fruit will shift during baking and create a beautiful pattern)
- Bake for 30-35 minutes until a toothpick inserted in the cake portion comes out clean
- Cool in the pan for 5 minutes, then carefully invert onto a serving plate while still warm
Pro tip: The coffee in the batter isn’t meant to taste like coffee—it deepens and intensifies the chocolate flavor in a way that makes people say “wow, this chocolate is really good” without realizing what’s creating that depth.
6. Chocolate Cherry Cobbler with Biscuit Topping
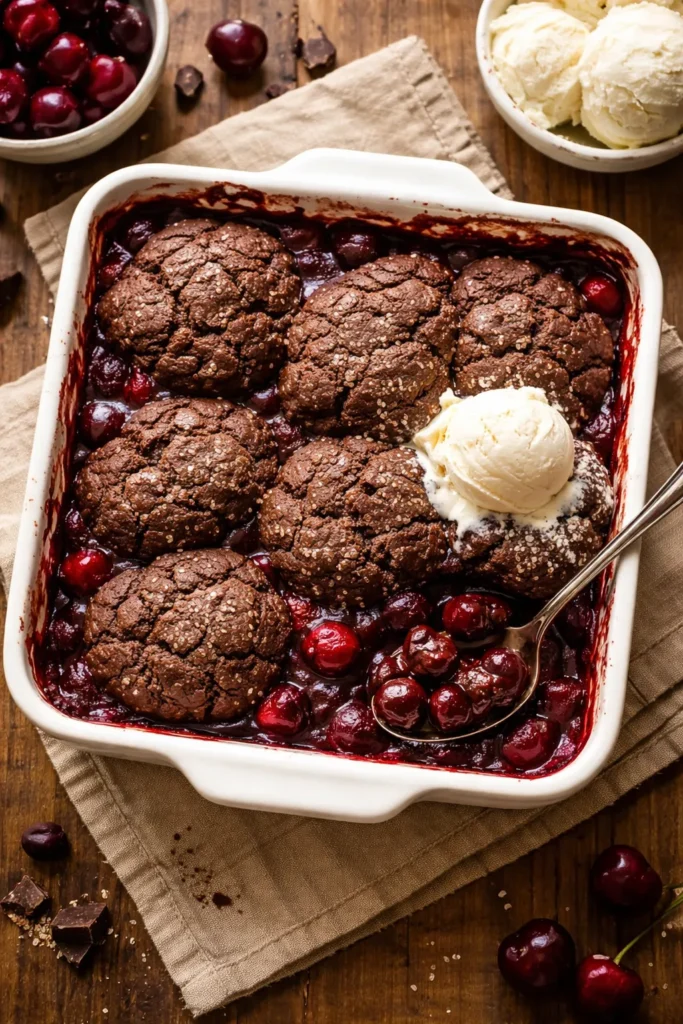
A cobbler sits somewhere between a pie and a cake—fruit filling on the bottom, topped with biscuit dough instead of a crust. A chocolate cherry cobbler is unique because the biscuits themselves are chocolate-flavored, making every bite a combination of warm cherry, gooey chocolate chip, and soft, fluffy biscuit. You can use homemade cherry pie filling or canned filling, and the whole thing bakes together in under 30 minutes. Serve it warm with vanilla ice cream or whipped cream, and you’ve got a dessert that tastes like you spent all afternoon baking when you really spent 20 minutes of active time.
What Makes Cobblers Better Than Pies
No pie crust rolling required, which eliminates the most stressful part of pie-making for most home bakers. The biscuit topping is mixed like a simple drop-biscuit dough and spooned over the fruit—no precision needed. Cobblers are also naturally forgiving about fruit moisture content because the thick biscuits stay crispy on top while the fruit bubbles underneath. The chocolate biscuits add an unexpected richness that elevates the whole dessert.
Building Your Chocolate Cherry Cobbler
- Preheat oven to 400°F and butter an 8×8-inch or 9×9-inch baking dish
- Pour 1 batch homemade cherry pie filling (or one 21-ounce can) into the prepared dish
- In a large bowl, whisk together 1½ cups flour, ¼ cup sugar, 1 teaspoon cinnamon, 2 teaspoons baking powder, ½ teaspoon salt, and ¼ cup dark cocoa powder
- Add ¼ cup cold unsalted butter cut into cubes and use a pastry blender or fork to cut it in until pea-sized crumbs form
- Pour in 1¼ cups heavy whipping cream and stir gently with a fork just until a soft, shaggy dough forms (don’t overmix)
- Fold in ⅓ cup mini chocolate chips gently
- Drop large spoonfuls of the chocolate dough over the cherry filling (it doesn’t need to cover completely—some filling will bubble up around the biscuits, which is perfect)
- Bake for 25-30 minutes until the biscuit topping is golden and the filling bubbles at the edges
- Cool for 15-30 minutes (longer cooling helps the filling set slightly so it doesn’t run everywhere when you serve)
Pro tip: If using a square baking dish, place a baking sheet on your oven rack directly below it just in case the fruit bubbles over—it’s delicious but cleanup is easier if you catch it on a sheet.
7. Chocolate Cherry Bars (Blondies with Fruit)
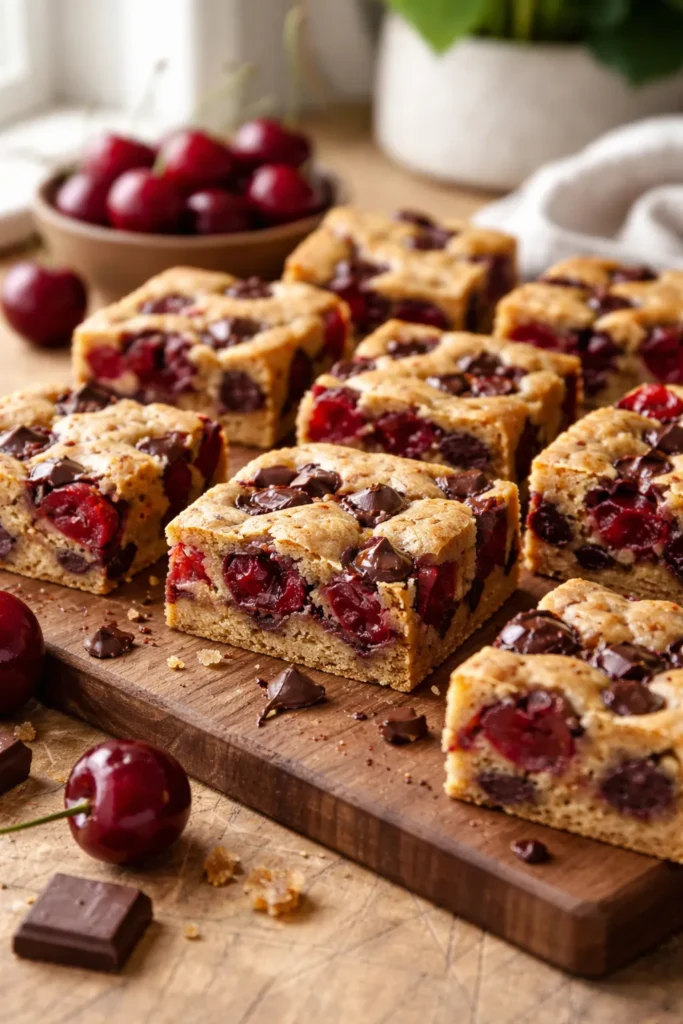
These are essentially brown sugar blondies loaded with fresh cherries and chocolate chips—more fruit-forward than traditional blondies, but with the same tender, chewy texture that makes them addictive. The batter is made in a single bowl (no mixer required), and everything comes together in about 10 minutes of active time. They bake in 27-32 minutes and are best served at room temperature or slightly warm with a glass of cold milk. The combination of melted chocolate, juicy cherries, and buttery brown sugar base is the kind of thing people remember and request again.
Why These Bars Are Dangerously Easy
The brown sugar base creates moisture and chewiness naturally—no eggs, no additional leavening needed beyond a tiny bit of salt. The cherries release juice as the bars bake, keeping everything tender. You can eat them warm when the chocolate is melty or at room temperature when they’ve firmed up. They also freeze beautifully for up to 3 months, so you can make a batch and portion them for grab-and-go cravings throughout the month.
The Actual Recipe Is Refreshingly Simple
- Preheat oven to 350°F and line an 8×8-inch baking pan with foil, then spray with nonstick spray
- In a microwave-safe bowl, melt ½ cup (1 stick) unsalted butter, about 60 seconds
- Stir in 1 cup packed light brown sugar until combined, then add 1 large egg and 2 teaspoons vanilla extract and stir until smooth
- Add 1 cup all-purpose flour and ¼ teaspoon salt; stir until just combined (don’t overmix or the bars will be tough)
- Fold in ¾ to 1 cup semi-sweet chocolate chips and 1 cup fresh pitted cherries (leave them whole—chunky is beautiful here)
- Spread the thick batter into the prepared pan and smooth with a spatula
- Bake for 27 to 32 minutes until the edges begin to pull away slightly from the sides of the pan and the center is just set
- Cool for at least 1 hour before slicing and serving (they’ll firm up as they cool)
Pro tip: The baking time is flexible depending on how gooey you prefer your bars and the moisture content of your cherries. Start checking at 25 minutes—you’re looking for the edges to pull away slightly and the center to be set but still soft. A toothpick won’t come out clean due to the melted chocolate and juicy fruit, so use your eyes and a gentle jiggle test instead.
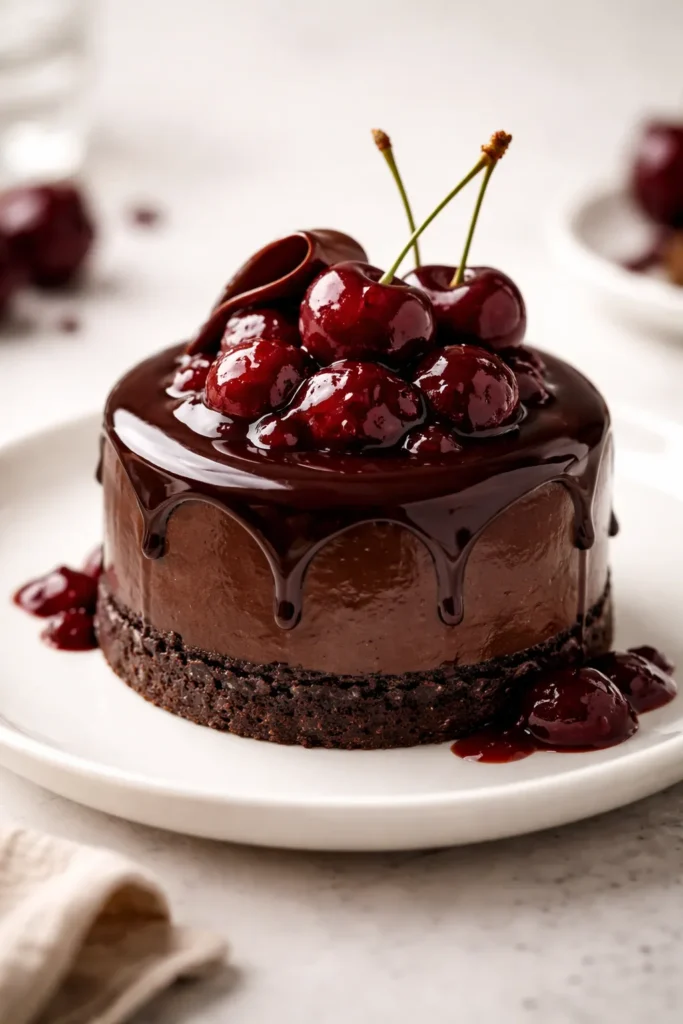
8. Chocolate-Cherry Tart with Pastry Crust
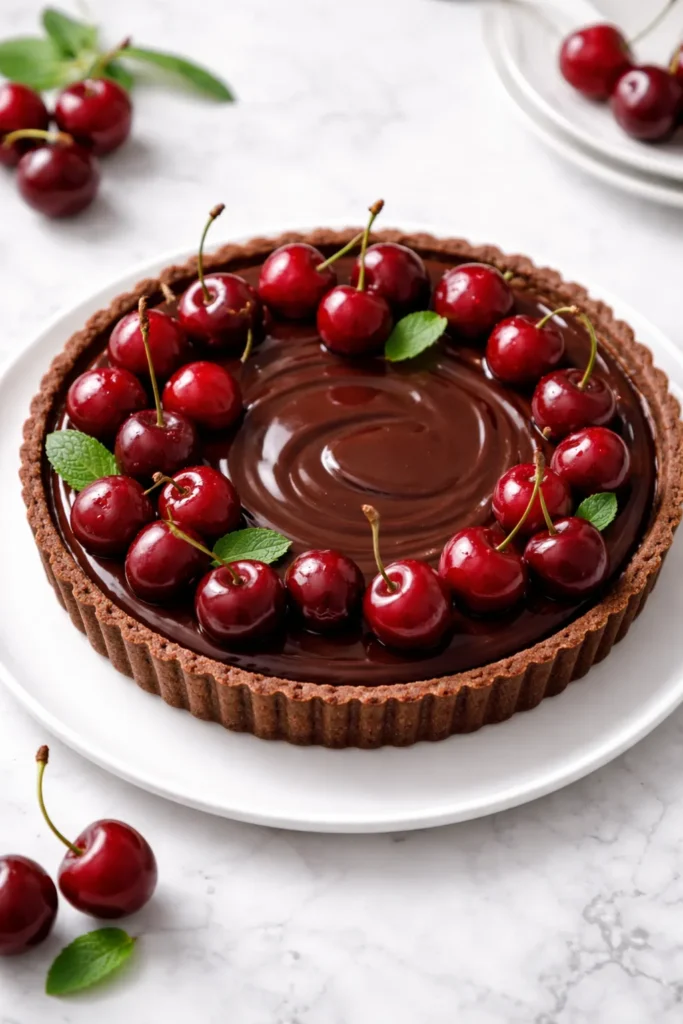
A tart feels restaurant-worthy and impressive, but making one is actually simpler than pie because the crust is pressed into a tart pan instead of rolled out and fitted into a pie dish. A chocolate shortbread or press-in crust comes together in minutes, and the filling is just fresh or macerated cherries arranged on top with melted dark chocolate drizzled over everything. You can use a pre-made chocolate pie crust to skip that step entirely, or make a simple press-in chocolate pastry if you want to feel fancy. The tart comes together in about 30 minutes of actual work time, plus chilling.
What Makes Tarts Feel Fancy Without Being Complicated
The fluted edges and removable sides of a tart pan create presentation magic automatically. There’s no crimping, no worrying about a crimped edge looking imperfect. You press the crust in, bake it briefly if needed, add your filling, and you’re done. A tart also showcases the fruit beautifully—you can arrange cherries in concentric circles or any pattern you like, and the shallow sides mean the fruit is visible and gorgeous rather than buried inside a deep pie.
Building a Chocolate Cherry Tart
- Preheat oven to 375°F
- For the crust, mix 1 cup flour, ⅓ cup cocoa powder, ¼ cup sugar, and a pinch of salt in a bowl
- Cut in ½ cup (1 stick) cold unsalted butter with a pastry blender or fork until the mixture resembles coarse crumbs
- Press this mixture firmly and evenly into a 9 or 10-inch tart pan with a removable bottom (use the bottom of a measuring cup to press it smooth and even)
- Bake the crust for 8-10 minutes until just set, then remove and cool slightly
- Arrange 2 cups fresh pitted cherries in concentric circles or your preferred pattern over the crust
- In a small saucepan, heat ½ cup heavy cream until steaming (not boiling)
- Pour the hot cream over 1 cup chopped dark chocolate and let sit for 1 minute, then stir until completely smooth and glossy
- Drizzle the chocolate ganache over the cherries (you can be artistic or simple—either works)
- Chill the tart for at least 30 minutes before serving to let the ganache set
Pro tip: A tart is best served within a few hours of assembly, while the crust is still crisp and the chocolate is still shiny. If you make it ahead, store it in the refrigerator and let it come to room temperature for 20 minutes before serving so the chocolate softens slightly and the flavors shine.
9. Chocolate-Cherry Icebox Cake (No-Bake Layers)
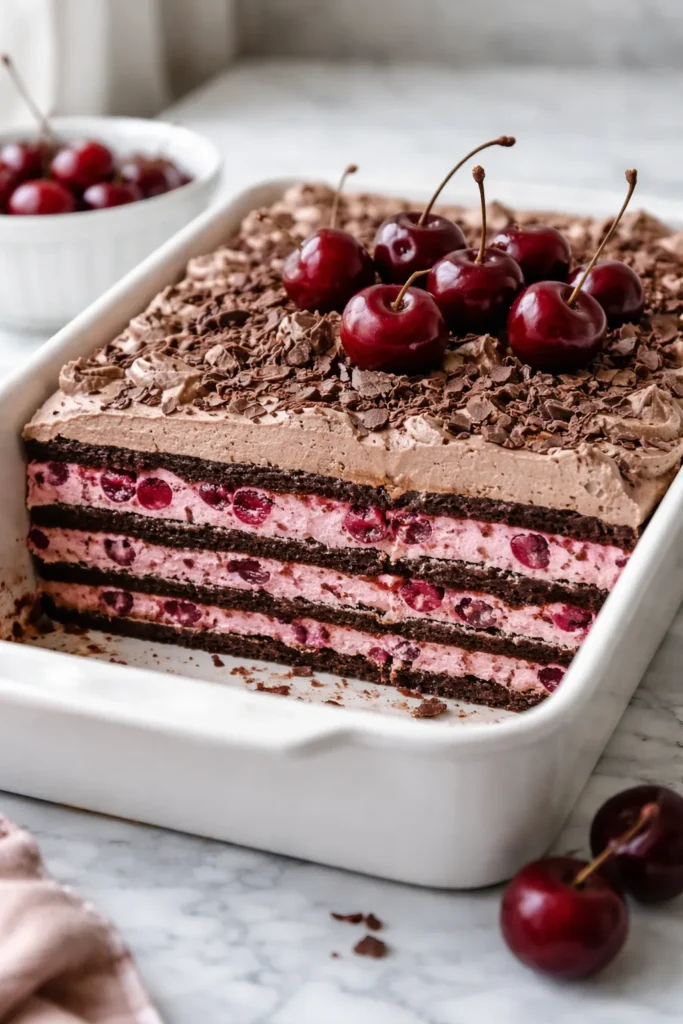
This is essentially a chocolate wafer cookie cake soaked with a cherry-chocolate cream mixture, refrigerated until the cookies soften into cake-like layers, then sliced and served. It’s one of the easiest “cakes” you can make because there’s literally no baking involved and no special equipment required beyond a 9×13-inch pan. The technique is decades old and absolutely reliable—chocolate wafers (or thin chocolate cookies like Pirouettes or even thin chocolate wafer cookies you might find at a specialty store) are layered with a mixture of chocolate pudding, sour cream, and cherry elements, then refrigerated for several hours while the cookies absorb moisture and transform into tender cake layers.
Why Icebox Cakes Are the Secret Weapon
They improve as they sit—the cookies soften, the flavors meld, and everything becomes more cohesive. You can make them up to 24 hours ahead and actually be grateful for it. They’re also naturally forgiving because there’s no baking temperature to worry about or batter consistency to monitor. The entire dessert lives in the refrigerator, making it perfect for warm-weather entertaining or any time you want a make-ahead dessert.
The Layer-and-Chill Method
- Crush 26 chocolate wafers into fine, even crumbs (you want about 1½ cups of crumbs)
- Reserve 2 tablespoons of the crumbs for garnish
- Mix the remaining crumbs with ¼ cup melted salted butter and press firmly into the bottom of an 8×8×2-inch baking pan
- Refrigerate the crust for 30 minutes until firm
- In a large bowl, combine 1½ ounces instant chocolate pudding mix (the 4-serving size), 8 ounces sour cream, and 1¼ cups cold milk
- Beat with an electric mixer on low speed for about 1 minute until smooth and thick (scrape down the sides and beat for another 30 seconds)
- Spread the pudding mixture evenly over the wafer crust
- Carefully spoon one 21-ounce can cherry pie filling over the pudding layer (spoon it gently to avoid disrupting the pudding—you can serve the extra cherries on the side)
- Sprinkle the reserved 2 tablespoons cookie crumbs on top
- Cover with plastic wrap and refrigerate for at least 3 hours (overnight is even better)
- Cut into squares and serve chilled
Pro tip: This dessert is actually easier to slice when it’s ice-cold—use a sharp, thin-bladed knife dipped in hot water and wiped clean between cuts for the cleanest slices.
10. Individual Chocolate-Cherry Parfaits for Elegant Simplicity
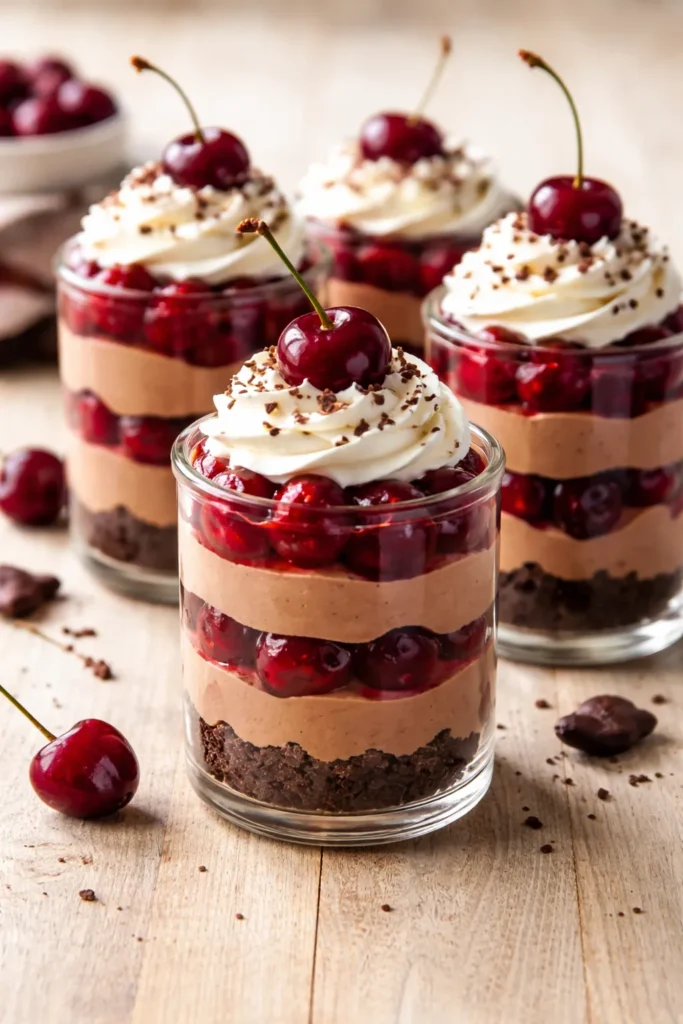
Parfaits are the ultimate make-ahead dessert because you can build them in individual glasses or jars hours (or even a full day) ahead, and they’re actually more attractive than when freshly made because the layers compress slightly and look intentional. Layer chocolate cookie crumbs (crushed Oreos or chocolate wafers work perfectly) with a creamy chocolate cheesecake mixture and cherry pie filling, then top with whipped cream. The beauty of individual servings is that everyone gets their own fancy presentation without you needing to slice and plate anything at the last minute.
Why Parfaits Are Underrated Entertainment Desserts
They’re made entirely in advance, they’re naturally portion-controlled, they’re beautiful to look at (people love layers), and you can build them right in the glasses your guests will eat from—no extra dishes to transfer them to. They look intentional and fancy even though they require no special skills. You can make them up to 8 hours ahead and simply refrigerate until serving time. They’re also endlessly adaptable—swap the filling flavor, change the cookie type, use different fruit—the structure remains the same.
Building Individual Parfait Layers
- For each parfait, start with about ¼ cup crushed chocolate cookies in the bottom of a 12-ounce glass or wide-mouth jar
- In a bowl, beat 4 ounces softened cream cheese with ¼ cup powdered sugar and 2 tablespoons unsweetened cocoa powder until smooth and fluffy (this makes enough for 3-4 parfaits)
- Layer about ⅓ cup of the chocolate cheesecake mixture over the cookie crumbs
- Top with ¼ cup cherry pie filling (drain it slightly so excess liquid doesn’t make the layers soggy)
- Add another thin layer of cookie crumbs if desired
- Top with about ¼ cup whipped cream or Cool Whip
- Garnish with a cherry, a few cookie crumbs, or chocolate shavings
- Cover each glass with plastic wrap and refrigerate for at least 2 hours (or up to 8 hours)
Pro tip: If you’re making these more than 4 hours ahead, wait to add the final whipped cream layer until just before serving, or the moisture from the cherry layer will weep into it and make it look less pristine—though it’ll still taste absolutely delicious.
Final Thoughts
The chocolate-cherry combination is genuinely one of the most forgiving flavor pairings in dessert-making, which is why these 10 options are all so straightforward. Whether you reach for a no-bake lush when you’re in a real time crunch, pull together a muddy cobbler on a weeknight, or assemble an impressive tart for a dinner party, you’re working with a duo that naturally complements itself. Cherry juice and chocolate create moisture and richness naturally, ingredients like cream cheese and sour cream add body without requiring a mixer, and shortcuts like boxed cake mix and canned fruit filling don’t diminish the quality of the final dessert.
The real takeaway is that making chocolate cherry desserts doesn’t require fancy equipment, advanced technique, or hours of your time. Most of these recipes come together in 30 minutes or less of active preparation, and many actually improve when made ahead. That means you can satisfy a chocolate craving without the guilt of seeming like you spent all day in the kitchen. Pick whichever version matches your current situation—quick and minimal effort for a weeknight, freezer-friendly for make-ahead peace of mind, or elegant and impressive for when you want to impress someone—and you’ll end up with a dessert that tastes like genuine indulgence.