If you’ve searched for a chocolate cake recipe more than once, you’ve been looking for the wrong thing. Most chocolate cake recipes are either forgettable or so complicated they require three stand mixers and a culinary degree. This one is different. This is the chocolate cake that people will ask for by name—the one that gets requested at every gathering, the one that makes people ask how you made something this good while using what they already have in their kitchen.
The beautiful truth about this recipe is that it works against everything you might expect a world-class chocolate cake to require. It doesn’t demand buttermilk you don’t have on hand. It doesn’t need a stand mixer. It doesn’t require softened butter, tempering, or precise ingredient timing. What it does require is an understanding of why certain techniques matter and the patience to let the science do the heavy lifting. Once you make this cake, you’ll understand why so many home bakers and professional pastry chefs have settled on similar formulas—because the fundamentals work, and they work every single time.
This recipe has earned its place as the definitive chocolate cake through thousands of successful bakes across different kitchens, different ovens, and different skill levels. Whether you’re a confident baker or someone who’s intimidated by the prospect of making a cake from scratch, this formula removes the guesswork and delivers a result that tastes like you’ve spent hours perfecting it—even though you’ve really just spent twenty minutes mixing ingredients in a bowl.
Table of Contents
- Why This Chocolate Cake Stands Apart From the Rest
- Understanding the Science Behind a Truly Moist Cake
- The Ingredients That Make This Cake Special
- What Separates This Recipe from Others
- Complete Ingredient List
- The Secret to Achieving That Perfect Crumb Structure
- Step-by-Step Instructions for Your Best Chocolate Cake
- Expert Baking Tips to Ensure Success Every Time
- Common Mistakes and How to Avoid Them
- Variations and Creative Twists on the Classic
- How to Store and Keep Your Cake Fresh
- Serving Suggestions and Perfect Pairings
- Final Thoughts
Why This Chocolate Cake Stands Apart From the Rest
The difference between an ordinary chocolate cake and an extraordinary one often comes down to texture and moisture retention. Most home bakers chase richness by adding more butter or more cocoa, but that’s actually backwards. The secret to a truly moist, tender crumb isn’t more fat—it’s the right ratio of liquid to dry ingredients, combined with careful mixing techniques that prevent overdevelopment of gluten.
This cake achieves its legendary moistness through an intentionally thin batter that looks almost like chocolate milk when it goes into the pan. That initial moment of doubt—that nagging feeling that something’s gone wrong—is actually the sign that everything’s going exactly right. The thin consistency comes from adding boiling water or hot coffee to the batter at the very end, which serves multiple purposes simultaneously: it blooms the cocoa powder to intensify the chocolate flavor, it accelerates the gelatinization of starches during baking, and it ensures that trapped moisture keeps the cake supremely moist even after it cools completely.
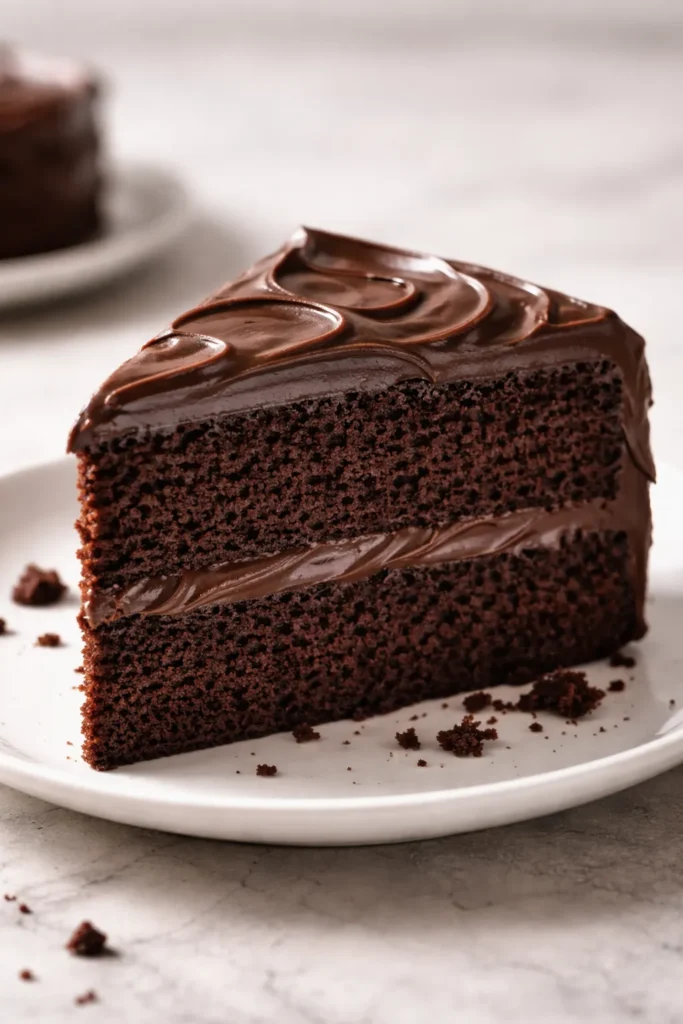
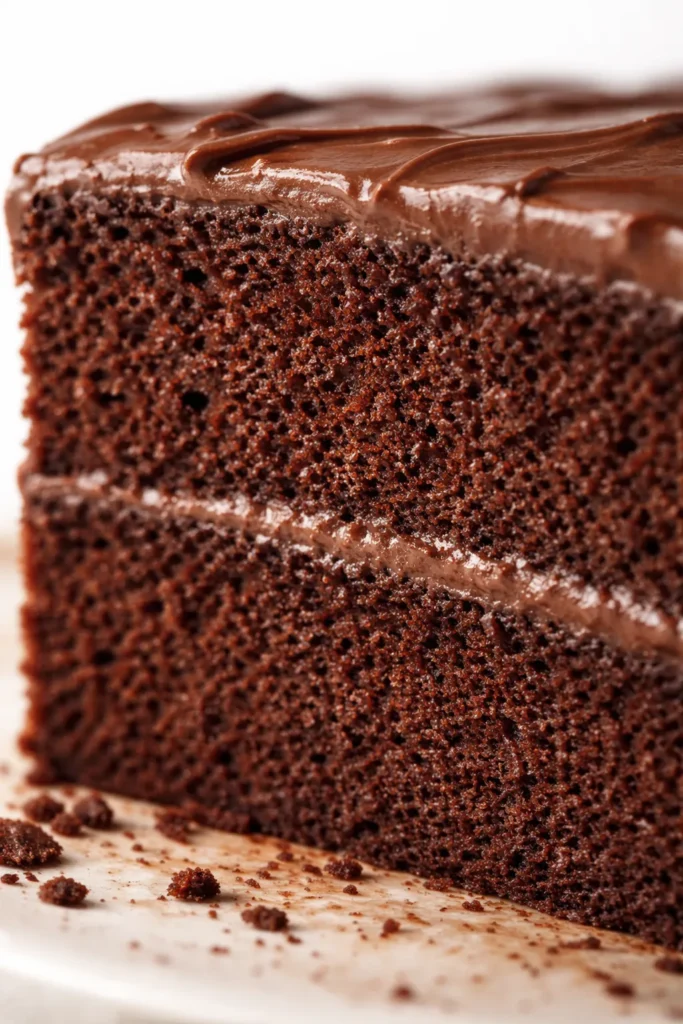
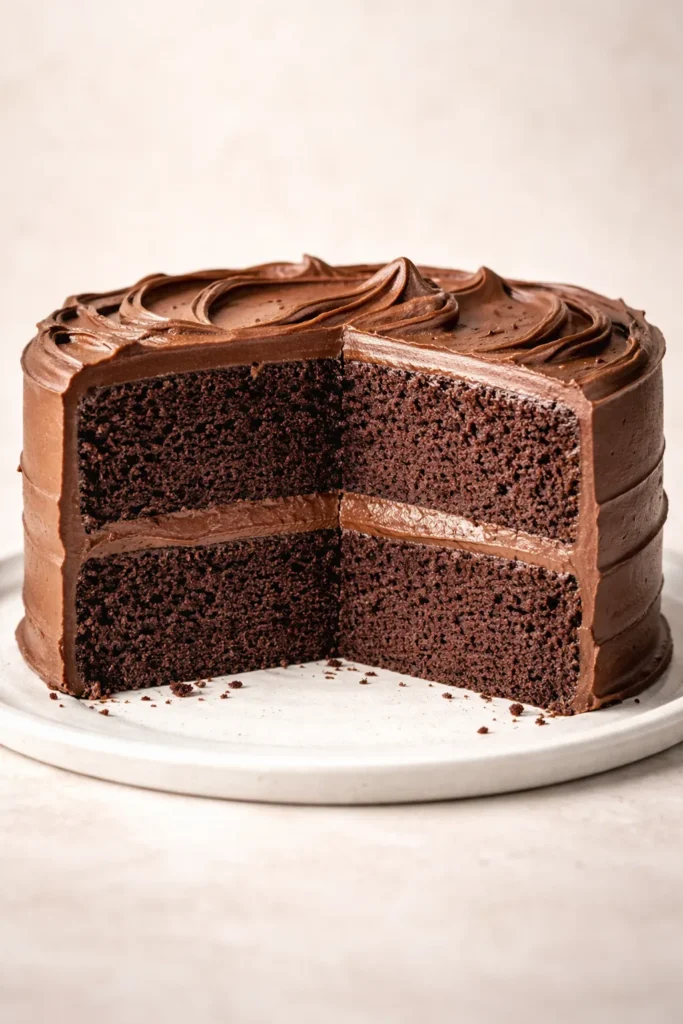
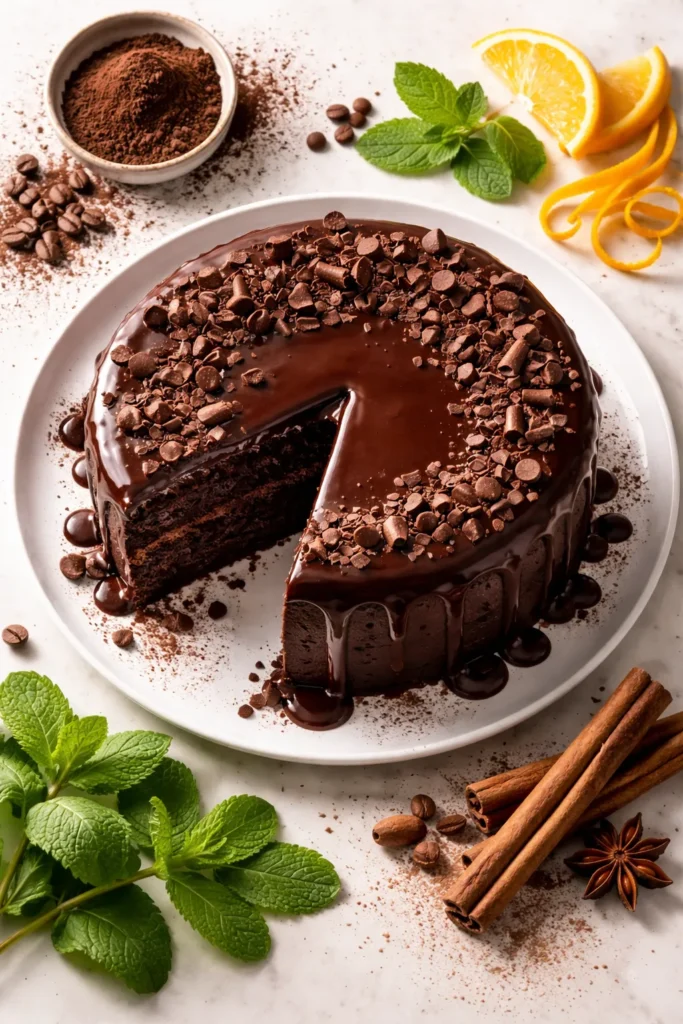
What you’ll notice when you slice into this cake is that it doesn’t crumble or tear. The crumb is fine, even, and delicate—almost like what you’d find in a commercial cake, except this one tastes dramatically better because it’s made with real ingredients. The cake stays moist for days without refrigeration and actually improves in flavor over time as the chocolate flavors meld and develop.
Understanding the Science Behind a Truly Moist Cake
Moisture in cake comes from liquid, not fat—this is one of the most important distinctions in baking science. You can add all the butter and oil you want, but if you don’t have enough liquid, your cake will taste dry. The relationship between sugar and liquid is equally critical. Sugar is hygroscopic, meaning it attracts and binds water molecules, holding them in the cake structure so they don’t evaporate during baking or storage.
This recipe uses more sugar by weight than flour, which might seem excessive until you understand the mechanism. When sugar competes with flour for water, it actually interferes with gluten development—and that’s exactly what you want. Too much gluten creates a tough, dense cake. By establishing the right sugar-to-flour ratio, you’re essentially creating a barrier that prevents the flour from absorbing too much water and forming strong gluten networks. The cocoa powder adds another layer of interference: cocoa particles don’t contain gluten proteins, so when they’re dispersed throughout the flour, they further break up the flour particles and prevent excessive gluten formation.
The water-to-sugar ratio in this recipe is precisely balanced so that the starches in both the flour and cocoa powder slowly hydrate during baking and swell into a gel network. This gel network is what creates that soft, moist crumb structure that stays tender even days later. The initial thinness of the batter actually matters tremendously—it allows even heat distribution and ensures that the starches hydrate uniformly throughout the cake, rather than forming dense pockets near the edges and undercooked sections in the center.
Temperature also plays a critical role. The boiling water activates the baking soda and baking powder instantly, so the cake begins to rise and set immediately. This rapid rise creates a fine, even crumb structure with small, uniform air bubbles rather than large tunnels. If you were to let the batter sit at room temperature before baking, the leavening agents would already be reacting in the bowl, releasing gases that escape through the surface rather than being trapped in the cake structure.
The Ingredients That Make This Cake Special
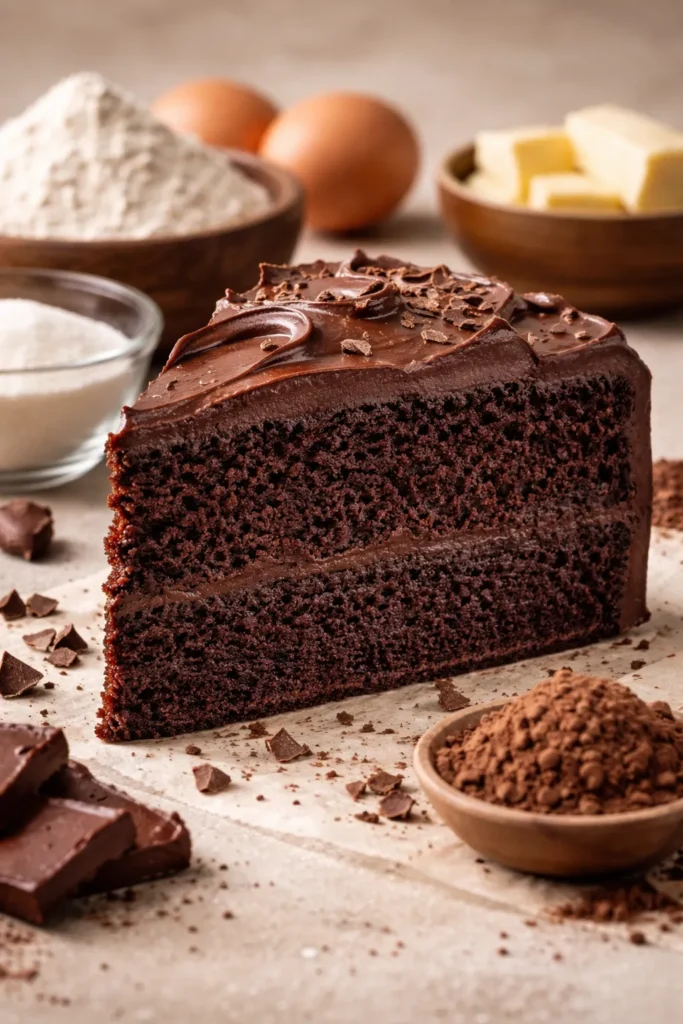
Every ingredient in this recipe earns its place through functionality, not through tradition or habit. Understanding what each component does will help you troubleshoot if something goes wrong and will give you the confidence to make intentional substitutions when needed.
All-purpose flour is perfectly adequate for this recipe—you don’t need cake flour. The key is measuring accurately. The most common mistake is adding too much flour by compacting it into the measuring cup. Instead, fluff the flour with a fork, spoon it lightly into your measuring cup, and level it off with a knife. If you have a kitchen scale, weigh the flour instead—this eliminates the guesswork entirely and is the most reliable method for consistent results every time.
Sugar in this recipe does triple duty: it sweetens the cake, it binds water to keep the cake moist, and it interferes with gluten development to create a tender crumb. Don’t reduce the sugar hoping to make a less sweet cake—the sweetness is balanced by the cocoa powder and any acidity in the recipe. If you want a less sweet cake, pair it with a less sweet frosting rather than changing the cake itself.
Cocoa powder is the star ingredient, and quality matters enormously here. Dutch-processed cocoa powder, which has been treated with an alkalizing agent, has a deeper, smoother chocolate flavor and darker color than natural cocoa powder. It’s also more soluble in liquids. If you can only find natural cocoa powder, you can absolutely use it—no adjustments needed—but the flavor will be slightly different, with a bit more fruity, acidic note. The type of cocoa you choose won’t break the recipe; it just slightly changes the final flavor profile.
Eggs provide structure and help emulsify the batter, creating a stable mixture where the oil and milk don’t separate. Room temperature eggs mix more smoothly and evenly into the batter than cold eggs straight from the refrigerator.
Vegetable oil is used instead of butter because it’s a liquid fat at room temperature. This means it remains distributed throughout the batter more evenly, creating a more uniformly moist cake. Butter, being a solid fat, creates a different texture—less moist and more crumbly. If you prefer to use butter, you can substitute an equal weight (not volume) of melted butter, but expect a slightly different—though still delicious—texture. Any neutral-tasting oil works: vegetable, canola, sunflower, or avocado oil.
Milk adds liquid and dairy flavor. You can use whole milk, buttermilk, almond milk, coconut milk, or oat milk successfully. If you’re using regular milk and want to replicate the acidity of buttermilk, mix regular milk with a tablespoon of white vinegar or lemon juice and let it sit for five minutes before using.
Boiling water or hot coffee blooms the cocoa powder and activates the leavening agents. The coffee doesn’t add a coffee flavor—a teaspoon or two of instant coffee granules dissolved in boiling water simply amplifies the chocolate taste by adding subtle depth. If you don’t have instant coffee, use plain boiling water or hot brewed coffee. If you want to avoid caffeine entirely, plain hot water works perfectly.
What Separates This Recipe from Others
Yield: Makes one 9-inch double-layer cake, serving 12–16 people
Prep Time: 20 minutes
Cook Time: 30–35 minutes
Total Time: 1 hour 5 minutes (plus cooling time)
Difficulty: Beginner to Intermediate — This recipe requires only basic mixing skills and common pantry ingredients. The main challenge is resisting the urge to add more flour when the batter looks thin, and that comes with understanding the science, which you now have.
Complete Ingredient List
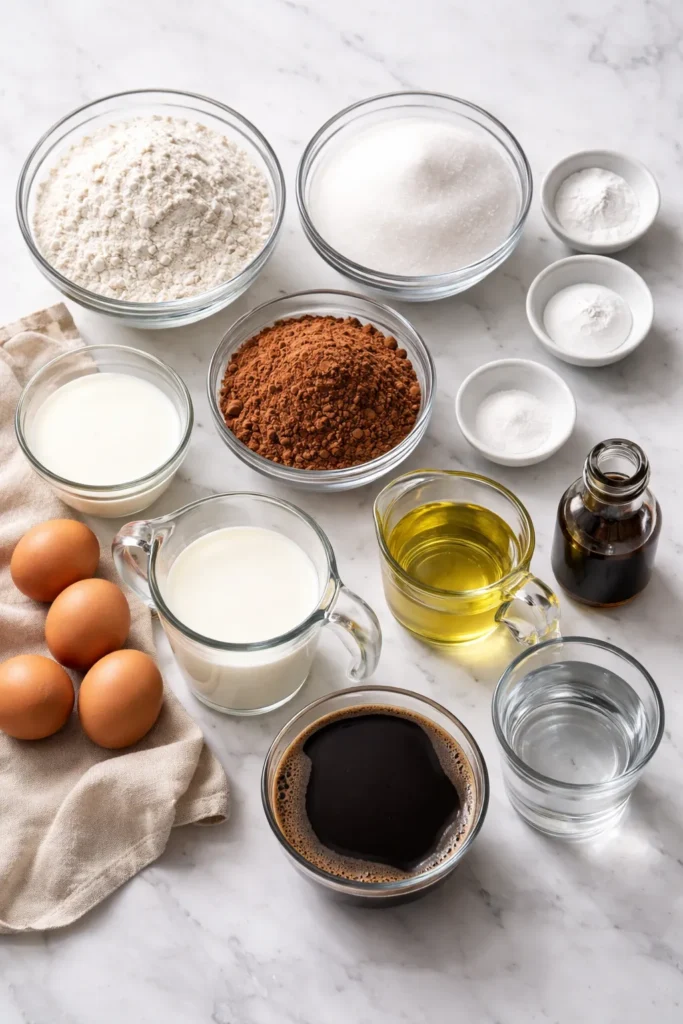
For the Cake:
- 2 cups (260g) all-purpose flour, spooned and leveled
- 1½ cups (300g) granulated white sugar
- ¾ cup (63g) unsweetened cocoa powder, preferably Dutch-processed
- 2 teaspoons (8g) baking powder
- 1½ teaspoons (9g) baking soda
- 1 teaspoon (6g) fine sea salt
- 2 large eggs, room temperature
- ⅔ cup (130g) neutral-tasting vegetable oil (canola, sunflower, or avocado)
- 1 cup (240g) milk (whole milk, buttermilk, or any alternative milk works)
- 2 teaspoons (9g) pure vanilla extract
- 1 teaspoon (2g) instant coffee granules or espresso powder (optional but recommended)
- 1 cup (240g) boiling water or hot brewed coffee
For Assembly and Frosting:
- 1 recipe of your favorite chocolate frosting (chocolate buttercream, chocolate ganache, or cream cheese frosting all pair beautifully)
The Secret to Achieving That Perfect Crumb Structure
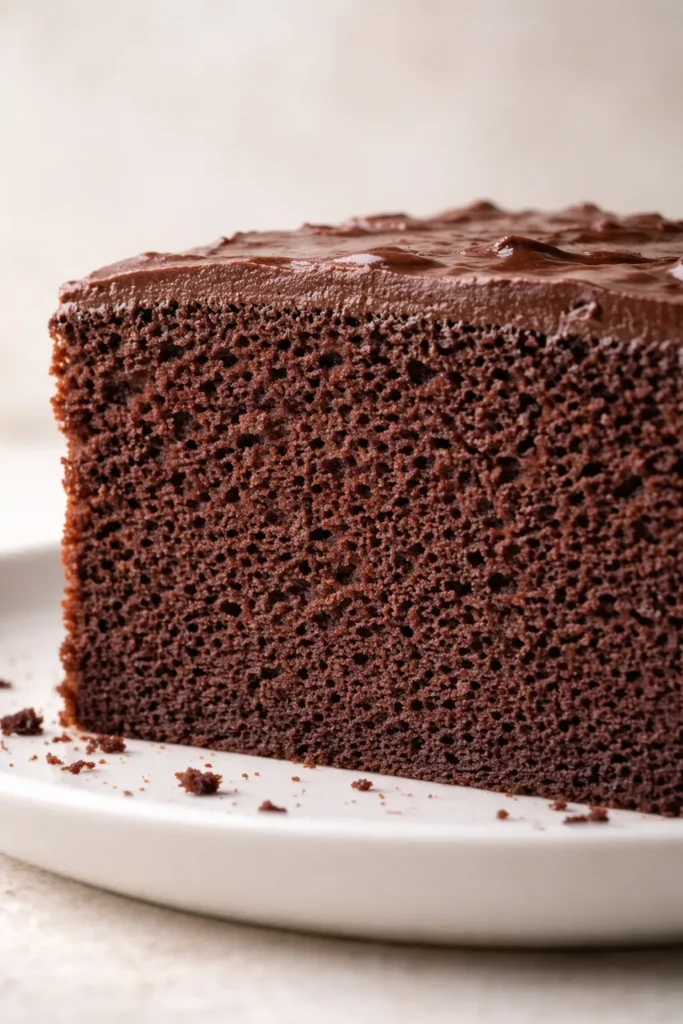
The crumb structure of a cake is determined by how many air bubbles form during mixing and baking, and how uniformly those bubbles are distributed. Large, irregular bubbles create a coarse, crumbly texture. Fine, uniform bubbles create the delicate, tender crumb that makes people marvel at how good a slice tastes.
This cake achieves fine, uniform bubbles through several mechanisms working together. First, the flour and cocoa powder are whisked thoroughly with the sugar and leavening agents before the wet ingredients are added. This dry mixing distributes the baking powder and baking soda evenly throughout the flour, ensuring that they’re not clumped in one area or unevenly dispersed. Clumpy leavening agents create tunneling—those large holes that run through the cake—because the gases are released unevenly.
Second, the wet ingredients are mixed gently into the dry ingredients rather than over-mixed. As soon as the visible streaks of flour disappear, you stop mixing. The impulse is to keep mixing until everything is completely smooth and uniform, but that’s the moment you start developing excessive gluten, which creates a tough, dense texture. This is why mixing by hand with a whisk is actually superior to using an electric mixer for this particular recipe—it’s harder to over-mix by hand.
Third, the boiling water is added gradually in two stages, stirring gently between additions. This prevents large lumps from forming and allows the cocoa powder to bloom completely. The final batter will be noticeably thin—like chocolate milk—and this thinness is crucial for even heat distribution during baking.
Step-by-Step Instructions for Your Best Chocolate Cake
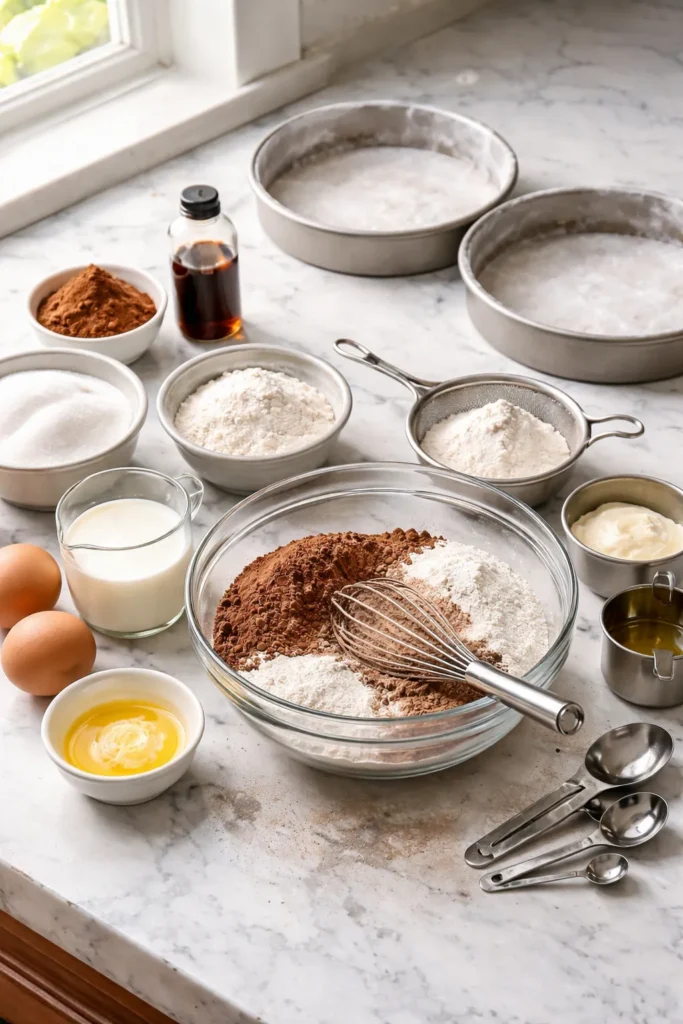
Prepare Your Equipment:
-
Preheat your oven to 350°F (175°C) and position the rack in the center. If you have an oven thermometer, place it on the rack to verify the temperature—many home ovens run hotter or cooler than the dial indicates, and accurate temperature is critical for even baking.
-
Grease two 9-inch round cake pans generously with softened butter or nonstick baking spray, then dust each pan lightly with flour, tapping out the excess. Alternatively, line the bottom of each pan with a round of parchment paper after greasing—this makes turning the cooled cake out of the pan effortless and prevents sticking. Do not skip this step. A stuck cake that breaks apart when you try to remove it from the pan will throw off your entire decorating plan.
-
If you’re using regular milk and want buttermilk’s acidity, combine 1 cup milk with 1 tablespoon white vinegar or fresh lemon juice in a liquid measuring cup and set aside for 5 minutes. The milk will curdle slightly—this is exactly what you want.
Mix the Dry Ingredients:
-
Into a large mixing bowl, sift the flour, cocoa powder, baking powder, and baking soda together using a fine-mesh sieve. Sifting is not optional here. Cocoa powder, in particular, is prone to clumping because of its fat content. A sieve breaks up those clumps and ensures the leavening agents are evenly distributed. If you don’t have a sieve, you can whisk these ingredients together vigorously for about one minute.
-
Add the sugar and salt to the sifted flour mixture and whisk thoroughly to combine, pressing out any remaining lumps of sugar with the back of a spoon. This step takes about a minute of whisking and is worth doing properly—you’re creating a homogeneous dry blend that will mix evenly with the wet ingredients.
Combine Wet and Dry Ingredients:
-
Create a shallow well in the center of the dry ingredients using the back of a spoon or a whisk. Crack both eggs into a small bowl, add the oil, milk (or buttermilk), and vanilla extract, and whisk together until the eggs are completely broken up and the mixture is uniform in color.
-
Pour the egg mixture into the well in the dry ingredients. Using a whisk, begin mixing from the center of the bowl, slowly dragging the dry ingredients in from the sides and folding them into the wet mixture. Mix gently and deliberately, using broad, sweeping motions rather than fast stirring. Stop as soon as you don’t see any streaks of dry flour. The batter will look thick and slightly lumpy at this stage—that’s perfect. Do not continue mixing.
Add the Hot Liquid:
-
In a small bowl or measuring cup, dissolve the instant coffee granules (if using) in the boiling water or hot brewed coffee, stirring until completely dissolved. This step blooms the cocoa particles and intensifies their chocolate flavor. If you’re using plain boiling water instead, you don’t need this step—just measure out the water.
-
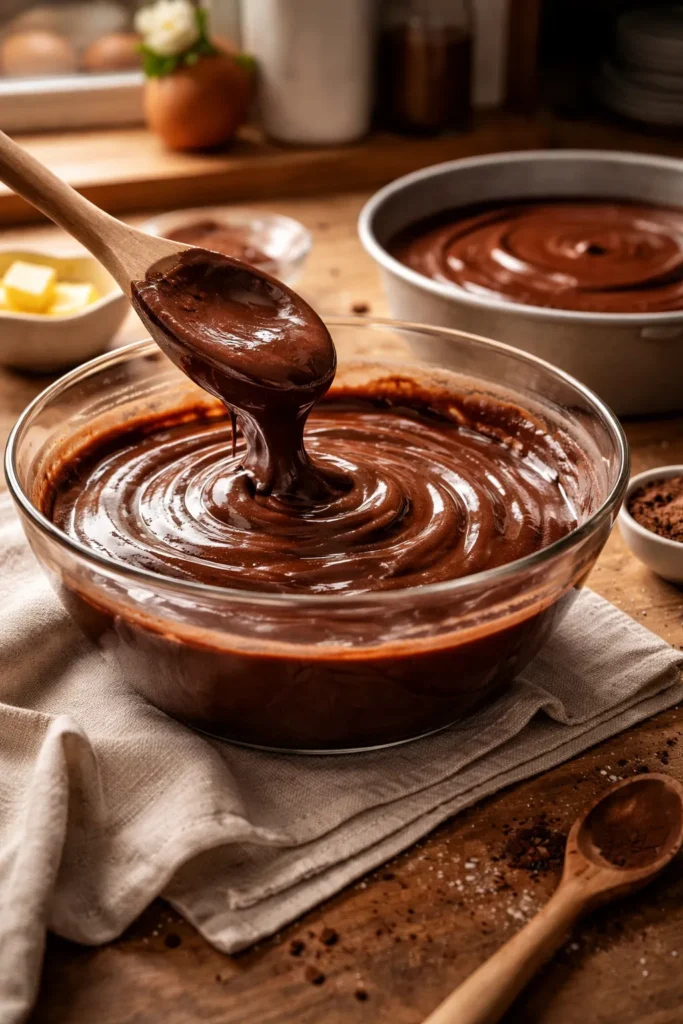
Pour half of the hot liquid into the batter and whisk gently until most of the lumps have disappeared. Do not overmix. The goal is to incorporate the liquid, not to over-develop gluten. The batter will suddenly become much thinner and darker.
-
Add the remaining hot liquid and whisk until the batter is completely smooth and uniform in color. This final batter should have the consistency of chocolate milk—definitely thinner than any cake batter you’ve probably made before. This is correct. Trust the process. The thinness is what creates the incredibly moist crumb.
Bake the Cake:
-
Divide the batter evenly between the two prepared pans. A measuring cup or kitchen scale helps here—if you divided accurately, both cakes will bake at exactly the same rate. Tap each pan gently on the countertop two or three times to release any large air bubbles trapped near the surface.
-
Place both pans in the preheated oven and set a timer for 20 minutes. At the 20-minute mark, open the oven gently and check the cakes by inserting a wooden toothpick or cake tester into the very center of one cake. If wet batter clings to the toothpick, the cakes need more time. If the toothpick comes out clean with no crumbs, the cakes are done or nearly done. Light, moist crumbs clinging to the toothpick is what you’re looking for—this indicates the cakes are perfectly baked, not overdone and dry.
-
The cakes should be completely baked within 30 to 35 minutes total. The edges will have just started to pull away from the sides of the pans, and a toothpick inserted in the center will come out clean or with only a few moist crumbs. Do not overbake. A few extra minutes in the oven can turn this moist cake into a dry one.
Cool the Cakes:
-
Remove the pans from the oven and place them on wire cooling racks. Let the cakes rest in the pans for 10 to 15 minutes—this waiting period allows the cakes to set enough that they can be safely turned out of the pans without tearing or breaking apart. Do not skip this step or rush it. A cake that’s too warm will fall apart; one that’s cooled in the pan loses some of its moisture.
-
After 10 to 15 minutes, run an offset spatula or thin butter knife around the edges of each cake to loosen it from the pan. Place a wire cooling rack over the top of one pan, hold the pan and rack together securely, and carefully flip so the cake falls onto the rack. Repeat with the second cake. If a cake sticks or resists flipping, return the pan to the oven for a minute or two to warm it slightly, which helps release the cake.
-
Allow both cake layers to cool completely on the wire racks—this takes about an hour at room temperature. The cakes must be completely cool before frosting, or the frosting will melt and slide right off. Never frost a warm cake.
Expert Baking Tips to Ensure Success Every Time

Invest in a kitchen scale. This single tool will transform your baking success rate more than any other purchase. Volume measurements (cups and tablespoons) are wildly inconsistent—different people will scoop flour differently, and different brands of cocoa powder have different densities. A scale costs under twenty dollars and removes all this variability. Once you’ve weighed your ingredients once or twice, you’ll never want to guess again.
Bring eggs to room temperature before baking. Cold eggs won’t blend smoothly into the batter and can cause streaking. Set your eggs on the counter 30 minutes before baking, or submerge them in warm (not hot) water for five minutes. Room temperature eggs mix more evenly and create a more uniform crumb.
Verify your oven temperature with an oven thermometer. Home ovens are notorious for running hotter or cooler than the dial indicates. If your cakes are consistently browning too quickly, your oven likely runs hot. If they’re taking much longer than 30 to 35 minutes and still look pale, your oven likely runs cool. An inexpensive oven thermometer hung from a rack reveals the truth, and you can adjust your temperature dial accordingly.
Rotate the pans halfway through baking if your oven has hot spots. If you’ve noticed that your cakes brown unevenly with darker edges on one side, your oven has hot spots. At the 15-minute mark, turn each pan 180 degrees so that the side that was facing the back of the oven now faces the front. This promotes more even browning and cooking throughout.
Don’t open the oven door frequently during baking. Every time you open the door, heat escapes and the baking process is disrupted. Check the cakes once, at the 20-minute mark, then close the door. If you must check before 20 minutes, open the door quickly, look, and close it just as quickly.
Use the visual and tactile cues, not just the timer. Every oven is different, and factors like altitude, humidity, and cake pan material affect baking time. The timer is a guideline, not gospel. The cakes are done when a toothpick inserted in the center comes out clean or with light, moist crumbs, and when the cakes spring back gently when you press your finger lightly on the surface.
Trim the domes if you’re layering the cakes. Most cakes dome slightly during baking as the center rises more than the edges. Once the cakes are completely cool, use a serrated knife to carefully trim off this dome, creating a flat surface for stacking. This makes assembly easier and prevents the frosting from sliding around.
Common Mistakes and How to Avoid Them
Adding too much flour because the batter looks thin. This is the number one reason this recipe fails. The impulse to add more flour when the batter looks like chocolate milk is almost overwhelming, but it’s exactly wrong. The thin batter is what creates the moist cake. Trust the recipe and trust the science.
Over-mixing the batter after the hot liquid is added. Once you’ve added the hot water or coffee, mix only until the batter is smooth. Continued stirring develops gluten, which creates a tough, dense texture instead of a tender crumb. Mix gently, deliberately, and stop as soon as there are no visible lumps.
Refrigerating the batter before baking. If the batter sits at room temperature for more than a few minutes before baking, the leavening agents begin reacting and releasing gases. Those gases escape into the air rather than being trapped in the cake. Bake the batter immediately after mixing.
Underbaking or overbaking. Underbaking leaves wet batter in the center, which is obviously problematic. Overbaking, which is more common, dries out the cake unnecessarily. Use the toothpick test: light, moist crumbs clinging to the toothpick is the sweet spot.
Using an oven temperature that’s too high. 350°F is not arbitrary. At higher temperatures, the outside of the cake sets and browns before the inside finishes baking, creating an overcooked exterior and an underdone center. Use an oven thermometer to verify your temperature.
Skipping the cooling period in the pans. Turning the warm cakes onto cooling racks too quickly causes them to break apart or tear. The 10 to 15 minute rest allows the cakes to set just enough to hold together, but they’re still warm enough to release easily from the pan.
Variations and Creative Twists on the Classic
Once you’ve mastered the basic recipe, you can explore variations that keep the same reliable structure but add different dimensions of flavor.
Dark chocolate intensity: Add an extra teaspoon of instant espresso powder or Dutch cocoa powder. The espresso amplifies chocolate flavor without adding coffee taste. For extreme chocolate lovers, substitute the milk with brewed coffee instead of water, creating a richer, more complex flavor.
Spiced chocolate cake: Add one teaspoon of ground cinnamon, ½ teaspoon of ground ginger, and a pinch of ground cloves to the dry ingredients. These warming spices play beautifully against chocolate and add a subtle sophistication that people often can’t quite identify.
Mint chocolate cake: Add ½ teaspoon of pure peppermint extract to the wet ingredients instead of vanilla. Reduce the vanilla to 1½ teaspoons. The mint and chocolate pairing is classic and beloved.
Chili-chocolate cake: Add ½ to 1 teaspoon of cayenne pepper or chili powder to the dry ingredients. A tiny amount creates a subtle tingle that enhances chocolate flavor; more creates a noticeable spice that pairs well with cream cheese frosting.
Orange-chocolate cake: Zest one orange and add the zest to the dry ingredients before mixing. Add ½ teaspoon of orange extract to the wet ingredients. The citrus brightness lifts the heaviness of the chocolate.
Gluten-free version: Substitute the all-purpose flour with an equal weight of high-quality gluten-free all-purpose flour (make sure it contains xanthan gum). Gluten-free flour typically absorbs liquid differently, so watch the batter consistency. It should still be thin and pourable after adding the hot liquid.
Dairy-free version: Use a non-dairy milk (almond, coconut, oat, or soy all work), and make sure your cocoa powder is dairy-free (most unsweetened cocoa powder is). All other ingredients remain the same. You can use dairy-free chocolate and dairy-free frosting to keep the entire cake vegan.
Single-layer version: Halve all the ingredients and bake in a single 9-inch pan for 25 to 30 minutes. This creates one thick cake layer that can be frosted simply or split horizontally if you want two layers.
Cupcake version: Use the full recipe and divide the batter evenly among 18 to 24 cupcake liners. Bake at 350°F for 18 to 22 minutes, until a toothpick inserted into the center of a cupcake comes out clean. This eliminates the assembly step and creates individual servings that are perfect for gatherings.
Sheet cake version: Use the full recipe and bake in a greased 9×13-inch pan at 350°F for 30 to 35 minutes. This creates one large cake perfect for parties, picnics, and feed-a-crowd situations. Top with chocolate ganache for an elegant finish, or use buttercream for a more casual presentation.
How to Store and Keep Your Cake Fresh
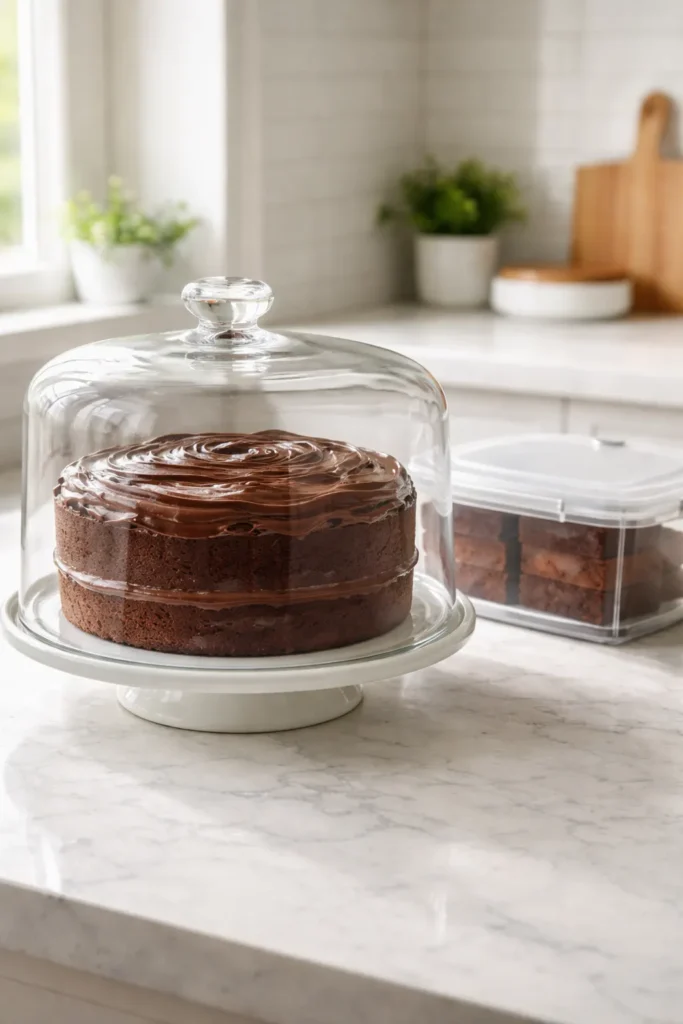
Room temperature storage: Store the frosted cake on the counter under a cake dome or covered with a large bowl for up to three days. The frosting prevents the cake from drying out. Without frosting, cover the cake loosely with plastic wrap and eat it the same day for best texture.
Refrigerator storage: A frosted cake can be refrigerated for up to one week in an airtight container. The cold actually preserves the moisture and intensifies the chocolate flavor. Remove from the refrigerator 30 minutes before serving to allow it to reach room temperature. A chilled slice is absolutely delicious—the cold accentuates the rich texture.
Freezer storage: Unfrosted cake layers can be frozen for up to three months. Wrap each completely cooled layer individually in plastic wrap, then in aluminum foil, and place in an airtight container or freezer bag. Thaw in the refrigerator overnight with the wrapping intact, then frost and serve. Frosted cakes can also be frozen—refrigerate until the frosting is firm, then wrap and freeze for up to two months.
Make-ahead strategy: You can bake the cake layers up to a day ahead and store them wrapped at room temperature. You can make the frosting a day ahead and store it, covered, in the refrigerator (allow it to come to room temperature or whip it briefly before frosting the cake). This means you can assemble a stunning cake with very little effort on the day you need to serve it.
Reheating and serving: There’s no need to reheat this cake—it’s delicious at room temperature, chilled from the refrigerator, or even slightly warm if you’ve stored it in a cool place. If a slice has been refrigerated and you want to serve it warm, microwave a single slice for 15 to 20 seconds.
Serving Suggestions and Perfect Pairings
This chocolate cake is magnificent on its own, but it transforms into different experiences depending on what you serve alongside it.
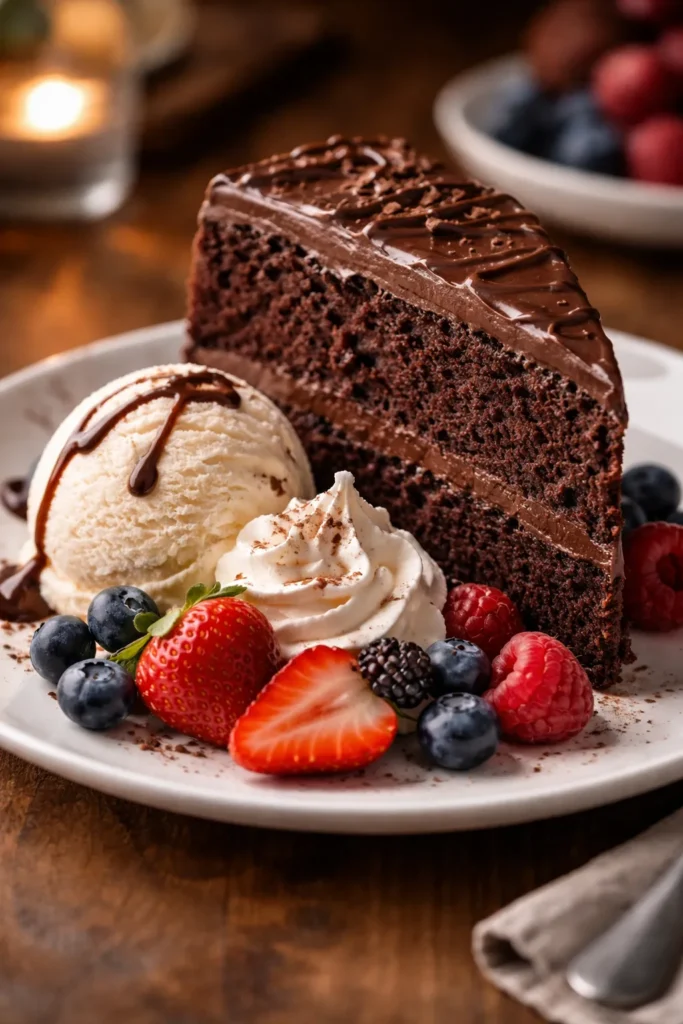
The classic pairing: A scoop of vanilla ice cream melting into the chocolate layers is an iconic combination that needs no justification. The cold ice cream contrasts beautifully with the warm cake, and vanilla complements chocolate without competing for attention.
The sophisticated pairing: Serve with fresh raspberries or cherries and a dollop of whipped cream. The tartness of the berries cuts through the richness of the chocolate, and the whipped cream adds a light, airy element.
The bold pairing: Top with salted caramel sauce and sea salt flakes. The salt amplifies the chocolate flavor, while the caramel adds a sweet, buttery contrast.
The espresso pairing: Serve alongside strong black coffee or espresso. The coffee and chocolate notes mirror each other, creating a cohesive flavor experience that’s sophisticated and warming.
For celebrations: Garnish the top of the frosted cake with gold leaf, chocolate shavings, fresh flowers, berries, or a dusting of cocoa powder for visual drama. This cake deserves a beautiful presentation because it delivers on the promise.
For casual gatherings: A simple dusting of powdered sugar or cocoa powder is often more elegant than elaborate decoration. Let the cake’s quality speak for itself.
Plating individual slices: Use a long, thin knife dipped in hot water and wiped clean between cuts for neat slices. Serve on white or neutral plates so the dark chocolate is the focal point. A small garnish on the plate—a berry, a cocoa powder dusting, a drizzle of chocolate—elevates the presentation without overwhelming the dessert.
Final Thoughts

You’ve found the chocolate cake recipe you’ll return to again and again. Not because it’s trendy or complicated, but because it’s reliably, unfailingly delicious. It works in your kitchen, with your oven, and with your skill level—whether you’re brand new to baking or you’ve been doing this for years.
The real beauty of this recipe isn’t that it’s forgiving, though it is. It’s that understanding the science behind why the recipe works—why the thin batter matters, why you don’t over-mix, why the hot liquid is essential—transforms you into a baker who can troubleshoot problems and confidently make variations. You’re no longer following instructions blindly; you’re making informed choices.
Make this cake for birthdays and celebrations, make it for quiet Sunday afternoons, make it for potlucks and dinner parties. Make it with someone you love, or make it purely for yourself. Once you’ve made it a few times, you’ll have it memorized, and that’s when the real magic happens—when you can make an extraordinary cake without even looking at the recipe. That’s when you’ll understand why people call this the only chocolate cake recipe they’ll ever need.