There’s a reason so many beloved desserts rely on a graham cracker crust—it’s the perfect marriage of convenience and flavor. That buttery, sweet, crispy foundation transforms everything from creamy no-bake pies to rich cheesecakes, delivering a satisfying crunch that complements virtually any filling you can imagine. Yet countless home bakers still reach for store-bought crusts, settling for cardboard-like textures and stale flavors when something incomparably better sits just minutes away in their own kitchen.
The truth that’ll change your baking forever? A homemade graham cracker crust requires just three ingredients, takes about five minutes of active work, and tastes like it came from a professional bakery. Once you master this one simple technique, you’ll never feel tempted by a pre-made crust again. This isn’t a difficult skill to learn—it’s an easy one with outsized rewards. Whether you’re filling it with tangy key lime, rich chocolate, or a no-bake cheesecake so creamy it practically melts on your tongue, this crust becomes the canvas that makes your dessert truly shine.
Let’s walk through everything you need to know to make a graham cracker crust so good, so buttery, and so perfectly crisp that it becomes your go-to recipe for every pie and dessert bar you bake.
Table of Contents
- Why Homemade Graham Cracker Crust Beats Store-Bought Every Time
- The Three Essential Ingredients You Need
- Selecting the Best Graham Cracker Brand
- How to Crush Graham Crackers Into Perfect Crumbs
- Mixing the Perfect Crust Base
- The Pressing Technique That Determines Success
- Getting the Texture Exactly Right
- Baked Versus No-Bake: Which Approach to Choose
- Common Mistakes That Sabotage Your Crust
- Variations That Add Flavor and Personality
- Storage, Make-Ahead, and Freezing Wisdom
- Perfect Pairings and Serving Suggestions
- Final Thoughts
- Master Tips for Picture-Perfect Results
- Variations You Can Make Confidently
- Storage and Make-Ahead Instructions
- Best Uses and Perfect Pairings
Why Homemade Graham Cracker Crust Beats Store-Bought Every Time
Store-bought graham cracker crusts deliver something unexpected when you open that foil pan: disappointment. They taste stale, texturally they’re either mushy or rock-hard with no middle ground, and they contain ingredients you can’t pronounce packed in as preservatives. The flavor is muted, almost nonexistent, and when you bite through them, there’s no satisfying crunch—just a dull, lifeless experience.
A homemade crust, by contrast, is buttery, crumbly, and uncompromisingly fresh. The butter melts across your tongue, the graham crackers taste like they were ground minutes ago, and the whole thing holds together with just enough structure to slice cleanly without crumbling apart. The sugar caramelizes slightly as the crust bakes, deepening the flavor and creating that golden-brown color that signals quality.
The time difference is negligible. Store-bought requires you to find it at the store, pay premium prices, and accept whatever condition it arrives in. Homemade takes five minutes of mixing and two minutes of pressing. The taste difference, though—that’s profound enough that every baker should experience it at least once. After that first bite, the choice becomes obvious.
The Three Essential Ingredients You Need
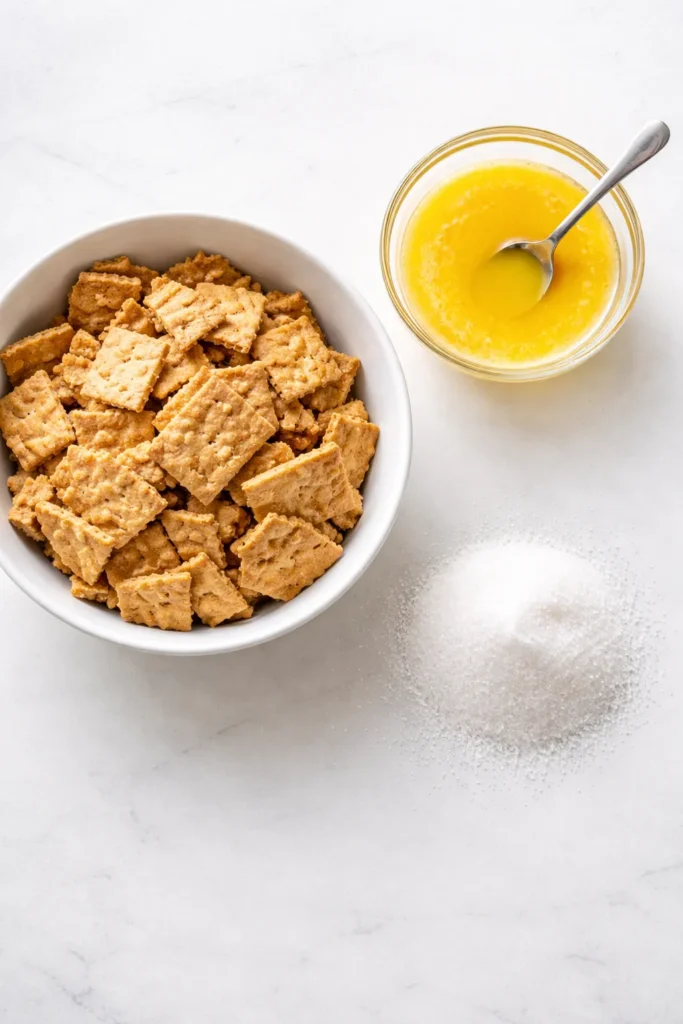
Every great graham cracker crust rests on three foundational ingredients, each one playing a specific and critical role. These aren’t complicated specialty items—they’re pantry staples you likely have on hand right now. The magic isn’t in exotic elements; it’s in using quality versions of these basics and understanding why each one matters.
Graham crackers form the structural backbone of your crust. They provide the distinctive sweet, toasted flavor that makes this crust recognizable and delicious. You’ll need enough to yield about 1½ cups of finely ground crumbs—typically that’s 10 to 12 full sheets, depending on the brand and how fine you grind them. The crackers you choose matter more than you might expect. Honey graham crackers offer that classic, slightly sweet vanilla flavor that pairs with almost every filling imaginable. You can experiment with cinnamon or chocolate varieties if they match your dessert, but traditional honey is the most versatile starting point.
Butter acts as the binder that holds everything together while simultaneously delivering richness and a luxurious mouthfeel. Melted butter coats each crumb, and as it cools, it solidifies and locks the crust into shape. Use 6 tablespoons (85 grams) of unsalted butter for a standard 9-inch pie crust. Unsalted butter gives you control over the salt level in your finished dessert, though if you only have salted butter on hand, it works fine—just skip any additional salt in the recipe. There’s no substitute that quite captures the flavor of real butter; while coconut oil technically works, it shifts the flavor profile and changes how the crust sets.
Sugar serves a dual purpose: it adds just enough sweetness to complement the graham crackers (which are already fairly sweet), and it assists the butter in binding the crumbs together. Use ¼ cup (50 grams) of granulated sugar. You can swap in light brown sugar for a richer, slightly molasses-forward flavor—this is especially nice if you want a crust with more depth or if you’re making a chocolate dessert. White sugar keeps the flavor clean and classic, letting the graham cracker taste shine through.
Selecting the Best Graham Cracker Brand
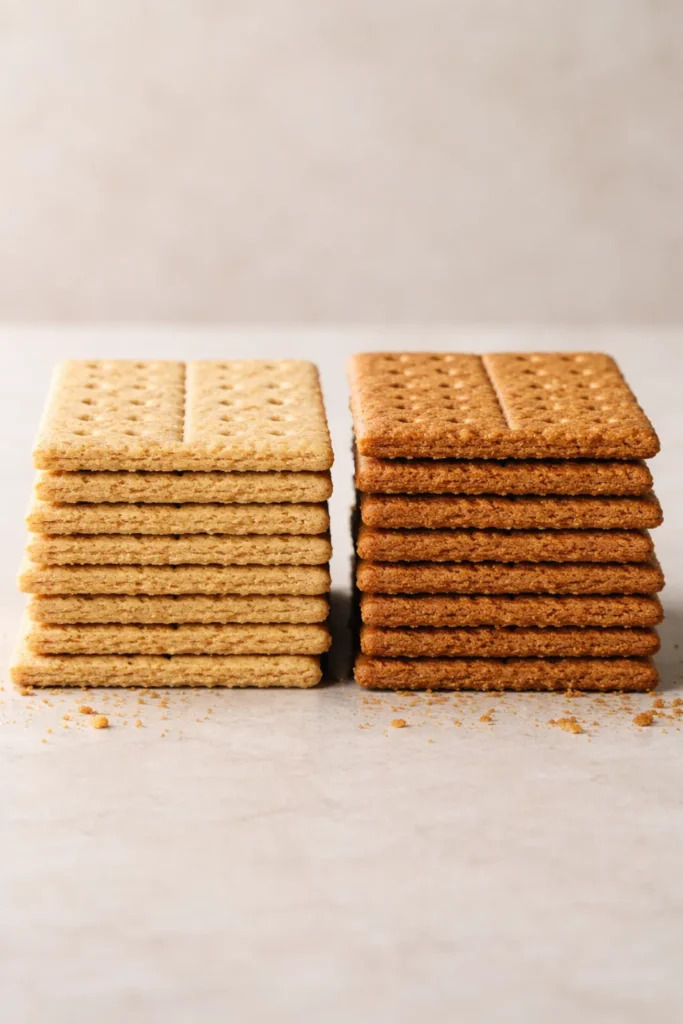
Not all graham crackers are created equal, and this seemingly small choice impacts your crust noticeably. The Nabisco Honey Maid brand consistently outperforms store-brand alternatives. They’re firmer, crispier, and have a more developed toasted flavor that translates into a superior crust. When you crush them, they create finer, more uniform crumbs that pack together more effectively.
Store-brand graham crackers, while less expensive, tend to be lighter in color and have a softer, slightly more moist texture. When you add melted butter to these crumbs, the mixture feels mushier rather than sandy and compact. The resulting crust lacks the structural integrity of one made from quality crackers, and the flavor is distinctly blander. The price difference between brands is typically just 50 cents to a dollar, but the taste difference is substantial enough to make it worth seeking out the better option.
If you live outside the United States where graham crackers aren’t available, digestive biscuits make an excellent substitute. They’re similar in spirit—a slightly sweet, crispy biscuit—though they’re not quite as crispy as graham crackers and disintegrate more readily when wet. If you’re using digestive biscuits, you’ll need about 12 to 13 of them (roughly 200 grams), slightly more sugar (⅓ cup instead of ¼ cup), and the same amount of butter. You may also want to add a minute or two to the baking time since digestive biscuits don’t set quite as quickly.
How to Crush Graham Crackers Into Perfect Crumbs
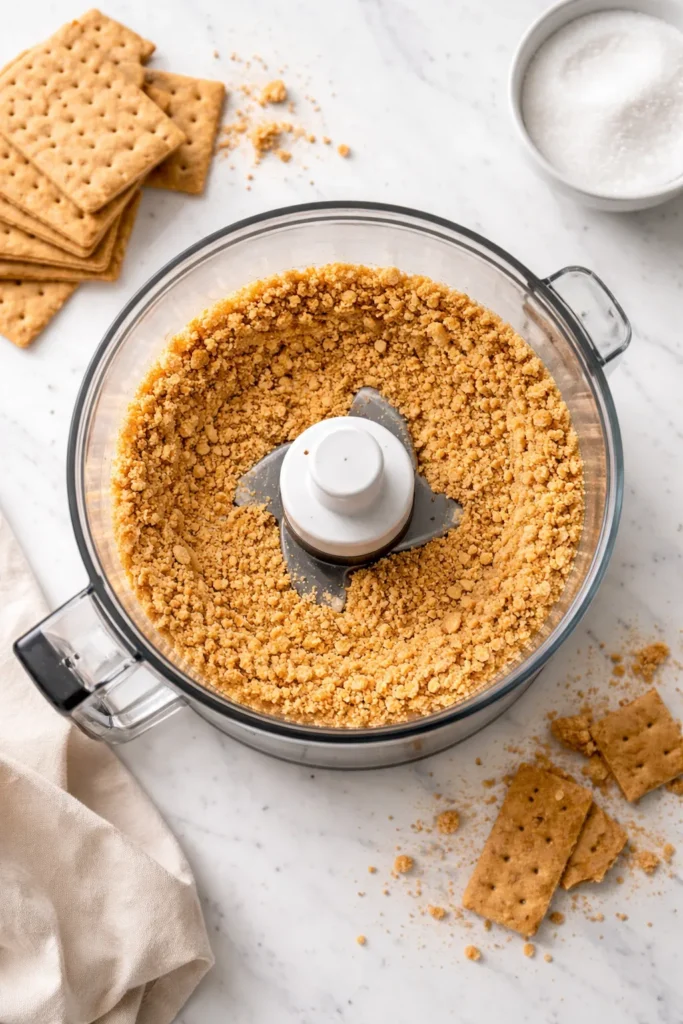
Before you can press a crust into a pie plate, you need to reduce your graham crackers to fine crumbs. The texture you’re aiming for is sandy and uniform, resembling granulated sugar rather than chunky breadcrumbs. Large pieces won’t pack together effectively and will create a crust that crumbles apart when you slice it; ultra-fine powder becomes dense and hard when baked. You want a middle ground where you can see the individual grains of crumb but they’re small enough to bond together.
A food processor makes quick work of this task. Break your graham crackers into pieces that fit comfortably in the food processor bowl (don’t overstuff it), then pulse until you reach that sandy texture—typically 30 to 45 seconds, depending on how many crackers you’re processing. Pulse in intervals rather than running the processor continuously; this gives you better control and helps you avoid over-processing into a fine powder.
If you don’t have a food processor, the rolling pin method works equally well and requires nothing but muscle and determination. Place your graham crackers in a sturdy zip-top bag, seal it completely, and then roll a rolling pin back and forth over them with medium-firm pressure. Start with gentle passes, then increase pressure as the crackers break down. You’ll feel when they’ve reached the right consistency—when the bag feels full of sand rather than chunks. This method actually has a bonus: it’s oddly satisfying and gives you a good sense of the texture you’re creating as you go.
Mixing the Perfect Crust Base

Once your graham crackers are crushed, combining them with sugar and butter is straightforward, but the technique matters. Start by mixing the crushed graham crackers and sugar together in a medium bowl using a fork or wooden spoon. The sugar crystals distribute evenly throughout the crumbs at this stage, helping ensure the butter incorporates uniformly later.
Pour your melted butter into the bowl and stir vigorously with a fork until every crumb is moistened and the mixture resembles very coarse, damp sand. This is where many people hesitate—the mixture will look crumbly and loose, nothing like a cohesive crust. This is completely normal and expected. The binding will happen as the mixture compacts and cools. Use your fork to break up any clumps of dry crumbs, making sure the butter reaches into every corner of the bowl.
If your butter has cooled significantly by the time you mix it, it may not distribute as evenly, leaving some dry spots. If this happens, you can microwave the mixture in short 5-second intervals, stirring between each burst, until the butter softens slightly and incorporates. Don’t overheat it—you just need it warm enough to distribute smoothly. Once everything is combined, you’re ready to press the mixture into your pan.
The Pressing Technique That Determines Success
How you press the crust into the pan matters far more than most people realize. This is where the difference between a crust that holds together beautifully and one that crumbles apart becomes evident. The goal is firm compaction without over-packing—you want the crumbs pressed together tightly enough that they don’t shift around, but not so compressed that they bake into a hard, dense, difficult-to-slice crust.
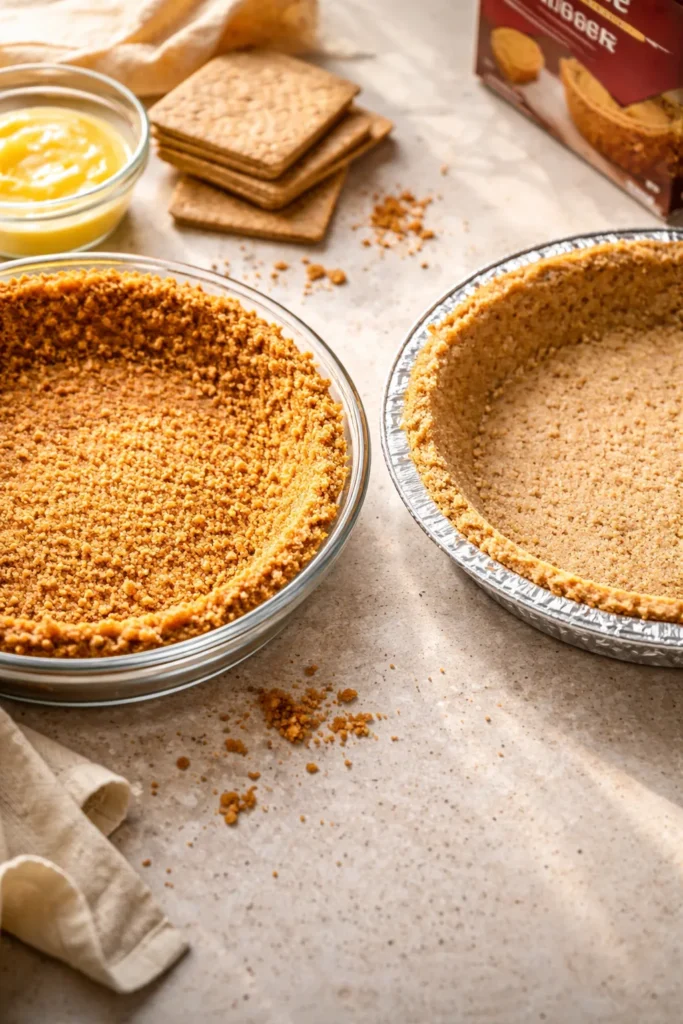
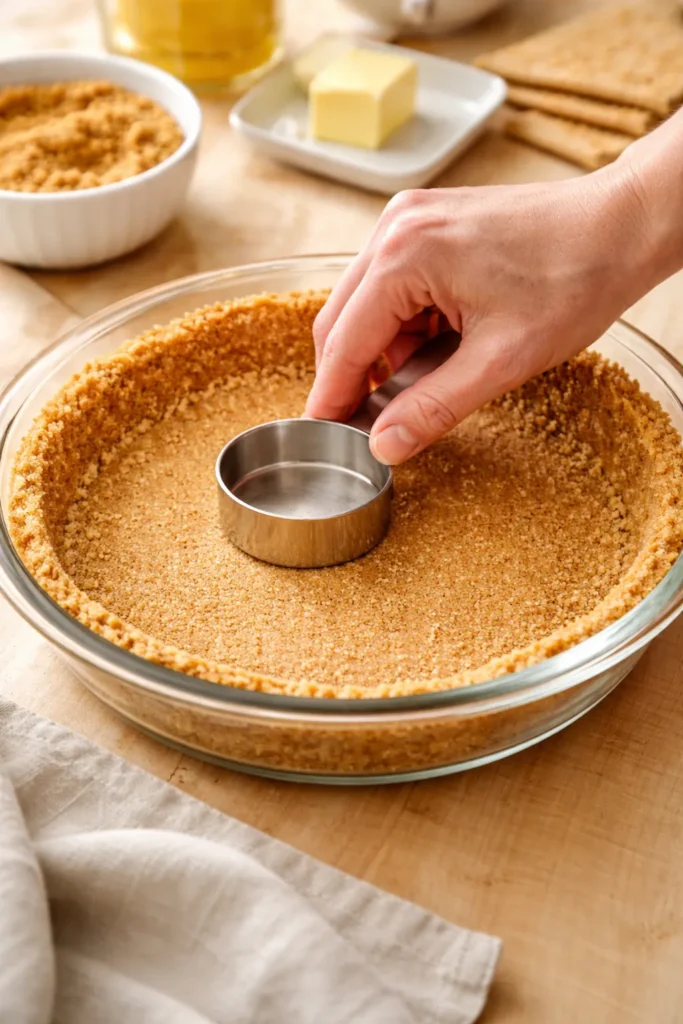
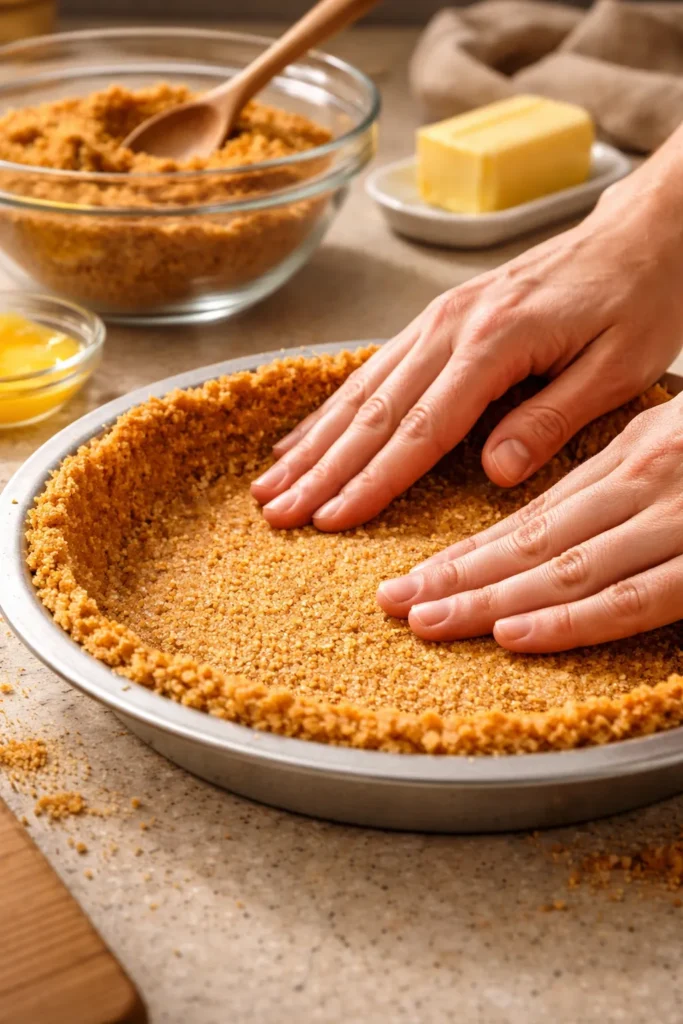
Start by pouring your crust mixture into an ungreased 9-inch pie plate (or your chosen pan). Using your hands first, press the mixture into the bottom of the pan and partway up the sides using medium-firm pressure. Work methodically, starting at the center and working outward, then moving up the sides. Your goal at this stage is to establish the basic shape and ensure the crumbs aren’t loose or moving.
Once you’ve pressed with your hands, use the flat bottom of a small measuring cup or glass to firm up and smooth the bottom and lower sides. Apply steady, even pressure—lean into it, but don’t mash. You can see a visual difference as you press: the mixture becomes slightly more compact and the surface becomes smoother. Press until the crust feels firm and no longer crumbly, then stop. Resist the urge to continue pressing once you’ve reached this point.
The rounded corner trick prevents cracking and crumbling when you slice. Instead of allowing a sharp 90-degree angle where the bottom of the crust meets the sides, use the back of a spoon or your thumb to create a gentle, rounded transition. Press firmly with your hand from outside the pan while simultaneously using your thumb to push and round that inner corner. This reinforces what’s naturally a weak point in a crust and helps the slices stay intact when you cut and serve.
Getting the Texture Exactly Right

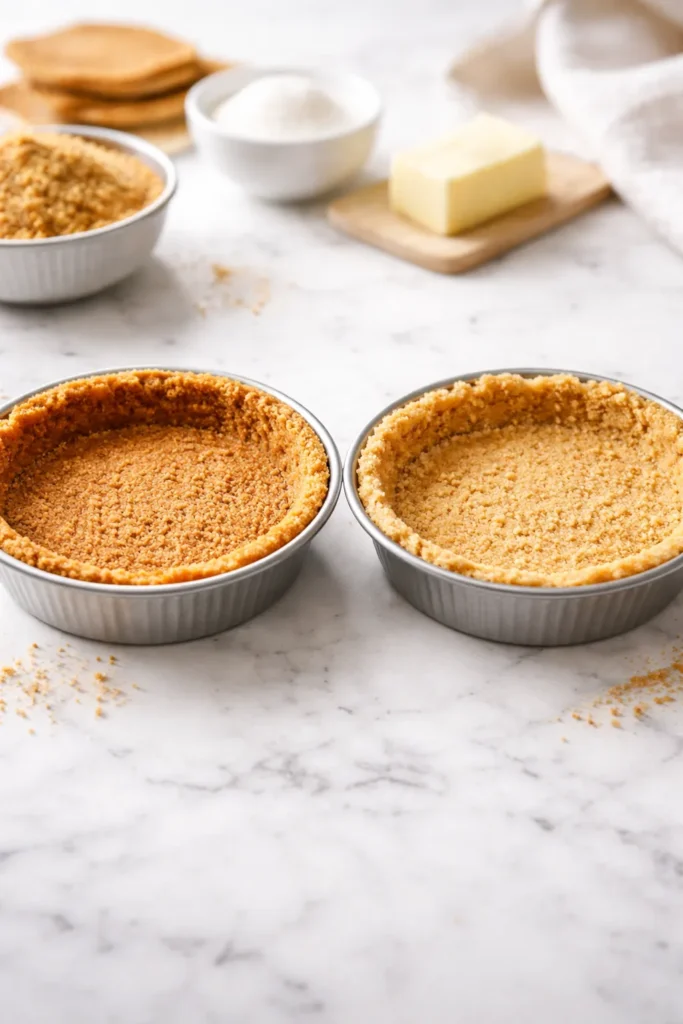
The texture of a finished graham cracker crust falls somewhere on a spectrum between two extremes, and where you land depends on your preferences and your filling. A softer, more crumbly crust works beautifully for no-bake desserts like cheesecake or mousse pies—the creamy filling provides structural support, and the tender crust simply melts on your tongue. A firmer, crisper crust suits baked pies better, as it provides structure against wet fillings and delivers a satisfying crunch.
The primary factor that determines texture is baking. A crust that’s chilled but not baked will be softer and more tender, with less structural integrity. If you press down too hard as you form it, the butter doesn’t distribute as well and the crust bakes unevenly—some areas brown while others remain pale and soft. A crust that’s baked at a low temperature for a short time develops just enough structure to hold without becoming hard. Baking at a moderate temperature (350°F / 175°C) for about 10 minutes creates a crust with ideal structure—crisp and golden on the outside, still tender enough to bite through easily, and sturdy enough to slice cleanly.
If your finished crust is too hard or dense, you likely over-packed it when forming it or baked it too long or at too high a temperature. If it’s too soft and crumbly, you may not have pressed firmly enough, used too little butter, or skipped the baking step entirely. Understanding these relationships helps you troubleshoot future batches and adjust to your preferences.
Baked Versus No-Bake: Which Approach to Choose
The beauty of a graham cracker crust is its flexibility. You can take it two completely different directions depending on what you’re making and what you prefer.
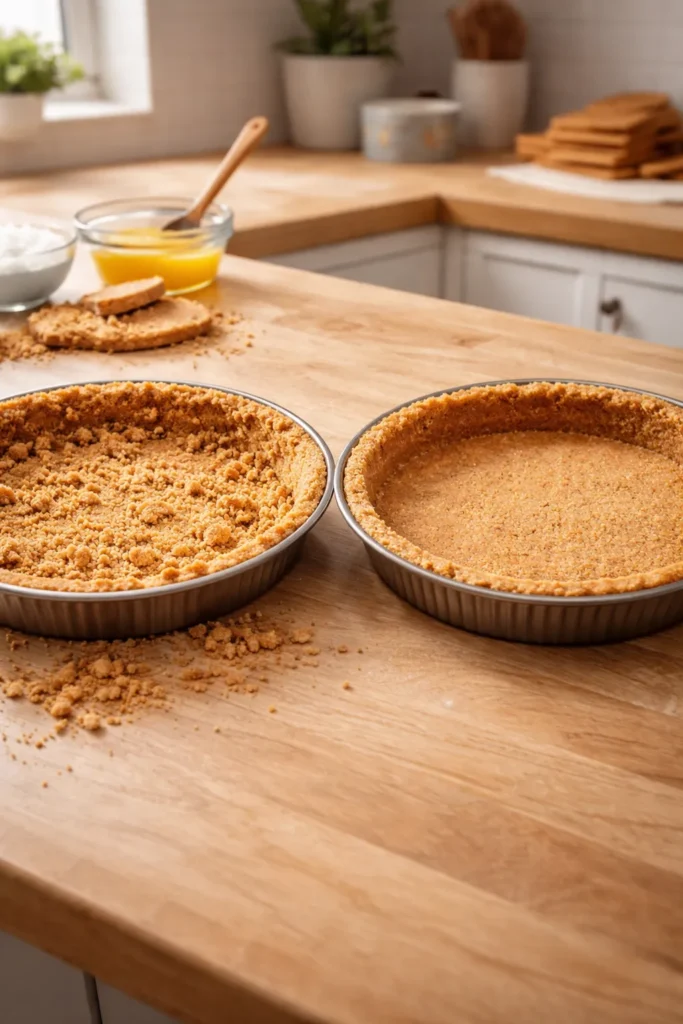
For a no-bake crust, press the mixture into your pan and refrigerate it for at least 1 hour before filling. The cold temperature solidifies the butter, and the extended chill time allows the crumbs to set without heat. This approach keeps your kitchen cool, requires no oven time, and works perfectly for mousse, cheesecake, or any filling that will be chilled or frozen. The resulting crust is softer and more tender, with less of a pronounced crunch. If you want a no-bake crust to have a bit more structure and crispness, you can brief-bake it for just 8 to 10 minutes at 350°F, then cool it completely before filling.
For a baked crust, preheat your oven to 350°F (175°C), then bake the pressed crust for 10 to 12 minutes, until it’s lightly golden brown and fragrant. The melted butter and sugar caramelize slightly, deepening the flavor and creating a noticeably crispier texture. The crust becomes more structurally sound—less likely to crumble apart—and develops a richer, more toasted flavor. This works wonderfully for baked pies like key lime or chocolate, and for any situation where the crust will be exposed to moisture or delicate cutting.
Remove your baked crust from the oven and let it cool completely on a wire rack before adding any filling. This cooling period is non-negotiable. A warm crust is soft and vulnerable; if you add a cold filling to hot crust, the temperature shock can cause cracking. Cooling also allows the butter to resolidify, giving the crust its final structure. If you’re making a baked pie that will go directly from the oven after the filling is added (like a traditional key lime pie), you can fill the cooled crust and bake again as directed by your pie recipe.
Common Mistakes That Sabotage Your Crust
Even with such a simple recipe, several small missteps can derail your results. Understanding what commonly goes wrong helps you sidestep these pitfalls.
Using the wrong butter ratio is surprisingly common. Too little butter and your crust won’t hold together; the crumbs remain too dry to bond, and you end up with a crumbly, falling-apart crust no matter how firmly you press. Too much butter and the crust becomes overly greasy, heavy, and hard when cooled. The ratio in this recipe—6 tablespoons to 1½ cups of crumbs—is carefully balanced to deliver a crust that holds together while remaining tender and crispy. Resist the temptation to guess; use a measuring spoon or kitchen scale.
Over-packing the crust transforms it into a dense, hard shell that’s difficult to cut through and unpleasant to eat. Press firmly enough that the mixture becomes compact and stops moving around; beyond that point, you’re creating a brick, not a crust. If you find yourself really leaning into your pressing tool, you’ve gone too far. The goal is “firmly packed,” not “compressed into submission.”
Using low-quality or stale graham crackers affects flavor and texture more than you’d expect. Older crackers are drier and less flavorful, and they don’t create as satisfying a crust. Buy fresh graham crackers and store them in an airtight container.
Skipping the cooling step after baking, or filling the crust while it’s still warm, can lead to cracks and a crust that softens prematurely. Patient cooling is essential—typically 15 to 20 minutes on the counter after the pan comes out of the oven is sufficient, followed by any additional chilling your recipe requires.
Neglecting the rounded corner when forming a pie crust leads to visible cracking and breaking when you slice. A sharp corner is structurally weak; a rounded curve distributes pressure more evenly.
Variations That Add Flavor and Personality
Once you’ve mastered the classic crust, variations open up endless possibilities. The beauty of this recipe is that it adapts beautifully to different flavors and additions.
Brown sugar instead of white deepens the flavor with notes of molasses and creates a richer, almost caramel-forward taste. It’s particularly stunning in chocolate pies or any dessert where you want complexity. Simply swap the ¼ cup of granulated sugar for ¼ cup packed light brown sugar, keeping everything else the same.
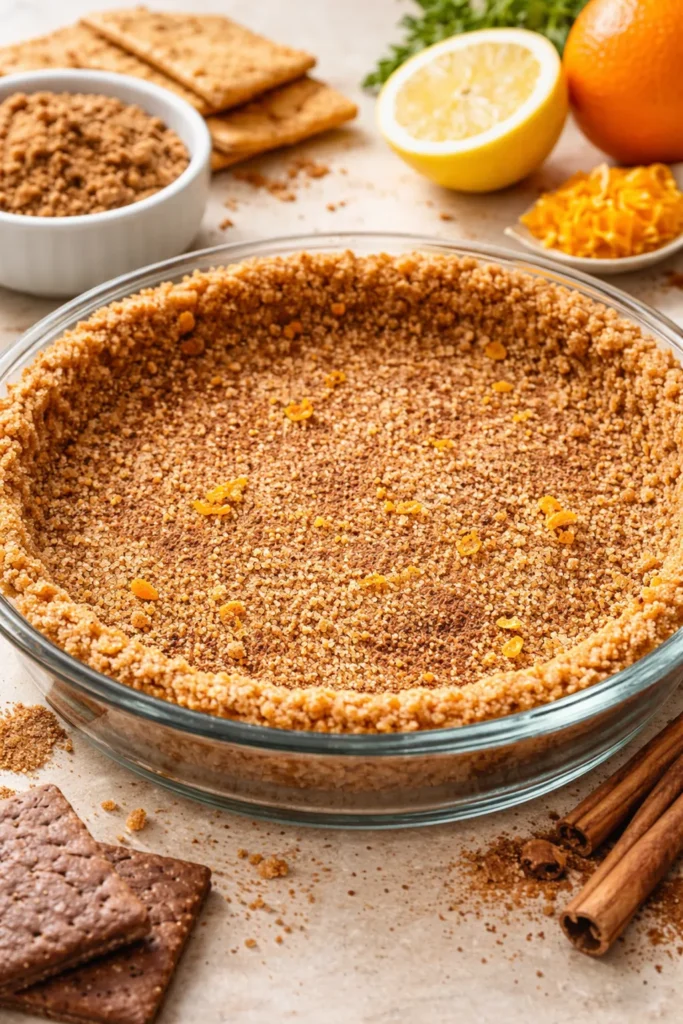
Cinnamon and spice additions work wonderfully, especially for fall desserts or warm, cozy pies. Add ¼ to ½ teaspoon of ground cinnamon, a small pinch of nutmeg, or even a whisper of ground ginger. These spices complement apple fillings, pumpkin preparations, and chocolate beautifully. Mix them into the sugar before combining with the crumbs so they distribute evenly.
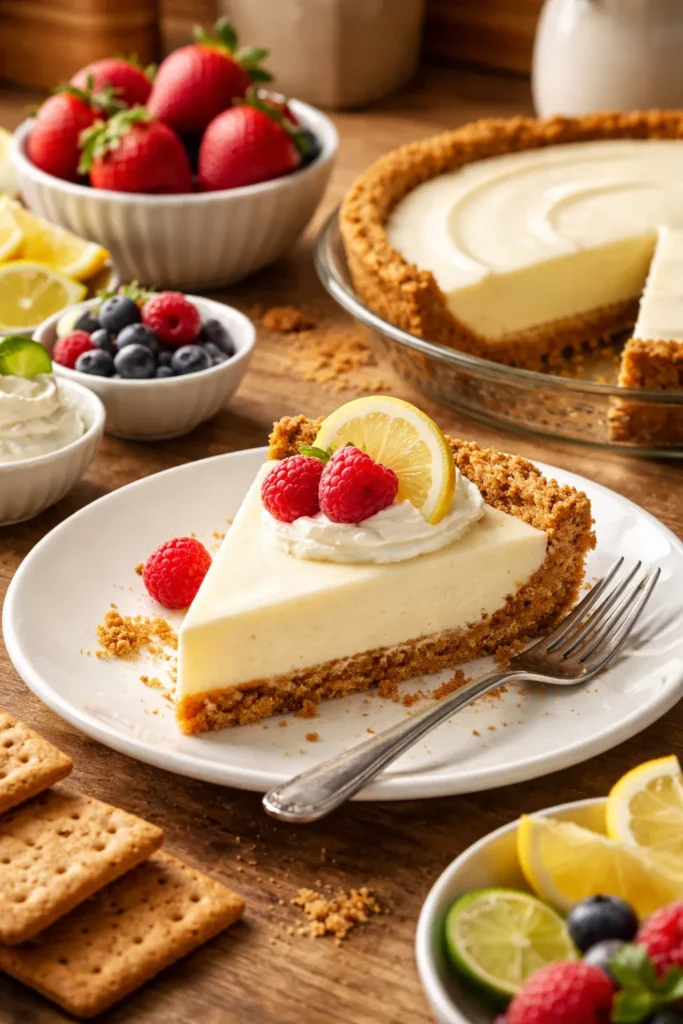
Citrus zest brings brightness and complexity. Finely grate the zest of a lemon, lime, or orange directly into your crust mixture. This is especially delicious in key lime pies, giving the crust a subtle citrus echo that builds on the filling’s flavor.
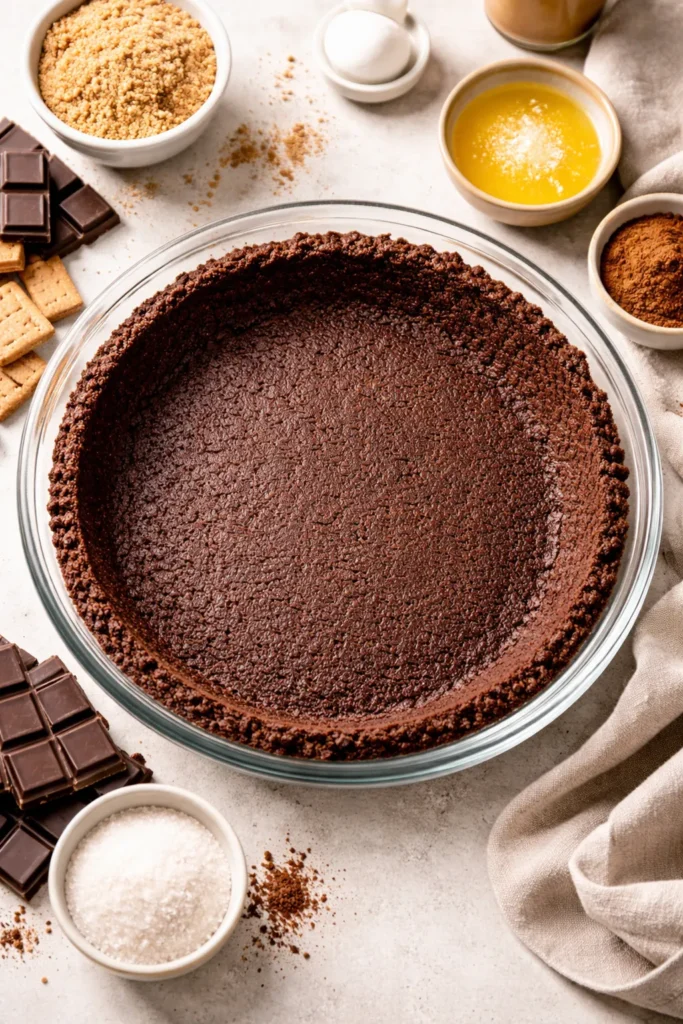
Chocolate graham crackers create an entirely different crust perfect for mousse or cream pies. Use them exactly as you would regular graham crackers; the increased cocoa flavor builds on chocolate fillings beautifully.
Toasted nuts (finely ground) can replace up to ¼ cup of the graham cracker crumbs. Almonds, hazelnuts, and pecans all work wonderfully, adding nuttiness and deeper flavor. Toast them lightly before grinding for maximum flavor impact.
Toasted coconut pairs beautifully with tropical fillings like key lime or coconut cream. Toast unsweetened shredded coconut until golden, then fold about ⅓ cup into your prepared crust mixture.
Storage, Make-Ahead, and Freezing Wisdom
One of the best attributes of a graham cracker crust is how make-ahead friendly it is. Plan ahead strategically, and you can have homemade crust ready whenever inspiration strikes.
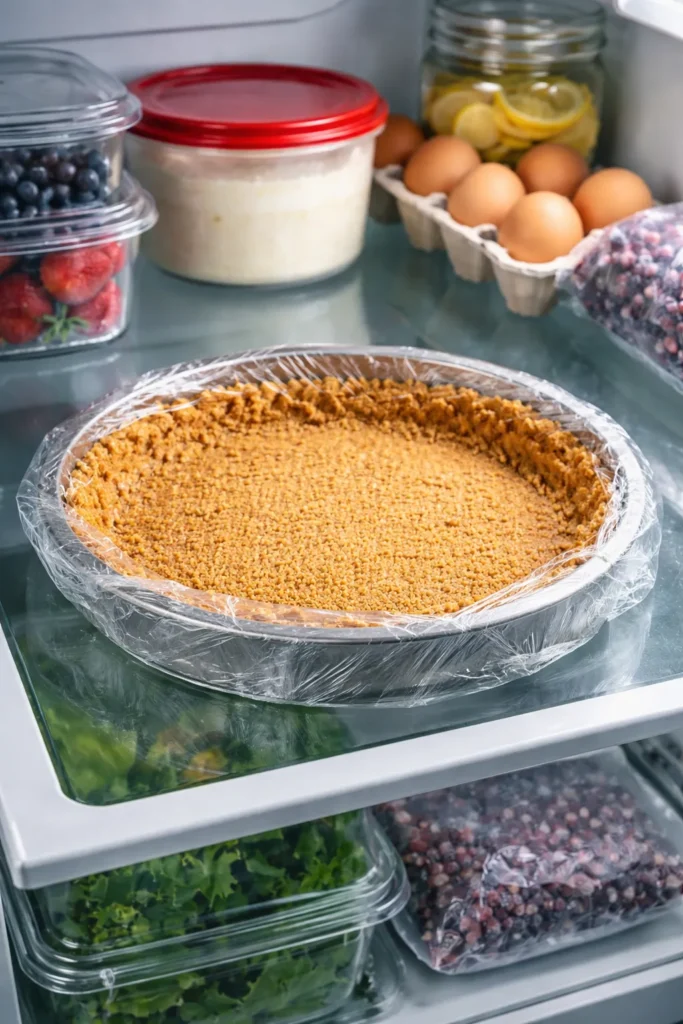
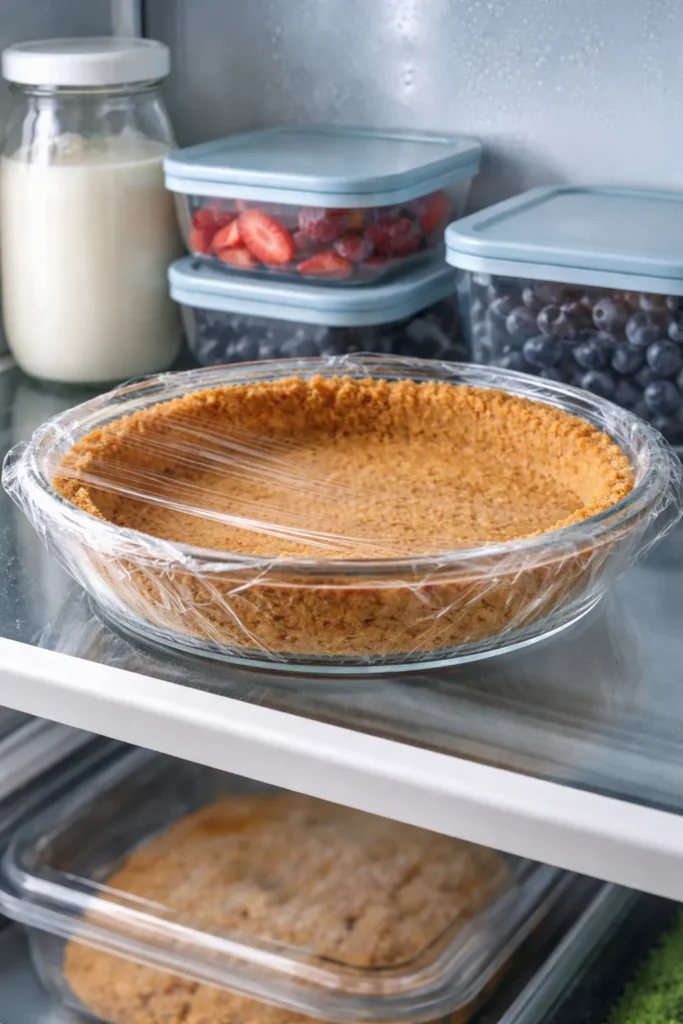
A prepared but unbaked crust stores beautifully in the refrigerator for up to 3 days when covered tightly with plastic wrap. The butter stays relatively firm in cold temperatures, and the crust is ready to bake whenever you’re ready to fill it. This is fantastic if you want to prepare the crust in advance and bake it fresh just before filling.
A fully baked and cooled crust also keeps in the refrigerator for several days when wrapped well. Store it right in the pie plate if possible, covering it loosely with plastic wrap to prevent it from absorbing odors or drying out. Before filling, let it come to room temperature for about 15 minutes so it’s easier to work with.
Freezing works beautifully for both baked and unbaked crusts. Wrap the crust (in its pan) with plastic wrap, then wrap again with aluminum foil to prevent freezer burn. Label it with the date. An unbaked crust keeps frozen for up to 3 months; thaw it completely before baking. A baked crust also freezes for 3 months; thaw it at room temperature before filling. When you remove a frozen crust from the freezer, expect condensation to form on the inside of the wrapping as it thaws—this is normal. Unwrap it carefully and blot any excess moisture with a paper towel before filling.
This strategy opens up real convenience: on a busy weekend, you can bake several crusts, wrap them, freeze them, and then fill them with different fillings throughout the month. Each one tastes like you made it fresh that day.
Perfect Pairings and Serving Suggestions
A graham cracker crust plays the supporting role to whatever filling you choose, but it’s a supporting role that makes everything shine brighter.
Classic cream pies—banana, coconut, chocolate—are perhaps the most traditional pairing. The buttery, sweet crunch of the crust contrasts perfectly with creamy, smooth fillings, and together they create pies that feel indulgent and special.
Citrus pies like key lime, lemon, and the increasingly popular frozen lemonade or lime pies showcase the crust’s versatility. The tartness of these fillings plays beautifully against the crust’s sweetness.
No-bake cheesecake, the perennial crowd-pleaser, relies on a graham cracker crust as its foundation. Creamy, tangy, and cool, it’s the dessert that converts skeptics.
Chocolate pies, whether silk, mousse-based, or cream pies, gain sophistication from a homemade crust. A chocolate graham cracker crust elevates the experience even further.
Frozen pies of every description benefit from a well-made crust. Ice cream pies, frozen custard pies, and frozen lemonade all demand a crust that holds its structure against cold and time.
When serving your finished pie, let it sit at room temperature for 5 to 10 minutes before slicing if it’s been chilled. This slight softening makes cutting cleaner and more elegant. Use a long, thin knife dipped in hot water and wiped dry between cuts for the cleanest slices. If the crust has a sharp corner (which you hopefully rounded), that’s the weakest point—if pieces break, try cutting from that direction next time.
Final Thoughts

Making a homemade graham cracker crust is one of those small kitchen skills that pays dividends every single time you bake. The investment is minimal—five minutes of your time and three pantry ingredients—but the return is substantial. Every single pie, every cheesecake, every dessert bar becomes noticeably better when built on a crust you made yourself.
The beauty of this recipe isn’t that it’s difficult or demanding. It’s that it’s accessible and reliable, delivering professional results to anyone willing to try it. Once you’ve pressed that first crust into a pie plate and felt how satisfying the process is, you’ll understand why so many bakers keep the formula close at hand. This isn’t a recipe to copy once and forget; it’s a foundation to return to over and over, varying and adapting it as your skills grow and your confidence increases. The next time you’re tempted by a store-bought crust, remember: you’re just five minutes away from something incomparably better.
Yield: 1 (9-inch) pie crust
Prep Time: 5 minutes
Cook Time: 10 minutes
Total Time: 15 minutes active + optional chilling time
Difficulty: Beginner — no special skills required, and the straightforward steps work perfectly even for first-time bakers.
For the Crust:
- 1½ cups (170-180g) graham cracker crumbs (approximately 10-12 full sheet graham crackers)
- ¼ cup (50g) granulated sugar (or light brown sugar for deeper flavor)
- 6 tablespoons (85g) unsalted butter, melted
Optional Flavor Additions:
- ¼ to ½ teaspoon ground cinnamon
- Pinch of finely grated nutmeg or ground ginger
- Zest of ½ lemon, lime, or orange
- 1 to 2 tablespoons finely ground toasted nuts (almonds, hazelnuts, or pecans)
Prepare and Crush:
-
If starting with whole graham crackers, break them into pieces that fit comfortably in your food processor. Process by pulsing (rather than running continuously) until the crackers resemble fine, uniform sand—typically 30 to 45 seconds. You’re aiming for crumbs about the size of granulated sugar, not a fine powder. If you don’t have a food processor, place the graham crackers in a sturdy zip-top bag, seal it completely, and use a rolling pin to crush them with steady, medium-firm pressure, rolling back and forth until you reach a sandy texture.
-
Once crushed, measure out 1½ cups of crumbs and transfer them to a medium mixing bowl. (If you crushed more than needed, save the extra for another use or enjoy it as a snack.)
Mix the Base:
-
Add the granulated sugar (or brown sugar) to the bowl of graham cracker crumbs. If using optional spice additions or citrus zest, add them now as well. Stir with a fork or wooden spoon until the sugar is evenly distributed throughout the crumbs and you don’t see any white streaks of unmixed sugar.
-
Pour the melted butter over the crumb mixture. Don’t worry if the mixture looks dry or crumbly—this is completely normal and will come together as you mix. Stir vigorously with a fork, breaking up any clumps and ensuring every crumb gets coated with butter. The mixture should resemble very coarse, damp sand when fully combined, with no dry spots remaining. This typically takes 1 to 2 minutes of steady stirring.
Press into Pan:
-
Pour the entire crust mixture into an ungreased 9-inch pie plate, cake pan, springform pan, or 8-inch to 9-inch square pan. Begin pressing the mixture with your hands, starting at the center of the bottom and working outward, then pressing up the sides. Use medium-firm pressure—lean into it, but don’t mash. Work methodically, ensuring the crumbs are distributed evenly and become increasingly compact as you go. The mixture will feel less crumbly as you press; this is the butter beginning to set and bind everything together.
-
Once you’ve achieved the basic shape with your hands, use the flat bottom of a small measuring cup, drinking glass, or the bottom of a dry measuring spoon to firm up and smooth the surface. Press with steady, even pressure against the bottom and lower sides, working until the crust feels firm and no longer crumbly—but stop once you reach this point rather than continuing to compress it. Over-packing creates a dense, hard crust that’s difficult to slice.
-
For a pie crust specifically, round the inner corner where the sides meet the bottom. This prevents the weak-point cracking that occurs when you cut the finished pie. Use the back of a spoon or your thumb to gently smooth and round this seam, pressing firmly from outside the pan while simultaneously pushing inward to create a gentle slope rather than a sharp 90-degree angle.
Chill or Bake:
-
For a no-bake crust: Place the pressed, uncooked crust in the refrigerator and chill for at least 1 hour until the butter is completely firm and the crust feels solid. Once chilled, it’s ready to fill according to your dessert recipe. This option is perfect for mousse pies, no-bake cheesecake, or any filling that will be thoroughly chilled.
-
For a baked crust: Preheat your oven to 350°F (175°C). Once the oven reaches temperature, place the pressed crust directly on the center rack and bake for 10 to 12 minutes, until the edges are lightly golden brown and the crust is fragrant. The mixture should look slightly darker and smell toasted—these are signs the butter has caramelized slightly and the structure is setting.
-
Remove the crust from the oven and set the pan on a wire cooling rack. Allow it to cool completely at room temperature—typically 15 to 20 minutes. Never fill a warm crust with a cold filling, as the temperature shock can cause cracking and the crust will soften prematurely. Once completely cooled, the crust is ready for your chosen filling.
Master Tips for Picture-Perfect Results
Don’t overthink the crumbly stage. When you first add butter to the crumbs, it looks like sandy, loose mixture. This is the correct texture at this stage—as you press it into the pan and apply pressure, the butter redistributes and everything binds together. Trust the process.
Pressing technique matters more than ingredients. Two people using identical ingredients can end up with very different crusts depending on how firmly they pack it. Aim for “firmly packed” rather than “compressed”—you want the crumbs pressed together tightly enough that they don’t shift, but not so compressed that the crust bakes into an unpleasantly hard shell.
Use unsalted butter for best control. While salted butter technically works, unsalted butter lets you control the total salt level in your dessert. If you only have salted butter, use it without concern—the difference is minor and your crust will still be delicious.
Pre-bake for maximum crispness and structure. Even for no-bake desserts like cheesecake, a brief 8-minute bake at 350°F transforms the crust’s structural integrity. It becomes noticeably crunchier and holds together better when sliced. This is especially valuable if you’re serving slices to a crowd.
Cool completely before filling. This is non-negotiable for the best results. Warm crust is soft and vulnerable; adding cold filling to a warm crust causes cracking and prevents the crust from developing its final texture.
Round that inner corner for pie crusts. This simple technique prevents the weak-point cracking that occurs when slices are cut. A sharp 90-degree angle breaks easily; a rounded curve distributes pressure evenly and keeps slices intact.
Variations You Can Make Confidently
Brown sugar crust: Swap the ¼ cup granulated sugar for ¼ cup packed light brown sugar. This creates a richer, more caramel-forward flavor that’s especially beautiful in chocolate desserts.
Spiced crust: Add ¼ teaspoon ground cinnamon and a small pinch of nutmeg to the dry ingredients before adding butter. Perfect for fall desserts and warm pies.
Chocolate crust: Use chocolate graham crackers instead of honey. Follow the recipe exactly; the chocolate flavor deepens mousse and cream pie fillings.
Citrus crust: Finely grate the zest of ½ lemon, lime, or orange into the sugar before mixing. This brightens key lime pies and lemon desserts beautifully.
Nutty crust: Finely ground toasted almonds, hazelnuts, or pecans can replace up to ¼ cup of the graham cracker crumbs. Toast nuts lightly before grinding for maximum flavor.
Coconut crust: Fold ⅓ cup toasted unsweetened coconut into the prepared crust mixture just before pressing. Sublime with tropical fillings.
Vegan version: Use vegan butter melted to the same temperature and consistency as regular butter, and vegan graham crackers if available (most mainstream brands are already vegan). The texture and flavor are virtually identical.
Gluten-free adaptation: Use gluten-free graham crackers and follow the recipe exactly. The gluten-free versions work beautifully with no adjustments needed.
Storage and Make-Ahead Instructions
Refrigerator (up to 3 days): Store a prepared crust (baked or unbaked) in the pie plate, covered tightly with plastic wrap. The crust keeps well and is ready to bake or fill whenever you need it.
Freezer (up to 3 months): Wrap the crust (in its pie plate) with plastic wrap, then wrap again with aluminum foil to prevent freezer burn. Label with the date. Thaw completely at room temperature before baking or filling unbaked crusts; thaw baked crusts before adding filling.
Make-ahead strategy: Bake several crusts on a quiet afternoon, cool them completely, wrap them individually, and freeze. You’ll have homemade crust ready whenever you want to make a pie or cheesecake without the fuss.
Prevent condensation: When thawing frozen crusts, condensation may form on the inside of the wrapping. Unwrap carefully and blot excess moisture with a paper towel before proceeding.
Best Uses and Perfect Pairings
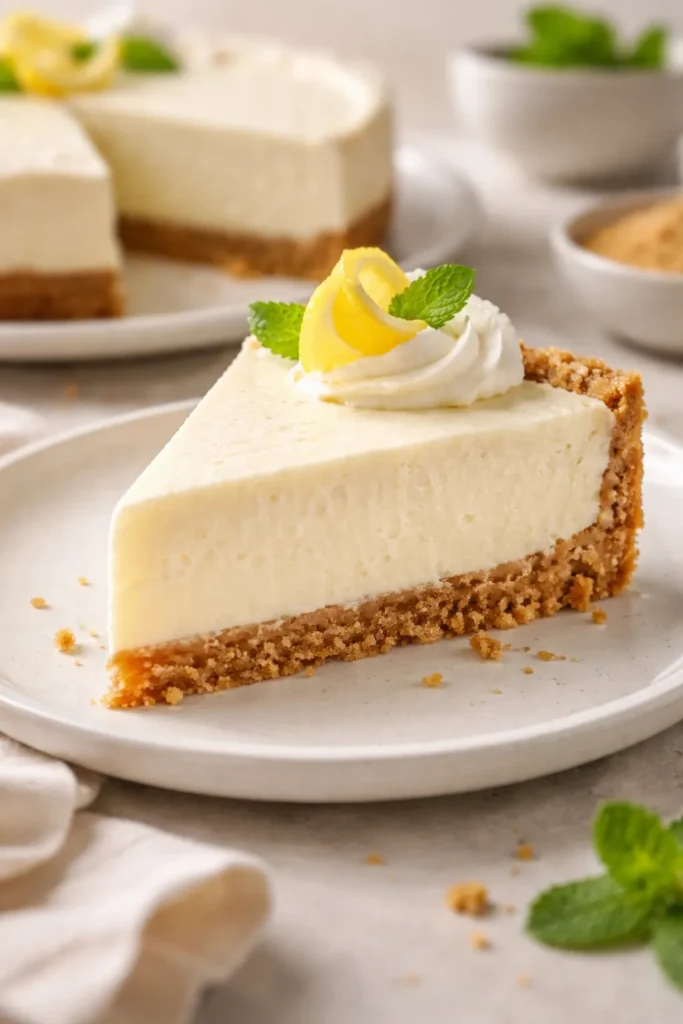
This crust is the ideal foundation for countless desserts. Key lime pie showcases the crust’s ability to contrast with bright, tart fillings. Chocolate cream pie demonstrates how well buttery crunch complements creamy smoothness. No-bake cheesecake relies entirely on this crust to provide structure and flavor. Banana cream pie, coconut cream pie, and frozen lemonade pie all shine when built on a homemade crust. Even simple mousse pies benefit from the flavor and texture this foundation provides.
For the most elegant presentation, let chilled pies sit at room temperature for 5 to 10 minutes before slicing. Use a long, thin knife dipped in hot water and wiped dry between cuts for the cleanest slices. If any pieces break, that’s typically where the corner wasn’t rounded enough—adjust your rounding technique next time.