Apple pie is more than just a dessert—it’s a cornerstone of comfort food tradition, a symbol of home baking, and one of those timeless dishes that brings people together across generations. What makes apple pie so enduring is its beautiful simplicity: fresh apples, warm spices, and a buttery crust. Yet within this seemingly straightforward format lives an incredible diversity of styles, techniques, and flavor approaches that span America’s baking heritage.
Whether you’re a seasoned baker looking to expand your apple pie repertoire or a home cook searching for the perfect version to master, understanding the different classic approaches will help you choose which one resonates with your taste and skill level. Each of these recipes represents a distinct philosophy about what makes apple pie great—from the minimalist elegance of a traditional version to the indulgent richness of caramel-topped variations. The choices you make about filling preparation, crust technique, spice balance, and finishing touches will fundamentally shape the final result.
The beauty of classic apple pie recipes is that they’ve been refined by countless bakers and cooks who’ve tested them in real kitchens with real families. These aren’t trendy reinventions or overly complicated interpretations. They’re proven formulas that consistently deliver the warm, nostalgic, deeply satisfying experience people crave when they think of apple pie. Let’s explore ten of the most beloved approaches, each with its own unique character and charm.
Table of Contents
1. Traditional Grandma’s Apple Pie
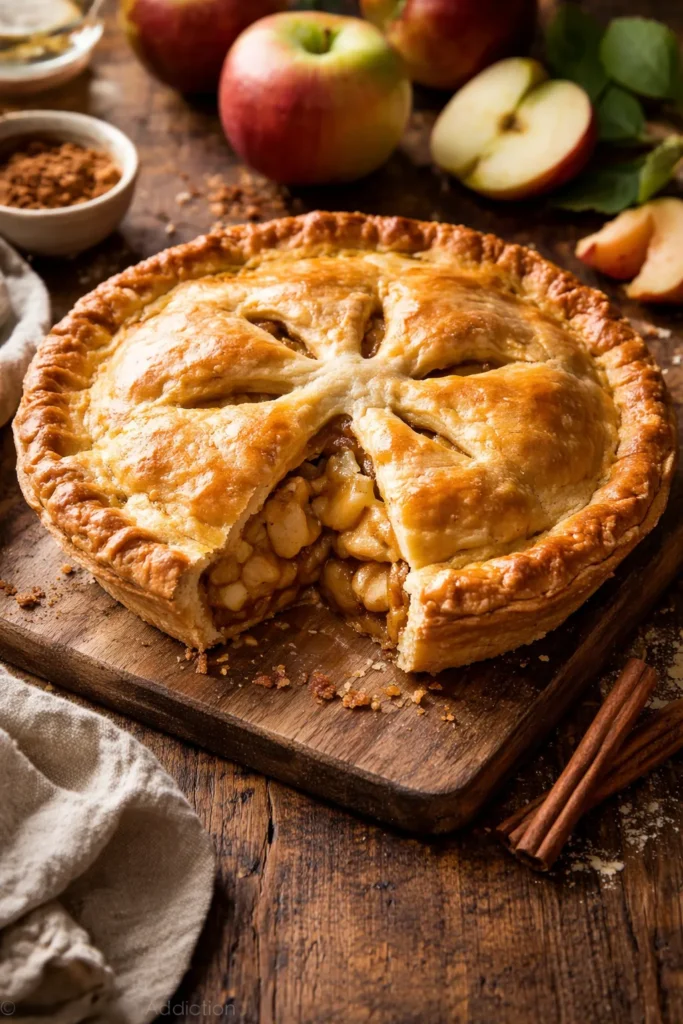
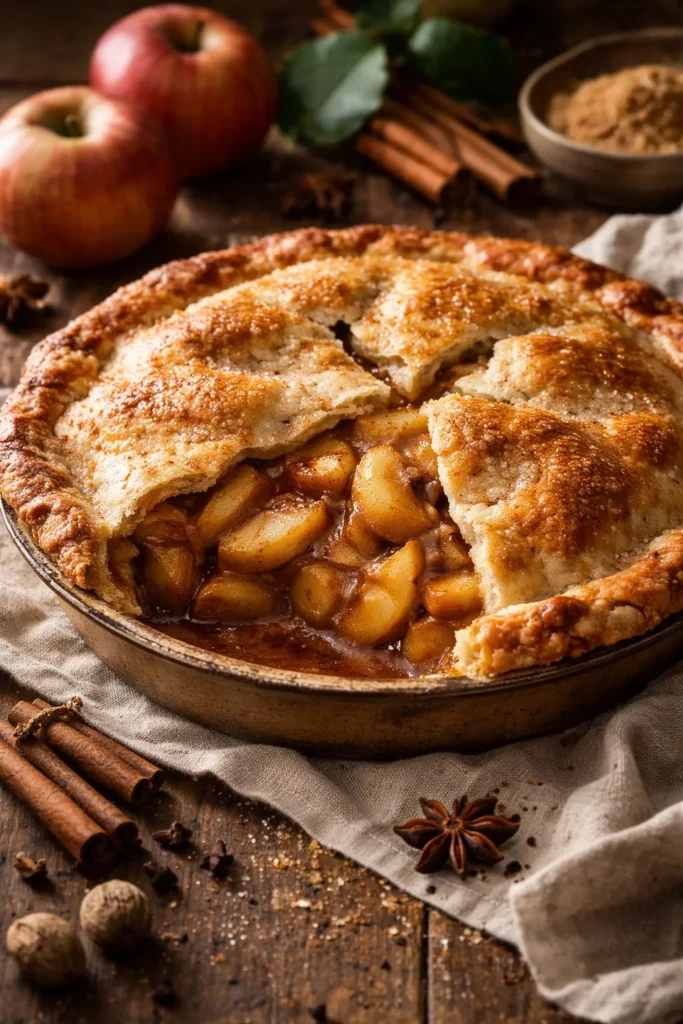
This is the apple pie that likely exists in some form in your family memory, whether from your own grandmother or from images and descriptions that have become woven into American food culture. The traditional apple pie is characterized by its straightforward ingredient list, a double crust (top and bottom), and a filling that lets the apples remain the star. The philosophy here is that good apples, proper technique, and restraint with flavoring create something transcendent—you don’t need excessive sugar or complicated additions when the foundation is solid.
What makes the traditional version distinctive is often how the filling is constructed. Many classic recipes use raw apple slices tossed with sugar and spices, which are then baked directly in the crust. Other variations cook the filling briefly on the stovetop before adding it to the pie shell, which reduces excess moisture and concentrates flavor. The best traditional recipes typically use a blend of apple varieties—combining tart Granny Smith apples with sweeter varieties like Honeycrisp or Golden Delicious—to achieve that perfect balance between tartness and sweetness without relying heavily on added sugar.
The crust in a traditional apple pie is paramount. An all-butter crust, made cold and handled minimally, will give you those delicate, flaky layers that make each bite satisfying. The egg wash (typically beaten egg or egg mixed with water) provides that iconic golden-brown sheen. The pie bakes at a high temperature initially—usually 425°F for 15-20 minutes—then finishes at a lower temperature (350-375°F) for another 30-45 minutes, allowing the crust to cook through completely while the apples soften and release their juices into a naturally thickened filling.
Pro tip: The secret to avoiding a soggy bottom crust is ensuring your oven is fully preheated before the pie goes in, placing the pie on a baking sheet (not directly on the rack), and baking for the full recommended time. Many bakers also place a baking sheet on the rack below the pie to catch any drips and insulate the bottom from direct heat.
2. Dutch Apple Pie
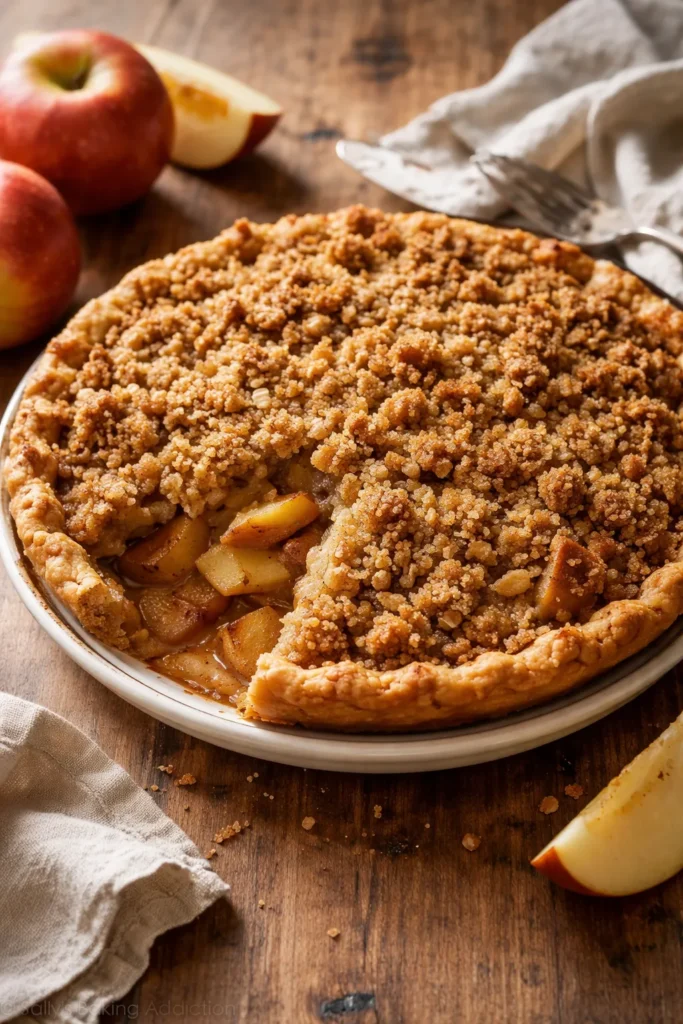
Dutch apple pie is distinguished by its crumb or streusel topping instead of a traditional top crust—though it does include a bottom crust. The crumb topping is essentially a simple mixture of flour, brown sugar, cinnamon, and butter that’s rubbed together until it resembles coarse breadcrumbs, then scattered generously over the apple filling. This creates an entirely different textural experience from a double-crust pie: you get the buttery crunch of the streusel contrasting with tender, juicy apples and a crispy-edged bottom crust.
The origins of Dutch apple pie are actually debated—some food historians credit Pennsylvania Dutch communities, while others point to Dutch immigrants’ influence on American baking. Regardless of its origins, the style has become beloved for good reason. The open filling means you can see and appreciate the apple slices as they cook, and the streusel topping bakes into a delightfully crunchy, almost caramelized layer that adds textural complexity.
The filling for Dutch apple pie is typically prepared similarly to traditional pie—sliced apples tossed with sugar and spices. Some recipes add a thickening agent like cornstarch or tapioca to ensure the filling isn’t too runny. The advantage of the streusel topping is that it allows more steam to escape during baking, which actually helps prevent an overly wet filling. The pie usually bakes at a single temperature (375-400°F) for 45-50 minutes, with no need for temperature adjustment.
Making an effective crumb topping is simple but requires attention to one detail: you want the butter to remain in small, distinct pieces rather than being fully incorporated into the flour and sugar. This creates pockets of butter that melt during baking, creating those desirable crispy spots. Many bakers use cold butter cut into cubes, then toss it gently with the flour and sugar mixture using a pastry cutter or their fingertips, being careful not to overwork it.
Worth knowing: Dutch apple pie is often easier for beginners than a lattice or fully topped pie because you don’t need to worry about crimping edges perfectly or weaving a lattice. It’s also more forgiving if your pie crust isn’t absolutely pristine, since the streusel topping draws the eye.
3. Caramel Apple Pie
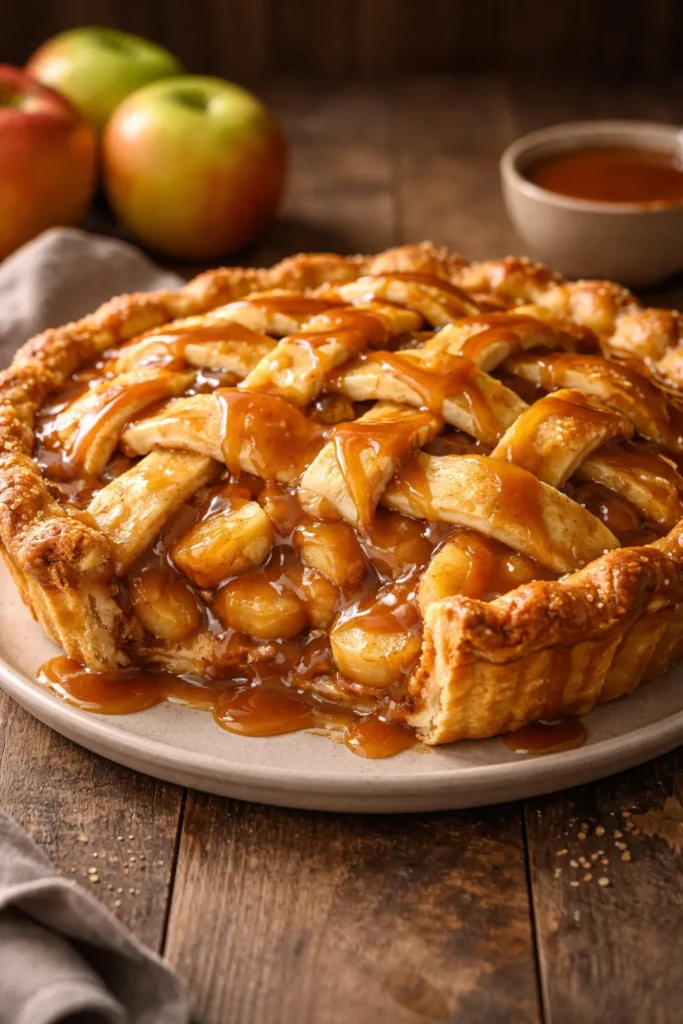
Caramel apple pie elevates the traditional formula by introducing a layer of rich, buttery caramel—either drizzled over the filling before the top crust goes on, or poured over the finished pie, or incorporated directly into the filling itself. The result is a more indulgent dessert with deeper, more complex flavor notes. Caramel adds sweetness, yes, but also a subtle bitter undertone and a silky richness that complements apples beautifully.
There are several approaches to incorporating caramel into apple pie. The simplest is to make or purchase quality caramel sauce and drizzle it over the raw apple filling before topping with the pie crust, allowing the caramel to mingle with the apples and their juices as the pie bakes. This method creates pockets of intense caramel flavor throughout the pie. A more restrained approach is to drizzle warm caramel over the baked, slightly cooled pie just before serving—this preserves the caramel’s smooth texture and prevents it from cooking down too much.
Some bakers create a caramel-infused filling by making a caramel sauce separately (butter, brown sugar, and cream cooked to the right consistency), allowing it to cool slightly, and then stirring it into the apple mixture. This distributes the caramel more evenly and ensures every bite has that caramel note. The filling may need slightly less added sugar when you’re using caramel, since the caramel itself is sweetening.
Caramel apple pie also pairs beautifully with sal—a light sprinkle of fleur de sel or coarse sea salt over the caramel adds complexity and prevents the dessert from tasting cloying. The salt heightens both the caramel and apple flavors, making them taste more vibrant. This pie also benefits from being served with vanilla ice cream or whipped cream, as the cool dairy balances the richness of the caramel.
Worth knowing: If you’re drizzling caramel over an unbaked pie, be sure it’s thick enough not to seep under the bottom crust too quickly, which could make it soggy. Cool your caramel sauce slightly before drizzling.
4. Spiced Apple Pie
Spiced apple pie takes the warm spice profile beyond basic cinnamon, incorporating a more complex blend of warming spices that might include nutmeg, allspice, cardamom, ginger, and cloves. This approach was historically common in American home baking and creates a pie that tastes noticeably more sophisticated and aromatic, with layers of flavor that unfold as you eat.
The key to a successful spiced apple pie is balance and quality spices. Pre-ground spices that have been sitting in your cabinet for years won’t deliver the same vibrant, fresh flavor as freshly ground spices. If you can, grind whole spices yourself using a spice grinder or coffee grinder (dedicated to spices). A pinch of cardamom, in particular, adds an almost floral, sophisticated note that elevated bakers often love—it’s not immediately identifiable as a distinct flavor, but it adds a complexity that makes people say “this tastes like something special.”
The proportions matter significantly. A typical spiced apple pie filling might contain 1-2 teaspoons of cinnamon, ¼-½ teaspoon each of nutmeg and allspice, and just a tiny pinch of cloves. You want the spices to enhance the apples, not overwhelm them. Some recipes add a small amount of ground ginger (about ¼ teaspoon) for a subtle peppery warmth. A squeeze of fresh lemon juice brightens all these warm spices beautifully, making them sing rather than feel heavy.
Many spiced apple pie recipes also include the zest of a lemon or even orange, which adds brightness and aroma. The citrus interacts with the spices in unexpected ways, creating additional layers of flavor. Some traditional recipes also include a pinch of salt in the filling, which balances sweetness and intensifies the other flavors—a technique that was common in older home baking but sometimes overlooked in modern recipes.
Insider note: If you’re new to the spice blend approach, start conservative with quantities and taste a small sample of your raw filling (yes, raw apples are safe to taste) before committing to your measurements. You can always add more spice, but you can’t remove it.
5. Apple Custard Pie
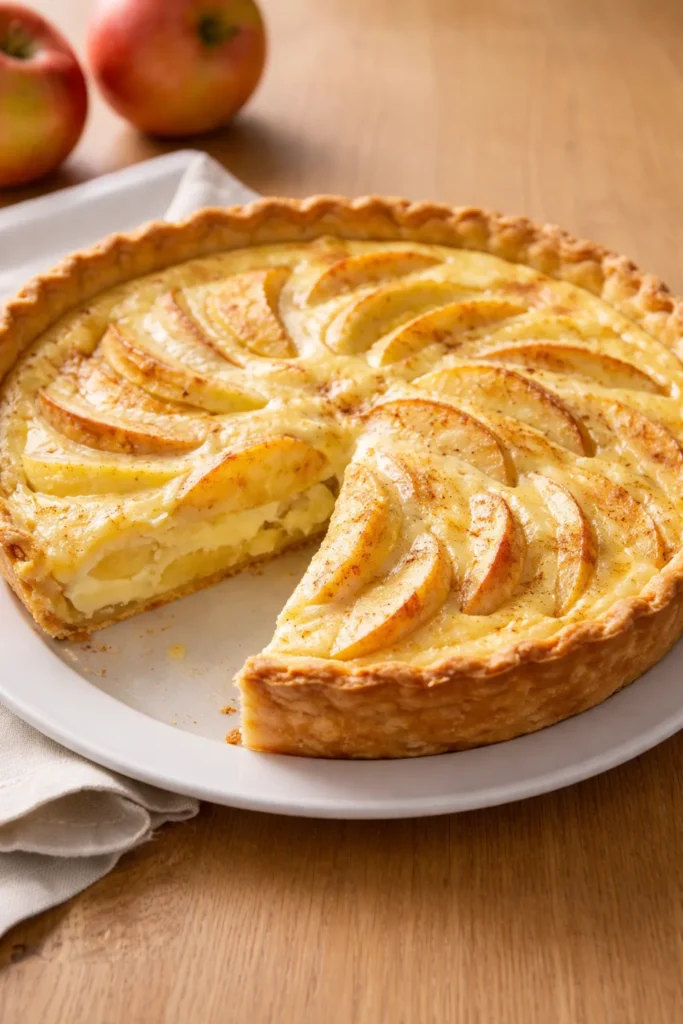
Apple custard pie is a hybrid that combines elements of apple pie and custard pie, creating a richer, more creamy dessert. A custard filling (made from eggs, cream, and milk) is poured over the apple slices in the pie shell, and as it bakes, the custard sets and creates a silky matrix that suspends the apples. The result is fundamentally different from a traditional apple pie—more decadent, more custardy, and with a different texture in every bite.
This style of pie has a longer history than many people realize. It appears in cookbooks dating back to the 19th century and represents a time when bakers had access to fresh cream and eggs and weren’t afraid to use them generously. The custard layer also solves a common apple pie problem: excess liquid. Since the custard absorbs and incorporates the apple juices as the pie bakes, you’re less likely to end up with a runny filling.
The custard mixture for apple pie typically consists of 3-4 eggs, ½ to 1 cup of cream or milk, a bit of sugar, vanilla, and sometimes nutmeg. The apples are arranged in the crust first (either in slices or pre-cooked), then the custard mixture is carefully poured over them. The pie bakes at a moderate temperature (350-375°F) for about 45-60 minutes, until the custard is set but still slightly jiggly in the very center—like a traditional custard pie.
One challenge with apple custard pie is knowing when it’s fully done. The custard will continue to cook slightly after removal from the oven, so it’s better to err on the side of slightly underdone rather than overbaked. A toothpick inserted in the custard should come out with just a tiny bit of custard clinging to it, not completely clean.
Pro tip: Arrange your apple slices in the crust in a somewhat organized fashion (even a simple concentric circle pattern) before pouring the custard. This makes the finished pie more attractive and ensures the apples cook evenly. You can use either raw or pre-cooked apples, though some bakers prefer to cook them briefly first to ensure they’re tender by the time the custard sets.
6. Open-Face Apple Pie

An open-face apple pie, sometimes called a tart or galette, features a bottom crust and apples arranged attractively on top, with no top crust. The edges of the bottom crust are typically folded up slightly to create a border, and the apples are arranged in an overlapping pattern that’s visually beautiful. This style is less formal than a traditional pie and actually quite approachable for home bakers intimidated by pie-making.
The advantage of an open-face presentation is that you can see and appreciate the apples, and there’s no fussy top crust to worry about. The apples bake uncovered, which means they develop slightly caramelized edges and a slightly drier, more concentrated flavor. Some open-face pies are finished with a glaze (perhaps apricot jam thinned with a bit of water, brushed on while still warm) that adds shine and a subtle sweetness.
Arranging apples for an open-face pie is actually quite simple if you follow one principle: slice your apples to uniform thickness (about ¼-inch), then arrange them in overlapping rows, starting from the outside and working toward the center. You can do concentric circles, straight lines, or even a casual scattered arrangement—any organized approach looks intentional and attractive. The apples can be tossed with spices and a bit of sugar before arranging, or you can sprinkle the spice and sugar over the arranged apples.
The baking time for open-face apple pie is typically shorter than for a fully covered pie—usually 35-45 minutes at 375-400°F. Since the apples aren’t covered, they cook more quickly and you can see exactly when they’re tender and the edges are beginning to caramelize. The crust edges will brown significantly, which is actually desirable; if they’re browning too quickly, you can tent them loosely with foil.
Worth knowing: An open-face pie is excellent for using apples that are aesthetically pleasing when sliced—firm apples that don’t brown too quickly and hold their shape well, like Honeycrisp or Pink Lady.
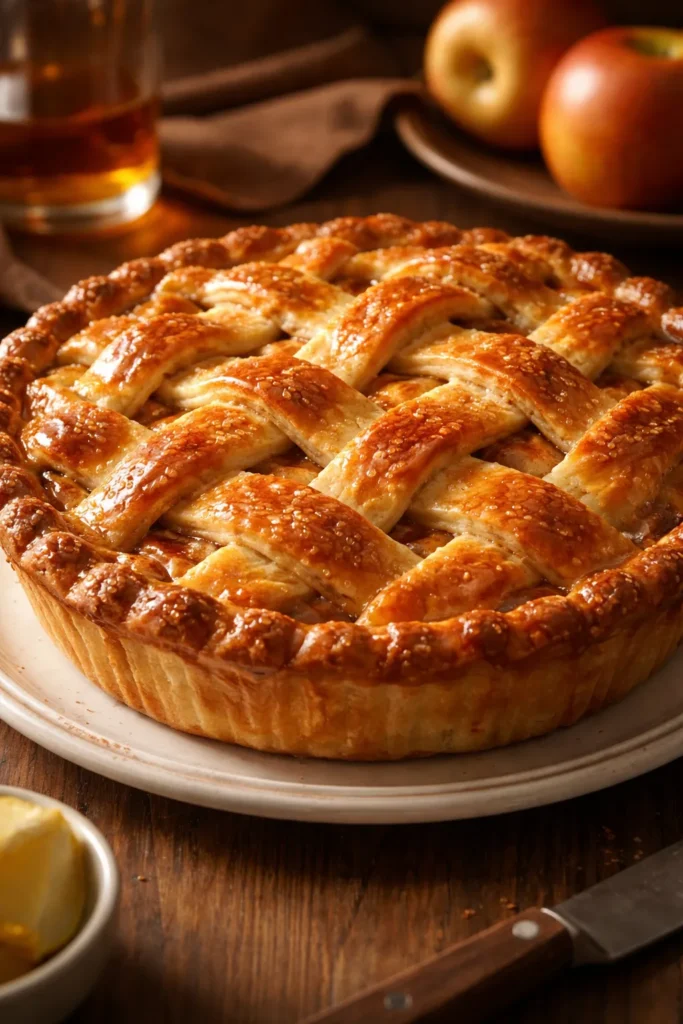
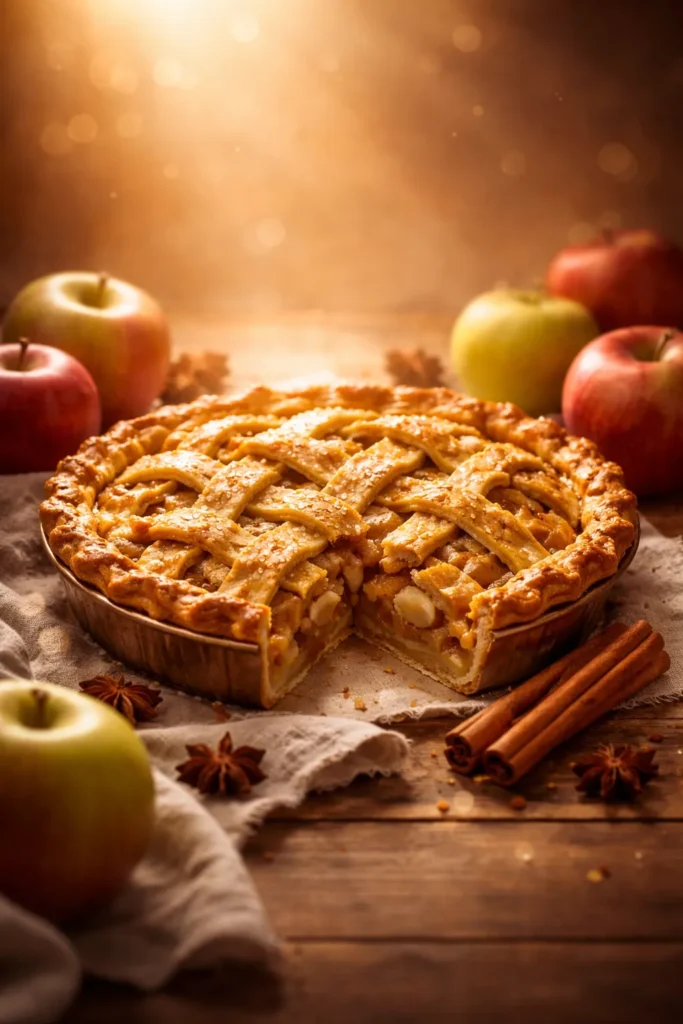
7. Lattice-Top Apple Pie
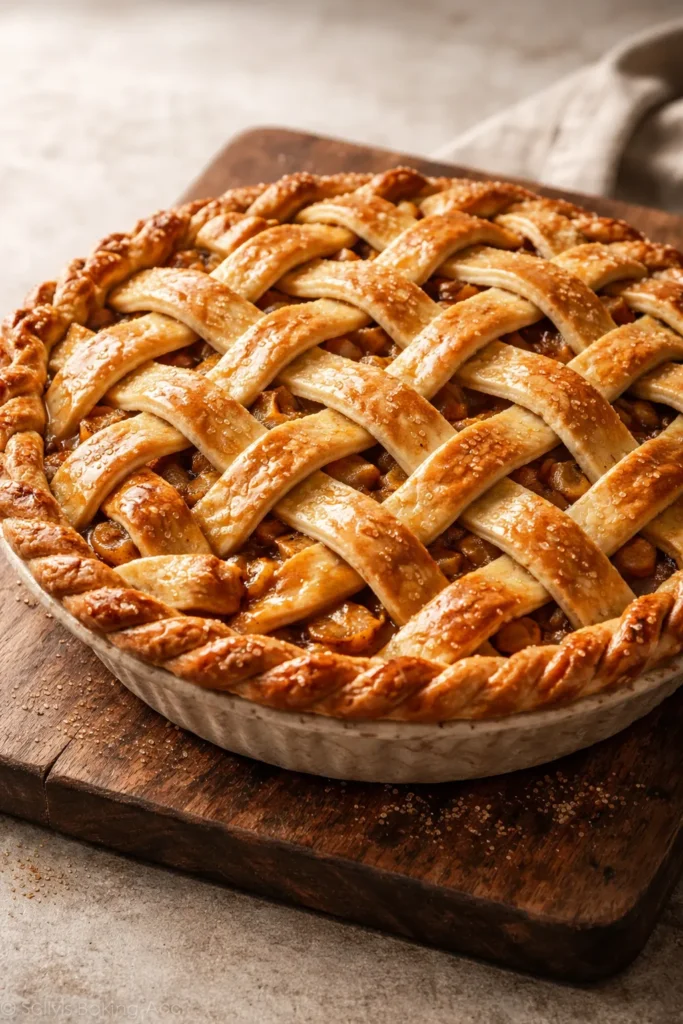
Lattice-top apple pie represents the decorative pinnacle of apple pie baking. The top crust is cut into strips, which are then woven together over the filling in a crosshatch pattern. This requires more skill and patience than a simple top crust, but the results are stunning and absolutely worth the effort. The lattice serves both aesthetic and functional purposes—it looks beautiful, and it allows steam to escape during baking, which can help prevent an overly wet filling.
Creating a lattice is simpler than it appears, especially once you’ve done it once or twice. After rolling out your top crust and transferring it to a baking sheet (to make it easier to handle), use a pizza cutter or a sharp knife to cut the dough into strips of equal width—typically ½ to ¾ inches wide. Lay half the strips across the pie filling in one direction (parallel to each other), evenly spaced. Then, fold back every other strip halfway, lay a perpendicular strip across the unfolded strips, then unfold those strips back over the new perpendicular strip. Continue this pattern with alternating strips until you’ve woven the entire lattice. Trim the edges and crimp them to seal.
The lattice pattern should be tight and secure enough that it doesn’t slide around during baking, but not so tight that you’re stretching the dough. Work carefully and deliberately, and the lattice will hold together beautifully. Some bakers find it easier to weave the lattice directly over the pie filling; others prefer to weave it on a baking sheet first, then transfer the entire woven lattice to the pie. Either method works fine.
A lattice-topped pie is typically finished with an egg wash and a sprinkle of coarse sugar, which adds visual appeal and helps the lattice brown evenly. The pie bakes using the same temperature progression as a traditional covered pie—high heat initially, then lower heat to finish.
Insider note: Don’t stress about perfect symmetry or spacing. Homemade lattice looks charmingly rustic even if it’s not perfectly geometric, and that’s part of its appeal. The contrast between the beautiful lattice and the bubbling apple filling beneath is what makes this style so visually striking.
8. Apple Crumb Pie
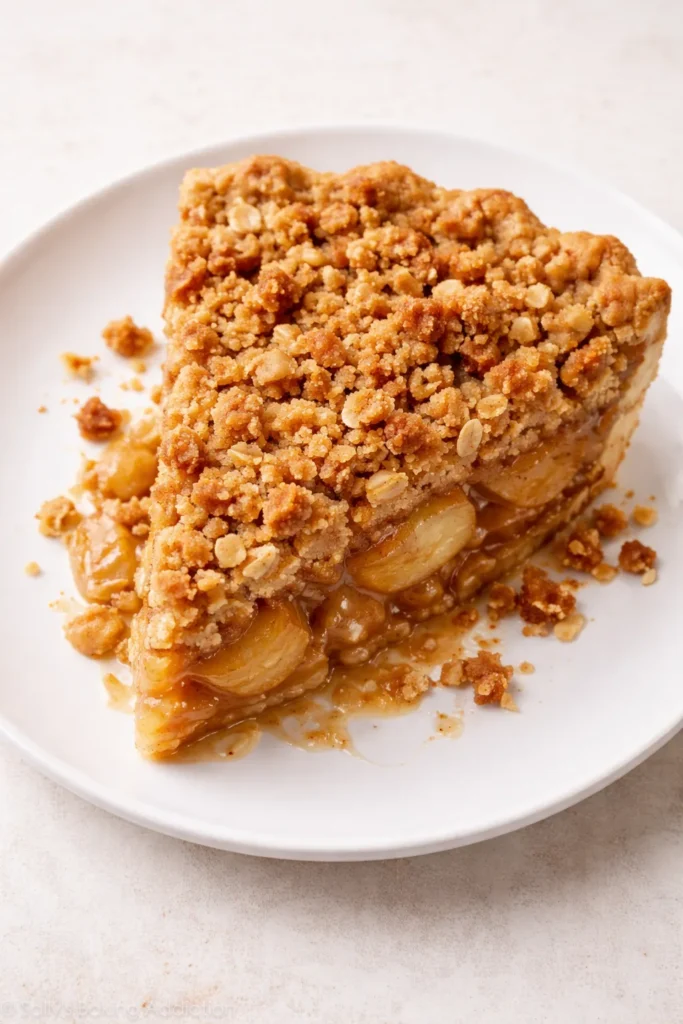
Apple crumb pie is the more dressed-up cousin of Dutch apple pie. While a Dutch pie typically has a simple crumb or streusel topping, a crumb pie often features a more generous, almost cake-like crumb topping that’s thicker and richer. The crumb mixture might include oats, nuts (like pecans or walnuts), brown sugar, cinnamon, and butter in proportions that create a topping that’s nearly as substantial as the filling itself.
The crumb topping for this style of pie is built on the same principle as a basic streusel—flour, sugar, and cold butter rubbed together until crumbly—but with additions that make it more complex and texturally interesting. Rolled oats add heartiness and a slightly nutty flavor. Chopped nuts add richness and crunch. Some recipes include a small amount of flour mixed into the nuts and oats to help bind everything together, while others keep it completely loose and crumbly.
The ratio of crumb topping to apple filling is more generous in apple crumb pie compared to Dutch apple pie. You might use ¾ to 1 full cup of crumb mixture spread evenly over the filling, creating a thick, crunchy layer that bakes until it’s golden brown and almost caramelized. The topping should cover the apples completely, creating a rustic, homey appearance.
One advantage of a crumb pie over a traditional double-crust pie is simplicity. You only have one crust to roll out and fit into the pan—the top is entirely crumb, which requires no skill beyond mixing and sprinkling. This makes crumb pie an excellent choice for bakers who find traditional pie-making intimidating. The texture is also quite pleasant: instead of biting through a top crust to reach the filling, you get the immediate gratification of crumb topping followed by tender apples.
Worth knowing: Don’t press the crumb topping down before baking. Keep it loose and airy so it stays crunchy rather than compacting into a dense, cake-like layer.
9. Bourbon Glazed Apple Pie
Bourbon apple pie brings sophistication and subtle warmth to the classic dessert. Bourbon can be incorporated in several ways: a splash added to the apple filling itself, a bourbon-infused caramel sauce drizzled over the apples or the finished pie, or a bourbon glaze brushed onto the top crust partway through baking. The alcohol cooks off during baking, leaving behind a complex, slightly smoky, vanilla-tinged flavor that complements apples and warm spices beautifully.
The amount of bourbon is important and should be subtle—typically ¼ to ½ teaspoon in the filling, or 2-3 tablespoons in a glaze, depending on the total recipe yield. Too much bourbon will make the pie taste like you’re drinking alcohol rather than eating a refined dessert. The ideal amount adds depth and complexity that most people can’t quite put their finger on until you tell them what it is.
A bourbon caramel sauce is particularly effective in bourbon apple pie. The vanilla notes in good bourbon interact beautifully with caramel’s buttery richness. To make a bourbon caramel sauce, heat butter and brown sugar together until the mixture turns a medium-amber color, then carefully add cream (the mixture will bubble), and remove from heat before adding a splash of bourbon. The sauce can be poured over the finished pie while warm, or drizzled over individual slices.
Bourbon apple pie pairs exceptionally well with a vanilla bean ice cream or a bourbon-vanilla whipped cream, which extends the flavor theme. It’s also a pie that feels slightly more grown-up and sophisticated, making it an excellent choice for dinner parties or holiday gatherings where you want to impress.
Pro tip: If you’re not comfortable cooking with alcohol or prefer to avoid it, you can achieve a similar sophisticated flavor by adding a tiny pinch of vanilla extract and a hint of smoked salt to your filling, which echoes some of bourbon’s flavor notes.
10. Rustic Galette-Style Apple Pie
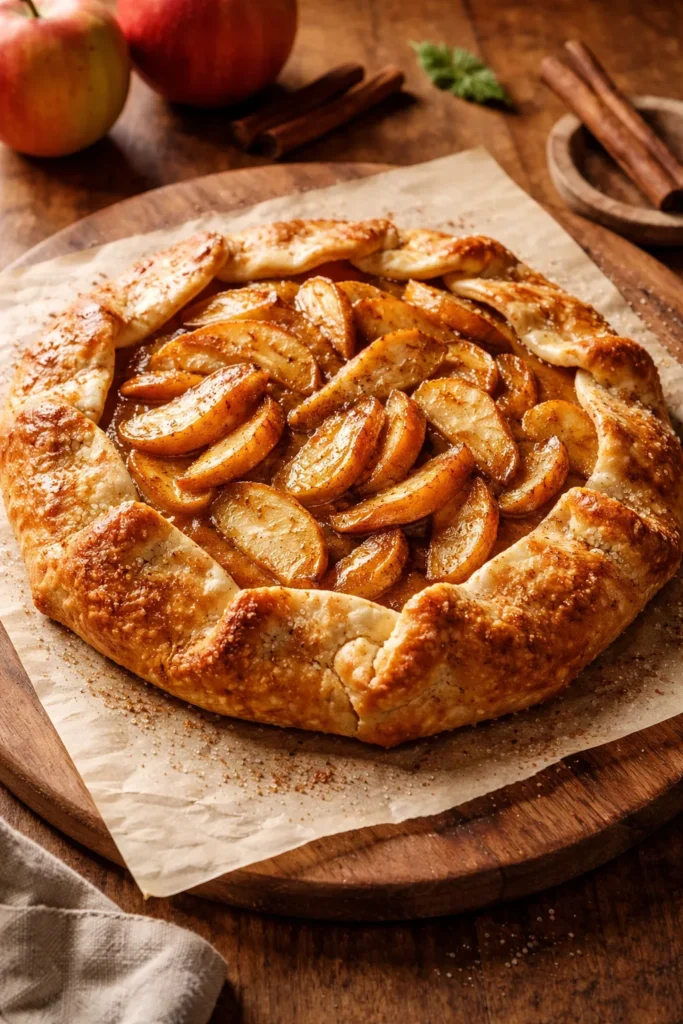
A rustic galette represents the most casual, free-form approach to apple pie. Rather than carefully fitting dough into a pie dish, you simply roll out a circle of pie dough, mound apples in the center, fold up the edges loosely over the apples, and bake. The result is a beautiful, charming dessert that looks homemade in the best possible way—imperfect, casual, and utterly appealing.
A galette-style pie requires less precision than traditional pie-making, which makes it appealing to many home bakers. You don’t need to perfectly line a pie pan, you don’t need to worry about a top crust fitting precisely, and you don’t need to crimp edges evenly. The free-form edges that result from folding up the dough around the filling create natural waves and folds that are genuinely attractive and suggest you’ve put care into the dessert without suggesting you’re trying too hard.
The dough for a galette should be rolled slightly thicker than traditional pie dough—about ⅛ to 3/16 inches—because the edges will fold up and you want them to be structurally sound. The apples are typically tossed with sugar and spices, then mounded in the center of the dough, leaving about a 2-inch border. The edges are then folded up and over the filling, partially covering it. The apples in the center remain visible, which is visually striking.
Galettes bake directly on a baking sheet lined with parchment paper (not in a pie pan), at 375-400°F for 35-45 minutes. Since there’s less structure than a traditional pie, they tend to bake somewhat faster. The exposed apples may caramelize slightly on their edges, and the crust will develop a beautiful golden-brown color. A galette is typically finished with an egg wash and perhaps a light sprinkle of coarse sugar, but even without these additions it looks rustic and appealing.
Insider note: Make sure your dough is cold and you work on a cool surface when rolling and assembling a galette. The dough needs to be sturdy enough to support the weight of the apples and hold its shape, so warm, soft dough will be frustrating to work with.
Final Thoughts
Choosing your perfect apple pie recipe is ultimately a personal decision based on your baking confidence, the impression you want to make, and your flavor preferences. The traditional double-crust pie offers timeless elegance and proven results. A Dutch apple pie or crumb pie simplifies the process without sacrificing appeal. A spiced pie allows you to emphasize aromatic depth. A caramel or bourbon version brings sophistication. And a rustic galette gives you beauty without precision.
What matters most is that you choose a version you’re genuinely excited to make. Your enthusiasm will translate into care and attention, which are the real secrets to pie-making success. All of these classic recipes have earned their place in American baking tradition because they work—they deliver delicious results reliably, and they bring genuine pleasure to the people who eat them. Pick one that calls to you, gather your ingredients, and bake with confidence. The apple pie tradition is yours to continue.