Most bakers default to frosting when decorating a cake, but here’s the truth: some of the most delicious, elegant, and visually stunning cakes skip the thick layer of buttercream entirely. Whether you’re tired of the same sweetness, looking for something lighter and more sophisticated, or simply want to let your cake’s natural flavor shine through, homemade cake toppings offer endless creative possibilities. The best part? Many of these alternatives are actually simpler to make, require fewer ingredients, and create restaurant-quality results that’ll have your guests asking for the recipe.
The shift away from heavy frosting isn’t just about novelty—it’s about balance. A rich, moist cake paired with a delicate ganache, fresh berries, or caramelized nuts creates a multi-dimensional dessert that’s far more interesting than cake smothered in buttercream. These toppings add texture, visual appeal, and surprising flavor combinations that make each bite worth savoring. From glossy chocolate drips to candied blossoms, the decorative and flavor possibilities are truly limitless.
What makes homemade toppings special is the control you have over ingredients and presentation. You’re not limited to pre-made products or complicated piping techniques—you can create something unique that reflects your style and complements your specific cake. Better yet, most of these toppings come together in minutes, whether you’re preparing them while the cake cools or finishing touches just before serving. Let’s explore ten homemade cake toppings that elevate your baking beyond traditional frosting.
Table of Contents
- 1. Silky Chocolate Ganache
- Why Ganache Beats Traditional Frosting
- Basic Chocolate Ganache Recipe
- Pro Tips for Perfect Ganache
- 2. Fresh Berry Medley with Citrus Glaze
- Creating Your Berry Arrangement
- Simple Citrus Glaze Recipe
- Pairing Strategies
- 3. Smooth Fondant with Decorative Accents
- Making Fondant from Scratch
- Covering Your Cake with Fondant
- Creating Fondant Decorations
- 4. Elegant Edible Flowers
- Selecting Safe and Beautiful Varieties
- Arranging Flowers for Maximum Impact
- 5. Caramelized Nuts and Crunch
- Making Candied or Caramelized Nuts
- Applying Nuts to Your Cake
- 6. Glossy Caramel Drizzle and Sauce
- Homemade Salted Caramel Recipe
- Applying Caramel for Maximum Visual Impact
- 7. Whipped Mascarpone or Cream Cheese Topping
- Making Whipped Mascarpone
- Cream Cheese Whipped Version
- 8. Buttercream Piped Designs (Elevated Beyond Basic)
- Textured Buttercream Applications
- Flavor-Forward Buttercream
- 9. Crushed Cookie or Wafer Crumb Topping
- Creating Your Crumb Topping
- 10. Artistic Fruit Coulis and Microdot Piping
- Making Fruit Coulis
- Microdot Piping Technique
- Final Thoughts
1. Silky Chocolate Ganache
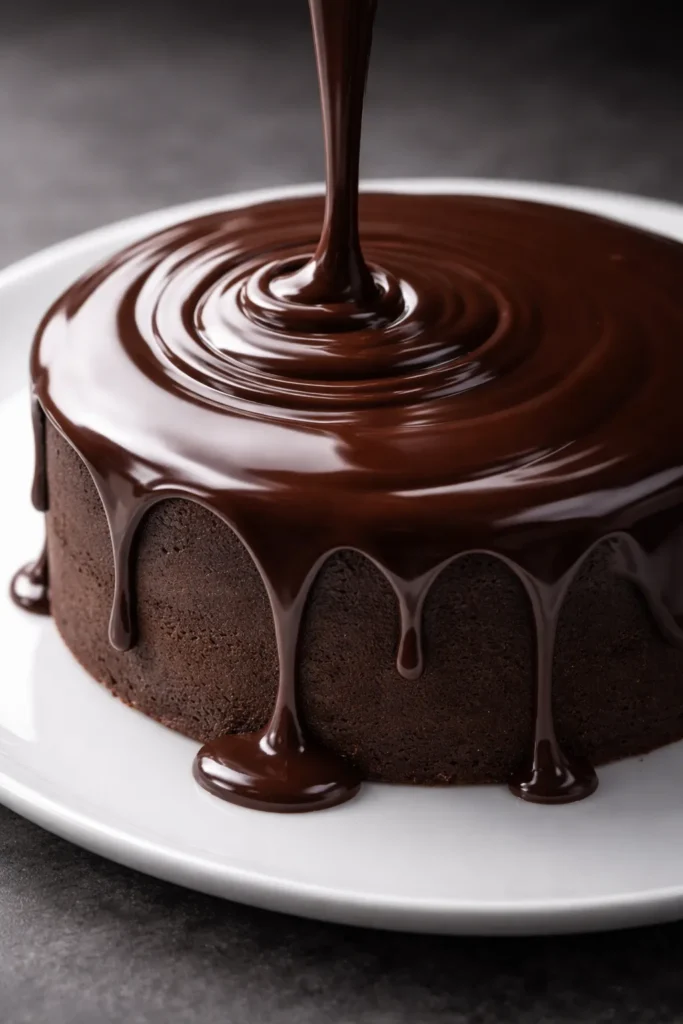
Chocolate ganache is the gold standard for cake toppings—it’s simultaneously elegant, decadent, and almost embarrassingly easy to make. This simple yet sophisticated mixture of chocolate and cream creates a glossy, smooth coating that transforms even a basic vanilla cake into something you’d find in a high-end patisserie. The beauty of ganache lies in its versatility: you can pour it thick for a luxurious coating, thin it for a shiny glaze, or whip it for a mousse-like frosting.
Why Ganache Beats Traditional Frosting
Unlike buttercream, which is air-whipped and can feel heavy on the palate, ganache has a dense, creamy texture that melts on your tongue. The ratio of chocolate to cream determines whether you get something glossy and pourable or thick and spreadable—you control the final consistency entirely. The intense chocolate flavor means you need far less topping than you would with frosting, allowing your actual cake to be the star. Most importantly, ganache requires absolutely no special equipment or piping skills; if you can stir, you can make ganache.
Basic Chocolate Ganache Recipe
The classic ratio is simple: one part cream to one-and-a-half parts chocolate by weight. For a standard cake, heat 1 cup of heavy cream in a saucepan over medium heat until it just begins to steam and small bubbles form around the edges—don’t let it boil. Remove from heat immediately, then pour the cream over 6 ounces of high-quality chocolate (chopped into small pieces or chips) in a heat-safe bowl. Let it sit undisturbed for one full minute. This resting period allows the residual heat to gently melt the chocolate without scorching it.
After the minute, whisk the mixture slowly at first, starting from the center and moving outward. The mixture will look broken and oily initially, but keep whisking gently for 2-3 minutes until it transforms into something glossy and smooth. The key is patience and gentle whisking—aggressive stirring incorporates air and prevents the emulsion from forming properly. If you’re pouring it over the cake while warm, it’ll create beautiful thin drips down the sides. If you’re spreading it, let it cool to room temperature first so it firms up slightly and holds its shape.
Pro Tips for Perfect Ganache
Temperature matters enormously. If your ganache is too warm, it’ll slide off the cake entirely. If it’s too cool, it’ll be thick and lumpy when you try to pour or spread it. The sweet spot is when it’s pourable but still warm enough to be glossy. Adding a tablespoon of light corn syrup or honey creates an even shinier finish by preventing crystallization. For a ganache that’s particularly forgiving, add a tablespoon of unsalted butter after whisking—this reduces the ratio slightly and creates a more workable consistency. You can also customize flavor by stirring in extracts (vanilla, espresso, peppermint) or zests after the ganache reaches room temperature.
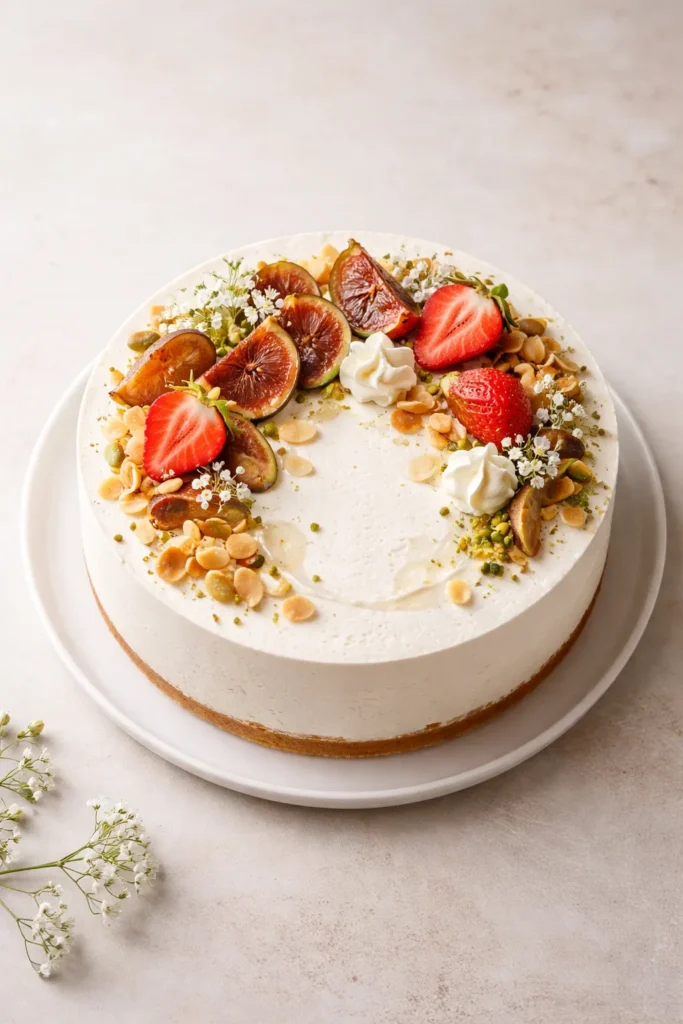
2. Fresh Berry Medley with Citrus Glaze
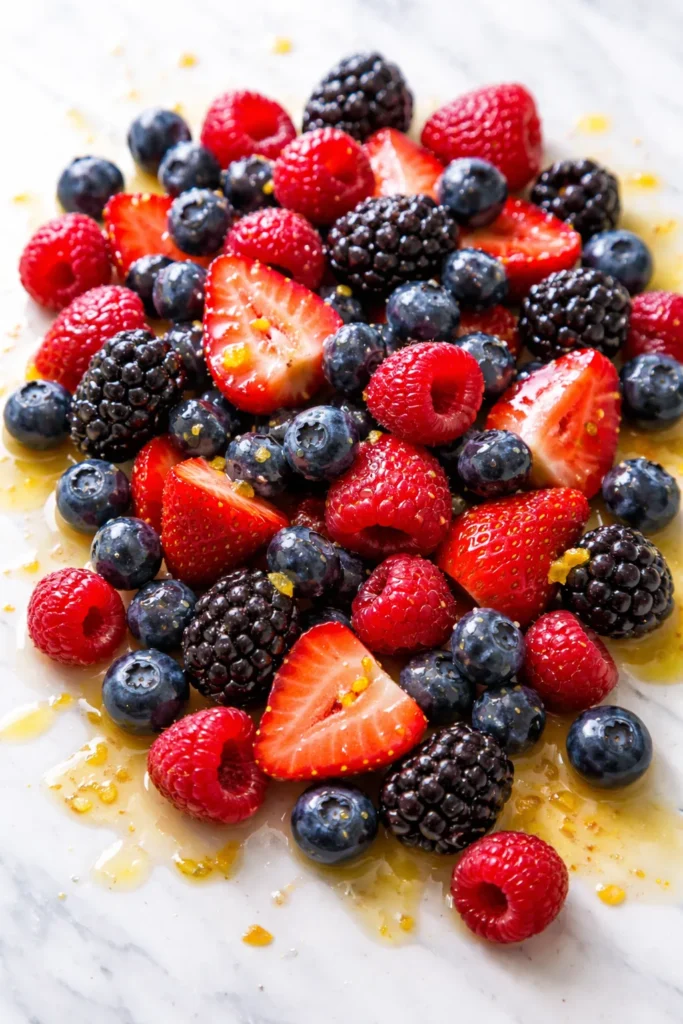
Fresh fruit is nature’s most beautiful cake decoration, and when you pair vibrant berries with a simple glaze, you create something that looks like it belongs in a pastry magazine. A fresh berry medley works beautifully for any occasion—the colors are naturally stunning, the flavors are bright and refreshing, and it actually makes your cake feel lighter and less indulgent. Unlike frosting, fresh fruit lets the quality of your actual cake shine through while adding juicy, bright bursts of flavor.
Creating Your Berry Arrangement
The key to an impressive fruit topping is abundance and variety. Don’t scatter a few berries across the top—create a cascading arrangement that covers the entire surface. Mix strawberries (sliced and whole), raspberries, blackberries, and blueberries in different sizes for visual interest. Arrange them in concentric circles, cluster them artfully, or create a tumbling cascade across the top and down one side. The contrast of different berry colors and shapes is what makes this topping photograph-worthy, so don’t worry about perfect symmetry—organic, abundant arrangements are actually more striking.
Timing matters when working with berries. If you’re decorating several hours before serving, add them only 1-2 hours ahead to prevent them from releasing too much juice and becoming mushy. For a cake that will be eaten immediately, you can decorate further in advance. Pat berries dry with a paper towel before arranging them—any excess moisture encourages mold and prevents a glossy finish on your glaze.
Simple Citrus Glaze Recipe
This light glaze adds shine and subtle flavor without overwhelming the fruit. Whisk together 1 cup of powdered sugar, 2 tablespoons fresh lemon juice, and 1 tablespoon of orange juice until completely smooth. The glaze should be thin enough to flow smoothly but thick enough to coat the back of a spoon. If it’s too thick, add more juice one teaspoon at a time. Stir in the zest of one lemon and half an orange for brightness and floral notes.
Brush this glaze gently over the berries with a pastry brush, allowing some to drip naturally down the sides of the cake. The glaze will set slightly as it cools, giving the berries a subtle shine without looking goopy. This glossy coating also acts as a preservative, helping the berries stay fresh longer by creating a moisture barrier.
Pairing Strategies
Fresh berries work beautifully with vanilla, almond, or lemon cakes—anywhere you’d want brightness and freshness. They’re particularly stunning on a white or vanilla cake where the colors really pop visually. For chocolate cake, add raspberries or blackberries with a dusting of powdered sugar for an elegant contrast. Berry medley toppings are perfect for spring and summer celebrations, but you can absolutely use them year-round with frozen and thawed berries or even dried fruit mixed in.
3. Smooth Fondant with Decorative Accents
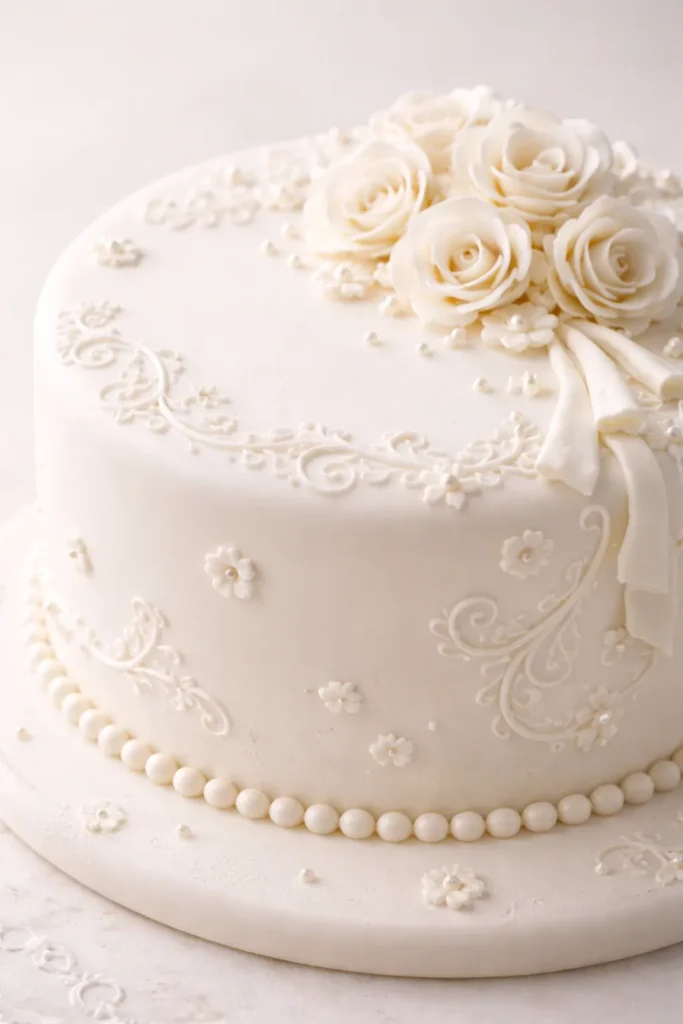
Fondant is pure cake decoration magic—it’s a pliable icing that creates impossibly smooth, flawless finishes and can be molded into intricate details that would take hours with piping bags and buttercream. While fondant has a reputation for being difficult, when you understand how to work with it, it becomes one of the most satisfying and professional-looking topping options available. The smooth, almost porcelain-like finish immediately elevates even a simple cake into something gallery-worthy.
Making Fondant from Scratch
You can absolutely make fondant at home with just a few ingredients. Start with 1 pound of powdered sugar (sifted), 2-3 tablespoons of water or clear corn syrup, 1 tablespoon of light corn syrup, and a pinch of salt. Combine the powdered sugar and salt in a large bowl, then add the corn syrup and water gradually while mixing. Once the mixture begins to come together, knead it by hand until it forms a smooth, pliable dough. The consistency should be like Play-Doh—soft enough to mold but firm enough to hold a shape without tearing.
If fondant becomes too sticky, dust it lightly with powdered sugar. If it cracks when you stretch it, it’s too dry—knead in a tiny drop of water at a time. The fondant should be smooth and elastic. Wrap it tightly in plastic wrap and let it rest for 30 minutes before rolling. Store wrapped fondant at room temperature in an airtight container; it keeps for weeks.
Covering Your Cake with Fondant
Before applying fondant, prepare your cake with a thin layer of buttercream or jam as an adhesive—this acts as the “glue” that holds the fondant in place. Roll out your fondant to about ¼-inch thickness on a surface dusted with powdered sugar or cornstarch. The surface should be large enough to drape over the entire cake with a few inches of overhang. Carefully lift the fondant and drape it over the cake, smoothing it gently from the center outward to eliminate air bubbles and wrinkles. Trim excess fondant at the base with a sharp knife.
The result should be a perfectly smooth, flawless surface that looks almost like porcelain. This finish is stunning on its own, but it’s also the perfect canvas for decoration. You can paint designs onto fondant using edible food coloring and a fine brush, create textured patterns with tools, or mold it into flowers, ribbons, and bows.
Creating Fondant Decorations
The magic of fondant is its malleability. Roll thin strips and create ruffles or drapes. Mold balls of fondant into roses by layering flat petals. Create geometric shapes using small cutters. Mold tiny decorative accents that match your theme—snowflakes for winter, flowers for spring, or custom figurines. Fondant holds details beautifully and dries to a firm, durable finish, making it perfect for cakes that need to travel or sit for hours before serving.
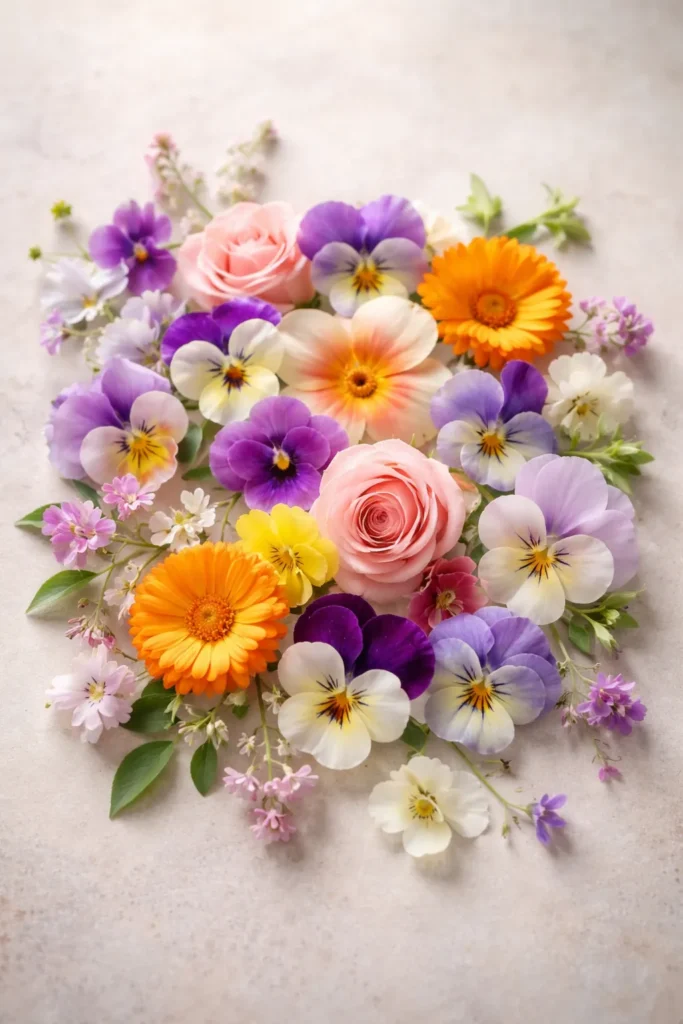
4. Elegant Edible Flowers
Edible flowers are the secret to making a cake look like it was decorated by a professional florist—they add sophistication, natural beauty, and a touch of romance that no piped frosting can quite match. The varieties available are surprisingly extensive, and when chosen carefully, they complement rather than overpower your cake’s flavor. Real flowers are a far more elegant statement than artificial ones, and they’re easier to work with than you’d expect.
Selecting Safe and Beautiful Varieties
Not all flowers are safe to eat, so sourcing matters. The most reliable edible flowers are pansies, violas, nasturtiums, calendula, roses (pesticide-free), lavender, honeysuckle, and borage. These are widely available from specialty bakery suppliers, farmers’ markets, and online sources. Always verify the source—flowers must be grown specifically for culinary use, not from a florist or garden center where they may have been treated with pesticides or other chemicals.
When selecting flowers, choose ones that are fresh, fully open, and free of blemishes. Store them in a sealed container with a barely-damp paper towel in the coolest part of your refrigerator until you’re ready to use them. Handle flowers minimally, as their delicate petals damage easily. Add them to the cake only 1-2 hours before serving to preserve their appearance and prevent wilting.
Arranging Flowers for Maximum Impact
A single stunning flower placed strategically creates impact. A cluster of mixed flowers cascading down the side of the cake creates abundance and elegance. Scatter individual petals across the top for a delicate, whimsical effect. Whole flowers arranged in a bouquet-like cluster on the center of the cake work beautifully for celebration cakes. The key is creating an arrangement that feels intentional but not overly fussy—trust your instincts and remember that flowers are inherently beautiful, so minimal arrangement is often most effective.
Pair edible flowers with complementary toppings: lavender with a light glaze, roses with fresh berries, nasturtiums with nuts. Edible flowers work on any cake flavor but are particularly stunning on vanilla, almond, lemon, or white chocolate cakes where they don’t compete flavor-wise. The visual drama of fresh flowers makes even a simple sheet cake look extraordinary.
5. Caramelized Nuts and Crunch
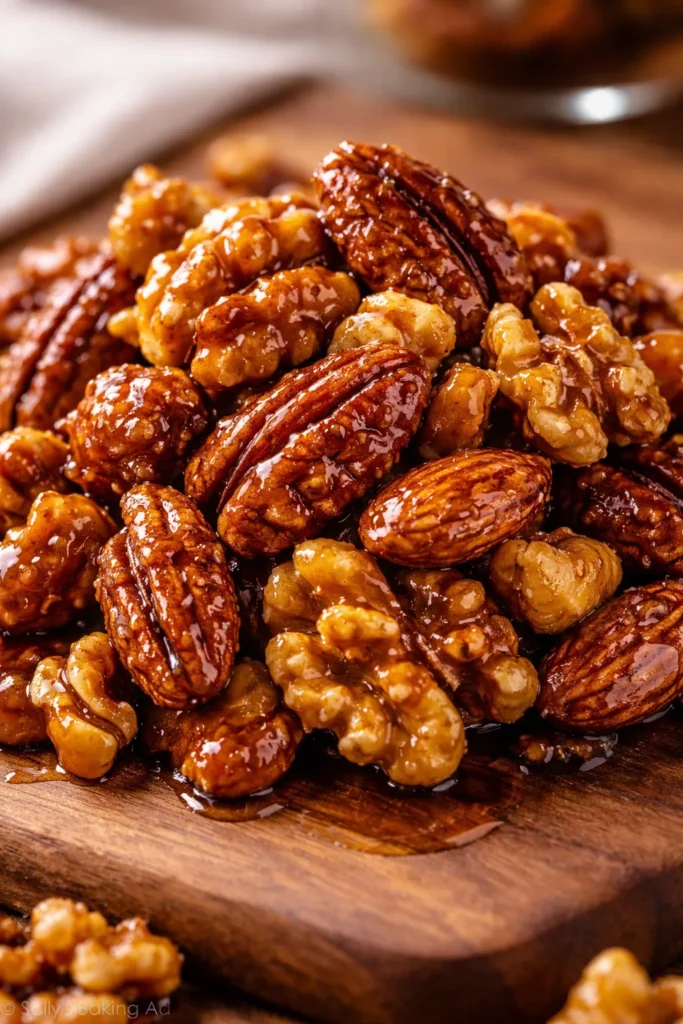
Nuts add sophistication, texture, and substantial depth of flavor that makes a cake feel genuinely gourmet. Caramelized or candied nuts are even better—they’re sweet, crunchy, and visually striking with their glossy coating and rich color. A topping of mixed nuts transforms an ordinary cake into something that feels restaurant-quality, and the combination of soft cake with crunchy toppings creates an irresistible textural contrast that frosting simply cannot provide.
Making Candied or Caramelized Nuts
The simplest version requires just nuts, sugar, and butter. Heat 2 tablespoons of butter in a large skillet over medium heat. Add ½ cup of mixed nuts (pecans, walnuts, almonds, or hazelnuts work beautifully) along with 3 tablespoons of brown sugar and a pinch of sea salt. Stir constantly for 3-5 minutes until the sugar melts and coats the nuts in a glossy layer. The nuts should turn golden brown and smell absolutely incredible. Transfer immediately to parchment paper to cool completely—they’ll crisp up as they cool.
For a more elaborate candied nut topping, create a proper caramel. Combine ¼ cup granulated sugar with 2 tablespoons water in a saucepan, stirring gently until the sugar dissolves. Stop stirring once the sugar is wet, and let it cook undisturbed for 5-7 minutes until it reaches a deep amber color. Immediately add 2 tablespoons of butter and a pinch of sea salt (careful, it will bubble), then stir in 1 cup of nuts. Pour onto parchment and let cool completely. The result is glossy, professional-looking candied nuts that taste like they came from a gourmet confectioner.
Applying Nuts to Your Cake
Once cooled and hardened, break the candied nuts into varied sizes—some as small as half-moons, others in larger clusters. Arrange them over the top of your cake in a random, abundant pattern that feels organic rather than geometric. Nuts are particularly striking when clustered around the edges or creating a border around the top. They stay crispy for hours, making them perfect for cakes that will be sitting on display before serving.
Caramelized nuts work beautifully on chocolate cakes, vanilla cakes, and especially on carrot or spice cakes where they complement warm flavors. The combination of crunchy, sweet candied nuts with a moist cake is genuinely luxurious, and your guests will be delighted by the texture contrast.
6. Glossy Caramel Drizzle and Sauce
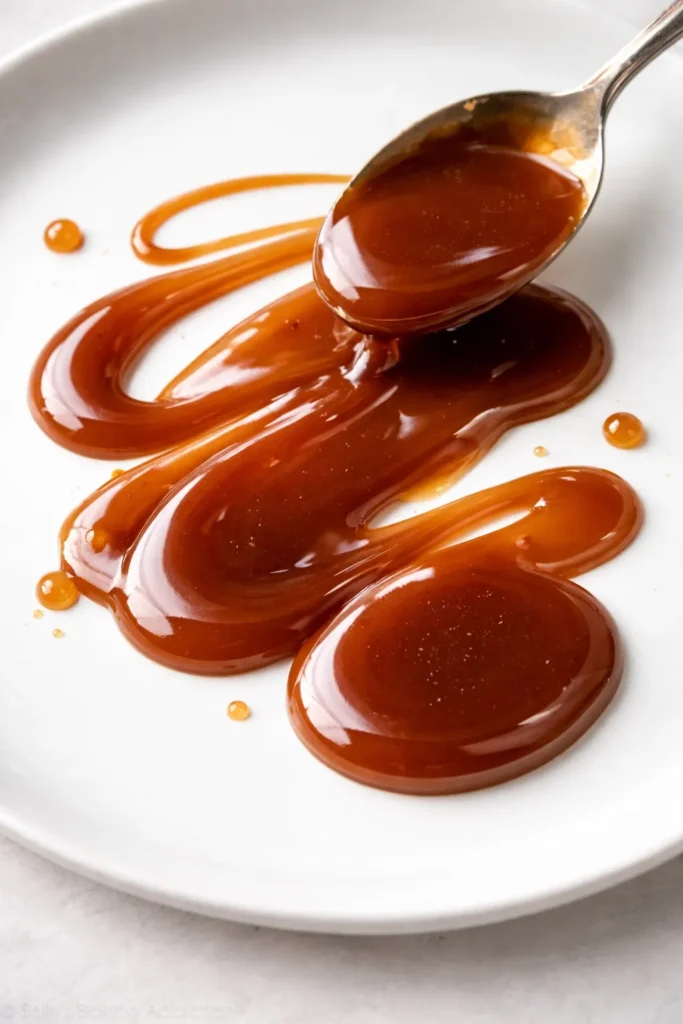
A caramel drizzle is pure indulgence in its simplest form—rich, buttery, glossy, and requiring almost no skill to apply. Unlike ganache, which must be carefully heated and tempered, caramel topping is forgiving and creates a stunning visual effect with minimal effort. The glossy finish is inherently elegant, and caramel’s deep butterscotch flavor complements nearly every cake variety while adding sophistication.
Homemade Salted Caramel Recipe
The best caramel starts with just three ingredients: sugar, butter, and cream. In a heavy-bottomed saucepan, combine 1 cup of granulated sugar with ¼ cup water, stirring gently until the sugar dissolves. Once dissolved, stop stirring—let it cook undisturbed for 8-12 minutes until it reaches a deep amber color. Watch carefully once it starts changing color, as the difference between perfect caramel and burnt is literally seconds. When the caramel reaches the right color (somewhere between light and dark amber—your preference determines the intensity), immediately remove from heat and add 6 tablespoons of cold butter cut into pieces.
Stir gently to incorporate the butter, then remove from heat and let cool for 2 minutes. Carefully stir in ½ cup of heavy cream (it will bubble vigorously, so pour slowly). Add ½ teaspoon of fine sea salt and stir until completely smooth. The result is thick, glossy, and absolutely luxurious. Let cool to room temperature before pouring over your cake—it should be pourable but still thick enough to create beautiful drips.
Applying Caramel for Maximum Visual Impact
For the popular “drip cake” effect, pour or spoon caramel over the top edge of your cake, allowing it to cascade down the sides in irregular, organic drips. The caramel will harden slightly as it cools, creating a dramatic glossy finish. For a more refined look, drizzle thin lines of caramel across the top in a decorative pattern, or create a pool of caramel on the center of the cake. The glossy appearance of caramel is inherently elegant, so even imperfect application looks intentional and beautiful.
Caramel works on vanilla, chocolate, apple, pecan, and carrot cakes—essentially any cake that benefits from warm, buttery, slightly sweet flavor. It’s particularly stunning on dark cakes where the golden-brown color creates gorgeous contrast.
7. Whipped Mascarpone or Cream Cheese Topping
For those who want the richness of frosting without the density or sweetness, whipped mascarpone or cream cheese is absolutely game-changing. These toppings are light, luxurious, and tangy—they taste like actual dessert rather than sweetened lard. The texture is clouds-like and elegant, and you can spread or pipe them with minimal skill, yet the results look entirely professional. They’re particularly brilliant for fruit cakes where the tang complements rather than competes with bright, fresh flavors.
Making Whipped Mascarpone
Combine 1 cup of mascarpone cheese with ¼ cup of heavy whipping cream, 2 tablespoons of powdered sugar, and ½ teaspoon of vanilla extract in a bowl. Using an electric mixer, whip on medium speed for 1-2 minutes until soft peaks form. Be extremely careful not to over-whip, as mascarpone can become grainy if overworked—you want fluffy clouds, not butter. The result is silky, light, and only moderately sweet.
Spread this across your cake with an offset spatula for a rustic, organic look, or dollop spoonfuls across the top for an artisanal appearance. You can even use a piping bag fitted with a large open-star tip to create beautiful rosettes. The slight sheen of mascarpone is elegant, and the tanginess adds sophistication that buttercream can’t match.
Cream Cheese Whipped Version
If you prefer slightly more tang, whip together 8 ounces of room-temperature cream cheese with ½ cup of heavy cream, 2 tablespoons of powdered sugar, and ½ teaspoon of vanilla. Whip until soft peaks form—again, be cautious not to over-whip. This version is tangier and slightly less sweet, making it perfect for chocolate or carrot cakes. The cream cheese base creates a more stable topping that holds its shape throughout service, whereas pure mascarpone is slightly softer.
Both versions work beautifully with fruit, nuts, drizzles, or edible flowers as additional toppings. They’re light enough that you taste the actual cake, but rich enough to feel like a proper dessert finish.
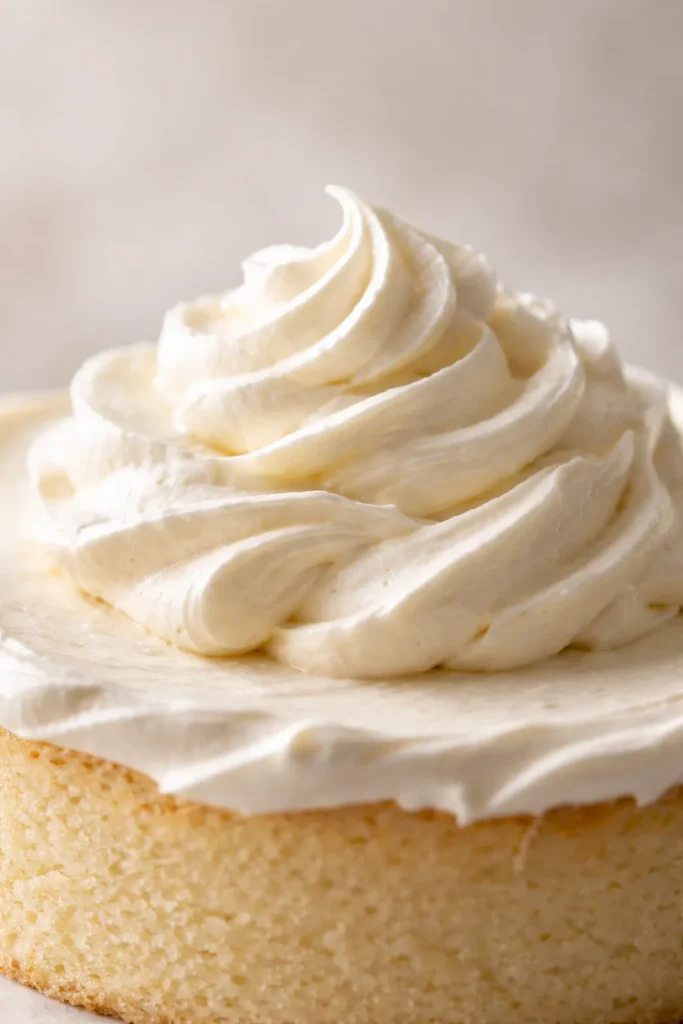
8. Buttercream Piped Designs (Elevated Beyond Basic)
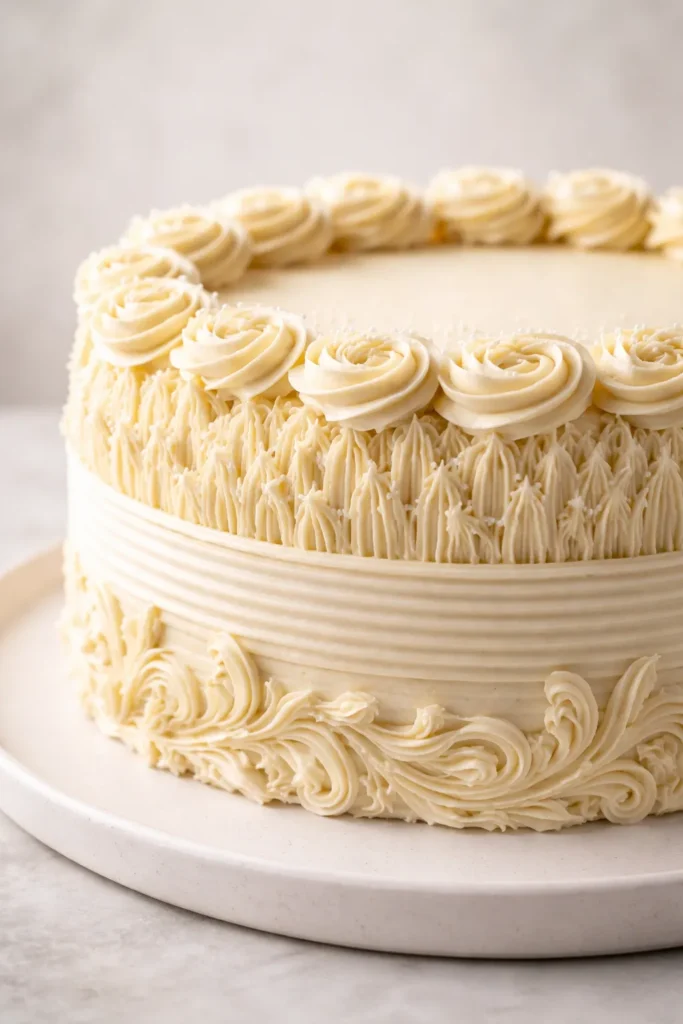
While traditional buttercream frosting might feel like old hat, elevated buttercream techniques create stunning effects that are far more interesting than thick swirls. By using specialty piping tips, creating textured effects, and applying buttercream more strategically, you can achieve looks that feel entirely fresh and sophisticated. The key is moving beyond the thick smothering approach and instead using buttercream as a decorative accent rather than the main event.
Textured Buttercream Applications
Rather than covering the entire cake in smooth frosting, apply buttercream in specific ways that showcase your cake: create a border of piped rosettes around the top edge while leaving the sides bare. Use a tall grass piping tip to create wild, hair-like texture covering just the top portion of the cake. Apply buttercream in horizontal combed lines across the sides, creating a striped effect. Pipe dots, lines, or geometric patterns for a contemporary look.
These techniques require a steady hand but minimal actual skill—the effects come from the tools and your intention rather than advanced piping ability. Invest in specialty piping tips (they cost just a few dollars), and practice on parchment paper before decorating your actual cake.
Flavor-Forward Buttercream
Take buttercream further by infusing it with flavors that actually matter. Instead of generic vanilla, make a brown butter buttercream by browning butter until nutty, cooling it, and whipping with powdered sugar. Create a coffee buttercream by dissolving instant espresso in hot cream before whipping it with butter. Make a cinnamon brown sugar buttercream that tastes like autumn. These flavor-forward versions make buttercream feel gourmet rather than basic.
9. Crushed Cookie or Wafer Crumb Topping
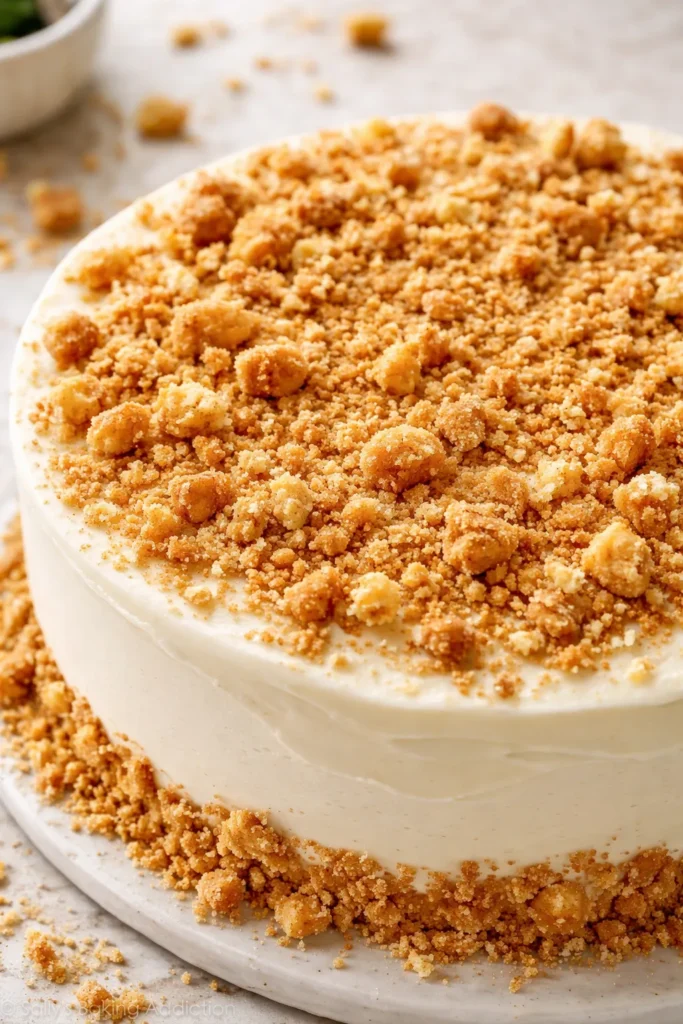
For a casual, fun, entirely crunchy topping, crush cookies or wafers and scatter them across your cake. This works beautifully for laid-back celebrations and adds texture that’s genuinely delightful. The combination of soft cake with crunchy cookie pieces creates the kind of textural interest that makes people keep coming back for more bites. This topping is forgiving, looks intentionally rustic, and requires zero special skills.
Creating Your Crumb Topping
Select cookies that complement your cake: Oreos for chocolate cakes, graham crackers for cheesecake, biscoff for vanilla, or digestive biscuits for nearly anything. Place cookies in a sealed bag and crush to varied sizes using a rolling pin—some fine crumbs, some larger chunks. Scatter generously across the top of your cake, pressing them slightly so they adhere. For extra elegance, layer the cookie crumbs with other toppings like whipped cream or a glaze.
You can toast the crumbs briefly in a dry skillet over low heat for enhanced flavor and a slightly more polished appearance. This simple technique takes cookie crumbs from “leftover scattered crumbs” to “intentional decorative element.”
10. Artistic Fruit Coulis and Microdot Piping
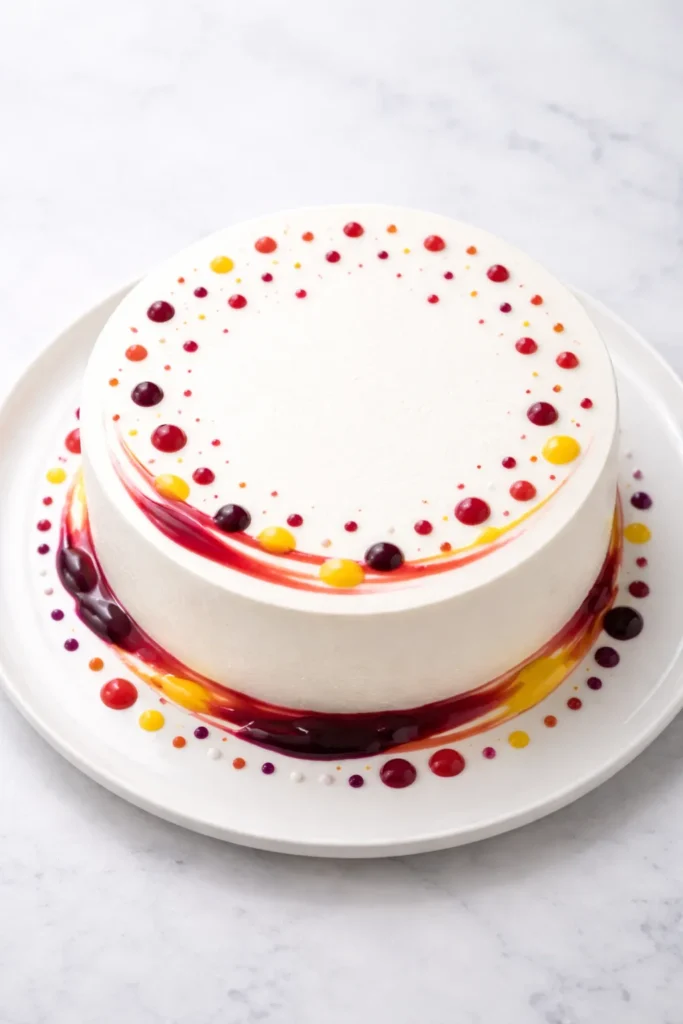
For genuinely show-stopping visual drama with minimal effort, create a fruit coulis (thin fruit sauce) and use microdot piping techniques—tiny dots of sauce applied in intentional patterns around the base and top of the cake. This is what you see plated in upscale restaurants, yet it’s surprisingly accessible to home bakers. The dots add color, elegance, and a touch of artistry that feels luxe.
Making Fruit Coulis
Blend 1 cup of fresh or thawed frozen berries (raspberries are classic) with 2 tablespoons of powdered sugar and 1 tablespoon of fresh lemon juice. Strain through a fine-mesh sieve, pressing gently with the back of a spoon to extract all liquid while leaving pulp and seeds behind. The result is a thin, glossy sauce with vibrant color. You can make coulis from other fruit too—passion fruit, mango, strawberry—or even create a chocolate coulis with melted chocolate mixed with a touch of cream.
Microdot Piping Technique
Transfer your coulis to a squeeze bottle with a fine tip (or a piping bag fitted with a small round tip). Practice on parchment paper first if you’re nervous. Create a ring of tiny dots around the base of the cake, spacing them evenly. Create another ring around the top edge, or scatter dots artfully across the surface. The dots should be small enough to read as deliberate rather than accidental, creating visual rhythm and elegance.
This technique works beautifully on white or neutral-colored cakes where colored dots create contrast. Pair it with edible flowers, fresh fruit, or a simple glaze for an entirely sophisticated presentation that reads as intentional and refined.
Final Thoughts
The shift from traditional frosting to creative homemade toppings opens up entirely new possibilities for cake decoration and flavor. These alternatives offer more sophistication, less overwhelming sweetness, and textures that make each bite interesting. Whether you choose the elegance of ganache, the freshness of berries, the romance of edible flowers, or the crunch of caramelized nuts, you’re creating something far more memorable than standard buttercream-laden cake.
The beauty of these toppings is that they’re actually easier than frosting for many bakers—no piping bags required, no need for steady hands or extensive decorating experience. Most come together in minutes and often require just a handful of ingredients you likely have on hand. Start with the toppings that appeal most to you, practice once or twice, then feel confident knowing you’ve got professional-quality techniques in your baking arsenal.
Your next celebration cake won’t just taste wonderful—it’ll look like you spent hours in a pastry kitchen when really, you invested maybe an extra fifteen minutes in topping. That’s the real magic of discovering alternatives to frosting.