Drip cakes have completely transformed the way home bakers approach cake decorating, turning what looks like an intimidating technique into something surprisingly achievable. If you’ve scrolled through social media and felt mesmerized by those elegant cakes with chocolate drips cascading down the sides, you’re not alone — and here’s the honest truth: making one is far easier than it appears. The beauty of drip cakes lies in their forgiving nature — imperfections actually add to their charm, and there’s genuine creative freedom in how you personalize them.
What makes drip cakes so approachable is that they require far fewer piping skills than traditional buttercream-decorated cakes. Instead of mastering intricate piping bags and tips, you’re simply applying a smooth frosting base and letting gravity do most of the work with a chocolate ganache drip. Whether you’re celebrating a birthday, hosting a special dinner, or just wanting to impress someone with a homemade cake that looks professionally decorated, the designs in this guide prove that stunning results are absolutely within reach.
Table of Contents
- Understanding the Drip Cake Foundation
- Choosing Your Base Cake and Frosting
- Making Perfect Chocolate Ganache
- Application Techniques That Work
- 1. Classic Chocolate Drip with Elegant Simplicity
- Why This Works
- Make It Your Own
- 2. Colorful White Chocolate Drip for Celebrations
- The Coloring Technique
- Design Pairings That Pop
- 3. Chocolate Lover’s Chocolate-on-Chocolate Dream
- Creating Depth With Chocolate
- Construction Tips
- 4. Fresh Fruit and Chocolate Contrast
- Selecting and Arranging Fruit
- Design Applications
- 5. Sprinkle-Covered Drip for Maximum Fun
- Sprinkle Selection Matters
- Pro Application Techniques
- 6. Floral-Adorned Drip for Romance
- Flower Selection and Safety
- Arrangement Principles
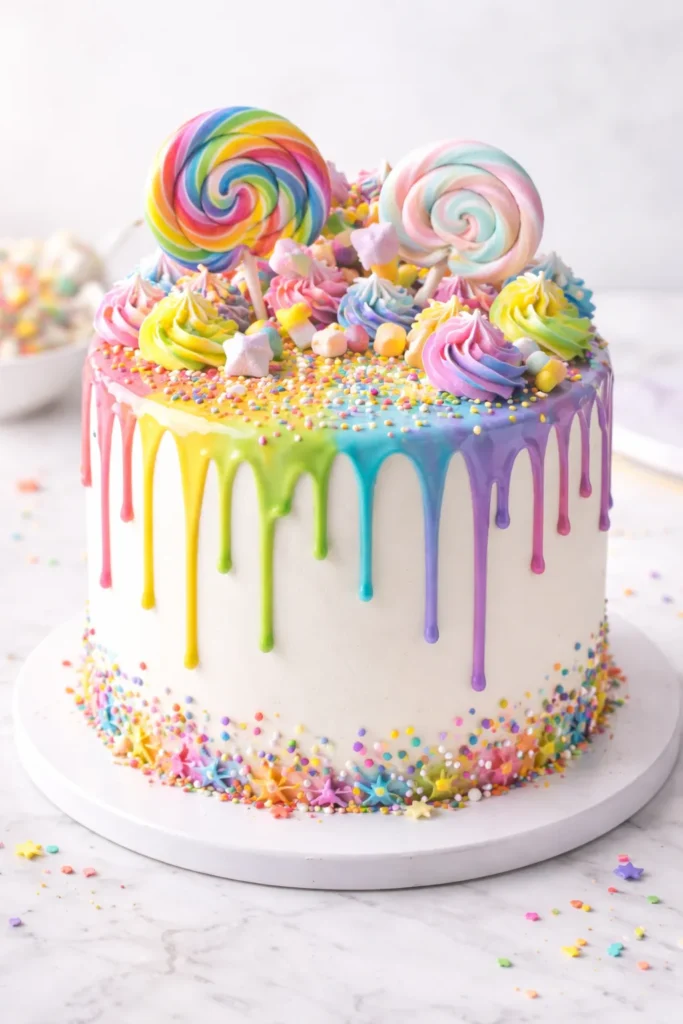
- 7. Ombre Rainbow Drip for Visual Drama
- Building the Ombre Buttercream
- Completing the Design
- 8. Caramel Drip for Warmth and Richness
- Making Caramel Ganache
- Design Approaches
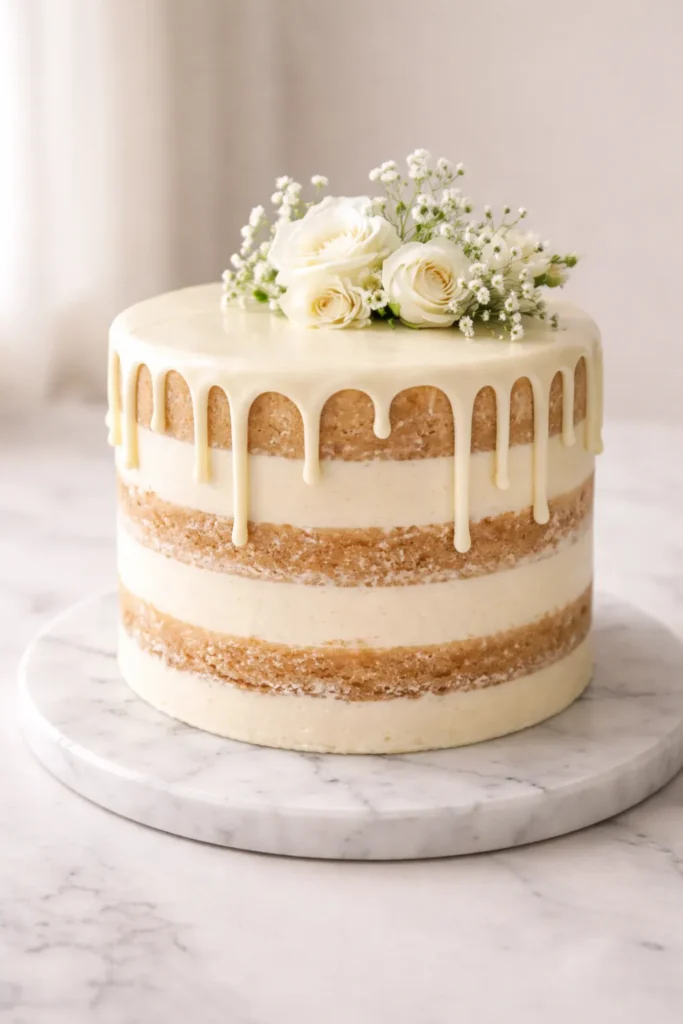
- 9. Naked Cake Drip for Understated Elegance
- Building a Stable Naked Cake
- Dressing It Up Minimally
- 10. Themed Drip Cake for Any Celebration
- Thematic Decoration Ideas
- Storage, Transport, and Make-Ahead Tips
- Your Drip Cake Adventure Starts Here
Understanding the Drip Cake Foundation
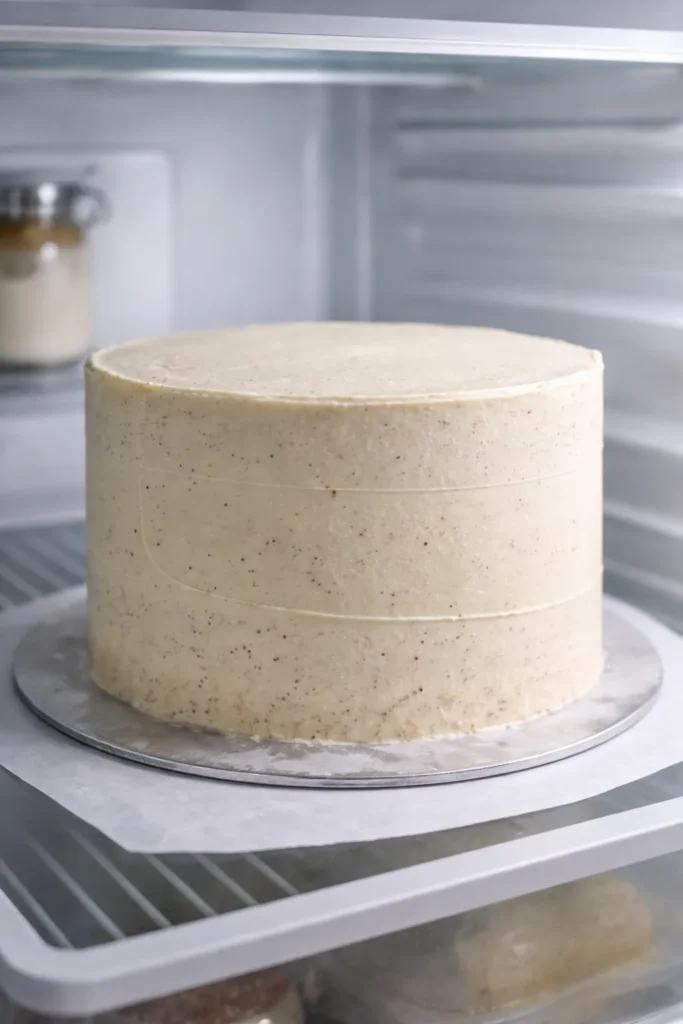
Before diving into specific designs, it helps to understand what makes a drip cake successful. The most important factor is starting with a thoroughly chilled cake — your buttercream needs to be firm enough to hold the ganache drips in place without the chocolate running uncontrollably down the sides. This means refrigerating your frosted cake for at least 30 minutes in the fridge, or 10 minutes in the freezer if you’re short on time.
The ganache itself is remarkably simple: heavy cream and chocolate combined in roughly a 1:3 ratio. When you heat the cream and pour it over chocolate, the two meld into a silky mixture that’s perfect for dripping. The consistency matters — if your ganache is too thin, it’ll run right off the cake; too thick, and it won’t flow at all. This is exactly why most expert bakers recommend making a test drip first, letting a small amount flow naturally, and adjusting the temperature or consistency before committing to decorating the entire cake.
Choosing Your Base Cake and Frosting
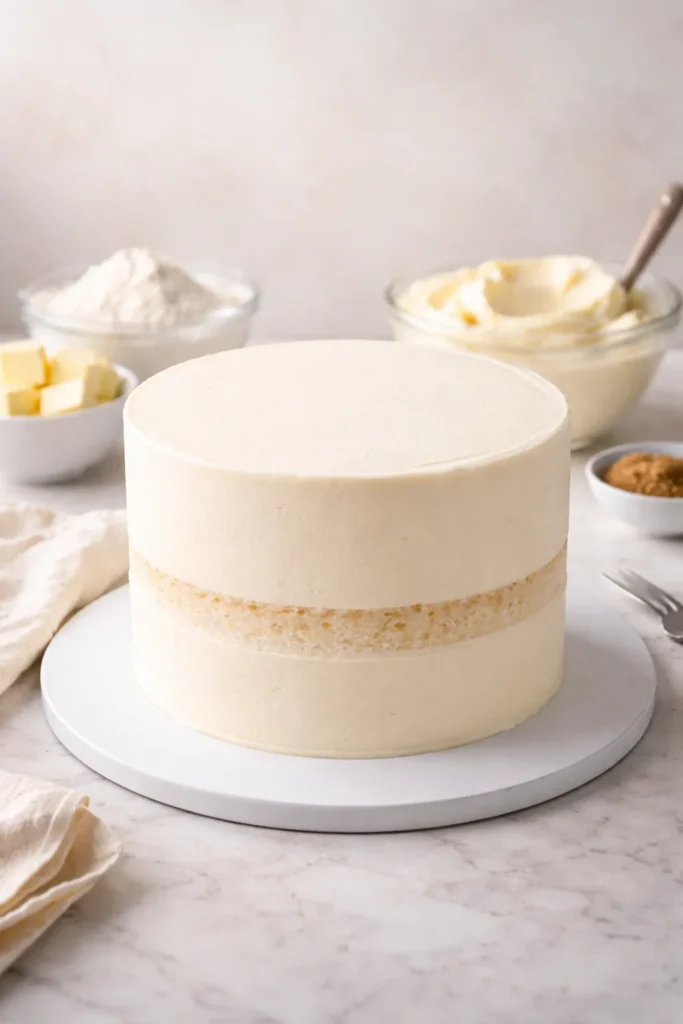
The cake itself can be whatever flavor you love most — vanilla, chocolate, lemon, red velvet, or anything in between. What matters far more is using a sturdy cake recipe that can handle stacking and frosting without collapsing. Dense cakes like Madeira, pound cake, or dense chocolate cake work beautifully, while lighter sponges need more careful handling. Buttercream frosting is the standard choice, and for good reason — it’s stable, easy to smooth, and provides the perfect foundation for ganache drips.
When frosting your cake, aim for two layers: a thin crumb coat that seals in any loose crumbs, chilled until firm, then a thicker final layer that you smooth as evenly as possible using an offset spatula or bench scraper. If you want help achieving perfectly smooth sides, a trick that works beautifully is dipping your bench scraper into hot water and lightly running it over the buttercream once it’s applied — the warmth helps smooth out any imperfections. For colored buttercream, use gel food coloring rather than liquid, as it won’t affect the frosting’s consistency.
Making Perfect Chocolate Ganache
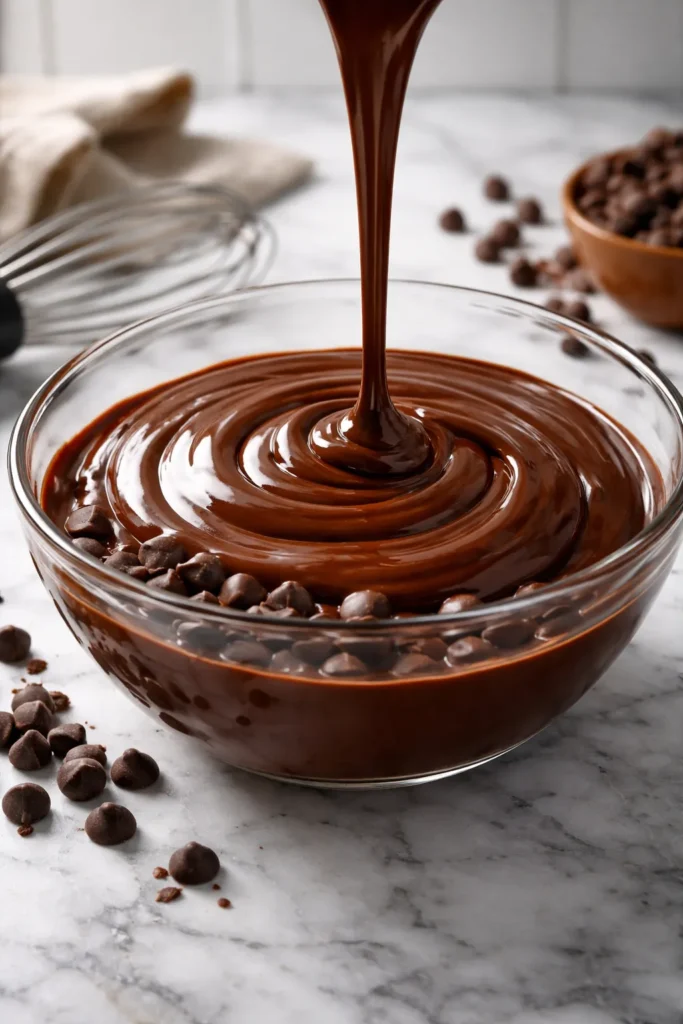
The classic ganache recipe uses heavy whipping cream (not milk — the higher fat content is crucial) and chocolate chips. Heat ⅓ cup of heavy cream until it just begins to bubble, pour it over 1 cup of chocolate chips in a heatproof bowl, let it sit for 1-2 minutes, then stir gently until completely smooth. If you’re using white chocolate, heat at 50% microwave power and stir frequently to avoid seizing, which happens when white chocolate is overheated.
For perfect consistency, let the ganache cool until it’s barely warm to the touch but still pourable. You can test this by making a single test drip on the back of your cooled cake — if it runs too fast, let it cool longer; if it’s too thick, gently reheat for 10-15 seconds. Leftover ganache lasts for several weeks in the fridge and can be reheated and reused, making it great to have on hand for future decorating projects.
Application Techniques That Work
There are two proven methods for applying drips: the spoon method and the squeeze bottle method. With a spoon, dip it in ganache and carefully pour a small amount over the cake’s edge, letting it flow naturally down the side. Scrape the bottom of your spoon against the bowl’s edge first to prevent stray drips. The squeeze bottle method (available inexpensively at kitchen supply stores or online) offers more control and consistency, though both methods produce beautiful results.
For varied, natural-looking drips, adjust the pressure and speed of your application — some drips will be longer, others shorter, and that’s exactly the aesthetic you’re aiming for. Starting slow lets you gauge how fast the ganache flows and helps prevent runaway drips that go all the way to the cake board. Work your way around the entire cake perimeter, then fill the top with any remaining ganache and smooth it gently with an offset spatula.
1. Classic Chocolate Drip with Elegant Simplicity
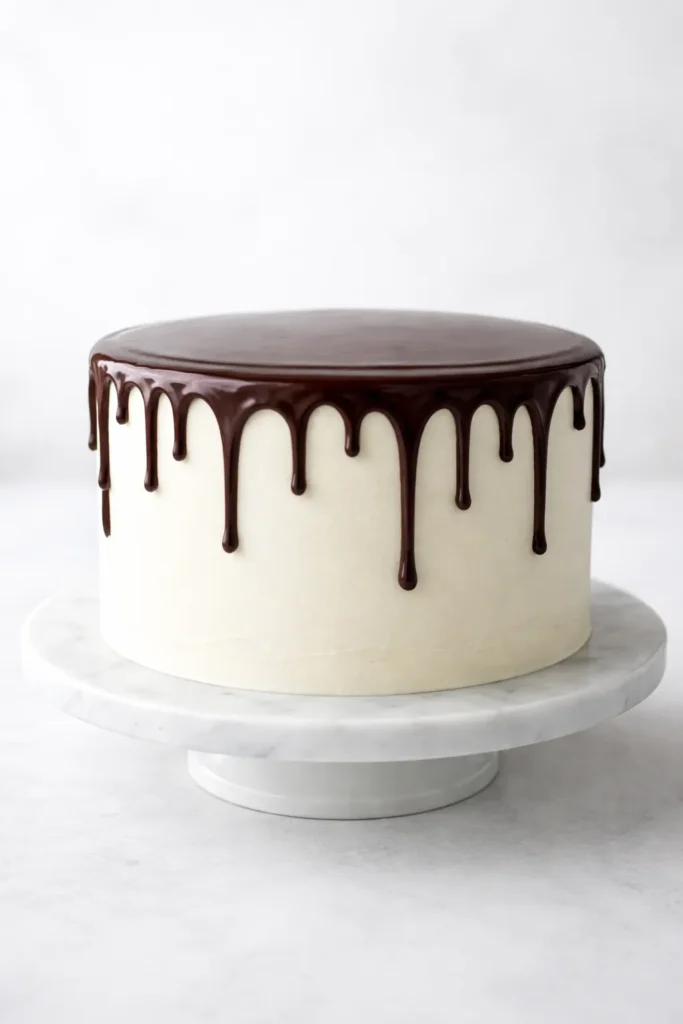
This is the timeless design that started the whole drip cake phenomenon, and for good reason — it’s stunning in its restraint. A deep, rich dark chocolate ganache paired with white or light-colored buttercream creates the most dramatic visual contrast, letting the drips be the true star of the show. The beauty of this design is that it requires absolutely nothing else — no sprinkles, no toppings, no embellishments. Just the pure elegance of geometry and chocolate.
Why This Works
The reason this design feels so sophisticated is the negative space and the natural flow of the ganache. Without competing decorations, every eye is drawn to those perfect drips cascading down. The color contrast makes the drips pop whether you use dark chocolate over white buttercream or milk chocolate over a pastel shade. This approach works beautifully for weddings, anniversaries, or any occasion where elegance matters more than playfulness.
Make It Your Own
- For a bolder look: Use slightly warmer ganache so the drips run longer and more dramatically down the sides
- For a delicate look: Use cooler ganache for shorter, more controlled drips that don’t reach all the way to the board
- For added luxury: Finish with a thin layer of edible gold leaf along the top edge where the ganache meets the buttercream, catching the light beautifully
2. Colorful White Chocolate Drip for Celebrations
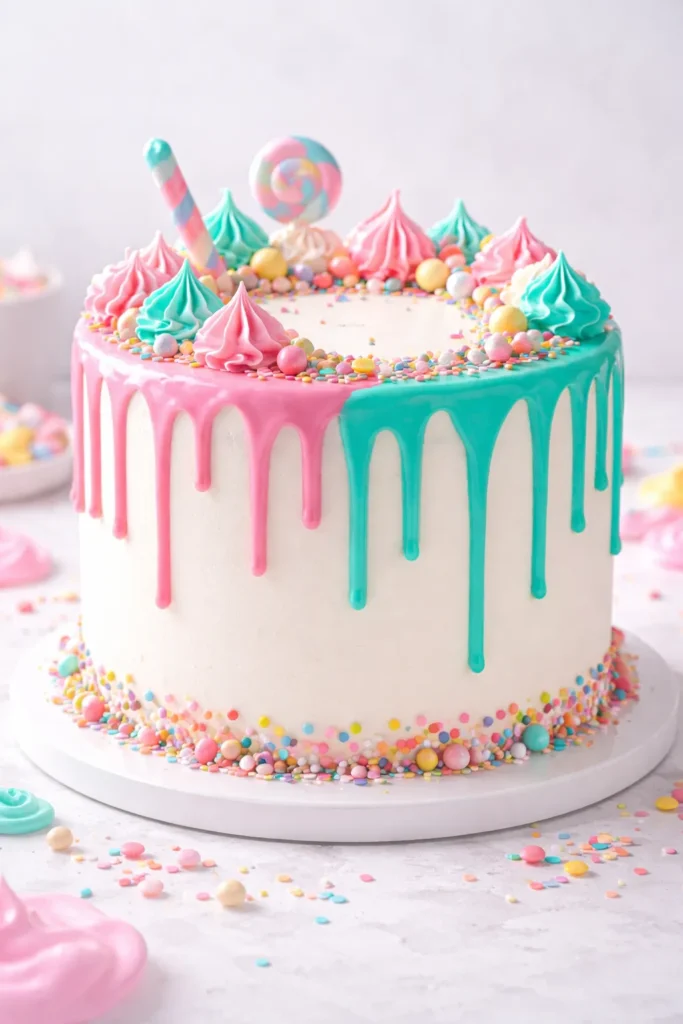
White chocolate ganache is a game-changer because it accepts gel food coloring beautifully, opening up a world of color possibilities. Make your base white chocolate ganache, then add drops of gel coloring one at a time, stirring thoroughly until you achieve your desired shade. Pair vibrant pink drips with white buttercream for a modern birthday cake, soft pastels for baby showers, or deep jewel tones for upscale celebrations.
The Coloring Technique
Start with just 2-3 drops of gel coloring in your cooled ganache and stir thoroughly. Add more drops gradually — you can always deepen the color, but you can’t lighten it. Different gel brands have varying intensities, so testing helps. For really vibrant colors, use bright white or super-white candy melts blended with white chocolate chips (the candy melts are more opaque and take color more vividly). Be sure to note that candy melts can’t substitute directly for white chocolate in a 1:1 ratio — the consistency changes, so you may need to adjust your cream slightly.
Design Pairings That Pop
- Pink drips on white buttercream: Add fresh flowers and pearl sprinkles for an elevated birthday cake
- Teal or jewel-blue drips: Pair with metallic gold or silver accents and gumballs for a modern look
- Pastel ombre drips: Apply multiple colors of ganache going around the cake for a rainbow effect
- Mint green drips: Combine with white buttercream and fresh greenery for a garden party feel
3. Chocolate Lover’s Chocolate-on-Chocolate Dream
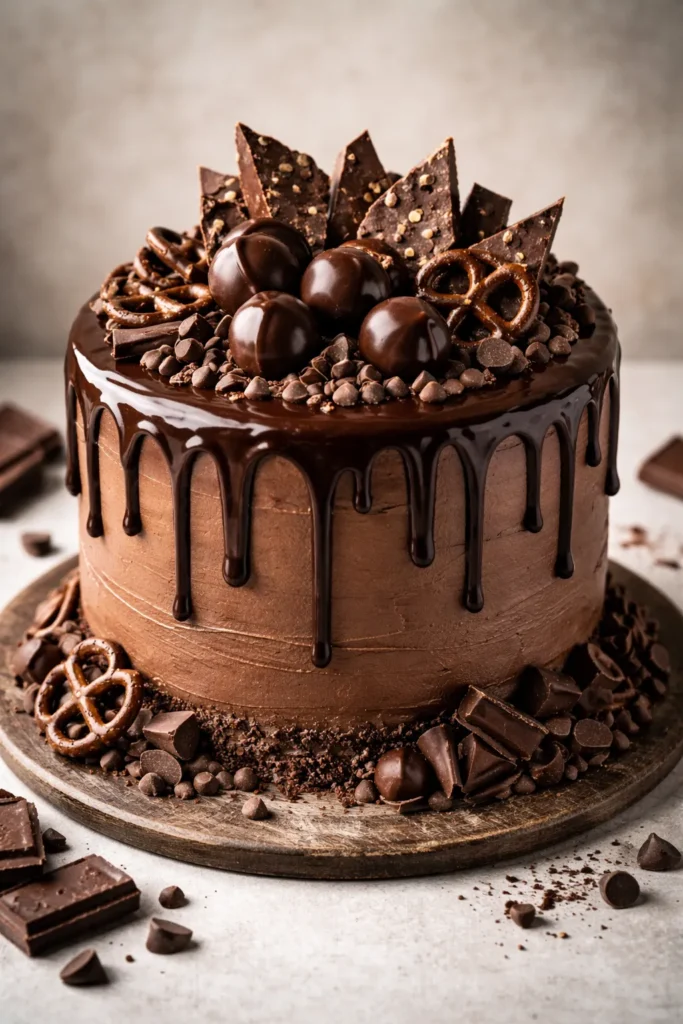
For those who believe more chocolate is always the answer, this design layers multiple chocolate components into one decadent experience. Use dark chocolate ganache drips over rich chocolate buttercream, then pile on chocolate toppings — chocolate shavings, chocolate truffles, chocolate-covered pretzels, chocolate bark, or hot chocolate bombs scattered artfully across the cake board and top.
Creating Depth With Chocolate
The key to making this design visually interesting (not just brown blob of chocolate) is varying the texture and presentation of your chocolate elements. Smooth ganache drips, shiny chocolate truffles, matte chocolate bark, crunchy pretzels, and glossy covered strawberries all catch light differently and add visual interest. Arrange heavier items like truffles and pretzels around the base of the cake, and use lighter elements like shavings or sprinkles on top and scattered on the board.
Construction Tips
- Place chocolate items strategically using a small dab of ganache as “glue” to keep them from sliding
- Create height variation by stacking items — a truffle next to a pretzel stick next to a tall chocolate spike makes the arrangement more dynamic
- Cover the seam where buttercream meets ganache with chocolate shavings or cocoa powder for a seamless look
- Chill everything thoroughly before serving so chocolate toppings stay firmly in place
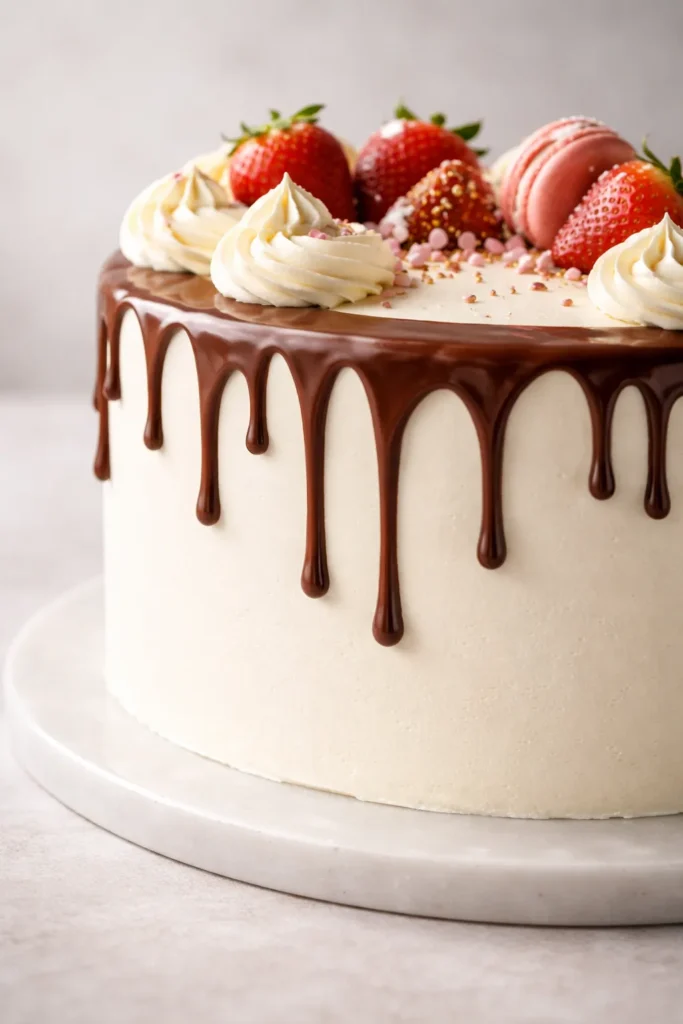
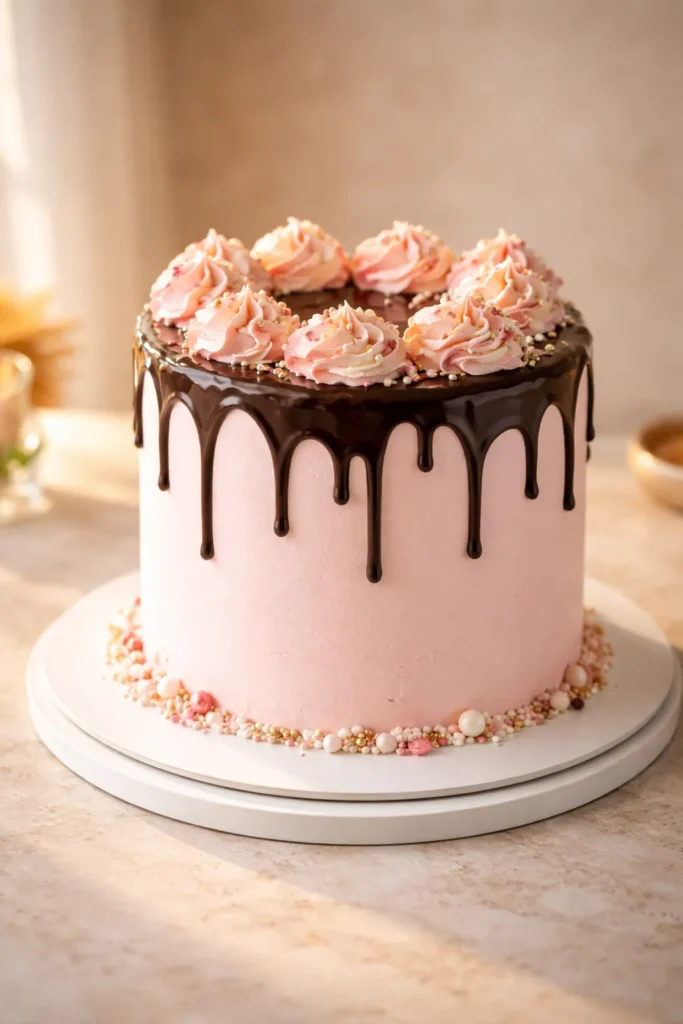
4. Fresh Fruit and Chocolate Contrast
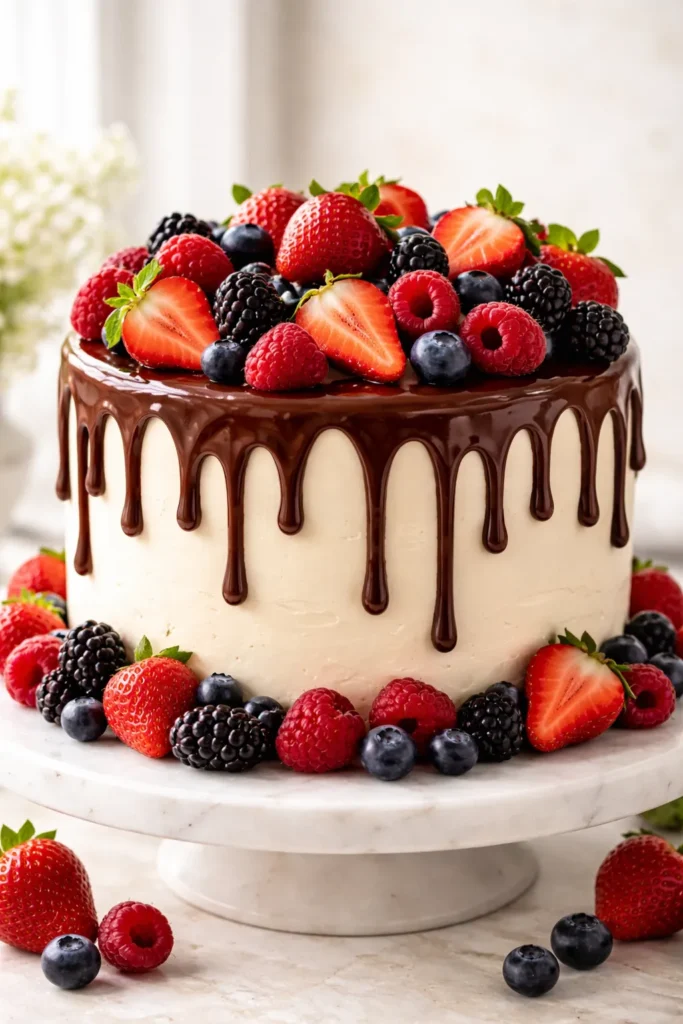
Pairing fresh fruit with chocolate drips creates a refreshing, elegant design that feels lighter than all-chocolate cakes while still maintaining that impressive drip cake aesthetic. Strawberries, raspberries, blackberries, or sliced citrus fruit create pops of color and natural beauty alongside dark chocolate ganache. This design is particularly stunning for spring and summer celebrations.
Selecting and Arranging Fruit
Choose firm, ripe fruit that won’t weep or deteriorate quickly. Strawberries work beautifully arranged around the base or tucked between the ganache drips, while raspberries and blackberries add elegant color spots without being as delicate. Slice citrus fruits thinly and arrange them in overlapping patterns on top of the cake, or candied citrus peels for a more sophisticated look. White or light pink buttercream makes fruit colors sing, though gold or champagne buttercream adds an extra touch of luxury.
Design Applications
- Classic strawberry: Dark chocolate ganache with fresh strawberries arranged around the board perimeter
- Berry medley: Mix strawberries, raspberries, and blackberries for color variety
- Citrus elegance: Use candied lemon, lime, or orange peels arranged in a pattern on top
- Mixed berries and florals: Combine fresh berries with edible flowers for a garden-inspired look
5. Sprinkle-Covered Drip for Maximum Fun
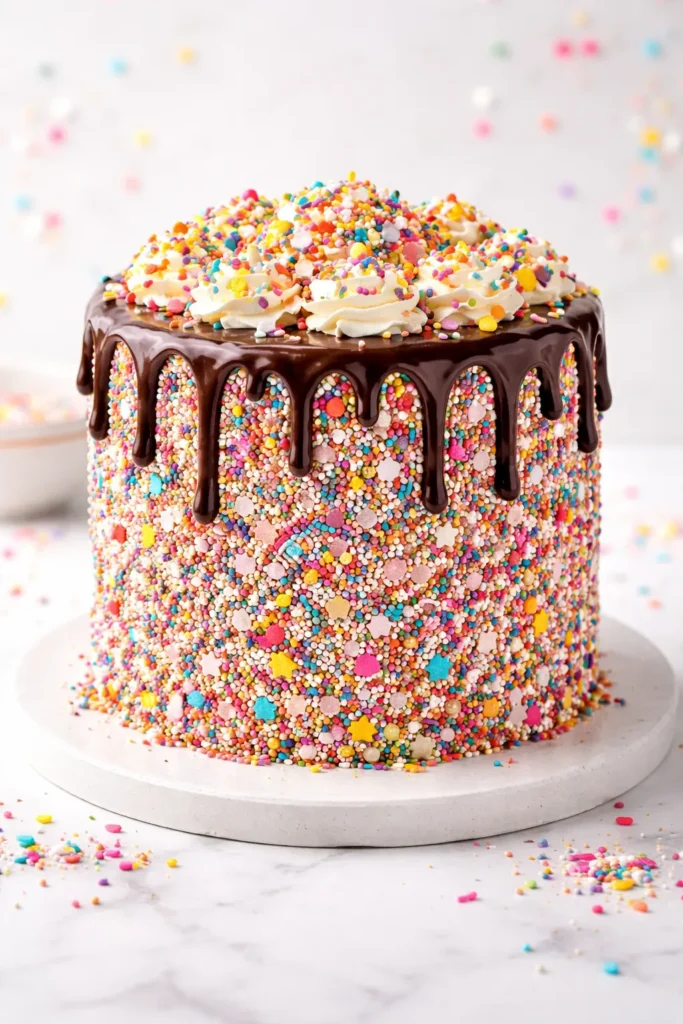
If chocolate drips are elegant, then sprinkle-covered drips are pure joy. Apply your ganache drips as normal, then while the chocolate is still slightly tacky, sprinkle edible sprinkles liberally over the still-warm drips. The sprinkles stick beautifully, creating a fun, festive, eye-catching design that screams celebration. This design appeals across age groups — kids find it playful, while adults appreciate the textural interest.
Sprinkle Selection Matters
The type of sprinkles you choose dramatically changes the mood of the cake. Pearl sprinkles create elegance, rainbow jimmies add fun chaos, metallic dragées add sophistication, and shaped sprinkles (stars, hearts, flowers) introduce thematic elements. Mix different sprinkle types within the same color family for rich texture without visual chaos. Apply heavier sprinkles while the ganache is still slightly warm so they adhere well, then continue adding lighter sprinkles on top for dimension.
Pro Application Techniques
- Apply ganache drips, wait 30 seconds until slightly tacky but still sticky
- Use your fingers, tweezers, or a small spoon to press sprinkles firmly into the ganache
- Vary sprinkle density — some areas densely packed, others with more negative space
- Add sprinkles on top of the cake as well for maximum fun and visual continuity
- Combine edible sprinkles with fondant candy, gumballs, or lollipops for mixed-media texture
6. Floral-Adorned Drip for Romance
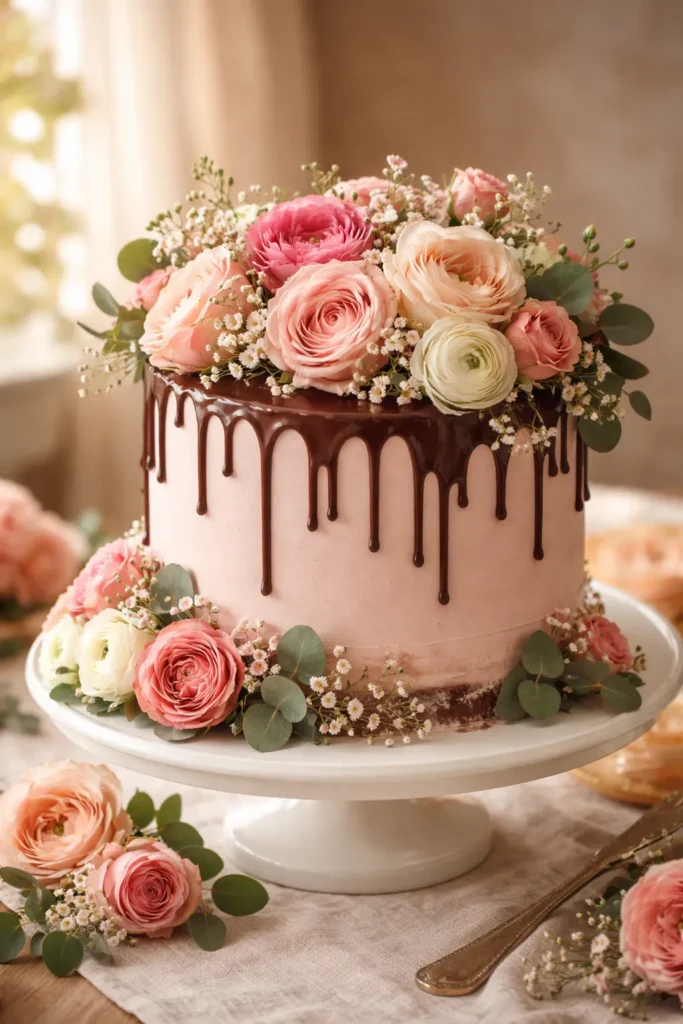
Fresh or faux flowers transform a drip cake from impressive to absolutely Instagram-worthy. Pair chocolate drips with flowers positioned artfully around the cake board and nestled into the buttercream on top. Garden roses, peonies, eucalyptus, ranunculus, and baby’s breath all photograph beautifully and add a romantic, special-occasion feel without requiring any advanced decorating skills beyond smooth frosting and applied ganache.
Flower Selection and Safety
Always use flowers specifically grown for decoration or eating — never use florist flowers treated with pesticides unless you’re certain they’re food-safe. Edible flowers like nasturtiums, pansies, violets, and marigolds add a gourmet touch. Gently rinse any flowers and pat dry before arranging. Position larger statement flowers off-center on top, with smaller filler flowers creating visual flow toward the base and around the cake board.
Arrangement Principles
- Use an odd number of blooms (3, 5, or 7) for more pleasing asymmetrical balance
- Mix bloom sizes and shapes — a large rose, some medium-sized flowers, and delicate filler creates visual interest
- Tuck greenery between blooms to connect the arrangement and hide any buttercream seams
- Let some flowers sit directly on the buttercream and others on the board for varied heights
- Choose flower colors that either complement or intentionally contrast with your buttercream and ganache
7. Ombre Rainbow Drip for Visual Drama
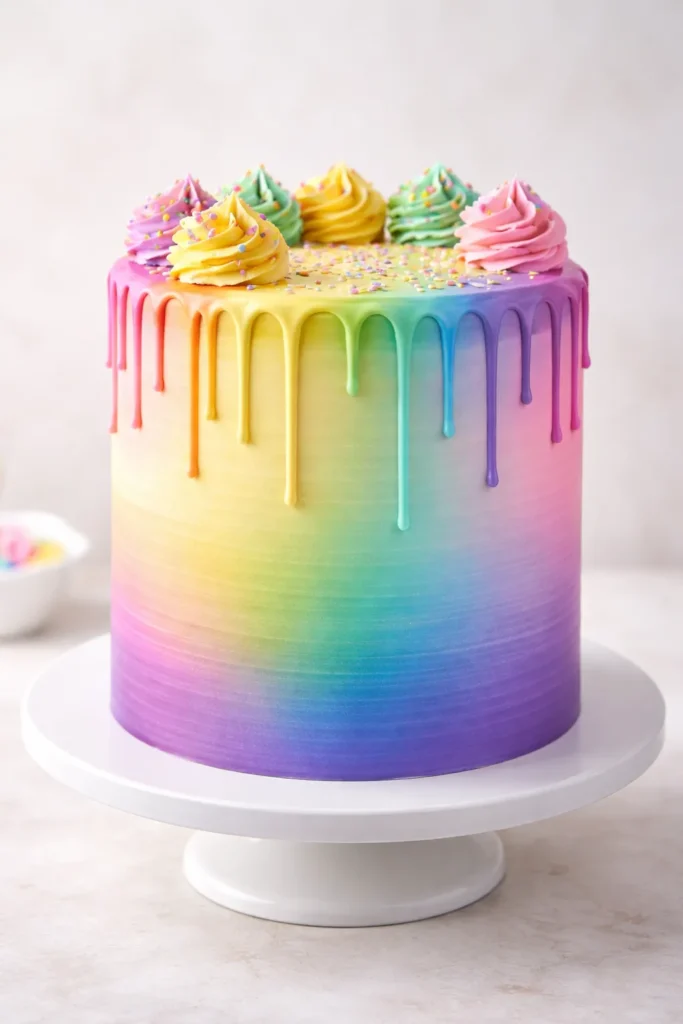
Creating an ombre effect where the buttercream gradually shifts from one color to another, then adorned with matching ombre ganache drips, produces a hypnotic, modern aesthetic. Start with the deepest color at the bottom and gradually lighten as you move toward the top, creating a seamless gradient. The ganache drips in a coordinating color tie the whole design together.
Building the Ombre Buttercream
Make one batch of buttercream and divide it into portions. Color one portion with your darkest shade, then add white buttercream to each successive portion to create lighter and lighter versions. Apply the darkest color around the bottom third of the cake using an offset spatula or piping bag, then continue layering the progressively lighter colors upward. Smooth the seams gently where colors meet for a blended, gradient effect rather than harsh lines.
Completing the Design
For maximum impact, make your ganache drips in a shade that coordinates — perhaps the same color as one of your buttercream layers, or white for stark contrast. Apply drips and fill the top completely with the lightest color buttercream for visual cohesion. Add metallic accents, pearl sprinkles, or fresh flowers in coordinating tones for a finished, polished appearance.
8. Caramel Drip for Warmth and Richness
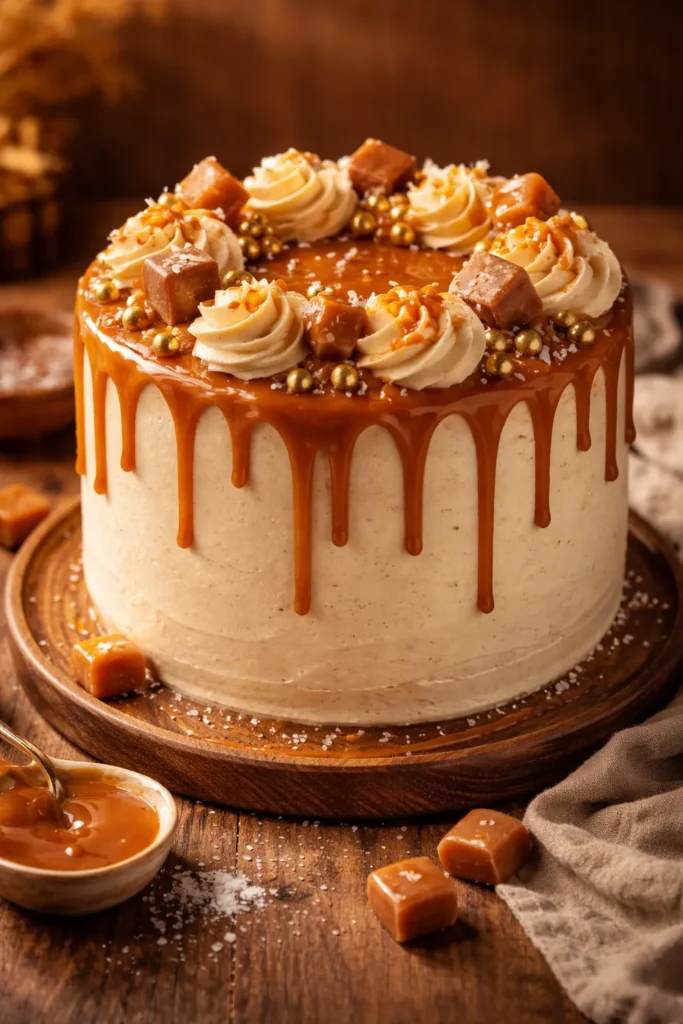
While chocolate gets most of the attention, caramel drips deserve celebration for their sophisticated, slightly sweet appeal and gorgeous golden-brown color. Caramel ganache (made with caramel bits or sauce mixed with heavy cream) pairs beautifully with vanilla, brown butter, or cinnamon buttercream. This design feels warm, inviting, and slightly more sophisticated than its chocolate counterpart.
Making Caramel Ganache
Combine ⅔ cup caramel bits (Kraft brand works reliably) with ¼ cup heavy cream in a microwave-safe bowl. Heat at 20-30 second intervals, stirring thoroughly after each heat until completely smooth. Let it cool until barely warm to the touch before applying. The consistency should be similar to chocolate ganache — pourable but not runny. If it’s too thick, add a touch more cream; too thin, add a bit more caramel or let it cool longer.
Design Approaches
- Classic caramel: Pair with vanilla buttercream and add caramel candies or sea salt flakes on top
- Salted caramel: Finish with fleur de sel or pretzel pieces for sweet-salty contrast
- Caramel and autumn spice: Use cinnamon buttercream with caramel drips and dried apple slices
- Caramel luxury: Add gold leaf, chocolate-covered pretzels, and macarons for an upscale presentation
9. Naked Cake Drip for Understated Elegance
The naked cake — where the cake layers are visible between buttercream layers rather than completely frosted — becomes extra sophisticated with subtle ganache drips. Apply just enough buttercream between and around the cake to hold it together, leaving the actual cake layers partially visible. Delicate ganache drips around the perimeter (rather than completely covering the sides) maintain the refined, slightly raw aesthetic.
Building a Stable Naked Cake
Start with level cake layers (trim any domed tops with a serrated knife). Apply thin, even layers of buttercream between each layer, being careful not to squeeze excess frosting out the sides. The cake needs enough frosting to be structurally sound but not so much that it drowns out the visible cake. Chill thoroughly before applying minimal frosting to the sides — just enough to provide structure, leaving most of the cake visible.
Dressing It Up Minimally
Small, understated toppings work best with naked cakes. Fresh flowers, a simple cake topper, edible gold leaf, or a few sprigs of eucalyptus add elegance without overwhelming the cake’s natural beauty. Apply ganache drips more sparingly — perhaps only around half the perimeter or just in back. The goal is a “effortlessly elegant” aesthetic, as if the cake is naturally beautiful without trying too hard.
10. Themed Drip Cake for Any Celebration
The versatility of drip cakes means they adapt to virtually any theme imaginable — birthday, holiday, wedding, baby shower, or personal milestone. Choose your buttercream color and ganache flavor to match your theme, then customize the toppings to tell the story. A rainbow drip with number toppers for birthdays, pastels with baby-themed toppers for showers, or deep jewel tones with edible gold for elegance makes the same basic technique feel entirely different.
Thematic Decoration Ideas
- Birthday: Combine with number toppers, metallic confetti, macarons, and sprinkles
- Wedding: Use white chocolate drips with fresh flowers, edible gold leaf, and elegant ribbon on the board
- Baby shower: Pastel buttercream with soft-colored drips, fondant baby toppers, and sugar flowers
- Graduation: Incorporate school colors with coordinating ganache drips and a graduation cap topper
- Holiday: Match buttercream to seasonal colors (red and green for Christmas, orange for fall, pastels for spring)
The beauty of this approach is that the fundamental drip cake technique stays exactly the same — only your color and topping choices change, making it easy to create dozens of different designs using the same core skill.
Storage, Transport, and Make-Ahead Tips
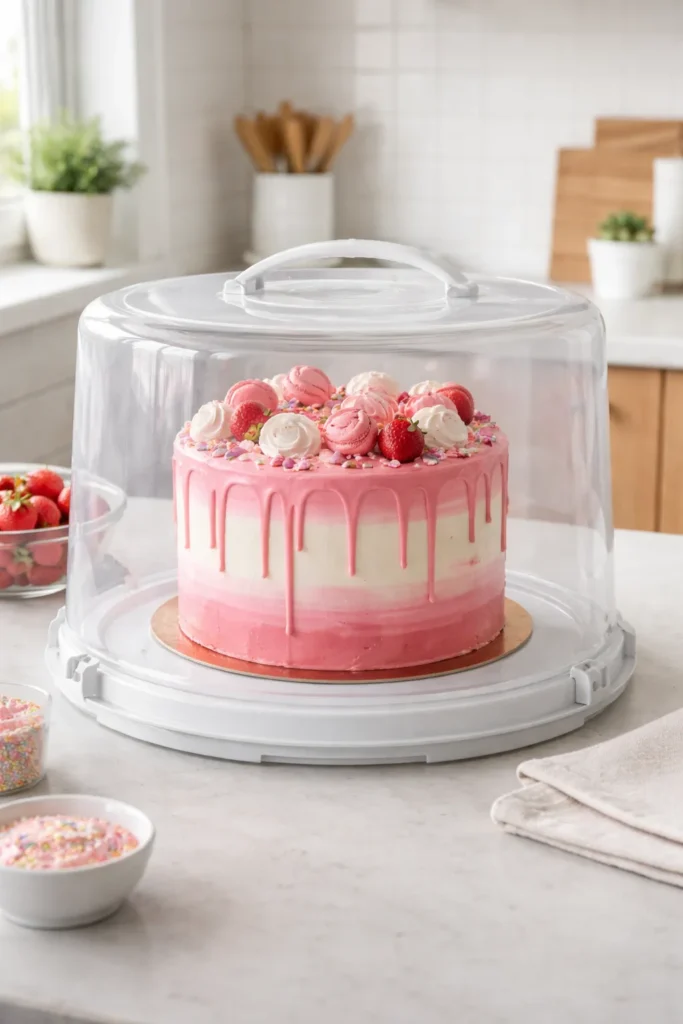
Drip cakes hold beautifully in the refrigerator for several days, making them perfect for advance preparation. A fully frosted and decorated drip cake lasts for up to a week in the fridge when stored in an airtight container or covered with plastic wrap to prevent it from drying out. The buttercream actually seals in the moisture, keeping the cake fresh and delicious longer than you might expect.
For transporting a drip cake, invest in a sturdy cake box slightly larger than your cake board. Place the cake board (not the cake itself) at the bottom of the box, then carefully slide the cake onto the board once the board is in the box. This prevents sliding and shifting during transport. If you’re concerned about condensation from the fridge causing the ganache to look dull, simply blot the cake gently with a paper towel before serving.
You can make the cake layers and buttercream several days ahead, even freeze them if needed (frosting lasts 3 months frozen, cake layers last 2 weeks). Assemble and frost the cake up to 3 days ahead, then apply ganache drips 24 hours before serving for the most beautiful, set appearance. This staged approach makes the project feel far less overwhelming and is exactly how professional bakers handle custom cakes.
Your Drip Cake Adventure Starts Here
The honest truth about drip cakes is that they look far more complicated than they actually are, which is precisely why they’ve become so beloved. Once you understand that the technique is simply cold cake + smooth frosting + properly tempered ganache = impressive results, the confidence to try one naturally follows. That first test drip when you’re unsure about consistency is your friend — take the 30 seconds to make it, assess whether you’re happy with the flow, and adjust accordingly before committing to the full design.
These ten designs represent just the beginning of what’s possible. Layer in your favorite flavors, your preferred color palettes, and your personal style, and you’ve created something uniquely yours that tastes as good as it looks. Whether you go classic and elegant, fun and festive, or somewhere beautifully in between, your homemade drip cake will impress everyone who sees it. The best part? You’ll know exactly how easy it truly was.