Picture this: the aroma of garlic, herbs, and perfectly seasoned chicken wafting through your kitchen, creating an inviting atmosphere that draws everyone to the dinner table. Italian chicken drumstick casserole represents the perfect marriage of convenience and culinary excellence, transforming simple ingredients into a show-stopping meal that satisfies both weeknight dinner needs and special occasion requirements. This one-pan wonder captures the essence of rustic Italian cooking while delivering tender, fall-off-the-bone chicken surrounded by vibrant vegetables and aromatic seasonings.
Whether you’re feeding a hungry family, preparing for meal prep Sunday, or hosting friends for a casual gathering, this casserole delivers impressive results without demanding hours in the kitchen. The beauty lies in its simplicity—chicken drumsticks offer incredible flavor and value, while the casserole format allows all ingredients to meld together, creating layers of taste that intensify with every bite. Beyond taste, the practical advantages are undeniable: minimal cleanup, budget-friendly ingredients, and the flexibility to customize based on dietary preferences or available pantry staples.
This comprehensive guide walks you through everything you need to know about creating the ultimate Italian chicken drumstick casserole. From selecting quality ingredients and mastering preparation techniques to understanding cooking methods and exploring creative variations, you’ll gain the confidence to make this dish your own signature recipe. Let’s dive into the delicious world of Italian-inspired comfort food that proves sophisticated flavors don’t require complicated techniques.
Table of Contents
- Why Italian Chicken Drumstick Casserole Deserves a Place in Your Recipe Collection
- Essential Ingredients That Make This Casserole Irresistible
- The Protein Foundation
- The Italian Flavor Arsenal
- Fresh Vegetables and Aromatics
- Kitchen Tools and Equipment You’ll Need
- Step-by-Step Preparation Guide
- Preparing the Chicken Drumsticks
- Building Your Flavor Base
- Assembling the Casserole
- Cooking Techniques for Perfect Results
- Temperature and Timing Guidelines
- Achieving Golden, Crispy Skin
- Customization Options and Variations
- Dietary Adaptations
- Flavor Profile Adjustments
- Serving Suggestions and Pairings
- Storage, Reheating, and Meal Prep Tips
- Troubleshooting Common Issues
- Final Words
Why Italian Chicken Drumstick Casserole Deserves a Place in Your Recipe Collection
This section explores the compelling reasons why this casserole has earned its reputation as a kitchen staple, examining both practical benefits and culinary advantages that make it stand out among countless chicken recipes.
Budget-Friendly Without Compromising Quality
Chicken drumsticks rank among the most economical poultry cuts available at your local grocery store, often priced significantly lower than breasts or thighs. This affordability doesn’t translate to inferior taste—quite the opposite. Drumsticks contain more flavor than white meat due to their higher fat content and darker, richer meat. When you prepare them in a casserole, the bones contribute additional depth and body to the surrounding sauce, creating a complexity that boneless cuts simply cannot achieve. The extended cooking time allows connective tissues to break down, resulting in tender meat that practically melts off the bone.
The Italian-inspired ingredients accompanying the chicken are equally cost-effective. Tomatoes, garlic, onions, herbs, and olive oil represent Mediterranean pantry staples that deliver maximum flavor impact without straining your budget. A single casserole can easily serve six to eight people, making the per-serving cost remarkably low. This economic efficiency makes the dish ideal for feeding large families, hosting gatherings, or preparing multiple meals through batch cooking.
One-Pan Simplicity Meets Sophisticated Flavors
Modern home cooks constantly balance the desire for delicious, restaurant-quality meals against limited time and energy. Italian chicken drumstick casserole addresses this challenge beautifully by requiring just one baking dish from start to finish. You’ll avoid the pile of pots, pans, and utensils that typically accumulate when preparing complex recipes. This streamlined approach means less time scrubbing dishes and more time enjoying your meal with loved ones.
Despite its simplicity, the casserole delivers sophisticated flavors reminiscent of Italian trattorias. The combination of herbs like rosemary, oregano, and basil alongside garlic, white wine, and tomatoes creates an aromatic profile that transports diners to the Mediterranean countryside. The layering technique allows ingredients to exchange flavors throughout the cooking process, developing a harmonious blend that tastes like it required hours of careful attention. Whether you’re a beginner cook or an experienced home chef, you’ll appreciate how this dish makes culinary excellence accessible.
Nutritional Benefits Worth Celebrating
Beyond convenience and taste, this casserole offers substantial nutritional advantages. Chicken drumsticks provide high-quality protein essential for muscle maintenance, immune function, and overall health. Dark meat contains higher levels of iron, zinc, and B vitamins compared to white meat, contributing to energy production and cognitive function. While drumsticks do contain more fat than chicken breasts, much of this fat is monounsaturated, the heart-healthy variety associated with Mediterranean diets.
The vegetable components further enhance the nutritional profile. Tomatoes deliver lycopene, a powerful antioxidant linked to reduced cancer risk and improved heart health. Garlic and onions contribute anti-inflammatory compounds and immune-boosting properties. Fresh herbs provide micronutrients and phytochemicals without adding calories. When you include bell peppers, zucchini, or other vegetables, you increase fiber content and add vitamins A and C. This combination creates a balanced, nourishing meal that supports wellness goals while satisfying appetites.
Versatility for Every Occasion
The adaptable nature of Italian chicken drumstick casserole makes it suitable for countless scenarios. Serve it for a cozy weeknight family dinner alongside crusty bread to soak up the flavorful sauce. Elevate it for weekend entertaining by pairing it with a crisp Italian wine and a simple arugula salad. The casserole travels well, making it perfect for potlucks, picnics, or bringing meals to friends during life transitions. It reheats beautifully, which supports meal prep routines and provides ready-made lunches throughout the week.
You can easily scale the recipe up or down depending on your needs. Preparing it in a large roasting pan feeds a crowd, while a smaller baking dish creates leftovers for just two people. The foundational recipe welcomes endless variations—adjust seasonings to match your preferences, swap vegetables based on seasonal availability, or modify cooking methods to suit different equipment. This flexibility ensures the recipe remains relevant regardless of changing circumstances, dietary requirements, or taste preferences.
Essential Ingredients That Make This Casserole Irresistible
Understanding each component’s role helps you make informed choices at the market and recognize how ingredients work together to create the finished dish. This section breaks down the building blocks of exceptional Italian chicken drumstick casserole.
The Protein Foundation
Selecting Quality Chicken Drumsticks
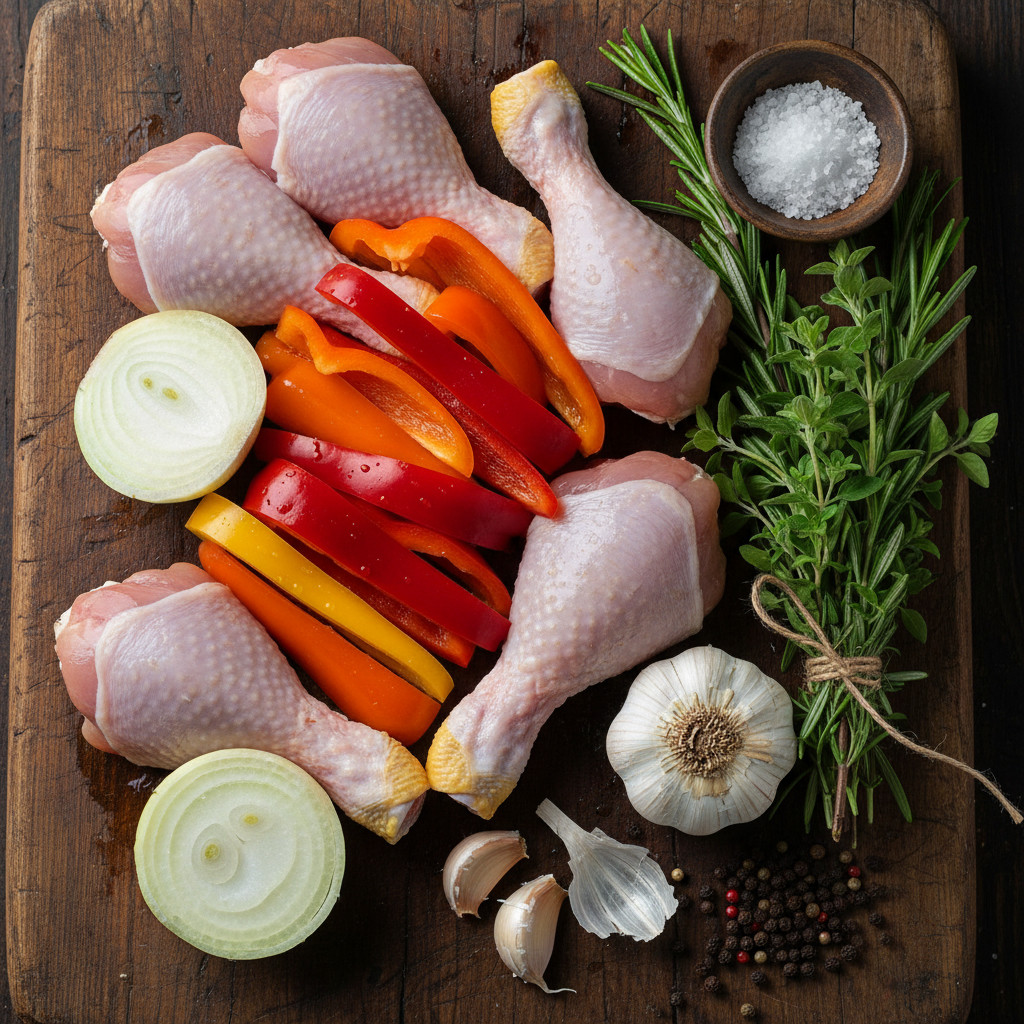
Your casserole’s success begins with choosing the right drumsticks. Look for pieces with smooth, unblemished skin that appears plump and moist rather than dry or discolored. The meat should feel firm to the touch and display a healthy pink color. Whenever possible, opt for organic or free-range chicken, which typically offers superior flavor and texture compared to conventionally raised poultry. These chickens develop more muscle tone from increased movement, resulting in meat with better structure and taste.
Size consistency matters when selecting drumsticks. Try to choose pieces of similar weight and dimension to ensure even cooking. If some drumsticks are significantly larger than others, they’ll require additional cooking time, potentially leaving smaller pieces overcooked and dry. Most recipes work best with medium-sized drumsticks weighing approximately four to five ounces each. Plan for two drumsticks per person for average appetites, or three for heartier eaters.
Bone-in, skin-on drumsticks are non-negotiable for this recipe. The bones contribute flavor and help meat stay moist during the extended baking time, while the skin becomes deliciously crispy and adds richness to the overall dish. Removing either element would compromise both taste and texture. If you prefer less fat, you can remove the skin after cooking, though you’ll sacrifice some flavor and visual appeal.
The Italian Flavor Arsenal
Herbs and Aromatics That Define the Dish
Fresh herbs elevate Italian chicken casserole from ordinary to extraordinary. Rosemary stands out as a classic pairing with chicken, offering a pine-like aroma and slightly bitter, woodsy flavor that complements rich poultry beautifully. Strip the needle-like leaves from tough stems and chop them finely to distribute flavor throughout the dish. Fresh oregano provides an earthy, slightly peppery taste that forms the backbone of Italian seasoning profiles. Its robust flavor holds up well during extended cooking times.
Basil contributes a sweet, aromatic quality that brightens the tomato-based components. Since basil loses potency when cooked for long periods, consider adding half during cooking and reserving the remainder to tear and scatter over the finished casserole for a fresh herb garnish. Thyme offers subtle, slightly minty notes that round out the herb blend. Just a tablespoon of fresh thyme leaves makes a noticeable difference.
Garlic deserves special attention as a cornerstone ingredient. Use fresh cloves rather than pre-minced jarred versions, which lack the punchy, assertive flavor that defines Italian cooking. Plan for at least six to eight cloves, minced or thinly sliced. Don’t worry about using too much—the extended cooking time mellows garlic’s sharpness, transforming it into sweet, caramelized bits that enrich the sauce. Quality extra virgin olive oil carries these aromatic compounds throughout the dish while adding its own fruity, peppery characteristics.
Tomato Components and Acid Balance
Tomatoes form the foundation of the casserole’s sauce, providing both liquid for braising and acidity to brighten flavors. Canned whole San Marzano tomatoes represent the gold standard, offering sweet, low-acid flesh with minimal seeds. Crush them by hand for a rustic texture, or use an immersion blender for a smoother consistency. If San Marzanos aren’t available, any high-quality canned whole tomatoes work well—avoid pre-diced versions, which often contain calcium chloride that keeps them firm rather than breaking down into sauce.
Cherry or grape tomatoes make excellent fresh additions, especially during peak summer season. Their concentrated sweetness intensifies during roasting, creating bursts of flavor throughout the casserole. Halve them before adding to ensure they release their juices. Tomato paste serves as a secret weapon for depth—just two tablespoons provide concentrated umami that enriches the overall taste profile without making the sauce overly thick.
Balancing tomato acidity requires a touch of sweetness and the right liquid components. A half-cup of dry white wine (like Pinot Grigio or Sauvignon Blanc) adds complexity and helps deglaze the pan, lifting flavorful browned bits. Chicken stock provides savory depth and keeps the casserole moist. A pinch of sugar or a drizzle of balsamic vinegar can neutralize excessive acidity from tomatoes while enhancing their natural sweetness.
Fresh Vegetables and Aromatics
Building Layers of Flavor and Nutrition
Onions provide essential aromatics that form the flavor base. Yellow onions offer the best balance of sweetness and sharpness for this application. Cut them into thick wedges or half-moons rather than dicing them finely—larger pieces maintain their structure during the long cooking time and provide textural variety. The onions caramelize beautifully, developing rich, sweet notes that complement the savory chicken.
Bell peppers contribute both color and gentle sweetness. Red, yellow, or orange varieties work best, as green peppers can introduce bitterness. Cut them into broad strips or large chunks. The peppers soften and sweeten during baking, absorbing the tomato sauce while releasing their own natural sugars. They also provide vitamin C and antioxidants that boost the casserole’s nutritional value.
Zucchini or other summer squash adds bulk and moisture while remaining neutral enough to let other flavors shine. Slice it into thick rounds or half-moons to prevent it from disintegrating. Mushrooms offer earthy, umami-rich notes that deepen the overall flavor profile. Cremini or button mushrooms work well, cleaned and quartered or halved. Olives—either Kalamata, Castelvetrano, or a mix—introduce briny, salty pops of flavor that accent the Mediterranean character. Use them whole or roughly chopped, and add them partway through cooking to prevent excessive saltiness from permeating the entire dish.
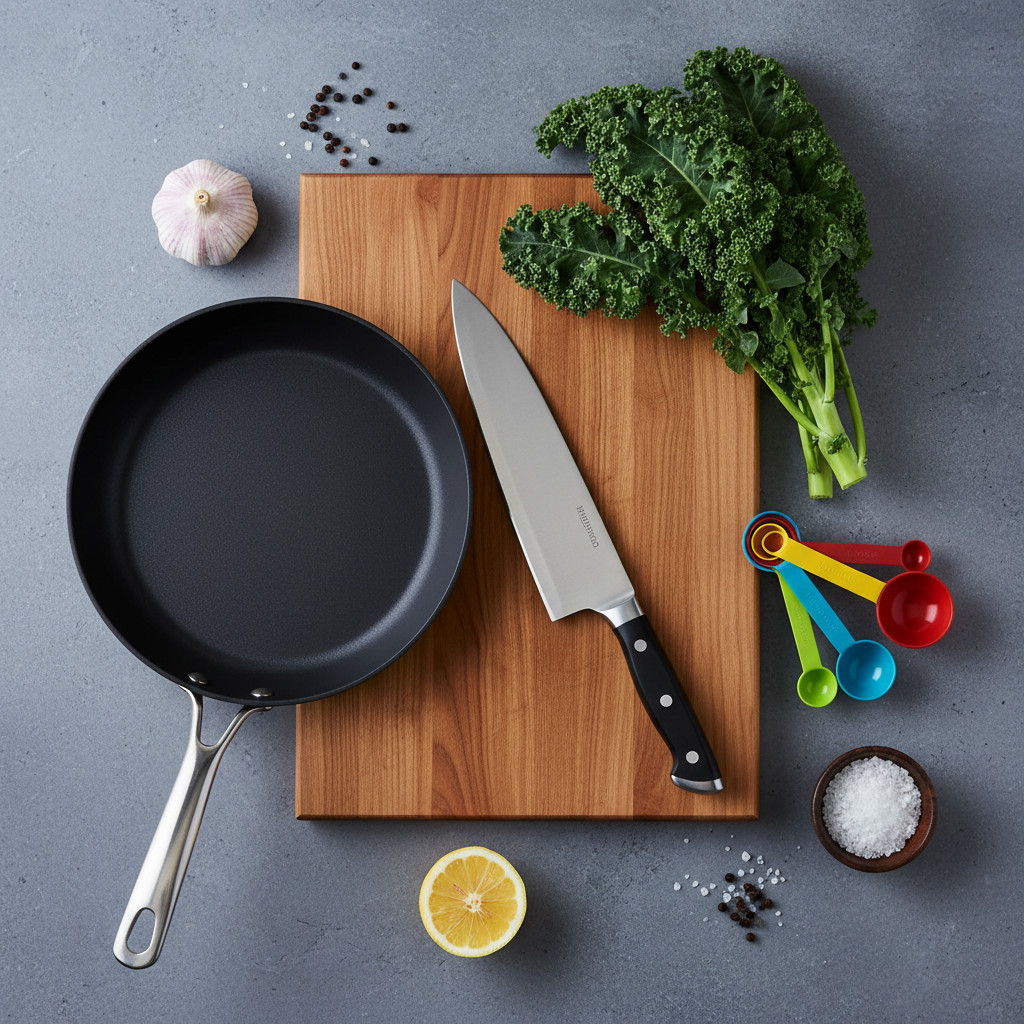
Kitchen Tools and Equipment You’ll Need
Setting yourself up for success requires having the right tools within reach. This section outlines essential and optional equipment that streamlines the cooking process and ensures optimal results.
The Critical Baking Vessel
Your casserole dish forms the foundation of this recipe. A large, heavy-duty roasting pan or baking dish measuring 9×13 inches provides adequate space for six to eight drumsticks plus vegetables without overcrowding. Ceramic, enameled cast iron, or heavy-gauge metal pans all work beautifully, each offering distinct advantages. Ceramic and enameled cast iron distribute heat evenly and maintain temperature well, promoting thorough cooking and excellent browning. Metal pans heat quickly and create superior crispy skin but may develop hot spots with less expensive versions.
Ensure your chosen vessel has sides at least two to three inches tall to contain the sauce and prevent spillovers during cooking. Shallow pans expose too much surface area, causing liquids to evaporate too quickly and potentially burning the bottom ingredients. The dish should fit comfortably in your oven with at least an inch of clearance on all sides to allow proper air circulation.
Preparation and Cooking Tools
A sharp chef’s knife makes vegetable prep efficient and safe. Dull knives require excessive pressure, increasing the risk of slipping and causing injury. Keep your knife properly sharpened for clean cuts through onions, peppers, and herbs. A sturdy cutting board—preferably wood or quality plastic—provides a stable work surface. Designate separate boards for raw poultry and vegetables to prevent cross-contamination.
Measuring cups and spoons ensure accurate seasoning and liquid ratios. While experienced cooks may successfully improvise, following measurements initially helps you understand proper proportions before experimenting with variations. A wooden spoon or heat-resistant spatula assists with stirring and scraping up browned bits. Tongs prove invaluable for turning drumsticks during browning and arranging them in the casserole dish. Paper towels help pat chicken dry—a crucial step for achieving crispy skin.
Optional Equipment That Enhances Results
A meat thermometer removes guesswork from determining doneness. Chicken drumsticks reach food-safe temperatures at 165°F, though cooking them to 175°F or 180°F creates more tender, fall-apart texture as connective tissues fully break down. Insert the thermometer into the thickest part of the drumstick without touching bone for accurate readings.
An oven-safe skillet allows you to brown drumsticks on the stovetop before transferring them directly to the oven in the same pan, reducing dishes and simplifying the process. Cast iron skillets work particularly well for this technique. A basting brush helps you coat chicken with marinade or brush on pan drippings during cooking, ensuring moist, flavorful results. Aluminum foil becomes useful if the chicken browns too quickly—simply tent it loosely over the dish to slow skin coloring while the meat finishes cooking.
Step-by-Step Preparation Guide
Follow this detailed roadmap to transform raw ingredients into a stunning Italian chicken drumstick casserole. Each stage builds upon the previous one, creating layers of flavor and ensuring perfectly cooked results.
Preparing the Chicken Drumsticks
1. Pat the Chicken Completely Dry
This seemingly simple step dramatically impacts your final results. Remove drumsticks from their packaging and place them on a plate lined with paper towels. Use additional paper towels to thoroughly pat every surface of each drumstick, removing all visible moisture. Excess water prevents proper browning because it must evaporate before the chicken can develop color. Wet chicken steams rather than sears, resulting in pale, rubbery skin instead of the golden, crispy exterior you’re aiming to achieve.
The drying process becomes especially important if you’ve brined or marinated the chicken, as these techniques add additional moisture. Take extra time to blot these drumsticks completely dry. Don’t rush this step—spending an extra minute or two here pays dividends in texture and appearance. Once dried, let the chicken sit at room temperature for 15-20 minutes before cooking. This allows the meat to lose its refrigerator chill, promoting more even cooking throughout. Cold chicken placed directly in a hot pan requires longer cooking times and develops less appealing color.
After drying, inspect each drumstick and remove any remaining feather remnants or excess fat deposits. Small feather pieces occasionally remain on commercially processed chicken. Pull them out with clean fingers or tweezers. Trimming obvious fat deposits reduces greasiness, though don’t remove all fat—it contributes flavor and moisture during cooking.
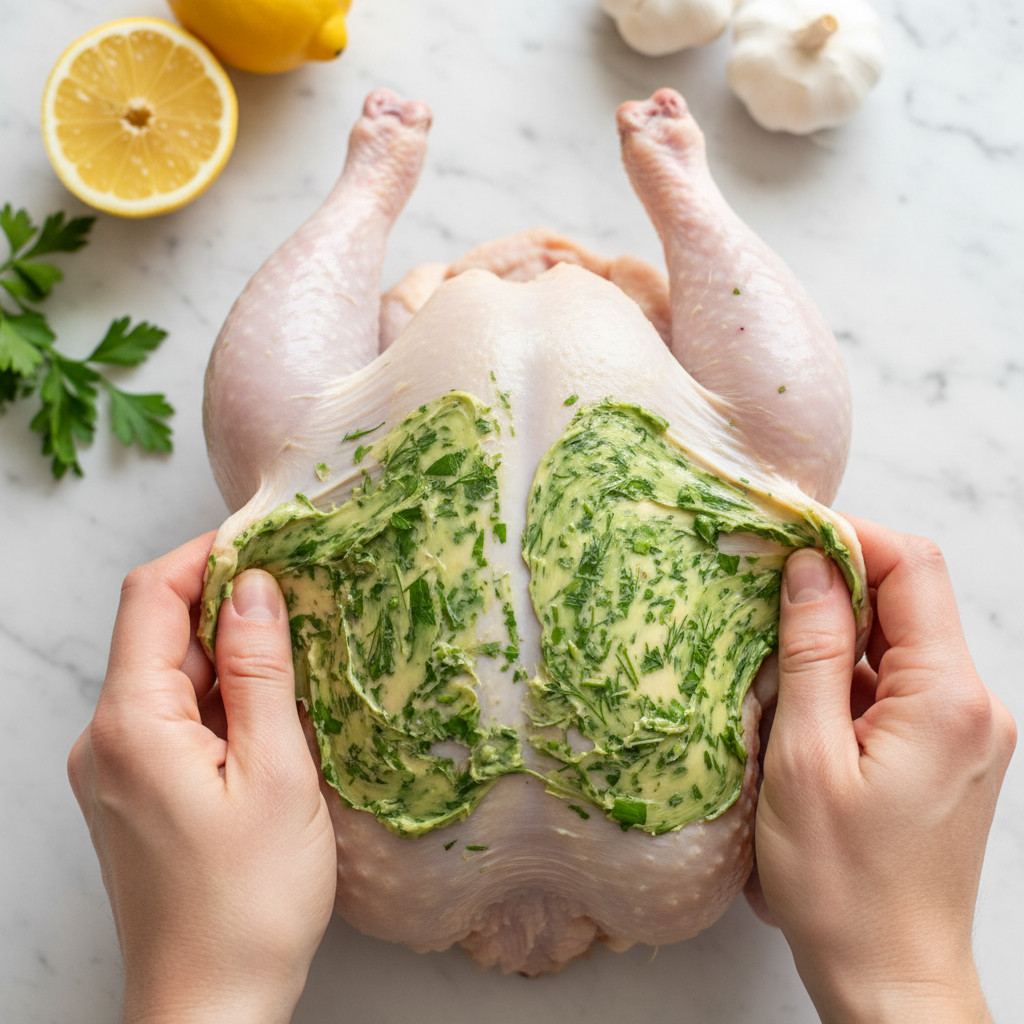
2. Season Generously with Salt, Pepper, and Initial Herbs
Proper seasoning makes the difference between bland and bold chicken. Create a seasoning blend by combining two teaspoons of kosher salt, one teaspoon of freshly ground black pepper, one teaspoon of garlic powder, one teaspoon of dried oregano, and half a teaspoon of red pepper flakes for gentle heat. Mix these together in a small bowl. Sprinkle the blend liberally over all sides of each drumstick, then use your hands to massage the seasonings into the meat and skin. Don’t be shy—chicken requires assertive seasoning to taste properly balanced.
The salt performs multiple functions beyond basic flavoring. It enhances the chicken’s natural taste, helps retain moisture during cooking through osmotic effects, and assists with browning by modifying surface proteins. Using kosher salt rather than table salt provides better control—its larger crystals distribute more evenly and taste less harsh. If you only have table salt available, reduce the quantity by about one-third to avoid oversalting.
Coating the chicken at least 30 minutes before cooking yields even better results. This brief dry-brining period allows salt to penetrate the meat rather than just seasoning the surface. For maximum impact, season the chicken and refrigerate it uncovered overnight. The extended time lets salt work its way deep into the meat while the air-drying effect on the skin creates ultra-crispy results. If you choose this approach, remember to bring the chicken to room temperature before proceeding with cooking.
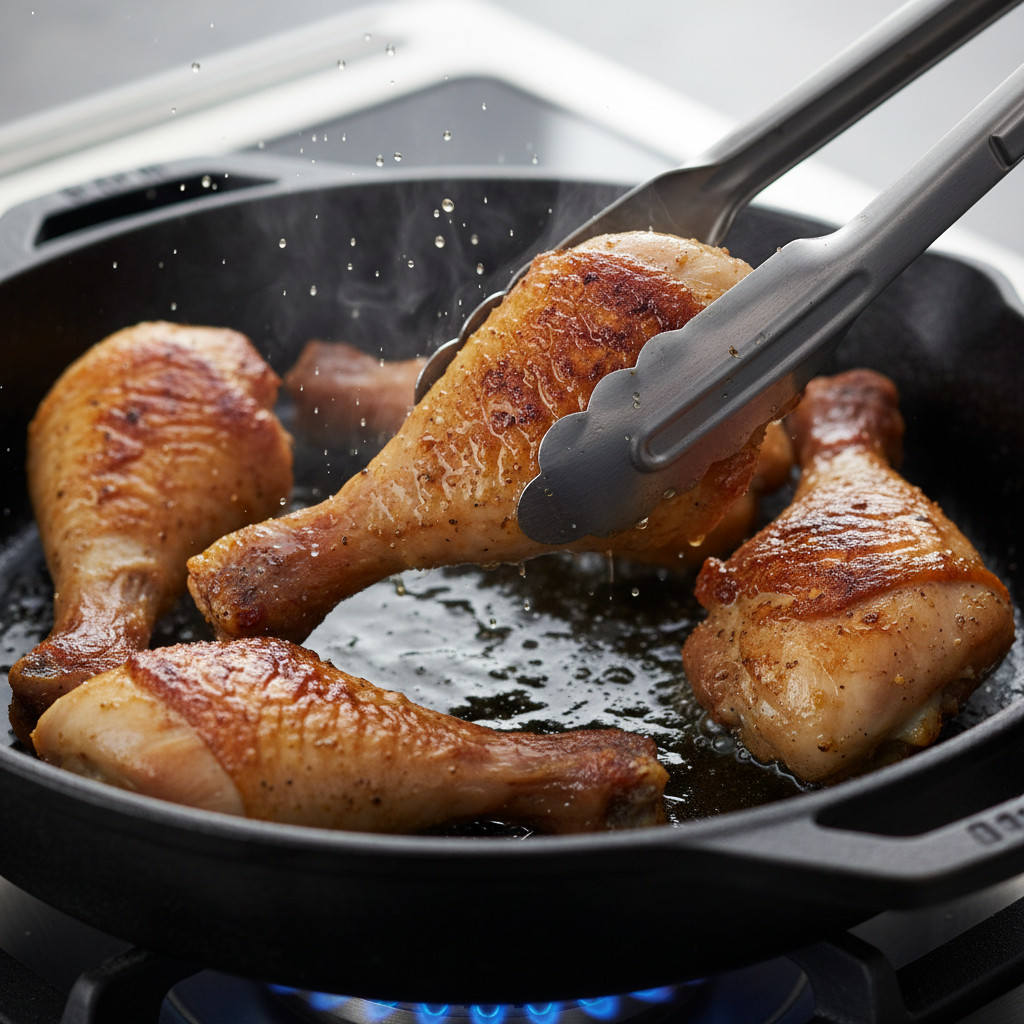
3. Brown the Drumsticks for Maximum Flavor Development
Heat two tablespoons of olive oil in a large skillet over medium-high heat until it shimmers but doesn’t smoke. Working in batches to avoid overcrowding, place drumsticks in the hot pan with space between each piece. Overcrowding lowers the pan temperature, causing chicken to steam rather than brown. Let the drumsticks cook undisturbed for four to five minutes on the first side. Resist the urge to move them around—proper browning requires sustained contact with the hot surface.
When the skin develops deep golden-brown color and releases easily from the pan, use tongs to flip each drumstick and brown the opposite side for another three to four minutes. You don’t need to brown every surface—focusing on two sides provides sufficient color and flavor. This browning process, called the Maillard reaction, creates hundreds of complex flavor compounds that significantly enhance the finished dish. The browned bits (fond) that stick to the pan bottom become the foundation for your sauce, so don’t skip this step.
Once all drumsticks are browned, transfer them to a plate and set aside while you build the vegetable base. The chicken doesn’t need to be fully cooked at this stage—it finishes in the oven surrounded by vegetables and sauce. Browning serves purely to develop flavor and create appealing color. If you’re short on time, you can skip browning and proceed directly to assembling the casserole, though you’ll sacrifice some flavor depth and visual appeal.
Building Your Flavor Base
Creating the Aromatic Foundation
Using the same skillet (don’t clean it—those browned bits contain concentrated flavor), reduce heat to medium and add another tablespoon of olive oil if the pan seems dry. Add sliced onions and cook for five to six minutes, stirring occasionally, until they soften and begin developing color around the edges. The onions will help loosen the browned chicken bits stuck to the pan bottom. Use your wooden spoon to scrape these flavorful deposits, incorporating them into the onions.
Add sliced bell peppers to the onions and cook for an additional three to four minutes until they begin to soften slightly. They’ll continue cooking in the oven, so they only need preliminary softening at this stage. Toss in minced garlic and cook for just 30 to 60 seconds, stirring constantly. Garlic burns easily, becoming bitter when overcooked, so add it near the end of the sautéing process and keep it moving in the pan. As soon as you smell that unmistakable garlic aroma wafting up from the skillet, it’s time to add liquid.
Pour in the white wine, using it to deglaze the pan. Scrape the bottom vigorously with your wooden spoon, lifting all those caramelized bits into the liquid. Let the wine bubble actively for two to three minutes, reducing by about half. This cooking time burns off harsh alcohol while concentrating the wine’s flavor. The acidity in the wine brightens the overall taste and helps balance the rich chicken. If you prefer not to cook with alcohol, substitute additional chicken stock with a tablespoon of lemon juice added for similar acidity.
Incorporating Tomatoes and Creating the Sauce
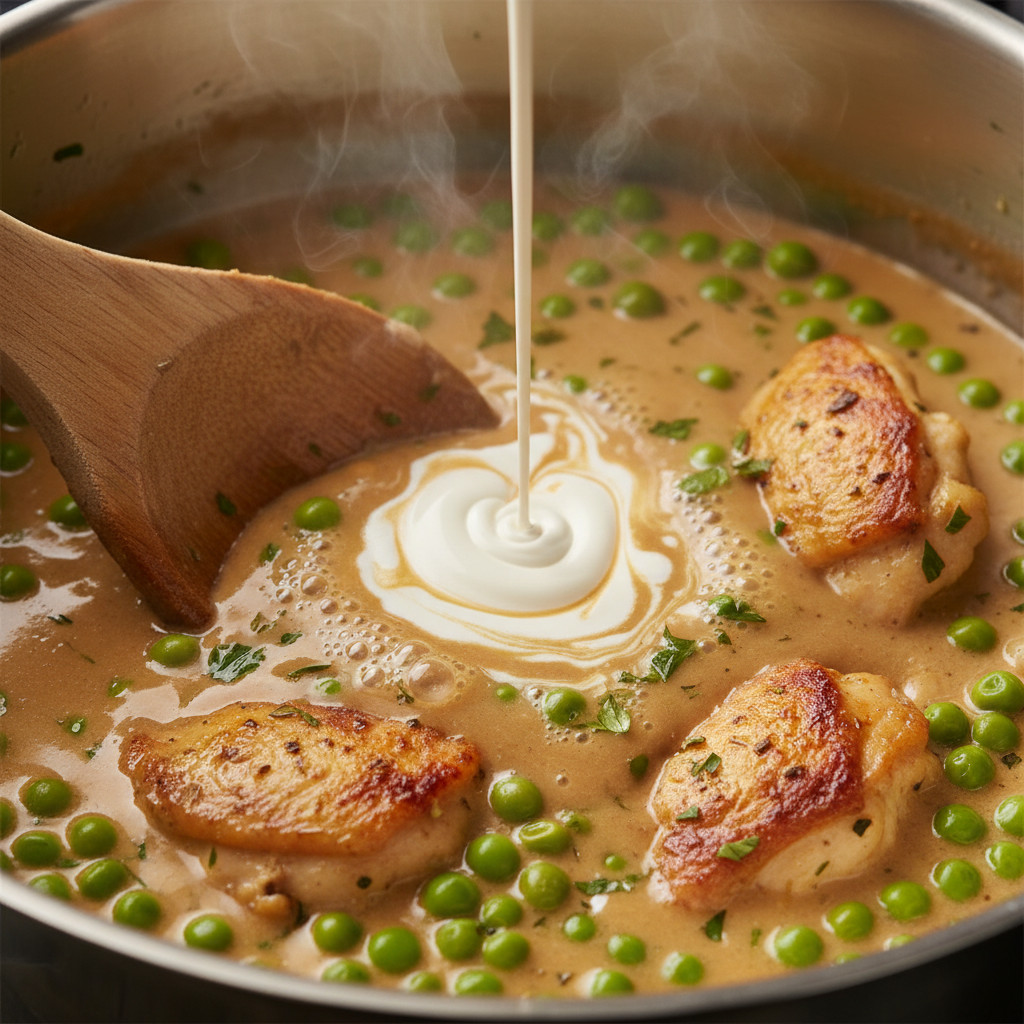
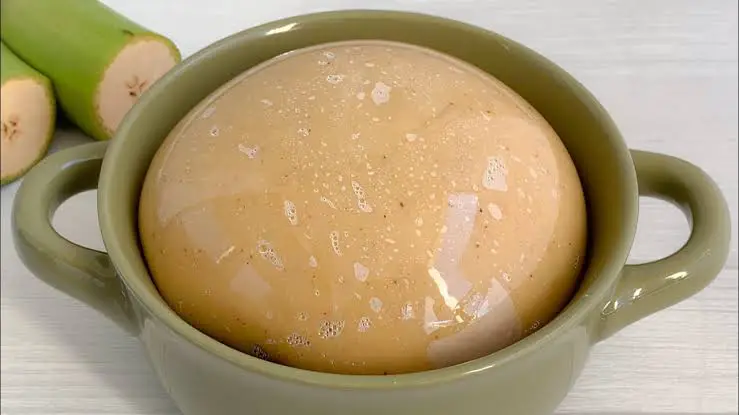
Stir in the tomato paste and cook it with the vegetables for one to two minutes. This brief cooking time caramelizes the paste’s natural sugars and removes any raw, metallic notes. The paste will darken slightly as it cooks—this color change indicates proper flavor development. Add your crushed tomatoes, chicken stock, and fresh herbs to the skillet. Stir everything together, breaking up any clumps of tomato paste. Season the sauce with salt, black pepper, and a pinch of sugar to balance acidity.
Bring the mixture to a simmer, then reduce heat and let it bubble gently for five minutes. This brief simmering helps flavors meld and slightly thickens the sauce. Taste and adjust seasonings—the sauce should taste slightly more assertive than you want the finished dish to be, as flavors will mellow during baking. If it seems too acidic, add another pinch of sugar. If it tastes flat, increase the salt incrementally until the flavors brighten. Remember that olives and cheese (if using) will add saltiness later, so avoid oversalting at this stage.
The sauce should have a pourable but slightly clingy consistency—thinner than marinara but thicker than soup. If it seems too thick, add more chicken stock a quarter-cup at a time. If it’s too thin, let it simmer a few minutes longer to reduce. This sauce forms the braising liquid that keeps chicken moist while infusing it with Italian flavors throughout the baking process.
Assembling the Casserole
Layering for Optimal Results
Preheat your oven to 375°F, positioning a rack in the center position for even heat distribution. Lightly oil your baking dish to prevent sticking. Pour roughly half of the tomato-vegetable sauce into the prepared dish, spreading it evenly across the bottom. This base layer prevents chicken from sitting directly on the dish surface, where it might stick and burn. The liquid cushion also promotes gentle, even cooking.
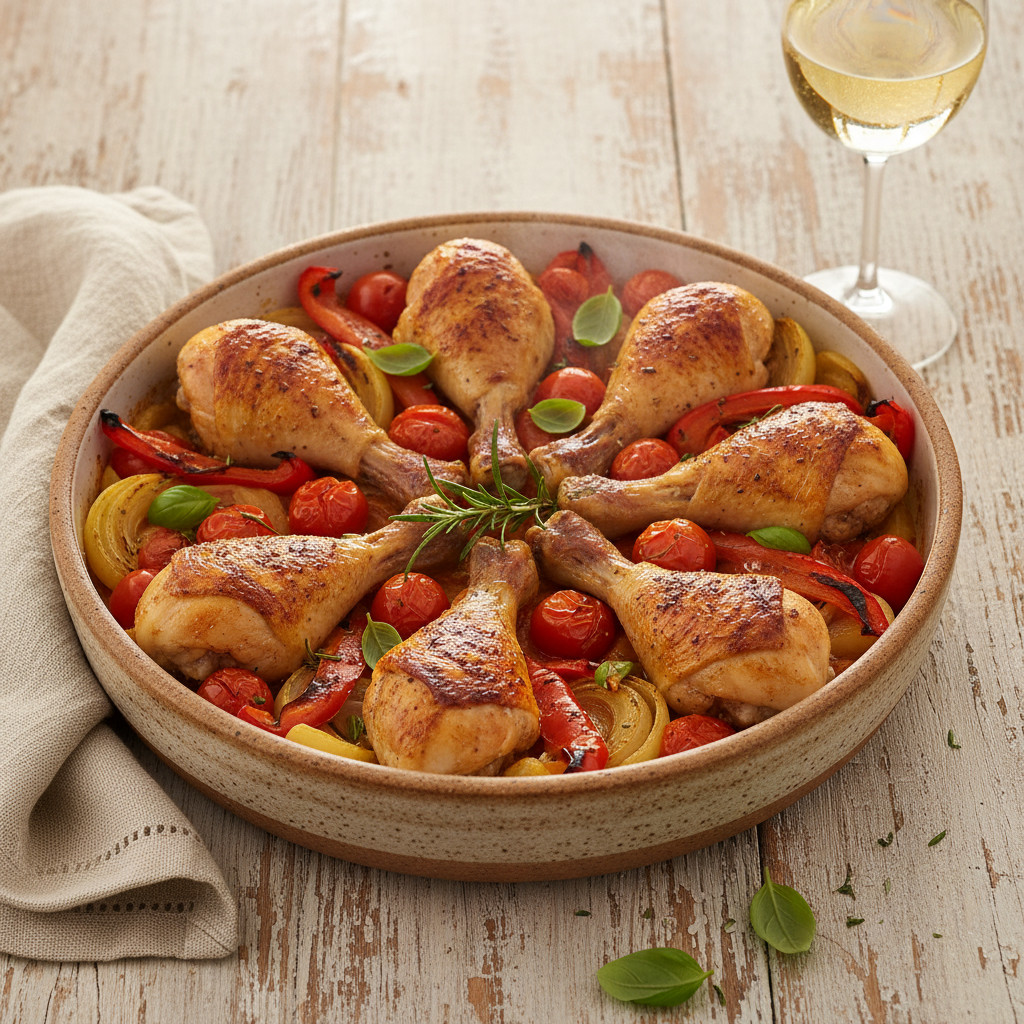
Nestle the browned drumsticks into the sauce, arranging them in a single layer with space between each piece when possible. Avoid stacking drumsticks, as this prevents even cooking and browning. Position them skin-side up so the tops can continue crisping during baking. If your dish isn’t quite large enough to prevent some overlap, that’s acceptable—just ensure most of each drumstick is exposed to heat.
Scatter the remaining vegetables around and between the drumsticks—add any reserved zucchini, mushrooms, and cherry tomatoes at this point. These vegetables will roast in the sauce, absorbing flavors while contributing their own. Pour the remaining sauce over and around the chicken, ensuring vegetables are mostly submerged while keeping the chicken skin exposed above the liquid line. The exposed skin crisps up beautifully, while the submerged meat stays moist and tender.
Final Touches Before Baking
Drizzle a tablespoon of olive oil directly over the chicken skin. This extra fat promotes browning and creates gorgeously crispy, golden skin. Scatter a few sprigs of fresh herbs across the top—whole rosemary or thyme sprigs add visual appeal and infuse additional aroma during cooking. If using olives, distribute them throughout the dish now, pressing them slightly into the sauce so they don’t dry out.
Some cooks like to add halved lemons to the casserole, tucking them between drumsticks. The lemons caramelize during baking, developing sweet-tart flavor while perfuming the dish with citrus essence. Diners can squeeze the roasted lemon over their portions for a bright flavor boost. This addition is entirely optional but adds an impressive professional touch.
Cover the dish loosely with aluminum foil, creating a tent rather than sealing tightly. This covering traps steam during the initial cooking phase, helping chicken cook through while preventing excessive evaporation of the braising liquid. The loose tent allows some moisture to escape, preventing the dish from becoming waterlogged. After the first 30 minutes, you’ll remove this foil to allow the skin to crisp.
Cooking Techniques for Perfect Results
Understanding the science and method behind the cooking process helps you adapt the recipe to your specific oven and preferences while troubleshooting any issues that arise.
Temperature and Timing Guidelines
The Initial Covered Baking Phase
Slide the covered casserole into your preheated 375°F oven and set a timer for 30 minutes. During this phase, the moderate temperature and trapped steam gently cook the chicken while keeping it incredibly moist. The liquid bubbles gently around the drumsticks, braising them in the aromatic tomato sauce. This technique combines the best aspects of roasting and braising—the chicken develops concentrated flavor while staying tender and juicy.
The covered cooking period also allows vegetables to soften without burning and gives the sauce time to thicken and concentrate. Flavors meld and intensify as garlic, herbs, and vegetables exchange essences. The chicken fat renders into the sauce, enriching it with savory depth and giving it a luxurious mouthfeel. Don’t open the oven during this phase—each time you crack the door, you release heat and extend the required cooking time.
At the 30-minute mark, carefully remove the foil (watch out for escaping steam that can burn). The chicken will look pale and steamed at this point, with the skin soft and flabby. Don’t worry—the transformation happens during the next phase. Check the liquid level in the dish. It should have reduced slightly but still come roughly halfway up the sides of the drumsticks. If it seems too dry, add a quarter-cup of chicken stock. If there’s excessive liquid pooling, use a spoon to carefully ladle some out (save it for another use—this concentrated liquid makes incredible soup or pasta sauce).
The Uncovered Crisping Phase
Return the uncovered casserole to the oven for an additional 30 to 40 minutes. This extended time at moderate temperature allows the chicken to cook completely through while the exposed skin gradually loses moisture, crisps up, and develops rich, golden-brown color. The sauce continues reducing, concentrating flavors and thickening to a consistency that coats the vegetables beautifully without being soupy.
Around the 20-minute mark of this phase, check the chicken’s progress. The skin should be starting to color and tighten. If you notice certain spots browning much faster than others (common with oven hot spots), rotate the dish 180 degrees to promote even cooking. If the skin browns too quickly before the meat cooks through, loosely drape a sheet of foil over just the top surface to slow browning while the interior finishes cooking.
The casserole is complete when the chicken reaches an internal temperature of at least 165°F (175°F for more fall-apart tender texture) and the skin appears deeply golden and crispy. Insert your thermometer into the thickest part of several drumsticks, ensuring you’re measuring meat temperature rather than touching bone, which gives inaccurately high readings. The sauce should be noticeably thickened, coating the back of a spoon, with visible bubbling around the edges of the dish.
Achieving Golden, Crispy Skin
Understanding the Crispy Skin Equation
Crispy chicken skin requires three elements: dry surface, adequate fat, and sufficient heat. You addressed the first requirement during preparation by thoroughly drying the drumsticks. The natural fat in the skin handles the second requirement, supplemented by the olive oil you drizzled over the top. The extended uncovered baking period provides the necessary heat exposure. As moisture evaporates from the skin surface, the fat renders out and the skin proteins contract and crisp, creating that satisfying crunch everyone loves.
The moderate oven temperature of 375°F represents a careful balance. Higher temperatures would crisp the skin faster but risk burning it before the meat cooks through, especially given the extended cooking time required for drumsticks. Lower temperatures wouldn’t generate enough heat to properly crisp the skin, leaving it rubbery. If you prefer extra-crispy skin, you can finish the casserole under the broiler for two to three minutes. Watch it constantly during broiling—the skin can go from perfectly golden to burnt in seconds.
The Optional Broiler Finish
For restaurant-quality crispy skin, switch your oven to the broil setting once the chicken reaches proper internal temperature. Position the oven rack about six inches from the broiler element—closer means faster browning but higher burning risk. Broil for two to four minutes, watching constantly. The high, direct heat rapidly crisps the skin while adding dark, caramelized spots that look incredibly appealing.
Rotate the dish if you notice uneven browning. Some areas may crisp faster due to varying distances from the heat element. As soon as the skin achieves your desired color and crispness, remove the dish immediately. Residual heat will continue cooking briefly even after removing it from the oven, so pull it slightly before reaching your ideal color to prevent overcooking. The vegetables and sauce can handle the brief high heat exposure without negative effects.
Keep in mind that broiling is entirely optional—the casserole delivers excellent results without this step. Many cooks skip broiling to avoid the risk of burning or to maintain a more rustic appearance. Make your decision based on personal preference and comfort level. If you’re new to cooking, perfect the basic recipe before experimenting with broiling.
Customization Options and Variations
The foundational recipe serves as a launching point for countless adaptations. This section explores ways to tailor the casserole to your preferences, dietary needs, and available ingredients.
Dietary Adaptations
Low-Carb and Keto-Friendly Modifications
The basic recipe already skews relatively low in carbohydrates, making it naturally compatible with low-carb and ketogenic diets. To further reduce carbs, omit the sugar addition and minimize high-carb vegetables. Replace bell peppers and cherry tomatoes with lower-carb options like green beans, asparagus, cauliflower, or broccoli. Use crushed tomatoes sparingly or substitute half the tomato product with additional chicken stock and a splash of red wine vinegar for acidity.
Focus on increasing healthy fats to meet keto macronutrient ratios. Add extra olive oil, include fat-rich olives generously, and top the finished casserole with full-fat mozzarella or Parmesan cheese during the final minutes of cooking. Serve the chicken with cauliflower mash or zucchini noodles rather than pasta or bread. These modifications maintain the Italian flavor profile while aligning with low-carb dietary requirements.
Whole30 and Paleo Compliance
Making the casserole Whole30 and Paleo-compliant requires minimal adjustments. Eliminate the wine and replace it with additional chicken stock or bone broth. Ensure your chicken stock doesn’t contain added sugars or non-compliant ingredients by reading labels carefully or making homemade stock. Skip the sugar addition—while it helps balance acidity, it’s not essential for flavor. Use fresh tomatoes or compliant canned tomatoes without added sugars or preservatives.
Replace white wine vinegar or balsamic vinegar with red wine vinegar if needed for acidity, as some balsamic varieties contain added sugars. Load up the casserole with Whole30-approved vegetables like bell peppers, zucchini, mushrooms, onions, and fresh tomatoes. Omit cheese and any grain-based side dishes, serving the chicken with compliant options like roasted sweet potatoes or a fresh salad. These simple swaps create a fully compliant version without sacrificing the essential Italian character of the dish.
Gluten-Free Considerations
The basic Italian chicken drumstick casserole recipe is naturally gluten-free when you use compliant chicken stock. Most commercially produced chicken stocks are gluten-free, but always verify by checking labels, as some brands use wheat-based ingredients as thickeners. If serving the casserole with bread or pasta, choose certified gluten-free alternatives. The casserole pairs beautifully with gluten-free crusty bread, polenta, or rice as side options.
Be cautious with any prepared seasonings or spice blends, as these sometimes contain wheat-based anti-caking agents or fillers. Using individual herbs and spices guarantees gluten-free status. If you’re cooking for someone with celiac disease or severe gluten sensitivity, take care to prevent cross-contamination by using clean utensils, cutting boards, and cookware that haven’t been in contact with gluten-containing foods.
Flavor Profile Adjustments
Mediterranean and Greek-Inspired Variations
Transform the Italian casserole into a Greek-inspired version by adjusting the herbs and adding region-specific ingredients. Replace some or all of the oregano with fresh dill and mint. Add lemon zest and extra lemon juice to brighten flavors. Include Kalamata olives generously and add artichoke hearts for authentic Greek flair. Top the casserole with crumbled feta cheese during the final ten minutes of cooking, allowing it to soften and brown slightly. Serve with tzatziki sauce on the side for drizzling.
For a broader Mediterranean interpretation, incorporate ingredients from various coastal regions. Add capers for briny pops of flavor. Include sun-dried tomatoes for concentrated, sweet-tart notes. Toast pine nuts and scatter them over the finished dish for textural contrast and nutty richness. Add a pinch of saffron to the sauce for an luxurious, aromatic quality reminiscent of Spanish and French Mediterranean cooking. These adaptations maintain the casserole’s soul while exploring different regional expressions.
Spicy Variations for Heat Seekers
Increase heat levels by incorporating more red pepper flakes into both the chicken seasoning and the sauce. Fresh or pickled jalapeños or Fresno chilies add bright, sharp heat. For a different heat character, stir Calabrian chili paste or harissa into the tomato sauce. These fermented chili products provide complex heat with subtle fruity notes. Hot Italian sausage makes an excellent addition—brown links alongside the chicken and slice them into rounds before adding to the casserole.
For serious heat enthusiasts, include fresh habanero or serrano peppers, seeds and all. Remember that capsaicin (the compound responsible for chili heat) concentrates during cooking, so taste as you go when adding hot peppers to avoid overwhelming the dish. Balance added heat with cooling elements—serve the spicy casserole with a dollop of ricotta or a side of creamy polenta to temper the fire while letting the flavors shine through.
Mushroom and Earthy Variations
Create an earthier, more robust version by emphasizing mushrooms and umami-rich ingredients. Use a mix of mushroom varieties—cremini, shiitake, oyster, and porcini—for complex, savory depth. Rehydrate dried porcini mushrooms in warm water, then chop them and add both the mushrooms and their soaking liquid (strained to remove grit) to the sauce. This mushroom stock intensifies umami flavors dramatically.
Add a tablespoon of tomato paste beyond what the recipe calls for and include a splash of soy sauce or tamari for extra savory depth. Fresh thyme pairs exceptionally well with mushrooms, so increase the quantity. Include pearl onions instead of standard onions for a more refined appearance. This variation pairs beautifully with hearty red wines and appeals to diners who prefer rich, bold flavors over bright, acidic profiles.
Serving Suggestions and Pairings
Transforming your casserole into a complete, memorable meal requires thoughtful accompaniments that complement rather than compete with the main dish’s flavors.
Traditional Italian Side Dishes
Crusty Italian bread represents the most classic accompaniment, perfect for soaking up the flavorful tomato sauce. Look for ciabatta, focaccia, or a rustic Italian loaf with a crispy crust and airy interior. Warm the bread in the oven for a few minutes while the casserole rests. Serve it whole at the table with quality butter or extra virgin olive oil for dipping. Alternatively, slice and toast it to make garlic bread by brushing with butter, minced garlic, and parsley before crisping under the broiler.
Pasta creates a heartier meal that satisfies larger appetites. Choose shapes that hold sauce well—rigatoni, penne, or orecchiette work beautifully. Cook the pasta until just al dente, then toss it with some of the casserole sauce or simply with olive oil, garlic, and Parmesan cheese. The starchy pasta absorbs the flavorful juices from the chicken, creating layers of taste. For a lighter option, spiralized zucchini noodles or spaghetti squash offer similar satisfaction without the carbohydrate load.
Creamy polenta provides a luxurious base that contrasts beautifully with the tangy tomato sauce. Cook coarse-ground cornmeal with chicken stock until tender and creamy, then stir in butter and Parmesan cheese. Spread the polenta on serving plates and nestle drumsticks on top, spooning sauce over everything. The soft polenta and crispy chicken create an appealing textural contrast. Make-ahead tip: prepare polenta in advance, spread it in a pan to firm up, then cut it into squares and pan-fry until crispy before serving.
Fresh Salads and Vegetable Sides
A simple green salad cuts through the richness of the chicken casserole, providing freshness and textural contrast. Toss baby arugula or mixed greens with a bright lemon vinaigrette, shaved Parmesan, and toasted pine nuts. The peppery arugula and acidic dressing cleanse the palate between bites of rich chicken. Add halved cherry tomatoes, thinly sliced red onion, and cucumber for more substance and color. This combination creates a complete meal with plenty of vegetable variety.
Roasted vegetables make an excellent side, especially in cooler months. Brussels sprouts, carrots, and cauliflower develop caramelized edges and concentrated sweetness when roasted at high heat. Toss them with olive oil, salt, and pepper, then roast at 425°F until golden. The slight bitterness of Brussels sprouts and the earthiness of root vegetables complement the tomato-based sauce beautifully. Finish the vegetables with a squeeze of lemon and a sprinkle of fresh herbs to tie them to the main dish.
Sautéed greens provide nutrition and a slightly bitter contrast to the rich casserole. Quickly cook Swiss chard, kale, or spinach in olive oil with garlic and red pepper flakes until just wilted. Season with salt, pepper, and a splash of white wine vinegar. The greens add valuable minerals and fiber while keeping the meal relatively light. Their slight bitterness balances the sweetness in the tomato sauce, creating a more complex flavor experience.
Wine and Beverage Pairings
Selecting the right wine elevates the entire meal. Italian reds offer natural affinity with this casserole. A medium-bodied Chianti Classico brings bright cherry fruit and notable acidity that matches the tomato sauce beautifully. Barbera from Piedmont offers juicy red fruit flavors and refreshing acidity without excessive tannins that might overwhelm the chicken. For something more robust, try Montepulciano d’Abruzzo, which brings darker fruit notes and earthy undertones that complement the herbs.
White wine lovers should reach for fuller-bodied options with enough structure to stand up to the rich flavors. A Vermentino from Sardinia or Liguria provides citrus and herbal notes that echo the dish’s aromatics. Greco di Tufo offers weight and texture along with stone fruit flavors. If you prefer something more familiar, a California Chardonnay with moderate oak aging provides the richness and depth to match the chicken.
For non-alcoholic options, sparkling water with lemon keeps palates refreshed between bites. Iced herbal tea—particularly mint or chamomile—offers a soothing accompaniment. Italian-style lemonade, slightly less sweet than American versions, provides bright acidity similar to white wine. Coffee serves as an excellent after-dinner beverage, concluding the meal in authentic Italian style.
Storage, Reheating, and Meal Prep Tips
Proper handling of leftovers extends the life of your casserole and maintains quality, while strategic meal prep approaches maximize efficiency for busy households.
Safe Storage Practices
Allow the casserole to cool to room temperature before storing, but don’t leave it out longer than two hours to prevent bacterial growth. Transfer leftovers to airtight containers—separate the chicken from the sauce and vegetables if possible for better quality retention. The chicken skin loses its crispness when stored in sauce, though it can be partially restored during reheating. Stored properly in the refrigerator, the casserole remains safe and delicious for three to four days.
For longer storage, freeze portions in freezer-safe containers or heavy-duty freezer bags. Remove as much air as possible to prevent freezer burn. Label containers with the date and contents. Frozen casserole maintains quality for up to three months. The tomato sauce and vegetables freeze beautifully, though the chicken skin texture suffers slightly after freezing. Consider this a reasonable trade-off for the convenience of having homemade meals ready to reheat.
When freezing, portion the casserole into single or double servings rather than storing the entire batch together. This approach allows you to thaw only what you’ll eat, preventing repeated freeze-thaw cycles that degrade quality. Flat freezer bags stack efficiently and thaw more quickly than deep containers. For maximum quality, thaw frozen casserole in the refrigerator overnight rather than using quick-thaw methods.
Reheating for Best Results
Oven reheating produces results closest to the original dish. Preheat your oven to 350°F. Place leftover casserole in an oven-safe dish and add a splash of chicken stock or water to replace moisture lost during storage. Cover loosely with foil and heat for 15 to 20 minutes until warmed through. Remove the foil during the final five minutes to re-crisp the chicken skin slightly. Check that the chicken reaches 165°F before serving to ensure food safety.
Microwave reheating offers speed and convenience, though with some quality trade-offs. Place a portion in a microwave-safe dish, cover loosely, and heat on 50 percent power in one-minute intervals, stirring between each. This gentler approach prevents edges from overcooking while the center remains cold. The microwave won’t restore crispy skin, but you can improve texture by finishing the chicken under the broiler for a minute or two after microwaving. Always verify the chicken reaches 165°F throughout.
Stovetop reheating works well for smaller portions. Place leftovers in a skillet over medium-low heat with a splash of liquid. Cover and warm gently, stirring occasionally. This method allows you to control heat exposure, reducing the risk of drying out the chicken. You can also repurpose leftovers creatively—shred the chicken and combine it with the sauce to create a pasta topping, sandwich filling, or soup base.
Meal Prep Strategies
Prepare components in advance to streamline weeknight cooking. Chop all vegetables up to two days ahead and store them in airtight containers in the refrigerator. Mix the seasoning blend and store it in a small jar. Brown the chicken drumsticks and refrigerate them, then complete the casserole assembly and baking on your desired serving day. This approach spreads the work across multiple days while still delivering a freshly baked meal.
For ultimate convenience, fully assemble the unbaked casserole, cover it tightly, and refrigerate it for up to 24 hours before cooking. When ready to bake, bring the dish to room temperature for 30 minutes, then proceed with the covered baking phase. You may need to add five to ten minutes to the cooking time since the ingredients start cold. This make-ahead approach proves invaluable when entertaining—complete all prep work in advance, then simply slide the dish into the oven when guests arrive.
Batch cooking multiplies efficiency. Double or triple the recipe, baking multiple casseroles simultaneously. Serve one immediately and freeze the others for future meals. When unexpected busy periods arise or you simply don’t feel like cooking, you’ll have a homemade meal ready to go. This strategy saves money compared to takeout while ensuring you always have nutritious food available. Many families dedicate a few hours one day per month to batch cooking several casseroles, creating a rotating freezer stock of ready-to-bake meals.
Troubleshooting Common Issues
Even experienced cooks encounter occasional problems. Understanding common issues and their solutions helps you course-correct and consistently achieve excellent results.
Chicken Isn’t Cooking Through
If your chicken hasn’t reached safe internal temperature after the recommended cooking time, several factors might be responsible. Very large drumsticks require additional cooking time—pieces weighing more than six ounces need an extra 10 to 15 minutes. Overcrowding the baking dish prevents proper heat circulation, leaving chicken undercooked even when the recipe timeline suggests it should be finished. Oven temperature calibration issues also cause problems—if your oven runs cool, everything takes longer.
To fix undercooked chicken, simply continue baking at 375°F, checking the internal temperature every five minutes until it reaches 165°F minimum. If the skin has already browned sufficiently, tent foil loosely over the top to prevent burning while the interior finishes cooking. Consider investing in an oven thermometer to verify your oven’s accuracy—many ovens run 25 degrees hotter or cooler than their displays indicate.
Prevent this issue in future preparations by selecting consistently sized drumsticks, avoiding overcrowding, and checking oven temperature accuracy. Make note of how long the casserole actually required in your specific oven with your typical batch size, then use that timing rather than the recipe estimate. Every cooking setup differs slightly, and adapting recipes to your unique circumstances leads to better results.
Skin Isn’t Crisping
Rubbery, pale chicken skin typically results from excess surface moisture. Ensure you thoroughly pat chicken dry before cooking and allow it to air-dry for 15 to 20 minutes after seasoning. Another common cause is sauce level—if liquid comes too high on the drumsticks, the skin never has a chance to dry and crisp. Keep sauce below the halfway point on the chicken, leaving skin exposed to direct heat.
Extended covered cooking time can also prevent crisping. Remove the foil after 30 minutes maximum to give skin adequate time to crisp during the uncovered phase. If your oven runs cool, increase temperature to 400°F for the uncovered cooking phase to promote better browning. The optional broiler finish provides guaranteed crispiness—just watch carefully to prevent burning.
If you’ve already baked the casserole and the skin is disappointingly soft, all isn’t lost. Transfer just the drumsticks to a clean baking sheet and place them under the broiler for two to three minutes, watching constantly. The high, direct heat will crisp the skin quickly. Meanwhile, the sauce and vegetables can stay in their dish, covered with foil to maintain warmth. Recombine everything just before serving.
Sauce Is Too Thin or Too Thick
Sauce consistency depends on multiple variables—the water content of your tomatoes, the accuracy of your liquid measurements, evaporation rates in your oven, and the size of your baking dish. If the sauce seems too thin and watery near the end of cooking, remove the lid and continue baking uncovered for an additional 10 to 15 minutes, allowing excess moisture to evaporate. You can also carefully transfer some of the liquid to a small saucepan and reduce it on the stovetop while the chicken finishes cooking, then recombine everything before serving.
For a quicker thickening solution, mix one tablespoon of cornstarch with two tablespoons of cold water to create a slurry. Stir this into the casserole sauce during the final 10 minutes of cooking. The cornstarch will thicken the liquid as it heats. Alternatively, mash some of the cooked vegetables directly in the dish—this adds body to the sauce naturally without additional ingredients.
If the sauce has thickened too much or threatens to burn on the dish bottom, add chicken stock or water a quarter-cup at a time, stirring to incorporate. The sauce should coat the vegetables and drumsticks but still pool slightly in the bottom of the dish. Don’t stress about achieving perfect consistency—slightly thinner sauce works beautifully with pasta or polenta, while thicker versions are ideal for serving with bread. Adjust based on your planned accompaniments and personal preference.
Flavors Taste Flat or Unbalanced
Bland casserole usually points to insufficient seasoning. Chicken requires generous salting, and the sauce needs proper seasoning beyond what the vegetables contribute naturally. If your finished casserole tastes flat, stir in additional salt gradually, tasting after each addition until flavors brighten. A squeeze of fresh lemon juice can work wonders, adding acidity that makes other flavors pop. A drizzle of good extra virgin olive oil enriched with fruity, peppery notes also enhances the overall taste.
Sometimes the issue is lack of depth rather than lack of seasoning. If flavors seem one-dimensional, stir in a tablespoon of tomato paste, a splash of balsamic vinegar, or a sprinkle of Parmesan cheese. These umami-rich ingredients add complexity. Fresh herbs scattered over the finished dish—basil, parsley, or oregano—contribute aromatic freshness that elevates the overall experience. A pinch of red pepper flakes adds subtle warmth that makes other flavors more pronounced without creating noticeable heat.
Prevent flat flavors by tasting and adjusting throughout the cooking process. Season chicken generously, taste the sauce before baking and adjust as needed, then taste again after cooking and make final corrections. Remember that salt enhances other flavors rather than just making food salty, so don’t be afraid to use adequate amounts. Season in layers—at multiple stages of cooking—rather than adding all seasoning at once for more complex, developed taste.
Final Words
Italian chicken drumstick casserole stands as a testament to the power of simple ingredients transformed through thoughtful preparation and classic cooking techniques. This dish delivers everything modern home cooks seek—convenience, affordability, nutrition, and most importantly, flavors that bring people together around the table. The combination of tender, fall-apart chicken, vibrant vegetables, and aromatic herbs creates a complete meal in one pan, simplifying both cooking and cleanup without sacrificing quality or taste.
Throughout this guide, you’ve discovered the essential elements that elevate this casserole from ordinary to exceptional. From selecting quality drumsticks and building layers of flavor through proper browning and sautéing, to understanding the science behind crispy skin and perfectly balanced sauce, you now possess the knowledge to consistently create restaurant-worthy results in your home kitchen. The versatility of this recipe ensures it remains relevant regardless of changing preferences, dietary requirements, or seasonal ingredient availability.
Beyond technique, this casserole represents something deeper—the joy of feeding yourself and those you care about with food made from scratch, infused with intention and care. In our fast-paced world, taking time to prepare a homemade meal constitutes an act of self-care and love. The aromas that fill your kitchen, the satisfaction of mastering a new recipe, and the pleasure of sharing delicious food create memories and connections that transcend the meal itself.
As you embark on making your own Italian chicken drumstick casserole, remember that cooking is as much about exploration and personal expression as it is about following instructions. Use this guide as a foundation, then adapt and adjust based on your unique preferences and circumstances. Perhaps you’ll discover that your family prefers extra garlic, or maybe you’ll create a signature variation featuring seasonal vegetables from your local farmers market. Each time you prepare this casserole, you’ll gain confidence and develop intuition about what works best in your kitchen.
The beauty of comfort food like this casserole lies in its ability to nourish both body and soul. It satisfies hunger while providing the nutrients necessary for health and vitality. Simultaneously, it offers comfort, familiarity, and the simple pleasure of a well-cooked meal. In times of stress or celebration, illness or achievement, food has always played a central role in human experience, and recipes like this one continue that timeless tradition.
Don’t hesitate to make this casserole your own by incorporating family traditions, regional ingredients, or creative interpretations. The foundational technique remains constant, but the possibilities for personalization are endless. Perhaps you’ll serve it at holiday gatherings, establish it as a weekly family dinner tradition, or rely on it during meal prep sessions to fuel busy weeks ahead. However you choose to integrate it into your cooking repertoire, this casserole promises to deliver consistent satisfaction.
As you close this guide and head to your kitchen, approach the cooking process with confidence and curiosity. Don’t stress about achieving perfection on your first attempt—even experienced cooks continually refine their techniques. Embrace the learning journey, celebrate your successes, and view any challenges as opportunities to develop your skills. With each casserole you prepare, you’ll notice improvements and discover personal preferences that make the dish uniquely yours.
Italian chicken drumstick casserole invites you to slow down, engage with real ingredients, and create something nourishing from scratch. In doing so, you participate in a culinary tradition stretching back generations, connecting with cooks past and present who understood that food represents much more than sustenance—it embodies love, community, and the simple joy of a meal shared with others. Now it’s your turn to bring this delicious dish to life and create your own delicious memories around the table.