Table of Contents
- How to Care for Indoor Palm Trees: Complete Care Guide
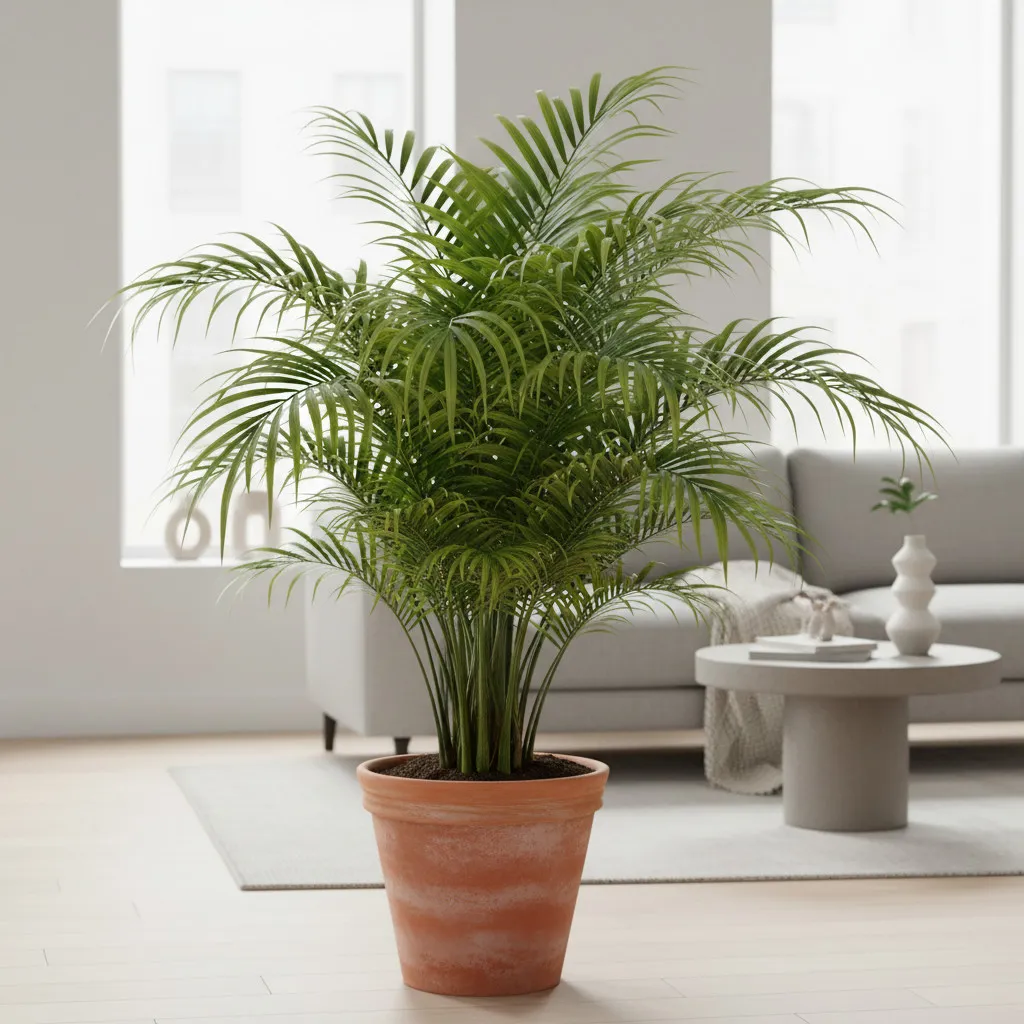
- Selecting the Perfect Indoor Palm Tree for Your Space
- Understanding Light Requirements for Indoor Palms
- Mastering the Art of Watering Indoor Palm Trees
- Creating the Ideal Soil Environment for Palm Success
- Maintaining Optimal Temperature and Humidity Levels
- Fertilizing Indoor Palms for Optimal Health and Growth
- Pruning and Maintenance for Attractive, Healthy Palms
- Repotting Indoor Palm Trees: When and How
- Troubleshooting Common Palm Problems and Pests
- Seasonal Care: Adjusting Through the Year
- Final Thoughts: Cultivating Your Indoor Tropical Paradise
How to Care for Indoor Palm Trees: Complete Care Guide
Imagine transforming your living space into a tropical oasis where lush, elegant fronds sway gently, bringing the serenity of a beach paradise right into your home. Indoor palm trees offer exactly this experience, combining stunning visual appeal with surprising ease of care. Whether you’re a seasoned plant parent or just beginning your indoor gardening journey, palm trees represent one of the most rewarding houseplants you can cultivate, offering both dramatic presence and forgiving nature.
With approximately 2,600 species in the palm family, these magnificent plants have captivated homeowners and interior designers alike for generations. From Victorian parlors to modern minimalist apartments, palms have graced indoor spaces for centuries, and for good reason. They purify the air, boost mood, elevate décor, and act as natural humidifiers—making them particularly valuable in dry indoor environments. Most importantly, despite their exotic appearance, indoor palms are remarkably low-maintenance compared to many other houseplants, requiring only moderate attention to their basic needs.
Understanding how to properly care for indoor palm trees ensures they’ll thrive for years, becoming stunning focal points that bring life, color, and tropical ambiance to any room. This comprehensive guide will walk you through every aspect of palm tree care, from selecting the perfect variety to troubleshooting common issues, so your palms can flourish and transform your indoor spaces into verdant retreats.
Selecting the Perfect Indoor Palm Tree for Your Space
Before diving into care routines, choosing the right palm variety sets the foundation for success. Not all palms are created equal when it comes to indoor cultivation, and matching your selection to your home’s specific conditions ensures healthier plants and less frustration down the road.
Understanding Your Indoor Environment
Take stock of your space before purchasing a palm. Consider the available natural light throughout the day, typical room temperatures, humidity levels, and how much space you can dedicate to the plant both now and as it matures. Some palms remain compact tabletop plants, while others eventually reach impressive heights of 8-12 feet indoors. Understanding these factors helps you select a variety that will truly thrive rather than merely survive in your home.
Popular Indoor Palm Varieties and Their Characteristics
The parlor palm stands as one of the most popular choices for indoor cultivation, earning its reputation as the ideal palm for beginners. This graceful plant thrives in low to medium light conditions, grows slowly, and typically reaches 4-6 feet in height indoors. Its delicate, feather-like fronds add elegance without overwhelming smaller spaces, and it tolerates occasional watering lapses better than many other varieties.
For those seeking air-purifying benefits, the areca palm (also called butterfly palm or bamboo palm) excels at removing toxins while adding a soft, tropical aesthetic. This variety features golden-yellow stems with arching fronds and prefers bright, indirect light. Though it can grow quite large—reaching 6-8 feet indoors—its clustered growth habit creates a lush, full appearance that serves as a stunning room divider or focal point.
The kentia palm represents another excellent choice, particularly prized for its tolerance of lower light conditions and forgiving nature regarding irregular watering. This elegant palm grows slowly and maintains a manageable size for years, making it ideal for less attentive gardeners who still want that sophisticated tropical look.
If you’re working with limited floor space but have bright windows, consider the lady palm. This fan-leafed beauty adapts remarkably well to various indoor conditions and can tolerate lower light better than most palms. Its thick, shiny leaves have blunt tips and grow from sturdy, fiber-covered stems that add textural interest. Lady palms grow slowly and can thrive in the same container for several years without becoming root-bound.
For dramatic visual impact, the majesty palm offers towering fronds and regal presence. However, this variety demands more attention than others, requiring bright indirect light, consistently moist soil, and higher humidity levels. If you can meet these needs, majesty palms reward you with rapid growth and impressive stature.
Selecting Healthy Plants at Purchase
When shopping for your palm, inspect potential purchases carefully to ensure you’re starting with a healthy specimen. Avoid plants showing signs of stress such as yellowing or brown leaves, spotted fronds, wilting, or visible pests. Check the soil—it should be moist but not waterlogged or bone-dry. Examine the base of the trunk for any soft spots or discoloration that might indicate rot. Look for palms with vibrant green foliage, firm trunks, and roots that haven’t completely overtaken their containers. A healthy young palm establishes more easily and proves far less challenging to nurture than one already stressed or sickly.
Understanding Light Requirements for Indoor Palms
Light serves as the lifeline for indoor palm trees, directly impacting their growth rate, foliage color, and overall health. Getting this fundamental element right makes all other aspects of care significantly easier.
The Science of Palm Lighting Needs
Most palms naturally grow in the understory of tropical forests, where they receive filtered sunlight shielded by larger trees overhead. This evolutionary background explains why many palms excel as houseplants—they’re genetically adapted to moderate light conditions. Bright, indirect light mimics their native environment perfectly, providing the energy they need for photosynthesis without the harsh intensity that can burn delicate fronds.
Bright Light Palm Varieties
Some palm species require more substantial light exposure to maintain their health and vigor. The areca palm, majesty palm, coconut palm, and fishtail palm all fall into this category, needing several hours of bright indirect sunlight daily. For these varieties, placement near east- or west-facing windows works beautifully, offering gentle morning or afternoon sun without the intense midday rays. South-facing windows can also work, but you’ll want to use sheer curtains to diffuse the light and prevent leaf scorch during peak afternoon hours.
Low-Light Tolerant Palm Options
If your home lacks abundant natural light, don’t despair. Several palm varieties adapt remarkably well to lower light conditions. The parlor palm, kentia palm, lady palm, bamboo palm, and cat palm all tolerate shadier spots, though they grow more slowly than they would in brighter conditions. These palms make excellent choices for north-facing windows, corners away from direct light sources, or rooms that simply don’t receive much sun. While they can survive in genuinely low light, they’ll still appreciate whatever natural light you can provide and won’t thrive in complete darkness.
Signs Your Palm Needs Different Lighting
Your palm communicates its lighting needs through its appearance. Pale, stretched, or sparse new growth signals insufficient light—the palm is literally stretching toward any available light source. Conversely, brown, crispy patches or yellowing leaves that progress from the tips inward often indicate too much direct sun burning the foliage. If you notice these symptoms, adjust your palm’s location incrementally, moving it either closer to or farther from your light source and monitoring its response over several weeks.
Supplementing with Artificial Light
When natural light proves inadequate, LED grow lights offer an effective solution. Modern grow lights are energy-efficient, produce minimal heat, and come in various styles from clip-on spotlights to standing floor lamps. Position grow lights 12-18 inches from your palm’s canopy and run them for 10-12 hours daily to supplement natural light. This approach works particularly well during winter months when days shorten and natural light intensity decreases.
Mastering the Art of Watering Indoor Palm Trees
Proper watering represents perhaps the single most critical aspect of palm care, yet it’s also where many plant owners struggle. Finding that perfect balance between adequate moisture and good drainage determines whether your palm thrives or merely survives.
The Goldilocks Principle of Palm Watering
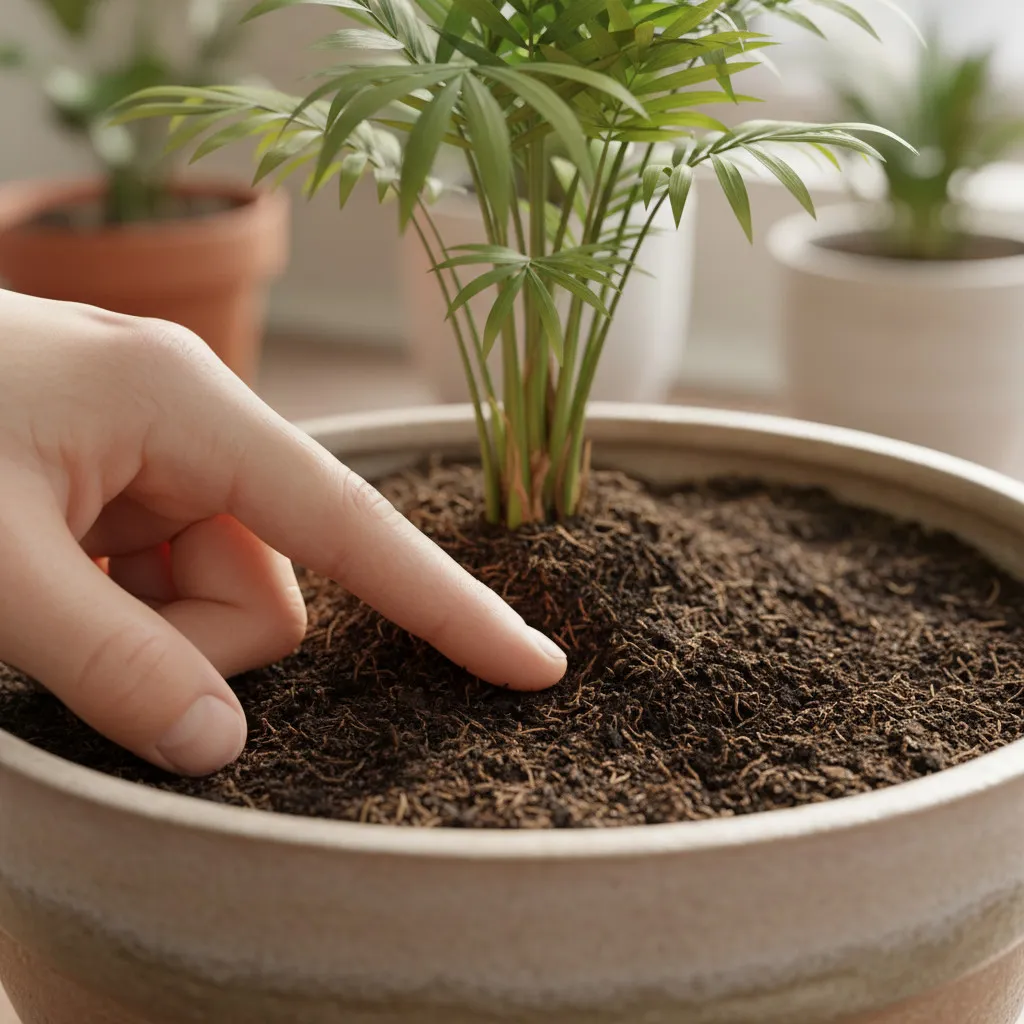
Palms prefer soil that’s consistently moist but never soggy—not too wet, not too dry, but just right. This balance supports healthy root development while preventing the rot that occurs when roots sit in waterlogged soil. As a general guideline, water your palm when the top inch of soil feels dry to the touch. Insert your finger into the soil up to your first knuckle; if it feels dry at that depth but still slightly cool and moist below, it’s time to water.
Proper Watering Technique
When you do water, be thorough. Apply water slowly until it begins draining from the bottom drainage holes, ensuring the entire root ball receives moisture. This deep watering encourages roots to grow downward, creating a stronger, more stable plant. After watering, always empty any excess water that collects in the saucer beneath the pot. Allowing palms to sit in standing water is one of the fastest ways to trigger root rot, which can quickly kill your plant.
Adjusting Watering Frequency Throughout the Year
Your palm’s watering needs fluctuate with the seasons. During spring and summer—the active growing season—palms typically need watering once or twice weekly, depending on your home’s temperature and humidity. In fall and winter, when growth naturally slows, reduce watering frequency to once every week or two. The plant simply doesn’t use as much water during dormancy, so maintaining summer watering schedules during winter almost guarantees overwatering problems.
Container Palms Require Extra Attention
Palms growing in containers dry out faster than those planted in the ground, and several factors influence how quickly this happens. Unglazed terra cotta pots wick moisture away more rapidly than plastic or glazed ceramic containers. Palms placed outdoors during summer or positioned near heating vents dry out faster than those in more stable environments. During hot summer months, container palms may need daily watering, while those in protected indoor locations might go several days between waterings. Check your specific plant’s soil moisture regularly rather than adhering to a rigid schedule.
Water Quality Matters
The quality of your water impacts your palm’s health, particularly over time. Tap water often contains chlorine, fluoride, and dissolved salts that can accumulate in the soil, leading to brown leaf tips and edges. If possible, use filtered water, rainwater, or let tap water sit out overnight to allow some chemicals to evaporate before watering. If you notice white crusty buildup on the soil surface—indicating salt accumulation—flush the soil periodically by watering thoroughly until water runs freely from the drainage holes, which helps leach away these accumulated salts.
Recognizing Watering Problems
Learning to identify overwatering versus underwatering helps you adjust care quickly. Overwatered palms typically display yellowing leaves that may feel soft or mushy, and the soil remains constantly wet with a potentially musty smell indicating fungal growth. In severe cases, the trunk base becomes soft and discolored. Underwatered palms show brown, crispy leaf tips that progress inward, wilting fronds, curling leaves, and soil that pulls away from the pot’s edges. The entire plant may appear limp and lackluster. Catching these signs early allows you to correct course before permanent damage occurs.
Creating the Ideal Soil Environment for Palm Success
The right soil mixture provides the foundation—literally—for healthy palm growth. Palms have specific soil preferences that support their unique root systems while balancing moisture retention with essential drainage.
The Perfect Palm Soil Profile
Indoor palms thrive in loose, well-draining soil that’s slightly acidic to neutral (pH 5.1-7.5). The ideal mixture combines organic matter for moisture retention with components that ensure excess water drains away quickly. While you can purchase pre-made cactus, palm, and citrus potting mixes that work beautifully, you can also create your own blend. Combine equal parts quality potting soil, peat moss (or coconut coir for a more sustainable option), and perlite or coarse sand. This combination provides the porosity palms need while holding enough moisture to keep roots hydrated between waterings.
Why Soil Drainage Matters So Much
Palm roots require oxygen just as much as they need water. When soil remains waterlogged, air pockets fill with water, essentially suffocating the roots and creating conditions where harmful fungi thrive. This leads to root rot, one of the most common and devastating problems affecting indoor palms. Well-draining soil prevents this scenario by allowing excess water to quickly pass through while retaining enough moisture to sustain the plant.
Avoiding Common Soil Mistakes
Never use heavy garden soil, pure topsoil, or dense potting mixes designed for moisture-loving plants when growing palms. These retain too much water and compact easily, creating exactly the conditions that lead to root problems. Similarly, avoid soils that are too lean and drain too rapidly, as palms do need consistent moisture availability. The goal is finding that middle ground where water moves through the soil but doesn’t immediately rush out, leaving roots with adequate moisture to absorb.
Maintaining Optimal Temperature and Humidity Levels
Creating the right atmospheric conditions helps your indoor palms feel truly at home, supporting healthy growth and preventing common problems related to environmental stress.
Temperature Requirements for Thriving Palms
Most indoor palm varieties prefer temperatures between 60-80°F, with nighttime temperatures around 60-65°F and daytime temperatures of 70-80°F proving ideal. These tropical plants absolutely detest cold drafts and sudden temperature fluctuations. Position your palms away from drafty windows, exterior doors, air conditioning vents, and heating registers. Even brief exposure to temperatures below 50°F can cause cold damage, appearing as reddish-brown dead areas on leaves after a few days.
During winter, many palms actually benefit from slightly cooler temperatures of 55-60°F, which mimics their natural rest period. However, some tropical varieties like majesty palms and areca palms are more cold-sensitive and should be kept warmer. If you move palms outdoors during summer (which many appreciate), bring them back inside once nighttime temperatures consistently drop to 55°F or below.
The Critical Role of Humidity
Humidity represents one of the trickiest aspects of indoor palm care, as most species originate from tropical and subtropical regions where humidity levels remain consistently high—often 50% or higher. Unfortunately, typical indoor environments, especially during winter when heating systems run constantly, maintain humidity levels of only 20-30%. This dramatic difference stresses palms, leading to brown leaf tips, slow growth, and increased susceptibility to pests like spider mites.
Effective Ways to Increase Humidity
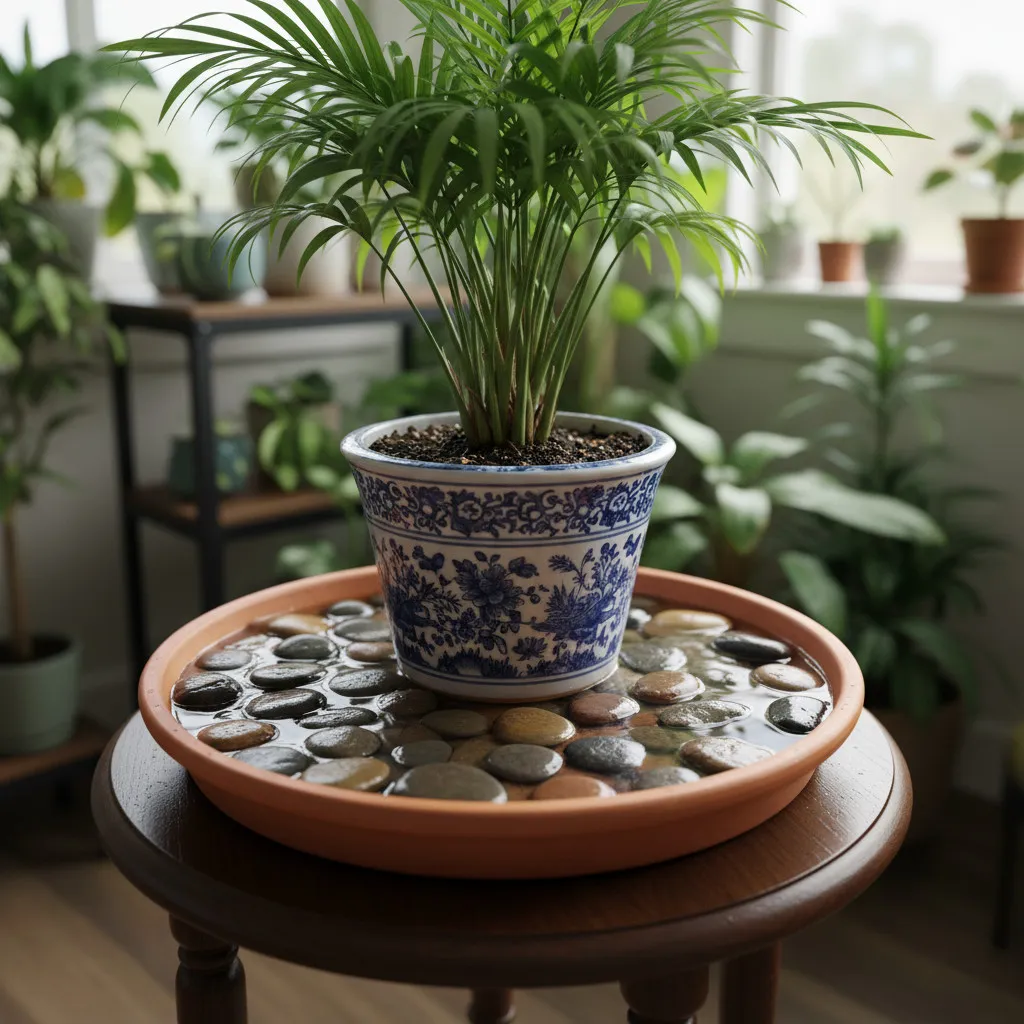
Fortunately, several straightforward strategies can boost humidity around your palms. A room humidifier provides the most effective solution, raising humidity levels throughout the space and benefiting not just your palms but other houseplants and even your own respiratory comfort. For a more targeted approach, create a humidity tray by filling a wide, shallow saucer with pebbles and water, then setting your palm’s pot on top (ensuring the bottom stays above the water line). As water evaporates, it creates a humid microclimate around the plant.
Grouping multiple plants together also increases localized humidity, as plants naturally transpire moisture through their leaves. Placing several palms or houseplants in the same area creates a mutually beneficial environment. Regular misting provides temporary humidity relief and helps clean dust from leaves, though its effects last only minutes rather than providing sustained moisture. For best results, combine multiple humidity-boosting strategies, especially during dry winter months.
Fertilizing Indoor Palms for Optimal Health and Growth
While palms aren’t heavy feeders compared to many houseplants, they do have specific nutritional requirements that, when met, keep them healthy, vibrant, and growing steadily.
Understanding Palm Nutritional Needs
Palms require a specialized balance of nutrients, with particular sensitivity to certain elements. They need relatively low phosphorus (the middle number on fertilizer labels) compared to nitrogen and potassium. Too much phosphorus actually interferes with their ability to absorb other essential nutrients. Palms also require specific micronutrients—particularly iron, manganese, magnesium, and zinc—to maintain their characteristic deep green color and healthy growth. Deficiencies in these micronutrients manifest as yellowing leaves, stunted growth, and overall decline.
Choosing the Right Fertilizer
Select a fertilizer specifically formulated for palm trees, typically with a ratio like 8-2-12 or 12-4-12 that includes essential micronutrients. These specialized blends account for palms’ unique needs and help prevent common deficiency problems. Opt for slow-release formulations that gradually break down over time, providing steady nutrition rather than quick bursts that can burn sensitive roots. High-quality palm fertilizers may cost slightly more, but they deliver far better results than generic houseplant foods.
When and How Often to Fertilize
Feed your indoor palms during their active growing season—spring and summer—when they can actually utilize the nutrients. Apply fertilizer every 2-3 months during this period, following the product label’s recommended amounts for your palm’s container size or height. During fall and winter, when growth naturally slows and palms enter dormancy, reduce feeding to once every 3-4 months or pause fertilization entirely until spring returns. Feeding too late in the season can stimulate tender new growth just before winter, which becomes vulnerable to cold damage.
Application Best Practices
Always apply fertilizer to moist soil rather than bone-dry soil to prevent root burn. Water your palm lightly first, then apply the fertilizer according to package directions, spreading it evenly over the soil surface beneath the plant’s canopy. Water again lightly after application to begin breaking down the fertilizer. Never apply more than recommended—excessive fertilization causes more problems than too little, including salt buildup, burned leaf tips, and stressed plants. When in doubt, err on the side of under-fertilizing rather than over-feeding.
Recognizing Nutrient Deficiencies
Understanding common deficiency symptoms helps you adjust your fertilization approach. Yellowing of older leaves starting from the tips often indicates potassium deficiency, which is particularly common in palms. Uniform yellowing of new growth suggests iron deficiency. Interveinal yellowing (green veins with yellow tissue between) typically points to manganese or magnesium deficiency. Brown speckling on older leaves may indicate potassium or magnesium issues. If you notice these signs, ensure you’re using a complete palm fertilizer and feeding regularly during the growing season.
Pruning and Maintenance for Attractive, Healthy Palms
Proper pruning and regular maintenance keep your indoor palms looking their best while supporting overall plant health. Understanding when and how to prune prevents common mistakes that can actually harm your palm.
The Golden Rule of Palm Pruning
Never, under any circumstances, cut the top growing point of your palm. Unlike many plants that branch out after pruning, palms grow from a single central point called the apical meristem. Removing this growing tip kills the entire plant. This fundamental difference in growth pattern means you cannot prune palms to control height or encourage bushier growth as you would with other houseplants.
When to Remove Fronds
Only prune fronds that have completely turned brown and died. This guideline proves harder to follow than you might think, as partially yellowing or browning fronds can look unsightly, tempting you to remove them prematurely. However, palms are remarkably efficient at recycling nutrients from dying fronds, pulling valuable potassium, magnesium, and other elements back into the plant to support new growth. Cutting off these fronds before they’re fully dead actually steals nutrients from your palm.
Wait until a frond has turned entirely brown from tip to base before removing it. Use clean, sharp pruning shears or scissors sterilized with rubbing alcohol to prevent disease transmission. Cut the dead frond’s stem as close to the trunk as possible without actually cutting into the trunk tissue. If you absolutely must trim brown tips for aesthetic reasons, use sharp scissors to cut just the discolored portion, following the natural shape of the leaf to make the cut less noticeable.
Cleaning Your Palm’s Foliage
Dust accumulation on palm fronds interferes with photosynthesis and can harbor pests. Rather than trying to wipe down every individual leaf, give your palm an occasional shower. Place smaller palms in your bathtub or shower and rinse them with a gentle spray of lukewarm water, or move larger palms outdoors during warm weather for a natural rain bath. This efficient approach cleans all foliage at once while providing extra humidity the plant appreciates. Allow the plant to drain thoroughly before returning it to its regular location.
Removing Flower Stalks
Some indoor palms occasionally produce flower stalks. While these won’t harm the plant, they can create a mess as flowers fade and drop. You can safely remove flower stalks at any time without harming your palm—simply cut them off close to the trunk base. This is one area where you can prune freely without worry.
Repotting Indoor Palm Trees: When and How
Contrary to what you might expect, indoor palms actually prefer being slightly pot-bound and only need repotting every 2-4 years. Understanding when and how to repot properly keeps your palm healthy without unnecessary disruption.
Signs Your Palm Needs Repotting
Roots growing through drainage holes, circling around the soil surface, or becoming so dense that water runs straight through without absorbing all indicate your palm has outgrown its container. Similarly, if your palm seems to dry out extremely quickly after watering or growth has significantly slowed despite proper care, it may be time for a larger home. However, if your palm appears healthy and isn’t showing these signs, resist the urge to repot prematurely.
Choosing the Right Time and Container
Spring or early summer—when palms enter their active growing season—represents the ideal repotting window. This timing allows the plant to quickly establish roots in its new container before winter dormancy arrives. Select a new pot only 1-2 inches larger in diameter than the current one. Oversized pots hold excess moisture that can lead to root rot, so incremental size increases work best. Ensure your new container has adequate drainage holes, and choose heavy materials like ceramic or terracotta for larger palms to prevent tipping.
The Repotting Process
Water your palm thoroughly a day or two before repotting to reduce transplant shock. Fill the new container about one-third full with fresh palm potting mix. Gently remove the palm from its current pot by tipping and tapping—avoid pulling on the trunk, which can damage the plant. If roots have become densely packed, carefully tease them apart slightly to encourage outward growth in the new container.
Position the palm in the new pot at the same depth it was growing previously—planting too deeply stresses the plant and can lead to rot. Fill in around the root ball with fresh potting mix, gently firming it down to eliminate air pockets but avoiding heavy compaction. Water thoroughly until water drains from the bottom, then place the repotted palm in a slightly shadier location for a week or two while it recovers from the stress of repotting.
Troubleshooting Common Palm Problems and Pests
Even with excellent care, you may occasionally encounter issues with your indoor palms. Recognizing problems early and knowing how to address them keeps minor issues from becoming major disasters.
Dealing with Spider Mites
These tiny arachnids represent the most common pest affecting indoor palms, particularly in dry indoor environments. Look for fine white webbing on the undersides of leaves, stippled yellowing on foliage, and tiny white or reddish dots moving on leaves. Spider mites thrive in low humidity, making prevention through adequate moisture your first line of defense.
Combat infestations by immediately isolating the affected palm to prevent spread. Thoroughly spray all leaf surfaces—especially undersides—with water to physically remove mites. Follow up with applications of neem oil or insecticidal soap every 3-5 days until the infestation clears. Increase humidity around the plant to discourage mites from returning.
Managing Mealybugs and Scale Insects
Mealybugs appear as white, cottony masses typically found where leaves meet stems. Scale insects look like small brown or tan bumps on leaves and stems. Both pests suck plant sap, weakening your palm and potentially transmitting diseases. For light infestations, dip a cotton swab in 70% isopropyl rubbing alcohol and wipe directly on the pests—the alcohol kills them on contact. For larger infestations, apply neem oil or insecticidal soap according to package directions, repeating weekly until pests disappear.
Addressing Root Rot
Root rot occurs when palms sit in waterlogged soil, causing roots to die and decay. Symptoms include yellowing leaves despite wet soil, a musty smell from the potting mix, and soft, discolored areas at the trunk base. If caught early, you may save the plant by removing it from its pot, cutting away all soft, brown, or black roots with sterilized shears, and repotting in fresh, well-draining soil in a clean container. Adjust watering practices going forward. Unfortunately, advanced root rot often proves fatal.
Solving Brown Tip and Leaf Problems
Brown, crispy leaf tips have several potential causes. Low humidity, underwatering, fluoride in tap water, and salt buildup from excessive fertilization all produce similar symptoms. Start by increasing humidity, switching to filtered water, and flushing the soil to remove accumulated salts. If the entire leaf is browning, consider whether the plant experienced cold exposure, which causes widespread leaf damage. Only remove completely dead fronds, trimming just the brown portions on partially affected leaves.
Dealing with Yellowing Leaves
Yellow leaves typically signal overwatering, poor drainage, insufficient light, or nutrient deficiencies. Check soil moisture first—if it’s constantly wet, reduce watering frequency and ensure good drainage. If the soil is appropriate but light is limited, move your palm to a brighter location. If neither seems to be the issue, your palm may need fertilization, particularly if yellowing affects older leaves first (suggesting potassium deficiency) or new growth (indicating iron deficiency).
Seasonal Care: Adjusting Through the Year
Indoor palms benefit from care adjustments that acknowledge their natural growth cycles and changing indoor conditions throughout the year.
Spring and Summer: Active Growing Season
As days lengthen and temperatures warm, your palms enter their most vigorous growth phase. Increase watering frequency as needed, typically checking soil moisture every 4-5 days and watering when the top inch dries out. Resume regular fertilization if you paused during winter, applying palm fertilizer every 2-3 months. This is also the best time for repotting if needed. Many palms benefit from spending summer outdoors—gradually acclimate them to outdoor conditions by starting in a shady spot, slowly introducing them to brighter light over a week or two.
Fall: Transition to Dormancy
As autumn arrives and daylight decreases, your palms naturally slow their growth. Begin reducing watering frequency and give your last fertilizer application in early fall. If your palms spent summer outdoors, bring them back inside before nighttime temperatures drop below 55°F. Before bringing them in, inspect thoroughly for any hitchhiking pests and rinse foliage well to avoid introducing problems to your indoor plant collection.
Winter: Dormancy and Rest
During winter’s short days and cooler temperatures, most palms enter a period of dormancy or significantly slowed growth. Reduce watering to once every 1-2 weeks, allowing soil to dry out more between waterings than during summer. Stop fertilizing entirely, as palms can’t effectively use nutrients during dormancy and feeding can stimulate vulnerable new growth. Maintain adequate humidity despite heating systems that dry the air, as low humidity combined with warm indoor temperatures creates ideal conditions for spider mites. Place palms away from cold drafts but also avoid positioning them directly over heat vents. If natural light becomes limited, consider supplementing with grow lights to prevent weak, stretched growth.
Final Thoughts: Cultivating Your Indoor Tropical Paradise
Growing indoor palm trees successfully comes down to understanding their basic needs and consistently meeting them. These magnificent plants ask for relatively little—appropriate light, consistent moisture without waterlogging, occasional feeding, and protection from temperature extremes—yet reward you abundantly with years of tropical beauty and air-purifying benefits.
Remember that different palm varieties have slightly different requirements, so taking time to research your specific palm’s preferences sets you up for success. Start with beginner-friendly varieties like parlor palms or lady palms if you’re new to palm cultivation, then expand your collection as your confidence grows.
Pay attention to what your palms tell you through their appearance. Healthy palms display vibrant green fronds, steady (if slow) growth, and overall vigor. When problems arise—and they occasionally will—early intervention usually solves issues before they become serious. Check your palms regularly during watering for any changes in color, texture, or signs of pests, and adjust care accordingly.
Most importantly, be patient with your palms and with yourself as a plant parent. These slow-growing plants won’t shoot up overnight, but they’ll steadily develop into stunning focal points that transform your indoor spaces into lush, tropical havens. With the knowledge you’ve gained from this guide, you’re well-equipped to provide the care your indoor palms need to thrive for years to come, bringing lasting beauty, improved air quality, and that coveted vacation-every-day feeling right into your home.

![What Is the National Fruit of Argentina and Why? [ANSWERED]](https://fruitonix.com/wp-content/uploads/2023/04/What-Is-the-National-Fruit-of-Argentina-.jpg)