Peach cobbler conjures images of warm summers, sticky fingers, and desserts that take hours to prepare—but what if you could have all that comfort in just 30 minutes? With Bisquick mix as your secret weapon, you’re not cutting corners on flavor or texture; you’re simply eliminating the fussy steps that don’t actually contribute to the final result. The truth is, a spectacular peach cobbler doesn’t require a from-scratch biscuit topping, multiple rise times, or a complex filling technique.
This isn’t a dumbed-down version of the classic. It’s the recipe smart home cooks reach for on weeknights when the craving strikes, when unexpected guests arrive, or when you need a showstopping dessert that tastes far more impressive than the effort invested. The magic happens because Bisquick provides a perfectly engineered base that bakes up golden, tender, and buttery in less time than it takes to bake a sheet of cookies. Your peaches—whether canned, frozen, or fresh—become juicy and jammy without any long simmering. And somehow, when you serve this warm from the oven with a scoop of vanilla ice cream melting into the fruit, no one suspects you made it in the time it takes to watch a television episode.
This isn’t about rushing through baking with inferior ingredients or cutting recipes into tiny, disappointing portions. This is about understanding the actual mechanics of peach cobbler and streamlining them without sacrificing a single element that makes this dessert worth making.
Table of Contents
- Why Peach Cobbler Doesn’t Need to Take All Day
- Understanding the 30-Minute Timeline
- The Bisquick Advantage for Speed and Texture
- What Makes This Recipe So Easy to Master
- Essential Ingredients and the Timing Block
- The Complete Ingredient List
- Why Each Ingredient Earns Its Place
- Detailed Instructions for Quick Peach Cobbler
- Why These Specific Steps Prevent Common Problems
- How to Troubleshoot If Your Cobbler Isn’t Perfect
- Variations to Customize Your Cobbler
- Canned versus Frozen versus Fresh Peaches
- Storage and Make-Ahead Options
- Serving and Pairing Suggestions
- Frequently Asked Questions About Quick Peach Cobbler
- Final Thoughts
Why Peach Cobbler Doesn’t Need to Take All Day
Traditional peach cobbler recipes often span three to four hours from start to finish. Much of that time goes toward making pastry crust from scratch, proofing biscuit dough, or slowly simmering peaches to break them down. If you’ve ever made pie dough from memory, you know the variables—too-warm butter ruins the texture, overworking the dough makes it tough, resting periods stretch the timeline.
Bisquick eliminates these pain points entirely. This isn’t a brand endorsement so much as a recognition of chemistry. Bisquick is pre-mixed flour, baking soda, salt, and fat in exact proportions. When you add liquid and heat, it rises predictably, browns evenly, and requires zero resting time. What takes a scratch baker 45 minutes of mixing, resting, and rolling takes you three minutes of stirring.
The peaches don’t need to simmer for 20 minutes to release their juices and soften. Whether you use canned (already tender), frozen (which thaw slightly during baking and release liquid), or fresh (which will cook in the oven), the heat of the oven handles the cooking while you’re doing something else. There’s no separate filling component to prepare. You simply drain your peaches, toss them with sugar and a pinch of nutmeg, and let the oven do the work.
Understanding the 30-Minute Timeline

Thirty minutes isn’t including oven preheat time—that’s a fair assumption most bakers make. Preheating your oven while you gather ingredients and mix the batter takes roughly 5 to 7 minutes depending on your oven. Active hands-on time is closer to 8 to 10 minutes. The baking itself takes 45 to 50 minutes, but here’s where the magic lies: you don’t need to watch it.
Many recipes instruct you to cool cobbler for 30 minutes before serving, which means the total timeline from “I want dessert” to “I’m eating dessert” is closer to 90 minutes if you follow that guidance. However, this recipe tastes exceptional even 10 to 15 minutes out of the oven when the top is still crispy and the filling is actively bubbling at the edges. This is where the 30-minute shorthand comes from—if you’re willing to eat it while it’s still cooling (which you absolutely should be), you’re looking at much less total time.
The Bisquick Advantage for Speed and Texture
Most home bakers don’t realize that Bisquick performs differently than all-purpose flour or self-rising flour because of its unique fat distribution and leavening ratio. When you stir Bisquick with milk and melted butter, you’re creating a batter that’s more forgiving than traditional biscuit dough. It won’t become tough from overmixing because the fat is already incorporated throughout the flour particles.
The baking soda in Bisquick reacts immediately with the acidic components in milk, creating lift as soon as heat hits the batter. You don’t need to let it rest on the counter; there’s no waiting for yeast to activate or biscuit dough to proof. This is efficiency without sacrifice—the resulting cobbler topping still has the tender crumb and slight crisp exterior that makes cobbler different from other fruit desserts.
The melted butter (rather than cold butter cut into flour) also serves a purpose beyond convenience. Melted butter distributes more evenly throughout the batter, which means every bite of the topping has richness rather than some pieces being dry and others butter-heavy. It also eliminates the risk of butter being too warm or too cold for the dough.
What Makes This Recipe So Easy to Master
There are essentially four ingredients in the topping—Bisquick, milk, melted butter, and nutmeg. Four ingredients. Most of these are pantry staples you likely keep on hand without thinking. The filling is three ingredients: canned or frozen peaches, sugar, and optionally, a touch more nutmeg. You’re not hunting for obscure spices or specialty products.
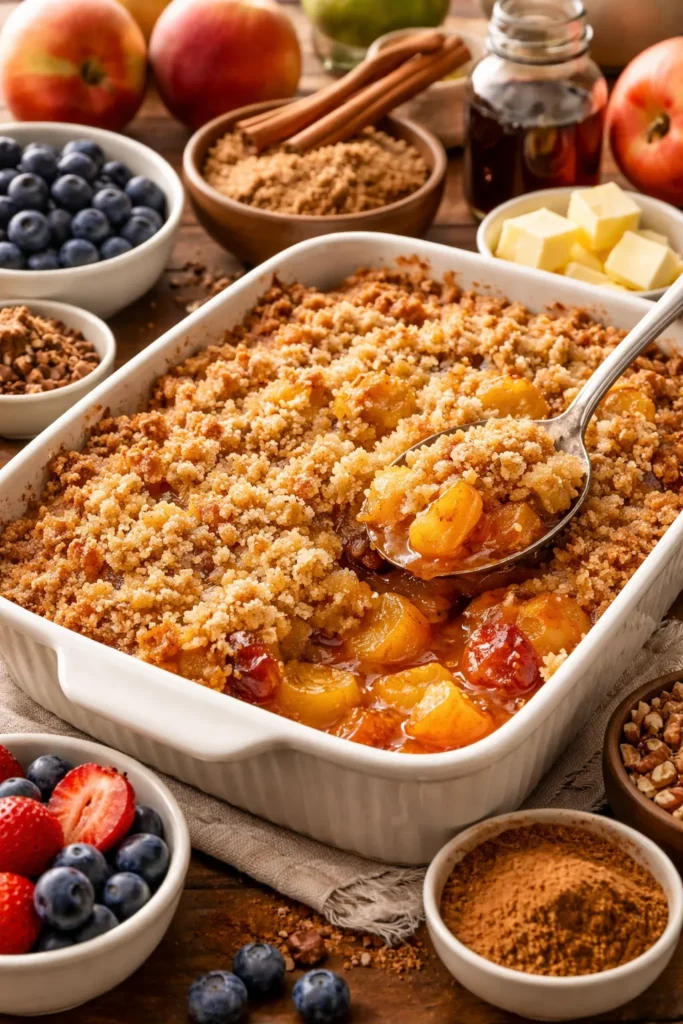
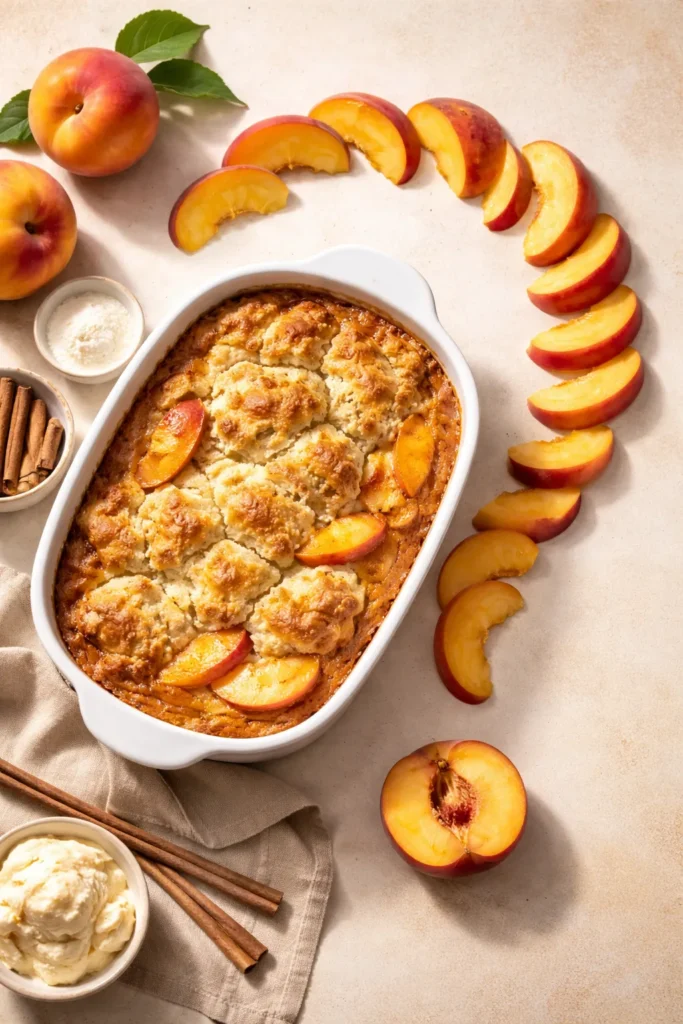
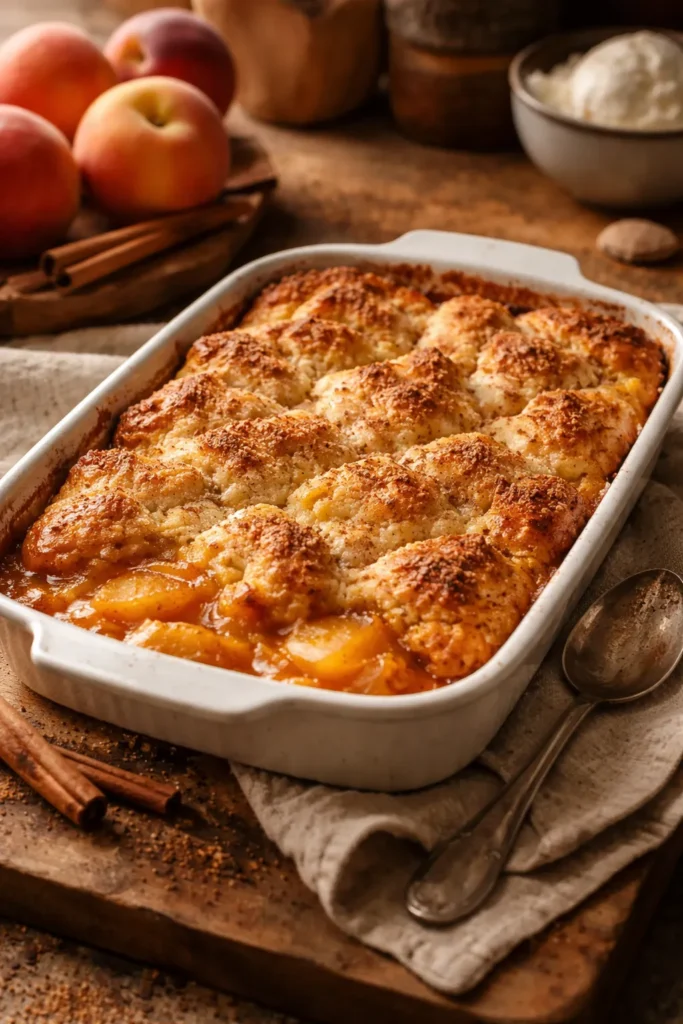
The single most important factor for success is using an ungreased baking dish. This seems counterintuitive, but the moisture from the filling prevents sticking completely. Greasing the dish doesn’t help and can sometimes lead to over-browning on the bottom. This is genuine knowledge that saves both effort and cleanup.
The mixing method is straightforward: combine dry ingredients, add wet ingredients, stir until combined. You’re not creaming butter and sugar, not separating eggs, not folding anything carefully. The cobbler topping is stirred, not folded, not beaten. This means you can’t overmix it into toughness. The filling is literally peaches and sugar combined in a bowl—no cooking required beforehand.
Measuring is simplified because this recipe isn’t finicky. A few tablespoons more or less of milk won’t ruin the result. If your milk measurement is slightly off, the cobbler still bakes into something delicious. This is a recipe designed around real-world kitchen realities, not laboratory precision.
Essential Ingredients and the Timing Block
Before you begin, gather these items so you’re not searching mid-recipe.
Yield: Serves 6
Prep Time: 10 minutes
Cook Time: 45 to 50 minutes
Total Time: 1 hour to 1 hour 5 minutes (including oven preheat; approximately 55 to 60 minutes of actual elapsed time from start to eating)
Difficulty: Beginner — This recipe has no advanced techniques, minimal ingredients, and is forgiving if measurements aren’t exact. Even someone baking for the first time will achieve excellent results.
The Complete Ingredient List
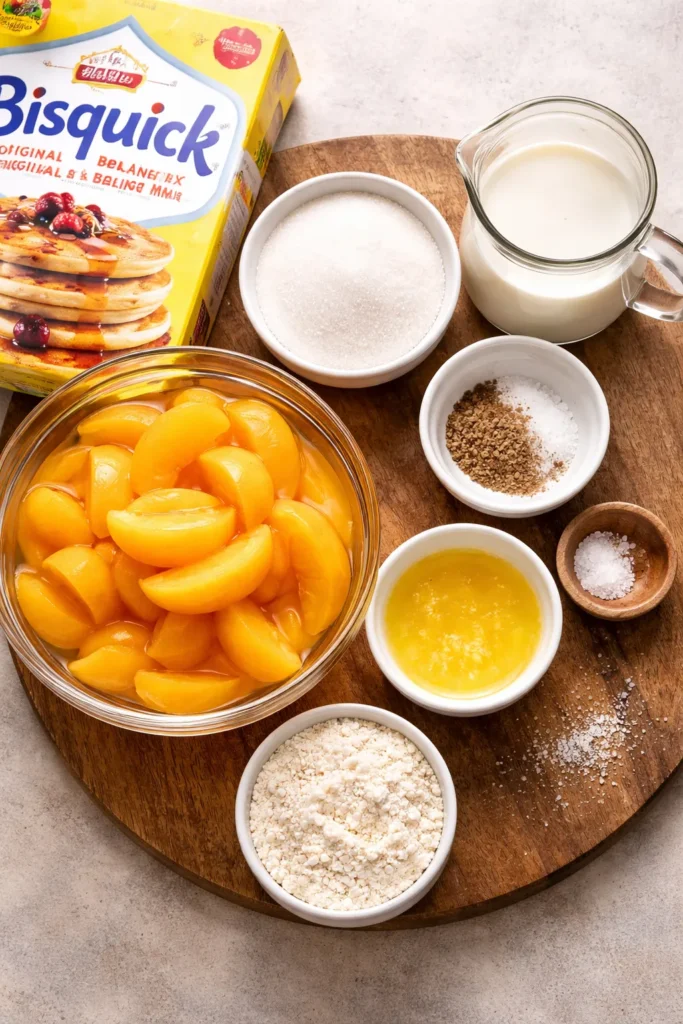
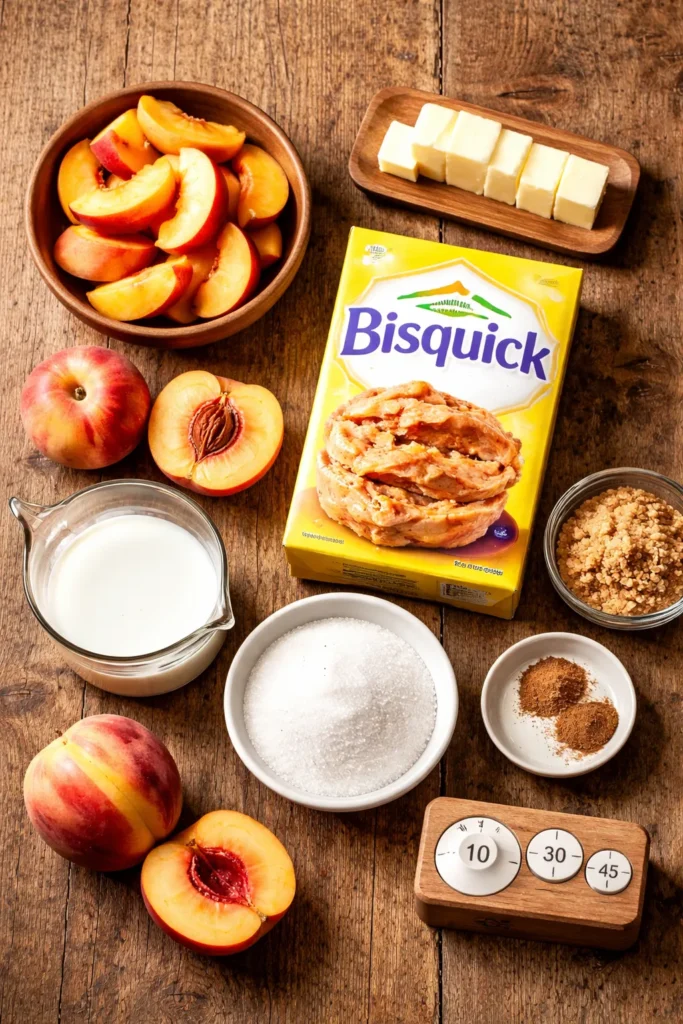
For the Cobbler Topping:
- 1 cup Bisquick Original Pancake & Baking Mix
- 1 cup milk (whole, 2%, or non-dairy alternatives like almond, oat, or coconut all work equally well)
- 1/2 cup unsalted butter, melted
- 1/2 teaspoon ground nutmeg
- Pinch of fine sea salt (optional but recommended; enhances sweetness perception)
For the Peach Filling:
- 1 can (29 ounces) sliced peaches in heavy syrup, drained well (or 1 pound frozen peaches, thawed and drained)
- 3/4 cup granulated sugar
- 1/4 teaspoon ground nutmeg (optional but creates depth)
For Serving:
- Vanilla ice cream (optional but strongly encouraged)
- Coarse sugar for topping (optional but creates an attractive finish)
Why Each Ingredient Earns Its Place
The Bisquick mix is doing the heavy lifting here. Beyond convenience, it’s specifically formulated with leavening and fat in the correct proportions for tender biscuits. You could theoretically substitute all-purpose flour with additional baking powder and salt, but you’d need to measure precisely, and you’d lose the simplicity that makes this recipe approachable.
Whole milk creates a richer batter than lower-fat options, but this is genuinely about preference. If you have only 2% milk or want to use almond milk for dietary reasons, the cobbler will still bake beautifully. The difference is subtle, not critical.
Melted butter is crucial. It needs to be fully liquid so it incorporates evenly. If your butter is still slightly solid, warm it in the microwave for 10 to 15 seconds more. Cold butter will create lumps that won’t fully hydrate the Bisquick.
Nutmeg is doing something specific here—it’s not just a spice, it’s a flavor bridge between peaches and baked goods. The warm spice notes in nutmeg are almost floral, which complements fruit better than you’d expect. A little goes a long way; start with 1/2 teaspoon and adjust in future batches if you want more intensity.
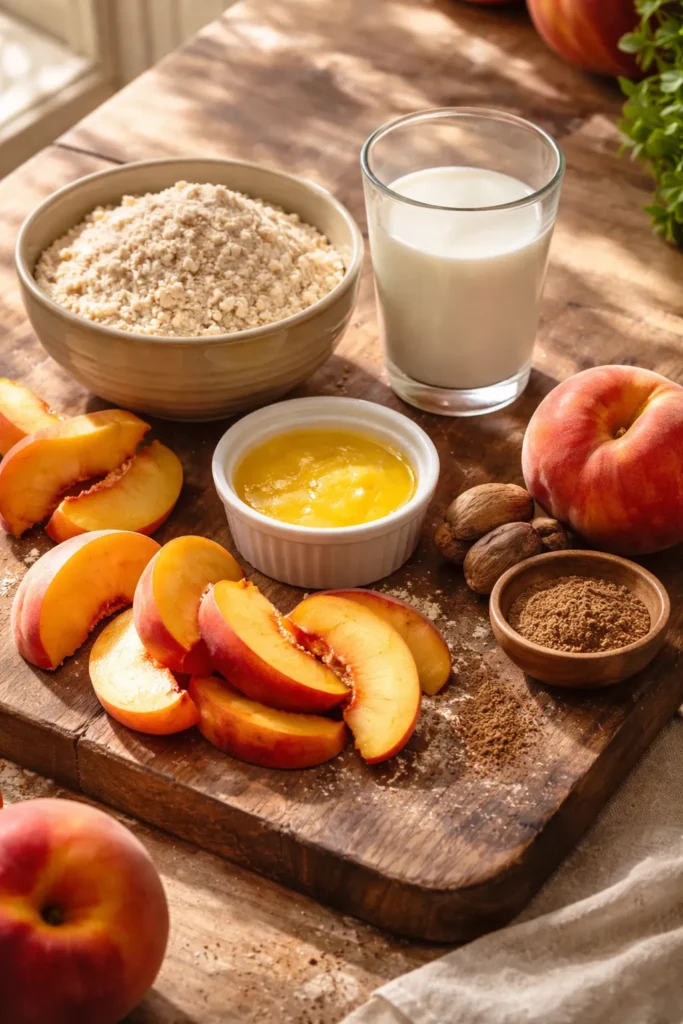
Peaches are the star, and their quality matters. Canned peaches are genuinely excellent for cobblers because they’re already picked at peak ripeness and preserved at that moment. If you prefer frozen peaches, they thaw to an ideal texture during baking. Fresh peaches can work, but you’ll need about 2 pounds, and you’ll need to peel and slice them—which adds 10 minutes of prep time. For the 30-minute target, canned or frozen are genuinely superior options.
Sugar is straightforward, but the amount is calibrated for canned peaches in heavy syrup that you’ve drained well. The syrup still clinging to the peaches provides some liquid, so you’re not adding additional cornstarch or other thickeners. If you’re using fresh or frozen peaches without syrup, you might want an additional 2 to 3 tablespoons of sugar and optionally 1 tablespoon of cornstarch to absorb excess moisture.
Detailed Instructions for Quick Peach Cobbler
Prepare Your Oven and Pan:
-
Preheat your oven to 375°F (190°C). Position the oven rack in the center. While the oven heats, gather your ingredients and baking dish.
-
Use an 8-inch square (2-quart capacity) glass baking dish. Do not grease it. The moisture from the peach filling will prevent sticking, and greasing can cause over-browning on the bottom. Glass is preferred over metal because it heats more evenly, but metal works too if that’s what you have.
Mix the Cobbler Topping:
-
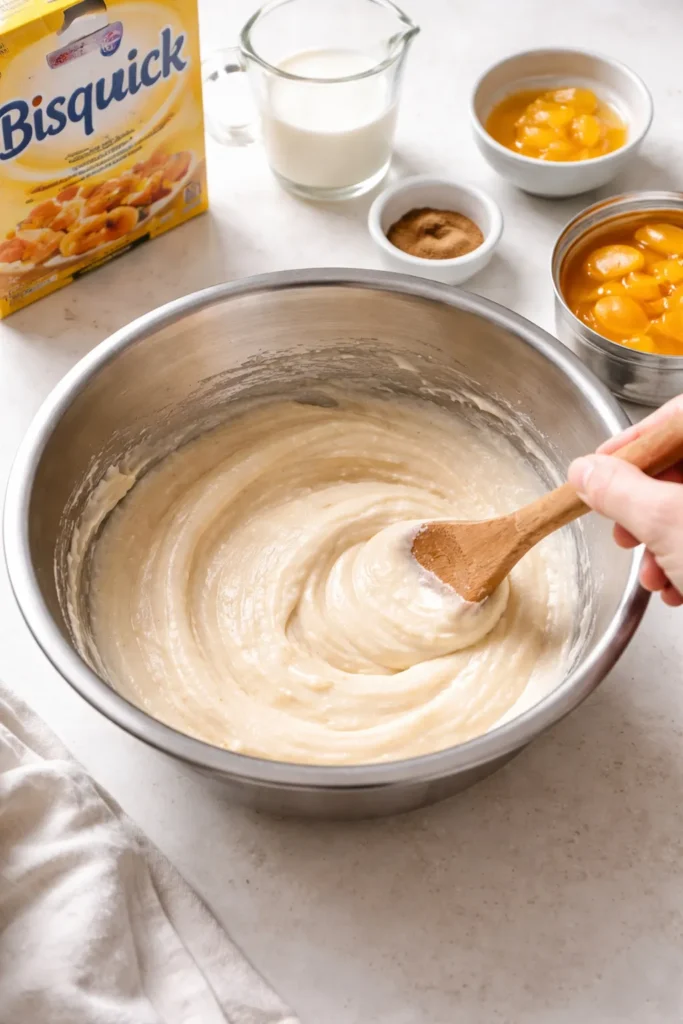
Pour 1 cup of Bisquick mix directly into your ungreased baking dish. Add 1 cup of milk and 1/2 teaspoon of ground nutmeg to the dish.
-
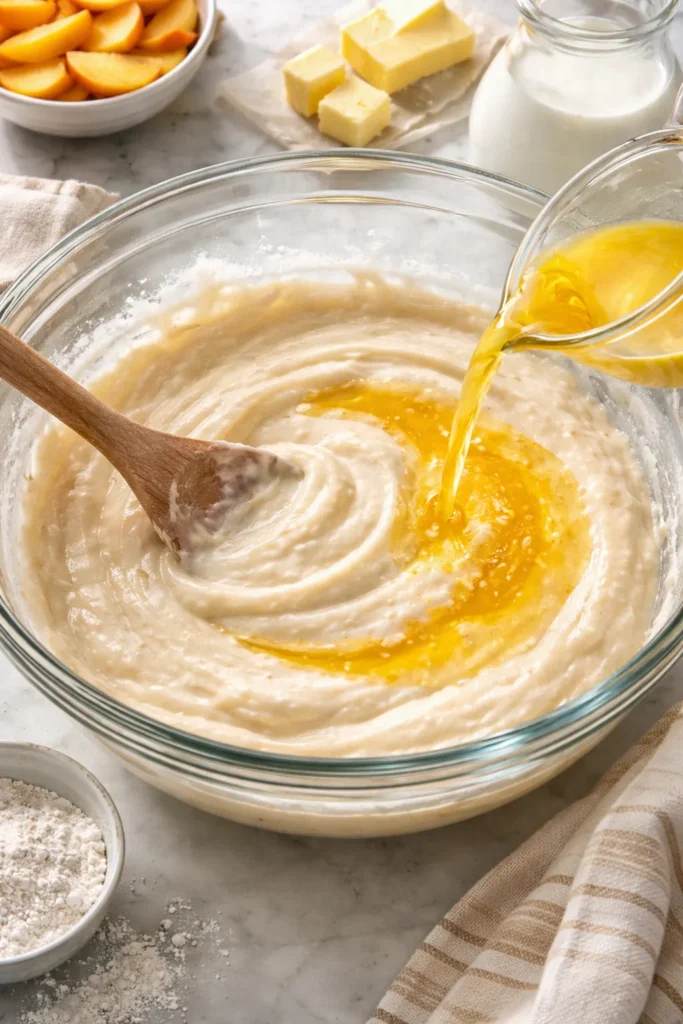
Using a fork or small whisk, stir the ingredients together until just combined. The mixture should look like a slightly lumpy pancake batter. You’re aiming for no visible dry flour streaks, but you don’t need it perfectly smooth. Overmixing at this stage doesn’t harm the result (unlike traditional biscuit dough), but there’s no benefit either.
-
Stir in the 1/2 cup of melted butter until the batter is smooth and uniform. The butter will slicken the batter considerably. If your butter was cold and there are small solid pieces, the oven heat will melt them and everything will smooth out as it bakes—this isn’t a concern.
Prepare and Add the Peaches:
-
Open your can of peaches and drain them thoroughly. Pour them into a colander or fine-mesh sieve and let them sit for 30 seconds, shaking gently to remove excess syrup. This step is crucial because too much liquid makes the cobbler bottom soggy. If you’re using frozen peaches, thaw them first and drain any liquid that accumulated during thawing.
-
In a separate bowl (a measuring cup works fine), combine the drained peaches with 3/4 cup of sugar and 1/4 teaspoon of nutmeg if using. Stir gently so the sugar dissolves slightly and coats the peaches evenly.
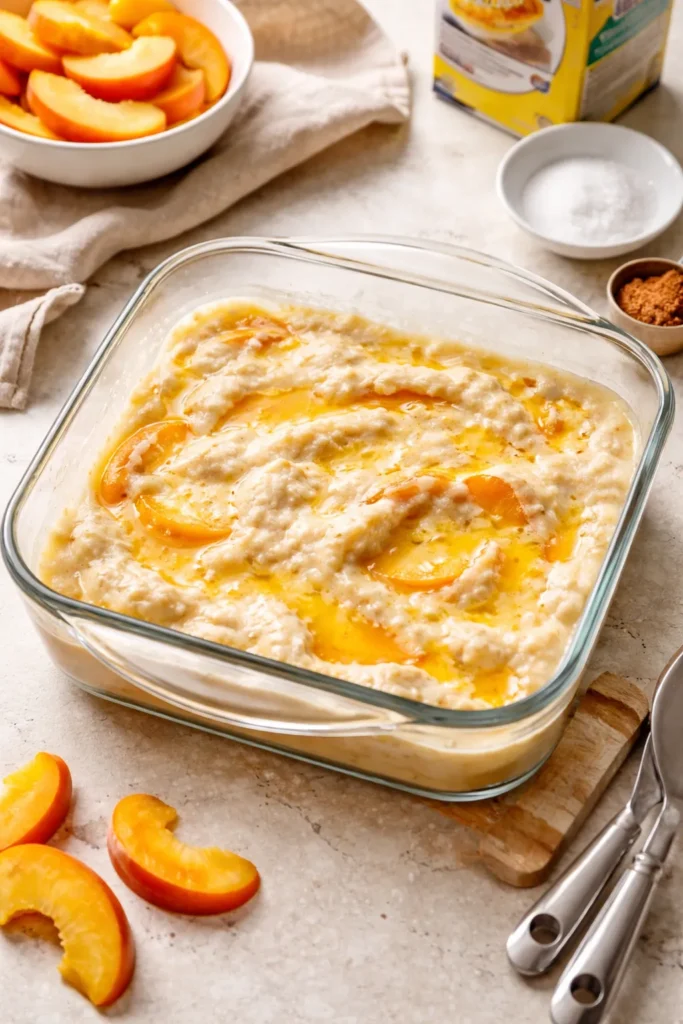
-
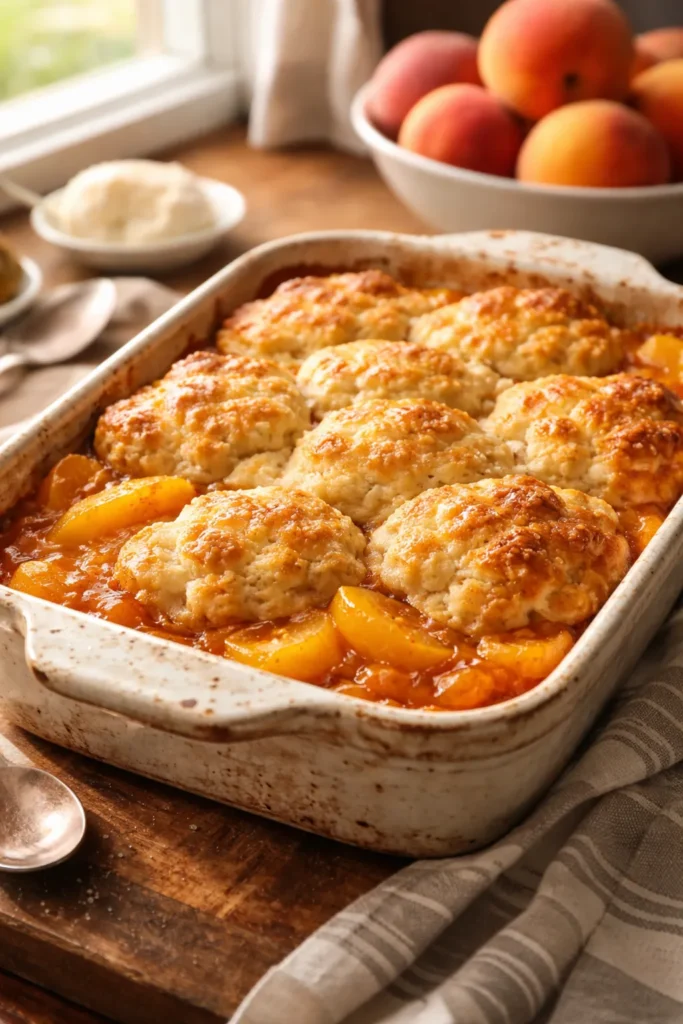
Spoon the peach mixture over the batter in the baking dish. Do not stir the peaches into the batter. The batter will rise around the peaches as it bakes, creating the distinctive cobbler structure where fruit and topping are distinct but interwoven.
Bake Until Golden:
-
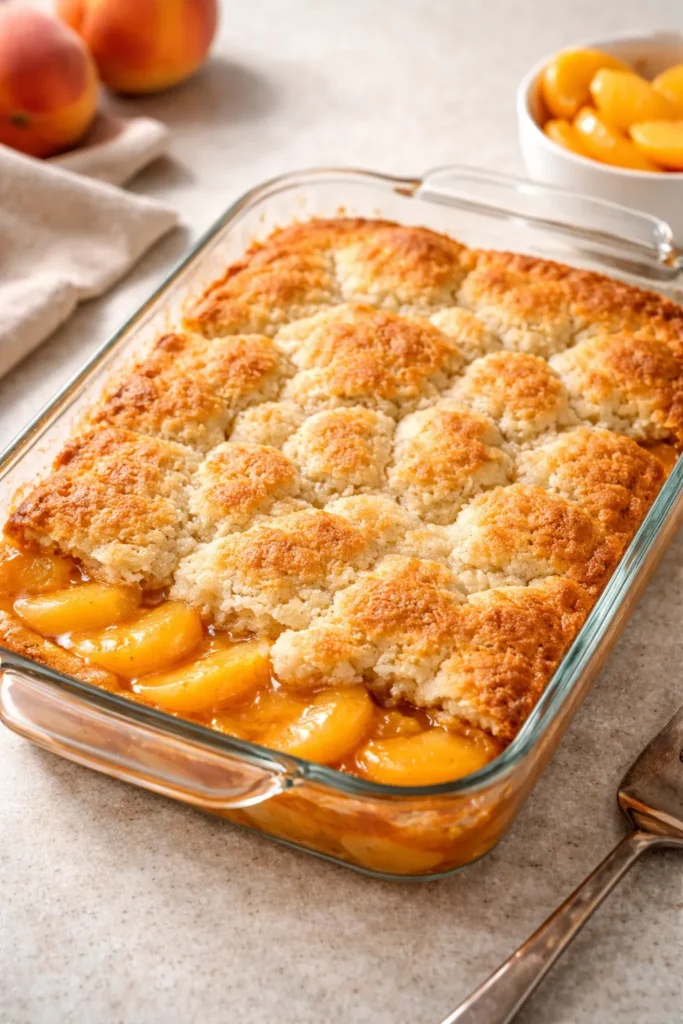
Place the baking dish in your preheated oven. Set a timer for 45 minutes as a baseline, but check it at 40 minutes. The cobbler is done when the topping is deep golden brown and the filling is bubbling visibly at the edges. The bubbling is your signal that the fruit has released enough juice and the filling is actively cooking.
-
If the top isn’t golden brown at 45 minutes, give it another 3 to 5 minutes. Every oven behaves slightly differently, and the color of your baking dish (darker glass bakes faster than lighter metal) affects timing. You’re looking for rich golden-brown, not pale tan.
Cool and Serve:
-
Remove the cobbler from the oven and place it on a cooling rack or trivet. Resist the urge to let it cool for a full 30 minutes before eating. Peach cobbler is genuinely best 10 to 15 minutes out of the oven when the topping still has some structural integrity but the filling is warm and saucy. The ice cream will melt beautifully into the warm cobbler.
-
Using a spoon or small ice cream scoop, portion the cobbler into serving bowls. The topping will soften slightly as it cools, which is exactly what you want—it becomes almost custardy where it’s been soaked with peach juice while still having texture in the parts exposed to direct oven heat.
Why These Specific Steps Prevent Common Problems
Many peach cobbler recipes fail because of soggy bottoms, unevenly browned tops, or a filling that’s either watery or stiff. This method prevents each issue.
The ungreased dish prevents sticking while ensuring even browning. The drained peaches reduce excess moisture that would turn the bottom layer of cobbler into mush. Combining the topping ingredients directly in the baking dish means less cleanup, but more importantly, it prevents the batter from being overmixed, which would make it tough.
Spoon the peaches over the batter rather than stirring them in. This is the classic cobbler technique. The batter will rise around the peaches, and as it bakes, you get pockets of fruit throughout rather than a uniformly fruity batter. This creates better texture variation.
The oven temperature of 375°F is slightly lower than many dessert recipes, which means the top won’t brown too quickly before the batter finishes cooking through. If your oven runs hot, you might need to place a tent of aluminum foil loosely over the cobbler at the 35-minute mark to prevent over-browning, then remove it for the final 10 minutes to crisp up the top.
How to Troubleshoot If Your Cobbler Isn’t Perfect

Despite how forgiving this recipe is, a few variables can throw off results.
If the top is pale or doesn’t brown: Your oven might run cool. Try increasing the temperature to 400°F (205°C) for future batches, or extending the baking time by 5 to 10 minutes. Darker baking dishes also brown faster, so if you’re using a light-colored metal pan, expect slightly longer baking times.
If the bottom is soggy: You didn’t drain the peaches sufficiently. Next time, drain them in a colander for a full minute and give it a gentle shake. You can also reduce the sugar by 1 to 2 tablespoons—less sugar means less syrup release.
If the top is crispy when you want it softer: Cover it loosely with foil while cooling for 5 to 10 minutes. The trapped steam will soften the surface slightly. Alternatively, serve it with a generous pour of warm peach syrup or the juice that accumulates at the bottom of the dish.
If the filling is watery: This usually means your peaches released too much juice. You can scoop out some of the liquid before serving, or next time use less sugar (start with 1/2 cup) or use fresh or frozen peaches, which release less liquid than canned fruit in syrup.
Variations to Customize Your Cobbler
The base recipe is delicious as-is, but it’s also infinitely adaptable.
Add warmth with spiced variations: Include 1/4 teaspoon of ground cinnamon along with the nutmeg, or add 1/8 teaspoon of ground ginger for an unexpected heat. Some bakers add a tiny pinch of cardamom, which amplifies the floral notes in nutmeg.
Mix fruit for complexity: If you have frozen berries in the freezer, add 1 cup of them (blueberries, raspberries, or blackberries) to the peaches. No need to thaw them—they’ll cook right in the cobbler. Reduce the sugar slightly to 1/2 cup since berries are often sweeter than peaches.
Create a vanilla-spiced topping: Add 1 teaspoon of vanilla extract to the topping batter along with the milk. This adds a subtle depth that doesn’t read as obviously vanilla but makes the cobbler taste more complex.
Make it butter-forward: If you love intensely buttery baked goods, increase the melted butter to 2/3 cup (10 tablespoons). This makes the topping richer and slightly more indulgent, though still tender.
Add texture with streusel: After pouring the peaches over the batter, sprinkle 1/4 cup of granulated sugar mixed with 2 tablespoons of cold butter that you’ve rubbed together into crumbs over the top. This creates a double topping—the Bisquick base with a streusel layer on top. It adds 5 minutes of prep but creates a noticeably crunchier texture.
Swap the milk: Use buttermilk instead of regular milk for a slightly tangy cobbler topping with more complexity. The acidity in buttermilk also ensures the baking soda in Bisquick activates fully, giving you the most lift.
Canned versus Frozen versus Fresh Peaches
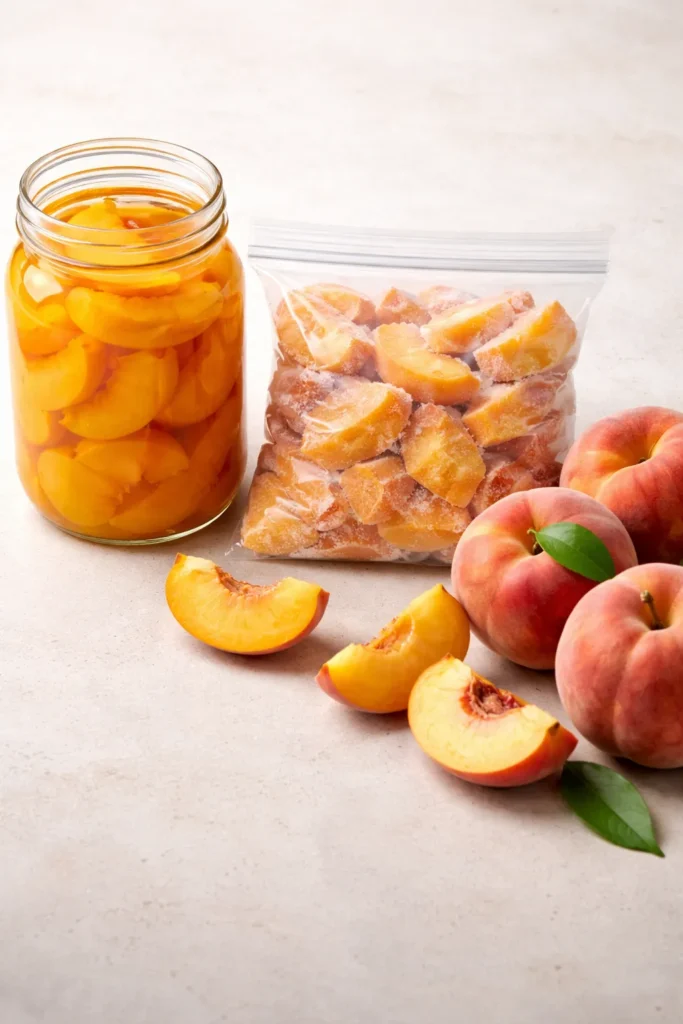
The 30-minute timeline is achievable because canned and frozen peaches eliminate prep work. Canned peaches are the fastest option. They’re drained and ready to use with no chopping, no peeling, no concern about whether they’re ripe. They’ve been processed at peak ripeness, so they taste like the best version of themselves. The only downside is that canned peaches in heavy syrup contain added sugar, which you account for by using slightly less sugar in the filling (though the recipe already factors this in).
Frozen peaches are an excellent middle ground. They thaw quickly in a bowl at room temperature while you prepare other ingredients. Once thawed, they should be drained to remove accumulated liquid. Frozen peaches taste fresher than canned and have a slightly firmer texture, but they’re still ready to use without peeling or slicing.
Fresh peaches require 10 to 15 minutes of prep time (washing, peeling, slicing), which pushes the total timeline past 30 minutes of elapsed time. You’d need approximately 2 pounds of fresh peaches, and you’d increase the sugar to 3/4 cup because fresh fruit releases less juice. Fresh peaches do create a brighter flavor, though—if you have access to peak-season peaches at a farmers’ market, they’re worth the additional prep time in the summer months when they’re abundant.
For consistency and speed, canned or frozen are genuinely superior. Don’t feel like you’re compromising; you’re being efficient.
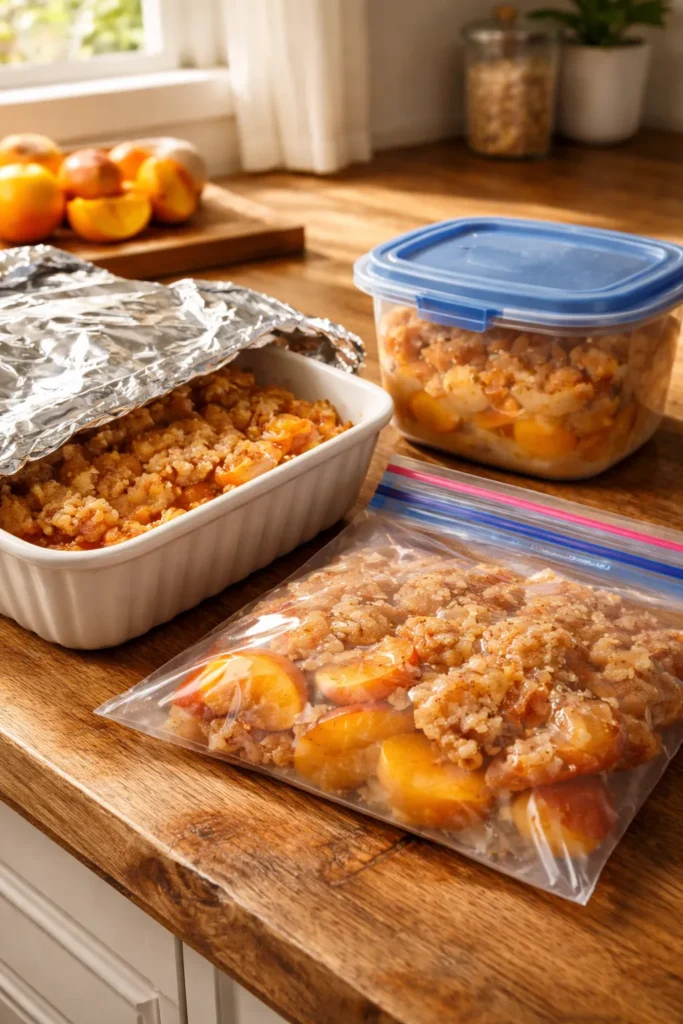
Storage and Make-Ahead Options
Peach cobbler keeps reasonably well, though the topping gradually softens the longer it sits.
Room temperature storage: If you eat the cobbler within 4 to 6 hours of baking, you can leave it on the counter in its baking dish, covered with foil or plastic wrap. The topping will gradually soften as it absorbs moisture from the filling, which some people prefer—the longer it sits, the more cake-like it becomes.
Refrigerator storage: Cover the cobbler tightly and refrigerate it for up to 3 days. The topping will be noticeably softer, almost custard-like where it’s been soaked in peach juice. This is delicious, though quite different from the crispy-topped fresh version.
Freezing: While cobbler can technically freeze, it’s not ideal. The high moisture content causes the topping to become dense and soggy when thawed. If you want to freeze it, portion it into individual servings, wrap tightly, and freeze for up to 2 months. Thaw overnight in the refrigerator and reheat gently before serving—the topping will never return to its original crispness, but it will still be tasty.
Make-ahead strategy: You can prepare the topping batter and peach filling up to 4 hours ahead of time. Keep both in separate covered containers in the refrigerator. When you’re ready to bake, pour the topping into an ungreased baking dish, stir in the melted butter, spoon the peaches over top, and bake as directed. This saves about 10 minutes at serving time.
Alternatively, prepare the dry ingredients for the topping (Bisquick, nutmeg) in a small bowl the night before. Drain your peaches the morning of. When you’re ready to bake, you’re literally mixing a few ingredients and spooning fruit, which makes the active time even shorter.
Serving and Pairing Suggestions
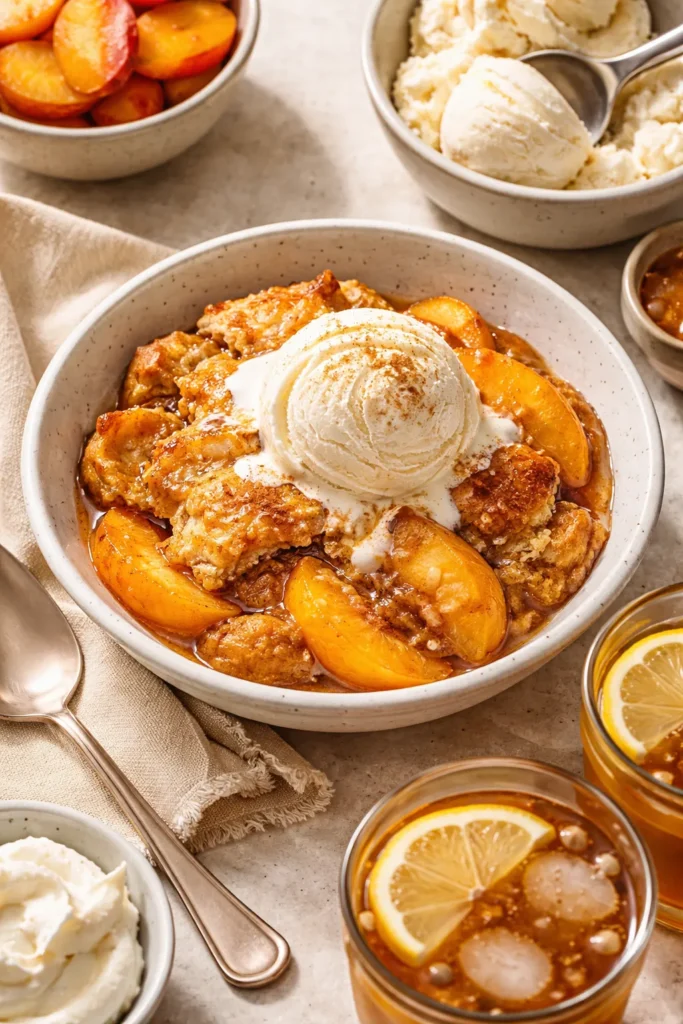
Vanilla ice cream is non-negotiable. The cold, creamy sweetness provides textural contrast to the warm, spiced filling and tender topping. Vanilla is traditional, but don’t skip other options—pecan praline ice cream, salted caramel, or even honey ice cream are extraordinary with this cobbler.
A sprinkle of coarse sugar on the topping before baking creates an attractive shimmer and adds subtle crunch. This is entirely optional but makes the plated cobbler look more intentional.
Whipped cream is a lighter alternative to ice cream if you prefer something less heavy. A dollop of unsweetened whipped cream with a tiny amount of vanilla folded in is perfect for eating the cobbler at the end of a meal when you’re already full.
Serve in shallow bowls rather than on dessert plates. The cobbler releases enough syrup that you want a bowl to catch it. Spoon the topping and filling together so each serving has both components, and make sure to include the syrupy juice that accumulates at the bottom—that’s flavor.
Pair with tea or coffee if serving for breakfast or brunch, or with dessert wine like a Moscato d’Asti if serving after dinner. The sweetness of the cobbler is balanced by slightly acidic beverages.
Frequently Asked Questions About Quick Peach Cobbler
Can I make this in a cast iron skillet instead of a glass baking dish?
Yes, absolutely. Use a 10-inch cast iron skillet, which has a similar capacity to the 8-inch square glass dish. Cast iron heats from the sides and bottom faster, so your cobbler might finish 5 to 10 minutes earlier. Watch it carefully at the 40-minute mark. Season your cast iron well so the cobbler doesn’t stick, and don’t skip the step about draining the peaches—excess moisture plus cast iron can cause sticking.
What if I don’t have ground nutmeg?
Omit it entirely, or substitute 1/4 teaspoon of ground cinnamon. The cobbler will taste good without any spice, though you’ll miss the complexity that nutmeg adds. Nutmeg is worth keeping on hand; it’s inexpensive and lasts for months.
Can I use self-rising flour instead of Bisquick?
In theory, yes, but not in this exact recipe. Self-rising flour contains salt and leavening but no fat, so you’d need to account for that. Stick with Bisquick—it’s formulated specifically for this type of quick recipe, and it performs better than substitutions.
Is the recipe dairy-free?
You can make it dairy-free by using non-dairy milk (almond, oat, or coconut milk work equally well) and non-dairy butter or coconut oil in place of the melted butter. The cobbler will be slightly less rich, but it will still bake into something delicious.
How do I know when it’s truly done baking?
Beyond the golden-brown color, the filling should be actively bubbling visibly around the edges. You should see small bubbles breaking at the surface of the filling—this indicates the fruit is hot and releasing steam. The topping should feel set when you gently touch it (carefully, it’s hot), not soft or doughy. A toothpick inserted through the topping should come out clean or with just a few small crumbs, not wet batter.
Final Thoughts
Peach cobbler earned its place in American dessert tradition because it’s fundamentally satisfying—juicy fruit, sweet spice, and buttery topping in one dish. For decades, home cooks thought achieving this required hours of work and complicated techniques. Bisquick changed that equation entirely.
This 30-minute cobbler (truly closer to 55 to 60 minutes of elapsed time, accounting for oven preheat and cooling) proves that excellent desserts don’t require labor-intensive methods. What matters is quality ingredients used intentionally and understanding how flavors and textures work together. The melted butter, the careful draining of peaches, the ungreased dish, the use of Bisquick for speed without sacrificing rise or tenderness—these aren’t shortcuts that compromise the end result. They’re smart choices that get you to the same destination faster.
When you pull this cobbler from the oven and the whole kitchen smells like cinnamon and caramelized peaches, when you scoop it into a bowl and the vanilla ice cream starts melting into the warm filling, it will feel impossible that you made something this good in under an hour. But you did. And now you have a recipe in your repertoire that works for weeknight cravings, last-minute entertaining, and any moment when you want dessert without the fuss.