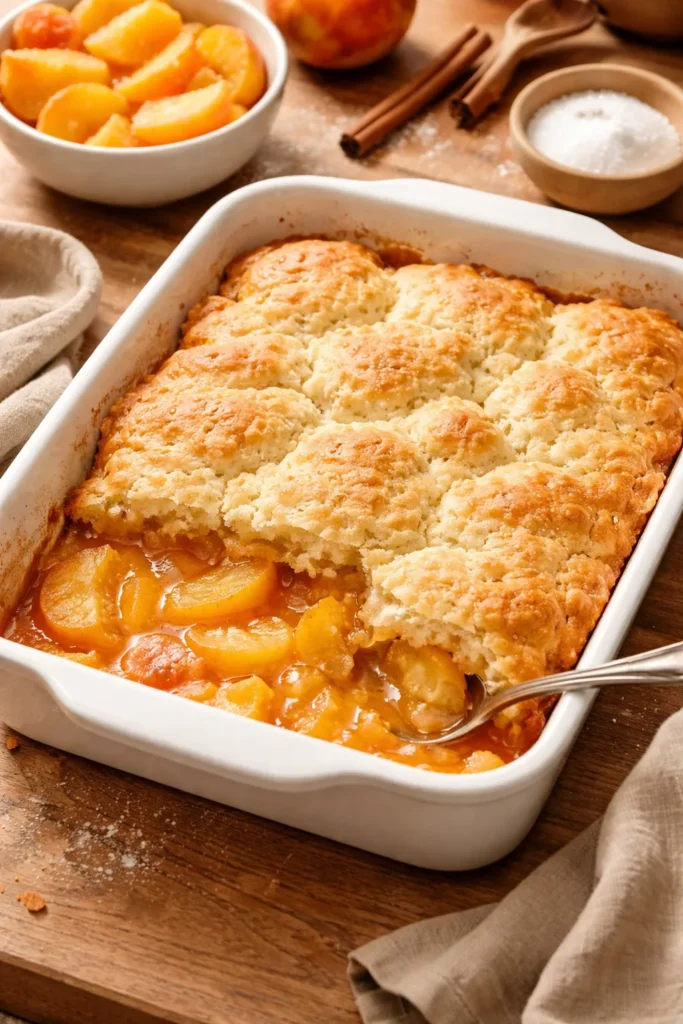
There’s something almost magical about pulling a golden, bubbling peach cobbler from the oven, the aroma of cinnamon and sweet fruit filling your kitchen. The best part? You don’t need to wait for peach season or spend hours peeling fresh fruit. Frozen peaches are actually an ideal secret weapon for making restaurant-quality peach cobbler at home, available year-round and often more reliable than fresh fruit. They’re picked at peak ripeness, frozen immediately, and bring consistent sweetness and texture to every batch. Whether you’re a seasoned baker or someone who rarely ventures into the kitchen, learning how to bake peach cobbler with frozen peaches opens up a world of possibilities—this is genuinely one of the most forgiving and rewarding desserts you can make.
The magic of frozen peach cobbler lies in its simplicity and flexibility. Unlike pies, which demand a perfectly executed crust, or cakes, which require precise ratios and careful technique, a great cobbler welcomes imperfection. The fruit can be slightly softer, the topping can be a little rustic and uneven, and the result is still stunning. Frozen peaches actually perform beautifully in this application because they release moisture slowly as they thaw, creating a naturally thick, jammy filling without the need for excess sugar or thickening agents. What you get is pure peach flavor—no mediocre texture, no soggy bottom, no mysterious watery filling.
This guide walks you through every aspect of the process, from selecting the best frozen peaches to troubleshooting common issues and creating variations that suit your tastes. You’ll learn the exact techniques that prevent watery cobblers, ensure a crispy yet tender topping, and deliver that perfect balance of sweet fruit and buttery cake in every single bite. By the time you finish reading, you’ll have the confidence to make this dessert as often as you’d like, adapting it freely to whatever ingredients you have on hand. This isn’t just a recipe—it’s a complete education in the art of cobbler.
Table of Contents
- Why Frozen Peaches Are Perfect for Cobbler
- Understanding the Science of Peach Cobbler
- Choosing Quality Frozen Peaches
- Essential Equipment and Ingredients
- Preparing Your Frozen Peaches for Baking
- Creating the Perfect Cobbler Topping
- Assembling Your Cobbler Before Baking
- Baking at the Right Temperature and Time
- Knowing When Your Cobbler is Perfectly Done
- Common Mistakes to Avoid
- Homemade Peach Cobbler with Frozen Peaches
- For the Peach Filling:
- For the Cobbler Topping:
- For Serving:
- Prepare the Peaches
- Make the Cobbler Topping
- Assemble and Bake
- Bake Until Golden and Bubbly
- Serve and Enjoy
- Pro Tips for Restaurant-Quality Results
- Creative Flavor Variations and Swaps
- Storage, Make-Ahead, and Reheating Guide
- Best Ways to Serve and Pair Your Cobbler
- Final Thoughts
Why Frozen Peaches Are Perfect for Cobbler
Many home cooks assume fresh peaches are superior, but frozen peaches actually hold distinct advantages for cobbler baking. When peaches are frozen at their peak ripeness, they maintain exceptional flavor intensity because the sugars are fully developed and the volatile aromatic compounds are locked in place. Unlike fresh peaches, which may be harvested underripe and sit in transit before reaching your kitchen, frozen peaches deliver consistent sweetness and texture every single time you bake.
The texture transformation that happens during freezing actually works beautifully in cobbler’s favor. The ice crystals that form within the peach cells break down the cell walls, making the fruit more tender and willing to release its juices during baking. This is precisely what you want in a cobbler—a soft, yielding filling that mingles with the topping and creates that characteristic jammy consistency. Fresh peaches, by contrast, sometimes resist breaking down and can leave you with large, firm chunks rather than the cohesive filling that makes cobbler so satisfying.
Convenience is another significant advantage that shouldn’t be overlooked. Frozen peaches eliminate prep work—no scoring, blanching, peeling, or pitting required. They’re sold pre-sliced, ready to use directly from the bag (or thawed and drained if you prefer). This means you can literally throw together a peach cobbler at 6 p.m. and have dessert on the table by 7:15. The ability to make this dessert year-round is genuinely transformative for home bakers who don’t want to wait for a narrow summer window.
Understanding the Science of Peach Cobbler
A peach cobbler is fundamentally a fruit dessert with two distinct components that must work in harmony: a thick, jammy filling and a biscuit or cake-like topping. Understanding what’s happening at the chemical level helps you navigate the baking process with confidence and troubleshoot if anything goes wrong.
When frozen peaches thaw, they release their natural pectin and juices. Pectin is a naturally occurring compound in fruit that helps create thickness and that signature spreadable consistency. As peaches warm in the oven, their cell walls continue to break down, and the released juices concentrate through evaporation, creating a filling that’s both flavorful and the right consistency—not runny, not stiff, but thick and luxurious.
The topping works through an entirely different mechanism. When flour, baking powder, butter, and liquid combine and hit the heat of the oven, the baking powder releases carbon dioxide bubbles. These bubbles are trapped in a matrix of flour and fat, which sets into a tender crumb structure. The butter is key here—its fat coats the flour particles and prevents too much gluten development, which would make the topping tough and dense. This is why cold, cubed butter is so important; it creates little pockets within the dough that bake into tender, flaky bits.
The interplay between the two components creates something magical. The filling releases steam, which rises into the topping and keeps it moist inside while the exterior browns and crisps. Meanwhile, the topping provides structure and something substantial to contrast with the soft fruit. This dynamic is why cobbler feels like both dessert and breakfast, both indulgent and wholesome.
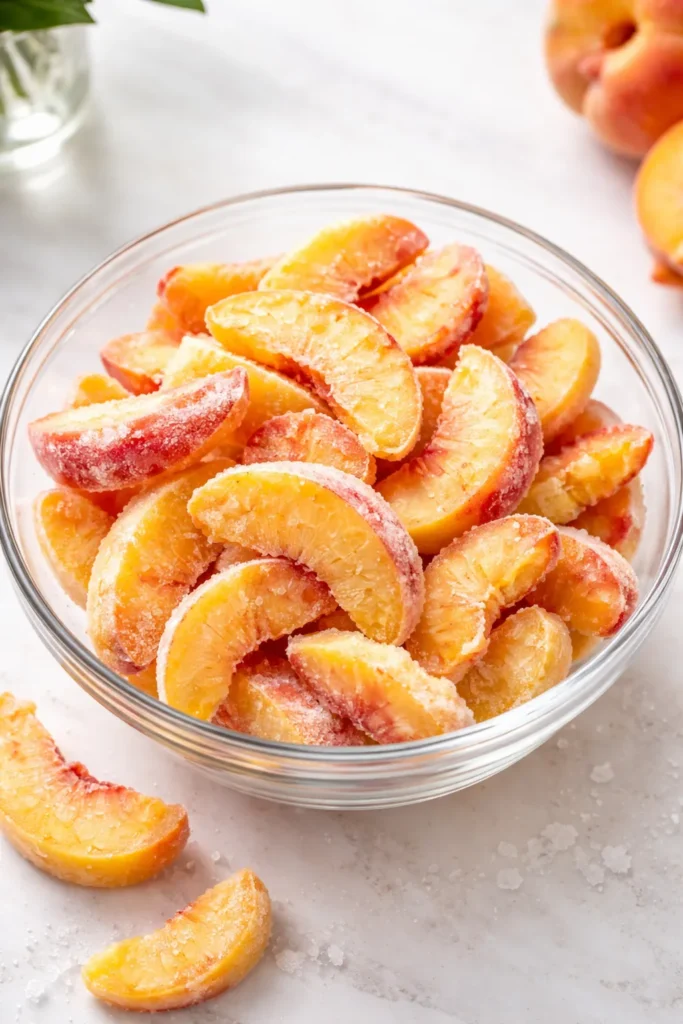
Choosing Quality Frozen Peaches
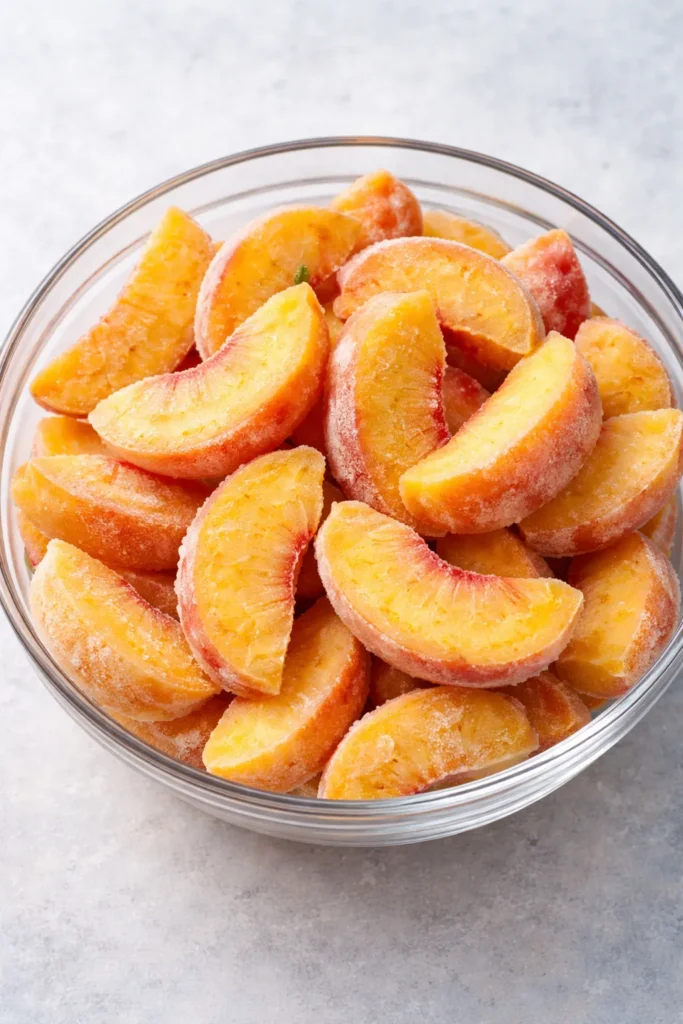
Not all frozen peaches are created equal, and the quality you select will noticeably impact your final cobbler. The best frozen peaches are those that contain only peaches—nothing else. Examine the ingredient list carefully; you want to see a single ingredient listed, or perhaps peaches and a minimal amount of ascorbic acid (which is simply vitamin C used to prevent browning). Avoid products that contain added sugar, corn syrup, or other sweeteners, as these can throw off your filling’s balance and leave you with overly sweet cobbler.
Look for packages that are solidly frozen with no ice crystals visible on the outside. Large ice crystals suggest the peaches have thawed and refrozen during storage, which damages the cell structure and can result in mushy, less flavorful fruit. The peaches inside should be whole slices or very large chunks—not a puree or highly processed product. Organic frozen peaches are worth seeking out if your budget allows, as they tend to be from producers who prioritize flavor and quality.
Consider shopping at stores with high produce turnover, as fresher frozen products taste noticeably better. Farmer’s markets and specialty grocers often stock superior frozen fruit compared to mass-market brands. You might also explore local orchards that freeze their own peaches; these are often exceptional and support small producers. Once you’ve found a brand you love, you can reliably use it for cobbler and other peach desserts.
Essential Equipment and Ingredients
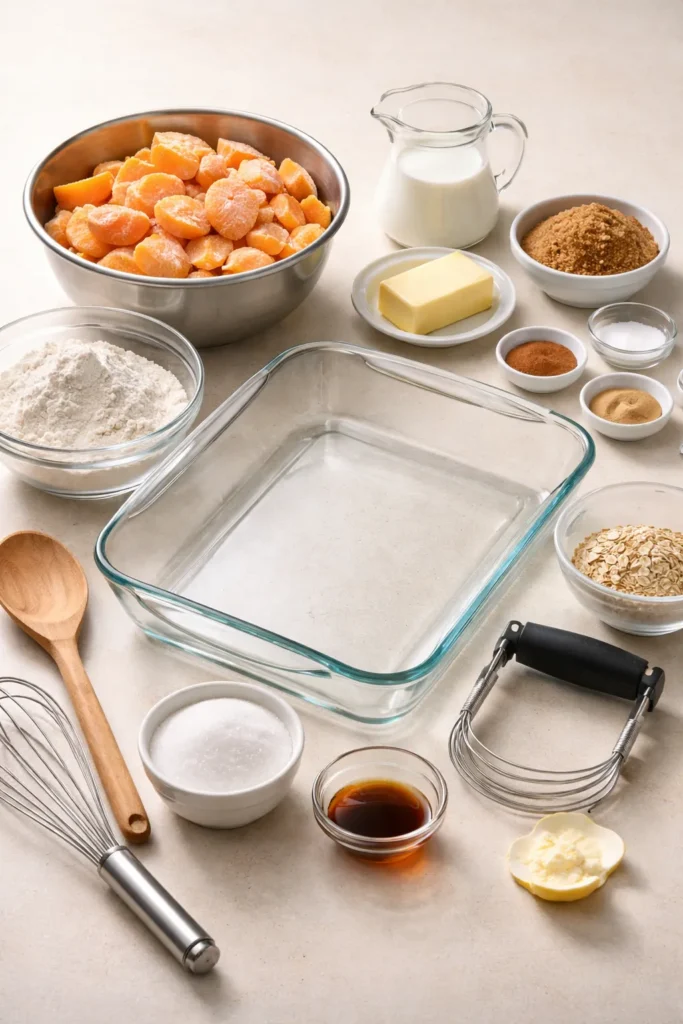
Baking an exceptional peach cobbler requires minimal equipment, which is part of its appeal. You’ll need a baking dish in the range of 2 to 3 quarts—this typically means an 8×8-inch square dish, a 9×9-inch square dish, or a 7×11-inch rectangular dish. Glass dishes heat evenly and allow you to monitor browning, which makes them ideal. Avoid dark metal pans unless you reduce the oven temperature by 25°F, as they absorb heat more aggressively and can cause over-browning.
Beyond the baking dish, gather these items: large mixing bowls (at least two), a medium saucepan for pre-cooking the filling, a colander for draining thawed peaches, measuring cups and spoons, a whisk, a spatula, and a pastry cutter or your fingertips for cutting cold butter into the dry ingredients. A kitchen scale isn’t essential but dramatically improves accuracy, especially for flour. An instant-read thermometer helps verify oven temperature.
The ingredients themselves are straightforward but worth choosing thoughtfully. Use unsalted butter so you control the salt level in your cobbler. Whole milk creates a richer topping than lower-fat alternatives. All-purpose flour works perfectly; there’s no need for specialty flours unless you’re adapting the recipe for dietary restrictions. For the filling, you’ll need granulated sugar and brown sugar—the brown sugar adds depth and a subtle molasses note that pairs beautifully with peaches. Ground cinnamon, vanilla extract, and lemon juice round out the flavor profile without requiring a long ingredient list.
Preparing Your Frozen Peaches for Baking
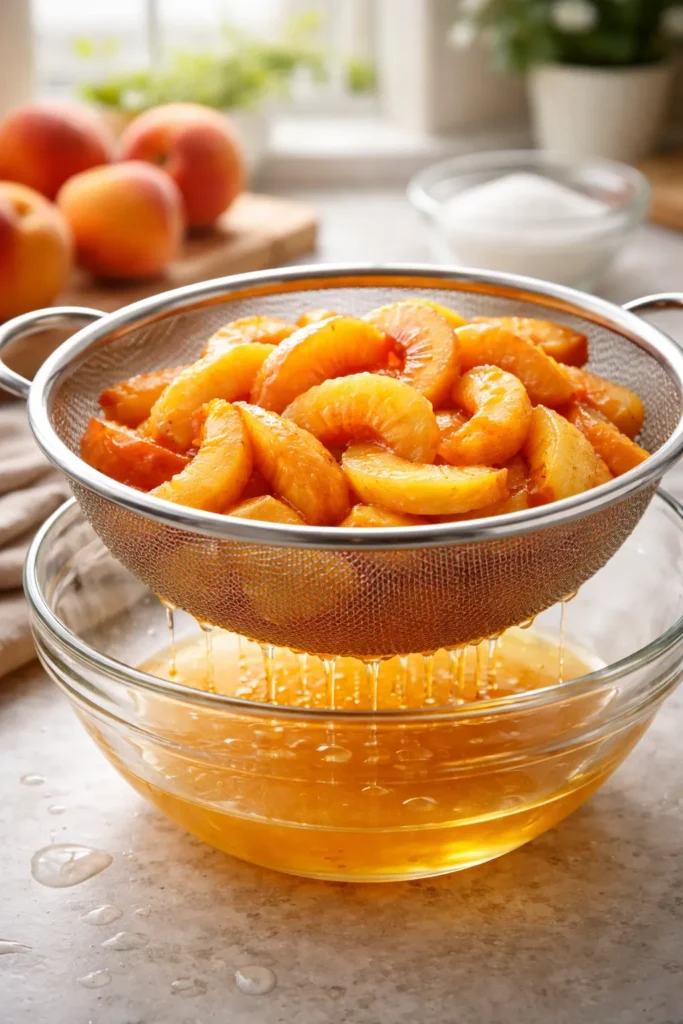
How you prep frozen peaches significantly impacts the final texture of your cobbler. Remove the peaches from the freezer and place them in a colander set over a bowl. Let them thaw at room temperature for 45 minutes to 1 hour, or you can run them under cool water for faster thawing. Thawing in a colander is crucial because it allows excess moisture to drain away rather than pooling in the fruit.
Once thawed, gently toss the peaches with your hands to separate any clumps and ensure even thawing. Use your fingers to press out additional moisture into the colander—this step prevents the cobbler filling from becoming watery. Some recipes suggest patting the peaches dry with paper towels, which works equally well. Don’t be afraid to remove extra liquid; a thick, concentrated filling is far superior to a watery one that leaves a soggy topping.
At this point, you have two options: combine the peaches with sugar and spices and let them macerate (rest) for 15-30 minutes before baking, or gently cook them in a saucepan over medium heat for 5-10 minutes. The cooking method is particularly effective because it allows the peaches to release their juices in a controlled environment, lets you thicken the filling slightly with cornstarch if needed, and gives you a clear view of the consistency before it goes into the oven. This approach produces the most reliable, restaurant-quality results. If you macerate instead, simply let the mixture sit undisturbed while you prepare the topping—the sugar draws out additional juice, and the mixture will thicken slightly as it rests.
Creating the Perfect Cobbler Topping
The topping is where cobbler bakers often go wrong, creating something that’s either dense and gluey or so sparse it barely covers the fruit. The sweet spot lies in a ratio of about 1 part fat (butter) to 3 parts flour, combined with just enough liquid to bring everything together into a tender dough. This creates a texture that’s rich without being heavy, and flaky without being dry.
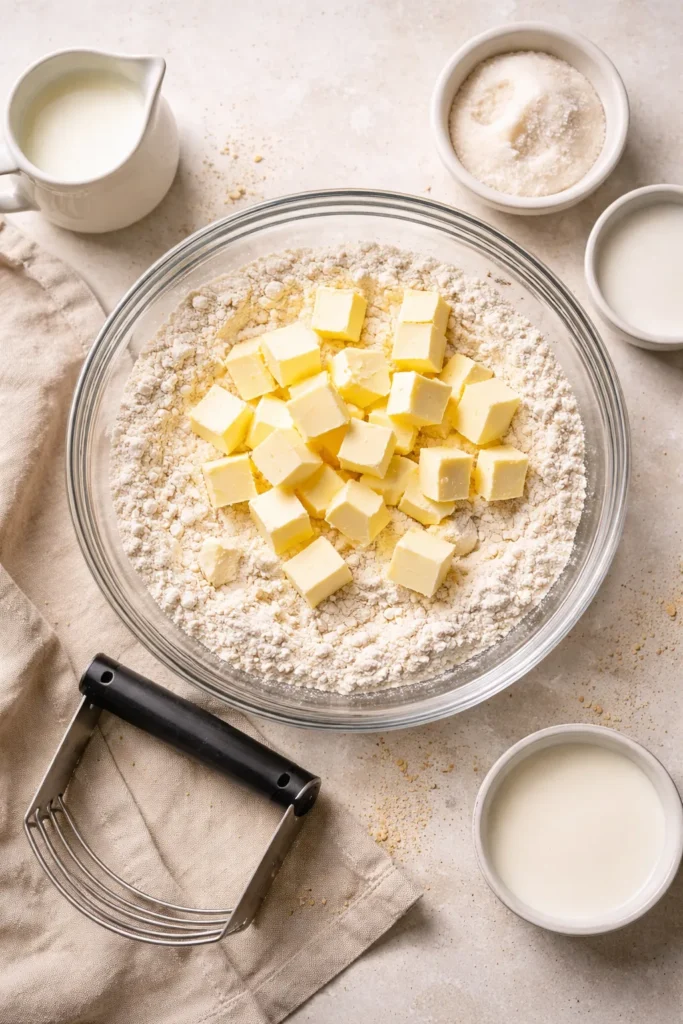
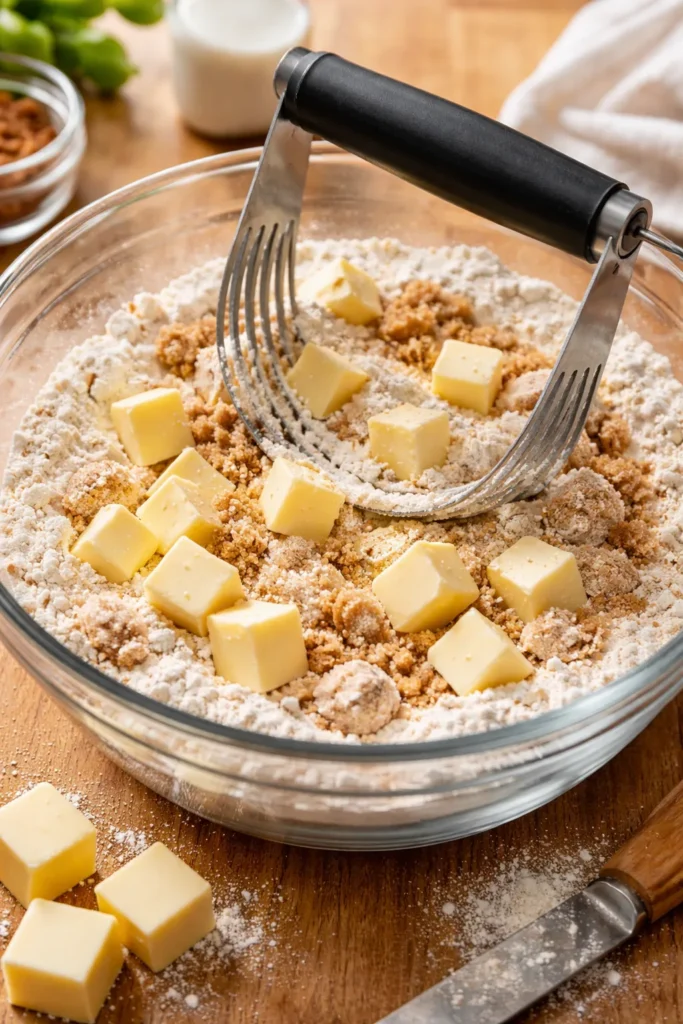
Start by whisking together your dry ingredients—flour, sugar, baking powder, and salt. These should be evenly distributed, which is why whisking matters even before you add wet ingredients. Next, cut cold butter into small cubes and scatter them over the flour mixture. Using a pastry cutter, two knives, or even your fingertips, work the butter into the flour until the mixture resembles coarse cornmeal or breadcrumbs. The key is keeping the butter cold so it stays separate from the flour; these little pockets of butter are what creates a tender, flaky topping. If the kitchen is warm, chill your bowl and utensils beforehand.
Once the texture is right, add cold milk and vanilla extract. Stir gently with a spatula or wooden spoon—just until the ingredients come together into a cohesive dough. Overmixing develops gluten, which toughens the topping and creates a heavy, cake-like result rather than a tender, biscuit-like texture. The dough should look slightly shaggy and imperfect. Some recipes include an egg, which adds richness and color; others skip it entirely. Both approaches work beautifully. If using an egg, beat it lightly before incorporating it with the milk.
Assembling Your Cobbler Before Baking

The assembly method you choose affects the final texture dramatically. The traditional approach—and the one most professional bakers recommend—is to pour the batter into a baking dish with melted butter, then spoon the fruit and its juices on top without stirring. This method allows the batter to rise around the fruit during baking, creating a cake-like layer underneath and a biscuit-like topping. The result feels luxurious and more complex than cobbler where everything gets mixed together.
Alternatively, you can place the cooked fruit filling into the baking dish first, then dollop spoonfuls of topping over it, leaving some gaps for steam to escape. This method is slightly less elegant visually but equally delicious, and it’s genuinely easier if you’re not confident with the no-stir method. The important rule applies either way: do not stir once the fruit and topping are in the same dish. Stirring causes the topping to sink and become soggy rather than rise and crisp.
If you want to build in extra cinnamon flavor, sprinkle ground cinnamon over the fruit before adding the topping. Some bakers add a pinch directly to the topping dough as well, or brush the top with milk before baking for extra browning. These steps are entirely optional but add flavor and visual appeal.
Baking at the Right Temperature and Time
Temperature precision matters more in cobbler baking than most home cooks realize. The standard temperature is 350°F to 375°F, with 350°F being ideal for even, gentle baking that allows flavors to develop without browning too quickly. If your oven runs hot (and many do), use 350°F. If it runs cool, use 375°F. An oven thermometer is the single best investment for baking accuracy—they cost just a few dollars and dramatically improve results.
Position the cobbler on the center rack, where heat circulates evenly above and below. The baking time typically ranges from 35 to 50 minutes, depending on your oven, the size of your baking dish, whether you pre-cooked the filling, and the thickness of your topping. A good general guideline is to bake until the topping is golden brown and the filling is bubbling vigorously at the edges. If the topping is browning too quickly while the filling remains uncooked, tent the dish loosely with foil for the remaining bake time to slow top browning while the interior finishes cooking.
For a convection oven, reduce the temperature by 25°F and expect slightly faster cooking time. Convection fans circulate heat more aggressively, which can over-brown delicate toppings. Watch your cobbler during the final 10-15 minutes of baking to ensure it doesn’t overdo it.
Knowing When Your Cobbler is Perfectly Done
The visual cues that indicate a finished cobbler are more reliable than any timer. The topping should be golden brown with no visible raw, pale dough remaining. Gently press the surface with a clean fingertip—it should spring back slightly and feel set rather than doughy. The filling should be bubbling enthusiastically at the edges and possibly peeking out in one or two spots around the topping.
If you cooked the filling beforehand, the peaches will have been soft before baking, so you’re mainly waiting for the topping to bake through. If you didn’t pre-cook the fruit, allow extra baking time to ensure the peaches have fully softened and released their juices. A toothpick inserted into the topping should come out clean with no raw batter clinging to it, though some creamy filling on the toothpick is expected and desirable.
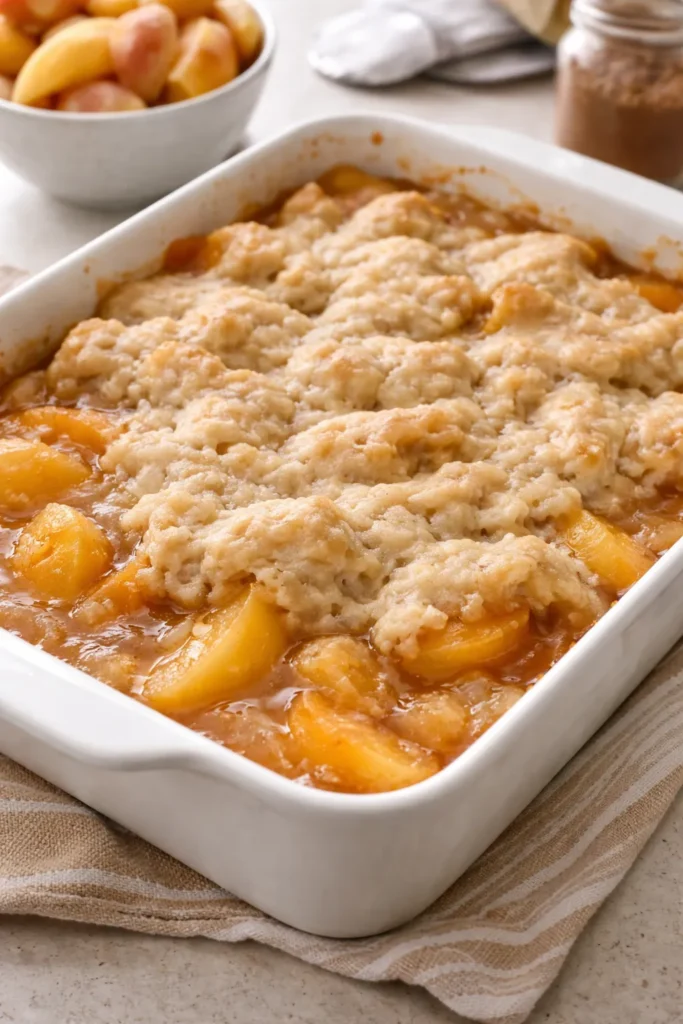
Allow the cobbler to rest on the counter for 10-15 minutes before serving. This resting period allows the filling to set slightly, making individual servings easier to scoop without everything running into one another. The cobbler will continue to thicken as it cools, and the flavors meld during this window. Serving it too hot means the filling is still quite liquid, while waiting until it’s completely cool sacrifices the warm, comforting quality that makes cobbler special.
Common Mistakes to Avoid
The most frequent cobbler mistake is creating a watery filling by not draining frozen peaches adequately. Many bakers assume that all the peach liquid is desirable because it carries flavor, but excess moisture steam-cooks the topping from beneath, making it soggy and cake-like. The solution is simple: drain thawed peaches thoroughly, and if you opt to cook them beforehand, cook them uncovered so steam can escape.
A second common error is overmixing the topping dough. This develops gluten, making the final texture dense, tough, and gluey rather than tender and flaky. Mix just until the dry ingredients are moistened; small lumps of flour are actually desirable. If you’ve overmixed and realized it before baking, chill the dough for 15 minutes, which helps relax the gluten somewhat.
Using cold ingredients isn’t merely a suggestion—it’s essential. Cold butter, cold milk, and sometimes even chilling the bowl and utensils ensures that butter remains distinct from the flour rather than blending into a homogeneous mass. Warm butter creates a dense topping; cold butter creates one that’s light and flaky. Similarly, avoid opening the oven door frequently during baking, as this causes temperature fluctuations that prevent the topping from rising evenly.
Finally, don’t skip the resting period after baking. Serving cobbler immediately while the filling is still actively bubbling means it’s too liquid and will run all over the plate. Waiting 10-15 minutes allows the pectin in the peaches to set, creating a filling that’s thick and scoopable. This single step transforms cobbler from a deconstructed mess into an elegant, composed dessert.
Homemade Peach Cobbler with Frozen Peaches
Yield: Serves 6 to 8
Prep Time: 20 minutes
Cook Time: 40 minutes
Total Time: 1 hour 10 minutes (including resting time)
Difficulty: Beginner — No special skills required, straightforward steps, and very forgiving if anything goes slightly off. This is an ideal recipe for first-time cobbler bakers.
For the Peach Filling:
- 32 ounces frozen sliced peaches (two 16-ounce packages), thawed and drained
- 1/3 cup granulated white sugar
- 1/3 cup light brown sugar, packed
- 1 tablespoon fresh lemon juice
- 1/2 teaspoon ground cinnamon
- 1/4 teaspoon fine sea salt
- 1 teaspoon pure vanilla extract
- 1 tablespoon cornstarch (use this if your drained peaches released excess liquid; optional otherwise)
For the Cobbler Topping:
- 1 1/2 cups all-purpose flour
- 1/3 cup granulated white sugar
- 1/4 cup light brown sugar, packed
- 1 1/2 teaspoons baking powder
- 1/2 teaspoon fine sea salt
- 8 tablespoons (1 stick) unsalted butter, cold and cut into small cubes
- 1/3 cup whole milk, cold
- 1 teaspoon pure vanilla extract
- 1 large egg, beaten (optional, but adds richness and browning)
For Serving:
- Extra cinnamon for sprinkling (optional)
- Coarse or sanding sugar for sprinkling (optional but recommended)
- Vanilla ice cream or freshly whipped cream
Prepare the Peaches
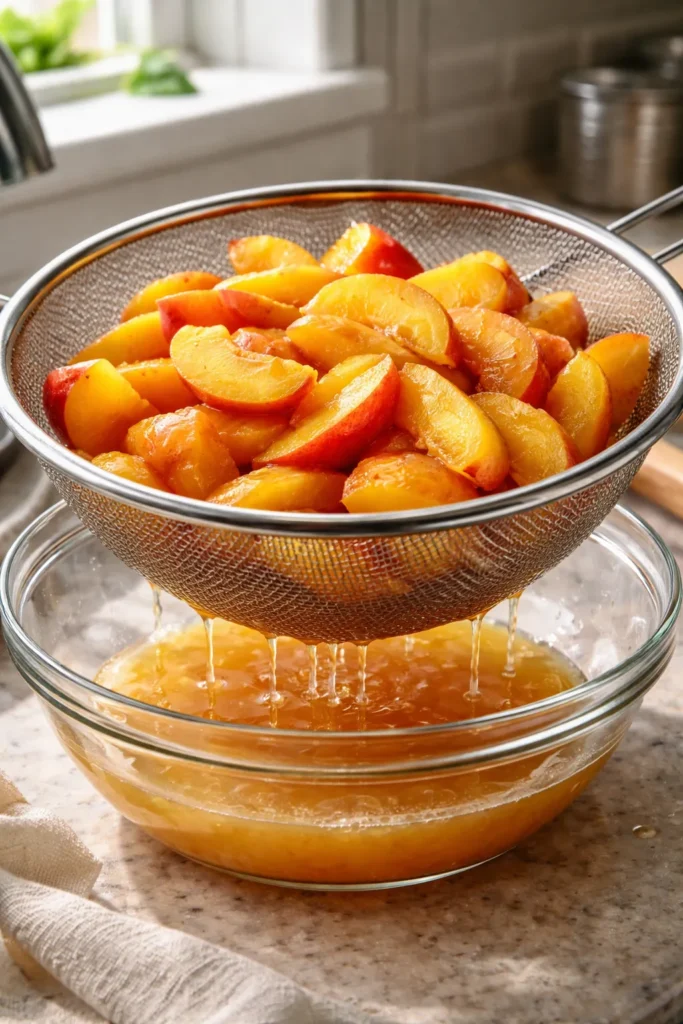
1. Thaw and drain the frozen peaches. Place the frozen peach slices in a fine-mesh colander set over a bowl. Allow them to thaw at room temperature for about 1 hour, or run them under cool water for faster thawing (about 10-15 minutes). Once fully thawed, gently press the peaches with your fingers or the back of a spoon to release additional liquid. Reserve the drained liquid in a separate bowl—you may need 2 tablespoons of it for the filling. Discard the remaining liquid.
2. Combine the peaches with sugars and spices. Transfer the drained peaches to a medium saucepan. Add both sugars, lemon juice, cinnamon, salt, and vanilla extract. Stir gently to combine without crushing the peaches excessively. Place the saucepan over medium heat and bring the mixture to a gentle simmer, stirring occasionally. Allow it to simmer for 5 to 7 minutes, until the peaches have softened further and released additional juice. The mixture should look thick and syrupy, with the peaches releasing their pectin naturally.
3. Thicken the filling if necessary. If you prefer a thicker filling (and most people do), whisk 1 tablespoon of cornstarch with 2 tablespoons of the reserved drained peach juice to create a slurry. Stir this into the simmering peaches and continue cooking for 1 to 2 minutes longer, until visibly thickened. The filling should coat the back of a spoon and slowly drip off, not run like water. Remove from heat and set aside to cool slightly while you prepare the topping.
Make the Cobbler Topping
4. Combine the dry ingredients. In a large mixing bowl, whisk together the flour, granulated sugar, brown sugar, baking powder, and salt. Use a whisk to ensure everything is evenly distributed and there are no clumps of baking powder (these can create bitter spots in the finished cobbler). Set aside.
5. Cut in the cold butter. Add the cubed cold butter to the flour mixture. Using a pastry cutter, two knives, or even your fingertips, quickly work the butter into the flour until the mixture resembles coarse cornmeal or panko breadcrumbs. Each piece of butter should be coated in flour, but still distinct and separate—not smeared or blended in. This is crucial for achieving a tender, flaky topping. If the kitchen is warm or your hands are naturally warm, chill the bowl and your utensils for 10 minutes before this step.
6. Add the wet ingredients. Pour the cold milk and vanilla extract into the flour-butter mixture. If using the beaten egg, add it now. Using a rubber spatula or wooden spoon, stir gently and deliberately—just until the dry ingredients are moistened and the mixture comes together into a shaggy, rough dough. Do not overmix. Small pockets of flour and butter are desirable; they’ll create a light, tender texture during baking. Overmixing develops gluten and results in a dense, tough topping that tastes more like a heavy cake than a tender cobbler.
Assemble and Bake
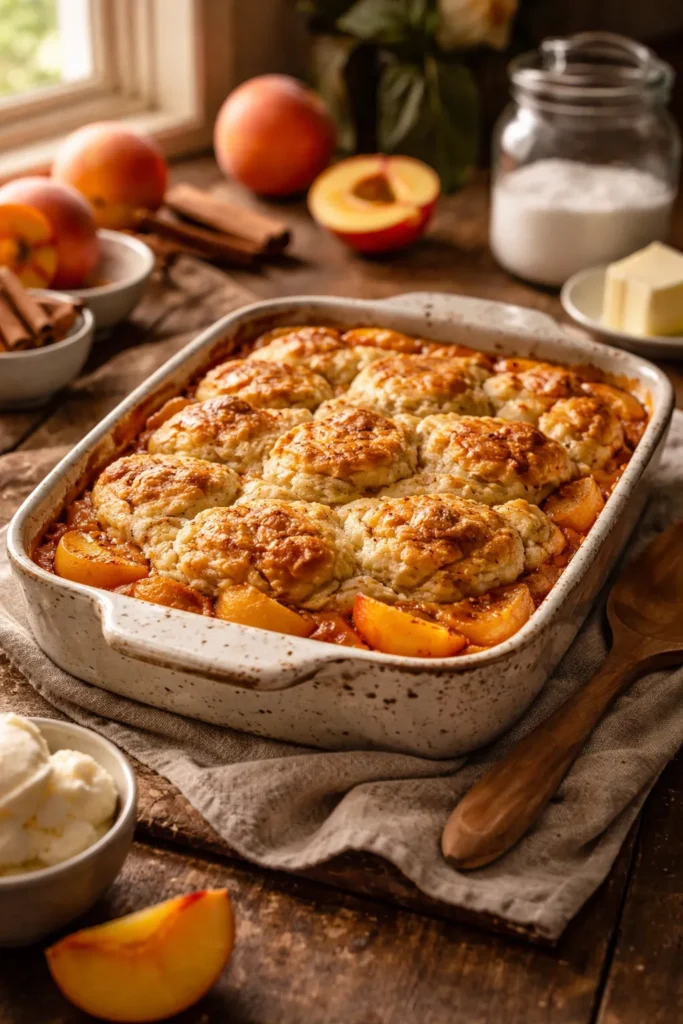
7. Preheat the oven and prepare the baking dish. Preheat your oven to 350°F. Position the rack in the center. Lightly grease a 9-inch square baking dish (or similar 2-quart capacity) with unsalted butter or cooking spray. The size matters; a dish that’s too large will create a thin cobbler, and one that’s too small will overflow.
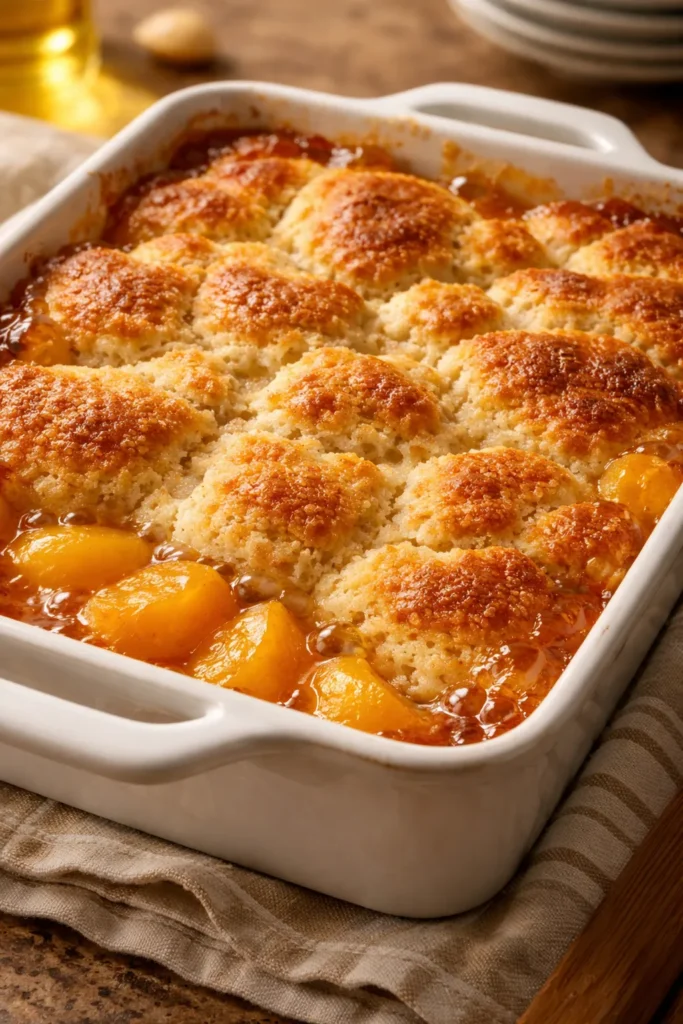
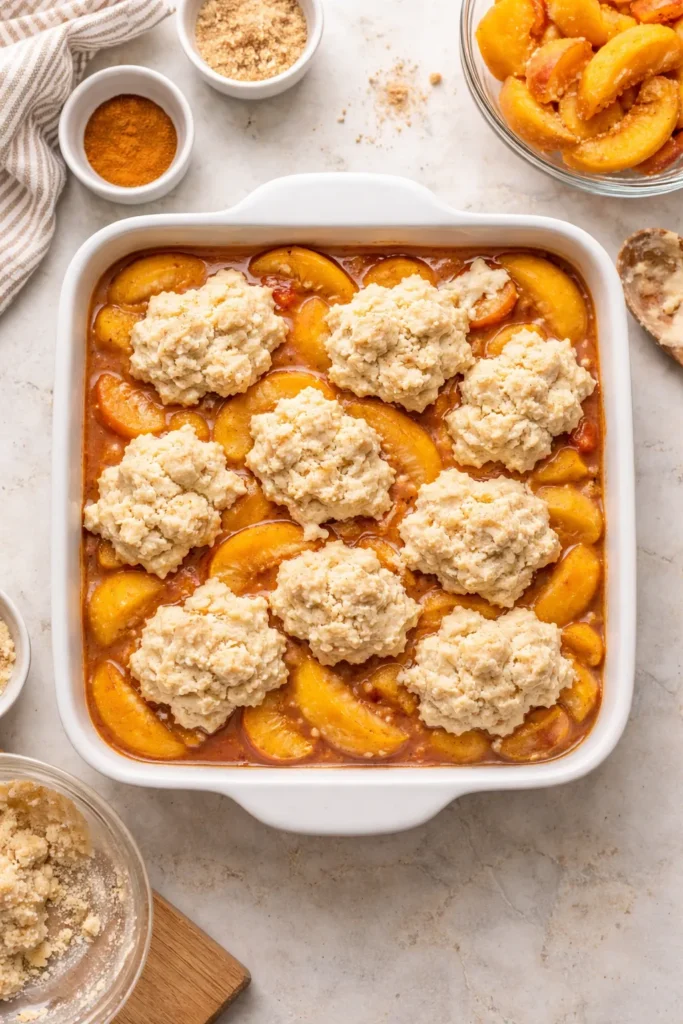
8. Assemble the cobbler. Spoon the peach filling (with all its juices and syrup) into the prepared baking dish. Use a spatula to spread it into an even layer, though exact evenness isn’t critical. If desired, sprinkle a light dusting of ground cinnamon over the peaches. Using a spoon or small ice cream scoop, drop spoonfuls of the topping dough over the peach filling. Space them so they cover about 75-80% of the fruit’s surface, leaving small gaps (roughly 1/2 inch) between mounds to allow steam to escape during baking.
9. Optional finishing touch. If you’d like, lightly brush each mound of topping with a bit of milk (optional—use a pastry brush), and sprinkle with coarse or sanding sugar. This step adds visual appeal and creates extra crunch on the finished cobbler. Skip it if you prefer a more rustic appearance.
Bake Until Golden and Bubbly
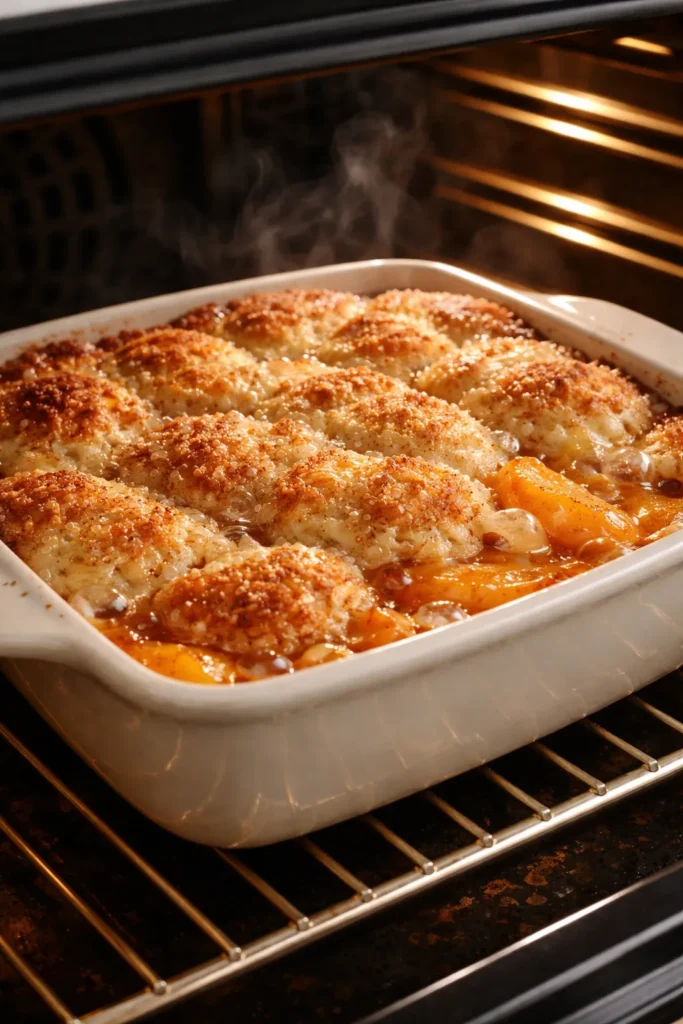
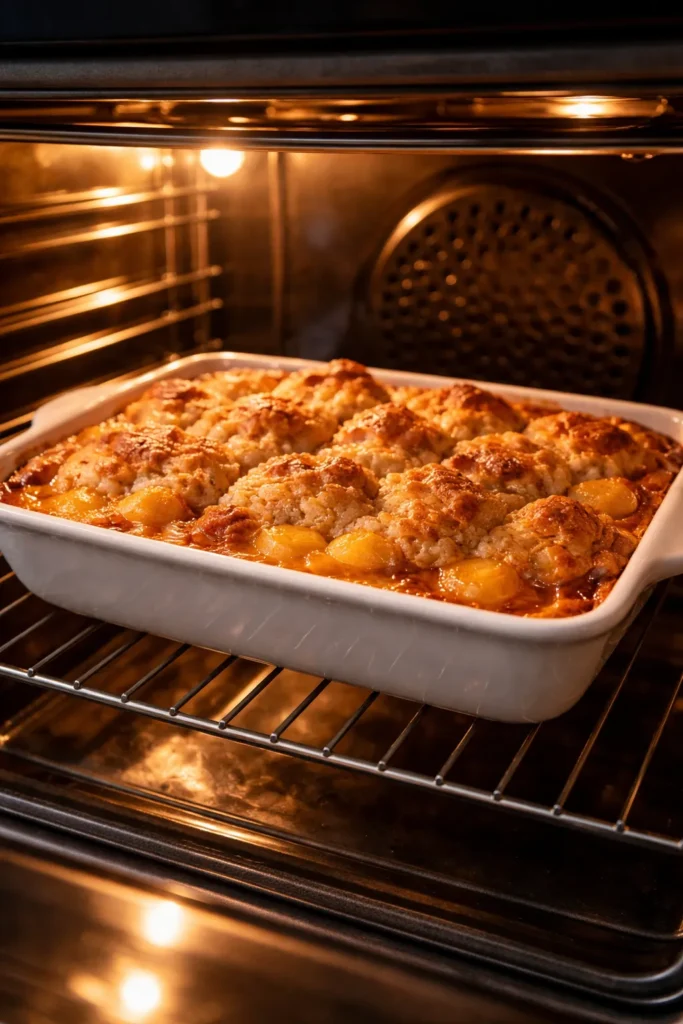
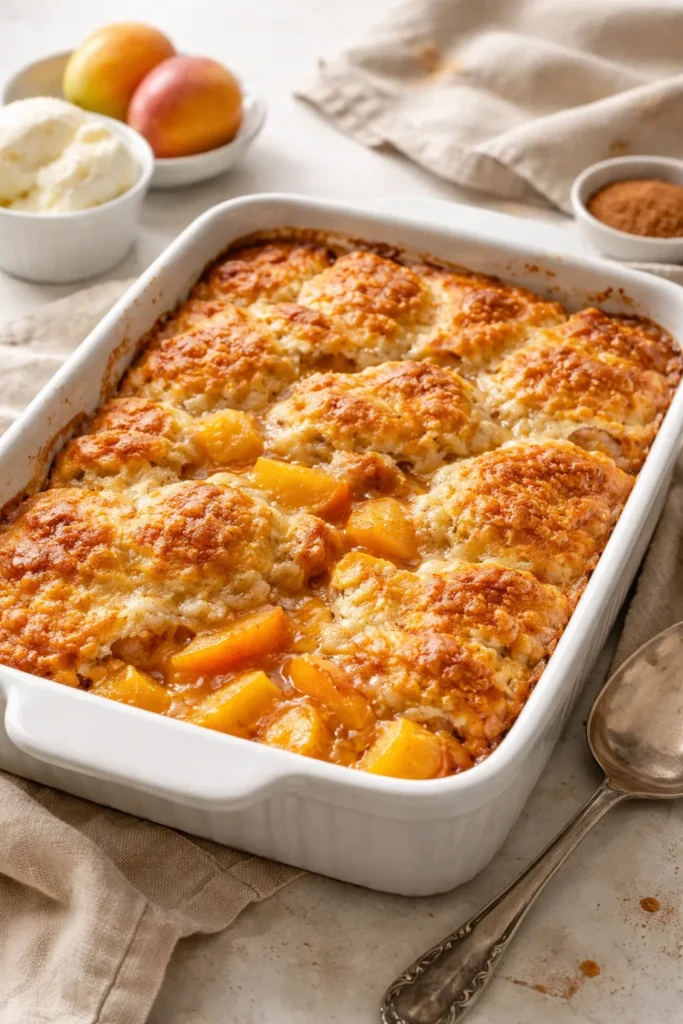
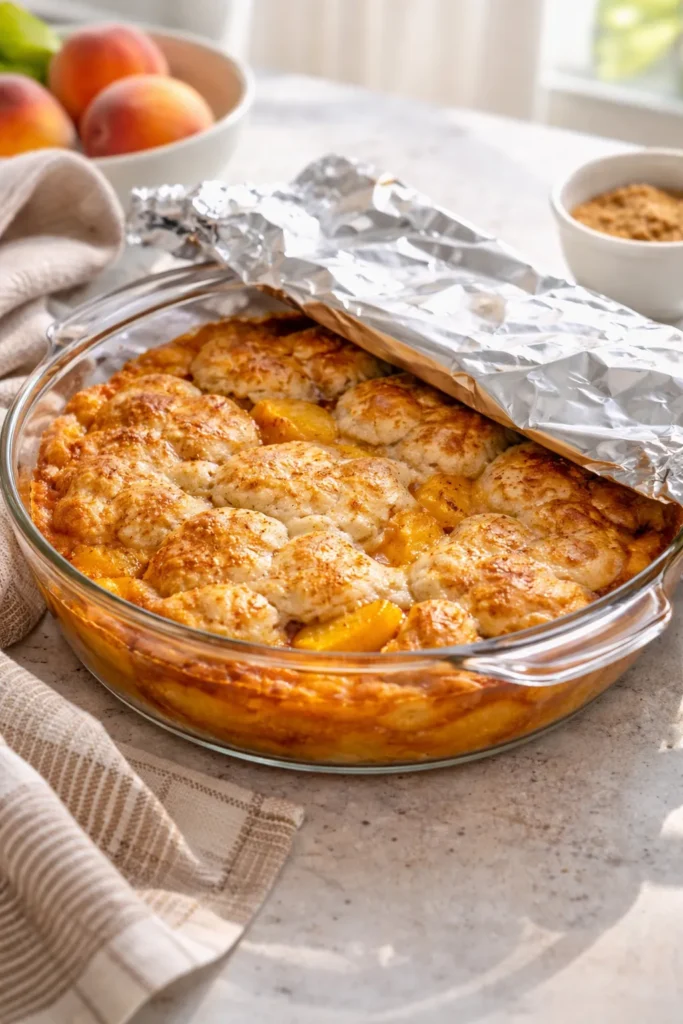
10. Bake the cobbler. Place the baking dish in the preheated 350°F oven on the center rack. Bake for 35 to 45 minutes. The cobbler is done when the topping is golden brown all over (not pale or raw-looking anywhere), and the filling is bubbling vigorously at the edges and in any gaps between the topping mounds. Gently press the surface of the topping with a clean finger—it should feel set and spring back, not doughy or soft.
11. Handle any browning issues. If the topping is browning too quickly while the interior is still underdone, loosely tent the cobbler with aluminum foil to slow top browning while the filling finishes cooking. Conversely, if the filling is bubbling but the topping remains pale after 40 minutes, the oven may be running cool. Continue baking for an additional 5-10 minutes while monitoring closely.
12. Cool before serving. Remove the cobbler from the oven and place it on a wire cooling rack or trivet. Allow it to cool for 10 to 15 minutes—this is non-negotiable. During this resting period, the filling thickens as pectin sets, and the flavors meld together. The cobbler will still be warm and comforting but scoopable rather than soupy.
Serve and Enjoy
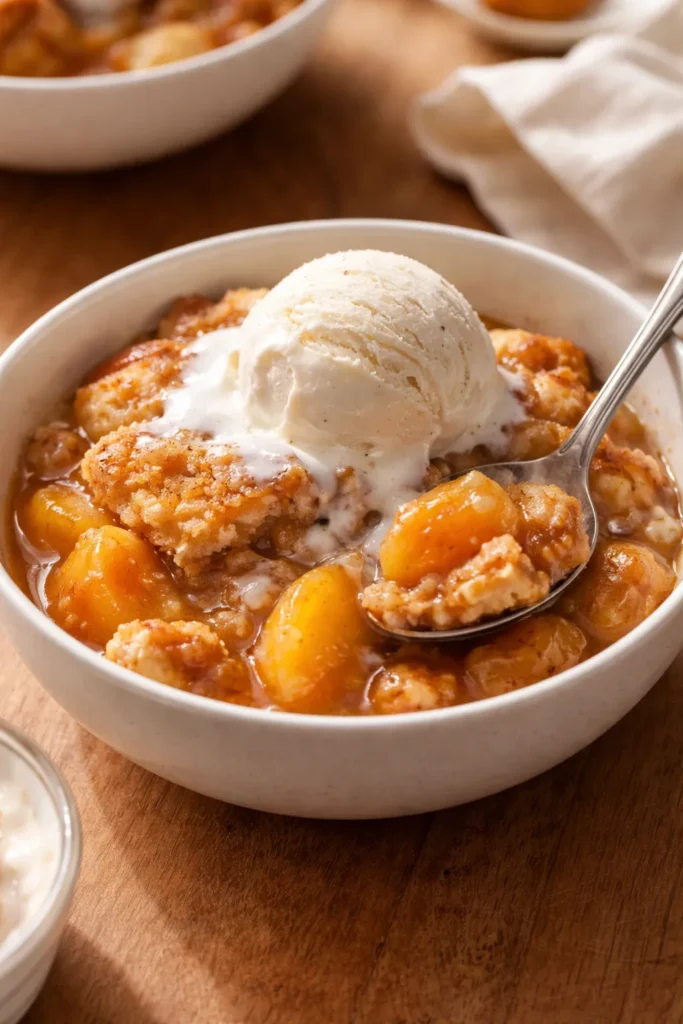
13. Portion and serve. Spoon warm cobbler into bowls or onto plates. Top each serving with a generous scoop of vanilla ice cream or a dollop of freshly whipped cream. The contrast between warm cobbler and cold ice cream is essential to the full experience. Serve immediately while the cobbler is still warm.
Pro Tips for Restaurant-Quality Results
Macerate the filling overnight. If you make the peach filling the day before baking, allow it to sit covered in the refrigerator overnight. The peaches will continue breaking down and releasing juice, creating an even more concentrated, jam-like consistency by the next day. Simply let it come to room temperature before assembling the cobbler, then bake as directed. This advance preparation deepens flavors and improves texture.
Use a combination of both sugars. The mix of granulated and brown sugar creates depth and complexity that all-white sugar can’t achieve. Brown sugar’s molasses content pairs beautifully with peaches’ subtle tartness. If you only have one type, the cobbler will still be delicious, but the flavor profile will be slightly one-dimensional.
Don’t skip the lemon juice. Lemon juice brightens peach flavors and prevents the cobbler from tasting cloying. Even though lemon isn’t “peachy,” the small amount used here enhances rather than changes the primary flavor. Lemon and peach are a classic pairing for good reason.
Toast your cobbler topping slightly faster using broil. If your topping is still pale after 40 minutes of baking but the filling is clearly done (vigorously bubbling, thickened), switch the oven to broil for 1-2 minutes to quickly brown the surface. Watch it constantly during broil—the difference between beautifully golden and burnt is about 30 seconds. Keep the oven door cracked open so you can monitor the progress.
Make an extra batch of topping and freeze it. The cobbler topping dough keeps beautifully frozen for up to 3 months. Scoop dollops onto a parchment-lined tray, freeze until solid, then transfer to a freezer bag. Whenever you have thawed peaches on hand or a craving strikes, you can simply pull out frozen topping dough and bake. The baking time might increase by 5-10 minutes since you’re starting from frozen.
Creative Flavor Variations and Swaps
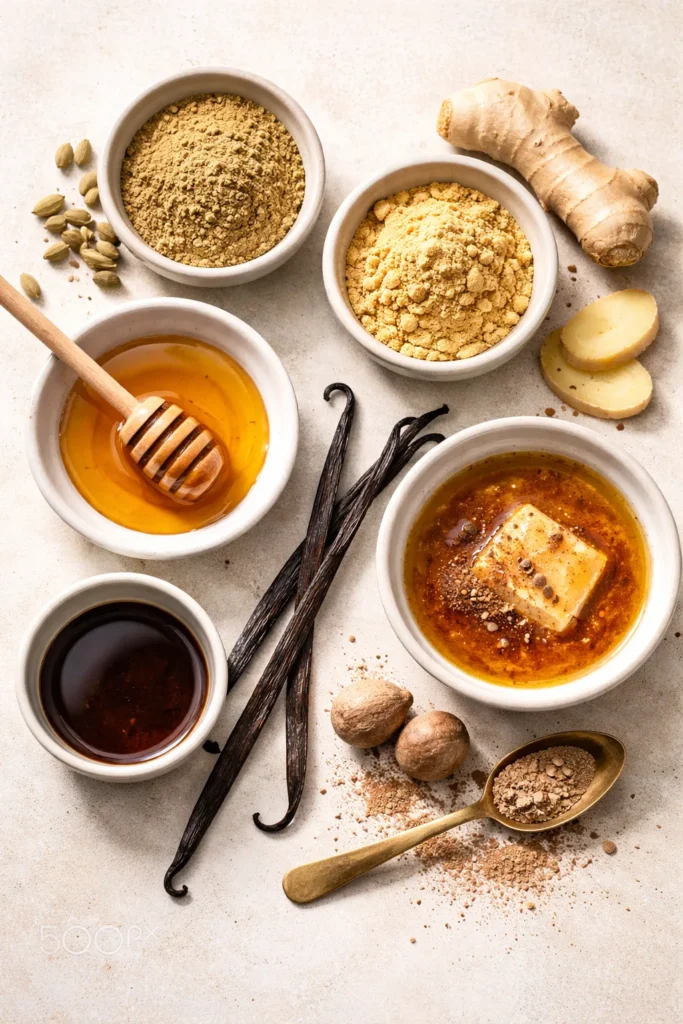
Spiced cobbler with cardamom and ginger. Replace the cinnamon with 1/2 teaspoon ground cardamom and 1/4 teaspoon ground ginger. These warm spices pair exquisitely with peaches and create a sophisticated, slightly exotic flavor profile. If you like visible spice notes, leave a few thin slices of fresh ginger in the filling.
Honey and vanilla version. Replace 1/4 cup of the granulated sugar with 1/4 cup raw honey. Add an extra 1/2 teaspoon of vanilla extract to the filling. This creates a cobbler that tastes more floral and luxurious, with subtle honey undertones.
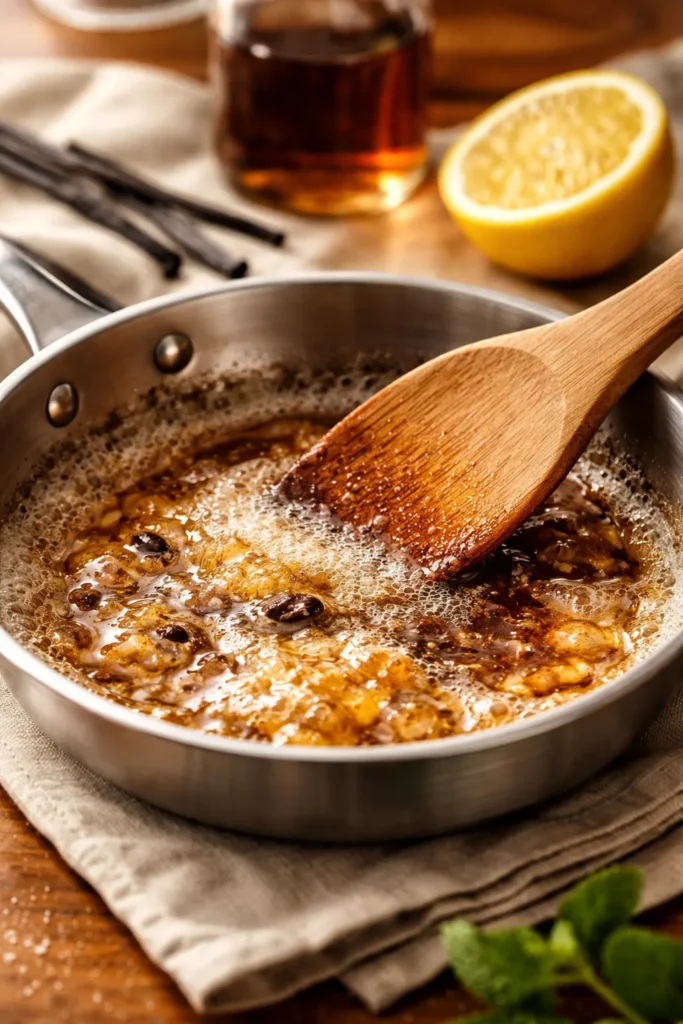
Brown butter topping with nutmeg. Make brown butter by melting 8 tablespoons of butter in a saucepan over medium heat, swirling occasionally, for 5-7 minutes until the milk solids brown and the aroma becomes nutty. Let it cool to room temperature, then use it in place of the cold butter in the topping (you’ll need to chill it until barely soft before cutting into the flour). Add 1/4 teaspoon freshly grated nutmeg to the topping’s dry ingredients. This version tastes almost caramel-like and is genuinely transformative.
Berry-peach cobbler. Replace 1/3 of the peaches with frozen blueberries, raspberries, or blackberries. These berries add tartness that balances the peaches’ sweetness and creates visual interest with flecks of darker color throughout the filling. The flavor becomes more complex without losing the peach identity.
Peach cobbler with almond extract. Use only 1/2 teaspoon vanilla extract and add 1/4 teaspoon pure almond extract to the filling. Almond and peach are a classic pairing that feels special but subtle. Some people add a small handful of sliced raw almonds to the topping dough for extra crunch.
Bourbon or rum-spiked filling. Add 2 tablespoons of bourbon, rum, or brandy to the peach filling just before baking. The alcohol partially bakes off, leaving a sophisticated warmth that complements stone fruits beautifully. This variation is ideal for a more adult-oriented dessert.
Cobbler with fresh ginger syrup. Create a simple syrup by heating 1/2 cup sugar with 1/4 cup water and 3-4 thin slices of fresh ginger until the mixture thickens (about 5 minutes). Strain out the ginger solids. Drizzle this syrup over the peach filling just before topping it with cobbler dough. The fresh ginger’s sharp bite contrasts wonderfully with sweet peaches.
Storage, Make-Ahead, and Reheating Guide
Room temperature storage. A freshly baked peach cobbler keeps perfectly well at room temperature, loosely covered with foil, for up to 2 days. It actually tastes excellent served at room temperature once completely cooled—the flavors become more pronounced and the contrast between filling and topping is less dramatic but still pleasant. This makes cobbler ideal for potlucks and casual gatherings where you can’t guarantee access to refrigeration.
Refrigerator storage. Store leftover cobbler in the refrigerator, loosely covered with foil (not tightly wrapped, which can trap condensation and make the topping soggy), for up to 4 days. The texture becomes denser as it sits, but the flavor actually improves as the filling thickens and the spices meld together. Some cobbler lovers insist cold cobbler tastes better than hot.
Freezing cooked cobbler. Cool the completely baked cobbler to room temperature, then wrap it tightly in plastic wrap and foil. Freeze for up to 3 months. Thaw overnight in the refrigerator, then reheat covered with foil at 350°F for 15-20 minutes until warmed through. The topping will soften slightly during storage but maintains acceptable texture.
Make-ahead assembly. You can assemble the cobbler (fruit filling in the dish, topping dough spooned over) up to 1 day in advance. Cover it tightly, refrigerate, then bake directly from cold (the baking time will increase by 10-15 minutes). This is genuinely convenient for entertaining because you can do all the work the day before, then simply pop it in the oven 1 hour before serving.
Reheating individual servings. Microwave a single serving in a microwave-safe bowl for 30-45 seconds to warm it through without drying out the topping. Alternatively, place individual servings in a covered ramekin and reheat in a 325°F oven for 8-10 minutes. Oven reheating produces better texture, though microwave is certainly faster.
Refreshing a stale topping. If the topping has softened after storage, place a loosely covered baking dish in a 375°F oven for 5-10 minutes to re-crisp the exterior while warming the interior. A toaster oven works beautifully for this purpose if you’re only reheating a couple of servings.
Best Ways to Serve and Pair Your Cobbler
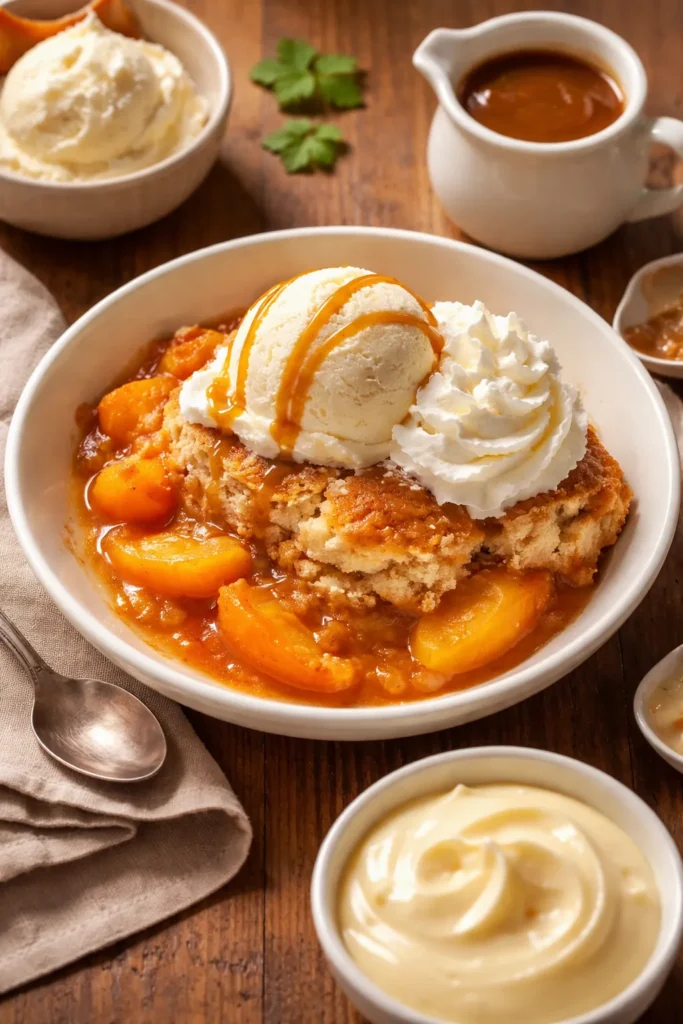
The classic pairing: vanilla ice cream. Warm cobbler with cold vanilla ice cream represents the ultimate flavor and textural contrast—warm, soft fruit against cold, creamy sweetness. Choose a high-quality vanilla (preferably made with real vanilla bean) because its subtle complexity won’t disappear against the peaches. Top each serving with a generous scoop.
Freshly whipped cream. Make it yourself by whipping cold heavy cream with a tiny pinch of salt and sugar (optional; the cobbler is already sweet). Homemade whipped cream tastes infinitely better than canned or stabilized versions and adds an elegant, old-fashioned quality to the presentation.
Custard sauce (crème anglaise). This French classic—made by heating cream with egg yolks, sugar, and vanilla until it coats the back of a spoon—is absolutely luxurious alongside cobbler. Make it ahead and serve it warm or at room temperature alongside each bowl. It takes only 10 minutes to prepare and transforms a casual dessert into something restaurant-worthy.
Caramel sauce or dulce de leche. Drizzle warm caramel over the cobbler and ice cream for a truly indulgent presentation. The caramel’s buttery richness complements peaches’ tartness beautifully, and the contrast between cool and warm elements makes each spoonful exciting.
Greek yogurt for a lighter option. If you prefer something less sweet than ice cream or whipped cream, dollop thick Greek yogurt (the kind labeled 0% or 2% fat) on top. The tanginess contrasts with the cobbler’s sweetness, and the texture adds interest. Drizzle a tiny bit of honey over the yogurt for optional sweetness.
Champagne or sparkling wine pairing. Serve the cobbler alongside a glass of brut champagne or dry sparkling wine. The bubbles and slight acidity cut through the cobbler’s richness and cleanse the palate between bites. This pairing is particularly elegant for special occasions.
Breakfast serving. Leftover cobbler makes an excellent breakfast dish when served with thick Greek yogurt or fresh whipped cream and perhaps a cup of hot coffee. It’s not quite as decadent as ice cream, but it hits that sweet-breakfast-treat note perfectly and feels lighter in the morning.
Final Thoughts
Baking peach cobbler with frozen peaches removes every barrier between you and a genuinely special dessert. No waiting for peach season, no wrestling with fresh fruit prep, no worries about quality or ripeness. You simply thaw, drain, and bake—and somehow end up with something that tastes like it took hours of careful preparation.
The beauty of this dessert lies in its flexibility and forgiveness. If your topping isn’t perfectly even, it still tastes incredible. If the filling is slightly thinner or thicker than ideal, it’s still delicious. If you swap spices or add unexpected ingredients, it adapts gracefully. This is a recipe that welcomes your creativity rather than demanding strict adherence to instructions.
Make this cobbler once and you’ll understand why it remains a beloved American classic. Make it twice and you’ll likely have adapted it to your preferences—maybe more cinnamon, maybe less sugar, maybe a favorite spice of your own. By the third time, it becomes your recipe, not just a recipe you’re following. That’s when baking truly becomes fun.