As the vibrant colors of autumn fade and the first frost warnings appear, many gardeners worry about their beloved rose bushes surviving the harsh winter months ahead. While roses are often perceived as delicate and demanding, the truth is that with proper winter care, these resilient plants can not only survive freezing temperatures but emerge in spring ready to produce spectacular blooms. Whether you’re growing classic hybrid teas, hardy shrub roses, or romantic climbers, understanding how to protect your roses during winter is essential for maintaining a thriving rose garden year after year. The good news is that winter rose care doesn’t have to be complicated—with the right knowledge and a few strategic steps, you can ensure your roses weather the cold season successfully and reward you with magnificent flowers when warm weather returns.
Table of Contents
- Understanding Winter Challenges for Roses
- Preparing Roses for Winter: Fall Care Essentials
- When to Start Winterizing Your Roses
- Winter Protection Methods by Climate Zone
- Protecting Different Types of Roses
- Container Rose Winter Care
- Winter Maintenance and Monitoring
- Spring Transition: Removing Winter Protection
- Key Takeaways: Ensuring Your Roses Thrive Through Winter
Understanding Winter Challenges for Roses

Before diving into specific care techniques, it’s crucial to understand what makes winter potentially harmful to rose plants and why protection becomes necessary in certain climates.
The Real Threats Roses Face in Winter
The primary danger to roses during winter isn’t simply cold temperatures—it’s the repeated cycle of freezing and thawing that causes the most significant damage. When temperatures fluctuate, ice crystals form within plant tissues, expand, and then contract, essentially damaging the cellular structure of the rose canes. This freeze-thaw cycle is particularly destructive because it happens repeatedly throughout winter, weakening the plant’s overall vigor and sometimes killing canes entirely. Additionally, desiccating winter winds can dry out rose canes, especially when the ground is frozen and the plant cannot absorb moisture to replace what’s lost through the canes. This combination of temperature stress and moisture loss creates challenging conditions that require thoughtful intervention from gardeners who want to preserve their rose investments.
Climate Zones and Rose Hardiness
Not all roses require the same level of winter protection, and understanding your USDA hardiness zone is the first step in determining how much care your roses will need. Gardeners in zones 7 and above, where winters remain relatively mild, may need only minimal protection such as a light layer of mulch around the plant base. However, those gardening in zones 6 and below, particularly zones 4 and colder, will need to implement more comprehensive winterization strategies. Hybrid tea roses, grandifloras, and floribundas typically require more protection than hardy shrub roses, rugosa roses, or species roses that have evolved to withstand harsh conditions. Own-root roses—those grown on their own root systems rather than grafted—tend to be more resilient and can recover more quickly from winter damage because even if the top growth dies back, the plant will regrow true to variety from the roots. When selecting roses for cold climates, choosing varieties specifically bred for winter hardiness, such as the Griffith Buck roses developed in Iowa or Canadian Explorer series roses, can significantly reduce your winterization workload.
Preparing Roses for Winter: Fall Care Essentials
Stop Fertilizing and Deadheading at the Right Time
Proper winter preparation actually begins in late summer and early fall, well before the first frost arrives. One of the most important steps is to stop fertilizing your roses by early to mid-August, approximately six to eight weeks before your area’s average first frost date. Continuing to fertilize late in the season encourages tender new growth that won’t have time to harden off before cold weather arrives, making the plant more vulnerable to winter damage. This soft, immature growth is easily killed by frost and can provide entry points for diseases and pests. Similarly, you should stop deadheading roses by Labor Day or early September, allowing the plants to form rose hips—the seed pods that develop after flowers fade. When roses produce hips, they receive a natural signal that the growing season is ending, which triggers them to slow growth, harden their canes, and begin the process of entering dormancy. This biological response is essential for preparing the plant for winter survival, so resist the temptation to continue removing faded blooms in fall.
Fall Cleanup and Disease Prevention
Thorough fall cleanup is one of the most valuable services you can provide for your roses before winter sets in. Remove all fallen leaves, spent blooms, and other debris from around the base of your rose plants and throughout the rose bed. This cleanup is especially critical if your roses experienced any fungal diseases like black spot, powdery mildew, or rust during the growing season, as these pathogens can overwinter in fallen foliage and re-infect your plants the following spring. Dispose of diseased material in the trash rather than composting it, as most home compost piles don’t reach temperatures high enough to kill fungal spores and disease organisms. After cleaning up debris, consider applying a dormant spray such as horticultural oil or lime sulfur to both the rose canes and the surrounding soil. These treatments help eliminate overwintering pests and disease spores, giving your roses a cleaner start when spring arrives. Some rose experts also recommend removing leaves from the lower 12 to 15 inches of rose canes if you’ve had persistent fungal problems, though this step isn’t necessary if you maintained a regular fungicide spray program during the growing season.
Critical Fall Watering
One of the most overlooked aspects of winter rose care is ensuring plants enter dormancy with adequate moisture. Roses going into winter with dry roots are far more susceptible to winter damage than well-hydrated plants. Throughout the fall, continue watering your roses regularly, especially during dry periods when rainfall is scarce. Before the ground freezes solid, give your roses one final deep watering, soaking the root zone to a depth of 8 to 12 inches. This deep watering is particularly important because rose roots continue to function even after the top growth has gone dormant, and they need moisture reserves to sustain the plant through winter. Even during winter itself, if you experience extended dry periods without snow cover—particularly in December, January, and February—water your roses on days when temperatures rise above freezing. This supplemental winter watering is especially crucial for roses planted in fall that haven’t had time to develop extensive root systems, as well as for roses growing near building foundations where roof overhangs may prevent precipitation from reaching the soil.
When to Start Winterizing Your Roses
Timing Is Everything
The timing of when you apply winter protection is just as important as the protection methods themselves, and winterizing too early can actually harm your roses rather than help them. Many gardeners make the mistake of applying winter mulch and protection at the first sign of cool weather, but roses need exposure to gradually cooling temperatures to properly harden off and enter true dormancy. Applying protection too early keeps the soil around rose roots warmer than it should be, which can prevent proper dormancy and encourage the plant to continue growing when it should be shutting down for winter. The ideal time to winterize roses is after your area has experienced several hard frosts—typically when nighttime temperatures have dipped into the low 20s°F for several consecutive nights and all the rose leaves have fallen. In most regions, this occurs around Thanksgiving or late November, though gardeners in colder zones may need to winterize earlier while those in milder climates can wait longer.
Signs Your Roses Are Ready for Winter Protection
Rather than relying solely on calendar dates, observe your roses for signs that they’re entering dormancy and ready for winter protection. The leaves should have dropped or be easily removed with a gentle touch, and you shouldn’t see any active new growth or soft, green shoots emerging from the canes. The rose canes themselves should appear hardened and mature, with bark that looks woody rather than green and tender. If you experience an unusually warm fall with temperatures remaining mild well into November, you may need to proceed with winterization even if your roses haven’t fully dropped their leaves, especially if the calendar is approaching December. In this case, you can manually remove remaining leaves before applying winter protection. However, in most years, letting nature take its course and waiting for natural leaf drop is the best approach, as this ensures the plant has completed its natural preparation for dormancy.
Winter Protection Methods by Climate Zone
This section provides comprehensive guidance on protecting roses based on your specific climate conditions, with detailed explanations of proven techniques that successful rosarians use across different hardiness zones.
Zones 7-11: Minimal Protection for Mild Winters
For gardeners blessed with mild winters where temperatures rarely drop below 10°F and the ground may not freeze solid, winter rose care is refreshingly straightforward and requires minimal intervention. In these warmer zones, roses often don’t enter complete dormancy and may continue producing some foliage and occasional blooms throughout winter. Your primary winterization task involves applying a 2 to 3-inch layer of organic mulch around the base of each rose plant, extending the mulch out to the drip line. This mulch layer serves multiple purposes: it moderates soil temperature fluctuations, retains soil moisture, suppresses weeds, and gradually breaks down to enrich the soil with organic matter. Excellent mulch choices include shredded bark, pine bark nuggets, composted wood chips, or mint compost, which has the added benefit of helping deter common rose pests. Avoid piling mulch directly against the rose canes, which can trap moisture and encourage fungal diseases or rot—instead, create a donut shape with the mulch, leaving a small gap around the plant’s crown.
Even in these mild climates, periodic winter maintenance remains important for rose health. Remove any diseased or damaged foliage as it appears, continue light watering during dry spells, and monitor for pest problems that may persist year-round in warm regions. If an unusual cold snap is forecast, you can provide temporary protection by draping frost cloth or old bed sheets over your roses, removing the covering once temperatures moderate. This is particularly important for tender varieties or newly planted roses that haven’t had time to establish strong root systems.
Zones 5-6: Moderate Protection for Cold Winters
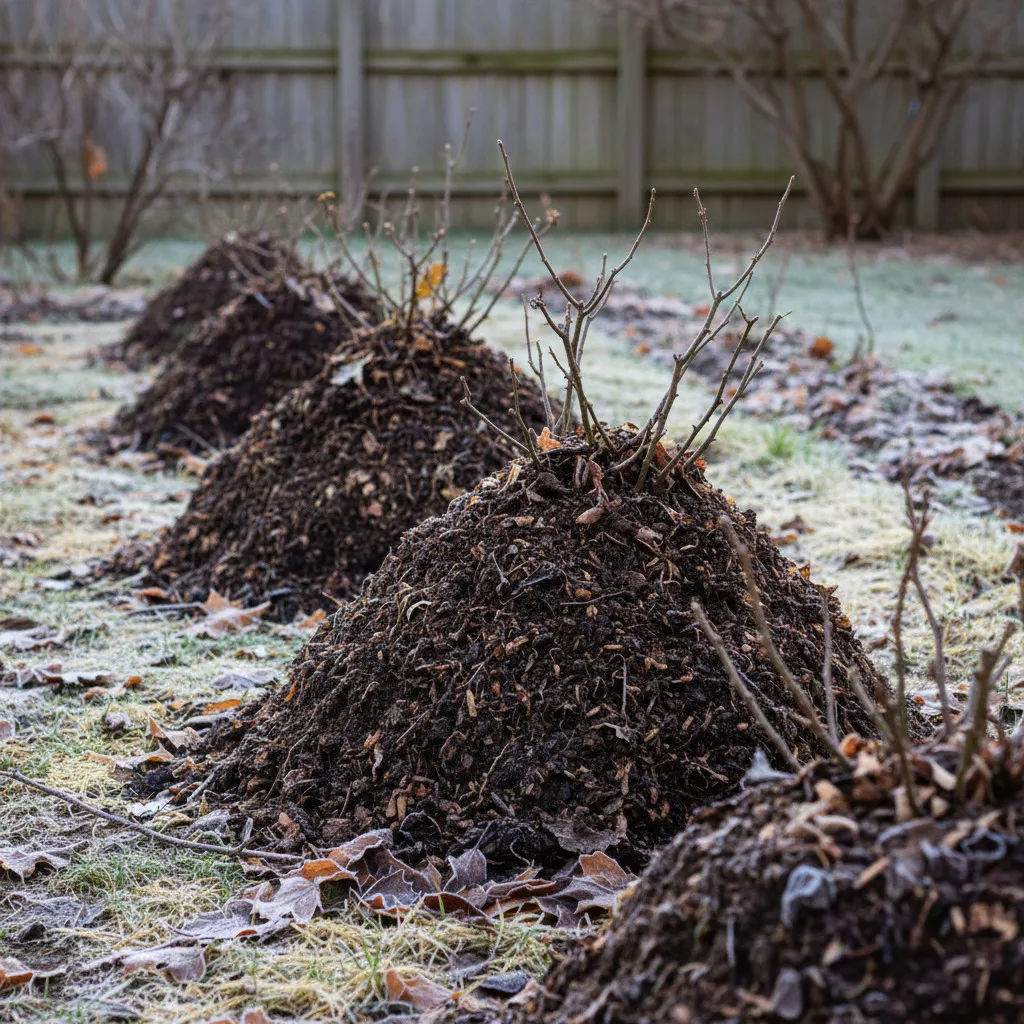
Gardeners in zones 5 and 6 face more challenging winter conditions that require thoughtful protection strategies, particularly for grafted hybrid tea, grandiflora, and floribunda roses. The goal in these zones is to keep roses uniformly cold throughout winter, preventing the damaging freeze-thaw cycles that cause the most harm. One of the most effective and traditional methods is mounding, which involves creating a protective mound of material around the base of each rose plant. Here’s how to properly mound your roses for winter protection:
-
Initial Pruning and Preparation – Before mounding, assess whether your rose canes need any reduction in height. Extremely tall canes—those extending more than 3 to 4 feet high—can be pruned back to a more manageable height of 18 to 24 inches to prevent wind damage and make applying protection easier. However, avoid heavy pruning at this time, as major pruning cuts create wounds that make plants more vulnerable to cold damage. If canes are whipping around in winter winds and threatening to loosen the plant at the soil line, loosely tie them together with soft twine or fabric strips to minimize movement. Make any pruning cuts at a 45-degree angle about one-quarter inch above an outward-facing bud, and use clean, sharp tools to ensure smooth cuts that heal properly.
-
Creating the Protective Mound – After several hard frosts have ensured dormancy, create a mound of soil, compost, or shredded leaves around the base of each rose plant to a height of 8 to 12 inches. The mound should completely cover the bud union on grafted roses—that knobby, swollen area where the desired rose variety was grafted onto rootstock, typically located just above the soil line. This bud union is the most cold-sensitive part of a grafted rose, and protecting it is essential for plant survival. Bring in fresh topsoil or compost from another area of your garden rather than scraping up soil from around the rose base, which would expose roots and create low spots where water can collect and freeze. For optimal protection, use coarse-textured materials like shredded leaves, pine bark mulch, composted wood chips, or a combination of soil topped with organic mulch.
-
Alternative Protection Methods – Some gardeners prefer using rose collars or wire mesh cages to contain mulching material around roses. To use this method, create a cylinder from hardware cloth, chicken wire, or purchase paper leaf bags from garden centers. Cut the bags to create 12-inch tall collars, place them around each rose, and fill them with coarse mulch material such as pine bark, shredded leaves, or straw. The collar helps keep protection material in place even during windy conditions. Once filled to the top, you can cover the collar with burlap tied with twine to prevent mulch from blowing away. Styrofoam rose cones are another option, though they’re somewhat controversial among experienced rosarians. If you choose to use rose cones, you must cut ventilation holes in the sides and top to prevent heat buildup on sunny winter days, which can break dormancy prematurely. Also, still mound 6 to 8 inches of soil around the base of the plant before placing the cone, as the cone alone doesn’t provide adequate protection.
Zones 4 and Below: Heavy Protection for Extreme Cold
Gardeners facing the harsh winters of zone 4 and colder regions need to employ the most comprehensive protection strategies to successfully overwinter roses, particularly tender varieties that aren’t bred for extreme cold tolerance. In these zones, temperatures regularly plunge below zero, and bitter winds can desiccate exposed canes. While it’s certainly easier to grow winter-hardy shrub roses or rugosa roses in these climates, even more tender roses can survive with proper care.
The Minnesota Tip Method represents the gold standard for protecting roses in extremely cold climates and involves completely burying the entire plant for winter. While labor-intensive, this method provides unsurpassed protection. Here’s the complete process:
-
After the first hard frost and once the plant has fully entered dormancy, prune the rose canes back to approximately 18 to 24 inches in height. Remove all remaining leaves from the plant.
-
Using a garden fork rather than a spade (to minimize root damage), carefully loosen the soil on one side of the rose plant, working your way around and under the root ball. The goal is to loosen the roots enough that you can tip the entire plant over without breaking it.
-
Dig a trench beside the rose plant, making it long and deep enough to accommodate the entire plant when laid on its side. The trench should be about 10 to 12 inches deep.
-
Gently bend the rose plant at its base, tipping it into the trench. Bend carefully to avoid cracking or breaking the crown where the canes meet the roots. Some gardeners wrap the canes together with burlap before tipping to protect them during this process.
-
Cover the entire plant—roots, crown, and canes—with 8 to 12 inches of soil. Mark the location with stakes so you can find your buried roses come spring.
-
After the soil freezes, add an additional layer of 12 to 18 inches of loose mulch such as straw, shredded leaves, or evergreen boughs over the buried plant for extra insulation.
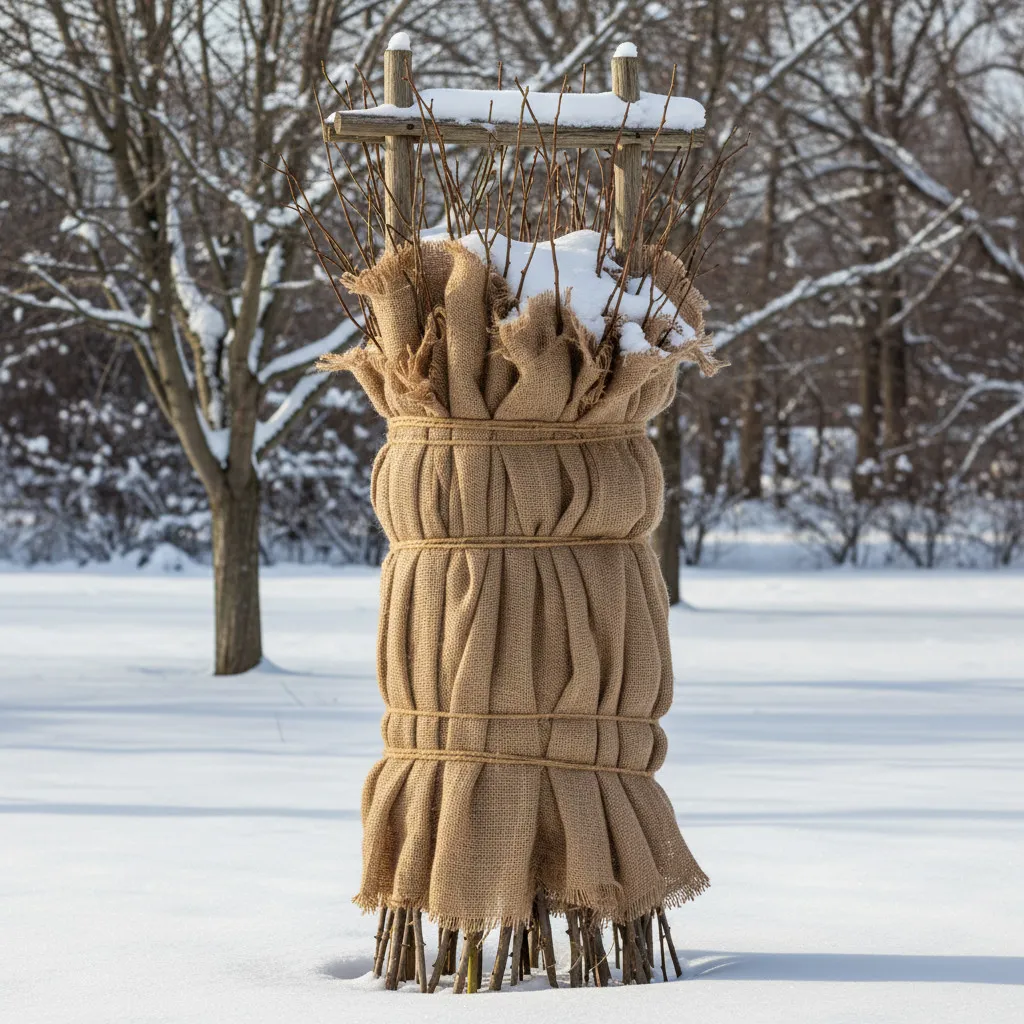
For those who find the Minnesota Tip Method too labor-intensive, an alternative for zones 4 and below is to provide heavy mounding combined with additional protection for exposed canes. Mound 10 to 12 inches of soil or compost around the plant base, then wrap the remaining exposed canes with burlap, securing it with twine. Stuff the space between the canes and burlap with dry straw, shredded leaves, or pine boughs for insulation. This wrapping protects canes from desiccating winter winds, which can be just as damaging as cold temperatures. Some gardeners go a step further by constructing a cylinder of hardware cloth around each rose, filling it with insulating material like oak leaves (which don’t mat down when wet like some other leaf types), then wrapping the entire structure with burlap for additional wind protection.
Protecting Different Types of Roses
Climbing Roses and Ramblers
Climbing roses present unique winterization challenges because they bloom on previous year’s growth (old wood), meaning that protecting the long canes is essential if you want blooms the following season. Additionally, their size and the fact that they’re often attached to structures like trellises, arbors, or fences requires different protection strategies than bush roses. In zones 6 and warmer, climbing roses can often survive winter with minimal intervention—simply mound 8 to 10 inches of soil or mulch around the base of the plant where the canes emerge from the ground, and if the climber is growing in an exposed location, consider wrapping the canes with burlap to protect against drying winds.
In zones 5 and colder, more extensive protection becomes necessary. One effective method involves detaching the canes from their support structure after the plant has gone dormant, carefully bending them down to the ground, and securing them in place with crossed stakes or landscape pins. Cover the laid-down canes with 6 to 8 inches of soil, then add an additional 12 inches of loose mulch such as straw or shredded leaves after the ground freezes. Mark the location so you know where to carefully uncover the canes in spring. If your climbing rose is trained on a structure that makes removing the canes impractical, you can protect them in place by tying the canes securely to their support to prevent wind damage, then wrapping them with burlap and stuffing the wrapped canes with straw for insulation. The base of the climber should still be heavily mounded with soil regardless of how you protect the canes.
Tree Roses (Standards)
Tree roses, also called standard roses, are among the most challenging roses to overwinter because the graft union sits atop a tall trunk several feet above the ground, making it impossible to protect using traditional mounding methods. In areas where winter temperatures drop below 10°F, tree roses require special attention. The most reliable method for protecting tree roses in very cold climates mirrors the Minnesota Tip Method used for bush roses. After dormancy, carefully dig on one side of the tree rose, loosening the roots enough that you can gently tip the entire plant over into a prepared trench. Cover the entire plant—trunk, crown, and head—with 10 to 12 inches of soil, then add additional mulch after the ground freezes. This method provides complete protection but requires careful handling to avoid breaking the trunk.
For gardeners who prefer to leave tree roses standing, construct a protective structure around the rose head (the top portion where the rose variety is grafted). Wrap the entire head and several inches of the trunk below the graft union with burlap, then fill the wrapped area with dry insulating material like straw or shredded leaves. Secure everything with twine, and consider wrapping the entire trunk with burlap as well to prevent bark splitting and winter sun scald. Tree roses growing in containers should be moved to protected locations like an unheated garage or basement for winter, as containerized plants are far more vulnerable to root damage from freezing than in-ground plants.
Shrub Roses and Hardy Varieties
One of the great joys of growing modern shrub roses, particularly varieties like Knock Out roses, the Griffith Buck roses, Canadian Explorer series, rugosa roses, and the new Grace N’ Grit or Nitty Gritty series from Heirloom Roses, is their minimal winter care requirements. These roses have been specifically bred for cold hardiness and disease resistance, making them ideal choices for gardeners who want beautiful roses without extensive winterization labor. In most cases, these hardy roses need nothing more than a 2 to 3-inch layer of mulch around their base, even in zones as cold as zone 3 or 4. Some gardeners don’t even mulch these varieties and still find them performing beautifully year after year.
That said, even hardy shrub roses can benefit from some basic winter preparation. Clean up fallen leaves and debris, ensure plants are well-watered going into winter, and if the shrub has grown quite tall and is in an exposed, windy location, consider pruning it back by one-third in mid to late October. This reduction isn’t for winter protection per se but to prevent “wind rock”—the loosening of roots that occurs when tall plants are repeatedly buffeted by strong winter winds. The plant still retains enough cane length for good bloom production the following season. Own-root shrub roses have the added advantage of being able to regenerate from the roots even if all above-ground growth is killed by an exceptionally harsh winter, and they’ll grow back true to the variety you planted.
Container Rose Winter Care
The Unique Challenges of Container Roses
Roses growing in containers face significantly different winter conditions than their in-ground counterparts, and understanding these differences is essential for successfully overwintering potted roses. Container soil freezes much more quickly and thoroughly than garden soil because it’s exposed to cold air from all sides—top, bottom, and all around the pot perimeter—rather than being insulated by the surrounding earth. This means container rose roots are far more vulnerable to freeze damage, and without proper protection, they can easily be killed even in moderately cold winters. Additionally, containers can crack or shatter when soil freezes and expands, potentially destroying both pot and plant.
Overwintering Container Roses: Step-by-Step Process
For gardeners in zones 6 and colder, the most reliable method for overwintering container roses is to move them to a protected location where temperatures remain cold but don’t experience the extreme fluctuations that outdoor containers face. Here’s a comprehensive approach to successfully overwinter your container roses:
-
Prepare the Plant – After your area has experienced the first few frosts of the season but before hard freezes arrive, begin preparing your container roses for winter. Remove any remaining flowers, seed pods, and clean up debris from the pot surface. Some gardeners prefer to remove all leaves at this time, while others allow them to drop naturally. If your rose has grown quite large, you can prune the canes back to 18 to 24 inches to make the plant easier to move and store, though this isn’t absolutely necessary.
-
Choose the Right Storage Location – The ideal winter storage location for container roses is an unheated garage, shed, or basement where temperatures remain consistently between 25°F and 40°F throughout winter. The space should be dark or have minimal light, as roses need dormancy rest and light can trigger premature growth. A cool but not freezing basement often works well, as does an unheated garage, though you should position containers away from the garage door if you open and close it frequently, as these temperature fluctuations can break dormancy.
-
Insulate the Containers – Even in protected storage, adding insulation around containers provides additional root protection. Group multiple containers together (plants naturally insulate each other), then surround them with bales of straw or hay, bags of leaves, or bubble wrap. For single containers, you can encase the entire pot in a cardboard box several inches larger than the pot, filling the space between pot and box with shredded newspaper, packing peanuts, or dry leaves. This insulation prevents the rapid temperature changes that damage roots.
-
Monitor Moisture – One of the most common mistakes gardeners make with stored container roses is allowing them to completely dry out during winter. While dormant roses need far less water than actively growing plants, their roots still require some moisture to remain viable. Check your stored roses every two to three weeks, feeling the soil with your finger. If it’s completely dry several inches down, water lightly—just enough to moisten the root ball without soaking it. Overwatering is just as dangerous as underwatering, as soggy soil in cool conditions promotes root rot.
Alternative Container Protection Methods
If you lack indoor storage space, you can overwinter container roses outdoors with extra protection. Sink the entire container into the ground in a protected area of your garden, burying it up to the rim. This technique allows the earth to insulate the container from all sides, essentially treating it like an in-ground rose. Alternatively, move containers to the most protected area available—against a south-facing wall, in a corner protected from wind, or under the eaves of your house. Group all containers together, wrap them collectively with burlap or frost blankets, and stuff the space between containers with straw, leaves, or pine boughs for insulation. Mound additional mulch over the top of each container to a depth of 6 to 8 inches, covering the rose canes as well for maximum protection.
Winter Maintenance and Monitoring
Checking on Your Roses During Winter
Winter rose care doesn’t end once you’ve applied protection—periodic monitoring throughout the cold months ensures your protection measures remain effective and allows you to address any problems before they become serious. On mild winter days when temperatures rise above freezing, take a walk through your rose garden to inspect your plants. Check that mulch mounds haven’t eroded or blown away, verify that burlap wrapping remains secure, and ensure that rose cones haven’t been knocked over by wind or displaced by snow. If you notice any protection that has shifted or deteriorated, take time to repair it, as consistent protection throughout winter matters more than the specific method you’ve chosen.
Winter Watering: An Often Overlooked Essential
Many gardeners are surprised to learn that roses may need supplemental watering during winter, but this is particularly important during dry winters with little snow cover. Snow acts as natural insulation and provides moisture as it gradually melts, but during winters with below-average snowfall and extended dry periods, rose roots can become dangerously dehydrated. This is especially true in December, January, and February—the heart of winter when gardeners are least likely to think about watering. On days when temperatures rise above freezing and the ground isn’t frozen solid, water your roses deeply, providing enough moisture to penetrate 8 to 12 inches into the soil. This is absolutely critical for roses planted in fall that haven’t had time to develop extensive root systems, as well as for roses growing near building foundations or under roof overhangs where natural precipitation doesn’t reach.
Protecting Against Wildlife Damage
Winter brings hungry wildlife searching for food, and rose canes can become targets for deer, rabbits, and voles, particularly when other food sources are scarce. Deer may browse on exposed rose canes, while rabbits and voles can gnaw on canes and bark at the base of plants. If wildlife pressure is heavy in your area, consider additional protection measures beyond basic winterization. For deer, the most effective solution is physical barriers—either individual cylinders of hardware cloth around each rose or deer fencing around your entire rose garden. For rabbits and voles, bury hardware cloth several inches into the ground around rose plants, extending it 18 to 24 inches above ground level. The mesh should be fine enough (quarter-inch or smaller) to exclude these smaller animals. Alternatively, commercial deer and rabbit repellents can provide some protection, though they require reapplication after rain or snow and their effectiveness varies.
Spring Transition: Removing Winter Protection
Timing the Removal of Winter Protection
Just as applying winter protection too early can harm roses, removing it too early in spring carries risks as well. The transition from winter to spring is a delicate time when roses begin emerging from dormancy, and late spring frosts can damage or kill tender new growth. The timing for removing winter protection should be gradual rather than sudden, allowing roses to acclimate slowly to changing conditions. Begin the process in late March or early April when you notice buds beginning to swell on your roses, indicating that dormancy is breaking. However, don’t remove all protection at once—instead, adopt a careful, staged approach over several weeks.
The Staged Removal Process
Start by removing any rose cones, burlap wrapping, or similar coverings on the first mild day in early spring, but leave the soil or mulch mounds in place for now. This allows air circulation around the canes and prevents overheating that can occur when temperatures warm but plants remain tightly wrapped. Over the next two to three weeks, gradually tease away the mulch mound, removing just a few inches every few days while monitoring weather forecasts carefully. If a late hard frost is predicted, pile some of the mulch back around the plant temporarily for protection, then continue gradual removal once the danger passes. By mid to late April in most regions (timing varies by zone), all mulch should be pulled back from the plant crown and spread throughout the rose bed where it will serve as summer mulch, conserve moisture, and eventually break down to enrich the soil.
Be extremely careful when removing mulch close to the rose crown, as new shoots will be emerging at this time and they’re quite brittle and easily damaged. Use your hands rather than tools for the final stages of mulch removal, or gently wash mulch away from new growth with a soft stream of water from your hose. If you used the Minnesota Tip Method and buried your roses for winter, begin carefully excavating the trench in early spring, working slowly to avoid damaging emerging shoots. Once the plant is exposed, gently raise it back to its upright position and backfill the hole with soil, firming it carefully around the root system. Water thoroughly after replanting to help settle soil around roots and eliminate air pockets.
Post-Winter Pruning and Assessment
Once all winter protection has been removed and you can clearly see the condition of your rose canes, it’s time for the most important pruning of the year. Wait until the forsythia and large daffodils reach their peak bloom in your area—this is nature’s signal that the time for rose pruning has arrived. Examine each rose carefully, looking for winter kill (dead canes), damage, and disease. Dead canes will be brown, gray, or black rather than green, and when you scratch the bark with your fingernail, there will be no green tissue underneath. Cut all dead wood back to healthy green tissue or all the way to the ground if the entire cane is dead, making cuts at a 45-degree angle about one-quarter inch above an outward-facing bud. Remove any thin, weak canes smaller than a pencil in diameter, as these won’t produce quality blooms. The specific pruning approach will depend on the type of rose you’re growing, but for most modern roses, cutting back to 12 to 18 inches of healthy cane produces excellent results.
Key Takeaways: Ensuring Your Roses Thrive Through Winter
Successfully caring for roses through winter ultimately comes down to understanding your climate, choosing appropriate varieties for your zone, and implementing protection strategies matched to your specific conditions. Remember that the foundation for winter survival is actually laid throughout the growing season—healthy, vigorous roses that receive proper nutrition, adequate water, and good cultural care during spring and summer are far more likely to survive winter stress than weak, struggling plants. As winter approaches, stop fertilizing and deadheading in late summer to allow natural hardening off, ensure your roses are thoroughly watered before the ground freezes, and clean up debris to minimize disease issues.
The level of winter protection your roses need varies dramatically based on both your climate zone and the type of roses you grow. While hardy shrub roses and rugosas may need nothing more than a light mulch even in cold regions, tender hybrid teas and grafted varieties in zones 6 and below require more extensive protection including mounding, wrapping, or even burying. Container roses face unique challenges and generally need to be moved to protected locations or given substantial insulation to prevent root damage. Throughout winter, don’t forget about your roses completely—monitor protection measures, provide supplemental water during dry periods, and watch for wildlife damage.
When spring arrives, resist the urge to rush the process of removing winter protection. A gradual, staged approach that allows roses to acclimate slowly will reward you with healthy plants that transition smoothly into active growth. The small investment of time and effort you put into proper winter rose care pays enormous dividends when your protected plants burst forth with vigorous new growth and abundant blooms as the weather warms. Whether you’re growing just a few treasured roses or maintaining an extensive collection, following these winter care guidelines will help ensure that your roses not only survive the cold season but emerge stronger, healthier, and ready to provide the stunning beauty and fragrance that make them worthy of their title as the queen of flowers.


![What Fruits Can Gerbils Eat? [10 Nutritious Fruits]](https://fruitonix.com/wp-content/uploads/2023/05/Screenshot-2023-05-13-12.04.13-AM.png)