The struggle is real when you’re trying to make a keto chocolate cake that doesn’t taste like cardboard. You’ve probably experienced it—that dense, crumbly, disappointingly dry cake that makes you wonder why you even bothered. The irony is brutal: you’re skipping traditional flour and sugar specifically to enjoy something decadent, yet what lands on your plate is about as appetizing as a hockey puck. The good news? The dryness problem in keto chocolate cake isn’t inevitable—it’s usually the result of one or two specific mistakes, and once you understand what causes it, you can bake a cake so moist and fudgy that nobody will believe it’s actually low-carb.
The real challenge with keto baking is that traditional cakes rely on sugar and wheat flour to create structure, moisture retention, and that tender crumb we all love. Remove those ingredients and you’re working with a completely different chemistry. Almond flour behaves differently than all-purpose flour, and sugar substitutes don’t behave like sugar—at least not all of them. But here’s what matters: certain sweeteners, the right balance of fats, and one secret ingredient make the difference between a sad, dry cake and one that melts on your tongue with rich chocolate flavor.
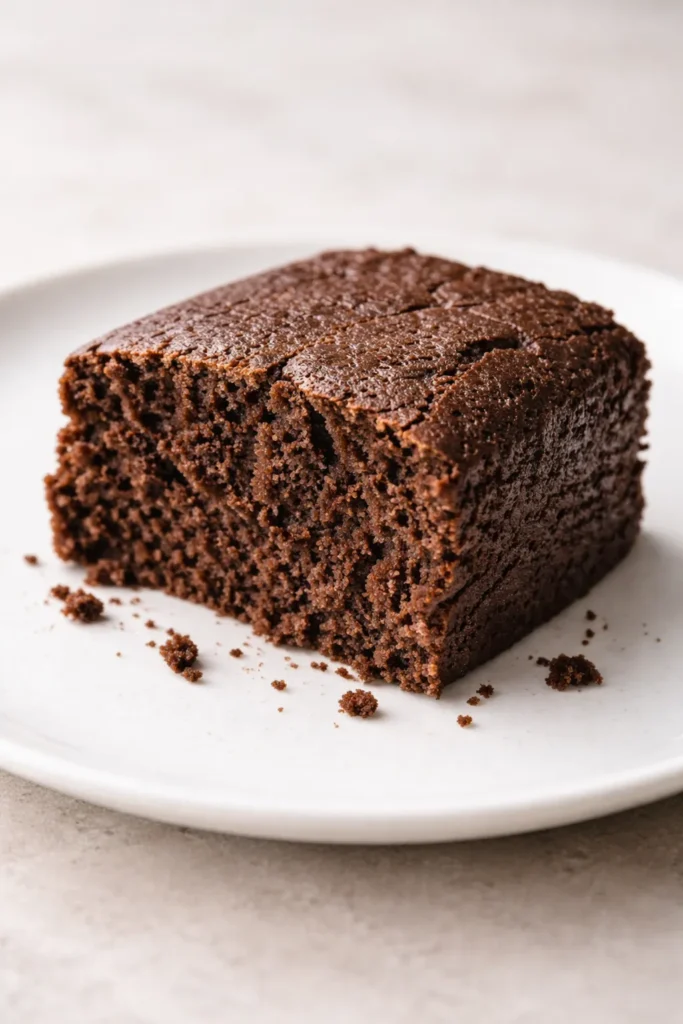
I’ve tested this recipe more times than I care to count, experimenting with different sweetener brands, fat ratios, and moisture-boosting ingredients. What finally worked was ditching the assumption that less oil means a better cake. It doesn’t. A proper keto chocolate cake needs enough fat to stay tender, needs the right sweetener so it doesn’t dry out during baking, and needs one additional ingredient that locks in moisture throughout the entire bake. The result is a cake with a dense, fudgy crumb that stays moist for days—if it lasts that long.
Table of Contents
- Why Keto Chocolate Cakes Tend to Dry Out
- The Secret Ingredient for Unstoppable Moisture
- Choosing the Right Sweetener Makes All the Difference
- The Role of Quality Cocoa Powder
- Almond Flour Quality Matters More Than You’d Think
- The Moisture-Preserving Mixing Method
- Room Temperature Ingredients Are Non-Negotiable
- Why Oil Beats Butter (Or Why You Need Both)
- The Perfect Baking Temperature and Timing
- Frosting Choices That Complement Moistness
- Storage Strategies That Preserve Moisture
- Flavor Variations and Adaptations
- Common Mistakes to Avoid
- Testing for True Doneness
- Ingredient List
- Practical Tips from Experience
- Variations and Flavor Adaptations
- Storage, Make-Ahead, and Reheating
- Serving Suggestions and Pairings
- Final Thoughts
Why Keto Chocolate Cakes Tend to Dry Out
The biggest culprit behind dry keto chocolate cakes is the wrong sweetener choice. Most people reach for erythritol or basic stevia because they’re readily available and cheap, but both of these have a drying effect on baked goods. Erythritol, in particular, can pull moisture from the cake as it bakes and even after it’s cooled. Stevia, especially pure stevia without a blend partner, can also leave a dry mouthfeel and often comes with an unpleasant aftertaste that makes the whole cake taste worse.
Allulose and monk fruit blends, on the other hand, dissolve more like actual sugar and don’t have the same moisture-robbing properties. When I switched to a monk fruit and allulose blend, the texture of my cakes improved dramatically. The sweetener distributed evenly through the batter, and the finished cake stayed tender and moist for days. This single change probably makes the biggest difference of anything you can do.
The second major issue is using butter as the only fat source. Butter is delicious and absolutely has a place in this cake, but when you rely on it exclusively, the cake tends to set up too firmly as it cools, creating a dense, sometimes crumbly texture. A combination of butter and coconut oil (or another neutral oil) creates a lighter crumb that stays moist. The oil keeps the cake tender because it distributes more evenly throughout the batter than solid butter does. Think of it this way: oil stays liquid at room temperature, so it’s always keeping the cake soft, whereas butter sets as it cools.
Third, insufficient moisture-locking ingredients can sabotage your cake. This is where many recipes fail. Almond flour alone doesn’t provide enough structure or moisture retention, especially in a keto cake without gluten. Adding sour cream or full-fat coconut cream changes everything. These ingredients add richness, fat (which keeps things moist), and acidity that helps activate leavening agents. The result is a cake with a silky crumb that doesn’t dry out.
Finally, overbaking is the enemy. Because there’s no gluten in the batter, you can’t rely on the traditional “toothpick test” as accurately. Almond flour cakes continue cooking slightly after you remove them from the oven, even after they’ve cooled. If you bake it until it’s completely set in the center, you’ve gone too far. Aim to pull the cake out when the top is just set and the center still has a tiny bit of jiggle. It will firm up as it cools, and you’ll have a moist cake instead of a crumbly one.
The Secret Ingredient for Unstoppable Moisture
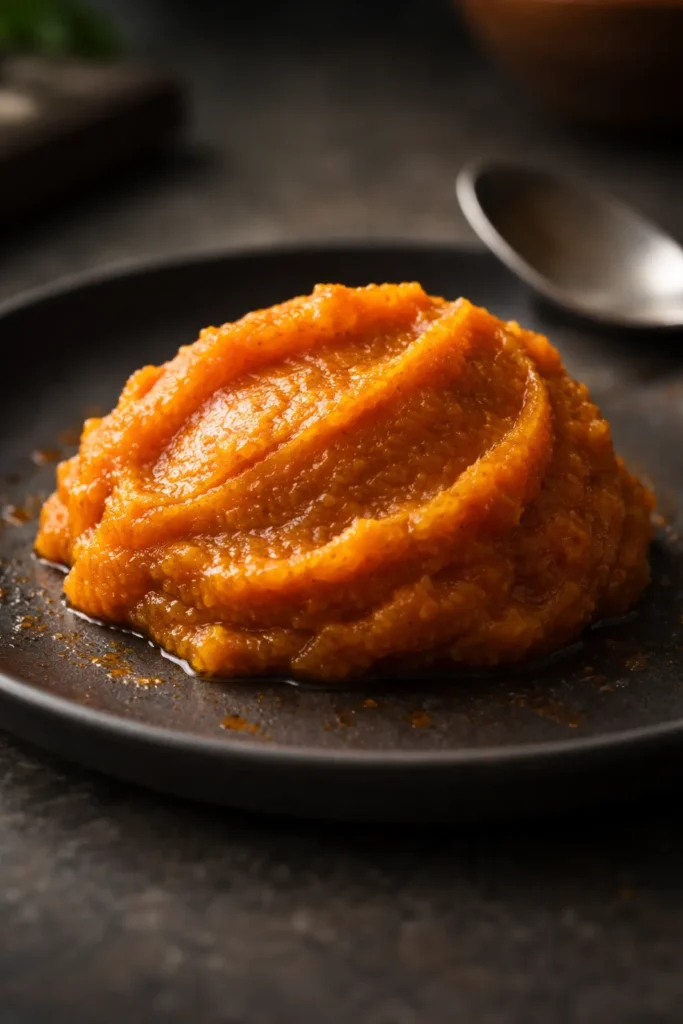
The absolute game-changer for keto chocolate cakes is a small amount of pumpkin puree or sour cream mixed into the batter. I know pumpkin puree sounds strange in a chocolate cake, but hear me out: you’re not adding pumpkin flavor—you’re adding moisture and fat that keeps the cake tender all the way through. Pumpkin puree is mostly water and fiber, but it also contains natural oils that emulsify into the batter beautifully. A half-cup of pumpkin puree in this recipe doesn’t make the cake taste like a pumpkin spice latte. What it does is create an incredibly moist crumb that stays soft even after several days in the refrigerator.
If you prefer to skip the pumpkin, sour cream does the same job. The high fat content in sour cream (especially full-fat) creates richness and moisture, and the acidity helps activate the baking soda, ensuring the cake rises properly and sets with a tender structure instead of a dense, tough one.
Both of these ingredients work because they’re high in fat and moisture, and they distribute evenly through an almond flour batter in a way that keeps the cake from drying out. They also add a subtle tang that deepens the chocolate flavor—you won’t taste it directly, but you’ll notice the cake tastes richer and more decadent.
Choosing the Right Sweetener Makes All the Difference
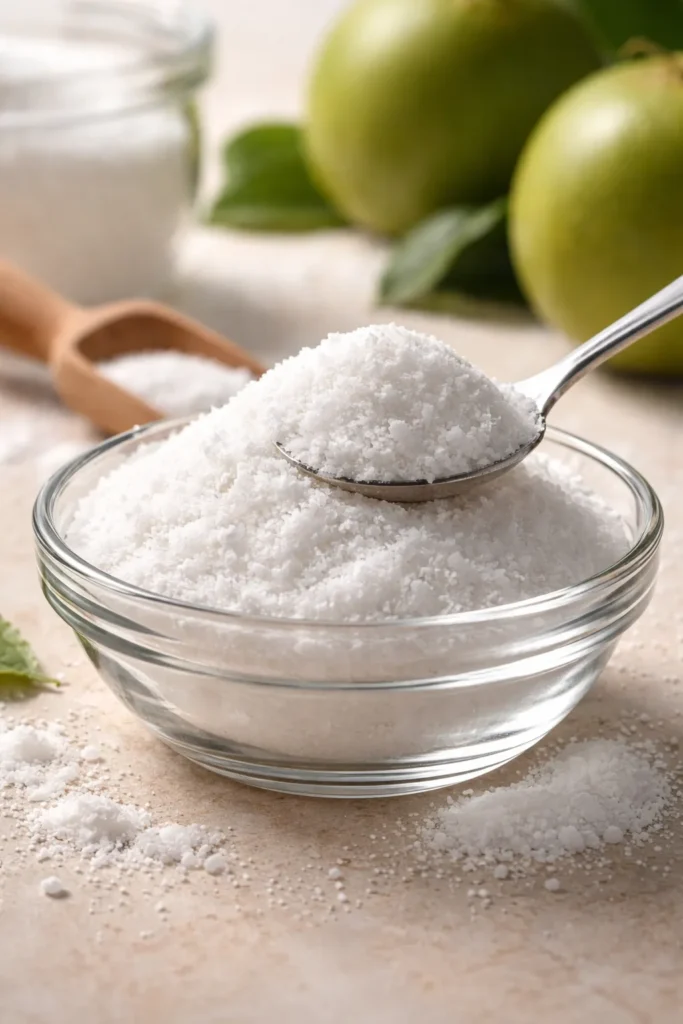
If you take away only one piece of advice from this article, make it this: use an allulose and monk fruit blend sweetener, not erythritol or stevia alone. The difference is genuinely night and day. A good allulose-monk fruit blend (brands like Besti or Wholesome Yum work beautifully) dissolves evenly in the batter, doesn’t pull moisture from the cake, and doesn’t leave that cooling aftertaste that some people get from pure stevia.
Allulose is particularly special because it crystallizes less than erythritol as a cake bakes and cools. When erythritol crystallizes, it can actually change the texture of the cake, sometimes making it feel gritty or crumbly. Allulose doesn’t do this. It stays dissolved and distributed throughout the crumb, which means the texture stays consistent and moist.
Monk fruit adds sweetness without the moisture-robbing effect, and the combination of the two creates a sweetener that behaves more like sugar than any other alternative. If you absolutely cannot find an allulose-monk fruit blend, your second choice would be straight allulose. Your third choice would be a monk fruit and erythritol blend. But if you want the moistest possible cake, hunt down the allulose-monk fruit option. It genuinely matters.
The Role of Quality Cocoa Powder
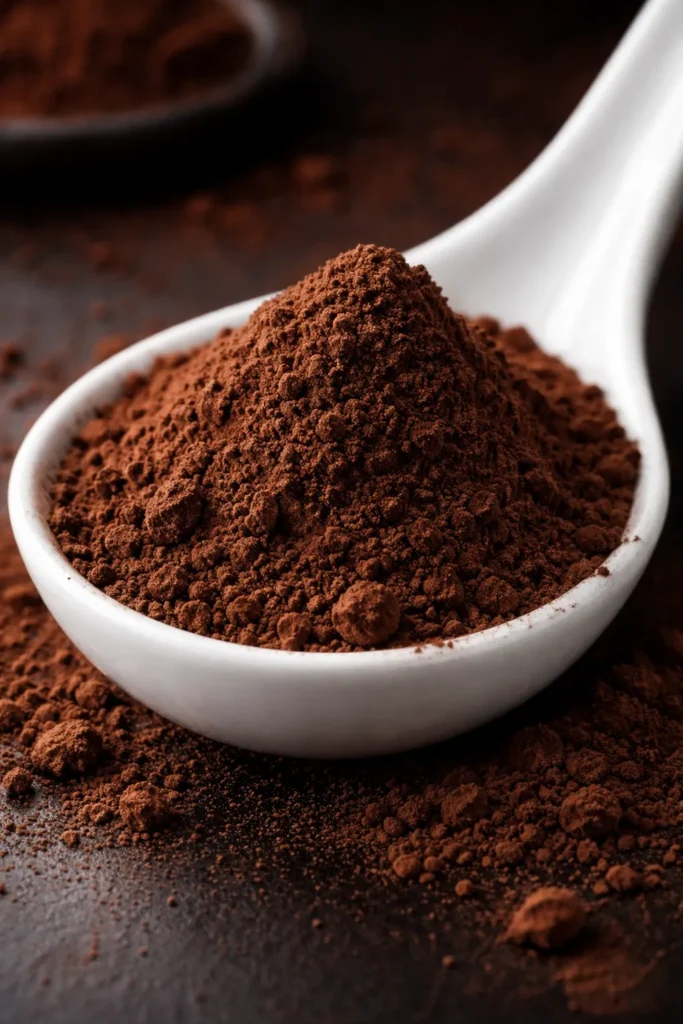
Using Dutch-processed cocoa powder rather than natural cocoa powder changes the flavor profile and actually contributes to moisture retention. Dutch-processed cocoa has been treated with alkali, which neutralizes its natural acidity. This creates a richer, smoother chocolate flavor that feels more luxurious on the palate. It also seems to distribute more evenly through the batter, which creates a more consistent, moist crumb.
You want good-quality cocoa powder—not the cheap grocery store stuff, but a real unsweetened cocoa powder from a brand you trust. The cocoa powder is one of your main ingredients by volume, so its quality directly affects the taste and texture of the cake. A premium Dutch-processed cocoa powder gives you deeper, more complex chocolate flavor without any hint of bitterness.
Make sure to sift your cocoa powder before adding it to the batter. Cocoa powder tends to clump, especially when it’s been sitting in your pantry for a while. Sifting breaks up those clumps and ensures even distribution throughout the batter. Uneven cocoa distribution can actually create pockets in the cake that feel drier than the rest.
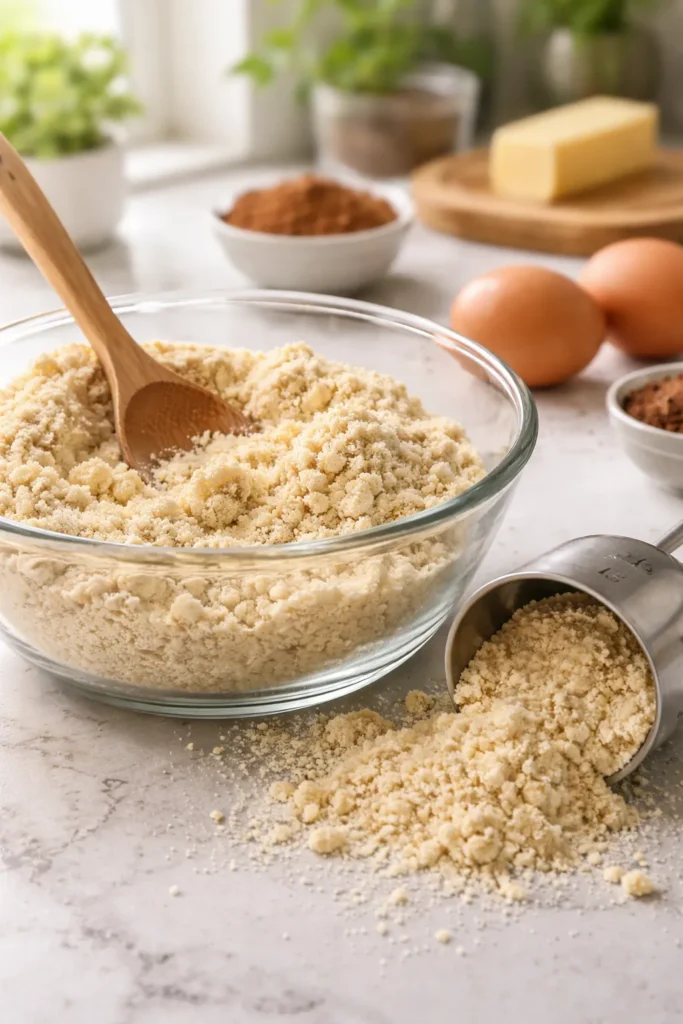
Almond Flour Quality Matters More Than You’d Think
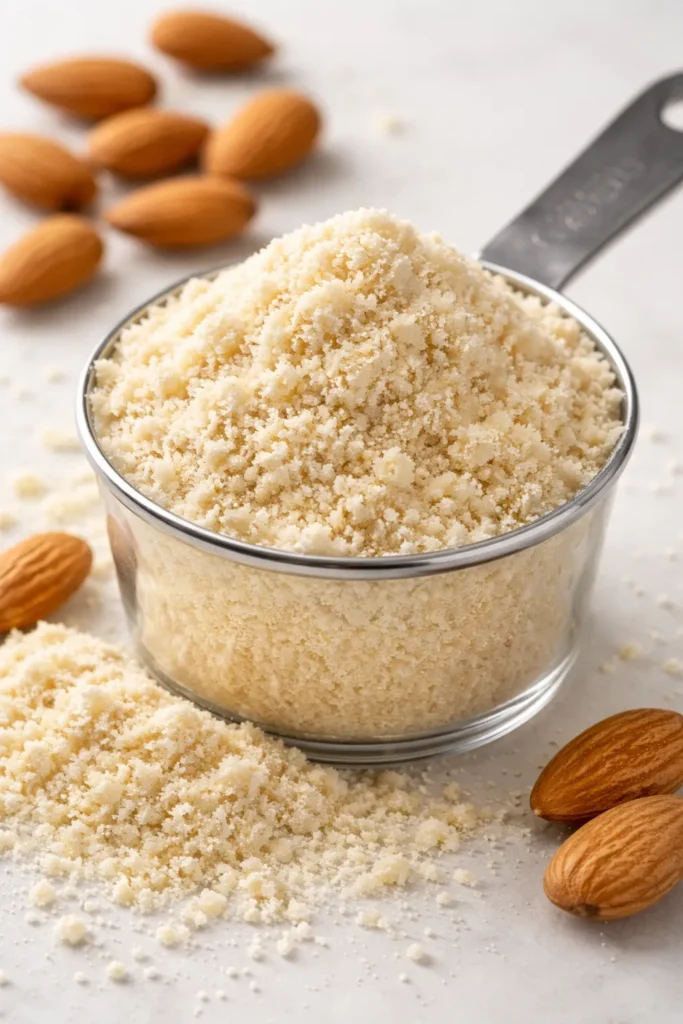
Not all almond flour is created equal, and this matters a lot when it comes to texture. You need blanched almond flour—not almond meal. Almond meal is made from whole almonds with the skin still on, which makes it coarser and absorbs moisture differently than blanched almond flour. Blanched almond flour is made from almonds that have had their skin removed, creating a much finer, more uniform texture. This finer texture bakes into a softer, more tender crumb.
Beyond blanched versus meal, you also want the finest almond flour you can find. Some brands are quite coarse, which can make the final cake grainy or mealy. Superfine or ultra-fine blanched almond flour is ideal. You can tell by feel—run it through your fingers before baking and it should feel almost like powder, not gritty.
Store your almond flour in an airtight container in the refrigerator or freezer if you’re not using it regularly. Almond flour contains natural oils that can go rancid over time, especially at room temperature. Old almond flour doesn’t just taste worse—it can actually affect how the cake bakes, making it drier and less tender.
The Moisture-Preserving Mixing Method
How you combine your ingredients affects the final texture more than most people realize. Never overmix a keto chocolate cake batter. Once you add the dry ingredients to the wet ingredients, fold gently with a spatula just until combined. Overmixing develops the proteins in the almond flour, and while there’s no gluten to become tough, overmixing can still make the cake denser and less tender.
The order matters too. Cream your butter and sweetener together first, then add eggs one at a time, then add your sour cream or pumpkin puree, then add your vanilla. This ensures everything is well-combined and the fats are properly distributed before you add the dry ingredients. The creaming step is where you incorporate air into the batter, which helps create a lighter, more tender crumb.
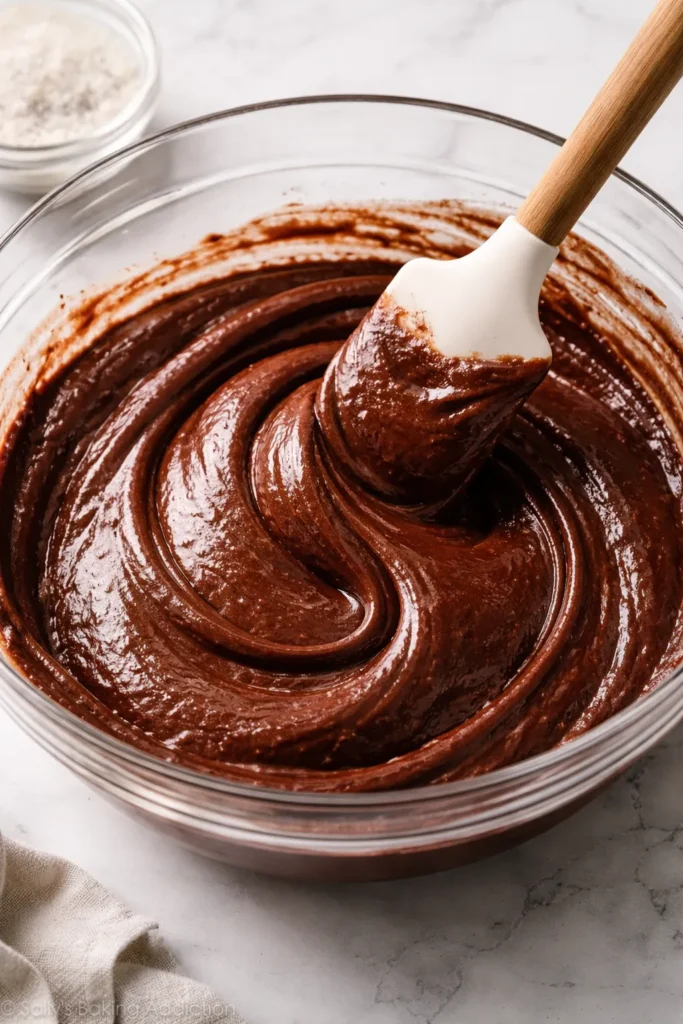
When you add the dry ingredients, do it gently. Use a spatula and fold—don’t beat or vigorously stir. You’re looking for a thick, cohesive batter that comes together smoothly. The batter will be thicker than you might expect, especially if you’re using pumpkin puree. That’s correct—don’t add extra liquid. A thick batter actually results in a moister cake.
Room Temperature Ingredients Are Non-Negotiable

This might seem like a small detail, but using room-temperature eggs and butter makes a measurable difference in moisture and texture. When eggs and butter are cold, they don’t combine smoothly with the other ingredients. Cold eggs can actually solidify cold butter, creating pockets in the batter instead of an even mixture. Those pockets become dry spots in the finished cake.
Take your eggs out of the refrigerator about 30 minutes before you start baking. If you forget, place them in a bowl of warm water for 5-10 minutes—that’s enough to bring them to room temperature. Do the same with your butter: let it sit on the counter for 20-30 minutes until it’s soft enough to press your finger into easily, but not melted or greasy.
Room temperature ingredients also mix more smoothly and incorporate more air, which creates a lighter, more tender crumb. The difference between a cake made with cold ingredients and one made with room-temperature ingredients is noticeable and worth the few extra minutes of prep time.
Why Oil Beats Butter (Or Why You Need Both)
This might sound controversial, but using a combination of oil and butter creates a moister cake than using butter alone. Oil stays liquid at room temperature, which means it continuously keeps the cake soft and tender. Butter sets as it cools, creating a firmer, sometimes crumbly structure.
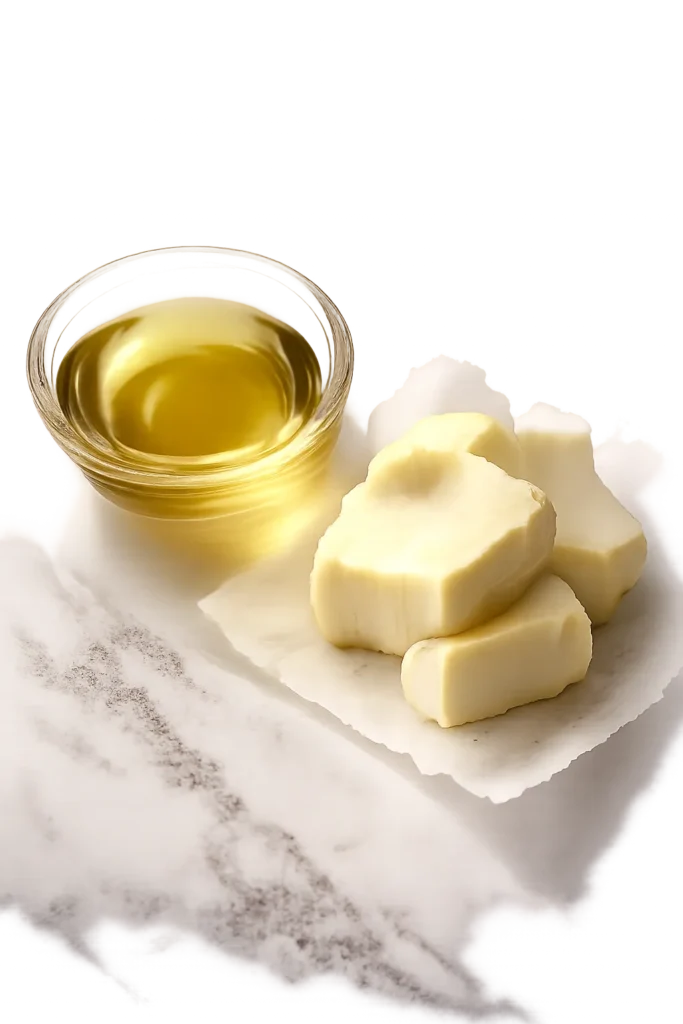
That said, you don’t want to use oil exclusively either. Butter provides essential flavor and a richness that oil alone can’t match. The ideal ratio is roughly equal parts butter and oil—so if a recipe calls for one cup of butter, use half a cup of butter and half a cup of coconut oil or neutral oil like avocado oil. This gives you the best of both worlds: the rich flavor of butter and the moisture-locking properties of oil.
Coconut oil works beautifully here because it has a relatively high fat content and a mild flavor that doesn’t compete with the chocolate. If you use coconut oil, make sure it’s refined and neutral-tasting, not virgin coconut oil, which would add coconut flavor. Avocado oil or even light olive oil work too—anything with a high smoke point and a neutral flavor.
The Perfect Baking Temperature and Timing
Baking temperature seems straightforward but actually affects moisture retention significantly. Bake your keto chocolate cake at 350°F (175°C). This temperature is hot enough to set the cake quickly but not so hot that the outside bakes much faster than the inside. If you bake at a higher temperature, the outside sets and creates a crust while the inside is still cooking, and that crust can dry out.
The actual baking time depends on your pan size and oven, but for a two-layer 9-inch round cake, expect 25-35 minutes. Start checking at 25 minutes by inserting a toothpick in the center. Here’s the key: you want the toothpick to come out with just a few moist crumbs clinging to it—not completely clean. A completely clean toothpick means the cake is overbaked.
Additionally, rotate your pans halfway through baking if you’re making two layers at once. Most ovens have hot spots, and rotating ensures even baking. Remove the cakes from the oven when the top is just set and springs back when you lightly touch it, but the very center still has the tiniest bit of jiggle. The cake will continue cooking slightly as it cools on the counter, and you want to account for that carryover cooking.
Never frost a warm cake. Let it cool completely—at least one hour, ideally longer—before adding frosting. A warm cake will absorb the frosting, and the frosting will melt and slide right off. A completely cooled cake has a set crumb that can support frosting beautifully.
Frosting Choices That Complement Moistness
The frosting you choose affects how the cake tastes and how long the moisture lasts. A chocolate cream cheese frosting or a simple chocolate ganache both work beautifully with a moist keto chocolate cake. Cream cheese frosting adds tangy richness and a slight structural support that helps stabilize the cake layers. Ganache (made from chocolate and heavy cream) adds indulgence and richness without adding moisture that could make the cake soggy.
If you’re making cream cheese frosting, make sure all ingredients are at room temperature before you start. Cold cream cheese and butter won’t combine smoothly, and you’ll end up with a grainy frosting. Beat them together until light and fluffy, then add sifted cocoa powder and your sweetener gradually, beating as you go.
For a ganache-style frosting, melt your chocolate and cream together gently, then let the mixture cool slightly before spreading it over the cake. Ganache sets as it cools, creating a beautiful glossy finish. It’s also incredibly forgiving—if you make it too thick, warm it gently; if it’s too thin, let it cool and thicken up.
Avoid frostings with too much powdered sweetener, as sweeteners can crystallize in frosting and create grittiness. A good chocolate frosting lets the chocolate be the star and uses the minimum amount of sweetener necessary.
Storage Strategies That Preserve Moisture
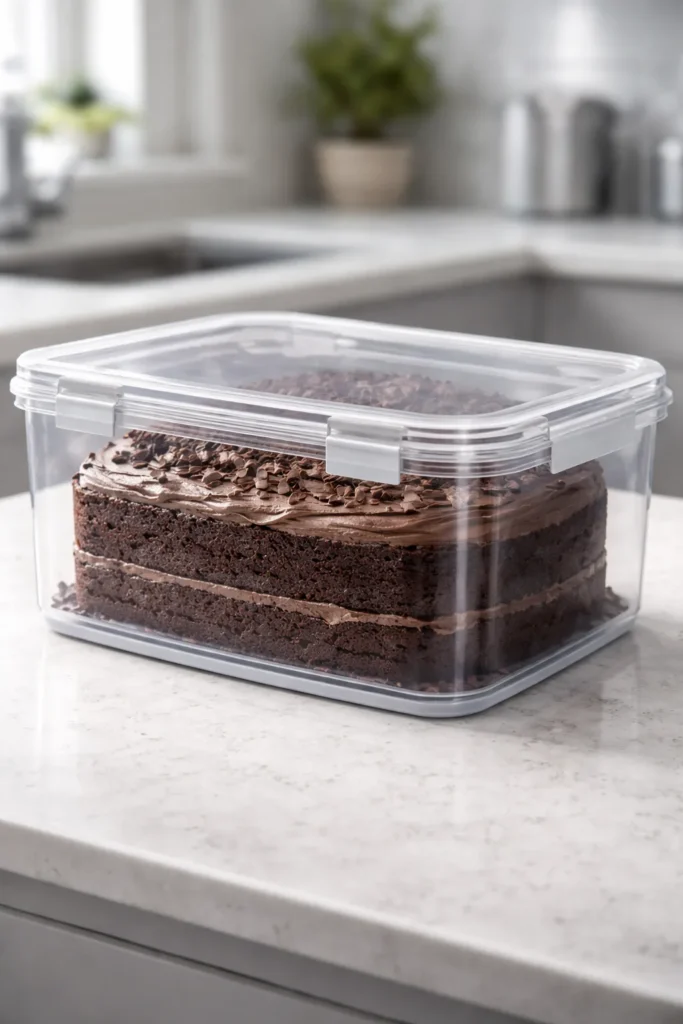
How you store your keto chocolate cake determines how long it stays moist. Keep unfrosted cakes tightly wrapped in plastic wrap at room temperature for up to two days, or in the refrigerator for up to five days. Wrapping prevents air from drying out the crumb.
Once frosted, store the cake in an airtight container in the refrigerator for three to four days. The frosting seals in moisture, and the cool temperature helps preserve the crumb. Before serving, let the cake come to room temperature—chocolate always tastes better at room temperature, and the frosting will have a better texture too.
Freezing is a great option if you want to make the cake in advance. Wrap unfrosted cake layers individually in plastic wrap, then place them in an airtight container or freezer bag. Frozen cake layers will keep for up to four months. Thaw them in the refrigerator for 24 hours or at room temperature for about 12 hours before frosting.
You can also freeze the assembled, frosted cake. Freeze it solid on a sheet first (about four to six hours), then wrap it tightly in plastic wrap and place it in an airtight container. Thaw it in the refrigerator for 24 hours before serving. The frosting may look slightly matte when it’s very cold, but it will look glossy again once it reaches room temperature.
Flavor Variations and Adaptations
Once you’ve mastered the basic moist chocolate cake, you can adapt it endlessly while maintaining that crucial moisture. Adding a teaspoon of instant espresso powder to the batter deepens the chocolate flavor dramatically without making the cake taste like coffee. The espresso amplifies chocolate notes and creates a more complex, sophisticated taste.
For a spiced version, add one teaspoon of cinnamon, a quarter teaspoon of cardamom, and a tiny pinch of cloves to the dry ingredients. This creates a warm, festive cake that’s still deeply chocolate but with subtle spice notes. You could also add the zest of one orange to the batter for a chocolate-orange cake—the citrus oil actually adds moisture and brightness to the chocolate.
If you want to make this cake vegan, replace the eggs with a flax egg (one tablespoon of ground flaxseed mixed with three tablespoons of water per egg, let sit for five minutes). The flax egg provides structure and moisture similarly to regular eggs, though the cake may be slightly denser. Add an extra tablespoon of pumpkin puree if you go this route to ensure maximum moisture.
For a dairy-free version, replace the butter with an equal amount of coconut oil, and use full-fat coconut cream instead of sour cream. The cake will be slightly different—more coconutty, with a lighter crumb—but it will still be moist and delicious.
Common Mistakes to Avoid
The most common mistake people make is trusting the cake’s appearance instead of knowing the actual baking time for their oven. Every oven is different, and an almond flour cake may look fully baked on top before it’s actually set in the center. Invest in an oven thermometer to verify your oven temperature, and use a timer. Even 2-3 minutes of extra baking time can dry out this cake noticeably.
Another frequent error is not measuring ingredients properly, especially almond flour. Almond flour is dense and easy to pack down without realizing it. If you’re using a measuring cup, spoon the flour into the cup gently and level it off with a knife—don’t scoop directly from the bag and pack it down. Better yet, weigh your ingredients if you have a kitchen scale. One cup of almond flour should weigh around 112 grams. Measuring by weight eliminates the guesswork and creates consistent results.
People also sometimes make the frosting too far in advance. If you make cream cheese frosting more than a few hours ahead, it can separate slightly or develop a grainy texture in the refrigerator. Make frosting on the same day you plan to frost the cake, or make it no more than 8-12 hours in advance. If your frosting does separate slightly, whip it again with a hand mixer until it comes back together smoothly.
Finally, don’t skip the cocoa powder sifting step. Unsifted cocoa powder creates little pockets of concentrated cocoa in the batter instead of even distribution. These pockets can taste bitter and create dry spots in the cake. Sifting takes two minutes and makes a real difference.
Testing for True Doneness
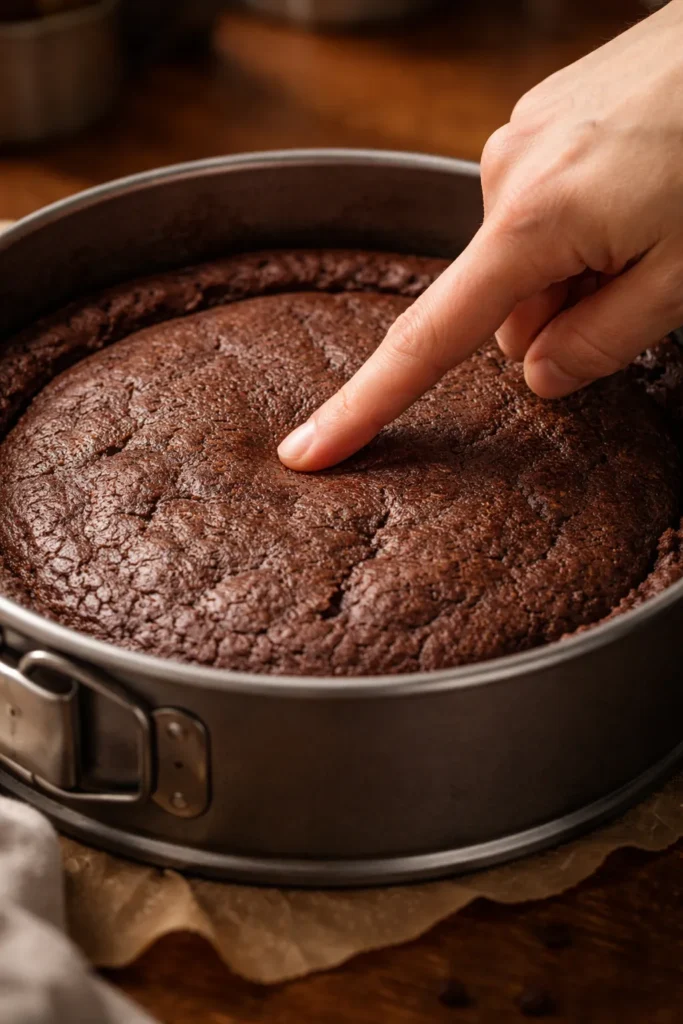
The traditional toothpick test doesn’t work perfectly for keto cakes the way it does for traditional cakes. Instead, use the spring-back test: gently press the top of the cake with your finger. If it springs back immediately and the center is just barely set, the cake is done. If your finger leaves an indentation or the top jiggles noticeably, it needs more time. If it feels hard and dense, you’ve baked it too long.
Additionally, look at the edges. In an almond flour cake, the edges set before the center. If the edges have pulled away from the sides of the pan by about a quarter-inch, that’s another sign the cake is done or nearly done. The top should look matte, not shiny or wet.
Listen to your oven too. A baking cake is relatively quiet. When the cake is done, the bubbling sound from the oven seems to quiet down. This is subtle, but once you notice it, you’ll use it as a helpful cue alongside the visual and tactile tests.
Yield: Serves 12 | Makes one two-layer 9-inch round cake
Prep Time: 20 minutes
Cook Time: 30 minutes
Total Time: 50 minutes active + 1 hour cooling
Difficulty: Intermediate — The recipe itself is straightforward, but success depends on following the moisture-preserving techniques closely and understanding how to test for proper doneness in an almond flour cake.
Ingredient List
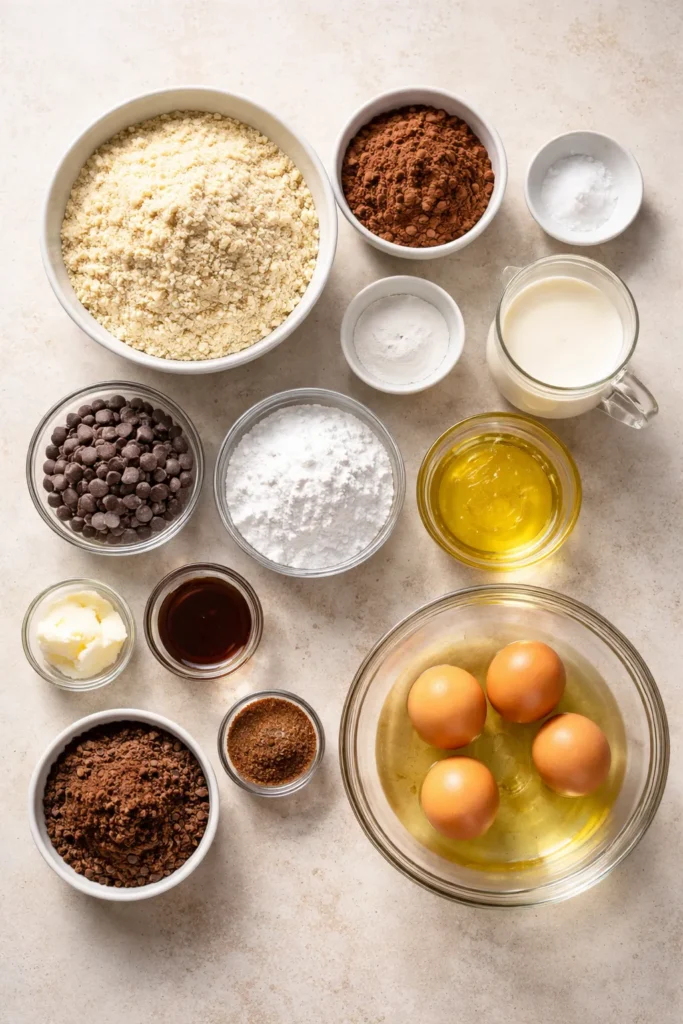
For the Cake:
- 1½ cups blanched almond flour, finely ground and measured by weight if possible (168g)
- ¾ cup Dutch-processed cocoa powder, unsweetened, sifted to remove clumps (60g)
- 1 teaspoon baking powder, aluminum-free
- ½ teaspoon baking soda
- ¼ teaspoon fine sea salt
- 1 cup (200g) allulose and monk fruit blend granulated sweetener (such as Besti or Wholesome Yum brand)
- ½ cup unsalted butter, softened to room temperature (113g)
- ½ cup neutral oil such as refined coconut oil or avocado oil (120ml)
- 6 large eggs, at room temperature
- ½ cup sour cream, full-fat and at room temperature (120ml)
- ½ cup canned pumpkin puree, unseasoned (not pumpkin pie filling)
- 2 teaspoons pure vanilla extract
- Pinch of sea salt for the batter
For the Cream Cheese Frosting:
- ½ cup unsalted butter, softened to room temperature (113g)
- 8 ounces cream cheese, softened to room temperature and cut into chunks
- ⅓ cup Dutch-processed cocoa powder, unsweetened and sifted (27g)
- ½ cup allulose and monk fruit blend powdered sweetener, sifted to remove clumps (50g)
- 1 teaspoon pure vanilla extract
- Pinch of fine sea salt
- 2-3 tablespoons heavy cream, added gradually as needed for the right consistency
Prepare Your Pans and Ingredients:
-
Preheat your oven to 350°F (175°C) and position the racks in the center of the oven. If you’re baking two layers simultaneously, position one rack in the lower-middle and one in the upper-middle position.
-
Grease two 9-inch round cake pans generously with butter or cooking spray, then line the bottoms with parchment paper rounds. This double protection ensures the cakes release easily without sticking. Grease the parchment as well.
-
Remove all ingredients from the refrigerator and let them sit at room temperature while you prepare the dry ingredients. Cold eggs and butter will not combine properly and will result in a less moist cake. If you’re short on time, place the eggs in a bowl of warm water for 5-10 minutes to bring them to room temperature quickly.
-
In a small bowl, sift together the almond flour, cocoa powder, baking powder, baking soda, and salt. Sifting the cocoa powder is crucial—it removes clumps and ensures even chocolate distribution throughout the batter. Set this aside.
Make the Batter:
-
In a large mixing bowl, combine the softened butter, oil, and sweetener. Beat together on medium speed with a hand mixer (or use a stand mixer fitted with the paddle attachment) for 2-3 minutes until the mixture is pale, noticeably fluffy, and increased in volume. This creaming step incorporates air into the batter, which contributes to a lighter, more tender crumb.
-
Add the eggs one at a time, beating for 30 seconds after each addition and scraping down the sides of the bowl after every other egg. The batter may look slightly separated or broken during this process—this is completely normal and will come together in the next step. Do not skip the scraping step; unmixed ingredients on the bowl’s sides won’t incorporate properly.
-
Reduce the mixer to low speed and add the sour cream and pumpkin puree, beating just until combined. These ingredients add crucial moisture and richness to the cake. Beat in the vanilla extract and mix for just a few more seconds until the batter looks smooth and cohesive.
-
Switch to a spatula (do not use the mixer for this step, as overmixing can make the cake dense). Add the sifted dry ingredient mixture to the wet ingredients in three additions, folding gently with the spatula each time. Fold just until the dry ingredients disappear into the batter—you’re not looking to beat or vigorously stir. The batter will be quite thick; this is correct. Overmixing at this stage is the enemy of a tender, moist crumb.
-
Scrape the batter evenly between the two prepared cake pans, dividing it as equally as possible. Use an offset spatula to smooth the tops into even layers. If the batter is uneven, you can grease your hands lightly with cooking spray and gently press it to an even thickness.
Bake the Layers:
-
Place both cake pans in the oven, positioning them on separate racks for more even baking. Set a timer for 25 minutes and rotate the pans from top to bottom and front to back at the 12-minute mark. This rotation ensures that both cakes bake evenly despite hot spots in your oven.
-
At 25 minutes, check the cakes for doneness. Gently press the top of each cake with your finger—it should spring back almost immediately, and the top should look matte rather than shiny or wet. The center should still have just the tiniest bit of jiggle when you lightly press it. This is the most important step for maintaining moisture. The cake will continue to cook as it cools, and you want to avoid overbaking.
-
If the cakes still look wet in the very center, bake for another 2-3 minutes and check again. Every oven is different, so don’t rely on a preset time. The total baking time is usually 27-32 minutes, but trust the visual and tactile cues over the clock.
-
When the cakes are done, insert a toothpick in the center of one layer. It should come out with a few moist crumbs clinging to it, not be completely clean. Remove both pans from the oven and set them on wire cooling racks.
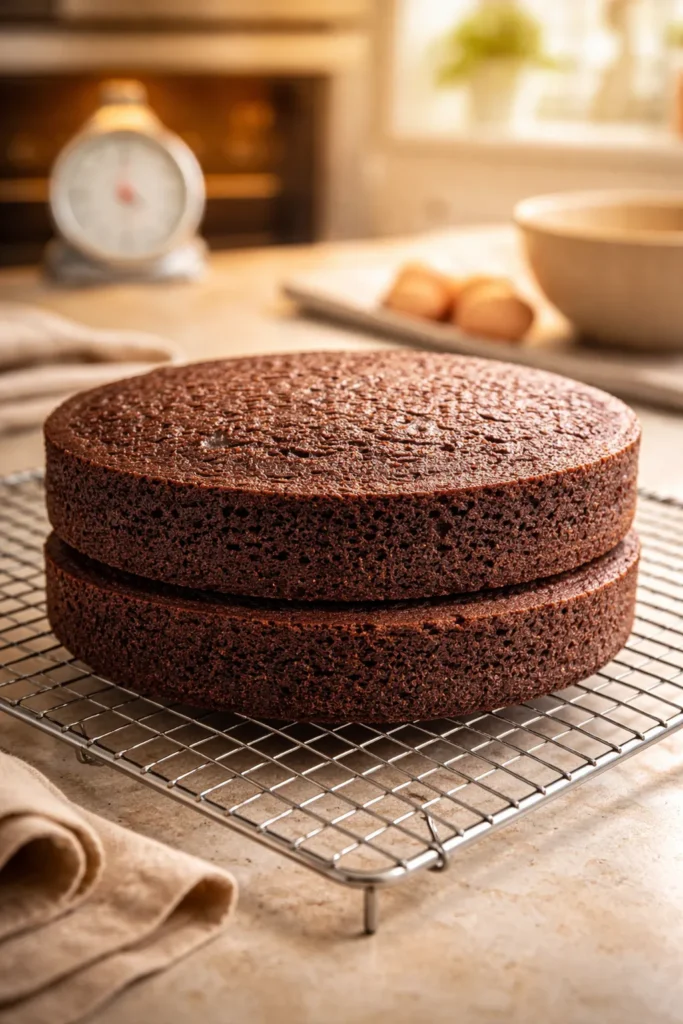
Cool the Cake Layers:
-
Let the cakes cool in their pans for 15 minutes. This short time in the pan allows the crumb to set slightly and makes the cakes easier to remove without breaking, but it’s not so long that the cakes cool too much and become difficult to release.
-
After 15 minutes, run a thin knife around the edges of each cake to loosen it from the pan. Invert each cake onto a wire cooling rack, peel away the parchment, and let the cakes cool completely to room temperature. This takes at least 1-1.5 hours, but ideally longer. Never frost a warm cake. The frosting will melt and slide off, and the warm crumb will absorb the frosting unevenly, causing it to sink and creating an unattractive appearance.
-
Once completely cool, you can wrap the cake layers in plastic wrap and refrigerate them for up to 24 hours before frosting. Cooling them overnight actually makes them easier to handle when you’re assembling the cake.
Make the Frosting:
-
In a clean medium bowl, combine the softened butter and cream cheese. Beat together on medium speed with a hand mixer for 1-2 minutes until well combined and creamy. Make sure both ingredients are truly at room temperature—cold cream cheese will create a lumpy frosting that’s difficult to smooth.
-
Add the sifted cocoa powder, beating on low speed to prevent cocoa powder from flying everywhere. Once the cocoa is incorporated, add the powdered sweetener gradually, beating as you add it.
-
Beat in the vanilla extract and salt, then add the heavy cream one tablespoon at a time while beating on low speed. You want the frosting to be thick enough to hold its shape when spread on the cake, but soft enough to spread smoothly. Stop adding cream when you reach the right consistency—it’s better to be too thick and add more cream than to make it too thin.
-
If the frosting looks grainy, this usually means the sweetener hasn’t fully dissolved or the ingredients weren’t warm enough. Add a tablespoon of heavy cream, gently warm the frosting slightly (you can set the bowl over a pot of warm water for a minute or two), and beat again. The frosting should be smooth and creamy, not gritty.
Assemble the Cake:
-
Place one cooled cake layer on a cake stand or serving platter. If the cake layers are slightly domed on top, you can carefully trim them flat with a serrated knife to ensure even layers, or just frost them as-is—the frosting will hide any unevenness.
-
Using an offset spatula or a butter knife, spread a thick layer of frosting over the first cake layer, making it even and about a quarter-inch thick. Leave about a half-inch of space around the edge (this prevents the frosting from squishing out when you place the second layer on top).
-
Carefully place the second cake layer on top of the frosting, centering it as best you can. If the layers slide slightly, don’t worry—the frosting will hold them together once it sets.
-
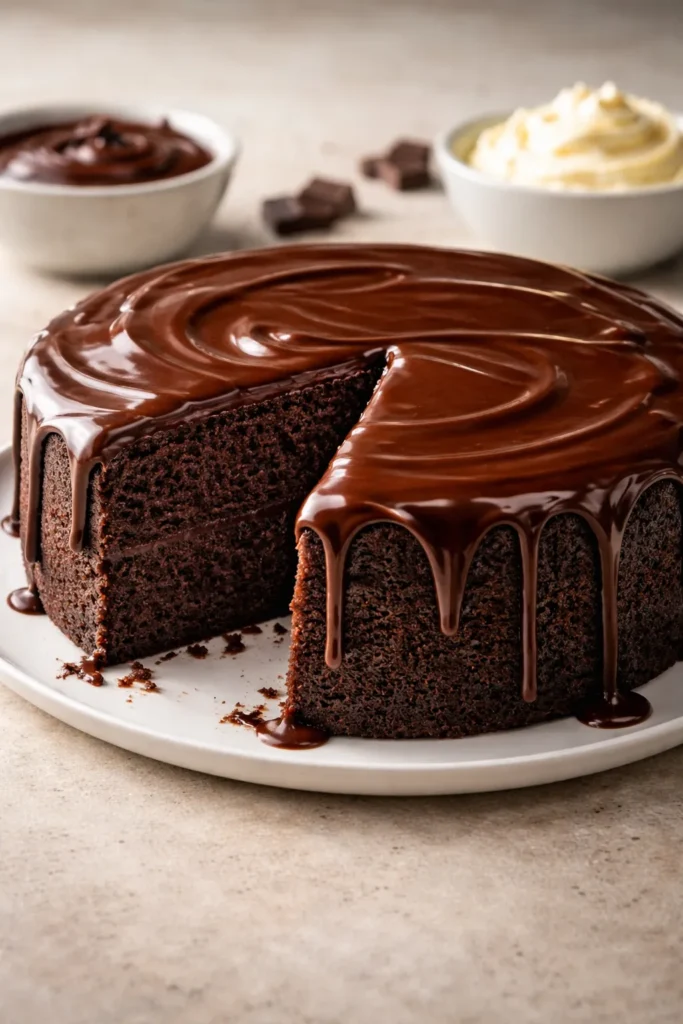
Spread the remaining frosting over the top and sides of the assembled cake using an offset spatula. If the frosting is too thick to spread smoothly, let it warm up at room temperature for a few minutes, or set the bowl over warm water briefly. The frosting should look smooth and glossy once the cake is fully frosted. Take your time with this step—a beautifully frosted cake tastes even better.
Chill and Serve:
-
Refrigerate the frosted cake for at least 1 hour before slicing and serving. This allows the frosting to set and makes the cake much easier to slice cleanly. The frosting will look more structured and glossy once it’s been chilled.
-
Remove the cake from the refrigerator 20-30 minutes before serving. Chocolate always tastes better at room temperature, and the frosting will have a better texture and mouthfeel than when it’s straight from the fridge. Use a sharp, thin-bladed knife dipped in hot water and wiped clean between each slice for the prettiest presentation.
Practical Tips from Experience
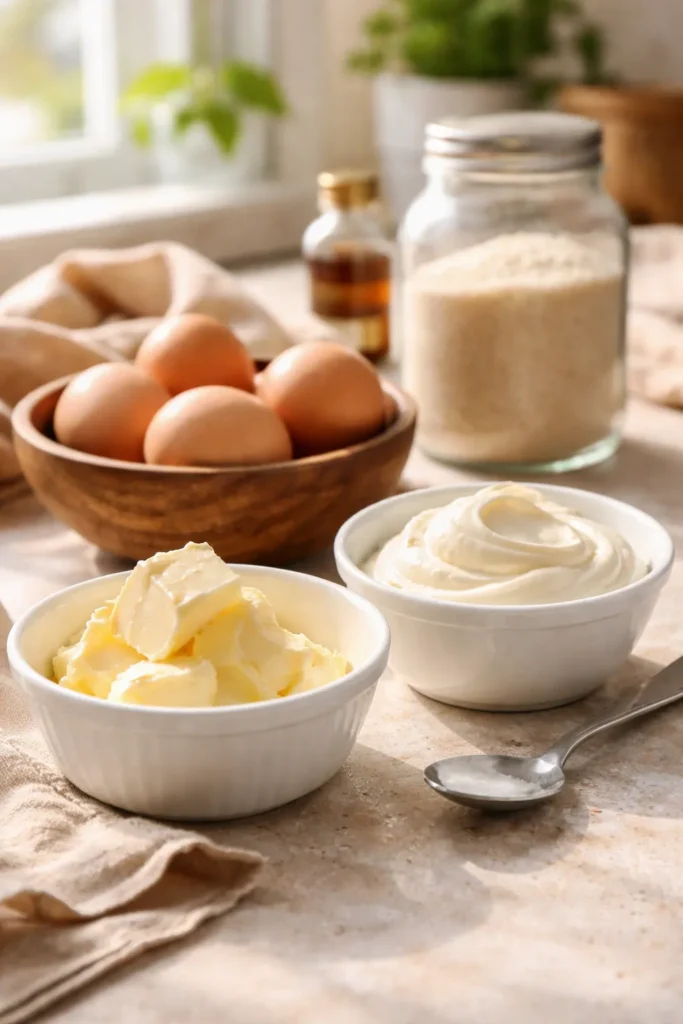
Room temperature ingredients truly matter more than any other single factor. If your butter and eggs are cold, they won’t incorporate properly, and you’ll end up with a grainy batter that bakes into a less moist cake. This is non-negotiable.
Don’t let the pumpkin puree intimidate you. I promise it doesn’t make the cake taste like pumpkin spice. What it does is add moisture and richness that keeps the cake tender. You genuinely cannot taste it—you only taste rich, decadent chocolate. I’ve served this cake to people who can’t tell it’s different from a traditional chocolate cake, and when I mention the pumpkin, they’re shocked.
Check your sweetener brand. Not all allulose-monk fruit blends behave identically. If you notice your frosting is grainy or your cake is drier than expected, switching to a different brand of sweetener might solve the problem. Besti and Wholesome Yum are the most reliable brands I’ve found, but other brands exist and work well too. Just avoid pure erythritol for this recipe.
Invest in an oven thermometer. This single tool solves more baking problems than anything else. Many ovens run hotter or cooler than what the dial says, and knowing your true oven temperature means you can adjust accordingly. If your oven runs hot, you might need to bake at 340°F instead of 350°F.
The cocoa powder you choose actually affects moisture and flavor. High-quality Dutch-processed cocoa powder (from brands like Ghirardelli, Lindt, or other premium chocolate companies) dissolves more evenly into the batter and creates a richer flavor than basic grocery store cocoa. This might seem like a small detail, but when cocoa is one of your primary ingredients by volume, its quality really matters.
If you overbake the cake even slightly, you can still salvage it. Let it cool, then brush the top and sides very lightly with some additional warm oil or melted butter mixed with a tiny bit of almond milk. Let it sit for an hour before frosting. This won’t completely restore a severely overbaked cake, but it can help a slightly overdone cake feel moister.
Variations and Flavor Adaptations
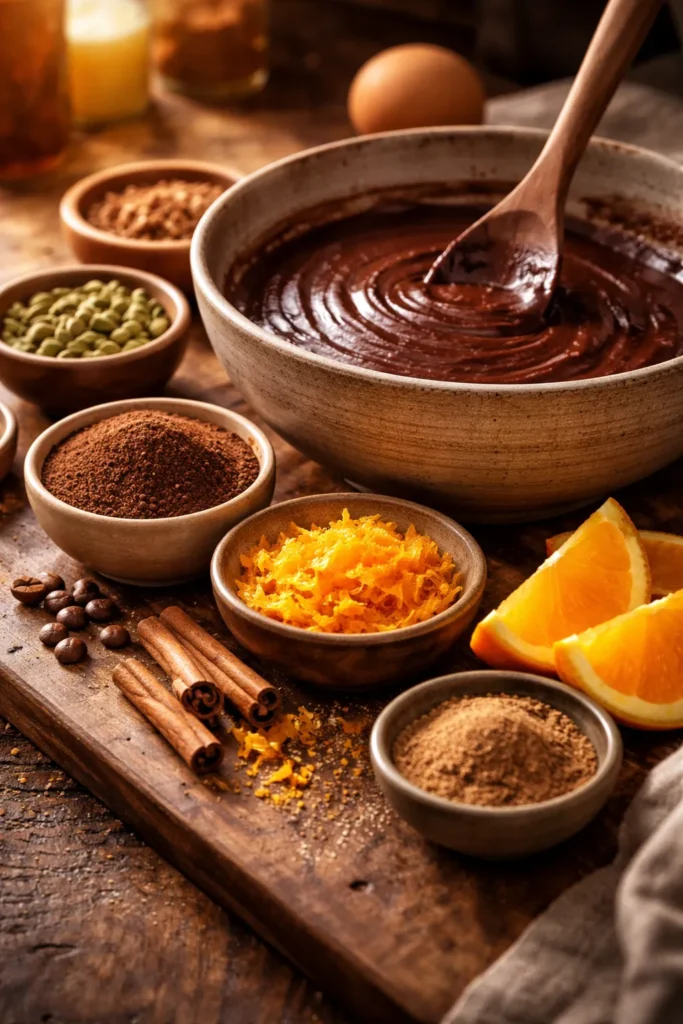
Espresso-Enhanced Chocolate: Add one teaspoon of instant espresso powder (or finely ground espresso beans) to the sifted dry ingredients. This deepens the chocolate flavor dramatically without adding any coffee taste. The espresso amplifies chocolate notes and creates a more sophisticated, complex flavor profile. If you want more dramatic coffee flavor, add a half-teaspoon to the frosting as well.
Spiced Chocolate Cake: Add one teaspoon of ground cinnamon, one-quarter teaspoon of ground cardamom, and one-eighth teaspoon each of ground cloves and nutmeg to the dry ingredients. These warm spices complement the chocolate beautifully and create a festive version that’s perfect for fall and winter gatherings. The spices remain subtle—this isn’t a spice cake, just chocolate cake with warmth and complexity.
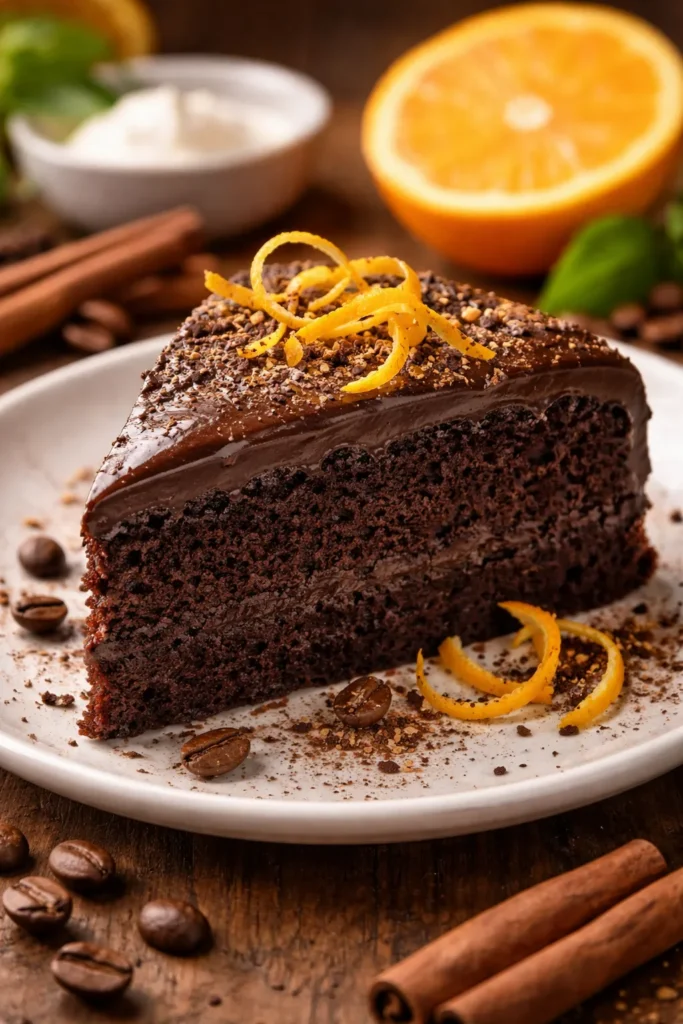
Chocolate-Orange Cake: Add the finely grated zest of one orange to the wet ingredients along with the vanilla extract. Orange zest adds brightness and a subtle citrus note that makes the chocolate taste even more chocolatey. You could also add a half-teaspoon of orange extract to the frosting, though the zest alone is often sufficient.
Mocha Cake: Combine the espresso variation with the moisture-locking base of this recipe. Add one teaspoon of instant espresso powder to the dry ingredients, and replace half of the pumpkin puree with cold brewed coffee or espresso. The coffee adds moisture and intensifies the chocolate flavor while creating a cake that’s deeply chocolatey but with a subtle coffee background note.
Vegan Version: Replace the six eggs with a flax egg mixture: combine six tablespoons of ground flaxseed with nine tablespoons of water, stir well, and let sit for five minutes before adding to the batter. Replace the sour cream with additional pumpkin puree (use one full cup total instead of one-half cup). Replace the heavy cream in the frosting with full-fat canned coconut cream. The cake will be slightly denser and have a more delicate crumb, but it will still be moist and delicious. The frosting will be creamier and richer with coconut cream, which actually enhances the chocolate flavor beautifully.
Dairy-Free Version: Replace the butter with refined coconut oil (same amount), replace the sour cream with full-fat canned coconut cream (same amount), and use a dairy-free cream cheese alternative in the frosting (or omit the cream cheese and use coconut cream with an extra tablespoon of cocoa powder for richness). The cake will taste slightly different—more coconutty, with a lighter crumb—but will remain moist and satisfying. Make sure the coconut oil is refined and odorless so you don’t get coconut flavor competing with the chocolate.
Storage, Make-Ahead, and Reheating
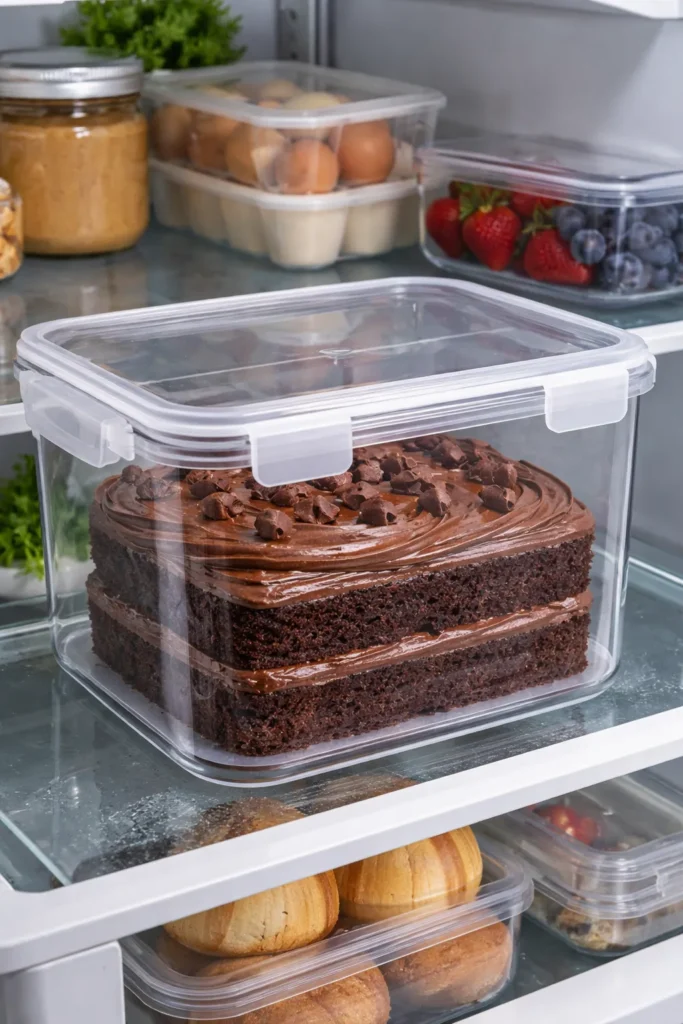
At Room Temperature: An unfrosted cake layer can sit on the counter covered loosely with a kitchen towel for up to two days without drying out significantly. Once frosted, the cake should be refrigerated.
In the Refrigerator: A frosted chocolate cake keeps beautifully in the refrigerator for three to four days in an airtight container or covered loosely with plastic wrap. In fact, the cake often tastes even better after a day in the fridge—the flavors meld together and the crumb continues to set up slightly, making it easier to slice cleanly.
In the Freezer: Unfrosted cake layers freeze perfectly for up to four months. Wrap each layer individually in plastic wrap, then place them together in a freezer bag or airtight container. Thaw at room temperature for about six hours, or in the refrigerator overnight. The cake should be completely thawed before you frost it.
You can also freeze a fully frosted cake, though this requires slightly more care. Freeze the cake solid on a sheet for four to six hours, then wrap it tightly in plastic wrap and place it in an airtight container. Frozen frosted cake keeps for up to two months. Thaw it in the refrigerator for 24 hours before serving.
Make-Ahead Strategy: For parties or special occasions, bake the unfrosted layers one or two days in advance and wrap them tightly. Make the frosting the morning of the event, or the night before and refrigerate it in an airtight container. Assemble the cake just a few hours before you plan to serve it, which gives the frosting time to set without the cake sitting in the fridge so long that it starts to taste stale.
Reheating: This cake is best served at room temperature, not straight from the fridge. Remove it from the refrigerator 20-30 minutes before serving. If you’re serving frosted cake straight from the fridge, you’ll lose some of the chocolate flavor and the frosting will have a slightly waxy mouthfeel. Room temperature transforms the cake into something far more delicious.
Serving Suggestions and Pairings
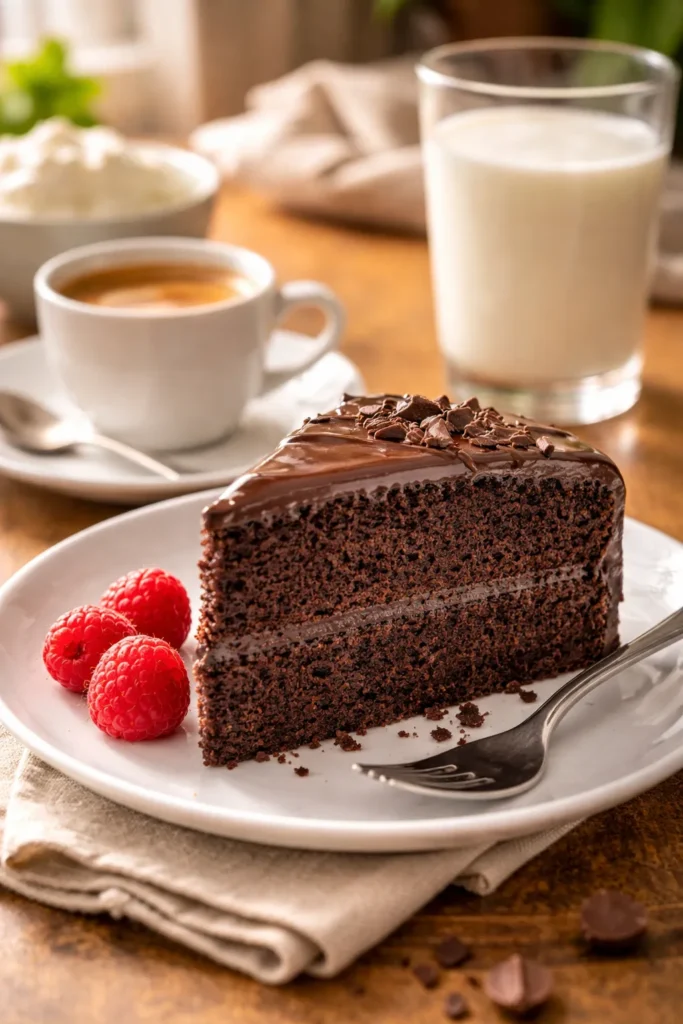
This rich, moist chocolate cake pairs beautifully with strong coffee or espresso. The bitterness of the coffee balances the sweetness of the cake and frosting, creating a sophisticated flavor pairing that elevates both. Serve a slice with a small cup of espresso for an afternoon treat, or with a larger mug of coffee for a more indulgent experience.
Cold whole milk or unsweetened almond milk provides a clean, cool complement to the richness of the frosting. This pairing works especially well for serving the cake to children or for a casual afternoon snack.
If you want to add a fresh element, fresh raspberries or strawberries scattered on top or served alongside the cake add tartness and brightness that cuts through the richness. The acidity of fresh berries cleanses the palate between bites, making the chocolate taste even more intense.
A dollop of whipped cream on top of each slice adds lightness and creaminess without adding a competing flavor. You could make the whipped cream sugar-free by whipping heavy cream with a tiny amount of sweetener and a splash of vanilla extract.
Ice cream is an obvious pairing, and a small scoop of vanilla or coffee ice cream on top of a warm slice of this cake is genuinely decadent. The ice cream melts slightly, creating its own little sauce.
For a more casual presentation, you could dust the frosted cake lightly with unsweetened cocoa powder using a fine-mesh sieve. This adds a professional-looking finish and a subtle bitter note that deepens the chocolate flavor.
Final Thoughts

The most important thing to understand about this keto chocolate cake is that dryness isn’t a feature of low-carb baking—it’s a mistake you can completely avoid. This cake proves that point. It stays moist for days, tastes indulgent without tasting artificial, and genuinely rivals traditional chocolate cakes in terms of flavor and texture.
The secret isn’t complicated: the right sweetener (allulose-monk fruit blend), the right fat balance (butter plus oil), moisture-locking ingredients (pumpkin puree or sour cream), quality cocoa powder, and knowing when to stop baking. Follow these principles and you’ll create a cake that makes you forget you’re on a keto diet entirely.
Bake this cake with confidence. Trust the visual and tactile cues for doneness. Let it cool completely before frosting. Use room-temperature ingredients. Once you’ve made it once, you’ll understand exactly why this is the cake that converts skeptics and satisfies every chocolate craving.