Table of Contents
- Rich Chocolate Ganache Cake for Birthdays
- Why This Chocolate Cake Deserves a Celebration
- The Science Behind Ultra-Moist Chocolate Cake
- Understanding Chocolate Ganache
- Choosing Your Ingredients Carefully
- Equipment That Makes a Difference
- Serving and Timing Information
- Ingredients
- Step-by-Step Instructions
- Expert Tips for Chocolate Cake Success
- Variations to Make It Your Own
- Storage and Make-Ahead Guide
- Serving Suggestions and Pairings
- Troubleshooting Common Issues
- Final Thoughts
Rich Chocolate Ganache Cake for Birthdays
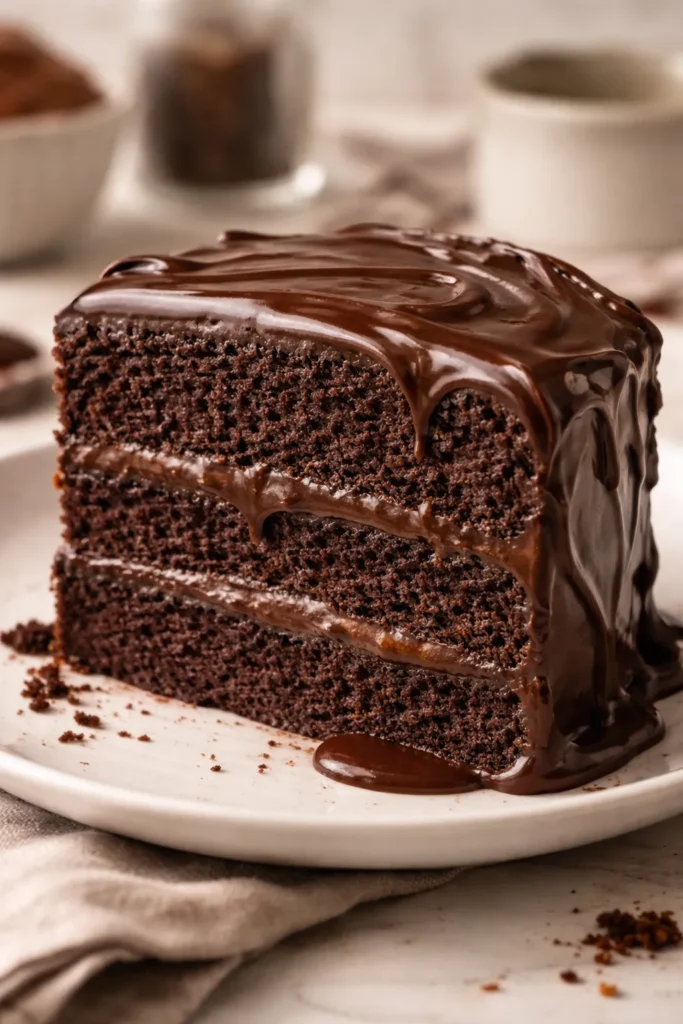
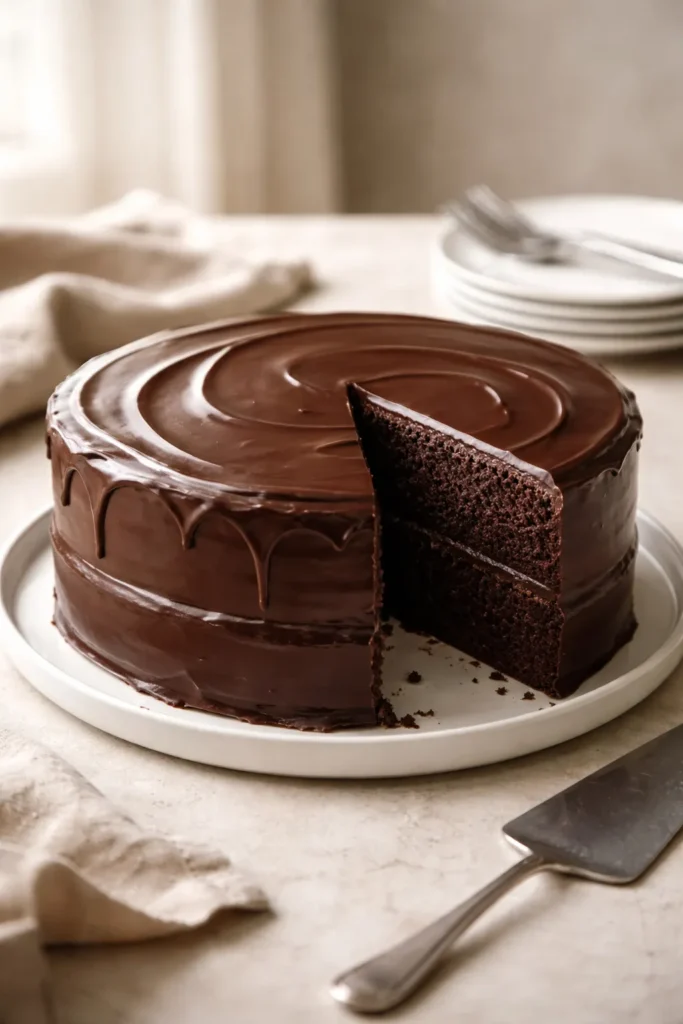
The most memorable birthday cakes aren’t the ones from a bakery shelf or a box mix—they’re the ones you make with your own hands, the ones where every layer is infused with intention and love. A rich chocolate ganache cake is the ultimate expression of that sentiment, a dessert that says “you’re worth the effort” in every decadent bite. This isn’t just cake; it’s a celebration in edible form, the kind of dessert that becomes the highlight of the party before a single slice is even cut.
What makes a chocolate ganache cake so special for birthdays is its perfect balance of showstopper presentation and genuine approachability. The dramatic chocolate drip down the sides, the glossy ganache topping, the promise of moist, tender cake layers inside—this is a cake that photographs beautifully and tastes even better. Yet despite its sophisticated appearance, it’s actually easier to make than many people assume. The secret lies in understanding a few key principles about moisture retention, proper ganache consistency, and timing. Once you master those, you’ll have a reliable cake recipe that works for any birthday, whether you’re celebrating a milestone, a simple gathering, or treating yourself.
The beauty of this particular recipe is that it combines tested bakery techniques with home-kitchen practicality. Unlike cakes that dry out by the next day, a properly made chocolate ganache cake stays moist and tender for days, actually improving as the flavors meld together. The two-ingredient chocolate ganache—nothing but quality chocolate and heavy cream—elevates this from a simple cake to something restaurant-worthy, yet it couldn’t be simpler to execute. No fancy equipment required, no complicated techniques, just the fundamentals done well.
Why This Chocolate Cake Deserves a Celebration
A birthday cake needs to do several things simultaneously: it must taste genuinely delicious, look impressive, hold up through transport and room-temperature serving, and actually be something the baker feels proud to present. This rich chocolate ganache cake accomplishes all of that without requiring professional pastry training.
The magic starts with the cake itself. This recipe uses a combination of unsweetened cocoa powder, melted bittersweet chocolate, and a clever technique involving hot liquid that creates exceptional moisture and depth of flavor. The cocoa powder gives the cake its characteristic chocolate note, while the melted chocolate adds richness and structure. The hot liquid—whether coffee or water—blooms the cocoa, intensifying its flavor profile and creating steam during baking that contributes to the cake’s tender, almost brownie-like crumb.
What sets this cake apart from standard chocolate recipes is the attention to moisture retention. Most home bakers think cake dryness is inevitable, something that happens to cakes as they cool. But bakeries have known for decades that the right combination of ingredients prevents this entirely. Buttermilk or sour cream adds tang that brightens the chocolate and improves moisture retention. Brown sugar, beyond adding subtle caramel notes, hygroscopically attracts and holds water, keeping the cake tender even days later. Vegetable oil—often overlooked in favor of butter alone—creates a different crumb structure than all-butter cakes, resulting in something softer and more velvety. Together, these ingredients create a cake that stays moist because the chemistry supports it, not by luck.
The Science Behind Ultra-Moist Chocolate Cake
Understanding why chocolate cakes dry out helps you understand why this particular approach prevents it. When a cake bakes, the exterior sets while the interior remains soft. As the cake cools, moisture naturally migrates from the center outward and eventually evaporates from the surface. Traditional cakes made with primarily butter and all-purpose flour can’t prevent this entirely—the gluten network holds the structure as water leaves, but the crumb becomes progressively drier.
This recipe interrupts that drying process at multiple points. First, the ingredients themselves hold water more effectively. Buttermilk’s lactic acid reacts with baking soda, creating carbon dioxide that produces a fine, tender crumb with more space for moisture distribution. The higher proportion of fat—from both oil and butter—coats the flour particles, slowing gluten development and creating a softer structure that holds onto water rather than allowing it to escape. Brown sugar literally attracts and retains water, which is why brownies and molasses-based cakes never feel as dry as their sugar-only counterparts.
Second, the ganache topping and filling seal the cake’s surface. Chocolate is hydrophobic—it resists water loss by creating a barrier. This is why ganache-covered cakes stay moist longer than frosted cakes; the chocolate seal physically prevents surface evaporation. The thick filling between layers also protects the interior, keeping the cake tender while it sits before serving.
Third, timing matters profoundly. A cake wrapped in plastic wrap before it completely cools locks in steam and distributes residual heat evenly, allowing the moisture to redistribute throughout the crumb rather than escaping. Wrapping the cooled cake prevents any surface moisture loss. Some bakers even brush layers with simple syrup before assembling, adding back moisture while the cake is still slightly warm and receptive.
Understanding Chocolate Ganache
Ganache is one of those deceptively simple preparations that rewards precision. The basic formula is equal parts chocolate and cream by weight, though the specific ratio depends on your desired consistency. For a pourable ganache that drips beautifully down the sides of a cake, you might use slightly more cream. For a thick frosting ganache that spreads smoothly and holds its shape, you’d use more chocolate.
The reason ganache is so effective as a birthday cake topping is multifaceted. Aesthetically, it’s instantly elegant—that glossy finish and dramatic drip feel sophisticated without any fussy piping. Texturally, ganache melts on the tongue in a way that frosting doesn’t, creating that “it dissolves in your mouth” moment that makes cake special. Flavor-wise, ganache is intensely chocolate-forward; there’s no butter competing with the chocolate flavor, no vanilla to dilute it. The cream simply carries the chocolate, letting it shine.
The quality of chocolate matters far more in ganache than in most cake applications. In a cake, the chocolate flavor is distributed throughout the crumb, combined with other flavors. In ganache, where chocolate is the primary ingredient, using lower-quality chocolate or chocolate chips results in a noticeably inferior product. The best ganache uses real chocolate—bars or chunks, not chips—with a cacao content you actually enjoy. If you prefer darker chocolate, use 70% cacao or higher. If you like something sweeter, 60% or even milk chocolate works beautifully. The ganache will taste like whatever chocolate you choose, so choose something you’d eat on its own.
Making ganache correctly involves respecting the temperature relationship between chocolate and cream. Hot cream poured over chopped chocolate creates an ideal environment for the chocolate to melt without becoming grainy or seizing. The key is letting them sit for a moment before stirring—patience allows the heat to penetrate the chocolate evenly. If you rush and stir immediately, you risk creating chunks of unmelted chocolate throughout your ganache. If your ganache does seize (becomes grainy or stiff), a small amount of additional cream or even coconut oil can rescue it through gentle reheating and stirring.
Choosing Your Ingredients Carefully
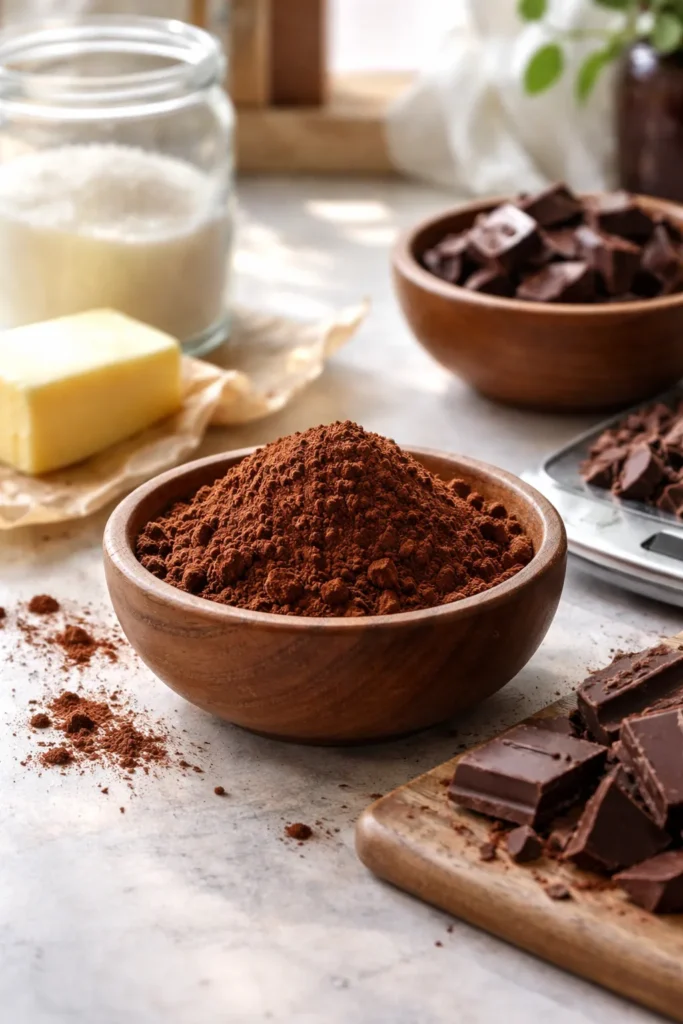
The quality of your finished cake depends almost entirely on the quality of your ingredients, because the recipe is simple enough that there’s nowhere to hide. Everything matters.
For the cake itself: All-purpose flour provides the right balance of structure without being as dense as bread flour or as delicate as cake flour. If you’re weighing ingredients with a scale, aim for the exact grams specified; if you’re measuring by volume, spoon flour into the measuring cup and level it off rather than scooping directly from the bag, which compacts the flour and results in too much flour in the recipe.
Dutch-process cocoa powder offers deeper color and smoother flavor than natural cocoa, a worthwhile upgrade if you have access to it. The Dutch processing doesn’t affect the baking chemistry in this particular recipe, so you can use either type, but Dutch-process cocoa will give you a richer, darker final product.
Bittersweet or dark chocolate for the cake and ganache deserves special attention. Look for chocolate with 60–70% cacao content—high enough to taste sophisticated, low enough to remain approachable. Brands like Ghirardelli, Lindt, Guittard, or specialty baking chocolate will all yield superior results compared to chocolate chips or melting chocolate, which often contain additives that affect texture. If possible, chop a chocolate bar into pieces rather than buying pre-chopped chocolate, which has a larger surface area and degrades more easily.
Buttermilk creates the tender crumb and improves moisture retention more effectively than regular milk. If you don’t have buttermilk on hand, make it by stirring one tablespoon of white vinegar or lemon juice into one cup of regular milk and allowing it to sit for five minutes before using. This simple substitution produces results nearly identical to store-bought buttermilk.
Brown sugar should be packed into the measuring cup to ensure you’re getting the full weight of sugar in the recipe. If your brown sugar has hardened, microwave it for 10–15 seconds to soften it, or store it with a piece of bread to restore moisture.
Eggs should be room temperature before mixing, which allows them to blend more evenly into the batter and helps create proper emulsification. If you’re in a hurry, place eggs in a bowl of warm water for 5 minutes to bring them to temperature.
Equipment That Makes a Difference
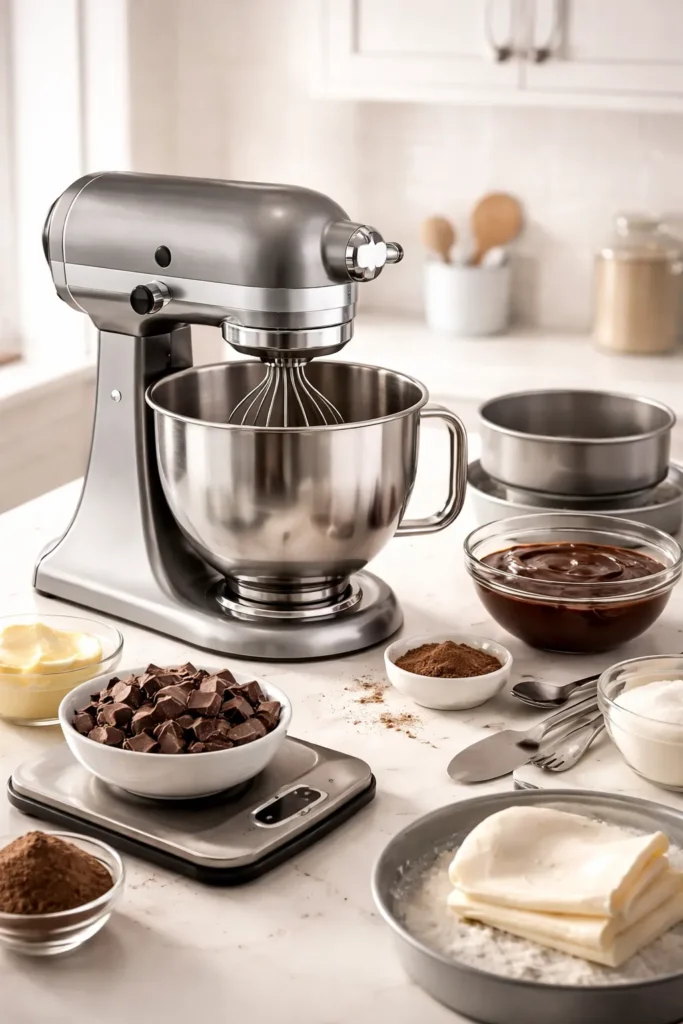
You don’t need a fully equipped bakery kitchen, but a few tools make this project significantly easier and more reliable.
A kitchen scale is genuinely worth owning for baking. Measuring flour by volume introduces variability; one person’s spoon-and-level differs slightly from another’s, and humidity affects how flour packs. A scale removes this guesswork. If you don’t have a scale, spoon flour into your measuring cup and level it carefully; don’t scoop directly from the bag.
Two 8-inch round cake pans with straight sides and removable bottoms are ideal. If you want three layers, some bakers use three pans or bake twice; others bake in a sheet pan and cut the cooled cake into layers using cake rings. The sheet-pan method actually produces a flatter, more evenly baked cake, but it requires cake rings and a bench scraper to execute cleanly.
A stand mixer with a paddle attachment makes creaming butter and sugar effortless, creating the light, fluffy mixture essential for proper cake structure. A handheld mixer works, though it requires more effort. You can even mix by hand with a sturdy wooden spoon, though you’ll need patience and upper-body strength.
Parchment paper lining the cake pan bottoms ensures the cooled cakes release cleanly. Parchment is far more reliable than greasing alone.
An offset spatula—a small, flexible metal spatula with a 2–3 inch blade set at an angle—makes spreading ganache and frosting infinitely easier than using a regular knife. It’s a small investment that transforms your cake-decorating experience.
A microwave-safe bowl for melting chocolate and making ganache should be heatproof and large enough to stir comfortably without splashing.
A piping bag with a large round or star tip lets you pipe decorative elements, though this is entirely optional. You can frost a beautiful cake with nothing but a spatula.
Plastic wrap and foil for wrapping cake layers before freezing or storing are essential for maintaining moisture.
Serving and Timing Information
Yield: One 8-inch two-layer cake, serving 12–16 people | One 8-inch three-layer cake, serving 14–18 people | 24–30 cupcakes
Prep Time: 30 minutes (hands-on preparation, including ingredient measuring and mixing)
Cook Time: 35–40 minutes (cake baking time)
Ganache Time: 3 hours at room temperature (or 30 minutes in the refrigerator to set before frosting)
Total Time: 4–5 hours active time plus setting time, or can be spread across two days
Difficulty: Intermediate — The cake itself is straightforward and uses basic mixing techniques, but success requires attention to detail regarding ingredient quality, oven temperature accuracy, and proper ganache consistency. First-time bakers can absolutely succeed, especially with an oven thermometer to verify temperature accuracy.
Best Served: At room temperature, 1–2 hours after removing from the refrigerator. The ganache is creamy and melts beautifully when the cake is room temperature; a cold cake will have firm frosting.
Make-Ahead Friendly: Yes—cake layers can be baked, wrapped, and frozen up to 2 weeks ahead. Thaw in the refrigerator overnight before frosting. Ganache can be made up to 3 days ahead and stored in an airtight container.
Ingredients
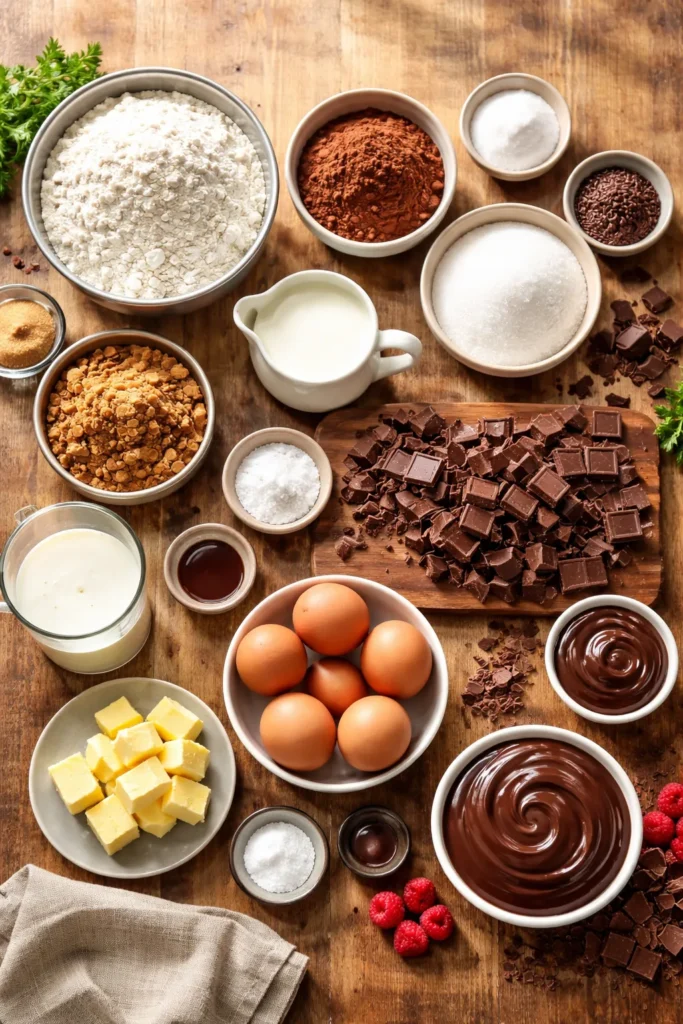
For the Chocolate Cake:
- 2 cups (240 g) all-purpose flour, spooned and leveled
- ¾ cup (65 g) Dutch-process unsweetened cocoa powder (or natural cocoa powder)
- 2 teaspoons baking soda
- 1 teaspoon baking powder
- 1 teaspoon fine sea salt
- 1¾ cups (350 g) granulated sugar
- ¾ cup (150 g) packed light brown sugar
- 1 cup (2 sticks / 226 g) unsalted butter, softened to room temperature
- 4 large eggs, room temperature
- 1 teaspoon pure vanilla extract
- 1 cup (240 ml) buttermilk or sour cream, room temperature
- 3 ounces (85 g) bittersweet or dark chocolate, finely chopped or grated
- 1 cup (240 ml) hot brewed coffee or hot water (coffee intensifies chocolate flavor but won’t taste like coffee)
For the Chocolate Ganache Filling and Frosting:
- 12 ounces (340 g) bittersweet or dark chocolate (60–70% cacao), finely chopped (not chocolate chips)
- 1 cup (240 ml) heavy cream
- 2 tablespoons (28 g) unsalted butter
- ¼ teaspoon fine sea salt
Optional for Decoration:
- Fresh berries (raspberries, blackberries, or strawberries)
- Chocolate shavings
- Sprinkles
- Whipped cream
- Fresh flowers
Step-by-Step Instructions
Prepare and Preheat:
-
Preheat your oven to 350°F (175°C) and position the rack in the center. Grease two 8-inch round cake pans with softened butter, then line the bottoms with parchment paper cut to fit. Grease the parchment as well—this ensures the baked cakes release cleanly.
-
Sift together the flour, cocoa powder, baking soda, baking powder, and salt into a large mixing bowl. Whisk in the granulated sugar and brown sugar until combined and any lumps of brown sugar are broken up. Set the dry mixture aside.
Create the Wet Ingredients:
-
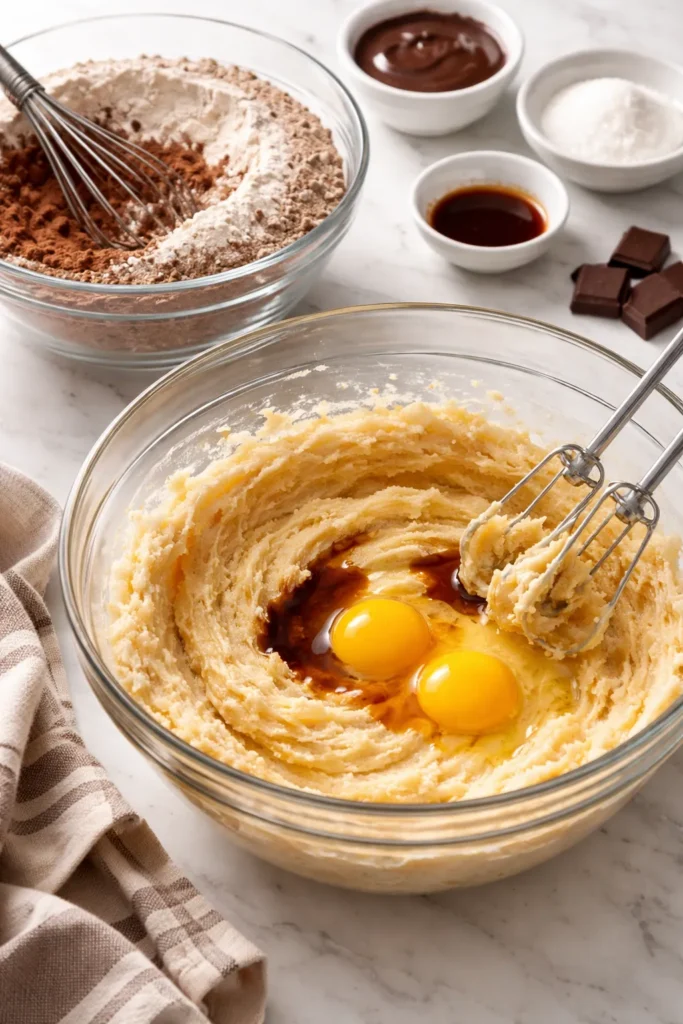
In a separate large bowl, cream the softened butter and both sugars together using a stand mixer fitted with the paddle attachment (or a handheld mixer) on medium-high speed for 3–5 minutes, until the mixture is noticeably lighter in color, increased in volume, and fluffy. Scrape down the sides of the bowl as needed. This step is crucial—proper creaming incorporates air, which helps the cake rise and creates a tender crumb.
-
Add the eggs one at a time, beating on medium speed for about 30 seconds after each addition and scraping down the bowl between additions. After the final egg, the mixture may look slightly curdled or separated—this is completely normal and will come together in the next steps.
-
Reduce the mixer to low speed and add the vanilla extract, then gradually add the dry flour mixture in three additions, alternating with the buttermilk in two additions. Begin and end with the dry mixture: dry, buttermilk, dry, buttermilk, dry. Mix only until each addition just disappears into the batter. Do not overmix—overmixing develops gluten and results in a dense, tough cake.
-
With the mixer still on low speed, add the chopped bittersweet chocolate and mix until evenly distributed, about 30 seconds.
-
Slowly pour in the hot coffee (or hot water) while mixing on low speed. The batter will thin considerably and appear thin and soupy—this is exactly correct. The moisture from the coffee creates steam during baking, which contributes to the cake’s tender texture. Mix until completely smooth and homogenous, with no streaks of flour visible.
Bake the Cake:
-
Divide the batter evenly between the two prepared pans. If you have a kitchen scale, weigh the batter to ensure each pan receives exactly the same amount. Tap each pan gently on the counter once or twice to release any large air bubbles.
-
Bake for 35–40 minutes, rotating the pans front-to-back halfway through baking to ensure even baking. The cakes are done when a toothpick or skewer inserted in the center comes out clean with only a few moist crumbs clinging to it—a bit of moisture is fine, but it shouldn’t be wet. The tops should spring back when gently pressed with a fingertip, and the edges should just begin to pull away from the sides of the pan.
-
Remove the cakes from the oven and allow them to cool in their pans for 15–20 minutes. This resting period allows the structure to set before turning out. Do not unmold the cakes while they’re hot—they’re too delicate and will tear or crumble.
-
Run a thin knife or offset spatula around the edge of each cake to release it from the pan’s sides. Place a wire cooling rack over the top of a pan, then carefully invert the pan and rack together so the cake lands on the rack. Lift the pan away and gently peel off the parchment paper. Repeat with the second cake. Allow both cakes to cool completely at room temperature.
Make the Chocolate Ganache:
-
Place the finely chopped chocolate and salt in a heatproof bowl. Use a scale and real chocolate, not chocolate chips—this makes a measurable difference in the final ganache quality.
-
In a small saucepan, combine the heavy cream and butter. Place over medium heat and bring to a simmer, stirring occasionally so the butter melts evenly. Do not let the cream boil hard—a gentle simmer is all you need.
-
Pour the hot cream mixture over the chopped chocolate. Let it sit undisturbed for 2 minutes—this resting period allows the heat to penetrate the chocolate evenly and begin melting it.
-
Stir gently with a spatula or wooden spoon, starting from the center and working outward in a circular motion until all the chocolate is melted and the ganache is completely smooth and glossy. If some chocolate pieces remain unmelted after 2 minutes of stirring, microwave the ganache in 15-second increments, stirring for 30 seconds between each increment, until melted.
-
The ganache will be thin and pourable at this stage. Allow it to cool at room temperature, stirring occasionally, until it reaches a spreadable consistency—thick enough that it doesn’t run off the cake but soft enough to spread with a spatula. This usually takes 1–3 hours depending on room temperature. You can accelerate this by placing the ganache in the refrigerator and stirring every 10 minutes, checking the consistency frequently. Be careful not to over-chill—if the ganache becomes too thick and firm, gently reheat it in the microwave at 10-second intervals, stirring between each increment, until spreadable again.
Assemble the Cake:
-
If the cake layers are slightly domed on top, use a serrated knife to carefully trim a thin layer off the top of each cake to create a flat surface. This ensures even stacking and prevents the cake from leaning.
-
Place the first cake layer, flat side up, on a cake plate or serving platter. If you want extra moisture, brush the top of this layer with a light coating of simple syrup (made by dissolving 2 tablespoons sugar in 2 tablespoons water, then cooling). Spread a generous layer of ganache over the top, extending it to the edges—about ½ cup of ganache for the filling. Use an offset spatula to spread it evenly.
-
Carefully place the second cake layer on top, flat side down. Press very gently so it sits flush with the first layer. Take care not to press so hard that the ganache squeezes out the sides, though a little showing is fine.
-
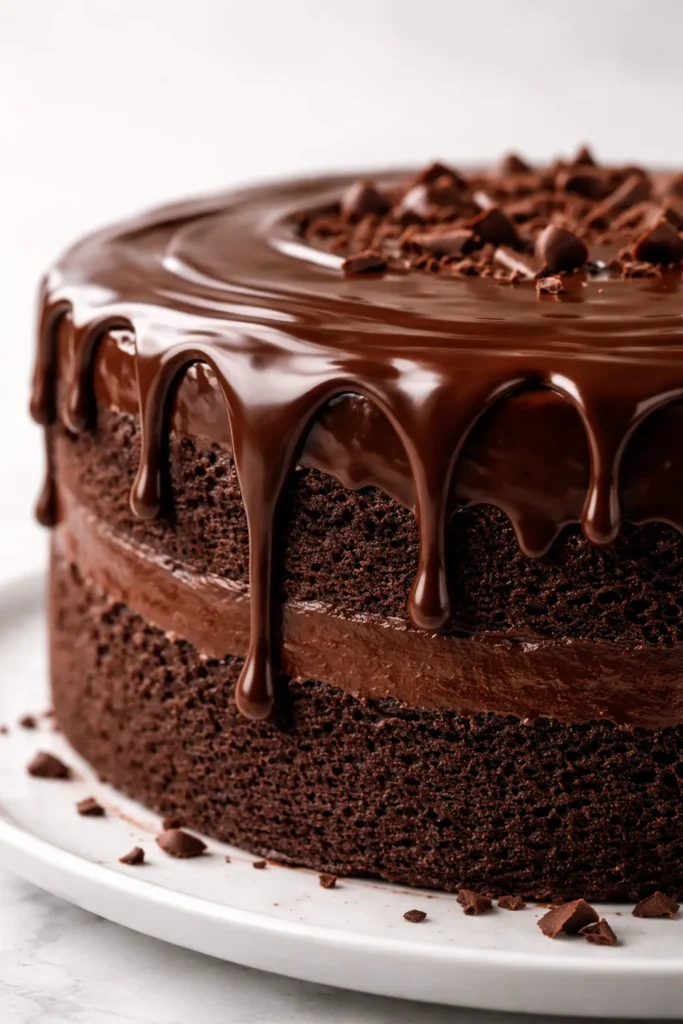
Spread the remaining ganache over the top and sides of the assembled cake, creating a smooth, even layer. An offset spatula works best for this—use it to spread from the center outward on the top, then work around the sides. For a smooth finish, use long, confident strokes; hesitant movements create marks. If you prefer a rustic look, leave the spatula marks visible or create an intentional crumb-coat texture.
-
If desired, create a ganache drip down the sides: heat ¼ cup ganache in the microwave at 15-second intervals until slightly thinner than peanut butter consistency. Transfer to a squeeze bottle or small spoon and slowly drizzle down the sides of the cake. The drips should fall naturally due to gravity—don’t push them. This takes practice; imperfect drips are still beautiful.
Chill and Set:
- Refrigerate the assembled cake for at least 30 minutes (or up to 2 hours) to allow the ganache to set and firm up. The cake can be served chilled, but it tastes best at room temperature.
Expert Tips for Chocolate Cake Success
Don’t Skip the Coffee: The instruction to add hot coffee often confuses home bakers, who worry the cake will taste like coffee. Here’s the secret: you will not taste coffee in the finished cake. What you’ll taste is significantly intensified chocolate flavor. Coffee is a flavor amplifier for chocolate; it awakens the chocolate’s nuances without announcing itself. This is a professional baking technique worth understanding. If you truly cannot use coffee, hot water works, but you’ll lose some depth of flavor.
Invest in a Good Oven Thermometer: Home ovens often run warmer or cooler than the dial indicates, which dramatically affects baking time and results. A $10 oven thermometer is the single best investment you can make for baking consistency. If your oven runs hot, your cakes may bake too quickly and emerge with a set exterior and underdone interior. If it runs cool, cakes spread excessively before setting. Verify your oven’s actual temperature before baking.
Room Temperature Ingredients Matter More Than You Think: When butter, eggs, and buttermilk are at room temperature, they emulsify smoothly into a homogenous batter. Cold ingredients fight integration, resulting in a broken, separated batter that creates a dense, tough crumb. If you’re in a hurry, place eggs in warm water for 5 minutes, and let butter sit on the counter while you prepare other ingredients.
Don’t Overmix the Batter: Gluten develops with mixing, and too much gluten in a cake batter creates toughness and density. Mix only until you can’t see streaks of flour. A few tiny lumps are fine and will disappear during baking. A batter mixed with a spatula is less likely to overmix than one mixed with a stand mixer on high speed.
Wrap Cooled Cakes Immediately: Before the cakes cool completely, wrap each one individually in plastic wrap, then in foil. This locks in steam and distributes residual moisture throughout the crumb, resulting in noticeably softer, more tender cake the next day. This technique—allowing wrapped cakes to sit at room temperature overnight—is a professional baker’s secret that transforms the texture.
Ganache Consistency is Everything: If your ganache is too thin, the cake becomes soggy. If it’s too thick, it becomes stiff and doesn’t spread smoothly. The sweet spot is the consistency of yogurt or peanut butter. If you need to adjust, a few seconds in the microwave thins it; a few minutes in the refrigerator firms it. Have patience with this step—rushing leads to ganache that doesn’t set properly.
Use a Kitchen Scale for Precision: Especially for the chocolate and cream in the ganache, weight measurements are far more reliable than volume. A scale removes guesswork and ensures consistent results every time.
Variations to Make It Your Own
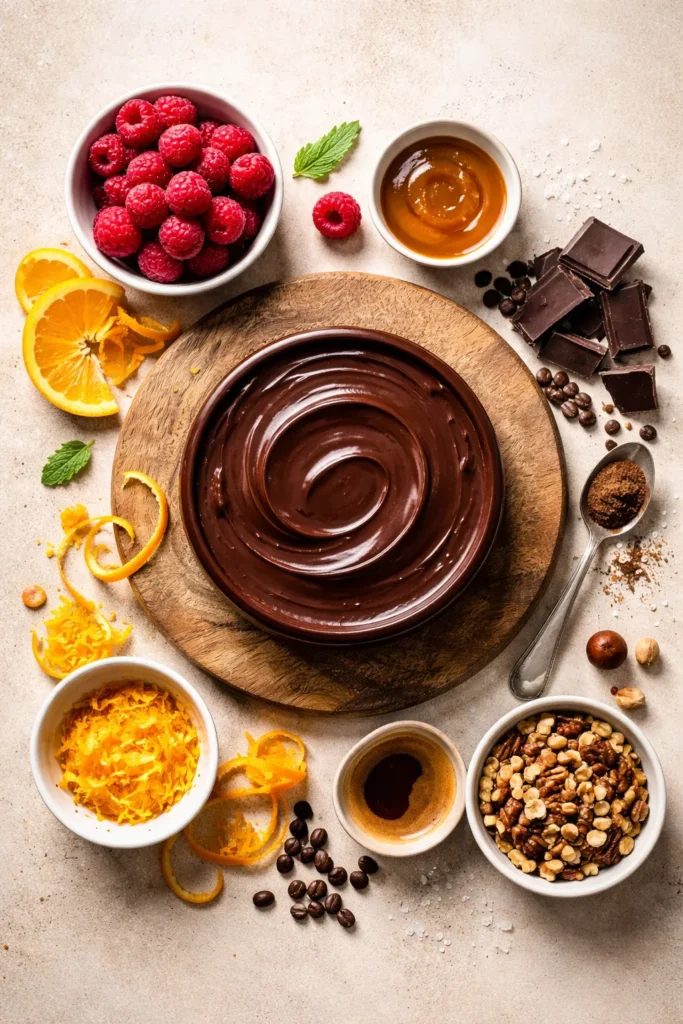
Orange and Dark Chocolate: Add 1½ tablespoons of finely grated orange zest to the dry ingredients for a sophisticated citrus-chocolate combination. The brightness of orange plays beautifully against dark chocolate’s intensity.
Raspberry Layer: Spread a thin layer of raspberry jam between the cake layers before adding the ganache. Or layer fresh raspberries between the ganache and cake for fresh-fruit contrast.
Espresso Intensifier: Dissolve 1–2 teaspoons of instant espresso powder in the hot coffee before adding to the batter. This deepens the chocolate flavor even further for espresso-lovers.
Salted Caramel Drizzle: After the ganache sets, drizzle homemade or store-bought salted caramel over the top. The salty-sweet combination is irresistible.
Nutty Variation: Toast 1 cup of chopped hazelnuts, almonds, or pecans in a dry skillet over medium heat until fragrant, about 5 minutes. Fold them into the batter just before baking, or press them into the ganache on the sides of the frosted cake for a textural element.
Cookies and Cream: Crush 8–10 chocolate sandwich cookies into pieces and fold them into the batter. Or press crushed cookies into the ganache around the edges of the finished cake.
Whipped Ganache Option: If you prefer a lighter frosting, cool the ganache to room temperature, then whip it with an electric mixer until it reaches the consistency of mousse. The extra air transforms the texture from dense to fluffy while maintaining chocolate flavor.
Dairy-Free Version: Substitute the heavy cream with full-fat coconut cream (the thick part from a can of coconut milk, not coconut milk beverage). Use dairy-free butter in the ganache, and substitute buttermilk with soy milk mixed with lemon juice or vinegar. The cake will be slightly different but still delicious.
Storage and Make-Ahead Guide
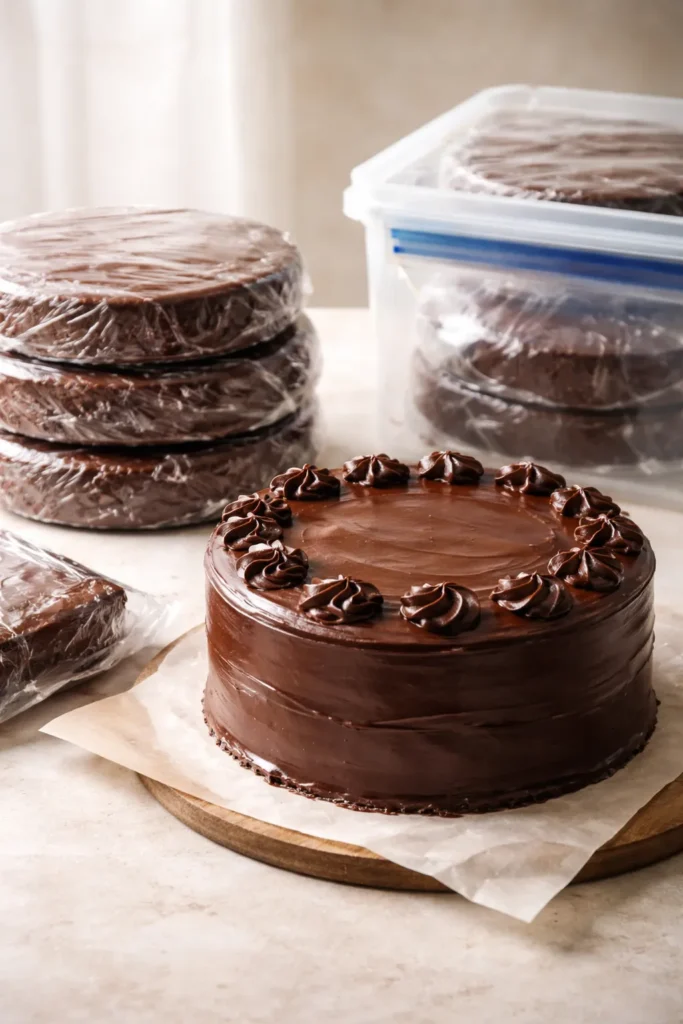
Unfrosted Cake Layers: Cooled, wrapped cake layers keep beautifully in the refrigerator for up to 3 days or in the freezer for up to 3 weeks. Wrap each layer individually in plastic wrap, then foil. Thaw at room temperature for 1–2 hours before frosting. Some bakers prefer to frost frozen or chilled layers because they’re less crumbly and easier to handle.
Frosted Cake: An assembled, ganache-frosted cake keeps at room temperature (60–70°F) for up to 2 days, covered loosely with plastic wrap. In warmer kitchens, refrigerate and bring to room temperature before serving. A refrigerated cake keeps for up to 5 days. The ganache will firm up when cold, but the cake moisture actually improves over time as flavors meld.
Freezer Storage: Wrap the completely frosted cake tightly in plastic wrap, then foil, and freeze for up to 1 month. Thaw in the refrigerator overnight, then bring to room temperature (1–2 hours) before serving.
Simple Syrup for Moisture: For cakes that will be stored in the refrigerator or frozen, brush the cooled cake layers with simple syrup (equal parts sugar and water, heated until the sugar dissolves, then cooled) before frosting. This adds back moisture that might otherwise be lost to the cold air. Use about 2 tablespoons per layer.
Ganache Storage: Made ganache keeps in an airtight container in the refrigerator for up to 1 week. It can also be frozen for up to 3 months. Reheat gently in the microwave at 15-second intervals, stirring between increments, until pourable again.
Serving Suggestions and Pairings
The Perfect Pairing: Serve this cake with cold milk, strong coffee, or a glass of red wine. The richness of the cake pairs beautifully with these beverages.
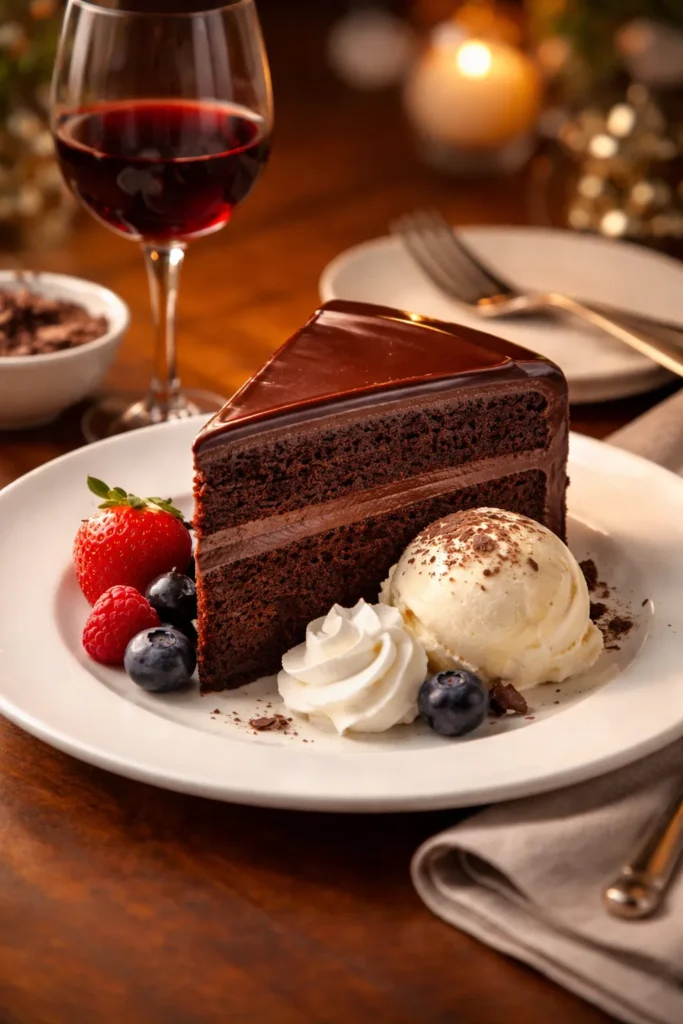
Elegant Plating: For special occasions, dust the plate with cocoa powder or powdered sugar before placing a slice. Add fresh berries, a quenelle of whipped cream, or a small scoop of vanilla ice cream beside the slice. Garnish the slice itself with a chocolate curl, fresh mint, or a berry.
Temperature Matters: Serve at room temperature for the creamiest ganache and most tender cake. If you’re removing the cake from the refrigerator, allow it 1–2 hours to come to room temperature before slicing and serving.
Cutting the Perfect Slice: Use a sharp, thin-bladed knife dipped in hot water and wiped dry before each cut. This prevents the ganache from sticking to the blade and creates clean edges. Dip the knife as needed between cuts.
Accompaniments: Fresh whipped cream, vanilla ice cream, or a scoop of chocolate ice cream makes the slice even more special. A small glass of dessert wine or afterdinner liqueur complements the chocolate beautifully.
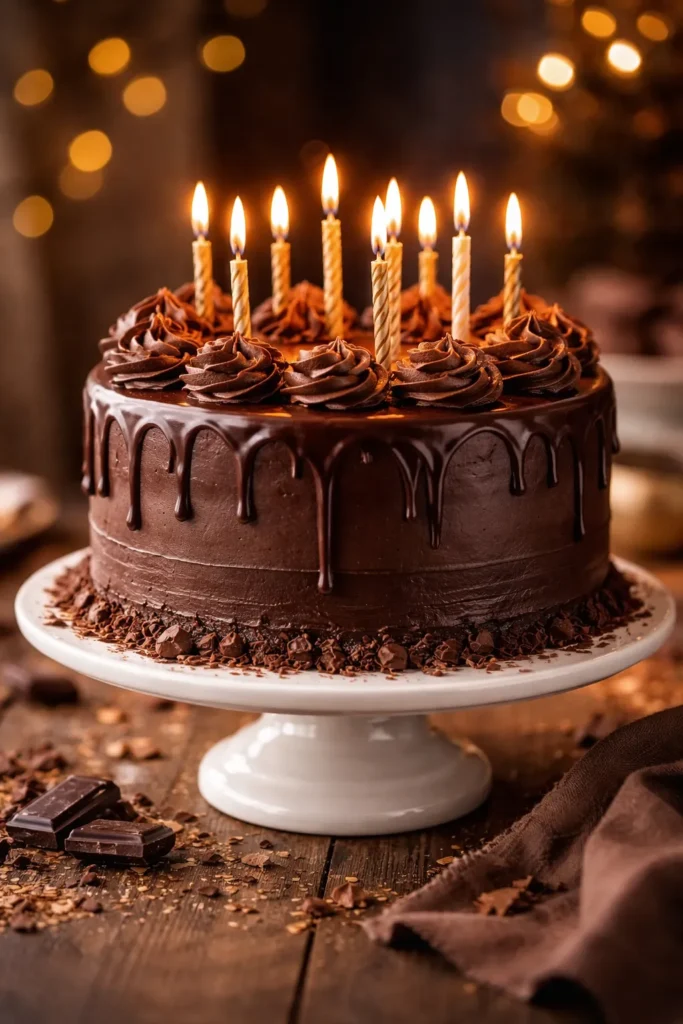
Make It a Celebration: Arrange fresh berries on top of the finished cake before serving. Light birthday candles in the ganache. Take a photo before anyone cuts into it—this cake is as beautiful as it is delicious.
Troubleshooting Common Issues
The Cake Came Out Dry: The most common cause is overbaking. Start checking at 33 minutes; the cake is done when a toothpick has just a few moist crumbs, not when it’s bone-dry. Using room-temperature ingredients also helps. If you baked correctly but the cake still feels dry, ensure you’re wrapping the cooled layers immediately to trap steam, and allow them to sit wrapped overnight before frosting.
The Ganache is Too Thick: Add cream 1 tablespoon at a time and reheat gently in the microwave until it reaches proper spreading consistency. Alternatively, let it sit at room temperature and stir occasionally—it will gradually thin out.
The Ganache is Too Thin and Won’t Set: Refrigerate for 15–30 minutes, stirring occasionally, until it thickens to yogurt consistency. Or add more finely chopped chocolate and reheat until melted and smooth.
The Cake Layers Crumbled When I Unmolded Them: This usually means the cake came out of the pan while still too warm. Let the cakes rest in their pans for the full 15–20 minutes next time. If you do crack a layer, don’t panic—use it as the bottom layer and cover any imperfections with ganache and frosting.
Air Bubbles in the Ganache: Tap the filled bowl gently on the counter, or run a thin knife through the surface and let it settle. These are purely cosmetic and don’t affect taste.
The Cake Layers Are Domed on Top: This is normal with 8-inch pans. Use a serrated knife to trim a thin layer off the top of each cooled cake. These trimmed scraps are perfect for the baker’s snack.
The Layers Slid When I Stacked Them: Use a cake strip or leveling layer to stabilize the bottom layer before stacking. Or place a small dollop of ganache in the center of the bottom layer before topping with the second layer—this acts as edible glue.
Final Thoughts
A rich chocolate ganache cake isn’t just dessert—it’s a statement that someone is worth the time and care required to make something from scratch. The beautiful part is that despite its impressive appearance, this cake is actually within reach of any home baker willing to pay attention to a few fundamentals: quality ingredients, proper mixing technique, accurate oven temperature, and patience allowing the ganache to set correctly.
The first time you make this cake, you might feel slightly nervous. The second time, you’ll feel confident. By the third time, you’ll be making variations and impressing everyone who tastes it. That’s the sign of a truly great recipe—it’s accessible enough for beginners but sophisticated enough to keep you engaged and experimenting for years.
Whether you’re celebrating a milestone birthday, honoring someone special, or treating yourself, this chocolate ganache cake says everything you need it to say: “You matter. This moment matters. And you deserve something truly delicious.” Slice into that beautiful chocolate ganache, watch it catch the light, take a bite of the moist, tender cake, and taste exactly why homemade cakes are worth the effort.