There’s something profoundly comforting about the aroma of a perfectly roasted chicken wafting through your home on a cold winter evening. The golden, crispy skin crackling under your knife, the tender, juicy meat falling off the bone, and the warmth that spreads through your kitchen—this is the magic that a well-executed roast chicken brings to your table. When it comes to creating the ultimate winter roast chicken, few approaches capture the essence of cozy, nourishing home cooking quite like the method inspired by Chelsea Winter, New Zealand’s beloved food writer and MasterChef winner whose recipes have transformed countless home kitchens.

Chelsea Winter has built her reputation on creating accessible, flavor-packed recipes that celebrate fresh ingredients and straightforward techniques, making gourmet-quality meals achievable for everyday cooks. Her philosophy centers around generosity with flavor, using whole, natural ingredients, and bringing people together around the table—principles that shine brilliantly in her approach to roast chicken. This comprehensive guide will walk you through everything you need to know about creating the ultimate Chelsea Winter-style roast chicken that will become your go-to centerpiece for family dinners, special occasions, or simply when you crave something soul-satisfying and delicious.
Table of Contents
- Who Is Chelsea Winter and Why Her Roast Chicken Recipe Matters
- Essential Ingredients for the Perfect Chelsea Winter-Style Roast Chicken
- Preparing Your Chicken: The Foundation of Success
- Starting With a Clean, Dry Bird
- Seasoning From the Inside Out
- The Butter Massage Technique
- Setting Up Your Roasting Pan
- The Chelsea Winter Method: Step-by-Step Roasting Process
- Flavor Enhancers and Secret Ingredients That Make the Difference
- Troubleshooting Common Roast Chicken Problems
- Serving Suggestions and Accompaniments
- Making the Most of Leftovers
- Final Words
Who Is Chelsea Winter and Why Her Roast Chicken Recipe Matters
Chelsea Winter emerged as a household name in New Zealand after winning MasterChef New Zealand in 2011, but her influence extends far beyond reality television success. She has authored multiple bestselling cookbooks, runs a thriving blog, and has cultivated a devoted following of home cooks who appreciate her down-to-earth approach to creating restaurant-quality food at home.
What sets Chelsea’s cooking philosophy apart is her unwavering commitment to using real, wholesome ingredients without unnecessary complications. She champions the idea that exceptional food doesn’t require exotic ingredients or professional training—just quality basics, proper technique, and a generous hand with flavor. Her recipes consistently deliver reliable results because they’re thoroughly tested and refined based on feedback from real home cooks facing real kitchen challenges.
When it comes to roast chicken specifically, Chelsea’s approach embodies everything that makes her cooking special. She understands that a perfectly roasted chicken is more than just a meal; it’s a cornerstone of practical home cooking that feeds a family beautifully, creates minimal waste through leftover versatility, and delivers maximum flavor with relatively minimal effort. Her method focuses on building layers of flavor through strategic seasoning, using aromatics effectively, and employing roasting techniques that ensure crispy skin and succulent meat every single time.
The Chelsea Winter approach to roast chicken also reflects a distinctly New Zealand sensibility—celebrating seasonal produce, embracing hearty, warming flavors perfect for cold weather, and creating dishes that bring people together. This isn’t fussy food meant to impress critics; it’s generous, honest cooking designed to nourish and delight the people you care about most. That authenticity resonates with home cooks worldwide who seek recipes they can trust to deliver consistently excellent results.
Essential Ingredients for the Perfect Chelsea Winter-Style Roast Chicken
Creating an exceptional roast chicken begins long before you turn on your oven—it starts with selecting the right ingredients. This section outlines everything you’ll need to execute the ultimate Chelsea Winter-inspired roast chicken that delivers on flavor, texture, and that unmistakable comfort factor.
The Foundation: Choosing Your Chicken
The star of this dish deserves careful consideration. Ideally, select a whole chicken weighing between 1.6 to 2 kilograms (approximately 3.5 to 4.5 pounds), which provides the perfect balance for cooking evenly while serving four to six people generously. Free-range or organic chickens offer superior flavor and texture, with meat that’s more flavorful and skin that crisps beautifully. While these options cost more, the investment pays dividends in the final result. Look for chickens with plump breasts, unblemished skin, and a fresh smell—avoid any with discoloration or off odors.
The size matters significantly because larger birds risk drying out before the interior cooks through, while smaller chickens may cook too quickly, preventing proper skin crisping. A medium-sized bird in the recommended range allows sufficient time for the fat to render, the skin to achieve that coveted golden-brown crackle, and the meat to remain succulent throughout. If purchasing from a butcher, ask about the chicken’s age and diet, as younger birds (often called “roasters”) provide more tender meat ideal for this cooking method.
Aromatics and Flavor Builders
The aromatic foundation of Chelsea Winter-style roast chicken creates depth and complexity that permeates every bite. Fresh herbs are non-negotiable—specifically, you’ll need several sprigs of fresh thyme and rosemary, which withstand the high heat of roasting while infusing the meat with earthy, fragrant notes. Fresh sage leaves add a slightly peppery, warming quality particularly suited to winter cooking. Don’t substitute dried herbs here; fresh herbs provide moisture, fragrance, and complexity that dried versions simply cannot match.
A whole bulb of garlic, separated into cloves but left unpeeled, adds sweet, mellow garlic flavor as the cloves roast alongside the chicken. One or two lemons serve multiple purposes—their juice brightens the overall flavor profile, cutting through richness, while the rinds add citrus oils and aromatic compounds. A large onion, quartered, provides sweetness and helps create a flavorful base that contributes to pan juices and eventual gravy. These aromatics work synergistically, each component enhancing the others while complementing the natural flavor of the chicken.
Essential Pantry Staples and Fats
Quality butter stands central to achieving Chelsea Winter’s signature richness and golden color. You’ll need approximately 100 grams (about 7 tablespoons) of butter at room temperature, which you’ll work under the skin and rub over the exterior. The butter serves multiple functions: it bastes the meat from within as it melts, adds richness and flavor, and promotes even browning of the skin. Choose unsalted butter so you can control the seasoning precisely.
Extra virgin olive oil provides additional fat for crisping and flavor—you’ll need about three to four tablespoons. High-quality sea salt or flaky salt and freshly ground black pepper are essential for proper seasoning; never skimp on these basics. Optional but highly recommended additions include a tablespoon of honey or maple syrup to promote caramelization, a splash of white wine or chicken stock for the roasting pan to create flavorful pan juices, and perhaps some smoked paprika or dried chili flakes if you enjoy a subtle warmth.
Supporting Vegetables for Roasting
Winter root vegetables transform a simple roast chicken into a complete meal while contributing to the overall flavor symphony. Carrots, parsnips, and potatoes are classic choices that roast beautifully alongside the chicken, absorbing the rendered fat and pan juices. Cut these vegetables into similar-sized pieces—about 4-5 centimeter chunks—to ensure even cooking. The vegetables not only provide delicious accompaniments but also create a natural roasting rack that elevates the chicken slightly, promoting air circulation for crispier skin.
Other excellent vegetables to consider include sweet potato, kumara (a New Zealand favorite), beetroot, or turnips. Brussels sprouts or cauliflower florets can be added during the final 30 minutes of roasting. These vegetables should be tossed with olive oil, salt, pepper, and perhaps some honey before arranging around the chicken. They’ll emerge from the oven caramelized, tender, and infused with all the delicious flavors from the roasting process.
Preparing Your Chicken: The Foundation of Success
Proper preparation separates mediocre roast chicken from truly exceptional results. This critical phase establishes the foundation for crispy skin, juicy meat, and maximum flavor penetration. Taking time with these preparatory steps pays enormous dividends once your chicken emerges from the oven.
Starting With a Clean, Dry Bird
Begin by removing your chicken from the refrigerator at least 30 to 45 minutes before you plan to cook it, allowing it to come closer to room temperature. This seemingly minor step significantly impacts cooking evenness—a cold chicken placed directly into a hot oven will cook unevenly, with the exterior potentially overcooking before the interior reaches safe temperatures. Remove any giblets, neck, or other organs from the cavity, which you can save for making stock later.
Thoroughly pat the chicken dry using paper towels, paying particular attention to the cavity interior and all skin surfaces. Moisture is the enemy of crispy skin—any water on the surface will need to evaporate before browning can begin, extending cooking time and potentially resulting in steamed, rubbery skin rather than the crispy, golden exterior you’re after. Some cooks even place the dried chicken on a wire rack set over a plate and refrigerate it uncovered for several hours or overnight, which further dries the skin for maximum crispiness. This technique, while optional, delivers notably superior results.
Seasoning From the Inside Out
Generously season the cavity with salt and pepper—this is your opportunity to flavor the meat from within. Stuff the cavity with aromatics: half a lemon (or a whole lemon if using a larger bird), several sprigs each of thyme and rosemary, a few sage leaves, and three or four garlic cloves. These aromatics release their essential oils and flavors as they heat, essentially steaming the chicken from within while imparting subtle fragrance throughout the meat.
Don’t pack the cavity too tightly; aromatics need space to release their flavors effectively. Some cooks add a quartered onion to the cavity as well, though others prefer to reserve the onion for the roasting pan. If your chicken came with twine to truss the legs, use it; otherwise, tying the legs together with kitchen string helps the chicken cook more evenly and presents more attractively. Tucking the wing tips under the body prevents them from burning and creates a more compact shape.
The Butter Massage Technique
This step defines the Chelsea Winter approach and creates the signature golden, crispy skin with incredibly moist meat underneath. Take your softened butter and work it into a paste with some finely chopped fresh herbs (thyme leaves, rosemary, sage), minced garlic, salt, pepper, and a touch of lemon zest. This compound butter becomes your secret weapon for flavor.
Carefully work your fingers between the skin and the breast meat, creating pockets without tearing the skin. This requires gentle persistence—start at the cavity end and work upward and outward, loosening the skin across both breasts and down toward the thighs if possible. Take approximately two-thirds of your herb butter and spread it evenly under the skin, directly onto the meat. This placement allows the butter to baste the breast meat from the outside in as it melts, preventing dryness while infusing herb flavor directly into the meat.
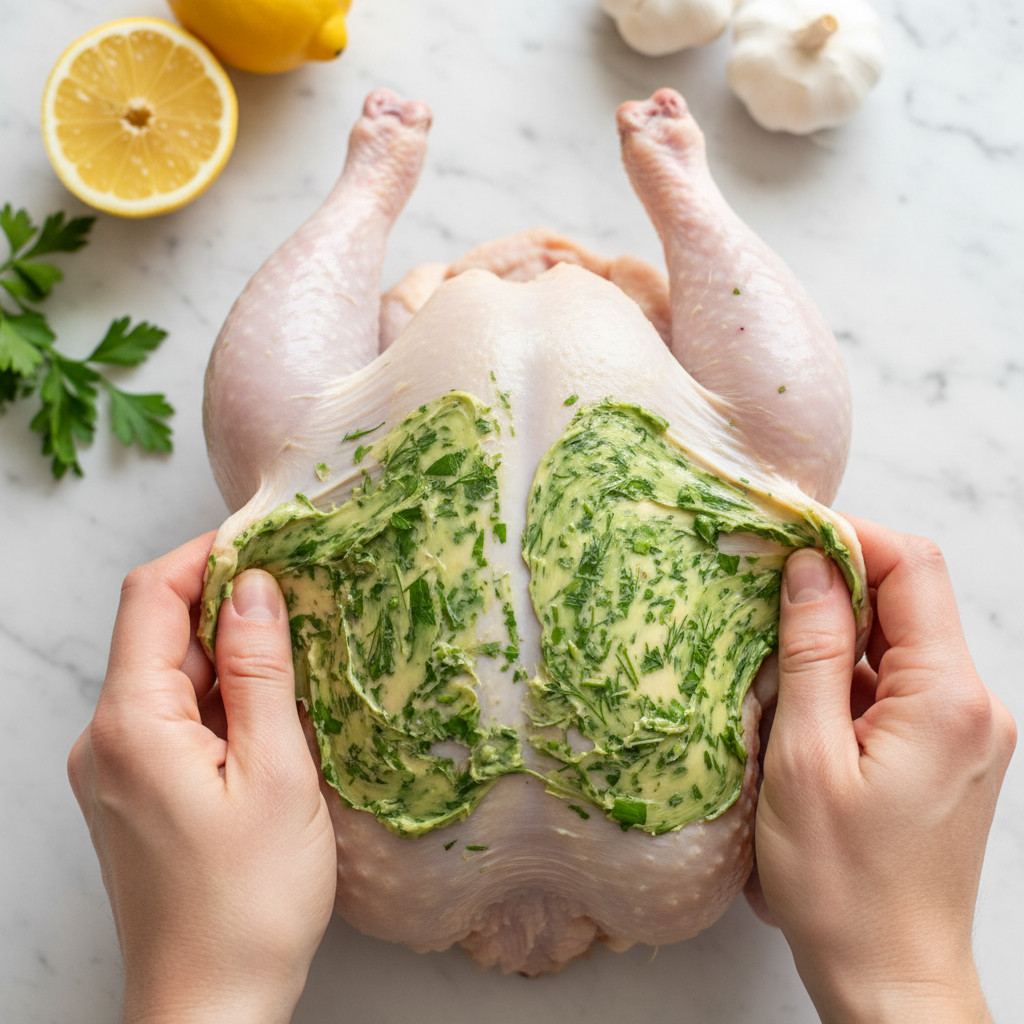
Use the remaining butter to thoroughly coat the outside of the chicken, massaging it into every surface. This external butter layer promotes browning and crisping while adding rich flavor. Some recipes call for olive oil on the exterior instead, which also works well, but butter provides superior flavor and color. Season the exterior generously with additional salt and pepper—the chicken should look well-seasoned, almost heavily so, as some seasoning will fall off during cooking.
Setting Up Your Roasting Pan
Your roasting setup significantly impacts the final result. Choose a heavy roasting pan or cast-iron skillet large enough to accommodate the chicken and vegetables without crowding. Crowding creates steam rather than roasting, resulting in less caramelization. If making a complete meal, arrange your prepared vegetables in the pan, tossed with olive oil, salt, and pepper, then nestle the chicken on top. The vegetables create a natural roasting rack.
Alternatively, place the chicken on a roasting rack set within the pan, which promotes even air circulation for crisper skin all around. Add about half a cup of chicken stock, white wine, or water to the bottom of the pan—this liquid prevents drippings from burning and creates the foundation for gravy. Tuck a few extra herb sprigs, garlic cloves, and perhaps some quartered onion around the chicken. Your preparation is now complete, and you’re ready for the actual roasting process.
The Chelsea Winter Method: Step-by-Step Roasting Process
This section walks you through the precise cooking process that delivers restaurant-quality roast chicken in your home oven. Following these steps carefully ensures perfectly cooked meat with crackling, golden skin every time.
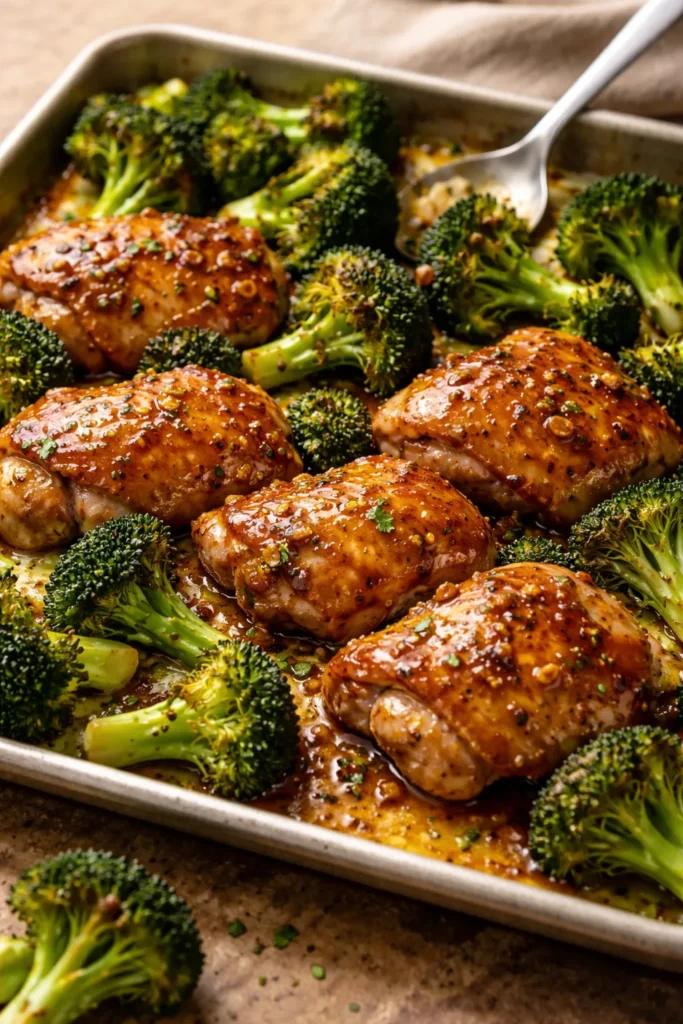
1. The High-Heat Start for Ultimate Crispy Skin
Preheat your oven to 220°C (425°F) or 200°C fan-forced (400°F fan). This high initial temperature is crucial for rendering fat quickly and beginning the crisping process. Once your oven reaches temperature, place your prepared chicken breast-side up in the center of the oven. The immediate blast of high heat causes the skin to tighten and begin crisping while sealing in juices. You should hear a gentle sizzling within minutes—this is the sound of fat rendering and moisture evaporating from the skin surface.
Roast at this high temperature for approximately 20-25 minutes. During this period, the skin develops its initial golden color and begins its transformation to crispy perfection. The high heat also creates rapid surface browning through the Maillard reaction, developing complex, savory flavors. Resist the urge to open the oven door during this phase, as temperature drops interrupt the crisping process. The kitchen will fill with an incredible aroma as the butter, herbs, and chicken begin working their magic together.
This initial high-heat phase essentially “sets” the exterior, much like searing a steak. The rapid temperature jump causes proteins on the surface to coagulate quickly, creating a barrier that helps retain moisture within the meat. Meanwhile, the high heat rapidly renders the fat deposits between skin and meat, allowing that liquid fat to baste the meat while creating space between skin and flesh, which contributes to crispiness.
2. Reducing Temperature for Even, Gentle Cooking
After the initial high-heat period, reduce your oven temperature to 180°C (350°F) or 160°C fan-forced (320°F fan). This lower temperature allows the interior to cook through gently without the exterior burning or drying out. Continue roasting for approximately 45-60 minutes longer, depending on your chicken’s size. As a general guideline, calculate about 20 minutes per 500 grams (per pound), plus an additional 20 minutes.
During this phase, the gentler heat allows collagen in the meat to break down slowly, creating tender, succulent texture while preventing the breast meat from drying out. The internal temperature gradually rises toward the safe minimum of 74°C (165°F) in the thickest part of the thigh. The lower temperature also prevents the vegetables from burning while allowing them sufficient time to roast until tender and caramelized.
This two-temperature approach is key to achieving the ideal combination of crispy skin and juicy meat. Many home cooks make the mistake of roasting at a constant moderate temperature throughout, which either results in pale, flabby skin with properly cooked meat, or beautifully crispy skin with overcooked, dry meat. The high-then-low method solves this dilemma by addressing skin and meat separately with appropriate temperatures for each.
3. Basting for Enhanced Flavor and Moisture
Every 20-25 minutes during the lower-temperature phase, remove the chicken from the oven and baste it with the pan juices that have accumulated at the bottom. Use a large spoon or bulb baster to scoop up the butter, rendered fat, and juices, then drizzle them over the chicken’s surface, particularly the breast area. This basting serves multiple purposes: it redistributes flavor, adds moisture to any drying areas, and promotes even browning.
The pan juices contain rendered chicken fat, melted herb butter, aromatics, and the beginning of caramelized fond from the vegetables—essentially, a concentrated flavor bomb that you’re using to continuously enhance the chicken’s exterior. Each basting adds another layer of flavor while helping achieve that coveted deep golden-brown color. Work quickly during basting to minimize oven temperature loss, and always remember to close the oven door promptly.

Some cooks add a tablespoon of honey or maple syrup to the pan juices halfway through cooking, which adds subtle sweetness and promotes additional caramelization. If the vegetables around the chicken appear dry, toss them briefly during basting to coat them in the flavorful juices. If any parts of the chicken are browning too quickly, tent that area loosely with aluminum foil to slow browning while the remainder catches up.
4. Testing for Perfect Doneness
Proper doneness testing is non-negotiable for both safety and quality. The most reliable method uses an instant-read meat thermometer inserted into the thickest part of the thigh without touching bone. The chicken is perfectly done when this area reaches 74-76°C (165-170°F). The thigh takes longest to cook, so if it’s at temperature, the rest of the bird will be safe as well. Some prefer the breast at exactly 74°C for maximum juiciness, while others prefer the thigh closer to 76-77°C for fuller breakdown of connective tissue.
Visual cues also indicate doneness: the juices should run clear (not pink) when you pierce the thigh, the legs should wiggle loosely in their sockets, and the skin should be deeply golden brown and crispy. If you don’t have a thermometer, pierce the thickest part of the thigh with a skewer—the juices should run clear or with just a hint of yellow from fat, never pink. When you gently pull on a drumstick, it should feel loose and ready to separate.
Once your chicken reaches proper temperature, remove it from the oven immediately and transfer it to a cutting board or serving platter, leaving the vegetables in the pan if you’re still roasting them. Tent the chicken loosely with aluminum foil and let it rest for at least 15-20 minutes before carving. This resting period is absolutely crucial—it allows the juices, which have been driven toward the center by heat, to redistribute throughout the meat. Cutting immediately causes all those flavorful juices to run out onto the cutting board instead of staying in the meat where they belong.
Flavor Enhancers and Secret Ingredients That Make the Difference
While the basic method delivers excellent results, certain additions and techniques elevate your roast chicken from very good to truly extraordinary. These flavor enhancers reflect Chelsea Winter’s philosophy of building depth through layered, complementary ingredients.
Herb Butter Variations
Beyond the classic thyme-rosemary-sage combination, experiment with different herb butter profiles to keep your roast chicken exciting. A Mediterranean variation might include oregano, basil, and sun-dried tomatoes mixed into the butter along with some finely grated Parmesan. An Asian-inspired version could incorporate finely grated ginger, garlic, and a touch of sesame oil (use less butter and supplement with neutral oil). A French-style herb butter might include tarragon, chives, and a hint of Dijon mustard worked into softened butter.
For special occasions, consider adding truffle oil or finely chopped truffle to your herb butter—a small amount goes far, creating an incredibly luxurious flavor. Compound butters can be prepared days in advance, rolled into logs using plastic wrap, and refrigerated or frozen until needed. This makes preparation even easier when you’re ready to roast your chicken.
Citrus Elements for Brightness
While lemon is traditional and excellent, other citrus fruits add intriguing dimensions. Try stuffing the cavity with orange quarters along with herbs—orange’s sweetness complements the savory elements beautifully while adding complex aromatics. Blood oranges, when in season, add visual appeal along with slightly berry-like notes. Lime works wonderfully if you’re incorporating Asian flavors into your herb butter.
Consider making a citrus glaze to brush over the chicken during the final 15 minutes of roasting: combine citrus juice with honey, a touch of soy sauce, and some fresh grated ginger. This glaze caramelizes beautifully, creating a slightly sticky, intensely flavorful coating that takes your roast chicken in an entirely different direction while maintaining the crispy skin and juicy meat fundamentals.
Wine and Stock for Exceptional Pan Juices
The liquid you add to your roasting pan significantly impacts the final flavor of your pan juices and eventual gravy. White wine adds acidity and complexity, helping to deglaze the flavorful fond that develops on the pan bottom. Choose something you’d actually drink—an unoaked Chardonnay or Sauvignon Blanc works beautifully. The alcohol evaporates during roasting, leaving behind concentrated flavor.
Chicken stock or bone broth adds savory depth and body to pan juices. For even richer results, use half wine and half stock. Add a splash of balsamic vinegar for a subtle sweet-tart complexity, or a tablespoon of whole grain mustard for peppery notes. These liquids shouldn’t completely cover the vegetables—about half a cup to a cup is sufficient. Too much liquid creates steaming rather than roasting.
Unexpected Flavor Boosters
Several less obvious ingredients can elevate your roast chicken dramatically. A couple of anchovy fillets tucked under the skin alongside the herb butter dissolve completely during cooking, leaving no fishy taste but adding incredible savory depth through natural glutamates. Similarly, a tablespoon of miso paste worked into your herb butter adds umami richness and complexity.
Smoked paprika rubbed over the skin provides a subtle smoky note reminiscent of rotisserie chicken. Fresh bay leaves, either stuffed in the cavity or tucked under the skin, contribute aromatic complexity. A whole head of roasted garlic alongside the chicken becomes a spreadable, sweet condiment perfect for smearing on bread or whisking into gravy. These small additions require minimal extra effort but deliver outsized flavor returns.
Troubleshooting Common Roast Chicken Problems
Even experienced cooks occasionally encounter challenges when roasting chicken. Understanding these common issues and their solutions ensures consistent success with every bird you prepare.
Solving the Dry Breast Meat Dilemma
Dry breast meat is perhaps the most common roast chicken complaint, occurring when the delicate white meat overcooks before the thighs reach safe temperature. The herb butter under the skin technique specifically addresses this issue by creating an internal basting system, but additional strategies help. First, ensure you’re not overcooking—use a reliable thermometer and remove the chicken when breast meat reaches 74°C (165°F). Remember that temperature will rise another few degrees during resting.
Consider spatchcocking (butterflying) your chicken for more even cooking—this technique, where you remove the backbone and flatten the bird, allows both breasts and thighs to cook at similar rates. While not traditional, spatchcocked birds roast more quickly and evenly. Another approach involves starting the chicken breast-side down for the first 20 minutes, then flipping it breast-side up for the remainder of cooking. This protects the delicate breast meat while the thighs, which require higher temperatures, receive direct heat initially.
Brining your chicken for 4-6 hours before roasting dramatically increases moisture retention through salt’s protein-altering effects. A simple brine of water, salt, sugar, and aromatics helps the meat retain moisture even if slightly overcooked. If you consistently struggle with dry breast meat despite proper technique, you might be purchasing chickens that have been pre-brined or “enhanced” with solution, which paradoxically can result in drier meat as the added water steams the flesh during cooking.
Achieving Truly Crispy Skin
Rubbery or tough chicken skin disappoints after all your effort. This issue almost always traces to excess moisture or insufficient heat. As mentioned earlier, thoroughly drying the skin before seasoning is foundational. For even better results, dry-brine your chicken by salting it generously and leaving it uncovered in the refrigerator for 12-24 hours. The salt draws out moisture, which then gets reabsorbed along with the salt, while the cold, dry refrigerator air desiccates the skin surface.
Ensure your oven temperature is accurate—invest in an oven thermometer, as many ovens run 10-25 degrees cooler than their settings indicate. If your skin isn’t crisping adequately, finish the fully-cooked chicken under the broiler for 3-5 minutes, watching carefully to prevent burning. The intense direct heat rapidly crisps any remaining soft spots. Some cooks dust the skin lightly with baking powder before roasting, which elevates pH and promotes browning, though this isn’t necessary with proper technique.
Avoid covering the chicken with foil during roasting except to protect specific areas that are over-browning. Covering creates steam, which directly opposes your crispy-skin goals. Using a roasting rack elevates the chicken, allowing heat circulation on all sides, which promotes even crisping. Finally, ensure you’re not overcrowding the roasting pan—vegetables packed too tightly create excess steam that softens skin.
Fixing Uneven Cooking and Cold Spots
Sometimes chicken cooks unevenly, with some areas done while others remain undercooked. This often results from starting with a cold bird, placing it too close to oven walls, or using an oven with significant hot spots. Always bring chicken to room temperature before roasting, and position the roasting pan in the center of the oven, away from walls and heating elements.
Rotate the pan 180 degrees halfway through cooking to compensate for oven hot spots. If wings or legs are cooking too quickly, shield them with small pieces of foil while the remainder catches up. Conversely, if thighs are lagging behind, arrange them facing the back of the oven where most ovens concentrate heat. Using a convection (fan-forced) setting, if available, promotes more even cooking by continuously circulating hot air, though you’ll need to reduce temperature by 20°C (25°F) from conventional settings.
Salvaging Burnt or Bland Elements
If your vegetables burn before the chicken finishes cooking, remove them to a separate dish and keep warm while the chicken completes roasting. Next time, add quick-cooking vegetables like Brussels sprouts later in the process, or cut vegetables larger so they take longer to cook through. If vegetables seem bland, they likely weren’t seasoned adequately or didn’t receive enough contact with the flavorful pan juices—ensure vegetables are well-coated with oil and seasoning before roasting, and toss them occasionally during cooking.
If the chicken skin burns before the interior cooks through, your oven temperature is too high or you’re roasting too close to the heating element. Lower the temperature and tent burnt areas with foil. If the overall flavor seems bland despite following instructions, you likely underseasoned—chicken requires generous seasoning to taste properly. Salt the bird more liberally next time, ensuring you season both the cavity and exterior thoroughly.
Serving Suggestions and Accompaniments
A beautifully roasted chicken deserves complementary sides, sauces, and presentation that showcase your efforts while creating a memorable meal experience.
Creating Exceptional Pan Gravy
Transform your flavorful pan drippings into restaurant-quality gravy with minimal effort. After removing the chicken and vegetables from the pan, place the pan over medium heat on your stovetop. If there’s excessive fat, spoon most of it off, leaving about two tablespoons. Sprinkle two tablespoons of flour into the pan and whisk it into the fat and drippings, creating a roux. Cook this mixture for one to two minutes until it smells slightly nutty and turns light golden.
Gradually add two cups of chicken stock, whisking constantly to prevent lumps, then bring to a simmer. Scrape up all the caramelized bits stuck to the pan bottom—these contain concentrated flavor. Simmer the gravy for five to seven minutes until it thickens to your desired consistency, then season with salt, pepper, and perhaps a splash of cream or a knob of butter for richness. Strain through a fine-mesh sieve if you prefer perfectly smooth gravy, or leave it rustic with all those flavorful bits. Fresh herbs stirred in at the end add color and brightness.
Perfect Side Dishes for Winter Roast Chicken
The vegetables roasted alongside your chicken form an excellent foundation, but additional sides round out the meal beautifully. Creamy mashed potatoes or cauliflower mash provide comforting richness that pairs perfectly with roast chicken and gravy. A simple green salad with a tangy vinaigrette offers refreshing contrast to the rich main course, cleansing the palate between bites.
For something distinctly wintery and special, consider making a root vegetable gratin with cream, cheese, and thyme, or prepare roasted Brussels sprouts with bacon and balsamic glaze. Fresh, crusty bread is essential for mopping up every drop of those precious pan juices and gravy. A simple coleslaw with a light dressing adds crunch and freshness that contrasts beautifully with the tender chicken.
Consider the meal’s overall balance—your roast chicken is rich and savory, so include at least one lighter, brighter element like steamed green beans with lemon, roasted asparagus, or a citrus-based salad. A grain-based side like wild rice pilaf, quinoa salad, or pearl barley with herbs adds texture variety and makes the meal more substantial for hearty winter appetites.
Presentation Tips for Maximum Impact
Transfer your rested chicken to a beautiful serving platter or large wooden board. Arrange the roasted vegetables around it artistically, perhaps adding some fresh herb sprigs for color. If you’ve carved the chicken, arrange the pieces attractively with breasts sliced and fanned, legs and thighs positioned prominently, and wings tucked alongside. Drizzle some of the pan juices over everything for a glossy, appetizing finish.
For family-style serving, present the whole chicken at the table before carving, allowing everyone to admire your handiwork. This moment of presentation, with the golden, crispy-skinned bird taking center stage, creates anticipation and celebration around the meal. Provide a proper carving knife and fork, and carve confidently—remove the legs first by cutting through the joint, then slice the breast meat against the grain, and separate wings at their joints.
Garnish your platter with roasted lemon halves, which guests can squeeze over their portions for brightness, and scatter some fresh herbs over everything for color and aroma. Serve the gravy in a proper gravy boat or attractive pitcher alongside the chicken. These presentation details transform a simple roast chicken into a special occasion worthy of celebration, embodying Chelsea Winter’s philosophy that food should bring joy and bring people together.
Making the Most of Leftovers
A properly roasted chicken continues giving even after the initial meal, providing delicious leftovers that extend your efforts across multiple meals while reducing waste—a principle Chelsea Winter consistently champions.
Proper Storage for Maximum Quality
Allow leftover chicken to cool to room temperature (within two hours of cooking for food safety), then remove all meat from the bones. Store the meat in airtight containers, keeping white meat separate from dark meat if possible since they have different moisture levels and optimal storage times. Properly stored, cooked chicken remains safe and delicious for three to four days in the refrigerator, or up to three months in the freezer.
Store any leftover vegetables separately in their own containers—they’ll keep for three to four days and reheat beautifully. Reserve all bones, skin scraps, and the carcass for stock-making, storing them in a large freezer bag if you’re not making stock immediately. Pour pan juices and gravy into containers as well—gravy freezes exceptionally well and provides instant flavor for future meals.
Leftover Chicken Recipe Ideas
Shredded roast chicken transforms into countless quick meals throughout the week. Make classic chicken sandwiches with mayonnaise, lettuce, and tomato, or create an elevated version with avocado, crispy bacon, and aioli on sourdough. Chicken salad, whether traditional with celery and mayo or more creative with grapes, pecans, and curry powder, provides excellent lunches served on greens, in wraps, or stuffed in tomatoes.
Repurpose leftover chicken in warm dishes like chicken fried rice, where the pre-cooked meat simply needs heating through. Create quick chicken quesadillas, tacos, or burritos with your favorite toppings. Stir leftover chicken into pasta dishes—chicken with sundried tomatoes and cream sauce over fettuccine makes an elegant, quick dinner. Add it to soups like chicken noodle, tortilla soup, or chicken and corn chowder, where it adds substance and flavor with zero additional cooking time required.
For something uniquely delicious, make Chelsea Winter-style chicken pot pie using puff pastry, leftover chicken, roasted vegetables, and a creamy sauce. Transform remaining chicken into Asian-inspired lettuce cups with hoisin sauce, ginger, and crunchy vegetables, or create a hearty chicken and vegetable frittata for breakfast or brunch. These versatile leftovers mean your initial effort in roasting the chicken provides meal solutions for days.
Transforming the Carcass Into Liquid Gold
Never discard your chicken carcass—it contains tremendous flavor and nutrition perfect for making rich, homemade stock. Place the carcass, any bones, and skin in a large pot and cover with cold water. Add roughly chopped onion, carrot, celery, a few peppercorns, a bay leaf, and perhaps some fresh herbs. Bring to a gentle simmer (never a rolling boil, which creates cloudy stock), then maintain that gentle simmer for three to four hours, skimming any foam occasionally.
Strain the finished stock through a fine-mesh sieve, discarding solids, then refrigerate. Once chilled, the fat will solidify on top, which you can scrape off if desired, though some adds flavor. This homemade stock is exponentially more flavorful than store-bought versions and contains gelatin from the bones, which gives it body and silky texture. Use it as a base for soups, risotto, gravy, or any recipe calling for chicken stock. It keeps refrigerated for five days or frozen for six months.
For even richer results, roast the carcass bones at 200°C (400°F) for 30 minutes before making stock—this additional browning creates deeper color and more complex flavor. If you want to maximize nutrition, consider making bone broth by simmering for 12-24 hours and adding a splash of vinegar to help extract minerals from the bones. This extended cooking creates a particularly gelatinous, nutrient-dense broth popular for its health benefits.
Final Words
Creating the ultimate Chelsea Winter-style roast chicken represents far more than simply following a recipe—it’s about embracing a philosophy of cooking that values real ingredients, generous flavors, practical techniques, and the profound satisfaction of feeding people you care about with food made from the heart. The method outlined in this guide brings together time-tested techniques with strategic innovations specifically designed to solve the common challenges home cooks face when roasting chicken.
The beauty of mastering roast chicken lies in its magnificent versatility. Once you’ve internalized the fundamental principles—proper seasoning, strategic use of butter and aromatics, the two-stage temperature approach, and adequate resting—you can adapt the method endlessly to suit your tastes, available ingredients, and dietary preferences. This adaptability means you’ll never tire of roast chicken because it transforms with the seasons, your mood, and whatever looks freshest at the market.
Beyond the technical skills you’ve developed, roasting chicken builds confidence in the kitchen. Successfully executing this classic dish demonstrates that you understand heat, timing, and flavor-building—foundations that transfer to countless other recipes. Each chicken you roast teaches you something new about your oven’s quirks, your preferences, and the subtle variables that distinguish good cooking from great cooking.
Remember that even experienced cooks occasionally encounter challenges—a slightly dry breast here, skin that could be crispier there. Rather than viewing these moments as failures, treat them as learning opportunities that refine your technique with each subsequent attempt. Keep notes about what worked particularly well or what you’d adjust next time. This reflective practice accelerates your development as a cook and ensures steady improvement.
The ultimate Chelsea Winter roast chicken isn’t defined by perfection; it’s defined by the warmth it brings to your table, the way it makes your home smell like comfort itself, and how it creates those precious moments of connection when everyone gathers around to share the meal you’ve prepared. In a world of increasingly complicated, fussy food trends, there’s something deeply satisfying about returning to this fundamental preparation that has nourished families for generations.
So preheat your oven, select a beautiful chicken, gather your herbs and aromatics, and embrace the process. Let the techniques outlined here guide you, but don’t be afraid to make the recipe your own. Trust your instincts, taste as you go, and most importantly, enjoy both the cooking process and the delicious results it produces. Your ultimate roast chicken awaits, ready to become a cornerstone of your cooking repertoire and a dish your loved ones request again and again, especially on those cold winter evenings when nothing else will quite satisfy.