Getting chicken perfectly cooked can feel like an art form that requires precision, patience, and a solid understanding of timing. Whether you’re a beginner in the kitchen or a seasoned home cook, knowing exactly how long to cook chicken is essential for creating meals that are both safe to eat and deliciously tender. Undercooked chicken poses serious health risks, while overcooked chicken becomes dry, rubbery, and unappetizing. The challenge is that cooking times vary dramatically depending on the cut of chicken you’re using, the cooking method you’ve chosen, and several other critical factors. This comprehensive guide will eliminate all the guesswork and provide you with precise cooking times, expert techniques, and professional insights to help you achieve perfectly cooked chicken every single time you step into the kitchen.
Table of Contents
- Understanding Chicken Cooking Times: The Fundamentals
- Why Cooking Time Matters
- Temperature vs. Time Relationship
- Safe Internal Temperature for Chicken
- USDA Guidelines and Food Safety Standards
- Using Meat Thermometers Effectively
- Cooking Times by Chicken Cut
- Chicken Breasts: Timing and Techniques
- Chicken Thighs: Dark Meat Perfection
- Whole Chicken: Complete Roasting Guide
- Chicken Wings and Drumsticks
- Cooking Times by Method
- Baking and Roasting Times
- Grilling Times and Techniques
- Pan-Frying and Sautéing Guidelines
- Slow Cooking for Tender Results
- Pressure Cooking and Instant Pot Times
- Air Frying for Crispy Chicken
- Factors That Affect Chicken Cooking Time
- Size and Thickness Variations
- Starting Temperature Considerations
- Bone-In vs. Boneless Differences
- Common Mistakes to Avoid
- Tips for Perfectly Cooked Chicken Every Time
- Final Words
Understanding Chicken Cooking Times: The Fundamentals
Before diving into specific cooking times, it’s crucial to understand the basic principles that govern how chicken cooks and why timing matters so significantly for both safety and quality.
Chicken is one of the most versatile proteins available in kitchens worldwide, but it requires careful attention to cooking times because of food safety concerns. Unlike beef or lamb, which can be safely consumed at medium-rare temperatures, chicken must be cooked thoroughly to eliminate harmful bacteria such as Salmonella and Campylobacter. These pathogens are commonly found in raw poultry and can cause severe foodborne illnesses if the chicken isn’t cooked to the proper internal temperature. Understanding cooking times isn’t just about following a recipe—it’s about comprehending how heat penetrates different cuts of meat, how thickness affects cooking duration, and how various cooking methods transfer heat differently to the protein.
The science behind chicken cooking involves heat transferring from the outside of the meat toward the center. As the protein heats up, its muscle fibers contract and moisture is expelled, which is why overcooking results in dry meat. The goal is to cook chicken just long enough to reach safe temperatures throughout while retaining as much moisture and tenderness as possible. This delicate balance requires knowledge of proper timing for each specific situation.

Why Cooking Time Matters
The importance of proper cooking time extends far beyond simply following recipe instructions. When chicken is undercooked, dangerous bacteria survive and can cause food poisoning, leading to symptoms like nausea, vomiting, diarrhea, and in severe cases, hospitalization. On the other hand, when chicken is overcooked, the proteins become overly tight and squeeze out all the natural juices, resulting in meat that’s tough, stringy, and unpalatable. The difference between perfectly cooked chicken and problematic chicken often comes down to just a few minutes.
Proper timing also affects the texture and flavor of your chicken. When cooked correctly, chicken breasts remain juicy with a tender bite, while chicken thighs develop a succulent, almost buttery texture. The Maillard reaction—the chemical process that creates browning and complex flavors—occurs at specific temperature ranges and requires adequate time. Rushing this process or extending it too long can dramatically impact the final taste and appearance of your dish.
Temperature vs. Time Relationship
While cooking times provide helpful guidelines, understanding the relationship between time and internal temperature is absolutely critical. Temperature is the ultimate indicator of doneness, while time is simply an estimate based on average conditions. Two chicken breasts of slightly different thicknesses will reach safe internal temperatures at different times, even when cooked using identical methods. This is why professional chefs and food safety experts emphasize using a meat thermometer rather than relying solely on cooking duration.
The cooking process involves heat gradually moving from the exterior toward the center of the meat. Thicker pieces require more time for heat to penetrate to the core, while thinner pieces cook more quickly. The cooking method also affects this relationship—high-heat methods like grilling cook the exterior quickly while requiring careful monitoring to ensure the interior reaches safe temperatures, whereas low-and-slow methods like braising cook more evenly throughout. Understanding this temperature-time relationship empowers you to adjust cooking times based on your specific circumstances rather than blindly following a timer.
Safe Internal Temperature for Chicken
Food safety should always be your primary concern when cooking chicken, and knowing the proper internal temperature is non-negotiable for protecting your health and that of your family.
The single most important number to remember when cooking chicken is 165°F (74°C). This is the minimum safe internal temperature that chicken must reach according to food safety authorities worldwide. At this temperature, harmful bacteria are effectively destroyed, making the chicken safe to consume. However, understanding where and how to measure this temperature, as well as the nuances around carryover cooking, will significantly improve both the safety and quality of your chicken dishes.
USDA Guidelines and Food Safety Standards
The United States Department of Agriculture (USDA) has established comprehensive guidelines for poultry cooking temperatures based on extensive research into bacterial destruction. According to these standards, all poultry—including chicken, turkey, duck, and goose—must reach an internal temperature of 165°F (74°C) to be considered safe for consumption. This temperature threshold ensures the elimination of Salmonella, Campylobacter, and other pathogens that commonly contaminate raw chicken.
It’s essential to note that this temperature applies to all parts of the chicken, including the thickest portions of the breast, the innermost part of the thigh, and the innermost part of the wing. For whole chickens, you should check the temperature in multiple locations to ensure the entire bird has reached the safe zone. Ground chicken products, such as chicken burgers or meatballs, must also reach 165°F throughout because the grinding process can distribute bacteria throughout the meat rather than keeping it on the surface.
The USDA also provides guidance on the relationship between temperature and time. While 165°F provides instant pasteurization, chicken held at lower temperatures for longer periods can also achieve safety. For example, chicken held at 150°F for approximately three minutes achieves the same bacterial reduction as chicken at 165°F. This principle is utilized in sous vide cooking and explains why some professional chefs cook chicken breasts to slightly lower temperatures when using precise temperature-controlled cooking methods.
Using Meat Thermometers Effectively
Investing in a reliable meat thermometer is one of the best decisions you can make for improving your chicken-cooking success rate. Digital instant-read thermometers provide quick, accurate readings and are essential tools for any kitchen. When using a meat thermometer, proper technique makes all the difference between accurate and misleading readings.
To check chicken temperature correctly, insert the thermometer probe into the thickest part of the meat, avoiding bones, which conduct heat differently than muscle tissue and can give false readings. For chicken breasts, insert the probe horizontally into the side of the breast, pushing it toward the center. For chicken thighs and drumsticks, insert the probe into the thickest part, making sure it reaches the center without touching bone. For whole chickens, check both the thigh and the breast, as these areas cook at different rates.
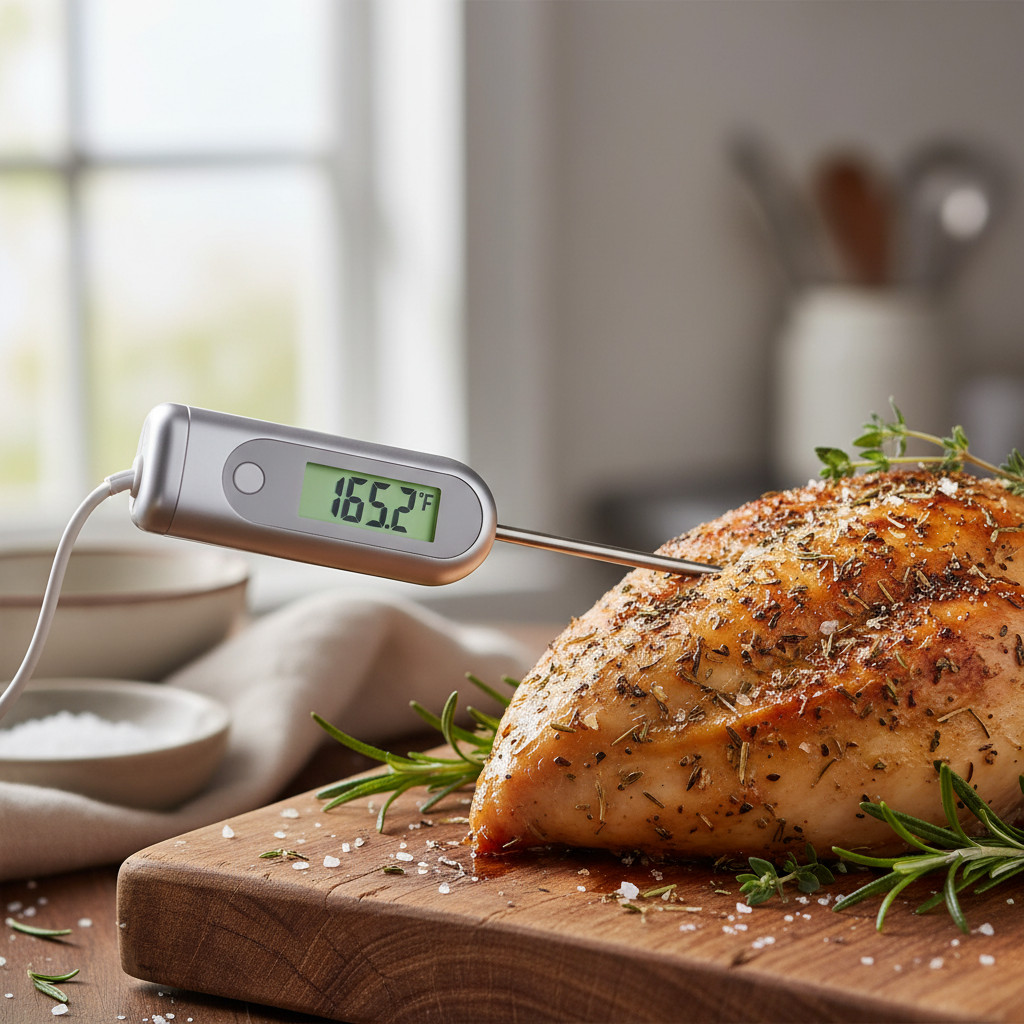
Remove the chicken from the heat source when it reaches 160-162°F (71-72°C), then let it rest for five to ten minutes. During this resting period, carryover cooking occurs as residual heat continues to raise the internal temperature by approximately 5-10 degrees. This technique prevents overcooking while still ensuring the chicken reaches the safe 165°F threshold. The resting period also allows juices to redistribute throughout the meat, resulting in more succulent, flavorful chicken.
Cooking Times by Chicken Cut
Different cuts of chicken require vastly different cooking times due to variations in size, fat content, and whether they contain bones, making it essential to understand each cut individually.
One of the most common sources of confusion when cooking chicken is that cooking times vary significantly depending on which part of the chicken you’re preparing. Chicken breasts cook at different rates than thighs, whole chickens require substantially more time than individual pieces, and bone-in cuts take longer than boneless varieties. This section provides detailed timing guidelines for each major chicken cut, helping you plan your meals accurately and achieve perfect results regardless of which cut you choose.
Chicken Breasts: Timing and Techniques
Boneless, Skinless Chicken Breasts are among the most popular cuts but also the most challenging to cook perfectly due to their lean nature and tendency to dry out quickly. A medium-sized boneless, skinless chicken breast (approximately 6-8 ounces and about 1 inch thick) typically requires 15-20 minutes when baked at 375°F (190°C), 12-15 minutes when baked at 425°F (220°C), 6-8 minutes per side when grilled over medium-high heat, or 6-8 minutes per side when pan-seared over medium-high heat.
The key challenge with chicken breasts is their uneven thickness—they’re typically much thicker on one end than the other. To ensure even cooking, consider pounding the breasts to an uniform thickness of about ¾ inch before cooking. This simple technique dramatically improves cooking consistency and prevents the thin end from overcooking while the thick end remains underdone. Alternatively, you can butterfly thicker breasts by cutting them horizontally, creating two thinner cutlets that cook more quickly and evenly.
Bone-in, Skin-on Chicken Breasts require significantly longer cooking times than their boneless counterparts but offer superior flavor and moisture retention. These larger cuts typically weigh 10-12 ounces and require 35-45 minutes when baked at 375°F (190°C), 30-40 minutes when baked at 425°F (220°C), or 10-12 minutes per side when grilled over medium heat. The bone acts as an insulator, slowing heat penetration to the center, while the skin provides a protective barrier that helps retain moisture and adds rich flavor when properly crisped.
Chicken Thighs: Dark Meat Perfection
Boneless, Skinless Chicken Thighs are remarkably forgiving compared to breasts due to their higher fat content, which helps keep them moist even if slightly overcooked. These flavorful cuts typically require 20-25 minutes when baked at 400°F (200°C), 15-18 minutes when baked at 425°F (220°C), 5-7 minutes per side when grilled over medium-high heat, or 6-8 minutes per side when pan-seared. The extra fat and connective tissue in thighs means they remain tender and juicy across a wider temperature range than breasts.
Many chefs actually prefer cooking chicken thighs to 175-180°F (80-82°C) rather than the minimum 165°F because the additional cooking time breaks down more connective tissue, resulting in incredibly tender meat. This higher temperature doesn’t dry out thighs the way it would breasts, making them an excellent choice for beginners who worry about overcooking.
Bone-in, Skin-on Chicken Thighs offer the ultimate in flavor and texture but require the longest cooking times among individual chicken pieces. These cuts typically need 35-45 minutes when baked at 400°F (200°C), 30-35 minutes when baked at 425°F (220°C), or 8-10 minutes per side when grilled over medium heat. The combination of bone and skin creates a barrier that slows cooking but rewards patience with incredibly juicy, flavorful meat and deliciously crispy skin.
Whole Chicken: Complete Roasting Guide
Cooking a whole chicken requires significantly more time and careful attention than individual pieces but provides an impressive, economical meal. A whole chicken typically weighs between 3-7 pounds, and the cooking time varies based on size. As a general rule, roast whole chickens at 375°F (190°C) for approximately 20 minutes per pound, or at 425°F (220°C) for approximately 15 minutes per pound.
More specifically, a 3-4 pound chicken requires 60-75 minutes at 375°F or 45-60 minutes at 425°F. A 5-6 pound chicken needs 90-120 minutes at 375°F or 75-90 minutes at 425°F. A larger 7-8 pound chicken requires 120-150 minutes at 375°F or 105-120 minutes at 425°F. Always verify doneness by checking the internal temperature in both the breast and thigh, as these areas cook at different rates.
For optimal results, truss the chicken before roasting to ensure even cooking and a more attractive presentation. Allow the chicken to rest at room temperature for 30-60 minutes before roasting, as cold chicken straight from the refrigerator will cook unevenly. After roasting, let the chicken rest for at least 15-20 minutes before carving to allow juices to redistribute throughout the meat.
Chicken Wings and Drumsticks
Chicken Wings are small, quick-cooking pieces that become irresistibly crispy when cooked properly. Whole wings typically require 40-45 minutes when baked at 400°F (200°C), 25-30 minutes when baked at 425°F (220°C), or 20-25 minutes when deep-fried at 375°F. For extra-crispy wings, many cooks use a two-stage process: bake at a lower temperature first to render fat, then increase the heat for the final 10-15 minutes to crisp the skin.
Chicken Drumsticks are economical, flavorful cuts that children and adults alike enjoy. These pieces require 35-45 minutes when baked at 400°F (200°C), 30-35 minutes when baked at 425°F (220°C), or 8-10 minutes per side when grilled over medium heat. The bone running through the center acts as a heat conductor, helping cook the meat relatively evenly, though the thick end near the joint requires more time than the thin end.
Cooking Times by Method
The cooking method you choose has an enormous impact on timing, as each technique transfers heat to the chicken differently, requiring specific adjustments to achieve perfect results.
Understanding how different cooking methods affect timing is crucial for kitchen flexibility. Each method has distinct advantages—baking offers hands-off convenience, grilling adds smoky flavor, pan-frying creates delicious crusts, and slow cooking produces fall-off-the-bone tenderness. This section breaks down cooking times for each major method, empowering you to choose the right technique for your schedule, available equipment, and desired outcome.
Baking and Roasting Times
Baking or roasting chicken in the oven is one of the most popular cooking methods because it requires minimal active attention and produces consistent results. Oven cooking uses dry heat that surrounds the chicken, cooking it evenly from all sides. The temperature you choose dramatically affects both cooking time and final texture.
At 350°F (175°C): This lower temperature cooks chicken gently, ideal for bone-in pieces. Boneless breasts require 25-30 minutes, bone-in breasts need 45-55 minutes, boneless thighs take 25-30 minutes, and bone-in thighs require 45-50 minutes.
At 375°F (190°C): This moderate temperature provides a nice balance between cooking time and browning. Boneless breasts require 20-25 minutes, bone-in breasts need 35-45 minutes, boneless thighs take 20-25 minutes, and bone-in thighs require 35-40 minutes.
At 400-425°F (200-220°C): These higher temperatures create better browning and crisping, particularly for skin-on pieces. Boneless breasts require 15-20 minutes, bone-in breasts need 30-40 minutes, boneless thighs take 15-20 minutes, and bone-in thighs require 30-35 minutes.
For optimal results when baking chicken, arrange pieces in a single layer with space between them to allow hot air circulation. Avoid crowding the pan, which creates steam and prevents proper browning. Consider starting with the chicken at room temperature rather than straight from the refrigerator, as this promotes more even cooking.
Grilling Times and Techniques
Grilling chicken adds wonderful smoky flavors and attractive grill marks but requires more attention than baking because the high direct heat can quickly burn the exterior before the interior cooks through. The key to successful grilling is understanding direct versus indirect heat and using both strategically.
For direct grilling over medium-high heat (400-450°F): Boneless breasts require 6-8 minutes per side, boneless thighs need 5-7 minutes per side, and chicken wings take 8-10 minutes per side. Always oil the grill grates before cooking to prevent sticking, and resist the urge to move or flip chicken too frequently—let each side develop proper grill marks before turning.

For bone-in pieces, use a two-zone grilling method: sear over direct high heat for 3-5 minutes per side to develop color and flavor, then move to indirect heat (with the burner off or coals pushed to one side) and cook with the lid closed for an additional 15-25 minutes until the internal temperature reaches 165°F.
For whole chickens, use indirect grilling exclusively. Set up your grill with heat on one side only, place the chicken on the cool side, close the lid, and maintain a temperature of 350-375°F. A 4-5 pound chicken requires approximately 75-90 minutes using this method. Rotate the chicken 180 degrees halfway through cooking for even browning.
Pan-Frying and Sautéing Guidelines
Pan-frying chicken in a skillet creates delicious crusts and allows you to build flavorful pan sauces from the browned bits left behind. This method works best for boneless, skinless pieces or thin cutlets because the high heat cooks the exterior quickly.
For boneless, skinless chicken breasts (pounded to ½-¾ inch thickness), heat oil in a skillet over medium-high heat until shimmering but not smoking. Cook for 5-7 minutes on the first side without moving it, allowing a golden crust to develop. Flip once and cook for an additional 4-6 minutes on the second side. Reduce heat to medium if the chicken is browning too quickly.
For boneless, skinless chicken thighs, follow similar timing but expect 6-8 minutes per side due to their slightly thicker nature and higher fat content. The rendered fat from thighs creates exceptional flavor in the pan that can be incorporated into sauces.
For bone-in, skin-on pieces, use a hybrid method: sear in the skillet over medium-high heat for 5-7 minutes per side to develop color, then finish in a 375°F oven for an additional 15-25 minutes depending on the size of the pieces. This ensures the interior cooks through without burning the exterior.
Slow Cooking for Tender Results
Slow cookers offer unmatched convenience for busy schedules, allowing you to add chicken in the morning and return to a ready meal in the evening. The low, moist heat of slow cooking breaks down connective tissue, making even lean chicken breasts surprisingly tender.
On Low Setting (approximately 200°F): Boneless, skinless chicken breasts require 6-7 hours, bone-in chicken breasts need 7-8 hours, boneless chicken thighs take 6-7 hours, and bone-in chicken thighs require 7-8 hours. Whole chickens (3-4 pounds) need 6-8 hours on low.
On High Setting (approximately 300°F): Boneless, skinless chicken breasts require 3-4 hours, bone-in chicken breasts need 4-5 hours, boneless chicken thighs take 3-4 hours, and bone-in chicken thighs require 4-5 hours. Whole chickens require 4-5 hours on high.
The main challenge with slow cooking is that chicken can become overly soft and stringy if cooked too long. Check for doneness at the lower end of the time range, and remove chicken promptly once it reaches 165°F. Chicken thighs handle longer cooking times better than breasts due to their higher fat content.
Pressure Cooking and Instant Pot Times
Electric pressure cookers like the Instant Pot have revolutionized home cooking by dramatically reducing cooking times while producing tender, flavorful results. The sealed environment creates steam under pressure, raising the boiling point of water and cooking food significantly faster than conventional methods.
For boneless, skinless chicken breasts: Set to high pressure for 8-10 minutes, followed by a 5-minute natural release, then quick release the remaining pressure. For bone-in chicken breasts: Use 12-15 minutes at high pressure with a 10-minute natural release.
For boneless, skinless chicken thighs: Cook at high pressure for 10-12 minutes with a 5-minute natural release. For bone-in chicken thighs: Use 15-18 minutes at high pressure with a 10-minute natural release.
For a whole chicken (3-4 pounds), cook at high pressure for 25-30 minutes with a 10-15 minute natural release. Always ensure at least 1 cup of liquid is in the pot, and remember that it takes approximately 10-15 minutes for the pressure cooker to come to pressure before the cooking time begins.
Air Frying for Crispy Chicken
Air fryers have surged in popularity because they produce crispy, golden exteriors similar to deep-frying but with significantly less oil. The concentrated circulating hot air cooks chicken quickly while creating appealing texture.
At 375-400°F: Boneless, skinless chicken breasts require 12-15 minutes (flipping halfway), bone-in chicken breasts need 22-25 minutes (flipping halfway), boneless chicken thighs take 12-15 minutes, bone-in thighs require 20-25 minutes, and chicken wings need 20-25 minutes (tossing every 5-7 minutes for even crisping).
The key to air fryer success is not overcrowding the basket—arrange chicken in a single layer with space between pieces to allow proper air circulation. Lightly spray chicken with cooking oil before air frying to enhance browning and crispiness. Remember that air fryers vary by brand and model, so check for doneness a few minutes before the suggested time.
Factors That Affect Chicken Cooking Time
Numerous variables beyond cooking method and chicken cut can significantly impact how long chicken takes to cook, making it essential to understand and adjust for these factors.
Even when following timing guidelines precisely, you may find that your chicken cooks faster or slower than expected. This variation occurs because multiple factors influence heat transfer and cooking speed. Understanding these variables empowers you to make intelligent adjustments rather than blindly following timers that may not account for your specific circumstances.
Size and Thickness Variations
The single most significant factor affecting cooking time is the size and thickness of the chicken piece. Heat penetrates meat at a relatively constant rate, meaning a chicken breast that’s twice as thick requires more than twice the cooking time because heat must travel further to reach the center. A thin 4-ounce chicken cutlet that’s ½ inch thick might cook in just 8-10 minutes in a 400°F oven, while a thick 10-ounce breast that’s 2 inches at its thickest point could require 30-35 minutes at the same temperature.
This is why pounding chicken breasts to an even thickness is such a valuable technique—it ensures all parts of the meat reach the target temperature simultaneously. When cooking chicken pieces of varying sizes together, arrange smaller pieces toward the edges of the pan where temperatures are typically slightly lower, and place larger pieces in the center where heat is most intense.
For whole chickens, size dramatically affects roasting time. The “20 minutes per pound” guideline works reasonably well, but larger chickens require slightly less time per pound (heat penetrates more efficiently), while very small chickens may need slightly more time per pound to achieve proper browning.
Starting Temperature Considerations
Whether your chicken is cold from the refrigerator or at room temperature when it goes into the heat source significantly affects cooking time. Refrigerator-cold chicken (approximately 40°F or 4°C) requires substantially longer to cook than chicken that has rested at room temperature for 30-60 minutes (reaching approximately 60-70°F or 15-21°C).
For large pieces like whole chickens or bone-in breasts, allowing the meat to come to room temperature before cooking can reduce cooking time by 10-20% and promote more even cooking. The exterior won’t overcook while waiting for the cold center to reach safe temperatures. However, food safety guidelines recommend not leaving raw chicken at room temperature for more than two hours to prevent bacterial growth.
For smaller pieces like boneless breasts or thighs, the temperature difference is less critical but still noticeable. If cooking chicken straight from the refrigerator, add approximately 5-10 minutes to the suggested cooking time and monitor the internal temperature carefully.
Bone-In vs. Boneless Differences
The presence of bones significantly affects cooking time because bones conduct heat differently than muscle tissue. Counter-intuitively, bones actually help conduct heat toward the center of the meat, but they also add mass and create areas of varying density that heat unevenly. Bone-in chicken pieces typically require 30-50% longer cooking time than equivalent boneless pieces.
For example, a boneless, skinless chicken breast might cook perfectly in 18 minutes at 400°F, while a bone-in, skin-on breast of similar weight requires 35-40 minutes at the same temperature. The bone acts as an insulator in some ways but a conductor in others, and the skin adds an additional protective layer that slows moisture loss but also slows heat penetration.
When checking the temperature of bone-in chicken, always insert the thermometer into the thickest part of the meat without touching the bone, as bones heat up faster than meat and will give falsely high readings. For whole chickens, the thigh meat near the bone takes the longest to cook, so always verify that this area has reached 165°F before removing the bird from heat.
Common Mistakes to Avoid
Understanding what not to do is just as important as knowing proper technique—these frequent errors sabotage cooking times and result in disappointing chicken.
Even experienced cooks sometimes make mistakes that affect chicken cooking times and final results. Being aware of these common pitfalls helps you avoid them and achieve consistently excellent outcomes. Many of these mistakes seem minor but have significant impacts on whether your chicken cooks in the expected timeframe and turns out tender, juicy, and properly cooked.
Not Using a Meat Thermometer: Relying solely on visual cues or cooking times is the most common mistake. Chicken can look fully cooked on the outside while remaining dangerously undercooked inside, or it may look slightly pink even when fully cooked if proper temperatures have been reached. A meat thermometer removes all guesswork and is the only reliable way to ensure both safety and quality. Invest in a good instant-read digital thermometer—it’s the single most valuable tool for cooking chicken successfully.
Overcrowding the Pan: When chicken pieces are too close together in a baking dish or skillet, they steam rather than roast or sear, dramatically affecting both cooking time and texture. The moisture released from the chicken can’t evaporate properly, creating a wet cooking environment that prevents browning and extends cooking time. Always arrange chicken in a single layer with at least ½ inch of space between pieces for optimal air circulation and even cooking.
Not Accounting for Carryover Cooking: Many cooks wait until chicken reaches exactly 165°F before removing it from heat, but by the time it reaches the table, it’s overcooked and dry. Remember that internal temperature continues rising by 5-10 degrees during the resting period. Remove chicken from heat when it reaches 160-162°F, tent it loosely with foil, and let it rest for 5-10 minutes. The temperature will climb to the safe 165°F while juices redistribute for more succulent meat.
Starting with Frozen or Partially Frozen Chicken: Attempting to cook frozen chicken extends cooking times dramatically and creates uneven cooking where the exterior dries out while the interior slowly thaws and cooks. Always thaw chicken completely in the refrigerator before cooking (allowing approximately 24 hours for every 5 pounds). If you’re in a hurry, use the cold water method—seal chicken in plastic and submerge in cold water, changing the water every 30 minutes until thawed.
Opening the Oven or Grill Too Frequently: Each time you open the oven door or grill lid, you release heat and extend the cooking time. Every opening can add 2-5 minutes to the total cooking time as the environment returns to the target temperature. Unless you’re basting or checking temperature, keep the oven door closed and resist the urge to peek constantly.
Tips for Perfectly Cooked Chicken Every Time
Master these professional techniques and you’ll consistently produce restaurant-quality chicken that’s juicy, flavorful, and cooked to perfection.
Achieving consistently excellent chicken requires more than just following timing guidelines—it demands technique, attention to detail, and understanding how to optimize each step of the cooking process. These expert tips will elevate your chicken from merely edible to truly exceptional, ensuring tender, juicy results regardless of which cut or cooking method you choose.
1. Brine or Marinate for Enhanced Moisture and Flavor
Brining chicken before cooking is one of the most effective techniques for ensuring juicy results, especially for lean cuts like breasts. A basic brine consists of water, salt, and optional sugar, though you can add aromatics like herbs, garlic, and citrus for additional flavor. Submerge chicken in the brine solution for 2-4 hours in the refrigerator (longer for whole chickens, shorter for individual pieces). The salt solution helps the meat retain moisture during cooking, providing a buffer against slight overcooking.
For a quick brine, use approximately ¼ cup salt per quart of water. For enhanced flavor without the wait, try a dry brine by rubbing salt directly onto the chicken skin and refrigerating uncovered for 8-24 hours. This technique seasons the meat deeply while helping the skin dry out for extra-crispy results. Alternatively, marinating chicken in an acidic marinade (containing lemon juice, vinegar, or yogurt) for 2-4 hours tenderizes the meat while infusing flavor.
2. Pound for Even Thickness
Chicken breasts naturally have an uneven shape—thick on one end and thin on the other. This variation causes the thin end to overcook and dry out while the thick end finally reaches safe temperatures. The simple solution is pounding the breast to an even thickness of approximately ¾ inch. Place the chicken between two pieces of plastic wrap or parchment paper and use a meat mallet or heavy skillet to gently pound from the center outward until uniformly thick. This technique reduces cooking time, ensures even doneness, and produces tender results.
3. Sear Before Baking for Maximum Flavor
For bone-in, skin-on pieces, searing in a hot skillet before finishing in the oven creates incredible flavor through the Maillard reaction. Heat oil in an oven-safe skillet over medium-high heat until shimmering, add chicken skin-side down, and cook without moving for 5-7 minutes until deeply golden brown. Flip the chicken, then transfer the entire skillet to a 375°F oven to finish cooking. This technique combines the crispy crust of pan-frying with the even, gentle cooking of baking.
4. Use the Resting Period Strategically
Resting chicken after cooking isn’t optional—it’s essential for juicy results. During cooking, heat drives moisture toward the center of the meat. If you cut into chicken immediately after removing it from heat, those juices spill onto the cutting board instead of remaining in the meat. Resting allows the proteins to relax and moisture to redistribute evenly throughout. Rest chicken for 5-10 minutes for individual pieces and 15-20 minutes for whole chickens, tented loosely with aluminum foil to retain warmth without trapping steam that could soften crispy skin.
5. Verify Temperature in Multiple Locations
Don’t rely on checking temperature in just one spot, especially for whole chickens or mixed pieces. Insert your thermometer into the thickest part of the breast, the innermost part of the thigh, and any other thick areas. The slowest-cooking spot determines when the entire dish is done. Remember to avoid touching bones with the thermometer probe, as they conduct heat differently and provide inaccurate readings.
6. Adjust Cooking Times Based on Observations
Timing guidelines provide excellent starting points, but your specific oven, grill, or stovetop may run hotter or cooler than average. Take notes about how your equipment performs—if chicken consistently finishes faster than suggested times, your heat source runs hot and you should reduce cooking times accordingly. If chicken consistently takes longer, increase suggested times. This personal calibration ensures success with your specific cooking environment.
Final Words
Mastering chicken cooking times is a fundamental skill that transforms you from a nervous cook constantly worried about food safety into a confident kitchen professional who consistently produces delicious, perfectly cooked meals. While the specific times vary dramatically based on the cut you’re cooking, the method you’re using, and various other factors, the underlying principles remain constant: understand safe temperatures, use a reliable thermometer, account for size and thickness variations, and allow for proper resting time.
Remember that timing guidelines serve as helpful starting points rather than rigid rules. Your specific circumstances—including the unique characteristics of your chicken, the accuracy of your oven or grill, and environmental factors—all influence how long chicken takes to cook. By combining the detailed timing information in this guide with the expert techniques and tips provided, you’ll develop an intuitive sense for when chicken is properly cooked.
Whether you’re preparing a quick weeknight dinner of boneless chicken breasts, an impressive weekend roast chicken for family and friends, or experimenting with new cooking methods like air frying or pressure cooking, the knowledge you’ve gained here empowers you to approach each preparation with confidence. Invest in a quality meat thermometer, be patient during the cooking process, and always prioritize food safety. With practice and attention to these fundamentals, perfectly cooked, juicy, flavorful chicken will become your consistent reality rather than an occasional lucky accident. Now it’s time to put this knowledge into action—select your favorite chicken cut, choose your cooking method, and create something delicious!