Table of Contents
- What Does My Tomato Plant Need? The Complete Guide to Growing Perfect Tomatoes
- Understanding Your Tomato Plant’s Basic Requirements
- Sunlight: The Foundation of Fruit Production
- Soil Quality and pH Balance
- Temperature Sweet Spots
- Essential Nutrients for Thriving Tomato Plants
- The NPK Ratio Explained
- Nitrogen for Early Growth
- Phosphorus for Flowering and Fruiting
- Micronutrients and Calcium
- Watering Your Tomatoes the Right Way
- How Much Water Tomatoes Really Need
- When to Water
- Watering Methods That Work Best
- Supporting and Spacing Your Plants
- Why Support Matters
- Types of Support Systems
- Proper Plant Spacing
- The Art of Pruning and Training
- Determinate vs. Indeterminate Varieties
- Removing Suckers
- Recognizing and Addressing Common Problems
- Blossom End Rot
- Flower Drop
- Yellowing Leaves
- Cracking and Splitting
- Seasonal Care and Timing
- When to Plant
- Temperature Considerations
- End-of-Season Care
- Container Growing Considerations
- Pot Size and Type
- Special Care for Container Tomatoes
- Final Thoughts: Growing Tomatoes with Confidence
What Does My Tomato Plant Need? The Complete Guide to Growing Perfect Tomatoes
Picture this: you’ve just planted your tomato seedlings with high hopes of harvesting basket after basket of juicy, sun-ripened tomatoes. You water them faithfully, check on them daily, and dream of caprese salads and homemade marinara sauce. But weeks pass, and your plants aren’t thriving the way you expected. The leaves look pale, flowers drop without forming fruit, or the whole plant just seems to be sulking in the garden. Sound familiar? You’re not alone. Tomatoes might be one of the most popular vegetables grown in home gardens, but they’re also one of the most misunderstood. The good news is that once you understand exactly what your tomato plant needs—and when it needs it—you’ll be amazed at how productive these plants can become.
Growing exceptional tomatoes isn’t about following a one-size-fits-all approach. These sun-loving, nutrient-hungry plants have specific requirements that change throughout their growing season. From the moment you tuck that seedling into the soil until you’re harvesting the last fruits before frost, your tomato plant is communicating its needs. Learning to read those signals and respond appropriately is the secret to transforming struggling plants into prolific producers. Whether you’re planting in a backyard garden bed, a raised bed, or even in containers on your patio, understanding these fundamental requirements will set you on the path to tomato-growing success.
Understanding Your Tomato Plant’s Basic Requirements
Before diving into the specifics of care, it’s essential to grasp the foundational elements that every tomato plant absolutely must have to survive and thrive. These aren’t negotiable luxuries—they’re the bare minimum for success.
Sunlight: The Foundation of Fruit Production
Tomatoes are sun worshippers, plain and simple. These plants need at least six to eight hours of direct, unfiltered sunlight every single day to produce their best harvest. This isn’t just a suggestion—it’s a requirement written into their genetic code. When tomato plants receive full sun, they photosynthesize efficiently, converting that solar energy into the sugars and compounds that make homegrown tomatoes taste so incredibly superior to anything you’ll find at the grocery store. Insufficient sunlight leads to leggy, weak plants with sparse foliage and disappointing fruit production.
If you’re selecting a location for your tomato garden, choose the absolute sunniest spot available in your yard. South-facing areas typically receive the most consistent sunlight throughout the day. However, gardeners in extremely hot climates—those in zones 7 and higher—should note that their tomatoes may actually benefit from some afternoon shade when temperatures regularly soar above 90°F. In these scorching conditions, a little respite from the intense afternoon sun can prevent blossom drop and help plants continue setting fruit. For most gardeners, though, more sun equals more tomatoes, so pick that prime sunny real estate for your plants.
Container gardeners have a distinct advantage when it comes to sunlight requirements. If you’re growing tomatoes in lightweight pots, you can actually move your containers throughout the day to follow the sun’s path across the sky. This mobility allows you to maximize sun exposure even in yards that don’t have a consistently sunny spot. Just remember that containers will dry out more quickly than in-ground plantings, so you’ll need to adjust your watering schedule accordingly.
Soil Quality and pH Balance
The foundation of any successful tomato harvest starts beneath the surface with the soil. Tomatoes prefer deep, fertile, well-draining soil that’s rich in organic matter. The ideal soil should hold moisture without becoming waterlogged, provide adequate drainage to prevent root rot, and contain ample nutrients to feed these heavy feeders throughout their growing season. Think of soil as your tomato plant’s buffet—if it’s not well-stocked with the right ingredients, your plants will go hungry no matter how much you water them.
Tomatoes thrive in slightly acidic soil with a pH ranging from 6.0 to 6.8. This specific pH range isn’t arbitrary—it’s the sweet spot where tomatoes can most efficiently absorb the nutrients they need from the soil. When soil pH strays too far outside this range, certain nutrients become locked up in the soil, unavailable to the plant even if they’re present in abundance. A simple soil test through your local extension office can reveal your soil’s pH and nutrient levels, providing invaluable information before you plant. If you’ve struggled with tomatoes in the past, this test might reveal the missing piece of the puzzle.
Before planting, enrich your soil by working in two to three inches of compost or well-rotted manure. This organic matter improves soil structure, enhances drainage in heavy clay soils, increases water retention in sandy soils, and provides a slow-release source of nutrients throughout the growing season. Avoid using fresh manure, which can burn plants and introduce harmful bacteria. For container gardeners, skip the garden soil entirely and use a high-quality, sterile potting mix specifically formulated for vegetables. Garden soil is too heavy and compacted for containers, preventing proper air circulation and water drainage around the roots.
Temperature Sweet Spots
Tomatoes are decidedly warm-season plants with specific temperature preferences. Understanding these temperature requirements can mean the difference between a bumper crop and a disappointing harvest. Tomatoes grow best when daytime temperatures range between 70 and 85°F, with nighttime temperatures staying above 55°F. Within this comfortable range, plants grow vigorously, flowers develop properly, and fruit sets consistently.
The critical mistake many eager gardeners make is planting tomatoes too early in the season. While it’s tempting to get a jump on the growing season, tomatoes simply won’t thrive when soil and air temperatures are too cool. Wait to transplant your tomatoes outdoors until all danger of frost has passed and nighttime air temperatures consistently stay above 50°F. In most regions, this means waiting until around mid to late spring. Planting too early won’t give you an advantage—in fact, tomatoes planted in cold soil will sit there and sulk, their growth stunted, sometimes never fully recovering.
On the flip side, extreme heat creates its own set of challenges. When daytime temperatures climb above 95°F and nighttime temperatures stay above 75°F, tomato plants experience significant stress. In these conditions, you’ll notice that plants continue producing flowers, but those flowers drop off without setting fruit. This phenomenon, called blossom drop, is the plant’s survival mechanism—it simply cannot sustain fruit development in extreme heat. If you live in a hot climate, select heat-tolerant varieties specifically bred to set fruit in higher temperatures, or focus on growing cherry and grape tomatoes, which generally handle heat better than large-fruited varieties.
Essential Nutrients for Thriving Tomato Plants
Tomatoes are notoriously heavy feeders, meaning they pull significant quantities of nutrients from the soil as they grow. Providing the right nutrients at the right time is crucial for developing strong plants that produce abundant, flavorful fruit.
The NPK Ratio Explained
When shopping for fertilizers, you’ll encounter three numbers prominently displayed on every package—something like 10-10-10 or 7-22-8. These numbers represent the NPK ratio, indicating the percentage of nitrogen (N), phosphorus (P), and potassium (K) in that particular fertilizer. Understanding what each of these primary nutrients does for your tomato plants empowers you to make informed decisions about feeding your plants appropriately throughout the growing season.
Nitrogen, the first number, fuels vegetative growth—stems, leaves, and overall plant size. Phosphorus, the second number, promotes root development, flower formation, and fruit production. Potassium, the third number, supports overall plant health, disease resistance, and fruit quality. For tomatoes, you’ll want different NPK ratios at different stages of growth. A common mistake is using an all-purpose fertilizer throughout the entire season, which often contains too much nitrogen and not enough phosphorus for optimal fruit production.
Nitrogen for Early Growth
During the initial weeks after transplanting, young tomato plants need nitrogen to develop strong stems and lush green foliage. The sturdy main stem you encourage early on will become the framework that supports pounds of fruit later in the season, so building a robust plant structure is essential. Nitrogen is the primary nutrient responsible for this green, vegetative growth.
Organic sources of nitrogen include fish emulsion, cottonseed meal, composted chicken or rabbit manure, and coffee grounds. These natural sources release nutrients slowly over time, feeding plants steadily without the risk of burning them with excessive concentrated nutrients. When using fish emulsion, dilute it according to package directions and apply it as either a soil drench around the base of the plant or as a foliar spray directly on the leaves. This liquid fertilizer is absorbed quickly, giving plants a noticeable boost in just a few days.
However, exercise caution with nitrogen as your plants mature. Too much nitrogen in later stages of growth creates lush, bushy plants with abundant foliage but disappointingly few fruits. If you notice your tomato plant developing thick stems and dark green leaves but failing to produce flowers, you’ve likely over-fertilized with nitrogen. The plant is putting all its energy into vegetative growth rather than reproduction. Once your plants begin flowering, it’s time to shift your fertilization strategy.
Phosphorus for Flowering and Fruiting
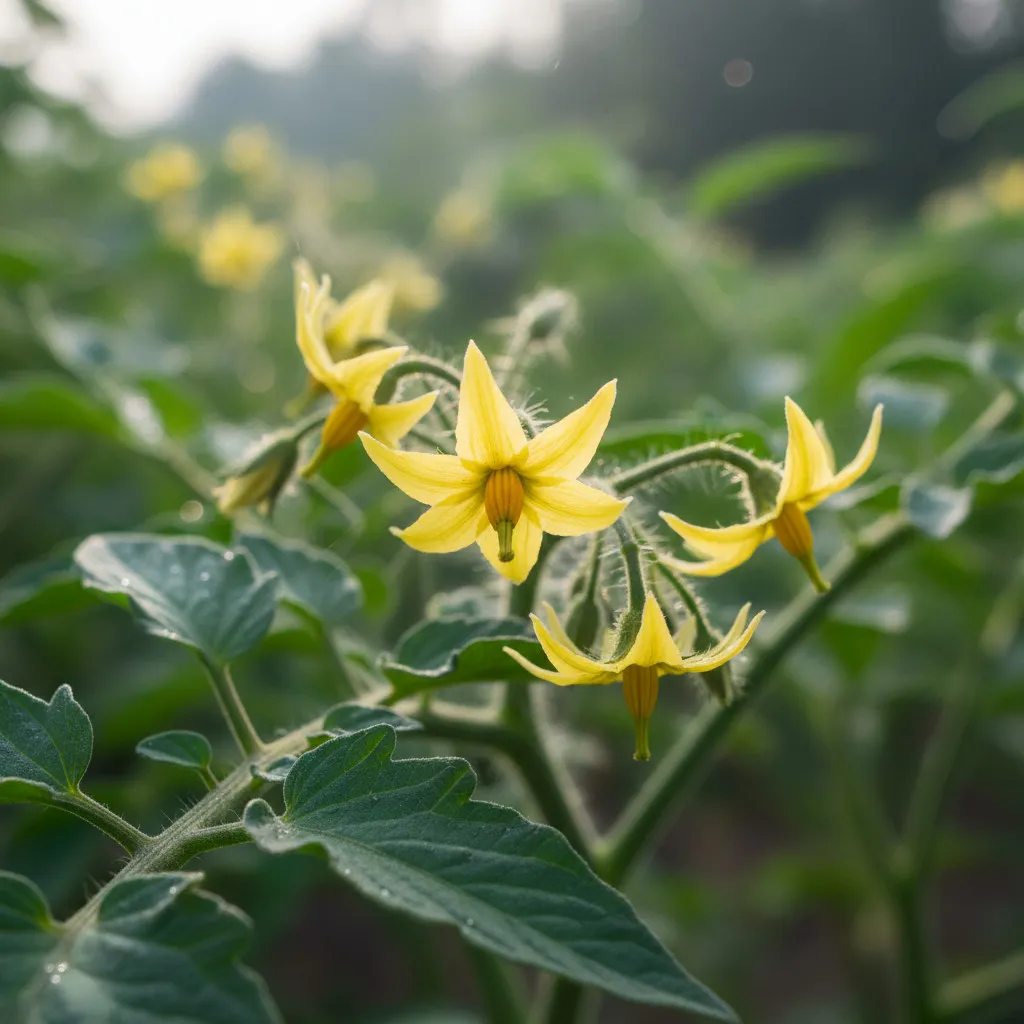
As soon as you spot the first yellow flowers on your tomato plants, it’s time to switch gears and focus on phosphorus. This crucial nutrient supports flower development, fruit set, and the overall process of turning those bright yellow blooms into delicious tomatoes. Without adequate phosphorus, flowers may drop before setting fruit, or fruits may develop slowly and incompletely.
Organic sources of phosphorus include bone meal, fish bone meal, rock dust, soft rock phosphate, and kelp meal. Bone meal is a slow-release fertilizer that you can work into the planting hole at transplant time or apply as a side-dressing around established plants. A tablespoon of bone meal worked into the soil around each plant provides a phosphorus boost that supports several weeks of flowering and fruiting. Rock dust and soft rock phosphate not only provide phosphorus but also deliver a wide array of trace minerals that enhance overall plant health and fruit flavor.
When selecting a fertilizer for flowering tomato plants, look for formulations with higher middle numbers—the phosphorus content. A fertilizer labeled 5-10-10 or 10-20-10 indicates higher phosphorus relative to nitrogen, making it ideal for fruiting tomato plants. Apply these fertilizers every two to three weeks once plants begin flowering, following package directions carefully to avoid over-application.
Micronutrients and Calcium
Beyond the big three NPK nutrients, tomatoes also require various micronutrients and minerals to thrive. Calcium deserves special attention because calcium deficiency leads to one of the most common and frustrating tomato problems: blossom end rot. This disorder appears as dark, leathery spots on the bottom of developing fruits, rendering them inedible and unsightly.
Interestingly, blossom end rot isn’t always caused by a lack of calcium in the soil. More often, it results from inconsistent watering that prevents the plant from properly absorbing and transporting available calcium to developing fruits. The problem actually begins when fruits are very small, though symptoms don’t appear until weeks later when fruits are larger. Maintaining consistent soil moisture is the single most effective prevention strategy for blossom end rot.
To ensure adequate calcium, many gardeners add crushed eggshells to the planting hole or work them into the soil around plants. Eggshells are pure calcium carbonate and break down slowly, releasing calcium throughout the growing season. Some gardeners swear by adding a couple of antacid tablets to each planting hole, which also provides readily available calcium. Using a continuous-release fertilizer that includes calcium, or periodically applying calcium nitrate, can also prevent deficiency issues.
Watering Your Tomatoes the Right Way
Proper watering might be the single most important factor in growing healthy, productive tomato plants. Too little water stresses plants and reduces yields; too much water leads to disease and poor fruit quality. Getting watering right requires understanding not just how much to water, but when and how to deliver that moisture.
How Much Water Tomatoes Really Need
Tomato plants require approximately one to two inches of water per week during the growing season, with the higher end of that range needed during the hottest weeks of summer when plants are laden with fruit. This isn’t a small amount—one inch of water penetrates sandy soil to a depth of about ten inches, and heavy clay soil to about six inches. Shallow, frequent watering encourages shallow root systems that make plants vulnerable to heat and drought stress.
The goal is to water deeply and less frequently rather than applying small amounts daily. Deep watering encourages tomato roots to grow downward, developing an extensive root system that can access water and nutrients from a larger volume of soil. A plant with deep roots is far more resilient during hot weather and can better support heavy fruit production. Check soil moisture by probing one to two inches below the surface with your finger. If the soil feels dry at that depth, it’s time to water thoroughly. If it still feels damp, wait another day or two.
Container-grown tomatoes have entirely different watering needs than in-ground plants. Because containers have limited soil volume and drain more quickly, tomatoes in pots typically need watering once a day during most of the growing season, and sometimes twice daily during the hottest summer weather. Self-watering containers can simplify this demanding watering schedule by providing a reservoir that delivers consistent moisture to plant roots without the daily hassle.
When to Water
Timing your watering is just as important as the amount you apply. The best time to water tomatoes is early in the morning, ideally before the sun rises or shortly after dawn. Morning watering allows moisture to soak into the soil and reach plant roots before the heat of the day causes significant evaporation. It also ensures that any water that splashes on leaves has time to dry before evening, reducing the risk of fungal diseases that thrive in moist conditions.
Avoid watering in the evening, even though it might be more convenient after a workday. Wet foliage overnight creates ideal conditions for fungal and bacterial diseases like early blight, Septoria leaf spot, and late blight. These diseases can devastate tomato plants, starting with a few spots on lower leaves and eventually defoliating entire plants. If you absolutely must water in the evening, take extra care to keep water off the foliage and direct it only to the soil around the base of plants.
Watering Methods That Work Best
The method you use to deliver water to your tomatoes significantly impacts plant health. Overhead watering with a sprinkler is the least desirable method because it wets the foliage, promoting disease, and wastes significant water through evaporation. If you must use a sprinkler, do so only in the early morning so leaves can dry quickly.
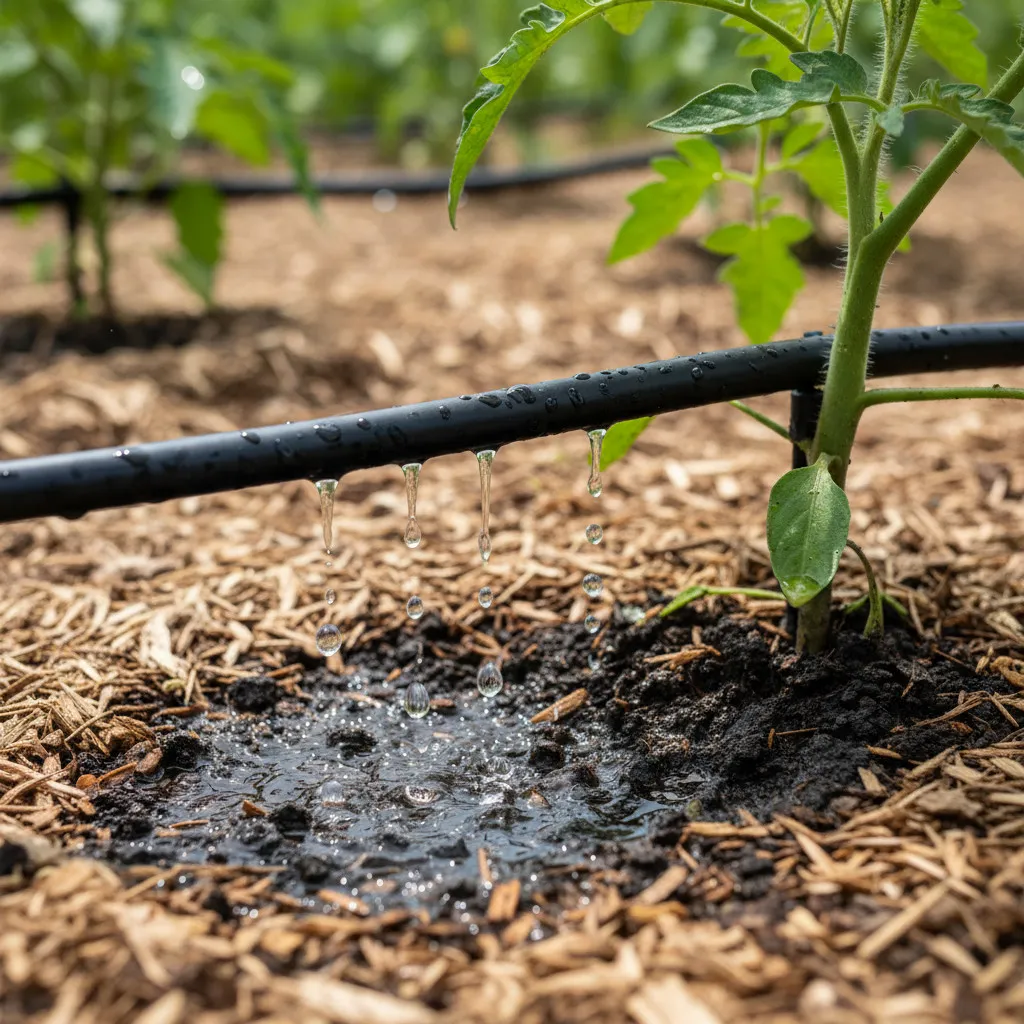
Drip irrigation represents the gold standard for watering tomatoes. This method delivers water slowly and directly to the soil at the base of plants, ensuring efficient water use with minimal evaporation and zero water on the foliage. Drip systems can be as simple as soaker hoses laid along rows of plants or as sophisticated as automated systems with timers and emitters positioned at each plant. The consistent moisture provided by drip irrigation helps prevent many common tomato problems, including blossom end rot and fruit cracking.
For gardeners without irrigation systems, hand watering with a watering wand works well. Direct the water at the soil level around the base of plants, avoiding splashing the foliage. Water slowly enough that moisture soaks in rather than running off. Creating a shallow basin or well in the soil around each plant helps water pool and soak in thoroughly. Apply mulch around plants after watering to help conserve soil moisture and reduce the frequency of watering needed.
Supporting and Spacing Your Plants
Tomatoes are vigorous vining plants that need support to grow vertically and keep developing fruits off the ground. Proper spacing and support systems aren’t optional extras—they’re essential components of successful tomato growing.
Why Support Matters
Allowing tomato plants to sprawl on the ground might seem natural, but it creates numerous problems. Fruits that touch the soil are vulnerable to rot, pest damage, and soil-borne diseases. Unsupported plants become tangled masses that are difficult to harvest and impossible to properly prune or inspect for pests. Air circulation suffers in sprawling plants, creating the humid, still conditions that fungal diseases love. Supporting your tomatoes vertically maximizes garden space, improves air flow around plants, makes harvesting easier, and produces cleaner, healthier fruits.
Install support structures at planting time rather than waiting until plants are large. Trying to insert stakes or position cages around established plants inevitably damages roots and makes it difficult to properly secure sprawling stems. By planning ahead and setting up supports when you transplant seedlings, you make the entire growing season easier and more productive.
Types of Support Systems
Several effective support systems work for tomatoes, each with advantages and ideal applications. Tomato cages are the most popular choice for home gardeners, providing 360-degree support without the need for tying plants. However, most inexpensive cages sold at garden centers are far too flimsy and small for vigorous tomato varieties. Invest in sturdy cages at least five feet tall made from heavy-gauge wire, or make your own from concrete reinforcing wire. These substantial cages will last for years and can actually support the weight of a fully loaded indeterminate tomato plant.
Staking involves driving a sturdy wooden or metal stake (at least six feet tall and 1.5 inches in diameter) about 12 inches deep into the ground, positioned three to four inches from the plant’s main stem. As the plant grows, tie the main stem to the stake at eight to twelve-inch intervals using soft ties, strips of cloth, or garden velcro. Staked plants require more labor—both for tying and for the pruning that staked tomatoes require—but they produce earlier, larger fruits and allow for closer plant spacing than caged plants.
Trellis systems work beautifully for indeterminate varieties and make excellent use of vertical garden space. You can grow tomatoes on a sturdy wire fence, create an A-frame trellis with strings for plants to climb, or build a permanent trellis structure from wood or metal. Trellised plants need regular tying or training to keep stems growing upward, and they require aggressive pruning to prevent overcrowding. The Florida weave or basket weave system uses stakes and horizontal twine to support entire rows of tomatoes, combining the benefits of staking with less labor since you don’t tie individual plants.
Proper Plant Spacing
Crowding tomato plants is a common mistake that leads to disappointing results. Plants need adequate space for air circulation, sunlight penetration, and root development. The proper spacing depends on both the variety you’re growing and your support method. Determinate (bush) varieties grown in cages can be spaced two feet apart, while indeterminate (vining) varieties need three feet between plants. If you’re letting determinate varieties sprawl without support—not recommended but sometimes done—leave four to six feet between plants.
When planting in rows, space rows at least three to five feet apart to allow room for walking, harvesting, and airflow. This spacing might seem excessive when you’re planting small seedlings, but remember that healthy tomato plants will fill every inch of that space as they mature. Overcrowded plants compete for light, water, and nutrients, resulting in weak, disease-prone plants with reduced yields. Trust the spacing recommendations and resist the urge to squeeze in extra plants.
The Art of Pruning and Training
Pruning tomatoes confuses many gardeners, but it’s actually straightforward once you understand the basics. The key is knowing whether your variety requires pruning and what specific pruning techniques will benefit your plants.
Determinate vs. Indeterminate Varieties
The first step in pruning is determining whether you’re growing determinate or indeterminate tomatoes. Determinate varieties grow to a predetermined height (usually three to four feet), set all their fruit within a concentrated period, and then stop growing. These compact, bushy plants should not be pruned beyond removing the bottom leaves. Pruning determinate tomatoes reduces their fruit production because you’re removing stems that would bear fruit.
Indeterminate varieties, in contrast, continue growing, flowering, and setting fruit throughout the entire growing season until frost kills them. Without intervention, indeterminate plants become massive, sprawling tangles of vines that can easily reach six to eight feet or more. These varieties absolutely benefit from pruning to keep them manageable, improve air circulation, and direct the plant’s energy into fruit production rather than excessive foliage.
Removing Suckers
The most common pruning task for indeterminate tomatoes is removing suckers—the small shoots that emerge in the crotch between the main stem and established branches. These suckers grow vigorously and, if left unpruned, will develop into full branches that crowd the plant and divert energy away from fruit production. Each sucker you remove means more energy directed to developing and ripening tomatoes on the remaining branches.
To remove suckers, simply pinch or snap them off when they’re still small—ideally when they’re just two to three inches long. At this size, they pop off easily with your fingers, and the wound closes quickly. If suckers have grown larger, use clean, sharp pruners to cut them off, taking care not to damage the main stem or branch. Don’t try to remove every single sucker; instead, maintain two to three main stems on each plant, allowing some branching while preventing the plant from becoming overcrowded.
Pay special attention to the bottom foot of your tomato plant as it grows. Once plants reach about three feet tall, prune off all the leaves and stems from the bottom 12 to 18 inches of the plant. This critical pruning step accomplishes several goals: it improves air circulation around the base of the plant, prevents soil-borne diseases from splashing onto foliage during rain or watering, makes it easier to mulch around plants, and allows more sunlight to reach ripening fruits. These lower leaves rarely receive adequate light once the plant is mature anyway, so removing them doesn’t reduce the plant’s photosynthetic capacity.
Recognizing and Addressing Common Problems
Even with excellent care, tomato plants sometimes develop problems. Learning to recognize these issues and understanding their causes helps you take corrective action quickly.
Blossom End Rot
Blossom end rot appears as dark, leathery, sunken spots on the bottom (blossom end) of tomatoes. It’s one of the most common and frustrating problems gardeners face. Despite what the name suggests, this isn’t a disease caused by a pathogen—it’s a physiological disorder resulting from calcium deficiency in the developing fruit. The tricky part is that the problem usually isn’t a lack of calcium in the soil but rather the plant’s inability to properly absorb and transport calcium due to inconsistent watering.
When soil moisture fluctuates dramatically—very wet, then very dry, then wet again—tomato plants struggle to maintain the steady calcium flow needed for proper fruit development. The damage occurs when fruits are very small, though symptoms don’t become visible until fruits are larger. Once you see blossom end rot on a tomato, that fruit cannot be saved, though you can cut away the affected area and use the rest. Prevention is the only solution: maintain consistent soil moisture through regular deep watering, use mulch to help stabilize soil moisture levels, and avoid excessive nitrogen fertilization that promotes rapid growth the plant can’t support.
Flower Drop
Few things are more discouraging than watching your tomato plant produce beautiful yellow flowers only to have them drop off without forming fruit. Blossom drop occurs when environmental conditions stress the plant beyond its ability to set fruit. Temperature extremes are the most common culprit—nighttime temperatures below 55°F or above 75°F, or daytime temperatures above 90 to 95°F will cause flowers to abort.
While you can’t control the weather, you can take steps to minimize flower drop. In cold conditions, use row covers or cloches to protect plants and trap heat around them. In excessive heat, provide afternoon shade using shade cloth, position plants where they’ll receive afternoon shade from structures or trees, and ensure plants have adequate water to cope with heat stress. Consider applying a blossom set spray containing natural hormones that help flowers develop into fruits even under marginal conditions. Cherry and grape tomatoes are generally more reliable fruit setters than large-fruited varieties, especially in temperature extremes.
Yellowing Leaves
Yellow leaves on tomato plants signal various problems, so you’ll need to play detective to determine the specific cause. Lower leaves that yellow and drop off are often simply older leaves being shed as the plant grows—this is normal as long as the plant continues producing healthy green growth at the top. However, widespread yellowing throughout the plant indicates a problem.
Nitrogen deficiency causes overall pale, yellowish-green foliage with reduced growth. The solution is supplemental feeding with a nitrogen-containing fertilizer. Overwatering creates yellow leaves because waterlogged roots can’t absorb nutrients properly—in this case, improve drainage and reduce watering frequency. Various diseases, including fusarium wilt and verticillium wilt, cause yellowing and wilting, typically starting on lower leaves and progressing upward. These soil-borne diseases have no cure, making prevention through crop rotation and disease-resistant varieties essential. Check for pests like aphids or spider mites, which can cause yellowing through their feeding damage.
Cracking and Splitting
Perfectly beautiful tomatoes that suddenly develop deep cracks or split open completely are a heartbreaking sight. This problem occurs when tomatoes grow too rapidly, causing the fruit’s skin to split because it can’t expand fast enough. Heavy rain or watering after a dry period causes tomatoes to take up water quickly and swell faster than the skin can accommodate. Cherry tomatoes are especially prone to cracking because they have thinner skins and higher sugar content.
Prevent fruit cracking by maintaining consistent soil moisture throughout fruit development—avoid allowing plants to dry out and then drenching them. Mulch helps moderate soil moisture fluctuations. Some gardeners find that reducing watering slightly once fruits begin to ripen can minimize cracking, though you need to balance this against the plant’s overall water needs. Harvest tomatoes slightly before they reach peak ripeness; fruits picked when just beginning to show color will finish ripening off the vine and are less likely to crack. Selecting crack-resistant varieties is also helpful if this is an ongoing problem in your garden.
Seasonal Care and Timing
Successful tomato growing requires understanding the seasonal rhythm of these warm-season plants and providing appropriate care throughout their life cycle.
When to Plant
Timing your tomato planting correctly sets the stage for success. In most regions, this means transplanting seedlings outdoors in late spring when soil temperatures have warmed to at least 60°F and all danger of frost has passed. Nighttime air temperatures should consistently stay above 50°F, ideally 55°F or higher. In cold climates, this might not occur until late May or even early June. In warm southern regions, spring planting can happen as early as late February or March, with a second planting in late summer for fall production.
Resist the temptation to plant too early. Cold soil and cold nighttime temperatures stunt tomato growth, potentially causing permanent damage that results in poor performance all season. Tomatoes planted two weeks later, when conditions are optimal, will quickly catch up to and often surpass those planted prematurely. If you’re eager to get started, warm the soil by covering planting areas with black plastic for a week or two before transplanting. This passive solar heating can raise soil temperatures enough to safely plant earlier.
Temperature Considerations
Throughout the growing season, monitor temperatures and their effects on your plants. During the main growing season, tomatoes thrive in warm weather, but when temperatures become extreme, plants need help coping with stress. In heat waves with temperatures above 95°F, provide afternoon shade if possible, water more frequently to prevent wilting, and avoid fertilizing, which pushes stressed plants to grow when they should be conserving energy.
Late in the season, typically four to six weeks before your area’s first expected frost, “top” your indeterminate tomato plants by cutting off the main growing point at the top of each stem. This topping forces plants to stop producing new flowers and concentrate energy on ripening existing fruits. Any tiny tomatoes that form within a month of frost likely won’t have time to mature anyway, so redirecting that energy to maturing fruits already on the vine increases your total harvest.
End-of-Season Care
When frost threatens in fall, harvest all fruits regardless of ripeness. Mature green tomatoes (full-sized and just beginning to lighten in color) will ripen if stored at room temperature, ideally around 70°F. Wrap individual tomatoes in newspaper or place them in a single layer in boxes, checking regularly and removing any that show signs of rot. With proper storage, you can enjoy homegrown tomatoes well into late fall or even early winter.
After frost kills your plants, remove all tomato debris from the garden promptly. Do not compost diseased plant material, as home compost piles rarely get hot enough to kill disease organisms. Instead, dispose of tomato plants in municipal yard waste collection or burn them if local regulations permit. This sanitation practice prevents diseases from overwintering in your garden and infecting next year’s crop.
Container Growing Considerations
Growing tomatoes in containers offers flexibility for gardeners with limited space, poor soil, or the desire to move plants to follow the sun or protect them from weather extremes.
Pot Size and Type
Container size dramatically affects tomato plant performance. The minimum container size for tomatoes is five gallons, but bigger is always better. For indeterminate varieties, use containers at least 18 to 24 inches in diameter; for determinate varieties, 18-inch containers work well. Larger containers hold more soil, which means more nutrients, better moisture retention, and more room for the extensive root system tomatoes develop.
Choose containers with adequate drainage holes in the bottom—poor drainage leads to waterlogged soil and root rot. Plastic and fiberglass containers retain moisture better than terracotta or clay pots, which dry out rapidly and may require watering multiple times daily in hot weather. Avoid black containers that can overheat in full sun, potentially damaging roots. Light-colored containers reflect heat and keep roots cooler. Self-watering containers with built-in reservoirs are excellent for tomatoes, providing consistent moisture that helps prevent blossom end rot and reduces the daily watering burden.
Special Care for Container Tomatoes
Tomatoes grown in containers require more intensive care than those planted in the ground. The limited soil volume means nutrients deplete quickly, requiring more frequent fertilization—typically weekly applications of diluted liquid fertilizer or monthly applications of granular fertilizer. Water requirements are significantly higher; plan on watering container tomatoes at least once daily during most of the growing season, and twice daily during hot summer weather.
Use only high-quality potting mix formulated for containers, never garden soil. Potting mix provides the light, fluffy texture that container plants need for proper drainage and root development. Each season, replace the potting mix rather than reusing the previous year’s depleted, compacted soil. Position containers where they’ll receive maximum sunlight but can be easily accessed for the frequent watering and feeding they require. The advantage of containers is mobility—you can move them to follow the sun, shelter them from extreme weather, or even bring them indoors briefly if an unexpected late-season frost threatens.
Final Thoughts: Growing Tomatoes with Confidence
Understanding what your tomato plant needs transforms you from a hopeful gardener into a confident grower who can diagnose problems, adjust care, and maximize harvests. Tomatoes aren’t difficult plants, but they are demanding—they ask for consistent attention to their specific requirements for sun, soil, water, nutrients, and support. When you provide these essentials and stay attentive to your plants’ signals, you’ll be rewarded with vigorous plants laden with delicious fruits.
Remember that tomato growing is both a science and an art. The science involves understanding the plant’s biological needs and requirements. The art comes from observing your specific plants in your unique growing conditions and responding to what they tell you. No two growing seasons are identical, and challenges will arise—unexpected weather, pest outbreaks, or mysterious wilting. Don’t let setbacks discourage you. Each season teaches lessons that make you a better gardener.
Start with the fundamentals: plant in full sun, prepare rich soil, water consistently, feed appropriately, provide sturdy support, and prune when needed. Choose varieties suited to your climate and growing conditions, especially disease-resistant cultivars if you’ve faced problems before. Pay attention to timing, both in planting after soils warm and in adjusting fertilization as plants transition from vegetative growth to fruiting. Scout your plants regularly so you catch small problems before they become disasters.
Most importantly, don’t forget to enjoy the process. There’s something deeply satisfying about nurturing a tiny seedling into a towering plant bursting with fruits. That first bite of a sun-warmed tomato you’ve grown yourself, juice running down your chin, makes all the effort worthwhile. With the knowledge you’ve gained here about what tomato plants truly need, you’re ready to grow your best crop ever. Get your hands dirty, stay consistent with care, and prepare yourself for a harvest that will have you sharing tomatoes with neighbors, making sauce to freeze, and savoring the incomparable flavor that only homegrown tomatoes can deliver.