Few meals carry the same kind of crowd-pleasing power as a well-built taco. There’s something almost magical about the combination — a warm tortilla, a perfectly seasoned filling, a handful of toppings — that turns an ordinary Tuesday night into something genuinely worth looking forward to. Tacos don’t require a special occasion, a complicated technique, or a long list of hard-to-find ingredients. They require good flavor, a little know-how, and the willingness to experiment.
The beauty of tacos runs deeper than convenience, though. From the charred, chile-rich braise of birria to the bright lime-kissed simplicity of blackened shrimp, tacos span an enormous range of flavors, textures, and cooking methods. You can go smoky, tangy, spicy, sweet, or creamy — sometimes all at once in the same bite. That range is exactly what makes tacos so endlessly satisfying to cook, and why a good collection of taco recipes is one of the most useful things you can have in your back pocket.
The eight recipes below were chosen to cover real variety. There’s a reliable weeknight classic, a slow-cooked showstopper, a vegetarian option that genuinely holds its own, and a restaurant-worthy birria that’s worth every extra minute it takes. Each one comes with practical cooking notes, topping ideas, and tips drawn from the kind of hands-on experience that separates a decent taco from an unforgettable one.
Table of Contents
- Choosing Tortillas That Actually Suit Your Taco
- How to Keep Tortillas Warm at the Table
- Building a Taco Topping Bar That Covers Every Flavor
- 1. Classic Ground Beef Tacos
- The Seasoning Breakdown
- What to Serve On These
- Quick Facts
- 2. Carne Asada Tacos
- How to Slice and Chop Carne Asada
- Topping Style for Carne Asada
- Quick Facts
- 3. Slow Cooker Chicken Tinga Tacos
- Why Chicken Thighs Beat Chicken Breasts Here
- Serving Chicken Tinga Tacos
- Quick Facts
- 4. Crispy Fish Tacos with Chipotle Slaw
- The Battered Alternative
- Quick Facts
- 5. Blackened Shrimp Tacos
- Building the Full Taco
- Why Corn Tortillas Work Best Here
- Quick Facts
- 6. Slow Cooker Carnitas Tacos
- Classic Carnitas Taco Toppings
- Make-Ahead Strategy
- Quick Facts
- 7. Chipotle-Roasted Cauliflower Tacos
- Building the Vegetarian Taco
- A Note on the Adobo Sauce
- Quick Facts
- 8. Birria Tacos with Consomé
- The Birria Taco Assembly Method
- Why Birria Is Worth the Time
- Quick Facts
- Storing Taco Fillings and Reheating Without Losing Texture
- Taco Night as a Build-Your-Own Dinner
- Final Thoughts
Choosing Tortillas That Actually Suit Your Taco
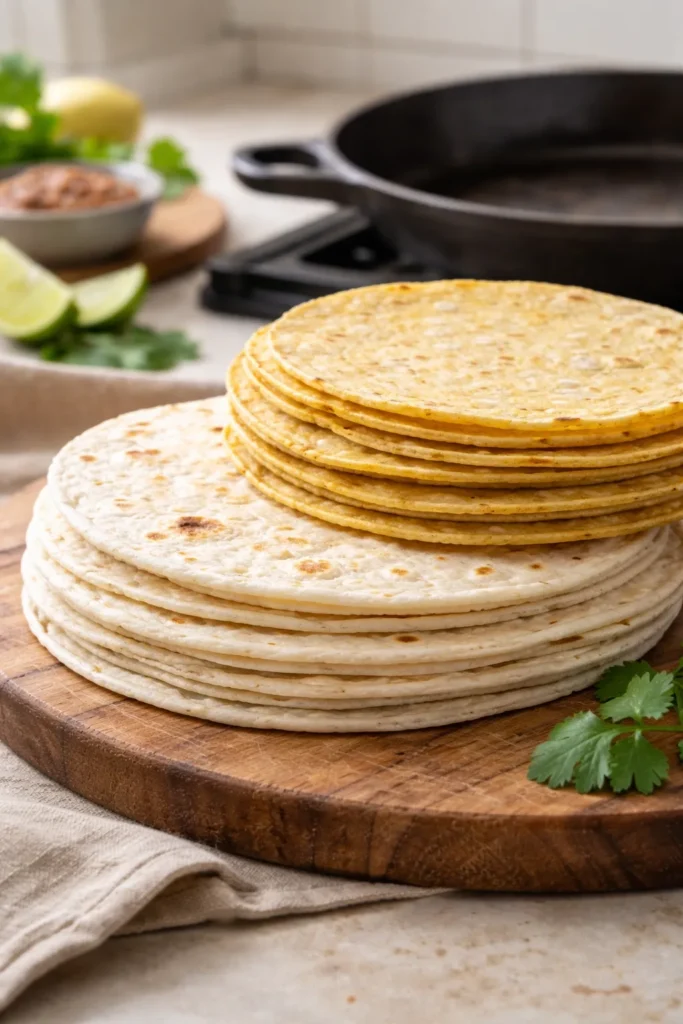
Before you get into the fillings, it’s worth spending a moment on the foundation. Tortilla choice shapes the entire eating experience, and picking the wrong one can undermine even the best filling.
Corn tortillas have a slightly earthy, toasted flavor that pairs beautifully with bold, saucy fillings like birria, carne asada, and chicken tinga. They’re firmer and smaller — typically 6 inches — which means they can crack if you don’t warm them properly. Always heat corn tortillas in a dry skillet over medium-high heat for about 30 seconds per side until they develop a few light char marks and turn pliable. For extra insurance against splitting, double them up.
Flour tortillas are softer, more neutral in flavor, and much more forgiving structurally. They work particularly well for heavier fillings — ground beef, pulled pork, breakfast-style tacos — and hold up better when you’re loading on multiple toppings. Warm them the same way as corn tortillas, or wrap a stack in foil and place them in a 350°F oven for about 12 minutes.
A dry skillet is all you need. Some cooks like to toast corn tortillas directly over a gas flame for a few seconds per side — this gives them a slightly smoky edge that pairs especially well with fish or shrimp tacos.
How to Keep Tortillas Warm at the Table
Wrap your warmed tortillas in a clean kitchen towel or a tortilla warmer. They’ll stay pliable for 20 to 30 minutes, which is plenty of time for everyone to assemble their own. If you’re feeding a crowd, a low oven (200°F) with the wrapped tortillas inside keeps them warm for up to 45 minutes without drying them out.
Building a Taco Topping Bar That Covers Every Flavor
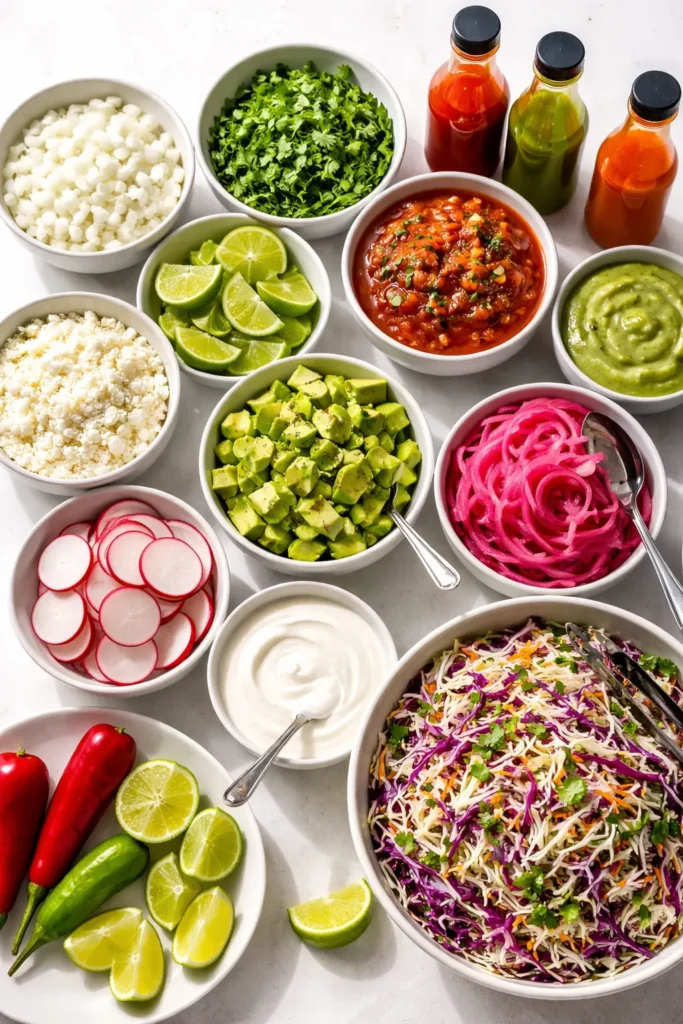
The filling is the star, but toppings are what make a taco yours. A well-stocked topping spread turns dinner into something interactive and gives picky eaters the control they need to build something they’ll actually enjoy.
The essentials for almost any taco:
- Fresh white or red onion, finely diced
- Chopped fresh cilantro (or skip it if you’re in the cilantro-aversion camp)
- Lime wedges — always, always lime wedges
- A fresh or pickled salsa
- Crumbled cotija cheese or shredded Monterey Jack
- Sliced or mashed avocado, or a simple guacamole
Optional but worth having:
- Pickled red onions (quick to make: thin-sliced red onion, white vinegar, a pinch of sugar and salt, 30 minutes minimum)
- Thinly sliced radishes for crunch
- Mexican crema or good sour cream
- Hot sauce — Valentina, Cholula, or Tapatío all work well
- Shredded cabbage or a simple cilantro-lime slaw
The slaw, in particular, is underrated. A handful of shredded green or red cabbage dressed with lime juice, a pinch of salt, and a drizzle of crema adds crunch and a cooling contrast that’s especially good on fish and shrimp tacos. It takes three minutes and makes a noticeable difference.
1. Classic Ground Beef Tacos
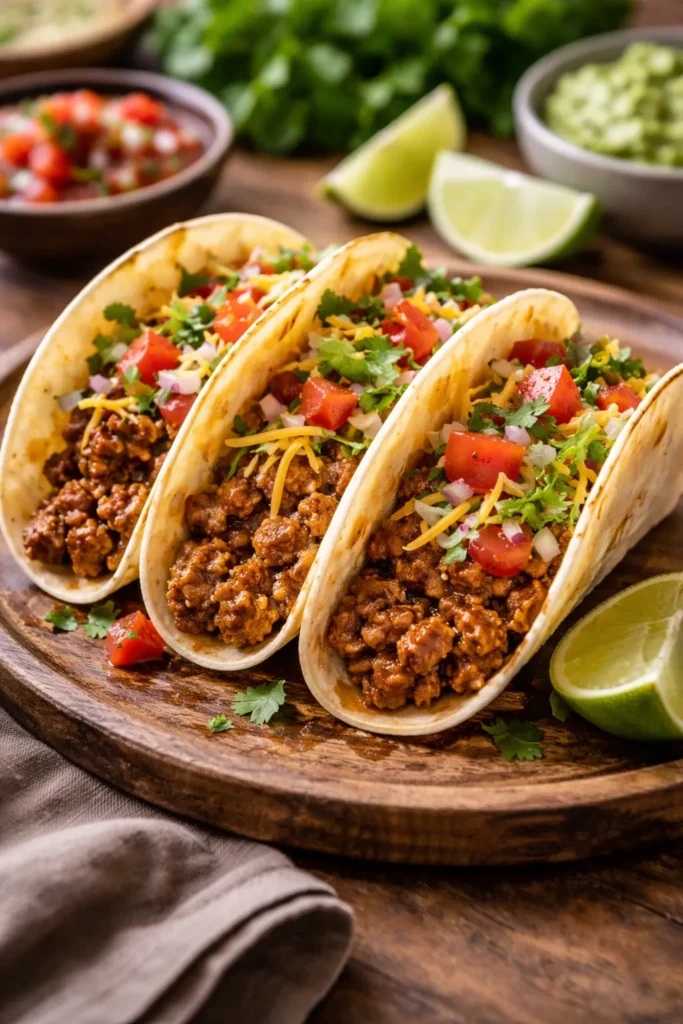
There’s a reason this is the taco most people grew up eating. Ground beef tacos are fast, filling, deeply satisfying, and easy to scale up for a crowd. Done right — with properly bloomed spices and a slightly saucy, not dry, filling — they’re hard to beat on a weeknight.
The secret is in how you build the seasoning. Don’t just dump taco seasoning into raw meat. Instead, sauté a finely diced onion in a little oil until soft, then add the spice blend and let it cook for about 60 seconds in the fat until fragrant. That step makes the spices taste deeper and more integrated instead of dusty and raw. Add the ground beef, break it up into small pieces, and cook over medium-high heat until browned.
Once the meat is cooked, add a splash of tomato sauce and a little water — about half a cup of each — and let the mixture simmer for 8 to 10 minutes. The liquid cooks down into a glossy, cohesive sauce that clings to the meat rather than pooling at the bottom of the tortilla.
The Seasoning Breakdown
A packet of store-bought taco seasoning works well, but if you want to mix your own, combine: 2 teaspoons chili powder, 1 teaspoon ground cumin, ½ teaspoon garlic powder, ½ teaspoon onion powder, ¼ teaspoon dried oregano, ¼ teaspoon smoked paprika, and salt to taste. This makes enough for about 1 pound of meat.
What to Serve On These
Hard taco shells are the classic choice here — warm them in a 350°F oven for 2 minutes to bring back their crunch. Top with shredded iceberg or romaine lettuce, cheddar or a Mexican blend cheese, pico de gallo, and a spoonful of sour cream. That’s the template. It hasn’t gone anywhere because it genuinely works.
Pro tip: A splash of white or apple cider vinegar stirred into the finished meat — about 2 teaspoons — brightens the whole thing without making it taste acidic. It’s the one addition that makes people ask what’s different about yours.
Quick Facts
- Protein: 1 lb ground beef (80/20 fat ratio recommended for flavor)
- Total time: 25 to 30 minutes start to finish
- Serves: 4 to 6 people
- Best tortilla: Hard shells for texture contrast, flour for softness
- Make-ahead friendly: Yes — filling keeps refrigerated for 5 days and freezes well for up to 3 months
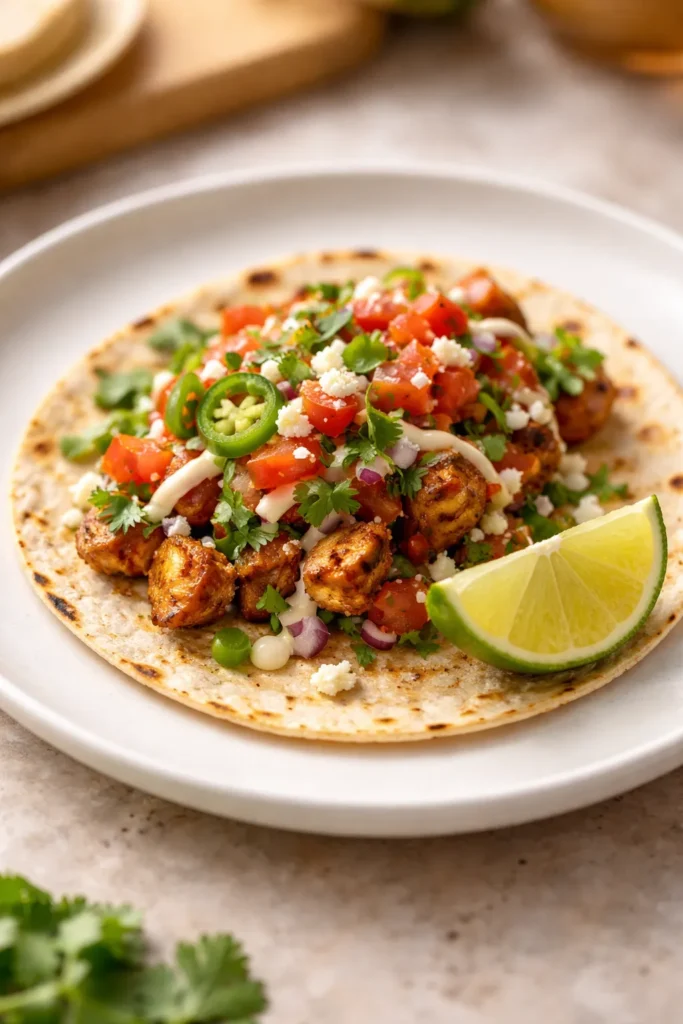
2. Carne Asada Tacos
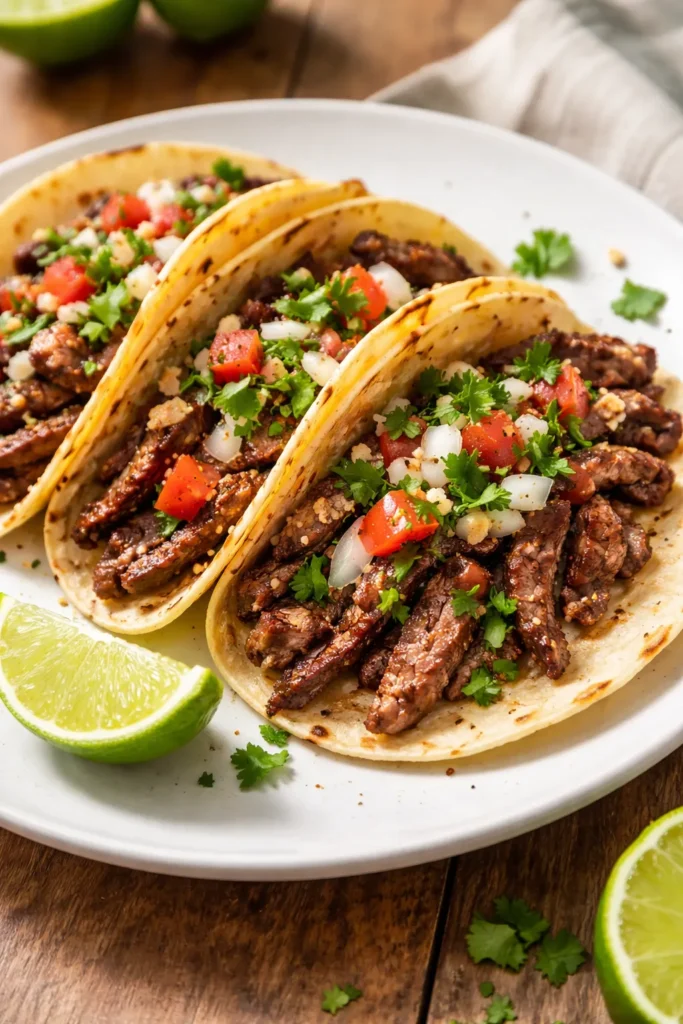
Carne asada translates to “grilled meat,” and these tacos represent one of the most beloved preparations in Mexican street food culture. Thinly sliced skirt or flank steak, marinated in citrus and spices, grilled over high heat until charred at the edges, then chopped into rough pieces and loaded into warm corn tortillas — the result is deeply savory, slightly smoky, and bright from the lime.
The marinade is what makes or breaks carne asada. You need citrus (both lime and orange juice work together — the orange adds sweetness that lime alone doesn’t give), garlic, a touch of oil, cumin, chili powder, and a small amount of soy sauce, which adds umami depth without tasting remotely Asian. Marinate the steak for at least 2 hours, ideally overnight in the fridge.
Skirt steak is the traditional cut — it’s thin, well-marbled, and absorbs the marinade quickly. Flank steak works well too and has a slightly leaner profile. Either way, cook the steak over genuinely high heat — a screaming hot cast iron skillet or a well-preheated grill grate. The goal is a fast sear that chars the exterior while keeping the interior medium to medium-rare. Overcooking makes skirt steak tough and chewy.
How to Slice and Chop Carne Asada
Rest the steak for at least 5 minutes after cooking. Then slice thinly across the grain first, and follow that with a rough chop to get pieces that are small enough to fit neatly in a taco. Street-style carne asada tacos have chopped, bite-sized pieces — not long slices that drag out of the tortilla when you bite in.
Topping Style for Carne Asada
Keep it simple and true to the street food original: finely diced white onion, fresh cilantro, a squeeze of lime, and a good salsa verde or tomatillo salsa. A sprinkle of cotija is optional but excellent. Guacamole makes it more festive. Resist the urge to pile on too many toppings — carne asada is flavorful enough to hold the spotlight.
Quick Facts
- Best cut: Skirt steak or flank steak
- Marinade time: 2 hours minimum, overnight ideal
- Cook time: 3 to 4 minutes per side over high heat
- Best tortilla: Corn, charred in a dry skillet or over a flame
- Serves: 4 to 6 people
Pro tip: After slicing the steak, pour any accumulated juices from the cutting board back over the chopped meat. Those juices carry enormous flavor and keep the meat from drying out while you assemble.
3. Slow Cooker Chicken Tinga Tacos
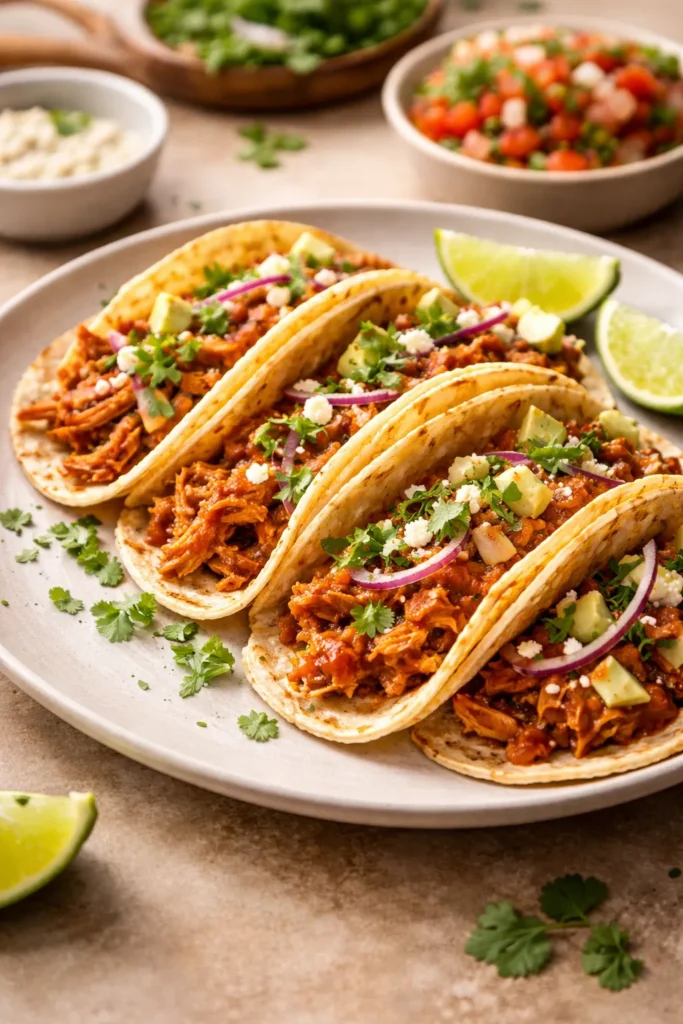
Chicken tinga is one of those preparations that seems almost too simple for how good it tastes. Shredded chicken simmered in a smoky, slightly sweet chipotle-tomato sauce — it’s the kind of filling that gets better the longer it sits, which makes it an ideal candidate for the slow cooker and for meal prep.
The base of tinga is a sauce made from canned tomatoes, chipotle peppers in adobo sauce, garlic, and onion. The chipotle peppers are the key ingredient — they bring smokiness and a moderate, layered heat that you can control by adjusting how many peppers you use. Start with one or two peppers plus a spoonful of the adobo sauce from the can. More if you want serious heat; less if you’re cooking for people who don’t love spice.
Add boneless, skinless chicken thighs directly to the slow cooker — don’t bother browning them first on a weeknight — and pour the blended sauce over top. Cook on low for 6 to 7 hours or on high for 3 to 4 hours. When the chicken is done, pull it apart into rough shreds using two forks right in the slow cooker, then stir everything together so the meat soaks up the sauce as it sits.
Why Chicken Thighs Beat Chicken Breasts Here
Chicken thighs stay moist and juicy through the long cooking time, while breasts tend to dry out and become stringy. Thighs also have enough fat to keep the filling from tasting lean or bland. If you only have breasts on hand, reduce the cooking time on high to 2 to 2.5 hours and watch carefully — they can overcook quickly in a slow cooker.
Serving Chicken Tinga Tacos
Top with shredded red cabbage for crunch, diced white onion, a drizzle of crema, and a few slices of fresh avocado. Tinga works beautifully on corn tortillas, tostadas, or even in a bowl over rice. It also reheats exceptionally well — make a double batch on Sunday and you have weeknight lunches sorted.
Quick Facts
- Protein: 1.5 to 2 lbs boneless skinless chicken thighs
- Slow cooker time: 6 to 7 hours on low, or 3 to 4 hours on high
- Key ingredient: Chipotle peppers in adobo sauce
- Make-ahead: Keeps refrigerated for 4 days, freezes well for 3 months
- Serves: 6 to 8
4. Crispy Fish Tacos with Chipotle Slaw
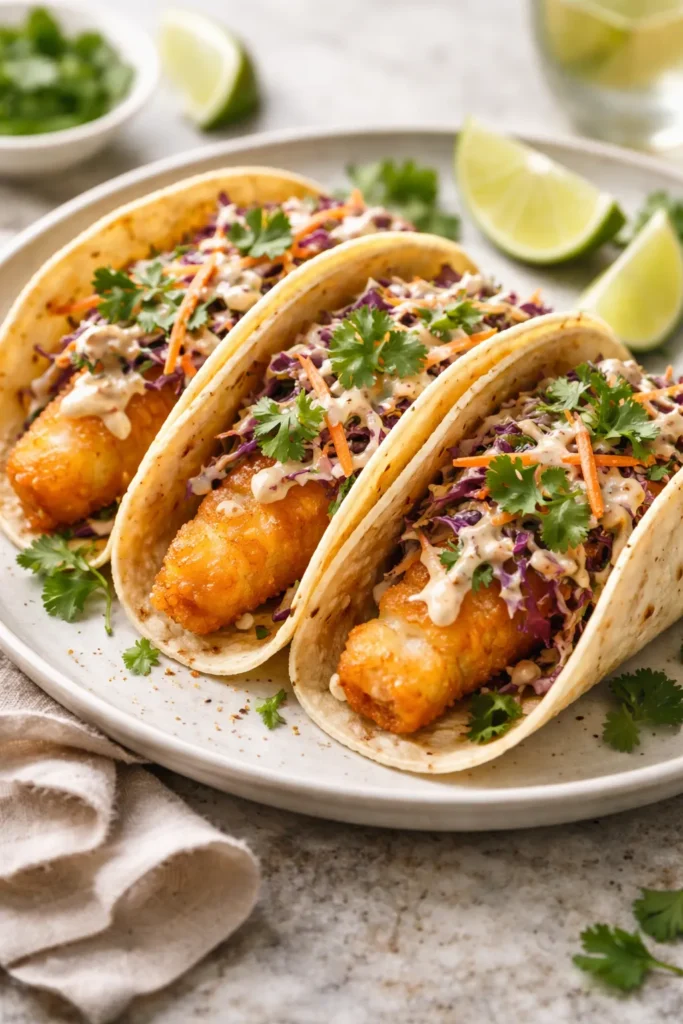
Fish tacos occupy a specific and beloved corner of the taco world. When done right — lightly battered or seasoned flaky white fish, a cooling creamy slaw, and a bright squeeze of lime — they’re one of the most satisfying things you can eat. The contrast of textures is what makes them: crispy fish against soft tortilla, creamy slaw against a squeeze of acid.
For the fish, cod, halibut, tilapia, mahi-mahi, or grouper all work well. You want a firm white fish that won’t fall apart in the pan. Pat the fillets completely dry before seasoning — moisture is the enemy of a good sear. Season generously with chili powder, cumin, garlic powder, smoked paprika, salt, and pepper. Pan-fry in a thin layer of oil over medium-high heat for 3 to 4 minutes per side until the fish is opaque through and has a lightly golden crust. Break it into rough chunks before serving — rustic pieces hold toppings better than a neat fillet.
The chipotle slaw takes five minutes and carries a huge amount of the flavor. Combine shredded green cabbage with a dressing made from mayonnaise, a tablespoon of adobo sauce from a can of chipotle peppers, lime juice, a pinch of sugar, and salt. Toss well and let it sit while you cook the fish — even 10 minutes of resting makes the cabbage soften slightly and the flavors meld.
The Battered Alternative
If you want a more traditional Baja-style fish taco, a beer batter creates an extraordinarily light, crispy coating. Whisk together 1 cup all-purpose flour, 1 teaspoon baking powder, salt, and enough cold beer (a lager works best) to make a batter the consistency of thin pancake batter. Dip seasoned fish strips and fry in 375°F oil for about 3 minutes until golden. The result is a taco that genuinely rivals your favorite taco stand.
Quick Facts
- Best fish: Cod, halibut, or mahi-mahi for their firm texture
- Cook time: 6 to 8 minutes pan-fried, or about 3 minutes if frying battered strips
- Best tortilla: Corn, lightly charred
- Essential topping: Chipotle slaw and a squeeze of fresh lime
- Serves: 4
Pro tip: Warm the corn tortillas directly over a gas flame for 10 to 15 seconds per side. The slight char and smokiness from open flame pairs with fish taco flavors in a way that a dry skillet alone doesn’t quite replicate.
5. Blackened Shrimp Tacos
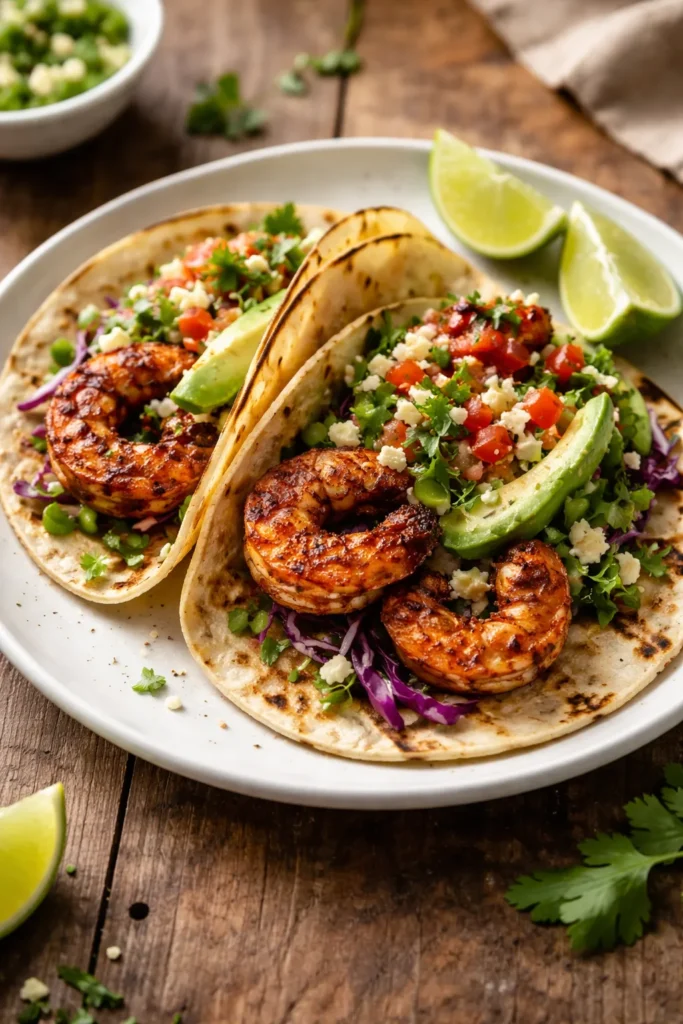
Shrimp tacos have a short cooking time — from seasoned shrimp to a finished taco, you’re looking at 20 minutes total — which makes them one of the most practical options for genuinely busy nights. The blackened seasoning brings bold, slightly smoky heat that turns simple shrimp into something with real character.
Blackening seasoning is a Cajun-inspired spice blend: paprika, cayenne, garlic powder, onion powder, thyme, oregano, and black pepper. Coat the shrimp generously and cook them in a screaming hot cast iron skillet with a small amount of butter. The key is high heat and restraint — shrimp cook in 90 seconds to 2 minutes per side. Any longer and they turn rubbery. Pull them off the heat the moment they curl into a loose C-shape and turn opaque.
Use medium or large shrimp (21 to 25 count per pound is ideal — smaller shrimp are harder to manage and lose their texture faster). Peel and devein them before seasoning. If you’re using frozen shrimp, thaw them under cold running water, then pat them bone dry before the spice rub goes on — water in the pan will steam the shrimp instead of searing them.
Building the Full Taco
The classic pairing for blackened shrimp is a crisp slaw and sliced avocado. A simple lime crema — equal parts sour cream and mayonnaise, lime juice, salt, and a pinch of garlic powder — adds richness and cools the heat of the blackening spice. A few thin-sliced radishes add crunch and a fresh, slightly peppery bite.
Why Corn Tortillas Work Best Here
The earthier, more mineral flavor of corn tortillas holds up better against the bold blackening spice than flour. Keep them small — 6-inch corn tortillas — and use two stacked per taco so they don’t tear under the weight of the filling and toppings.
Quick Facts
- Shrimp size: 21 to 25 count per pound (medium-large)
- Cook time: 3 to 4 minutes total — about 90 seconds per side
- Key technique: Screaming hot cast iron pan, butter not oil
- Make-ahead: Shrimp are best cooked fresh; the crema can be made up to 3 days ahead
- Serves: 4
6. Slow Cooker Carnitas Tacos
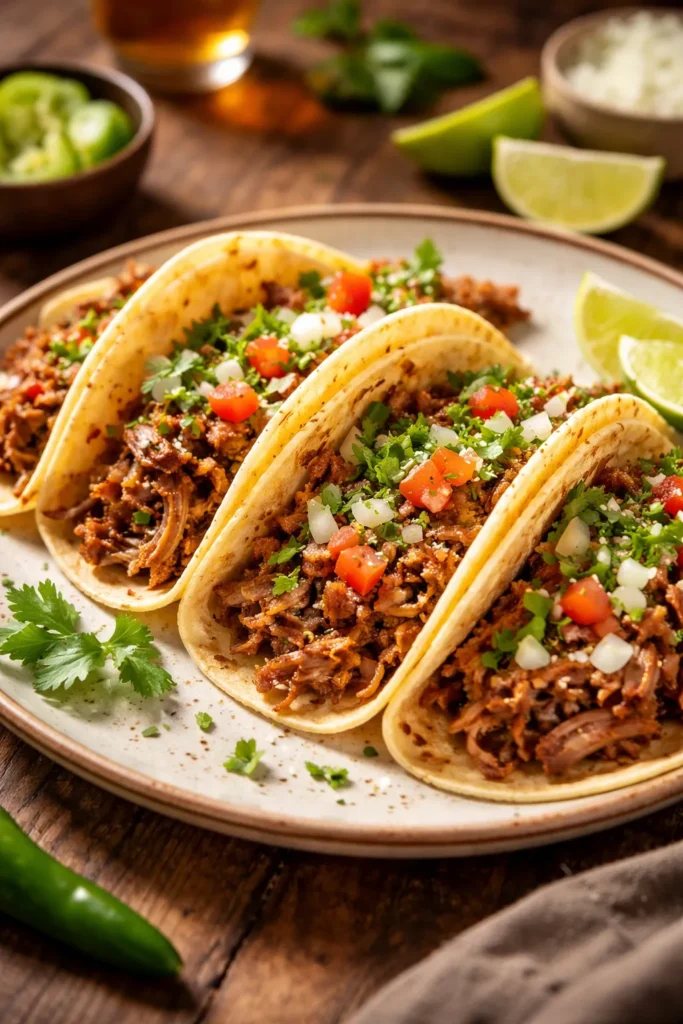
Carnitas is slow-cooked pork at its absolute best — tender, slightly crispy at the edges, rich with citrus and spice, and endlessly versatile. The word translates to “little meats,” and the traditional preparation involves cooking pork low and slow in its own fat (a method called confit) until it’s meltingly soft, then crisping the shredded pieces until they develop golden, slightly caramelized edges.
The cut you want is pork shoulder (also labeled pork butt), which has the right fat-to-meat ratio to survive the long cooking time without drying out. Season it generously with salt, cumin, dried oregano, chili powder, and garlic. Place it in the slow cooker with orange juice, chicken broth, and a couple of bay leaves. The orange juice is not optional — it gives carnitas their characteristic brightness and helps balance the richness of the pork.
Cook on low for 8 to 10 hours or on high for 5 to 6 hours. When done, the pork should fall apart when you press it with a fork. Shred it directly in the slow cooker using two forks, then spread the shredded meat on a foil-lined baking sheet and broil 6 inches from the broiler element for 5 to 7 minutes until the edges turn golden and crisp. Don’t skip the broiling step. That caramelization is what separates carnitas from plain pulled pork.
Classic Carnitas Taco Toppings
The traditional accompaniment is simple: diced white onion, fresh cilantro, lime, and either a salsa verde or pickled jalapeños. Queso fresco crumbled on top adds a mild, salty contrast to the rich pork. Diced avocado rounds it out. This isn’t the time for heavy sauces — the pork is the star and the toppings exist to complement, not compete.
Make-Ahead Strategy
Carnitas are arguably better the next day, once the meat has had time to absorb more of its cooking juices. Make the pork on a Sunday and refrigerate it in an airtight container for up to 5 days. Re-crisp it in a hot skillet with a drizzle of oil each time you serve — it comes back beautifully.
Quick Facts
- Cut: Bone-in or boneless pork shoulder (3 to 4 lbs serves 6 to 8)
- Slow cooker time: 8 to 10 hours on low
- Critical step: Broil after shredding for crispy edges
- Best tortilla: Small corn tortillas, warmed in a dry skillet
- Freezes well: Yes — up to 3 months
7. Chipotle-Roasted Cauliflower Tacos
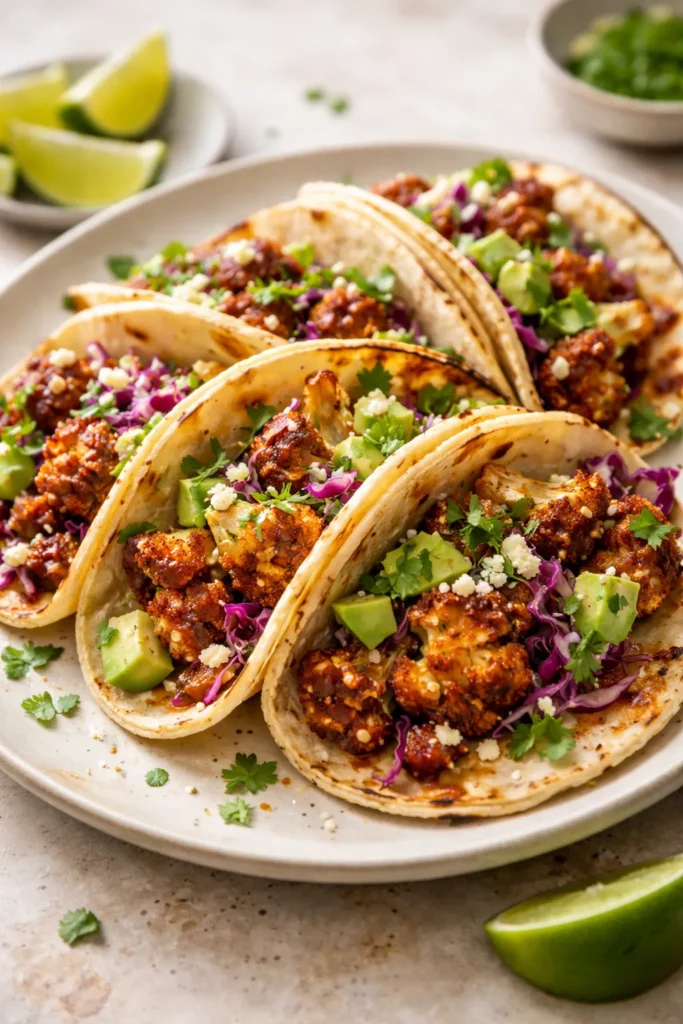
Vegetarian tacos often get treated like an afterthought — a wilted mushroom or a pile of black beans dropped into a tortilla without much consideration. Chipotle-roasted cauliflower tacos are the exact opposite of that. The cauliflower becomes deeply savory, slightly smoky, and caramelized at the edges when roasted at high heat, and the chipotle adobo sauce clings to the florets to build a flavor profile that satisfies on the same level as meat.
The technique is straightforward but the details matter. Cut the cauliflower into small, evenly sized florets — roughly 1.5-inch pieces — so they cook at the same rate. Toss them with oil, salt, cumin, smoked paprika, garlic powder, and a generous tablespoon or two of the adobo sauce from a can of chipotle peppers. Roast on a sheet pan at 425°F, spread in a single layer with no pieces touching. Crowding the pan steams the cauliflower instead of roasting it, and you’ll end up with soft, pale florets instead of the caramelized, slightly charred result you’re after.
Roast for 25 to 30 minutes, tossing once at the halfway point. The cauliflower will shrink significantly — this is normal and good. The edges will turn deep brown and crispy, and the flavor will concentrate as moisture evaporates.
Building the Vegetarian Taco
Spread a thin layer of warmed black beans or refried beans on the tortilla first — this creates a base that prevents the tortilla from getting soggy and adds protein. Layer the roasted cauliflower on top, then add thinly sliced red cabbage, a squeeze of lime, and a drizzle of either cashew crema (blended soaked cashews, lime, garlic, water, salt) or regular crema. A sprinkle of cotija finishes it if you’re not keeping it vegan.
A Note on the Adobo Sauce
The adobo sauce from a can of chipotle peppers does double duty here — it seasons the cauliflower and can be stirred into the crema for extra smoky heat. Unused chipotle peppers and sauce freeze well in ice cube trays, so you’ll always have some ready for the next batch.
Quick Facts
- Main ingredient: 1 large head cauliflower (serves 4)
- Roasting temperature: 425°F, 25 to 30 minutes
- Key ingredient: Adobo sauce from canned chipotle peppers
- Vegan-friendly: Yes, with cashew crema instead of dairy
- Best tortilla: Corn or small flour tortillas
Pro tip: If you want more texture contrast, add a handful of crumbled tortilla chips or pepitas between the cauliflower and the crema — the crunch is particularly good against the soft, saucy cauliflower.
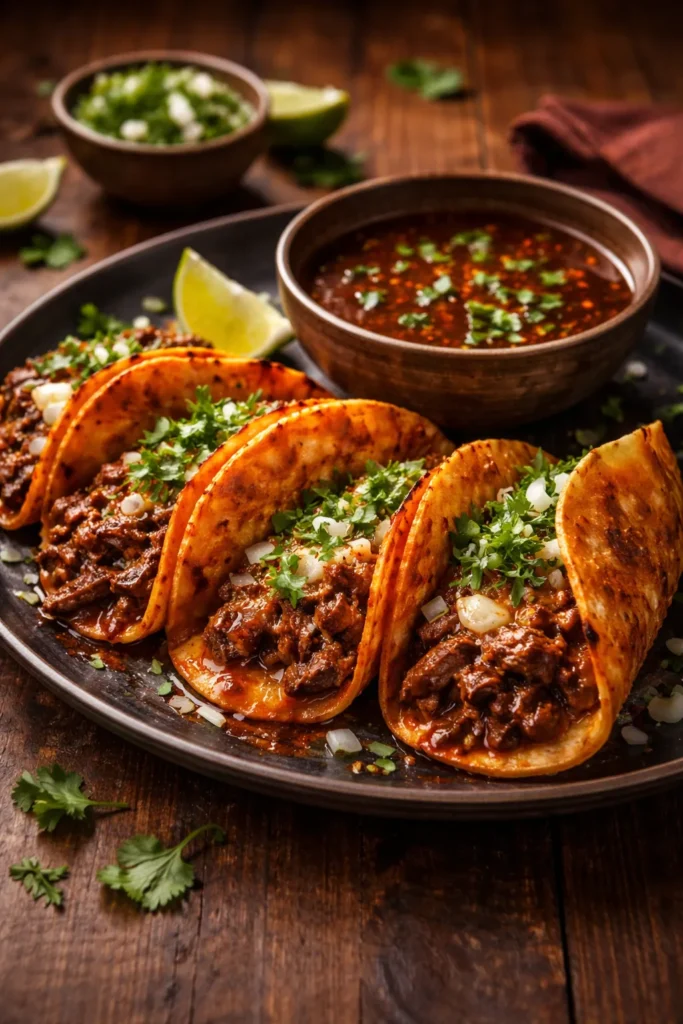
8. Birria Tacos with Consomé
Birria tacos are the taco world’s great commitment recipe. They take considerably longer than anything else on this list — a proper birria braise needs 3 to 4 hours — but the result is so exceptional, so deeply layered with flavor, that the time investment makes complete sense on a weekend. And the consomé, the rich, spiced broth left behind after braising, turns into one of the most satisfying dipping sauces you’ll ever encounter.
Traditional birria comes from Jalisco, Mexico, and was originally made with goat. The version that spread across the globe is typically made with beef — bone-in short ribs, beef chuck, or a combination of both. The braising liquid is built from a blend of dried chiles: guajillo chiles (mild, slightly fruity) and ancho chiles (dark, raisiny sweetness) form the base. Reconstitute them in hot water for 20 minutes, then blend with tomatoes, garlic, white onion, cumin, dried oregano, cloves, black pepper, and a splash of apple cider vinegar.
Sear the beef in batches in a heavy pot until deeply browned on all sides — this step builds the fond that enriches the consomé. Pour the blended chile sauce over the meat, add beef broth to just cover, and braise covered at 325°F for 3 to 3.5 hours until the meat falls from the bone. Shred the beef and return it to the pot to soak in the broth.
The Birria Taco Assembly Method
The preparation of birria tacos is different from any other taco on this list. Dip the corn tortilla into the fat layer floating on top of the consomé — that fat is deeply seasoned and turns the tortilla a burnished red-orange. Cook the dipped tortilla in a hot skillet for about 30 seconds per side. Add shredded birria meat and a handful of shredded Oaxacan cheese (or mozzarella as a substitute) to one half of the tortilla and fold it over. Press gently and cook until the cheese melts and the tortilla is crispy — about 2 minutes per side.
Serve with a small bowl of hot consomé for dipping. This is non-negotiable. The consomé is finished with a squeeze of lime and a sprinkle of diced onion and cilantro. You dip the taco, you take a bite, you dip again.
Why Birria Is Worth the Time
No other taco produces quite the same reaction as a properly made birria. The depth of the chile braise, the melted cheese, the crispy-tender tortilla, and the ritual of the consomé dip create an eating experience that feels genuinely special. It’s the taco you make when you want to impress someone or when you simply want to spend a Saturday afternoon cooking something that rewards patience.
Quick Facts
- Best cut: Bone-in short ribs, beef chuck, or a combination
- Braise time: 3 to 3.5 hours at 325°F
- Key technique: Dip tortillas in consomé fat before cooking
- Make-ahead: The birria improves significantly overnight — make it a day ahead
- Serves: 6 to 8
- Dried chiles needed: Guajillo and ancho (find them in the Latin grocery aisle or at most supermarkets)
Pro tip: If you don’t have a Dutch oven, a slow cooker works for the braise — cook on low for 8 hours after blending and straining the chile sauce. You’ll miss some of the caramelization from oven braising, but the flavor will still be outstanding.
Storing Taco Fillings and Reheating Without Losing Texture
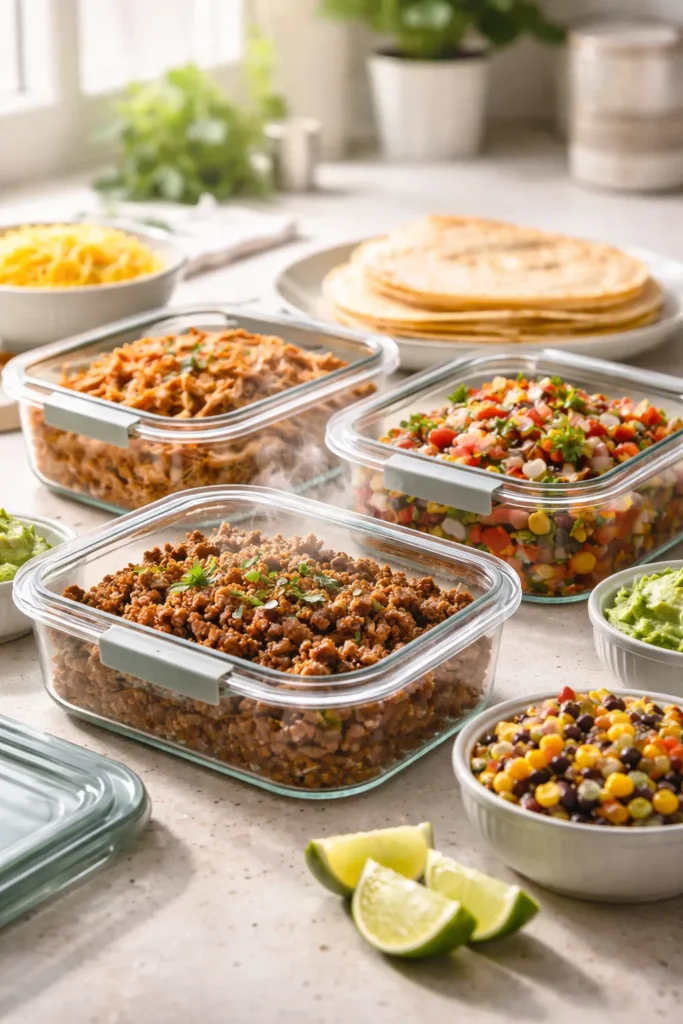
Every filling on this list stores well, which makes all of them useful for weeknight meal prep. A few storage principles that apply across the board:
Refrigerator storage: Most cooked taco fillings keep for 3 to 5 days in an airtight container. The saucier ones — tinga, birria, carnitas — actually improve as they sit, because the meat continues absorbing the surrounding liquid and spices.
Freezer storage: Ground beef taco meat, carnitas, chicken tinga, and birria all freeze beautifully for up to 3 months. Portion them into zip-lock bags laid flat — they’ll thaw faster and take up less space. Fish and shrimp fillings don’t freeze well after cooking and are always best prepared fresh.
Reheating without drying out: Reheat meat-based fillings in a skillet over medium heat with a small splash of water or broth — about 2 to 3 tablespoons is enough. Cover the pan for the first minute to create steam, then uncover to let any excess liquid evaporate. This method keeps the filling moist without making it watery. Avoid the microwave for carnitas or carne asada — it tends to make the meat tough and rubbery.
Keep components separate: Always store fillings, tortillas, and toppings separately. A tortilla left sitting under a wet filling turns to mush within hours. Assemble tacos fresh each time, even when reheating.
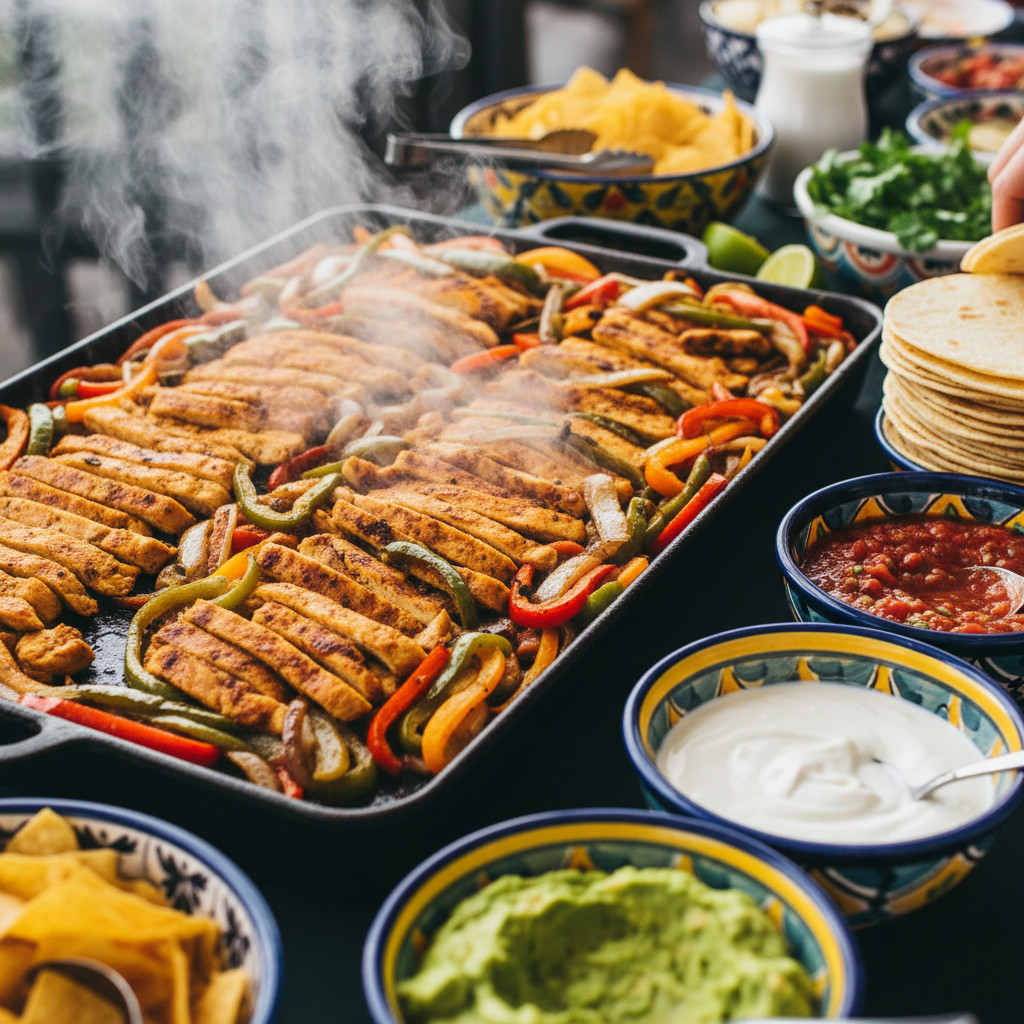
Taco Night as a Build-Your-Own Dinner
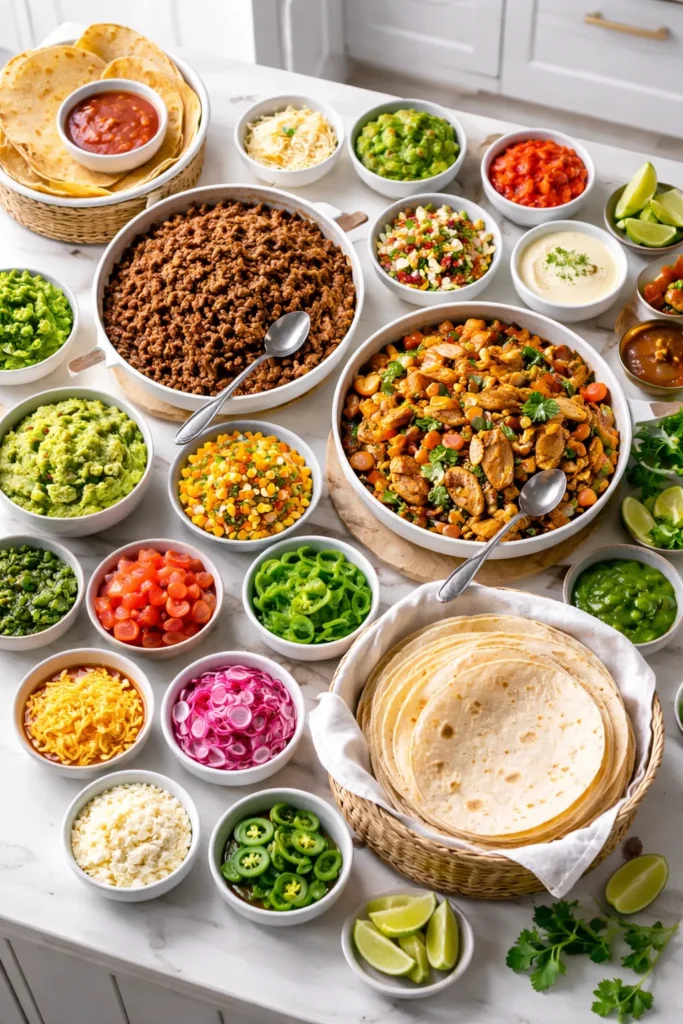
One of the smartest ways to serve tacos for a group — especially when people have different preferences or dietary needs — is the taco bar format. Set out the warm filling (or two, if you’ve prepped ahead), a basket of warm tortillas wrapped in a towel, and six to eight toppings in small bowls. Let everyone build their own.
This approach is practical and genuinely more fun. It removes the pressure of plating individual tacos, keeps the tortillas from getting soggy before anyone eats them, and gives everyone agency over their own dinner. Kids who would normally resist a particular filling will often try something new when they’re the ones adding it.
For a proper taco bar spread, aim for at least two different proteins (or one protein and a hearty vegetarian option), two salsas with different heat levels, at least four topping options, and both corn and flour tortillas so people can choose. That’s the setup that makes a weeknight taco bar feel like an actual event.
Final Thoughts
The eight tacos in this collection cover most of the moods a taco night can take — fast and simple with the ground beef, slow and luxurious with the carnitas and birria, fresh and bright with the fish and shrimp, and genuinely satisfying for the vegetable-forward crowd with the chipotle cauliflower.
If you’re new to making tacos at home, start with the ground beef or the chicken tinga — both are forgiving, fast, and hard to mess up. Once you’re comfortable, the carne asada and birria will reward the effort with flavors that genuinely rival your favorite taqueria.
The consistent thread through every version is this: warm your tortillas, don’t overcrowd your fillings, and always, always serve lime wedges. Everything else is up to you.