Baking can feel like walking a tightrope while blindfolded. One tiny mistake—too much salt, cold ingredients, or opening the oven at the wrong moment—and what you imagined as a showstopping dessert becomes a flat, dense, sunken disappointment. If you’ve ever burned cookies, curdled cake batter, or watched a soufflé collapse in slow motion, you’re not alone. The truth is, many home bakers struggle not because they lack skill or taste buds, but because they’re attempting recipes that demand precision, timing, and techniques that take years to master.
The good news? You don’t need to become an expert baker to make desserts that look elegant, taste incredible, and actually impress people. Some of the most delicious treats in the culinary world are almost impossible to mess up—they’re forgiving by design, flexible with minor mistakes, and built on foolproof techniques that work even when your kitchen is hot, your ingredients aren’t perfectly room temperature, and you’re making them for the first time.
This collection of fifteen desserts is specifically curated for anyone who’s ever felt defeated in the kitchen. These aren’t oversimplified recipes that taste like it—they’re genuinely delicious treats that happen to be extraordinarily forgiving. Many require no oven at all, some need just five minutes of hands-on time, and all of them work reliably whether you’re a complete novice or someone who’s had a few baking mishaps. The secret isn’t complicated: these desserts work with your limitations rather than against them.
Table of Contents
- 1. No-Bake Chocolate Mousse
- Why It Never Fails
- How to Make It Foolproof
- 2. Crème Brûlée
- Why Beginners Love This Dessert
- The Easiest Method
- 3. Foolproof Brownies
- What Makes Them Basically Impossible to Mess Up
- The Dump-and-Stir Approach
- 4. Chocolate Pots de Crème
- Why They’re Perfect for Nervous Bakers
- Simple Stovetop Method
- 5. Tiramisu
- Why Tiramisu Is Beginner-Friendly
- The Easiest Approach
- 6. Three-Ingredient Peanut Butter Cookies
- Why They’re Virtually Impossible to Ruin
- The Basic Recipe
- 7. Panna Cotta
- Why Gelatin Desserts Intimidate Nobody Once They Try Them
- Foolproof Vanilla Panna Cotta
- 8. No-Bake Cheesecake
- Why This Version Never Fails
- The Complete No-Bake Method
- 9. Chocolate Truffles
- Why Truffles Are Foolproof Candy
- Simple Two-Ingredient Truffle Base
- 10. Fruit Crisps
- Why Crisps Are Nearly Impossible to Mess Up
- Basic Foolproof Fruit Crisp
- 11. Microwave Mug Cakes
- Why They’re Stress-Free Desserts
- Basic Chocolate Mug Cake
- 12. Lemon Bars
- Why the Method Matters
- Fool-Proof Lemon Bars
- 13. No-Bake Rice Krispie Treats
- Why Kids and Adults Both Love Making These
- The Classic Method
- 14. Pavlova with Fruit
- Why Meringue Is Less Scary Than Most People Think
- Straightforward Pavlova Method
- 15. Puff Pastry Tarts with Fruit
- Why Store-Bought Puff Pastry Is a Cheat Code
- Simple Fruit Tart Assembly
- Final Thoughts
1. No-Bake Chocolate Mousse
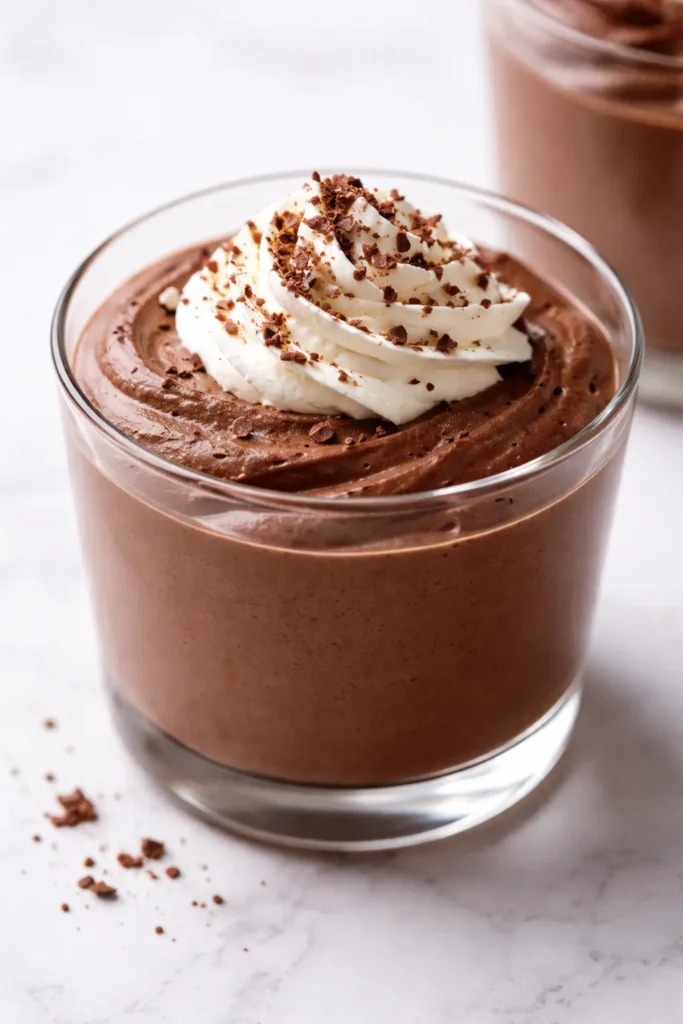
Chocolate mousse is the ultimate no-stress dessert, and there’s a reason fancy restaurants serve it constantly. It requires zero baking skills because there’s no baking involved. You’re essentially whipping cream, mixing chocolate, and waiting for the fridge to do the actual work. The dessert is naturally forgiving because mousse’s appeal lies in its airy, luxurious texture—slight imperfections only add to its rustic charm.
Why It Never Fails
The beauty of mousse is that you can’t really ruin it through timing or temperature mistakes. Unlike baked goods that require precise ingredient ratios and oven temperatures, mousse works with whatever method you use. Whether you whip the cream by hand or use an electric mixer, whether you use melted chocolate or cocoa powder, the result is always silky and impressive. Even if you slightly over-whip the cream, the texture simply becomes denser, which most people prefer anyway.
How to Make It Foolproof
- Melt 6 ounces of high-quality dark chocolate with 2 tablespoons of butter over gentle heat (or microwave in 30-second bursts, stirring between each)
- Let the chocolate cool for 5 minutes while you whip 1 cup of heavy cream with 2 tablespoons of sugar until soft peaks form
- Fold the whipped cream into the cooled chocolate gently—the mixture should look marbled and luxurious
- Divide into serving glasses and refrigerate for at least 2 hours
- Top with fresh berries, whipped cream, or a dusting of cocoa powder just before serving
Pro tip: Make this up to 24 hours ahead and store it covered in the fridge. It actually improves as it sits because the flavors meld together.
2. Crème Brûlée
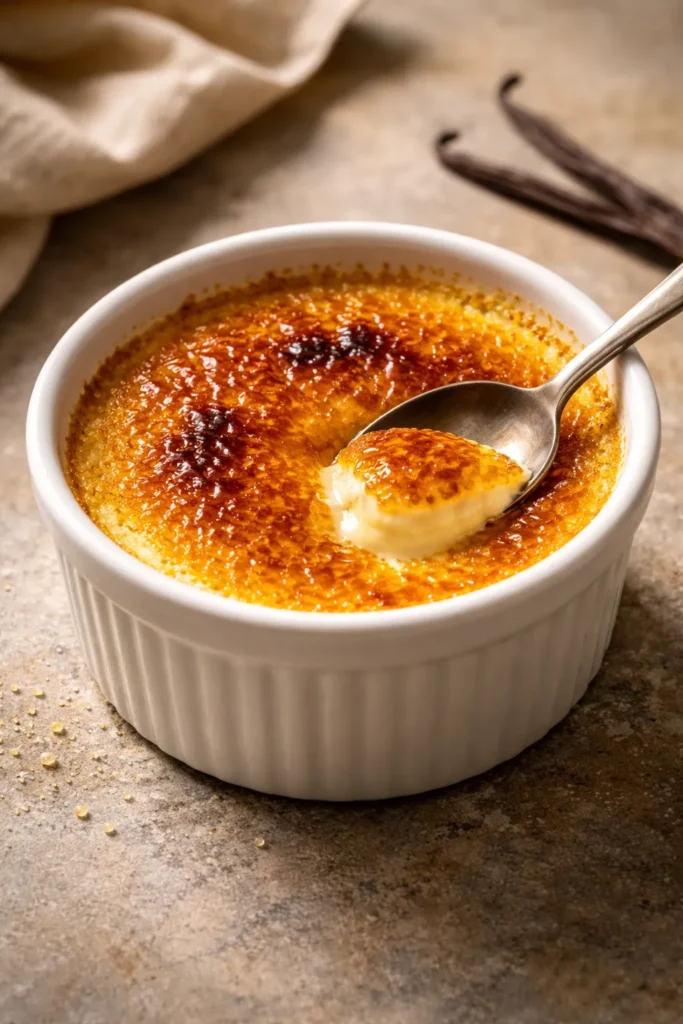
Crème brûlée looks so elegant that people assume it’s complicated, but this custard dessert is actually one of the most forgiving baked items you can make. The secret is understanding that crème brûlée doesn’t need to be perfect—it’s meant to be rustic and individual. The wobble in the center when you set it down? That’s exactly right. The slight unevenness of the caramelized sugar on top? That’s part of the appeal.
Why Beginners Love This Dessert
Most failing baked goods fail catastrophically—cakes sink, cookies spread into one giant blob, pastry tears. Crème brûlée forgives almost everything because the custard is cooked in a water bath, which creates an incredibly forgiving cooking environment. The water acts as a temperature buffer, preventing the edges from cooking too quickly. Even if your oven temperature is slightly off or you bake it 5 minutes longer than intended, you’ll still get silky, delicious custard.
The Easiest Method
- Whisk 5 egg yolks with 1/4 cup of sugar until pale (this takes about 2 minutes)
- Heat 1 1/2 cups of heavy cream with 1/2 cup of whole milk until steaming (don’t boil)
- Slowly pour the hot cream into the egg yolks while whisking constantly to prevent scrambling
- Add 1 teaspoon of vanilla extract and strain through a fine-mesh sieve
- Pour into ramekins and place them in a hot water bath (the water should come halfway up the sides)
- Bake at 325°F for 25-30 minutes until the edges are set but the center still jiggles slightly
- Chill for at least 4 hours (overnight is better)
- Top with sugar and torch it right before serving, or broil for 2-3 minutes until caramelized
Worth knowing: You don’t actually need a kitchen torch. A hot broiler works just fine, and the imperfect caramelization from a broiler often looks more charming anyway.
3. Foolproof Brownies
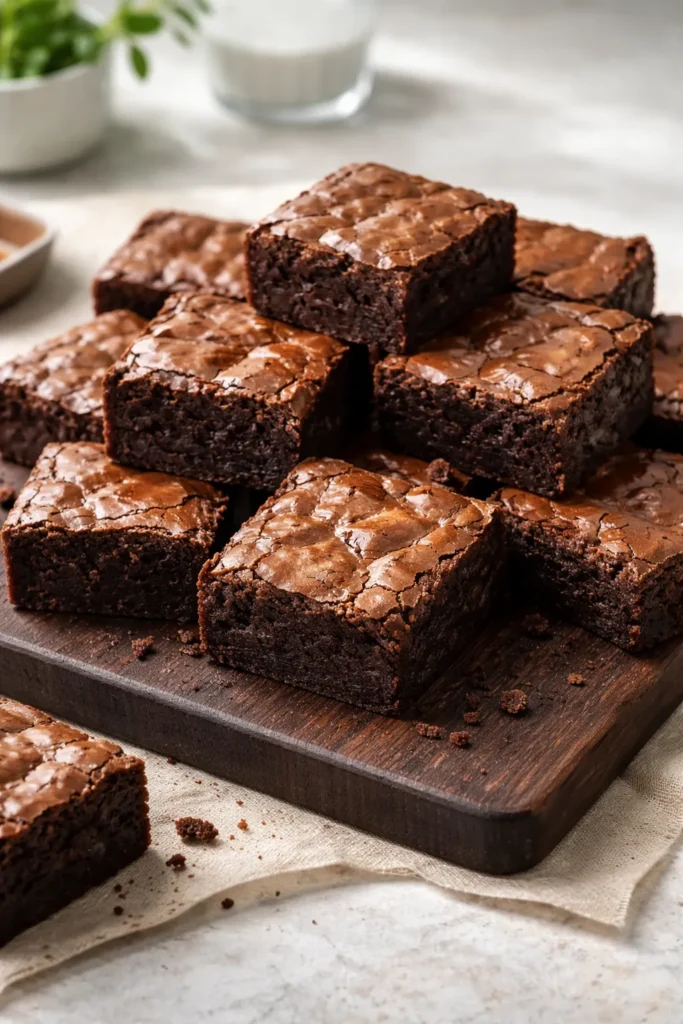
Brownies might be the most forgiving baked good that exists. They’re supposed to be dense and fudgy. They’re supposed to be slightly underbaked. They’re meant to be rustic. A brownie that looks rough around the edges with a slightly cracked top is exactly what you want. This isn’t a baked good where precision matters—it’s one where happy accidents often lead to the best results.
What Makes Them Basically Impossible to Mess Up
The dump-and-stir method is the secret here. Instead of melting chocolate separately or creaming butter and sugar for precise times, you’re combining everything in one bowl with minimal fussing. The high cocoa content and fat content from butter means there’s enough richness to carry the dessert even if you over-mix slightly or use an ingredient that’s not exactly room temperature.
The Dump-and-Stir Approach
- Melt 8 ounces of unsweetened chocolate with 8 ounces of butter in a large bowl (microwave in 30-second bursts or use a double boiler)
- Stir in 1 1/2 cups of sugar, 1/2 teaspoon of salt, and 1 teaspoon of vanilla
- Add 3 large eggs one at a time, stirring after each addition (the mixture will look slightly separated, and that’s completely normal)
- Fold in 3/4 cup of all-purpose flour with a wooden spoon until just combined
- Spread into a greased 8×8-inch pan and bake at 325°F for 30-35 minutes
- The toothpick test doesn’t work perfectly for brownies—instead, look for the edges to pull slightly away from the sides of the pan and the center to still jiggle slightly
Insider note: Lower oven temperature (325°F instead of 350°F) gives you more leeway with baking time because the brownies bake more gently, creating that fudgy texture without the risk of overcooking them completely.
4. Chocolate Pots de Crème
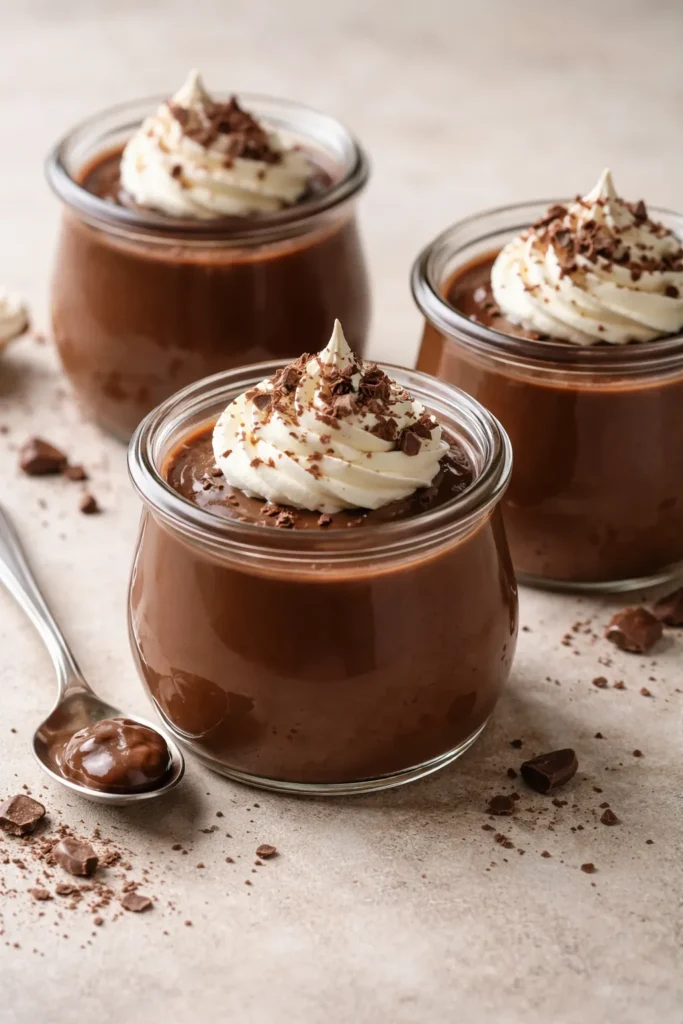
Pots de crème are individual chocolate custards that require no baking at all—just a water bath on the stovetop. These are arguably more forgiving than crème brûlée because you don’t have to nail oven temperature. You’re simply heating cream, pouring it over chocolate, letting it sit, whisking, and then chilling. Each step is gentle and hard to mess up.
Why They’re Perfect for Nervous Bakers
The ingredient list is almost comically simple—chocolate, cream, egg yolks, and vanilla. There’s nowhere to hide mistakes, which actually makes this dessert more forgiving because the simplicity means less can go wrong. You can’t forget an ingredient or add too much baking powder or make a timing mistake with a rise. You’re just combining high-quality ingredients and letting them meld together.
Simple Stovetop Method
- Chop 8 ounces of dark chocolate (70% cacao works beautifully) into small pieces and place in a bowl
- Heat 1 cup of heavy cream until it’s just beginning to steam
- Pour the hot cream over the chocolate and let it sit for 1 minute without stirring
- Whisk until completely smooth and glossy
- Whisk together 4 egg yolks with 1 tablespoon of sugar in a separate bowl
- Slowly pour the chocolate mixture into the egg yolks while whisking constantly to prevent cooking the eggs
- Strain through a fine-mesh sieve and add 1 teaspoon of vanilla extract
- Divide into serving cups and refrigerate for at least 6 hours
Real talk: The slow pouring while whisking step is important, but it’s not as complicated as it sounds—you’re just trying to prevent the eggs from scrambling by adding the hot liquid gradually while stirring.
5. Tiramisu
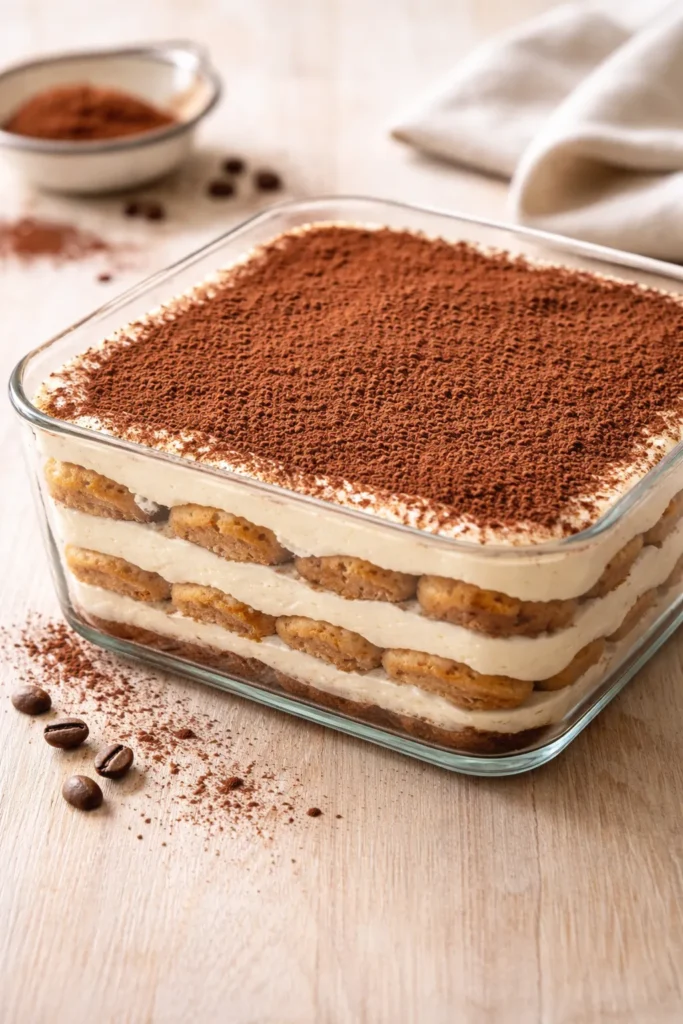
Tiramisu is essentially layers of coffee-soaked cookies held together with a mascarpone cream. It requires no baking, no precise timing, and actually improves when made 24 hours ahead. The beauty of this dessert is that even if one layer is slightly wonky or the coffee mixture isn’t perfectly uniform, the end result still looks impressive and tastes incredible.
Why Tiramisu Is Beginner-Friendly
Most layered desserts are stressful because you have to stack unstable components and hope they don’t topple over. Tiramisu is the opposite—it’s supposed to be slightly messy, slightly rustic. The ladyfingers soften as they absorb the coffee mixture, making the whole thing more forgiving to assemble. Plus, you can make it entirely in a 9×13-inch dish, which eliminates any structural concerns.
The Easiest Approach
- Whisk together 6 egg yolks and 1/2 cup of sugar until pale and thick (this takes about 3-4 minutes)
- Gently fold in 1 pound of mascarpone cheese until no lumps remain
- In a shallow bowl, combine 1 cup of strong espresso (cooled) with 2 tablespoons of coffee liqueur and 2 tablespoons of sugar
- Quickly dip 24 ladyfinger cookies (savoiardi) one at a time into the coffee mixture—just a quick dunk on each side, about 1 second per side
- Arrange half the dipped ladyfingers in the bottom of a 9×13-inch dish
- Spread half the mascarpone cream over the cookies
- Layer the remaining dipped ladyfingers and then the remaining cream
- Cover and refrigerate overnight (or at least 6 hours)
- Dust the top with cocoa powder just before serving
Worth knowing: You can use pasteurized eggs if you’re concerned about raw egg safety, or use this recipe with egg yolks that have been heat-treated in a double boiler with sugar until they reach 160°F.
6. Three-Ingredient Peanut Butter Cookies
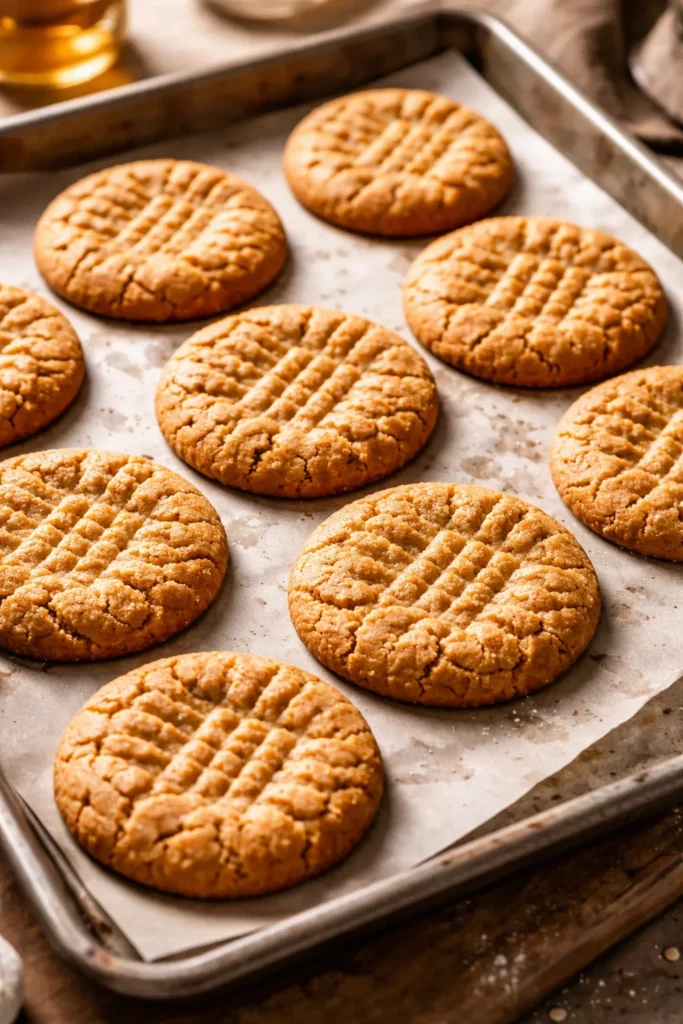
These cookies prove that you don’t need complicated ingredient lists or fancy techniques to make something delicious. Three ingredients, minimal mixing, and they come out perfect every single time. They’re supposed to have a slightly crackled top and chewy center. Even if they spread more than expected or bake a little longer than intended, you still get delicious cookies.
Why They’re Virtually Impossible to Ruin
The peanut butter provides so much flavor that subtle mistakes don’t matter. These cookies are supposed to look rustic and homemade. If they’re slightly thinner than ideal, you just have crunchier cookies. If they’re thicker, you have chewier cookies. Both versions are delicious. The simplicity means you’re not juggling multiple techniques or precise ingredient ratios—you’re just mixing and baking.
The Basic Recipe
- Mix together 1 cup of peanut butter (creamy or chunky), 1/2 cup of sugar, and 1 beaten egg in a bowl
- That’s it—you’re done mixing
- Scoop onto a parchment-lined baking sheet and flatten slightly with the bottom of a glass
- Bake at 350°F for 10-12 minutes until the edges are golden but the center still looks slightly underbaked
- Let cool on the baking sheet for 5 minutes before transferring to a wire rack
Pro tip: Chill the dough for 30 minutes before baking if your kitchen is warm. This prevents them from spreading too much, but honestly, they taste great either way.
7. Panna Cotta
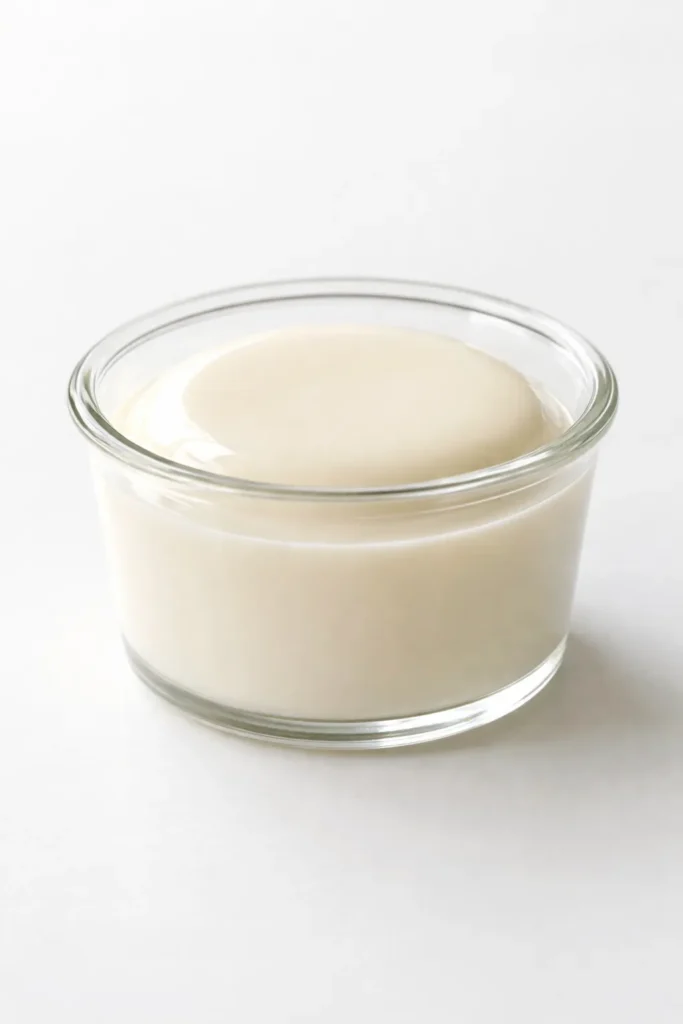
Panna cotta means “cooked cream” in Italian, and that’s essentially all this dessert is—cream set with gelatin, topped with fruit or sauce. It requires only five ingredients, minimal cooking, and—because it’s served in individual cups—looks elegant without any decoration skills. Even if the set isn’t perfectly uniform or the texture is slightly looser than ideal, panna cotta is forgiving enough to still taste luxurious.
Why Gelatin Desserts Intimidate Nobody Once They Try Them
Many home cooks avoid gelatin-set desserts because they seem complicated, but panna cotta is actually one of the most forgiving chilled desserts you can make. The worst that happens is the gelatin doesn’t set firmly, which simply means you have an ultra-creamy mousse-like dessert instead of a firm one. Both are delicious. The flavor, which comes from real cream and vanilla, can’t fail no matter what happens with the texture.
Foolproof Vanilla Panna Cotta
- Sprinkle 1 1/2 teaspoons of gelatin over 3 tablespoons of cold water and let it bloom for 5 minutes
- Heat 1 1/2 cups of heavy cream with 1/2 cup of whole milk and 1/4 cup of sugar until steaming (don’t boil)
- Remove from heat and stir in the bloomed gelatin until completely dissolved
- Add 1 teaspoon of vanilla extract
- Strain through a fine-mesh sieve and divide into serving cups
- Refrigerate for at least 4 hours until set
- Top with fresh berries, fruit compote, or caramel sauce just before serving
Insider note: The bloom time—letting the gelatin sit in cold water before adding it to hot liquid—is what ensures smooth, lump-free panna cotta. Don’t skip this step, but it’s incredibly easy and just requires patience.
8. No-Bake Cheesecake
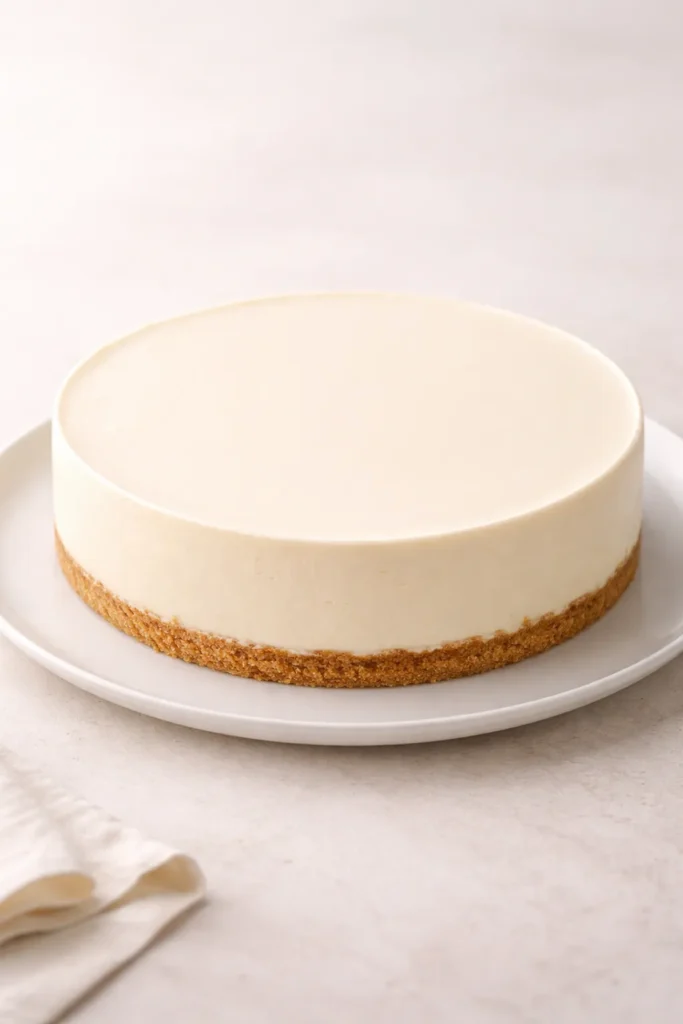
No-bake cheesecake eliminates the biggest risk factor in traditional cheesecake—the baking process where cracks can form and the texture can become grainy if it’s overcooked. This version uses just a simple cookie crust, a creamy no-bake filling, and cooling time. There’s no oven involved, which means no temperature guessing, no cracking, and no disappointing textural problems.
Why This Version Never Fails
Traditional baked cheesecake requires precise oven temperature and careful monitoring to avoid overcooking, which causes cracking and a rubbery texture. No-bake cheesecake sidesteps all of these problems. The filling sets through chilling rather than baking, which means the only thing that can go wrong is under-chilling it, and even then, it’s still delicious—just a bit softer. The texture is naturally creamy and smooth because you’re not relying on eggs to set the cake.
The Complete No-Bake Method
- Crush 1 1/2 cups of graham cracker crumbs and mix with 6 tablespoons of melted butter and 2 tablespoons of sugar
- Press into the bottom of a 9-inch springform pan
- Beat 1 pound of softened cream cheese with 1/2 cup of powdered sugar until completely smooth (this takes about 3 minutes)
- Fold in 1 cup of heavy whipped cream gently until no streaks remain
- Add 1 teaspoon of vanilla extract and the zest of 1 lemon (optional but lovely)
- Spread over the crust and smooth the top
- Refrigerate for at least 6 hours (overnight is better)
- Top with fresh berries, fruit compote, or leave plain—it’s equally beautiful
Worth knowing: The key to smoothness is making sure the cream cheese is genuinely soft before mixing. Take it out of the fridge 30 minutes before starting, or soften it gently in the microwave for 15-20 seconds.
9. Chocolate Truffles
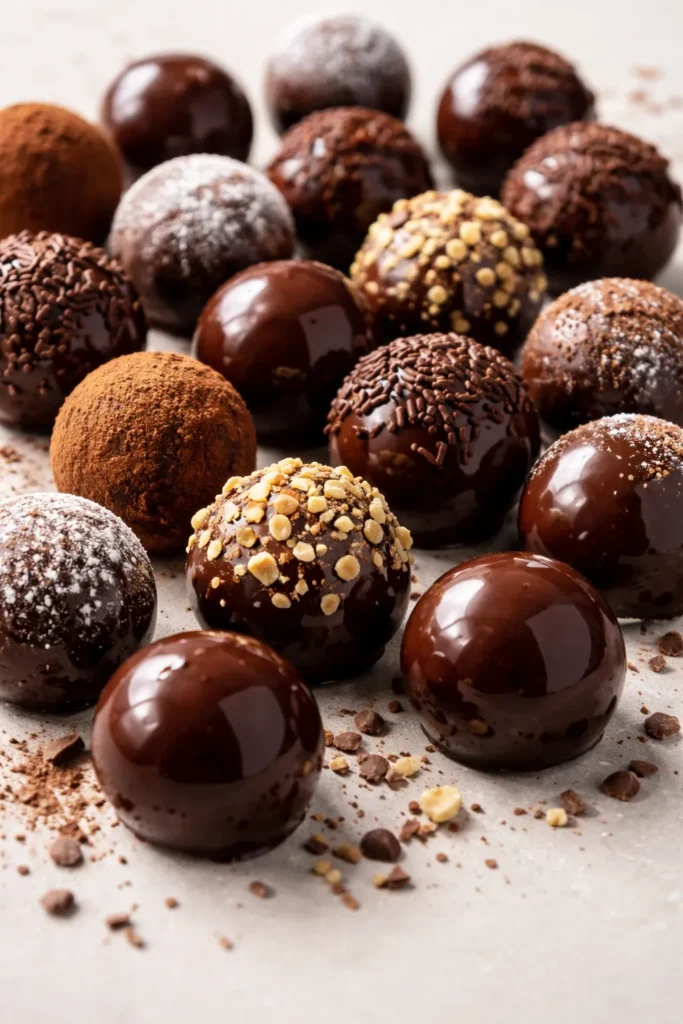
Truffles are candy, and candy-making intimidates many home cooks who’ve never tried it. But truffles require only a ganache base and rolling in whatever topping you like—no tempering, no special equipment, no complicated techniques. These are one of the easiest homemade candies to make, and they look completely professional and gift-worthy.
Why Truffles Are Foolproof Candy
Unlike other candies that require precise temperature control and timing, truffles are forgiving because they’re meant to be imperfect. They’re individual little balls—if one is slightly lopsided or unevenly coated, it only adds charm. The ganache base is foolproof: equal parts chocolate and cream, melted together and chilled until firm. That’s it.
Simple Two-Ingredient Truffle Base
- Chop 8 ounces of dark chocolate and place in a bowl
- Heat 1 cup of heavy cream until just beginning to steam
- Pour the hot cream over the chocolate and let sit for 1 minute
- Whisk until completely smooth and glossy
- Stir in 1 teaspoon of vanilla extract
- Cover and refrigerate for at least 4 hours until firm enough to scoop
- Use a small cookie scoop or melon baller to create balls (the mixture will be soft, so work quickly)
- Roll in whatever topping you like: cocoa powder, crushed nuts, sprinkles, shredded coconut, or melted chocolate
- Refrigerate in an airtight container for up to 2 weeks
Pro tip: If the ganache gets too soft while you’re scooping, pop it back in the fridge for 15 minutes. If it’s too hard to scoop, let it sit at room temperature for a few minutes.
10. Fruit Crisps
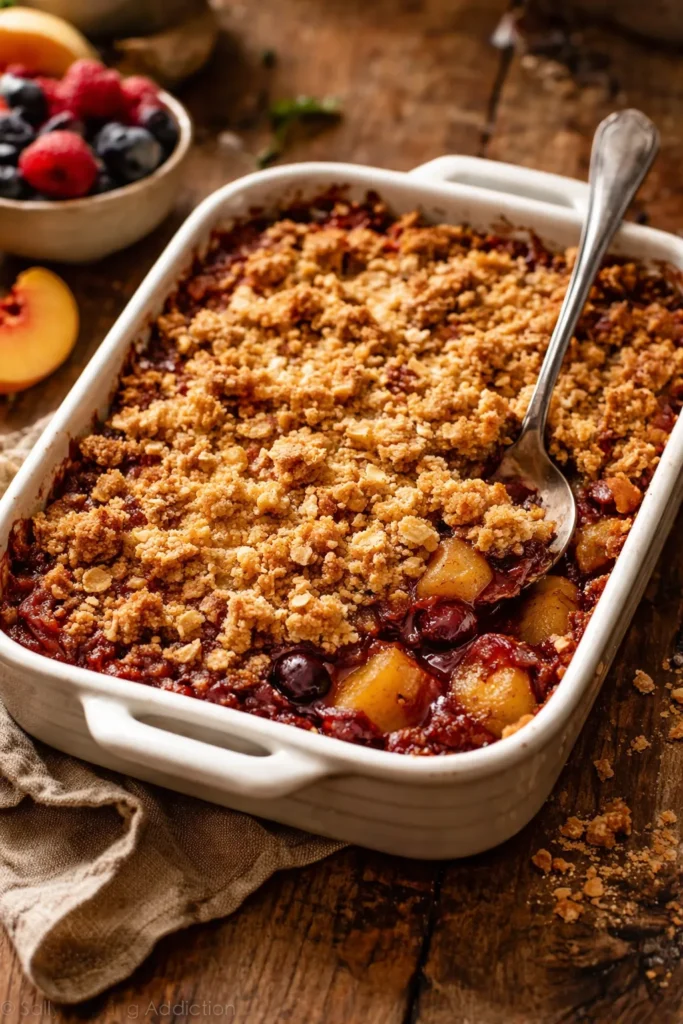
Fruit crisps are the most forgiving fruit dessert you can make. They’re supposed to look rustic. The fruit layer doesn’t need to be perfectly even. The topping doesn’t need to be uniformly distributed. Even the most unpolished-looking fruit crisp looks homey and appealing, and since it’s warm and served with ice cream, nobody scrutinizes the presentation.
Why Crisps Are Nearly Impossible to Mess Up
There’s no batter to rise at a precise moment, no custard that needs specific baking times, no delicate structure to maintain. You’re essentially making a buttery crumb topping and baking fruit until it’s soft and bubbly. The fruit essentially can’t overcook—it just becomes softer and more jammy, which most people prefer. The topping either gets golden or slightly darker, both of which are delicious.
Basic Foolproof Fruit Crisp
- Toss 6 cups of sliced fruit (apples, peaches, berries, or a combination) with 1/4 cup of sugar and 1 tablespoon of lemon juice
- Spread in a buttered 9×13-inch baking dish
- Make the topping by mixing 1 1/2 cups of rolled oats, 1 cup of flour, 3/4 cup of brown sugar, 1/2 teaspoon of salt, and 1 teaspoon of cinnamon
- Cut 8 tablespoons of cold butter into small pieces and work into the mixture with your fingers until it looks like coarse breadcrumbs
- Scatter the topping over the fruit (it doesn’t need to be even or cover everything completely)
- Bake at 350°F for 40-45 minutes until the fruit is bubbly at the edges and the topping is golden
- Serve warm with vanilla ice cream
Real talk: Even if the topping isn’t golden, if the fruit is bubbling around the edges, it’s done. The topping will crisp up as it cools.
11. Microwave Mug Cakes
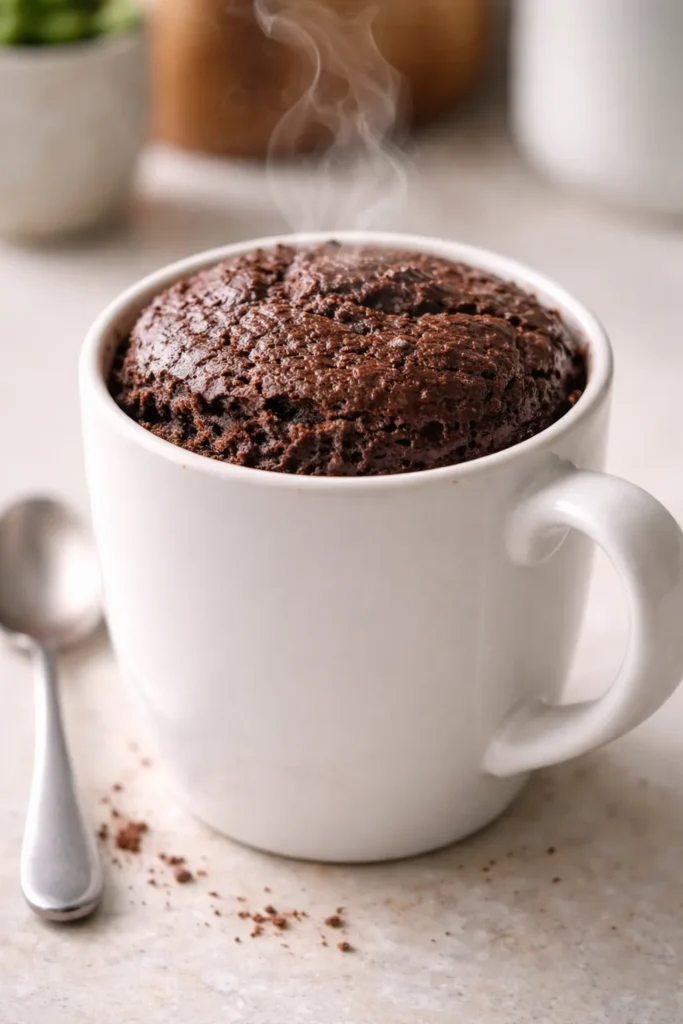
Mug cakes are cooked in the microwave in individual mugs and come together in literally five minutes from start to finished dessert. They’re supposed to be a little dense and a little wobbly in the center. They’re meant to be eaten straight from the mug. There’s virtually nothing you can do wrong with a mug cake because the expectations are already set very low, and the results always exceed those expectations.
Why They’re Stress-Free Desserts
Mug cakes are inherently casual and forgiving. They cook in the microwave instead of an oven, which eliminates temperature variables. They’re eaten immediately while still warm, which means slight textural imperfections are completely hidden. You can’t accidentally overbake a mug cake—the microwave heat cooks it very evenly and quickly.
Basic Chocolate Mug Cake
- Combine 1/4 cup of all-purpose flour, 1/4 cup of sugar, 2 tablespoons of cocoa powder, and 1/4 teaspoon of baking soda in a mug
- Add 1/4 cup of water, 2 tablespoons of oil, and a pinch of salt
- Stir until just combined (a few small lumps are fine)
- Microwave on high for 60-90 seconds (ovens vary, so start checking at 60 seconds)
- Let cool for 1 minute and add a scoop of ice cream or whipped cream on top
Worth knowing: The cake will look slightly underbaked when you remove it from the microwave. That’s exactly right. It continues cooking as it cools and reaches perfect fudgy texture.
12. Lemon Bars

Lemon bars are one of the most foolproof baked desserts because they’re basically a shortbread crust with a simple custard-like topping baked on top. They don’t need to rise, they don’t need perfect edges, and they’re supposed to be slightly wobbly in the center when done. Even if you overbake them slightly, they’re still delicious—just a bit firmer, which many people prefer.
Why the Method Matters
The best lemon bar method involves making the crust first, then adding the topping and baking everything together. This eliminates the extra step of pre-baking the crust. The crust gets golden and set during the first part of baking, and then the topping sets during the second part, making the whole process foolproof.
Fool-Proof Lemon Bars
For the Crust:
- Mix 1 cup of all-purpose flour, 1/4 cup of powdered sugar, and 1/2 cup of cold butter (cut into small pieces)
- Use your fingers to work the mixture until it looks like coarse breadcrumbs
- Press into a 9×9-inch baking pan
- Bake at 350°F for 12-15 minutes until light golden
For the Topping:
- Whisk together 2 large eggs, 1 cup of sugar, 3 tablespoons of lemon juice, 2 tablespoons of lemon zest, and 2 tablespoons of all-purpose flour
- Pour over the warm crust and return to the oven for 15-20 minutes until the center is set but still slightly jiggly
- Cool completely before cutting
Pro tip: Don’t use a toothpick to test doneness—instead, gently shake the pan. The edges should be set, and the very center should jiggle slightly.
13. No-Bake Rice Krispie Treats
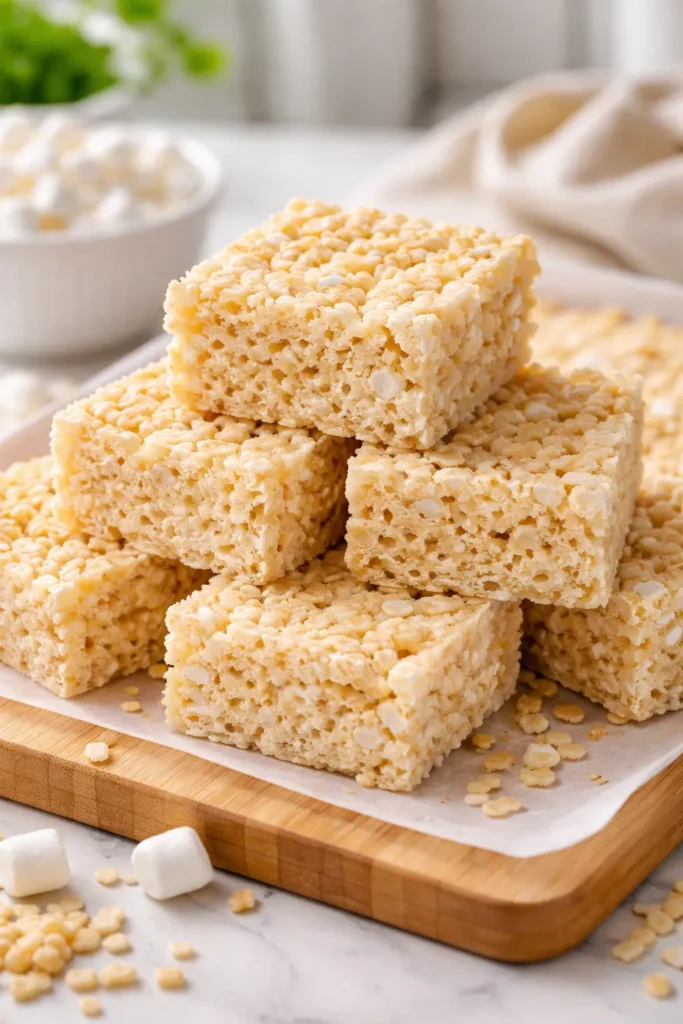
Rice Krispie treats are nostalgic, easy, and practically impossible to mess up. There’s no baking involved, just melting marshmallows, mixing with cereal, and pressing into a pan. Even if the mixture is slightly too soft or too firm, you still get a delicious, recognizable Rice Krispie treat that tastes like childhood.
Why Kids and Adults Both Love Making These
There’s something deeply satisfying about making Rice Krispie treats—they come together quickly, smell amazing, and you get almost instant gratification. The hands-on mixing is fun, not stressful. Even if you’re not following a recipe exactly or the proportions are slightly off, the result is still recognizable and delicious.
The Classic Method
- Melt 3 tablespoons of butter in a large pot over low heat
- Add 8 cups of marshmallows and stir until completely melted (about 3-4 minutes)
- Remove from heat and add 1 teaspoon of vanilla extract
- Add 9-10 cups of Rice Krispies cereal and stir until everything is coated
- Press into a buttered 9×13-inch pan
- Let cool completely before cutting
- Serve as-is or drizzle with melted chocolate
Insider note: The secret to perfect texture is not cooking the marshmallows too long—just until they’re melted and smooth. If you cook them too much, they become tough and stringy.
14. Pavlova with Fruit
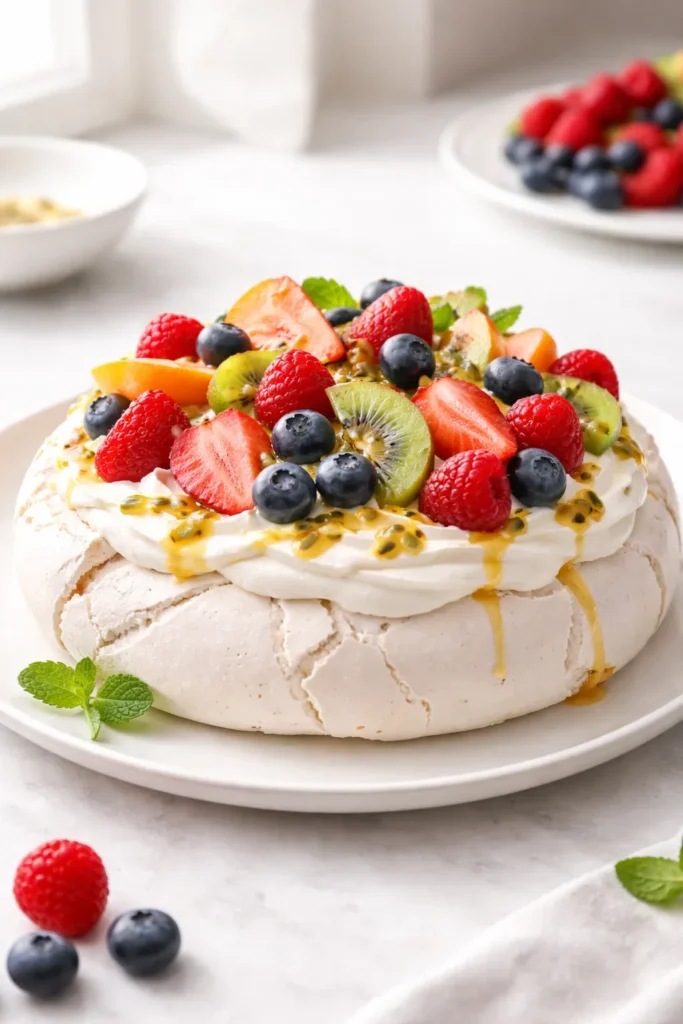
Pavlova is a meringue-based dessert that seems intimidating but is actually quite forgiving once you understand the basic technique. It’s baked low and slow, which means there’s a wide window of doneness. It’s supposed to be slightly imperfect, with cracks and a rustic appearance. Even if your pavlova doesn’t look magazine-perfect, topped with whipped cream and fresh fruit, it always looks beautiful and impressive.
Why Meringue Is Less Scary Than Most People Think
Meringue is simply whipped egg whites and sugar, set by heat and time. The biggest “mistake” people make is thinking it’s fragile and precise, when actually, pavlova is built to be rustic. It’s supposed to have a crispy exterior and a slightly soft, marshmallow-like interior. Cracks are charming, not failures.
Straightforward Pavlova Method
- Preheat oven to 250°F and line a baking sheet with parchment paper
- Beat 4 large egg whites with a pinch of salt until soft peaks form (about 3 minutes)
- Gradually add 1 cup of superfine sugar while beating until stiff peaks form and the mixture is glossy (about 5-7 minutes total)
- Add 1 teaspoon of vanilla extract and 1 tablespoon of cornstarch, then fold in gently
- Spread or pipe into a 9-inch circle on the prepared baking sheet
- Bake for 1 hour until the outside is dry and pale golden
- Turn off the oven and crack the door open slightly—let it cool in the oven for at least 1 hour
- Top with whipped cream and fresh berries just before serving
Worth knowing: Humidity affects meringue significantly. If your pavlova seems like it’s not setting, the kitchen is probably humid—just bake it slightly longer. The cornstarch helps prevent cracks and makes the texture even more forgiving.
15. Puff Pastry Tarts with Fruit
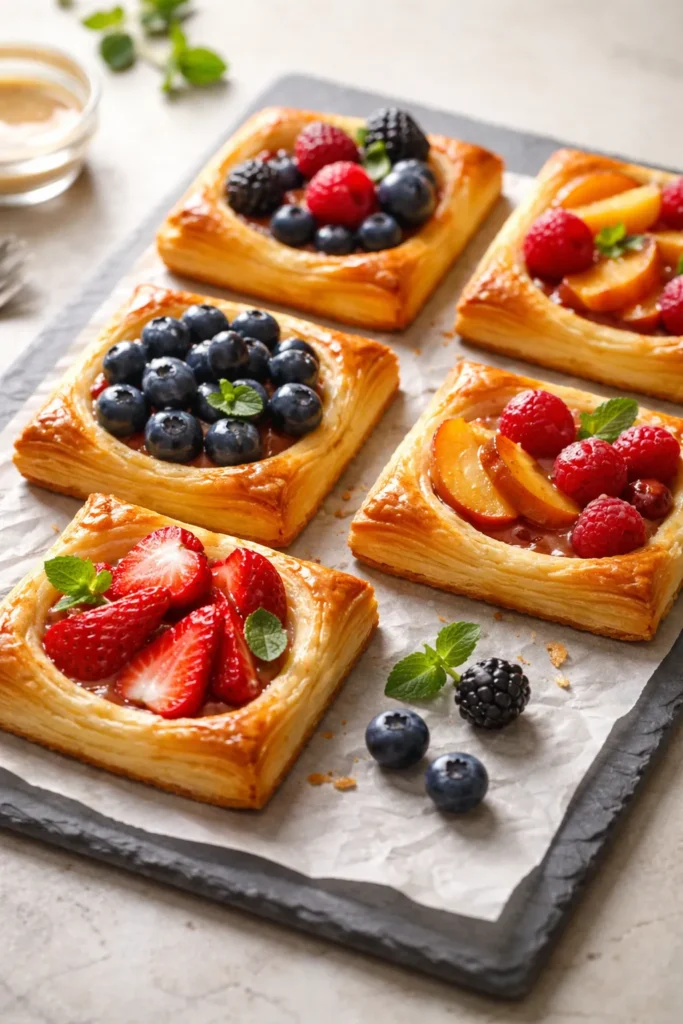
Puff pastry is literally magic—those thin, crispy, golden layers contain enough butter to taste absolutely incredible with minimal effort. Using store-bought puff pastry eliminates the most difficult part of pastry-making entirely. These tarts come together in thirty minutes and look completely impressive, even though you didn’t make the pastry yourself.
Why Store-Bought Puff Pastry Is a Cheat Code
There’s no shame in using store-bought puff pastry, and frankly, it’s better than most home-made versions. You’re getting a professional product that’s been laminated precisely and frozen properly. You just thaw it, shape it, add toppings, and bake. The hardest part is letting yourself believe you didn’t actually make everything yourself.
Simple Fruit Tart Assembly
- Thaw 1 sheet of puff pastry according to package directions
- Prick all over with a fork (this prevents excessive puffing)
- Spread a thin layer of pastry cream or softened cream cheese over the pastry, leaving a 1/2-inch border
- Arrange fresh fruit on top (thin apple slices, berries, peach slices, or whatever looks beautiful)
- Brush the pastry border lightly with beaten egg
- Bake at 400°F for 15-20 minutes until the pastry is puffed and golden
- Cool slightly, dust with powdered sugar, and serve warm or at room temperature
Pro tip: If you don’t have pastry cream, simply beat softened cream cheese with a little powdered sugar and vanilla extract—it works beautifully and takes two minutes.
Final Thoughts
The most important thing to understand about foolproof desserts isn’t that they’re less delicious than complicated ones—it’s that they prove baking success isn’t about complicated techniques or perfect execution. It’s about choosing recipes that work with your limitations instead of against them. Many of the most celebrated desserts in the world are actually simple, forgiving, and built on straightforward methods that have worked for decades.
You don’t need fancy equipment, special techniques, or years of practice to make desserts that taste like they came from a professional bakery. You just need to understand which desserts are inherently forgiving and why they work so reliably. Start with one of these recipes tonight, and you’ll realize that the real secret to becoming a successful baker isn’t perfection—it’s knowing exactly which shortcuts and foolproof methods actually deliver the best results. Once you’ve experienced success with these desserts, you’ll have the confidence to branch out into more challenging recipes, knowing that you’ve already proven you can make something absolutely delicious.