There’s something deeply satisfying about pulling a beautifully golden loaf from the oven—that moment when the kitchen fills with the aroma of tart blueberries and bright lemon. But then reality hits: a mixer bowl splattered with batter, measuring cups scattered across the counter, and the sinking realization that you’ve created far more cleanup than cake. What if I told you that the most impressive blueberry loaf you’ll ever make requires just one bowl, a whisk, and about two minutes of actual hands-on mixing?
The one-bowl blueberry loaf has become my go-to whenever I want something that tastes like it came from a corner bakery—without the production of a full baking project. It’s the kind of cake that makes people ask for the recipe, not because it’s complicated, but because they can’t believe something this moist and bursting with flavor requires so little effort. The secret isn’t some fancy technique or hard-to-find ingredient. It’s understanding how to work with physics and moisture to create a cake that practically bakes itself, leaving you with minimal mess and maximum satisfaction.
Table of Contents
- Why This One-Bowl Method Changes Everything
- The Science of Why One Bowl Actually Works
- Getting Your Ingredients Ready
- How This Cake Stays So Impossibly Moist
- Yield, Prep Time, Cook Time, and Difficulty
- Complete Ingredient List
- Step-by-Step Instructions
- The Real Reasons Blueberries Stay Evenly Distributed
- Secrets to Getting Maximum Moisture Every Time
- Common Mistakes and How to Avoid Them
- Flavor Variations You Can Try
- Storage, Freezing, and Make-Ahead Tips
- Perfect Serving Ideas and Pairings
- Final Thoughts
Why This One-Bowl Method Changes Everything
Baking doesn’t require a stand mixer and fancy equipment to produce phenomenal results, but most recipes seem to insist on it anyway. The traditional approach to cake-making involves creaming butter and sugar with an electric mixer, a step that takes time and creates another dish to wash. It’s rooted in a legitimate technique—aerating the fat to incorporate air bubbles that help the cake rise—but it’s not the only way to achieve a tender, fluffy loaf.
The one-bowl method works because it relies on different leavening mechanics entirely. Instead of depending solely on the butter and sugar to trap air, this approach uses baking powder and the moisture in the batter itself to create lift and texture. That might sound like it should result in a dense, sad cake, but when executed correctly, you get something closer to a featherlight sponge than a heavy brick.
Here’s what actually happens: the yogurt or oil in the batter creates moisture that steam can work with. That steam, combined with the chemical reaction between baking soda and acidic ingredients (like lemon juice or yogurt), creates lift from the inside out. The result is a cake that rises beautifully while staying incredibly moist—sometimes even moister than traditional butter-based loaves, which can dry out if you’re not careful.
The cleanup advantage is obvious, but there’s a subtler benefit too. When you’re not fussing with equipment or technique, you’re more likely to actually bake. That’s not a small thing. The simplicity of this method means you can have fresh-baked cake on the table in under two hours with minimal fuss, which opens the door to baking on a busy Tuesday afternoon or throwing together something special on short notice.
The Science of Why One Bowl Actually Works

Understanding the “why” behind one-bowl baking makes you a better baker, not because you need to become a chemistry expert, but because it helps you troubleshoot when something feels off. Traditional cakes often incorporate butter through creaming, which physically incorporates air bubbles into the fat. Those bubbles expand in the oven and create structure in the finished cake.
One-bowl loaves take a different path. The combination of oil (which is already liquid) and yogurt means your fat is already dispersed through a wet mixture from the start. You’re not trying to trap air into solid butter; instead, you’re relying on the batter’s moisture content to create steam during baking. Steam is actually incredibly powerful for lift—it expands dramatically as the cake bakes, and all those water vapor bubbles create the rise and tender crumb you’re after.
Lemon juice and yogurt both bring acid to the party. Acid activates baking soda, creating a chemical reaction that produces carbon dioxide bubbles immediately when mixed. This is why you don’t want to let the batter sit around for hours before baking—those bubbles are ready to work right now. The timing is crucial: you mix, you pour, you bake. That’s it.
The third component is the sugar-to-lemon-zest interaction that happens at the very beginning. When you rub fresh lemon zest directly into granulated sugar using your fingertips, you’re releasing oils from the zest. These oils are where the real lemon flavor lives—not in the juice, which is mostly water and acid. This step is what separates a cake that has “some lemon flavor” from one that absolutely sings with brightness. The friction and warmth from your fingers break down the zest’s cell walls, releasing those fragrant compounds into the sugar crystals.
Getting Your Ingredients Ready
The absolute most important step before you even reach for your bowl is bringing your ingredients to room temperature. This isn’t one of those annoying baker recommendations you can ignore—this is actually crucial for the texture of your finished cake. Cold ingredients don’t blend smoothly, which means you end up with pockets of unmixed flour or chunks of undissolved sugar. Room temperature ingredients—eggs, yogurt, and milk—blend into a cohesive batter almost instantly.
Pull your eggs out of the fridge and let them sit while you’re gathering everything else. Thirty minutes on the counter is ideal, but even fifteen minutes makes a noticeable difference. If you forget this step, you can place the eggs in a bowl of warm water for five minutes as a shortcut—it genuinely works.
Your blueberries need to be completely dry. Any moisture clinging to their surface can create soggy spots in the cake or cause the berries to bleed their color into the batter, creating streaks instead of beautiful pockets of fruit. If you rinsed fresh blueberries, pat them completely dry with a clean kitchen towel or paper towels. Frozen blueberries should go straight into the batter without thawing—the ice crystals will melt during baking, distributing moisture evenly rather than creating a burst of juice at one spot.
The lemon matters too. You want one with thin, unblemished skin that feels heavy for its size—that weight indicates juice. Before you zest it, roll it firmly on the counter under your palm for about thirty seconds. This breaks down the internal membranes slightly, making juicing easier and more productive. Zest the lemon first (you’ll get more zest if you haven’t already squeezed it), then juice it.
How This Cake Stays So Impossibly Moist
Moisture retention is one of the biggest advantages of the one-bowl loaf. Traditional cakes made with butter can sometimes dry out within a day, especially if stored at room temperature. This loaf stays tender and moist for nearly a week without any special treatment beyond an airtight container. The secret is the fat composition and the inclusion of yogurt.
Oil stays liquid at room temperature, unlike butter, which solidifies. Because the oil doesn’t crystallize and harden as the cake cools, it continues to coat each crumb even after the cake has completely cooled. Butter crystallizes, which can make a cake feel slightly dry by comparison. This is why oil-based cakes feel more tender to bite into, even if the initial mixing process felt simpler.
Yogurt contributes both fat and moisture. The dairy proteins in yogurt also create a slightly different crumb structure—finer, more tender, with less chance of that tough, rubbery texture that happens when you overmix a wheat-flour batter. The acid in yogurt (from the fermentation) also helps keep the crumb from becoming dense over time, another factor in why this cake stays fresh longer.
The combination of these wet ingredients means your cake contains more moisture going into the oven than a traditional butter cake would. Some of that moisture bakes out, but plenty remains, creating a loaf that slices cleanly without crumbling and tastes soft without being gummy.
Yield, Prep Time, Cook Time, and Difficulty
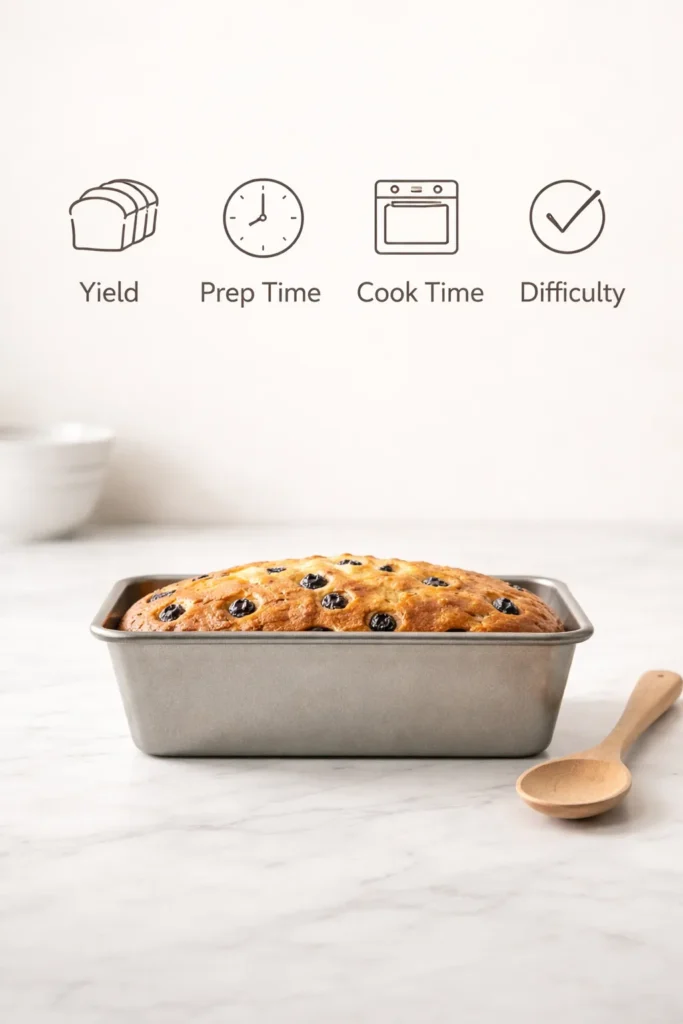
Yield: Serves 10 to 12 | Makes one 9×5-inch loaf
Prep Time: 15 minutes
Cook Time: 55 to 65 minutes
Total Time: 1 hour 20 minutes
Difficulty: Beginner — This recipe uses straightforward mixing techniques, requires no special equipment, and has a flexible bake time window that’s very forgiving for ovens that run hot or cold.
Complete Ingredient List
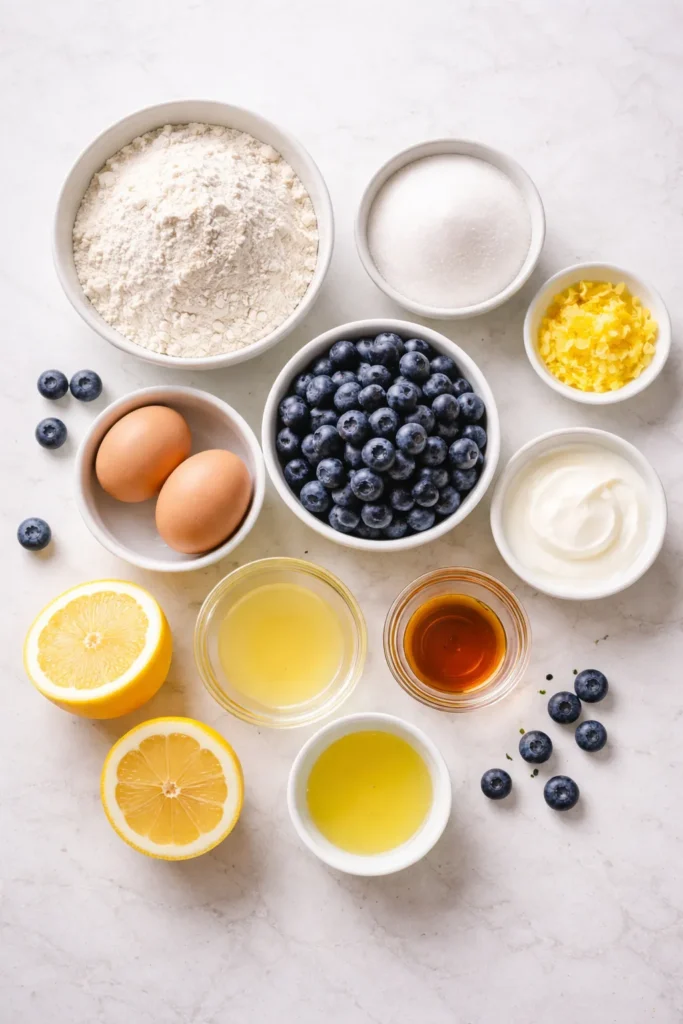
For the Blueberry Loaf:
- 1¾ cups (220 g) all-purpose flour
- 1 teaspoon baking powder
- ½ teaspoon baking soda
- ½ teaspoon fine sea salt
- ¾ cup (150 g) granulated sugar
- 2 teaspoons finely grated fresh lemon zest (from 1 large or 2 medium lemons)
- 2 large eggs, at room temperature
- ½ cup (120 ml) plain unsweetened yogurt, at room temperature (Greek yogurt or regular both work beautifully)
- ¼ cup (60 ml) fresh lemon juice, strained
- ¼ cup (60 ml) neutral oil such as canola, vegetable, or light olive oil
- 1 teaspoon pure vanilla extract
- 1½ cups (215 g) fresh blueberries, completely dry (see notes for frozen)
- 2 tablespoons all-purpose flour, for coating berries
For the Optional Lemon Glaze:
- 1 cup (190 g) powdered sugar, sifted
- 2 to 3 tablespoons fresh lemon juice
- ½ to 1 tablespoon whole milk or heavy cream (optional, for consistency)
Step-by-Step Instructions
Prepare Your Pan and Preheat:
-
Preheat your oven to 350°F (175°C) and position the rack in the center. Line a 9×5-inch loaf pan with parchment paper, letting the excess hang over two opposite sides—this makes removing the finished loaf effortless. Lightly grease the parchment with butter to help it stick.
-
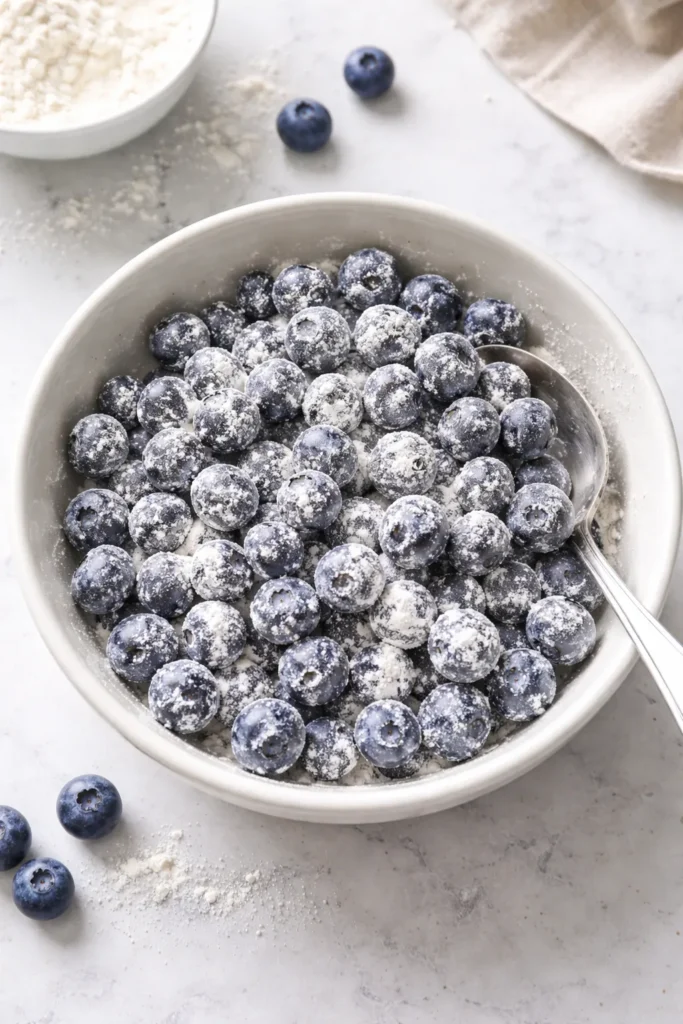
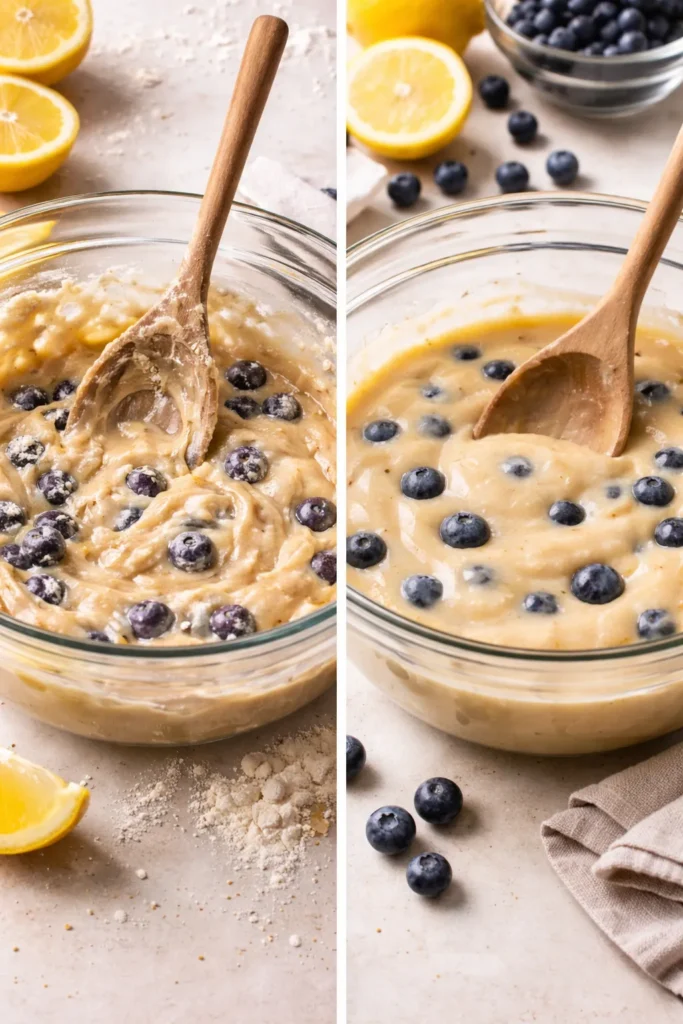
In a small bowl, toss the dry blueberries with the 2 tablespoons of flour, coating them evenly. This simple step keeps them suspended throughout the batter instead of sinking to the bottom. Set them aside.
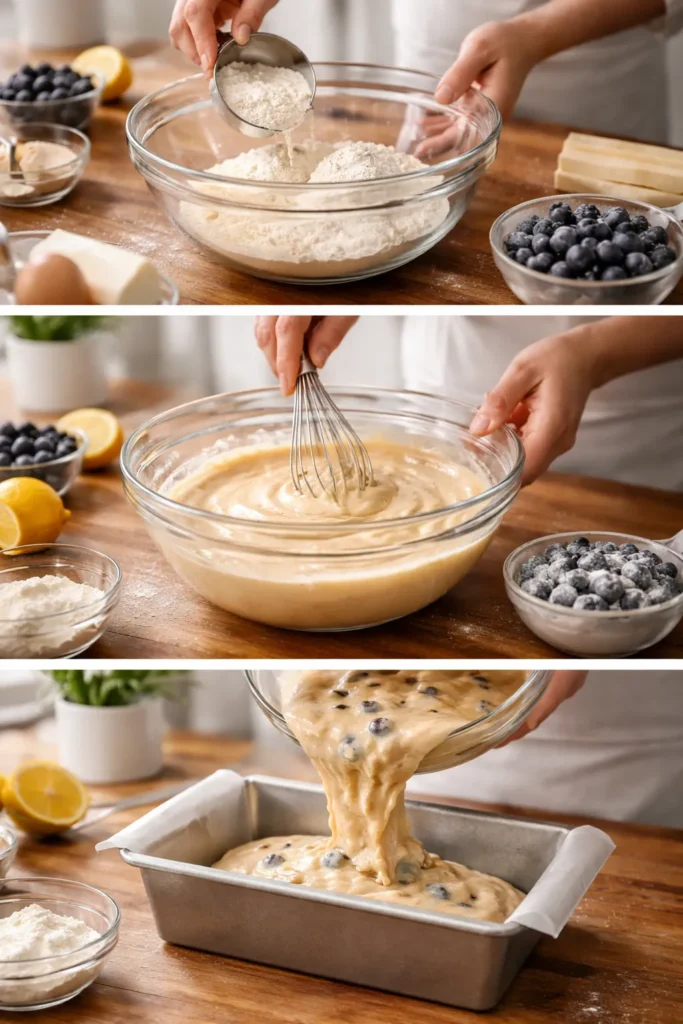
Make the Batter:
-
In a large mixing bowl, combine the sugar and lemon zest. Using your fingertips, rub the zest directly into the sugar for about one minute, pressing gently as you rub. The sugar will become damp and fragrant as the lemon oils release—you’ll notice the smell transforms into something intensely lemony and wonderful. This single step is what makes the lemon flavor so bright and pronounced.
-
Add the oil and vanilla extract to the sugar mixture. Whisk vigorously for about 30 seconds until the mixture becomes smooth and slightly thick.
-
Add the eggs one at a time, whisking thoroughly after each addition and scraping down the sides of the bowl. After adding both eggs, whisk for another 30 seconds until the mixture is noticeably lighter in color and slightly fluffy—you should see thin ribbons of mixture that dissolve back into the batter.
-
Add the yogurt and lemon juice, whisking until completely combined and smooth. The mixture will look slightly thinner at this point.
-
Add the baking powder and baking soda, whisking for about 30 seconds until everything is evenly distributed.
-
Sprinkle the flour and salt over the top of the wet ingredients. Using a wooden spoon or flexible spatula, stir gently until you no longer see streaks of flour—the batter should be smooth but still slightly thick. Do not overmix at this stage—overmixing develops gluten, which makes the cake tough and dense. It’s better to have a few tiny lumps than to stir too much.
-
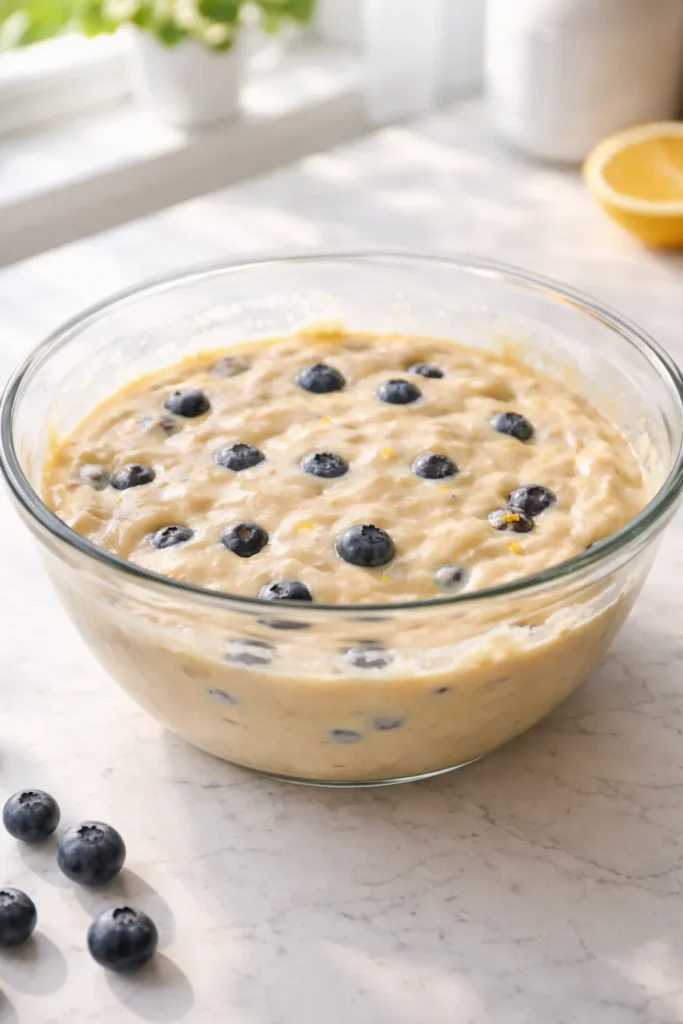
Add the flour-coated blueberries and gently fold them in using a spatula, folding just until they’re evenly distributed throughout the batter. Be gentle to avoid crushing the berries, which would cause them to release their color into the batter.
Bake the Loaf:
-
Pour the batter into the prepared loaf pan and smooth the top with a spatula so it’s relatively even. If you like, scatter a small handful of reserved fresh blueberries across the top and sprinkle with a tiny pinch of granulated sugar or turbinado sugar for a beautiful presentation.
-
Place the loaf pan on a baking sheet (to catch any potential drips) and transfer to the preheated oven. Bake for 55 to 65 minutes, until a toothpick inserted into the very center comes out clean or with just a few moist crumbs clinging to it. The edges should be golden and pulling away slightly from the pan, and the top should be puffed and golden-brown.
-
If the top is browning too quickly but the center isn’t done, cover the loaf loosely with aluminum foil for the final 10 to 15 minutes of baking.
Cool and Finish:
-
Remove the loaf from the oven and let it cool in the pan for 15 to 20 minutes. During this time, the cake will continue cooking slightly from residual heat and will firm up enough to handle.
-
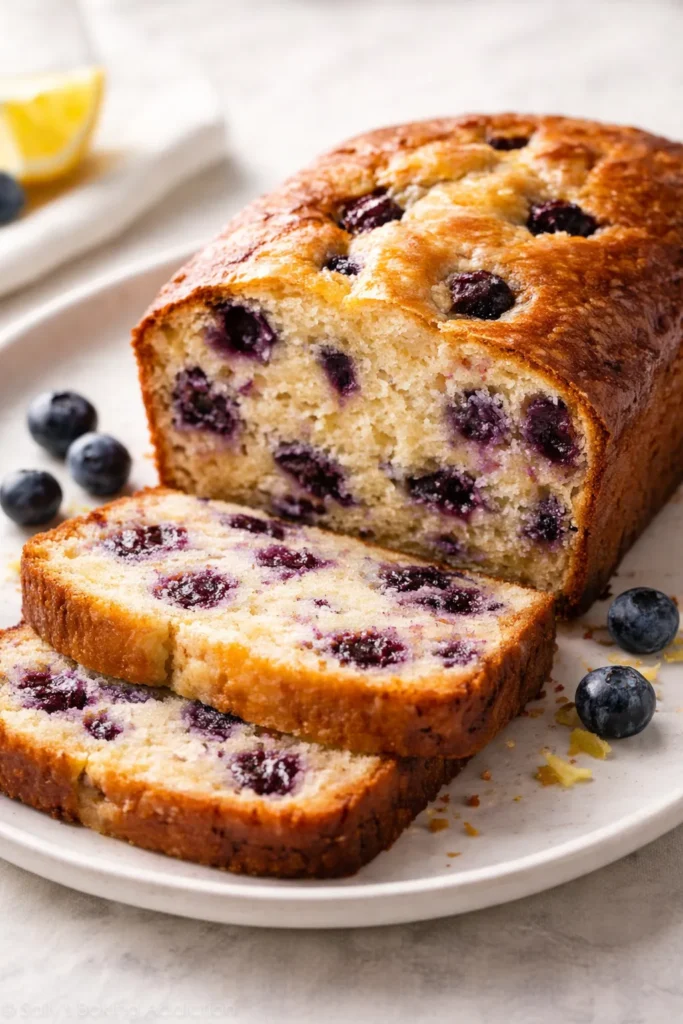
Using the parchment overhang, carefully lift the loaf out of the pan onto a wire cooling rack. Let it cool completely at room temperature before slicing—at least one full hour. Slicing a warm or even barely-warm loaf will cause it to fall apart or look ragged. Patience here pays off beautifully.
-
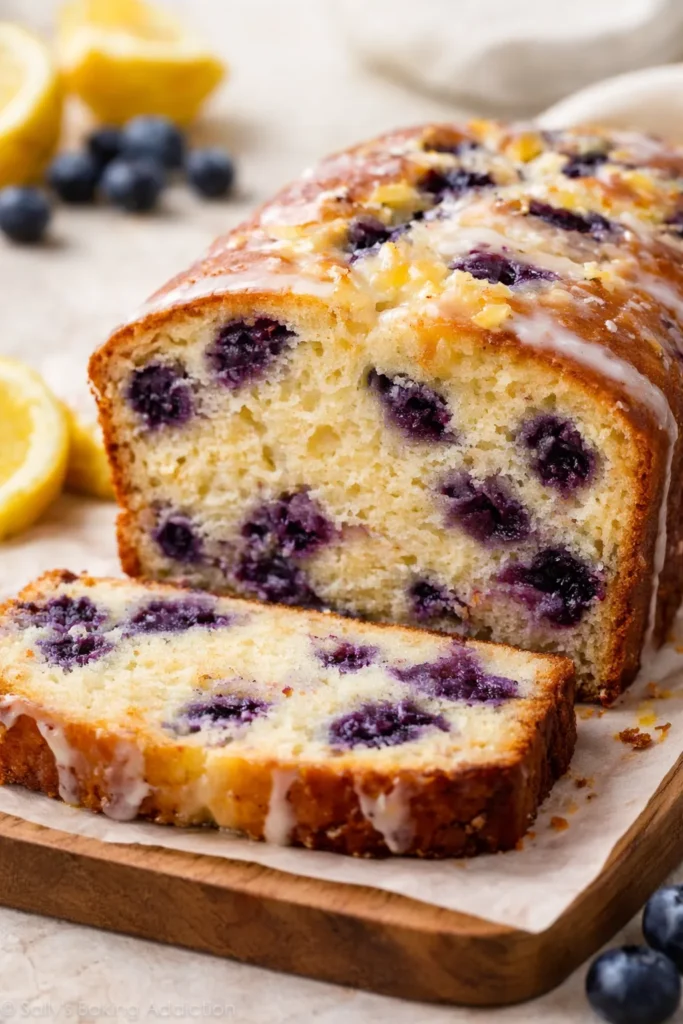
Once completely cooled, make the glaze if desired by whisking together the powdered sugar and lemon juice until smooth. If it’s too thick, add milk one teaspoon at a time until it reaches a consistency you can drizzle. Drizzle the glaze over the top of the cooled loaf and let it set for 10 to 15 minutes before slicing.
The Real Reasons Blueberries Stay Evenly Distributed
One of the most frustrating aspects of baking berry loaves is ending up with all the fruit sinking to the bottom, leaving you with naked cake on top and a berry-packed bottom layer. It feels like a failure, even though it’s actually a physics problem, not a baker problem. The solution involves two simple tactics that work together beautifully.
The first tactic is coating the blueberries in flour before folding them in. The flour creates friction between the berries and the batter, essentially making them slightly sticky. This friction is enough to slow their descent through the batter as it bakes. The flour coating is so minimal that it doesn’t affect the taste or texture—you’re using just two tablespoons to coat about 1½ cups of berries.
The second tactic is the formula of the batter itself. Because this batter contains oil (which doesn’t firm up as quickly as butter) and relies on steam for lift, it bakes more gently and slowly than a traditional butter-based cake. That slower, more gradual setting time means the blueberries have a better chance to find their equilibrium throughout the crumb before the batter sets completely.
For even more control, some bakers use a third technique: adding blueberries in phases. Pour half the batter into the prepared pan, scatter half the blueberries over it, add the remaining batter, then scatter the final blueberries on top. This guarantees fruit in every slice from top to bottom. It takes an extra thirty seconds and genuinely improves the visual appeal when you slice the loaf.
Secrets to Getting Maximum Moisture Every Time
A loaf that’s moist on day one often stays moist through day five, which is one of the biggest advantages of this recipe. But there are several variables that affect how much moisture your finished loaf retains, and understanding them helps you nail perfect results every time.
The first secret is not opening the oven door during the first 25 minutes of baking. Every time you open the oven, heat escapes and the temperature drops. A temperature dip at the wrong moment can prevent proper rise, which can cause the crumb to be dense and consequently feel drier. Use the oven light to peek if you must, but save actual opening for at least the halfway point.
The second secret is not slicing the loaf while it’s still warm. This feels counterintuitive because warm cake sounds nice, but warm cake is actually still setting up internally. The crumb is delicate and hasn’t fully stabilized. Slicing warm cake causes it to crumble and fall apart, and during that breakdown, internal moisture evaporates more quickly. Letting it cool completely to room temperature allows the crumb to set properly and stay intact when sliced, which preserves moisture better.
The third secret is storage method. Once completely cooled, wrap the entire loaf tightly in plastic wrap or transfer it to an airtight container. The goal is to minimize air exposure, which dries things out. If you’re slicing it ahead of time, wrap individual slices separately so you’re not exposing the entire loaf each time you want a piece.
The fourth secret, surprisingly, is not storing it in the fridge if you can help it. Room temperature storage actually preserves moisture and texture better than refrigeration does. The loaf will stay perfect for three to four days at room temperature, which is longer than most people need. The exception is if your kitchen is very warm and humid (above 75°F), in which case the fridge prevents mold and spoilage.
Common Mistakes and How to Avoid Them
Even with simple recipes, a few consistent mistakes trip up most bakers at least once. Knowing what they are ahead of time helps you sidestep them entirely.
Mistake: Using cold ingredients. When eggs, yogurt, or milk are cold, they don’t blend smoothly into the batter. You end up with pockets of unmixed ingredients that bake into problems—sometimes dense spots, sometimes bitter patches if baking soda didn’t distribute evenly. The fix is simple: pull everything out of the fridge while you’re preheating the oven. Twenty to thirty minutes is ideal, but even ten minutes helps.
Mistake: Using wet blueberries. Moisture on the surface of the berries migrates into the batter during baking, which can create soggy spots or cause the berries to bleed color throughout instead of staying as distinct pockets of fruit. Pat them completely dry with paper towels. If using frozen berries, absolutely do not thaw them—use them straight from the freezer.
Mistake: Overmixing the flour. Once you add the flour, stop as soon as you no longer see dry streaks. An extra thirty seconds of mixing seems harmless but can genuinely affect the texture. More mixing means more gluten development, and gluten in cakes makes them tough and heavy. It’s better to leave a few tiny lumps of flour than to over-mix. Those lumps bake out harmlessly; over-developed gluten doesn’t.
Mistake: Slicing before the loaf has cooled. This is the hardest one to follow because a warm slice with melting glaze sounds perfect. But warm loaf falls apart as you cut. Wait the full hour, and your slices will come out clean and beautiful every time.
Mistake: Using bottled lemon juice instead of fresh for the zest. You need the fresh zest regardless, so you might as well use fresh juice too. Bottled lemon juice often contains preservatives and has a slightly different flavor profile that can taste slightly off-tasting compared to fresh. Since you’re already cutting open lemons, squeezing is just one extra step.
Flavor Variations You Can Try

The beauty of a one-bowl loaf base is how easily it adapts to different flavor combinations. The basic formula—sugar, lemon zest, oil, yogurt, eggs, and leavening—is solid enough to support all kinds of variations without needing to adjust techniques.
Lemon-Blueberry with Poppy Seeds: Add 1 tablespoon of poppy seeds to the dry ingredients. The tiny seeds add a subtle crunch and nuttiness that pairs beautifully with the lemon and blueberries. They don’t change the baking time or texture at all.
Lemon-Blueberry with Lavender: Replace ½ teaspoon of the lemon zest with ½ to ¾ teaspoon of finely ground culinary lavender. The floral notes complement the blueberries in an unexpected, sophisticated way. Don’t overdo the lavender—it can taste soapy if too much is used.
Raspberry or Mixed Berry Version: Swap the blueberries for raspberries, blackberries, or a mixture. The technique stays identical. Berries roughly the size of blueberries work best; if using larger berries, chop them to similar size so they bake evenly.
Lemon-Blueberry with Almond Extract: Keep the vanilla but reduce it to ¾ teaspoon and add ¼ teaspoon of almond extract. It adds a subtle depth without making the cake taste like almond—just mysteriously delicious.
Dairy-Free Version: Replace the yogurt with a non-dairy yogurt (coconut, oat, or soy all work), and use your preferred non-dairy milk. The baking time might extend by 5 to 10 minutes depending on the brand and water content of the yogurt. Everything else stays exactly the same.
Whole Wheat Variation: Substitute up to ¼ cup (55 g) of the all-purpose flour with whole wheat pastry flour. It adds a subtle nuttiness and slightly more fiber without making the cake dense. Don’t substitute more than ¼ cup, or the texture becomes too heavy. Whole wheat flour absorbs slightly more liquid, so the batter may be marginally thicker.
Storage, Freezing, and Make-Ahead Tips

This loaf is remarkably forgiving when it comes to timing and storage. You can make it days ahead, keep it on the counter, or freeze it for later without any quality loss.
Room Temperature Storage: Once completely cooled and wrapped tightly in plastic wrap or stored in an airtight container, the loaf stays fresh and moist at room temperature for three to four days. This is ideal storage if you’re going to eat it within a few days. The crumb actually stays softer at room temperature than in the fridge.
Refrigerator Storage: If your kitchen is warm or humid, or if you need to keep it longer than four days, wrap it tightly and refrigerate. It will stay fresh in the fridge for up to seven days. Let it come to room temperature before serving for the best texture, or warm individual slices very briefly in the microwave (15 to 20 seconds).
Freezing the Whole Loaf: Wrap the completely cooled, ungrazed loaf tightly in plastic wrap, then place it in a freezer-safe bag. It will keep frozen for up to three months. To thaw, remove it from the bag (keep the plastic wrap on) and let it thaw at room temperature for about four hours. Once thawed, treat it as fresh and consume within a few days. You can apply the glaze after thawing if you prefer.
Freezing Individual Slices: If you prefer, slice the loaf first, then wrap individual slices in plastic wrap and place them in a freezer bag. This is convenient if you want to pull out one or two slices at a time. They thaw in about an hour at room temperature or can be briefly warmed in the microwave.
Make-Ahead Tip: You can prepare the dry ingredients the night before—measure the flour, baking powder, baking soda, salt, and lemon zest into a bowl, cover it tightly, and leave it on the counter. The next day, proceed with the wet ingredients and mix as directed. The only step you can’t do ahead is mixing the baking soda and lemon juice together, as that reaction starts immediately.
Perfect Serving Ideas and Pairings
A slice of blueberry loaf is wonderful on its own, but pairing it thoughtfully with other elements elevates it from simple treat to memorable moment.
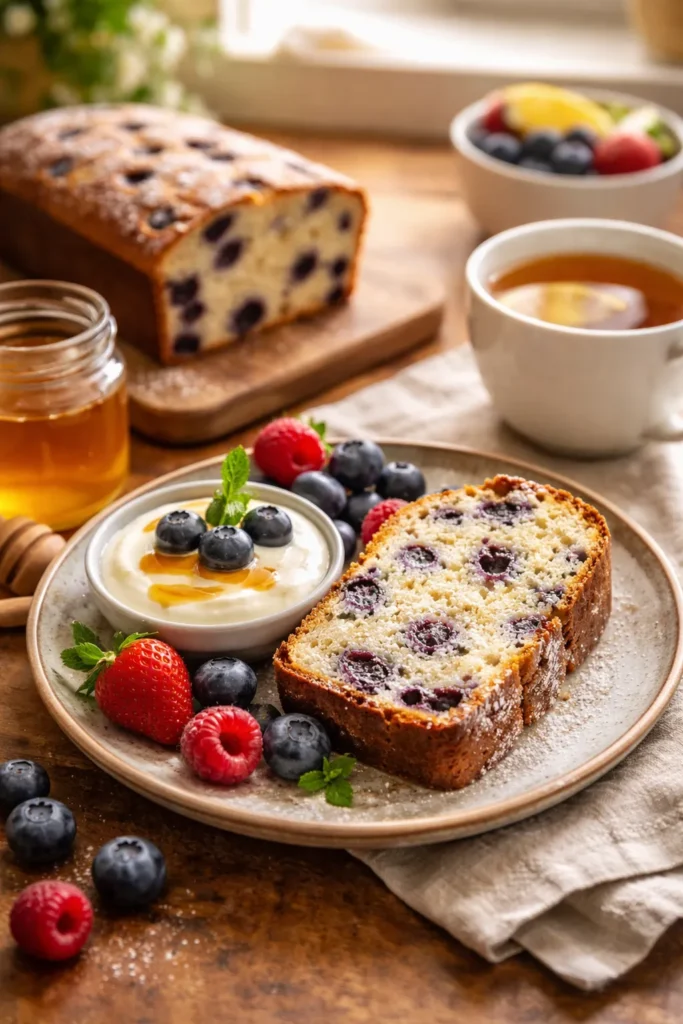
Morning Breakfast Pairing: Serve a slice alongside Greek yogurt and a drizzle of honey. The tart blueberries and bright lemon play beautifully against the creamy, tangy yogurt. It’s a balanced breakfast that feels indulgent but is actually quite nourishing.
Afternoon Tea Service: Slice the loaf and serve it alongside a pot of Earl Grey tea or English breakfast tea. The bergamot in Earl Grey echoes the citrus notes in the cake, creating a harmonious pairing. Add a small plate of whipped cream or a spread of clotted cream if you want to get proper about it.
Dessert with Fruit: Serve a slice alongside fresh berries—raspberries or blackberries work particularly well. The fresh berries provide a cool, bright contrast to the baked blueberries in the loaf, and the flavors reinforce each other.
With Whipped Cream and Lemon Curd: Slice the loaf, top with a dollop of unsweetened whipped cream, and a spoonful of lemon curd. It’s essentially a deconstructed lemon blueberry cake in its finest form.
With Vanilla Ice Cream: A still-warm (but not hot) slice with a scoop of vanilla ice cream is completely justifiable. The vanilla doesn’t compete with the lemon and blueberry—it actually amplifies them by providing a neutral canvas.
Afternoon Snack: Toast a slice, spread it lightly with butter, and eat it plain. The crispy exterior and soft interior are particularly good at this temperature.
Final Thoughts

The beauty of this one-bowl blueberry loaf isn’t really about saving dishes, though that’s certainly a wonderful side benefit. It’s about understanding that simple doesn’t mean less-than. A loaf that requires one bowl, basic equipment, and straightforward mixing can rival or surpass cakes that demand a stand mixer and complicated technique.
The first time you make this, you’ll probably be surprised by how easy it is. The second time, you’ll be amazed by how reliable the results are. By the third time, it’ll become one of those recipes you make without thinking—the kind you reach for when you want something warm and comforting but don’t want to turn your kitchen upside down getting there.
The lemon and blueberry combination has been beloved for good reason. The bright, tart citrus cuts through the sweetness while the berries add juiciness and complexity. Every slice should burst with fruit, taste clearly of lemon without being acidic, and have a tender crumb that’s moist enough to taste luxurious but structured enough to slice cleanly. This recipe delivers all of that in under two hours, with minimal cleanup, and with results so consistently good that you’ll find yourself making it again and again. That’s not luck—that’s good recipe design, and it’s absolutely worth celebrating.