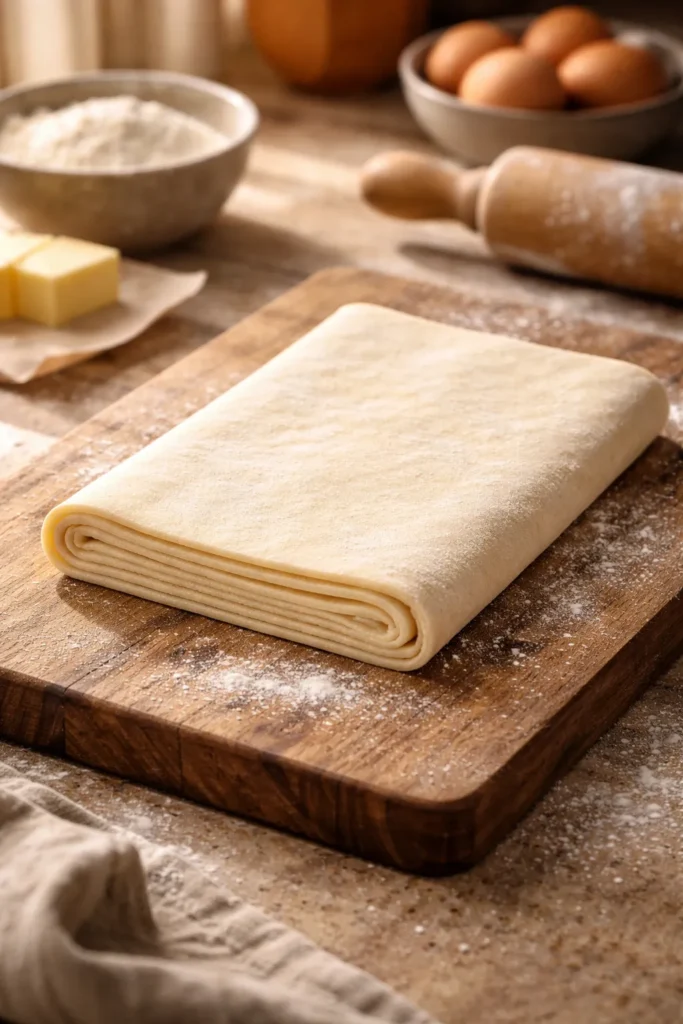
Few ingredients in your freezer pull as much weight as a box of puff pastry. Tucked behind the frozen peas and forgotten ice cream, it’s quietly capable of producing bakery-level results in under 45 minutes — no pastry training required. Whether you pull it out for a last-minute appetizer or a showstopping weekend dessert, puff pastry delivers that shatteringly crisp, golden, buttery finish that makes everything taste like it took serious effort.
The magic lies in what’s already built into the dough: hundreds of paper-thin layers of butter and flour that expand dramatically in a hot oven, creating that iconic flaky lift. Store-bought versions from brands like Pepperidge Farm and Dufour are genuinely excellent — the quality difference between making your own and buying it is small enough that most home cooks won’t notice or care. The few extra minutes you’d spend making it from scratch are almost always better spent on the filling.
What makes puff pastry special is how completely it transforms based on what you pair with it. Ham and Gruyère turns it savory and satisfying. Nutella and banana makes it taste like something from a Parisian pastry counter. Fresh tomatoes and ricotta make it feel like summer on a plate. It plays every role beautifully, which is exactly why professional kitchens and home cooks alike keep it stocked.
The eight recipes below cover both ends of the flavor spectrum — four savory, four sweet — and every single one is achievable on a weeknight. Some take 30 minutes from freezer to table. A few need a short rest in the fridge before baking. All of them are crowd-pleasers, and most of them will have people asking for the recipe.
Table of Contents
- Why Puff Pastry Belongs in Every Home Kitchen
- Homemade vs. Store-Bought
- What to Look for on the Ingredient Label
- What to Know Before You Start Baking
- Scoring and Docking
- Oven Temperature
- 1. Ham and Gruyère Pinwheels
- What Makes Them Work
- Ingredients and Method
- 2. Nutella Chocolate Hand Pies
- Getting the Seal Right
- Ingredients and Method
- Variations Worth Trying
- 3. Caramelized Onion and Brie Galette
- The Caramelized Onions Are Worth the Time
- Ingredients and Method
- 4. Spinach and Feta Triangles
- Building the Right Filling Texture
- Ingredients and Method
- 5. Apple Cinnamon Turnovers
- Apple Choice and Prep
- Ingredients and Method
- 6. Tomato Ricotta Tart
- The Ricotta Base
- Ingredients and Method
- 7. Cheesy Sausage Rolls
- The Filling Ratio That Matters
- Ingredients and Method
- 8. Pear, Walnut, and Chocolate Chip Crescents
- Choosing the Right Pear
- Ingredients and Method
- Storage, Make-Ahead, and Freezing Tips
- Choosing Fillings Beyond These Eight Recipes
- Final Thoughts
Why Puff Pastry Belongs in Every Home Kitchen
There’s a reason experienced home cooks treat puff pastry as a pantry staple rather than a special-occasion ingredient. One box (typically two sheets, around 17 ounces) can yield an appetizer, a main dish, or a dessert with minimal prep. The dough is forgiving in ways that homemade pastry often isn’t — it tolerates minor overworking, accepts almost any filling, and bounces back from imperfect shaping once it hits a hot oven.
The key principle is keeping it cold. Butter is what creates all those layers, and warm butter means those layers collapse and merge before the oven can separate them. Thaw puff pastry in the refrigerator overnight rather than on the counter, and work quickly once it’s out of the fridge. If the dough starts feeling soft or sticky, slide it onto a tray and chill it for 10 minutes before continuing.
Homemade vs. Store-Bought
Making puff pastry from scratch — even the simplified “rough puff” version — produces something genuinely special. You work cold butter cubes into flour by hand, fold the dough several times to build layers, and chill it between each fold. The result is a dough with deeper butter flavor and slightly more dramatic lift.
The trade-off is time. Rough puff pastry takes at least 2 hours from start to finish, most of which is resting in the refrigerator. For weeknight cooking, store-bought wins without question. For a dinner party where you want to impress, spending a Saturday afternoon making a batch from scratch — and freezing half for later — is absolutely worth it.
What to Look for on the Ingredient Label
Not all store-bought puff pastry is created equal. The best versions list butter as the primary fat. Some budget brands use vegetable oil or partially hydrogenated shortening, which bakes up with a different texture — less flaky, less rich, and noticeably less flavorful. Dufour is widely considered the gold standard in the US and is made with 100% butter. Pepperidge Farm uses vegetable shortening but still delivers a reliably flaky result for most recipes.
What to Know Before You Start Baking
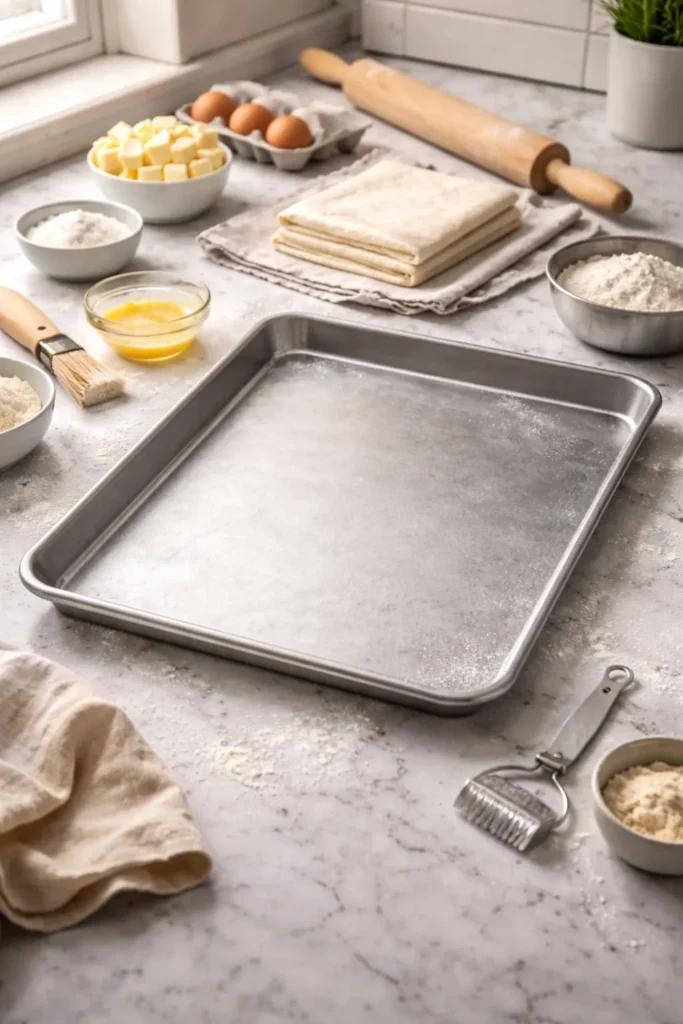
A few practical rules apply across every recipe below, and understanding them upfront makes the difference between a pale, soggy pastry and a perfectly golden, puffed one.
Temperature matters more than technique. Cold dough = flaky pastry. Warm dough = dense, greasy pastry. Keep the sheet in the fridge right up until you’re ready to fill and shape it, and if your kitchen runs warm, chill assembled pastries on the baking sheet for 15 minutes before they go into the oven.
Egg wash is not optional. A simple mixture of one egg beaten with one tablespoon of water, brushed over the surface before baking, is what gives puff pastry its deep golden color and glossy finish. Skip it and the pastry will bake pale and matte — edible, but not impressive.
Scoring and Docking
For tarts where you want a raised crust border, score a line about ¾ inch in from the edge using a sharp knife — cut through only halfway, not all the way through. This allows the border to puff dramatically while the center stays relatively flat under the toppings.
For hand pies, turnovers, and any sealed pastry, dock the surface with a fork before baking. Those small holes let steam escape during baking, which prevents the pastry from puffing up unevenly and creating an air pocket between the dough and the filling.
Oven Temperature
Puff pastry needs a hot oven — 375°F to 425°F (190°C to 220°C) depending on the recipe. Lower temperatures don’t generate enough steam fast enough to separate the layers before the butter melts into the dough. If your oven runs cool, invest 5 minutes in calibrating it with an oven thermometer. It genuinely changes your results.
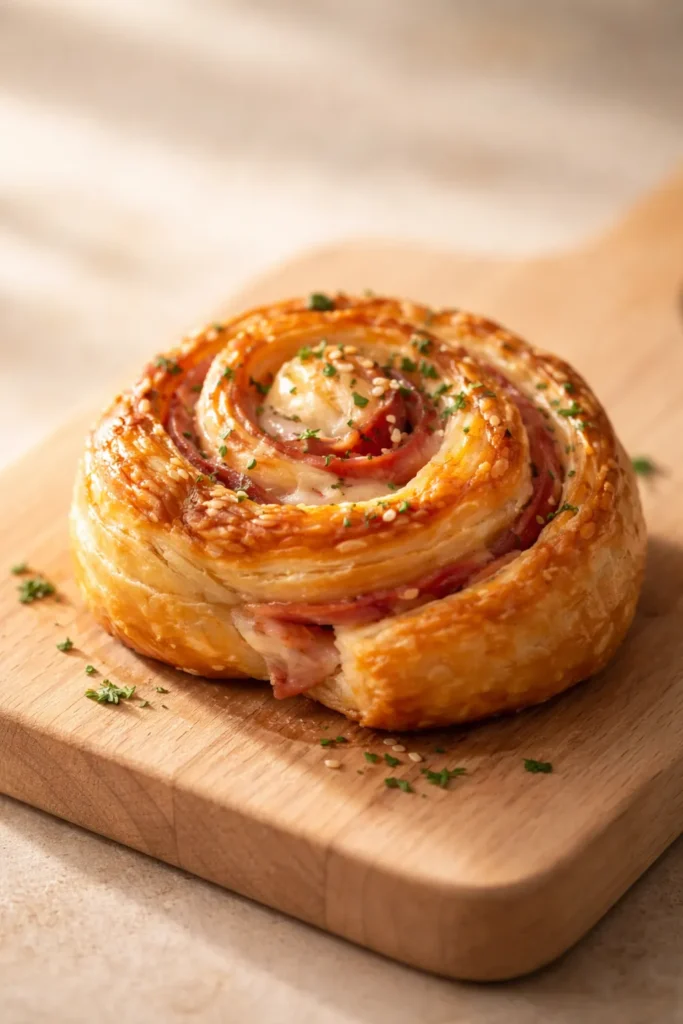
1. Ham and Gruyère Pinwheels

These spiral-shaped pinwheels are one of the most versatile things you can make with puff pastry. They work as an appetizer at a cocktail party, a simple lunch alongside soup, or an impressive addition to a brunch spread. The combination of salty cooked ham and nutty, melting Gruyère wrapped in buttery pastry is essentially perfect, and they look far more labor-intensive than they actually are.
What Makes Them Work
The trick with pinwheels is the chill before you slice. After rolling the filled dough into a tight log, wrap it in plastic and refrigerate it for at least 20 minutes. Cold dough slices cleanly with a sharp knife, giving you neat spirals rather than squashed rounds. Slice them ¼ inch thick — any thicker and the center won’t cook through; any thinner and they’ll crisp up too quickly before the cheese melts properly.
Ingredients and Method
- 1 sheet puff pastry, thawed in the refrigerator
- 6 to 8 thin slices cooked ham
- 1¼ cups Gruyère cheese, finely shredded (fontina or Swiss work as substitutes)
- 1 egg + 1 tablespoon water (egg wash)
- Freshly cracked black pepper
Unroll the pastry on a lightly floured surface and press out any fold lines with your fingers. Lay the ham slices in a single, even layer, leaving a ½-inch border along one long edge. Scatter the shredded cheese evenly over the ham, then season with cracked pepper. Starting from the opposite long edge, roll the pastry into a tight log. Brush the bare border with egg wash to seal. Wrap tightly in plastic and refrigerate for 20 to 30 minutes.
Slice into ¼-inch rounds, place on a parchment-lined baking sheet with space between each one, brush with egg wash, and scatter a little extra cheese on top. Bake at 375°F (190°C) for 18 to 22 minutes, until deep golden and the cheese is bubbling and lightly caramelized at the edges. Serve warm.
Worth knowing: Pinwheel logs freeze beautifully before slicing. Wrap tightly and freeze for up to 3 months. Slice from frozen and add 3 to 5 extra minutes to the baking time.
2. Nutella Chocolate Hand Pies

Hand pies made with puff pastry are one of those recipes that seem almost too easy to produce results this good. A spoonful of Nutella sealed between two layers of buttery dough creates a portable, molten-centered pastry that’s genuinely hard to beat. They take about 30 minutes from start to finish, and they disappear from the plate in roughly half that time.
Getting the Seal Right
The biggest mistake people make with hand pies is a broken seal — the filling leaks out during baking, burns onto the pan, and leaves you with empty pockets of dry pastry. The fix is simple: don’t overfill. One generous tablespoon of Nutella per hand pie is plenty. Any more and the pressure during baking pushes through the seam. Press the edges firmly with a fork to crimp them, and brush the entire border with egg wash before sealing — that egg wash acts as glue.
Ingredients and Method
- 1 sheet puff pastry, thawed in the refrigerator
- ½ cup Nutella (or any chocolate-hazelnut spread)
- 1 egg + 1 tablespoon water (egg wash)
- Powdered sugar for dusting (optional)
On a lightly floured surface, roll the pastry out slightly to smooth the folds and cut it into 9 equal squares or rectangles. Place 1 tablespoon of Nutella slightly off-center on each piece. Brush the edges with egg wash, fold the dough over the filling to form a rectangle or triangle, and press the edges firmly with a fork. Dock the tops with the fork twice to let steam escape. Brush the tops with egg wash.
Bake at 400°F (200°C) for 18 to 22 minutes, until puffed and deeply golden. Let them cool for at least 5 minutes before eating — the filling holds heat intensely. Dust with powdered sugar just before serving.
Variations Worth Trying
- Raspberry jam + cream cheese: Place 1 teaspoon of cream cheese and 1 teaspoon of raspberry jam in the center
- Apple cinnamon: Toss 2 thinly sliced apple pieces with brown sugar and cinnamon before filling
- Guava and cream cheese: A classic Cuban combination that bakes in the same time with no adjustments needed
3. Caramelized Onion and Brie Galette
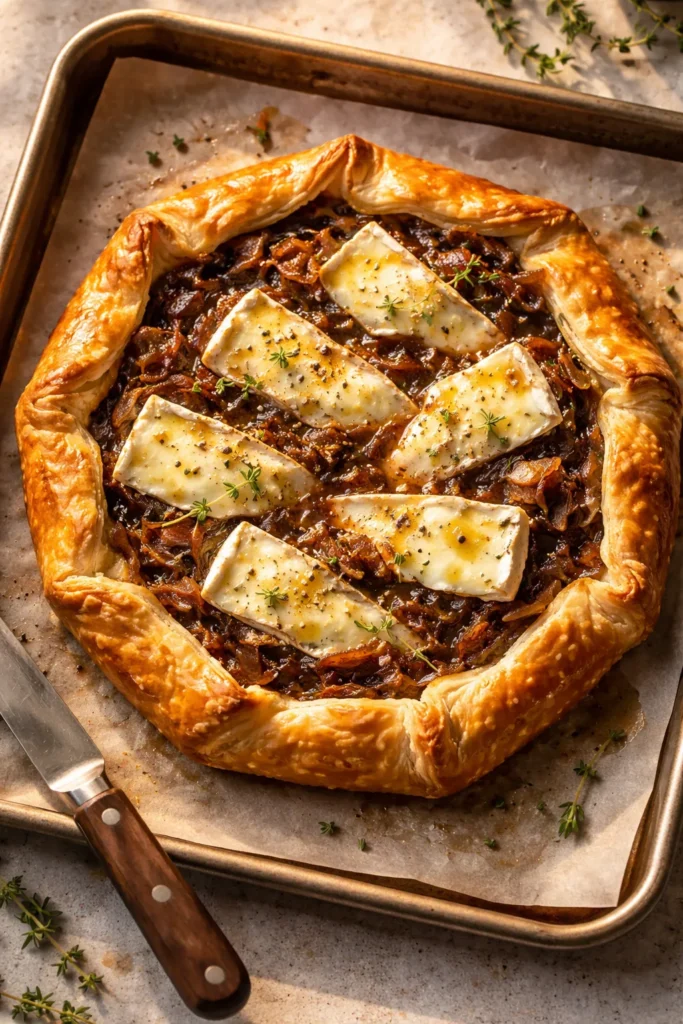
A galette is essentially a free-form tart — no baking dish, no fuss, just a sheet of pastry topped with good ingredients and baked until golden. This version layers fig jam, silky caramelized onions, and planks of Brie for a result that feels genuinely restaurant-worthy. Serve it with an arugula salad dressed in lemon vinaigrette piled directly on top, and it becomes a full dinner.
The Caramelized Onions Are Worth the Time
Properly caramelized onions take 35 to 45 minutes over low heat — and that’s the honest truth that most recipes don’t say loudly enough. Rushing them on high heat gives you browned (but not sweet, jammy, deeply flavored) onions. Cook them low and slow in butter with a pinch of salt, stirring every 5 minutes, until they’re deeply mahogany and almost paste-like. They can be made up to 5 days ahead and stored in the fridge.
Ingredients and Method
- 1 sheet puff pastry, thawed in the refrigerator
- 2 large yellow onions, thinly sliced
- 2 tablespoons unsalted butter
- 2 tablespoons fig jam (apricot works too)
- 6 ounces Brie, rind on, sliced into ¼-inch planks
- 1 egg + 1 tablespoon water (egg wash)
- Fresh thyme leaves
- Flaky sea salt
Cook the onions in butter over low heat, stirring occasionally, for 35 to 45 minutes until deeply golden and jammy. Set aside to cool slightly.
Place the puff pastry sheet on a parchment-lined baking sheet. Score a ¾-inch border around the entire edge without cutting all the way through. Spread the fig jam across the center, inside the scored border. Top with the caramelized onions, then lay the Brie slices over the top. Brush the border with egg wash, scatter thyme leaves over everything, and finish with flaky salt.
Bake at 400°F (200°C) for 22 to 26 minutes, until the border is dramatically puffed and deep golden and the Brie is melted and bubbling. Rest for 5 minutes before slicing.
4. Spinach and Feta Triangles

These pastries draw inspiration from the Greek börek and spanakopita traditions — a filling of wilted spinach, crumbled feta, and egg, folded inside crisp pastry. They’re substantial enough to serve as a light meal and elegant enough to pass as party appetizers. The filling takes about 10 minutes to prepare, and once it’s done, assembly is quick and forgiving.
Building the Right Filling Texture
Watery spinach is the enemy of a good pastry triangle. Whether you use fresh or frozen spinach, squeezing it dry is non-negotiable. Place the cooked, cooled spinach in a clean kitchen towel and wring it out firmly until almost no moisture remains. The filling should be thick enough to hold a shape in a spoon, not runny. Runny filling steams the pastry from the inside and prevents it from crisping properly.
Ingredients and Method
- 1 sheet puff pastry, thawed in the refrigerator
- 10 ounces frozen spinach, thawed and squeezed very dry
- ¾ cup crumbled feta cheese
- 1 large egg, lightly beaten (reserve some for egg wash)
- 2 cloves garlic, minced
- ¼ teaspoon freshly grated nutmeg
- Black pepper to taste
- 1 tablespoon water (to mix with reserved egg for egg wash)
Combine the spinach, feta, garlic, nutmeg, black pepper, and most of the beaten egg (reserve about 1 tablespoon for egg wash) in a bowl. Stir until well combined.
Cut the puff pastry into 8 equal squares. Place 1 heaping tablespoon of filling in the center of each square. Brush the edges with egg wash, fold each square diagonally into a triangle, and press the edges firmly with a fork. Brush the tops with egg wash.
Bake at 375°F (190°C) for 22 to 26 minutes, until puffed and deeply golden. Sprinkle with everything bagel seasoning before baking for an extra dimension of flavor and texture.
5. Apple Cinnamon Turnovers

There’s something irresistible about a warm apple turnover — flaky pastry, spiced apple filling, just enough sweetness. This version keeps the filling simple and properly textured: apples that are soft but not mushy, spiced with cinnamon and a touch of brown sugar, finished with a drizzle of simple icing once baked. They come together in about 40 minutes and taste like something from a serious bakery.
Apple Choice and Prep
Not all apples behave the same way inside pastry. Granny Smith apples hold their shape during baking and provide a pleasant tartness that contrasts the sweetness of the pastry. Honey crisp apples work similarly well. Avoid Red Delicious — they turn mushy and flavorless under heat. Cut the apple pieces small (about ½-inch cubes) so they cook through fully during the baking time without requiring pre-cooking.
Ingredients and Method
- 1 sheet puff pastry, thawed in the refrigerator
- 2 Granny Smith apples, peeled, cored, cut into ½-inch cubes
- 3 tablespoons brown sugar
- ½ teaspoon ground cinnamon
- 1 teaspoon fresh lemon juice
- 1 teaspoon cornstarch
- 1 egg + 1 tablespoon water (egg wash)
For the icing (optional):
- ½ cup powdered sugar
- 1 to 2 tablespoons milk
- ¼ teaspoon vanilla extract
Toss the apple cubes with brown sugar, cinnamon, lemon juice, and cornstarch until evenly coated. The cornstarch absorbs excess moisture and prevents the filling from making the pastry soggy.
Cut the pastry into 6 squares. Place 2 to 3 tablespoons of apple filling slightly off-center on each square. Brush the edges with egg wash, fold into triangles, and crimp firmly with a fork. Brush the tops with egg wash and cut two small slits in each turnover to let steam escape.
Bake at 400°F (200°C) for 20 to 24 minutes, until puffed and golden. Cool for 10 minutes, then drizzle with the icing. Serve warm or at room temperature.
6. Tomato Ricotta Tart

This tart looks like it belongs in a Provençal farmhouse kitchen, and it tastes like pure summer. The base is a mixture of ricotta and lemon zest spread across scored puff pastry, topped with ripe tomatoes sliced about ¼ inch thick and seasoned generously with olive oil, salt, and fresh herbs. It bakes into something creamy in the center, golden at the edges, and deeply savory throughout.
The Ricotta Base
A plain ricotta base can taste bland — the cheese needs some help. Mixing it with lemon zest, a clove of minced garlic, fresh black pepper, and a tablespoon of good olive oil transforms it into something that actually tastes like a deliberate, interesting component rather than a filler. Some cooks add a few tablespoons of cottage cheese to the ricotta, which boosts the protein and adds a slight tang that works beautifully with the acid of the tomatoes.
Ingredients and Method
- 1 sheet puff pastry, thawed in the refrigerator
- ¾ cup whole-milk ricotta
- 1 clove garlic, finely minced
- Zest of ½ lemon
- 1 tablespoon good olive oil, plus more for drizzling
- Salt and freshly cracked black pepper
- 3 to 4 medium ripe tomatoes, sliced ¼ inch thick
- Fresh basil leaves, for finishing
- 1 egg + 1 tablespoon water (egg wash)
- Flaky sea salt
Pat the tomato slices dry between paper towels and season them lightly with salt. Let them sit for 5 minutes, then pat dry again. This draws out excess water that would otherwise make the pastry soggy.
Mix the ricotta, garlic, lemon zest, olive oil, salt, and pepper together until smooth. Place the pastry on a parchment-lined baking sheet. Score a ¾-inch border without cutting all the way through. Dock the center with a fork. Spread the ricotta mixture across the center, inside the border. Lay the tomato slices over the ricotta in a slightly overlapping pattern. Drizzle with olive oil, brush the border with egg wash, and season with cracked pepper.
Bake at 400°F (200°C) for 22 to 26 minutes, until the border is puffed and golden and the tomatoes have softened and lightly caramelized at the edges. Scatter fresh basil leaves and flaky salt over the top immediately after it comes out of the oven. Serve warm or at room temperature.
7. Cheesy Sausage Rolls

Sausage rolls are a cornerstone of British and Australian baking culture for good reason — they’re portable, satisfying, and endlessly adaptable. This version uses seasoned pork sausage meat (or good-quality pork sausages with the casings removed), mixed with Parmesan, Dijon mustard, and fresh herbs, wrapped in puff pastry and baked until deeply golden. They work as an appetizer, a lunch, or a simple dinner alongside a green salad.
The Filling Ratio That Matters
The best sausage rolls have a roughly equal ratio of meat to pastry in each bite — not a thin smear of filling or an overstuffed tube that can’t close. About ¾ inch of filling diameter is the sweet spot. The Dijon mustard in the mix isn’t just for flavor — the slight acidity helps keep the filling moist and cuts through the richness of the pork and pastry.
Ingredients and Method
- 1 sheet puff pastry, thawed in the refrigerator
- 1 pound ground pork sausage (or 4 sausage links, casings removed)
- ¼ cup freshly grated Parmesan
- 1 tablespoon Dijon mustard
- 1 teaspoon fennel seeds, lightly crushed
- 2 tablespoons fresh parsley, finely chopped
- 1 clove garlic, minced
- Salt and black pepper
- 1 egg + 1 tablespoon water (egg wash)
- Sesame seeds or poppy seeds, for topping
Mix the sausage meat with Parmesan, Dijon, fennel seeds, parsley, garlic, salt, and pepper until evenly combined. Don’t overwork the mixture — stir just until everything is incorporated.
Cut the puff pastry in half lengthwise to create two long rectangles. Divide the sausage mixture in half and shape each portion into a log running along the center of each pastry rectangle. Brush the edges with egg wash, fold the pastry over the filling, and press firmly to seal. Brush the tops with egg wash, scatter sesame seeds over, and score diagonal lines across the top every inch or so (don’t cut all the way through).
Cut each log into 6 to 8 individual rolls. Place on a parchment-lined baking sheet with space between each roll. Bake at 400°F (200°C) for 25 to 30 minutes, until the pastry is deeply golden and the internal temperature of the filling reaches 160°F (71°C). Serve warm with Dijon mustard or ketchup on the side.
8. Pear, Walnut, and Chocolate Chip Crescents
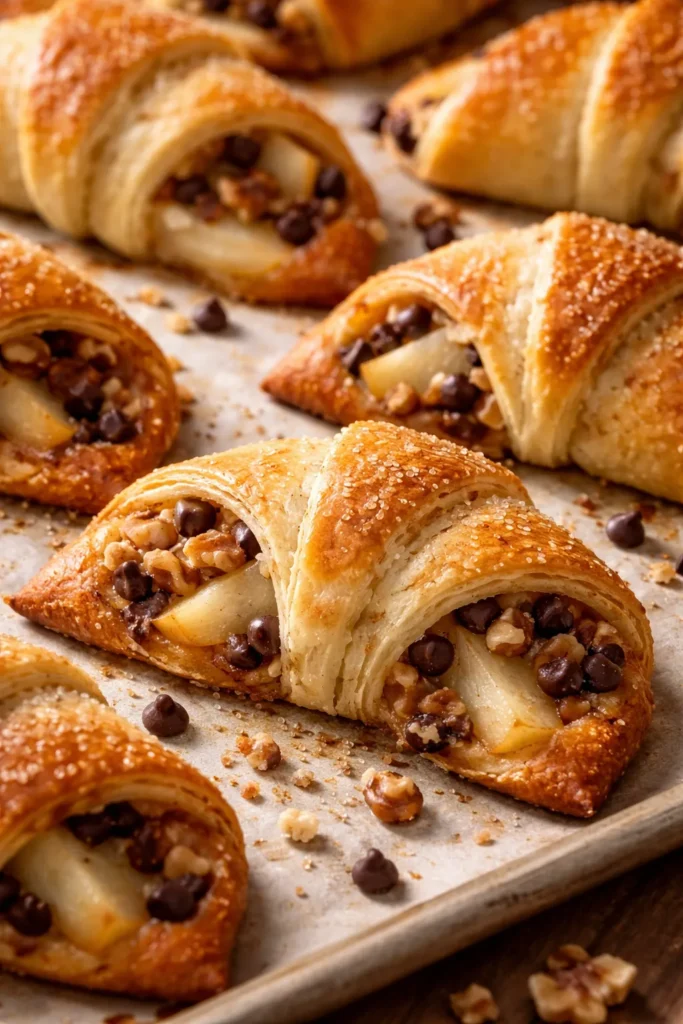
These crescent pastries land firmly in the category of desserts that look elaborate but require almost no technical skill. A triangle of puff pastry gets filled with thin slices of ripe pear, a small handful of chopped walnuts, and a scatter of mini chocolate chips, then rolled up from the wide base to the tip. They bake into golden, flaky crescents with a warm, sweet filling and a dusting of powdered sugar. They’re also the kind of thing that makes people assume you’ve been baking all day.
Choosing the Right Pear
Pear ripeness is the single most important variable in this recipe. An underripe pear won’t soften fully during the short baking time, leaving you with firm, slightly starchy pieces inside the pastry. An overripe pear turns mushy and releases too much liquid. Look for pears that give slightly when pressed near the stem — Bosc and Anjou varieties hold their shape particularly well under heat. Slice them about ⅛ inch thick so they cook through without falling apart.
Ingredients and Method
- 1 sheet puff pastry, thawed in the refrigerator
- 1 ripe but firm pear, thinly sliced (about ⅛ inch thick)
- ¼ cup walnuts, roughly chopped
- ¼ cup mini chocolate chips
- 1 egg + 1 tablespoon water (egg wash)
- 1 teaspoon granulated sugar (for sprinkling)
- Powdered sugar, for dusting after baking
On a lightly floured surface, roll the pastry sheet into a circle roughly 12 inches in diameter. Cut the circle into 8 equal triangles (like cutting a pizza). Along the wide base of each triangle, place 2 to 3 pear slices, a pinch of chopped walnuts, and a small scatter of chocolate chips. Starting from the wide base, roll each triangle up toward the tip, curving the ends slightly to form a crescent shape.
Place on a parchment-lined baking sheet. Brush with egg wash and sprinkle with granulated sugar. Bake at 375°F (190°C) for 18 to 22 minutes, until puffed and deep golden. Cool for at least 10 minutes — the filling holds heat. Dust generously with powdered sugar before serving.
Pro tip: Apple slices tossed in a little brown sugar and cinnamon are an excellent substitute for the pear. Both versions work beautifully, and you can swap the walnuts for pecans if that’s what you have on hand.
Storage, Make-Ahead, and Freezing Tips
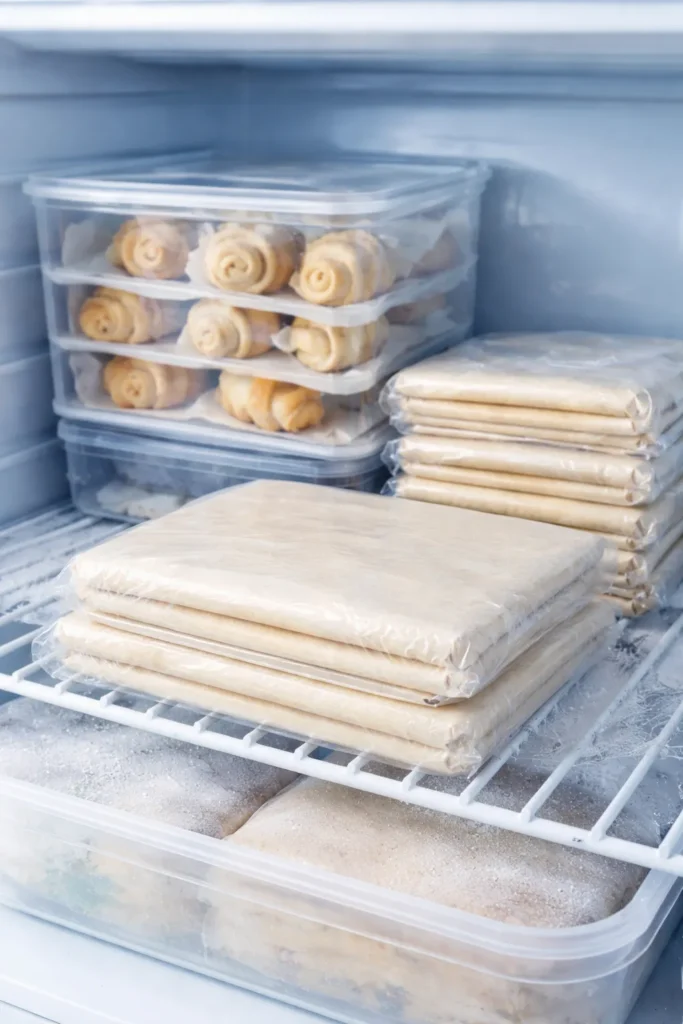
One of puff pastry’s most underappreciated qualities is how well it behaves as a make-ahead ingredient. Understanding how to store and freeze your assembled pastries gives you a serious advantage when you’re planning for a dinner party or a weekend brunch.
Unbaked pastry: Store thawed, unused puff pastry in the refrigerator wrapped tightly in plastic for up to 2 days. Beyond that, the texture begins to suffer. To freeze it, wrap the sheet flat in plastic, place it in a zip-lock freezer bag, and freeze for up to a month. Thaw overnight in the refrigerator — never on the counter.
Assembled but unbaked pastries — pinwheels, hand pies, sausage rolls, and turnovers — can all be frozen before baking. Arrange them on a baking sheet, freeze until solid (about 2 hours), then transfer to a freezer bag. Bake from frozen, adding 5 to 8 minutes to the baking time. This is genuinely useful: assemble a double batch, bake half now, freeze the other half, and pull them out whenever you need something impressive in under 30 minutes.
Baked pastries are best eaten the day they’re made. Puff pastry loses its crispness as moisture from the filling migrates into the layers. If you do need to reheat them, use an oven or toaster oven at 350°F (175°C) for 8 to 10 minutes rather than a microwave, which will make the pastry soft and chewy rather than crisp.
For tarts and galettes, the components — roasted vegetables, caramelized onions, ricotta base — can be prepared 2 to 3 days ahead. Assemble and bake the day you plan to serve for best results.
Choosing Fillings Beyond These Eight Recipes

Once you’re comfortable with the basic techniques — scoring, docking, egg washing, maintaining cold dough — puff pastry becomes one of the most open-ended ingredients in your kitchen. Almost any combination of flavors you enjoy eating can be wrapped, folded, or spread onto a sheet of pastry and baked into something worth serving.
A few combinations that consistently produce outstanding results:
- Baked Brie: Place a whole round of Brie in the center of a pastry sheet, top with a spoonful of fig or cherry preserves, wrap the pastry around it, seal with egg wash, and bake at 400°F for 25 minutes. Serve with sliced apples and crackers.
- Chicken pot pie topping: Roll a sheet of puff pastry over a filled skillet or casserole dish, cut small steam vents, brush with egg wash, and bake until golden. Dinner is done.
- Savory cheese twists: Sprinkle half a pastry sheet with shredded cheese and fresh herbs, fold in half, cut into ½-inch strips, twist each one, and bake at 375°F for 20 minutes. They’re impossible to stop eating.
- Puff pastry pizza: Lay a sheet on a parchment-lined baking sheet, top with marinara and mozzarella, add your chosen toppings, and bake at 425°F for 15 to 20 minutes. The crust is extraordinary.
The patterns repeat across all of them: cold dough, hot oven, egg wash, and don’t overfill. Master those four rules and puff pastry will serve you extremely well.
Final Thoughts
Puff pastry is one of those ingredients that genuinely rewards a little confidence. The recipes above don’t require special equipment, advanced technique, or hours of preparation — they require good butter (if you’re making your own), ripe or well-seasoned fillings, and a hot oven.
If you’re making just one recipe from this list to start, the ham and Gruyère pinwheels and the tomato ricotta tart are the most forgiving and the most versatile. They both teach you the two core puff pastry skills — rolling and sealing, and scoring and docking — and they produce results that look and taste far more impressive than the effort involved.
The sweet recipes — particularly the apple turnovers and the pear crescents — are genuinely excellent served slightly warm with a scoop of vanilla ice cream or a spoonful of crème fraîche alongside. Keep both ideas in your back pocket for the next time you need a quick dessert that doesn’t feel quick.
Keep a box of puff pastry in your freezer. It earns its place there every time.