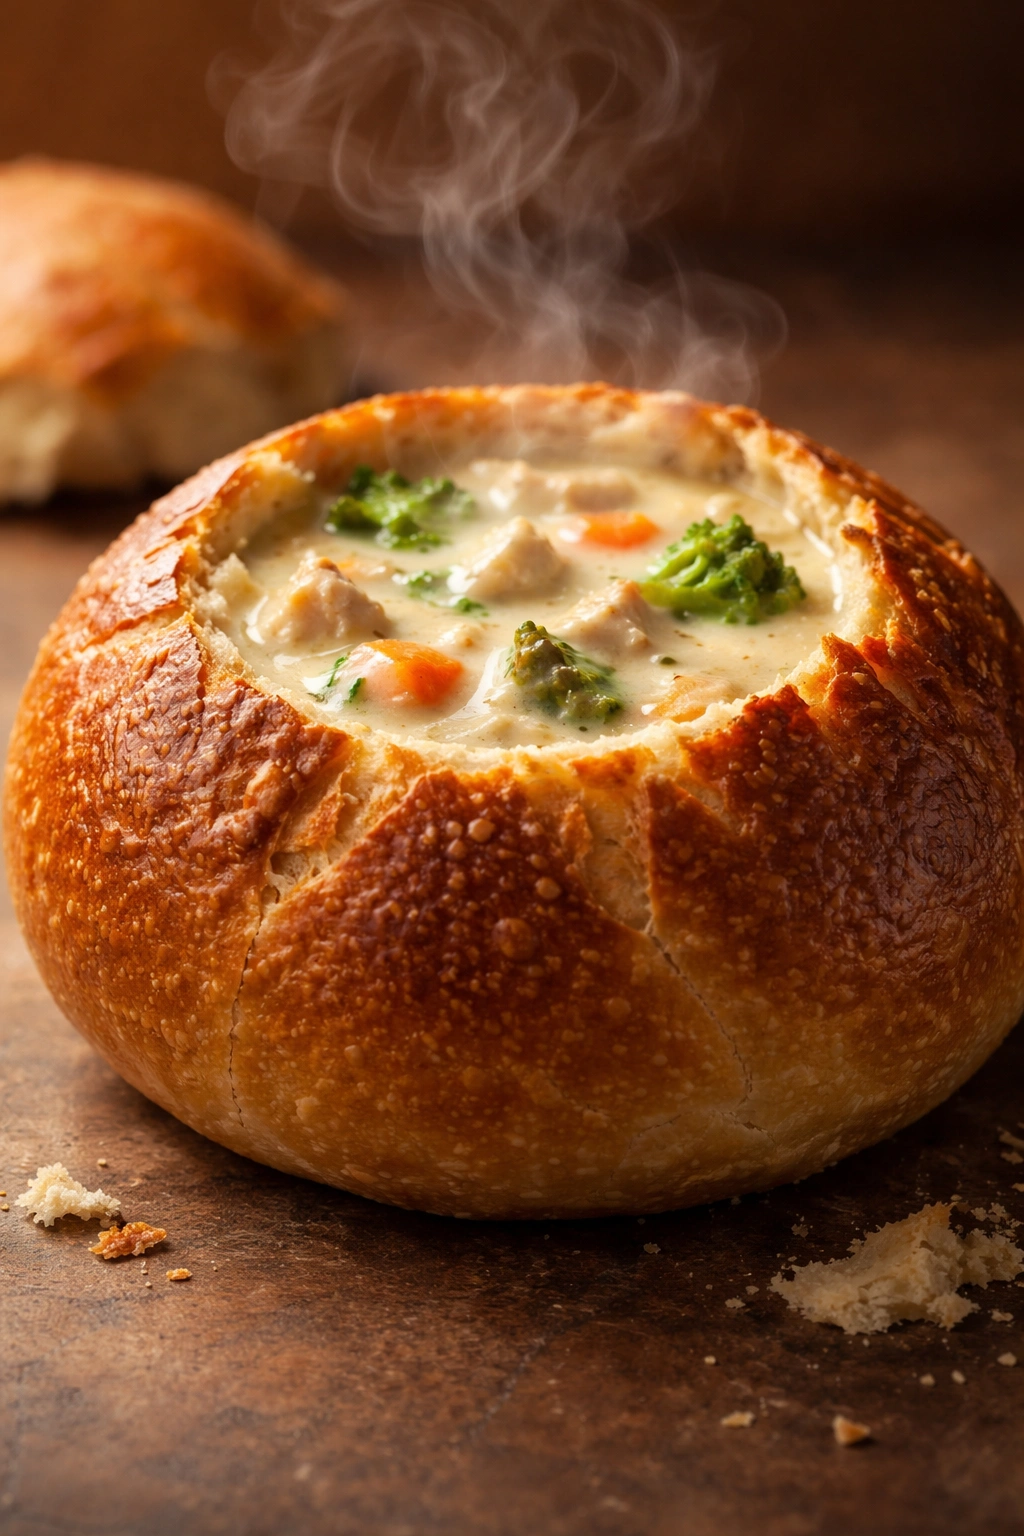
If you’ve ever bit into a warm bread bowl filled with creamy Panera soup, you know that moment of pure comfort—the crispy exterior giving way to soft, buttery bread that absorbs every rich, savory spoonful. The genius of the dish isn’t really the soup alone or the bread bowl alone, but the combination of the two, eaten together, where bread becomes almost a vehicle for flavor and texture. The problem is that Panera’s version costs $10-14 per bowl, and honestly, making it at home isn’t that much harder than ordering it—yet most people never think to try.
What’s genuinely surprising is how simple the whole thing becomes when you break it down. You don’t need special equipment, rare ingredients, or even advanced cooking skills. The soup is basically a controlled simmer of vegetables, broth, and cream. The bread bowl is either something you bake yourself (easier than you’d think) or something you buy and toast. And once you’ve done it a couple of times, you’ll realize you can make restaurant-quality bread bowl soup for a fraction of the price, customize every flavor to your exact preferences, and have the satisfaction of knowing exactly what went into your food.
This isn’t about cutting corners or settling for “almost as good.” A homemade version can actually surpass the bakery version because you control the salt level, the cream ratio, the quality of the cheese, the freshness of the vegetables, and how thick or thin you want it. Plus, your kitchen smells absolutely incredible while it’s cooking.
Why Panera’s Bread Bowl Concept Works So Well
Panera didn’t invent soup in a bread bowl—that concept has existed in medieval times and various cultures for centuries. But Panera perfected the marketing and accessibility of it, turning it into an iconic visual and a craveable lunch experience. What makes their version so appealing goes deeper than just Instagram appeal, though the presentation certainly helps.
The warmth factor is huge. A bread bowl keeps soup warmer longer than a ceramic bowl because bread is an insulator. The carbs also satisfy you in a way that soup alone doesn’t—you’re getting protein from the cheese, vegetables, carbs from both the bread and any potatoes or pasta in the soup, and fat from the cream, making it a genuinely complete meal that leaves you full for hours.
The textural contrast is equally important. That first bite where your spoon breaks through crispy, toasted bread exterior into creamy soup is deeply satisfying. As you eat, the bread softens and absorbs the soup, becoming almost a thick, hearty component of the meal rather than a side element. By the last few bites, you’re eating bread that’s been infused with soup flavor, which honestly might be the best part.
There’s also a psychological element—novelty and theater. Eating soup from an edible bowl feels special and deliberate, not like a quick lunch. It creates a moment of actual enjoyment rather than just consuming calories. That sense of “treating yourself” is part of why Panera can charge premium prices, and it’s exactly the feeling you can recreate at home for a fraction of the cost.
The Soup That Goes in the Bowl

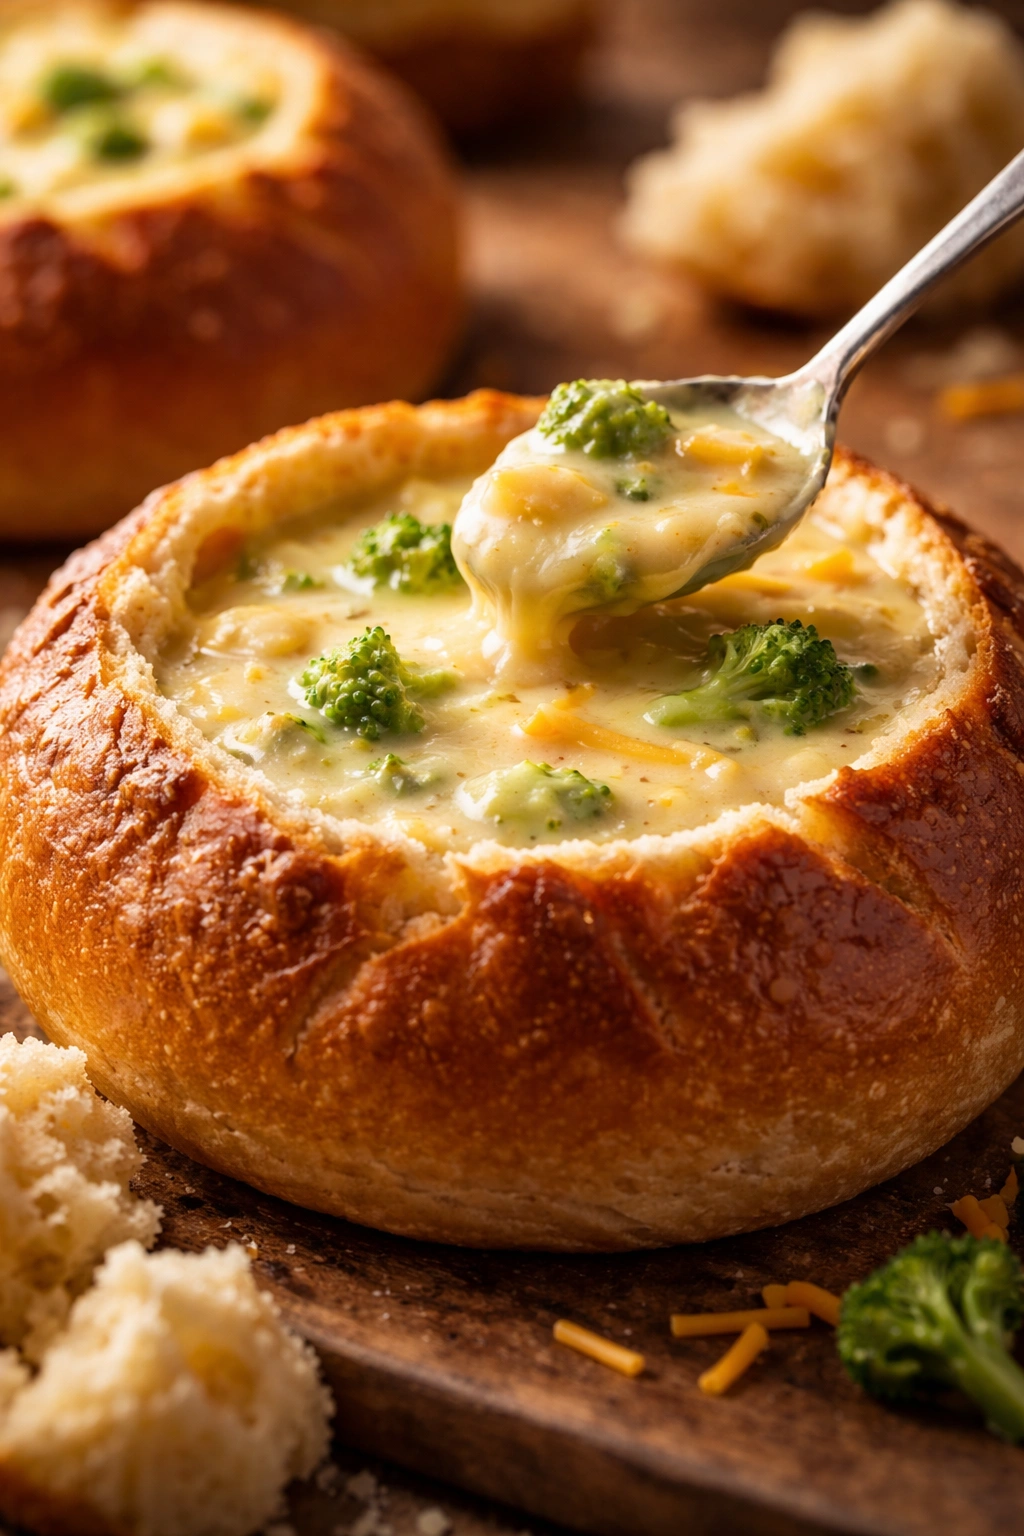
Panera’s most famous bread bowl soup is their Broccoli Cheddar, though they rotate seasonal varieties like Tomato, Creamy Vegetable, and Potato Leek. For a copycat that captures the essence of what makes their soup so addictive, we’re focusing on Broccoli Cheddar—it’s rich, accessible, not overly complicated, and genuinely delicious.
Their version uses a cream base, actual broccoli florets (not pureed into oblivion), sharp cheddar cheese, and some kind of thickening agent—likely cornstarch or roux. The key to making yours taste like theirs is using real sharp cheddar, not processed cheese product. The difference is immediately noticeable. Sharp cheddar has a slight tang and complexity that mild cheddar lacks, which is what makes the soup taste sophisticated rather than flat.
The broccoli texture is another critical detail. Panera doesn’t puree their broccoli into creamy nothingness—they keep bite-sized florets intact so you can actually taste and feel the vegetable. This matters because it gives you something to work for with your spoon, adds nutritional value, and makes the soup feel less like baby food and more like actual food you’re choosing to eat.
One more thing that separates good creamy vegetable soup from great creamy vegetable soup is the depth of the broth base. Many home cooks start with water or weak vegetable broth, which results in thin, one-dimensional soup. Panera almost certainly uses either chicken broth (even for a vegetarian soup, a light chicken broth adds flavor without meatiness) or vegetable broth that’s been simmered with aromatics. We’ll do the same.
Building Your Bread Bowl
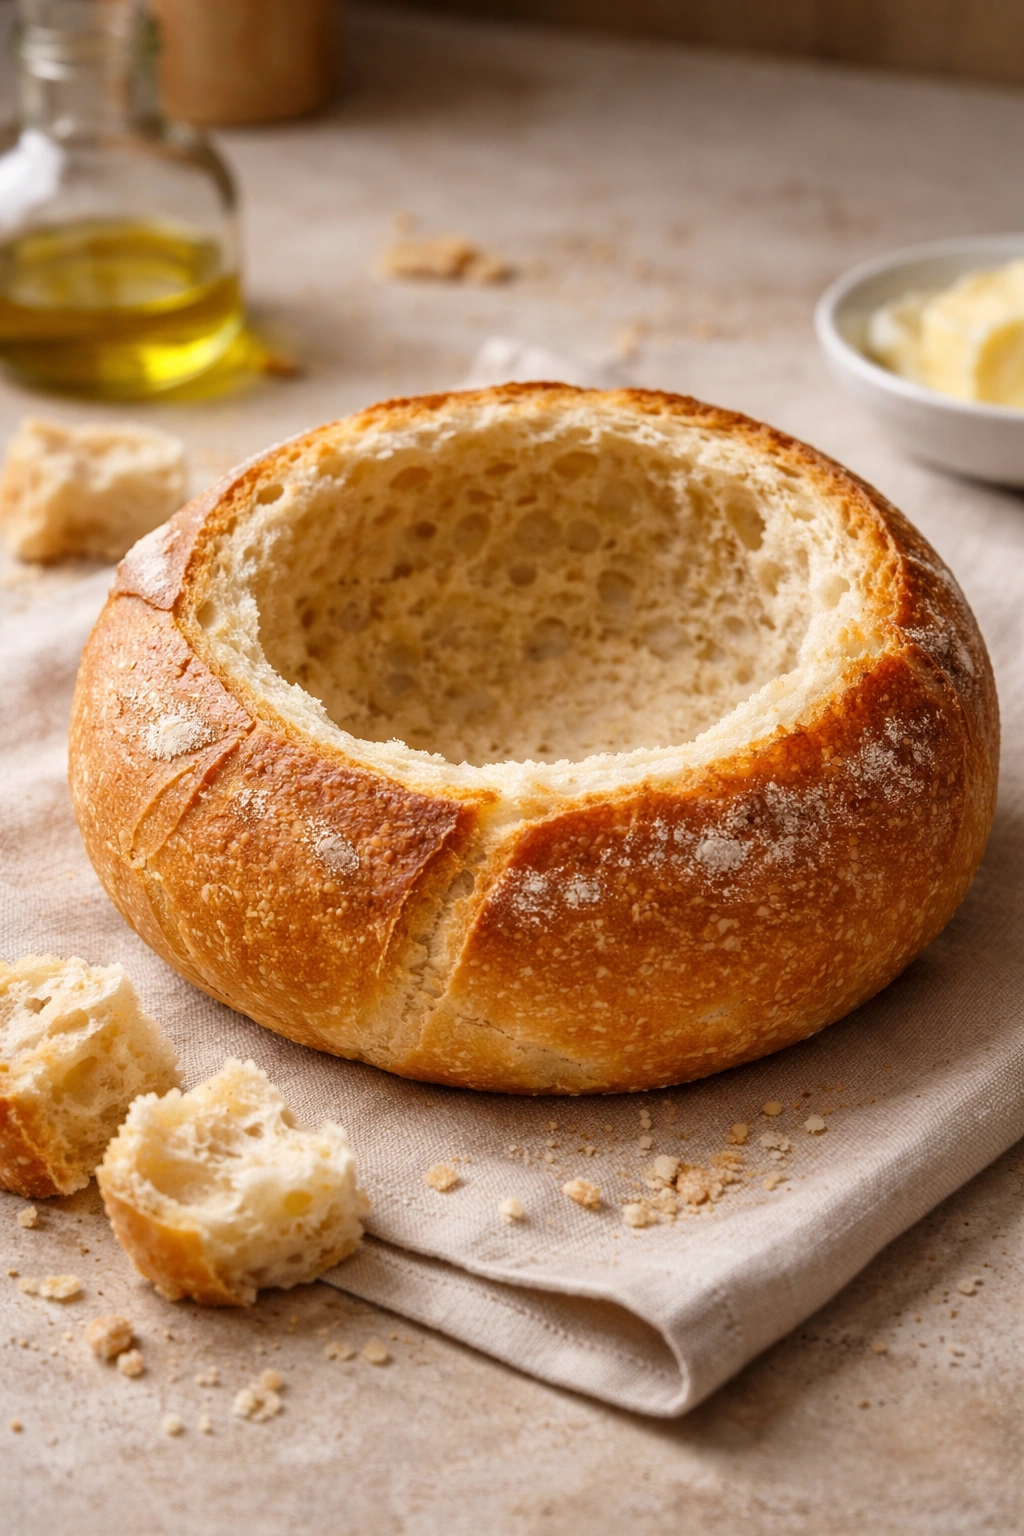
The bread bowl itself is the other half of the equation, and you have two legitimate options: make one or buy one. Making one from scratch is absolutely doable and takes about 90 minutes from start to finish. Buying one from a bakery (Panera, local bakeries, sometimes grocery store bakeries) and toasting it at home is the faster route and honestly still delivers 95% of the magic.
If you’re making your own, you’re starting with a basic bread dough—flour, water, yeast, salt, a touch of sugar. You shape it into a ball, let it rise, bake it until golden and hollow inside, then (this is the key step) you scoop out the interior while it’s still warm to create the bowl cavity. The interior bread comes out soft and can be reserved for breadcrumbs or eaten plain.
The critical detail is toasting. Whether your bread bowl is homemade or store-bought, you must toast it before filling it with soup. This serves two purposes: it dries out the interior enough that it won’t immediately disintegrate when filled with hot liquid, and it creates that essential crispy exterior. You can toast it in a 375°F oven for 8-10 minutes, or even in a toaster oven if you’re doing one at a time. The interior should be warm and crispy but not burned; the exterior should have a light golden color.
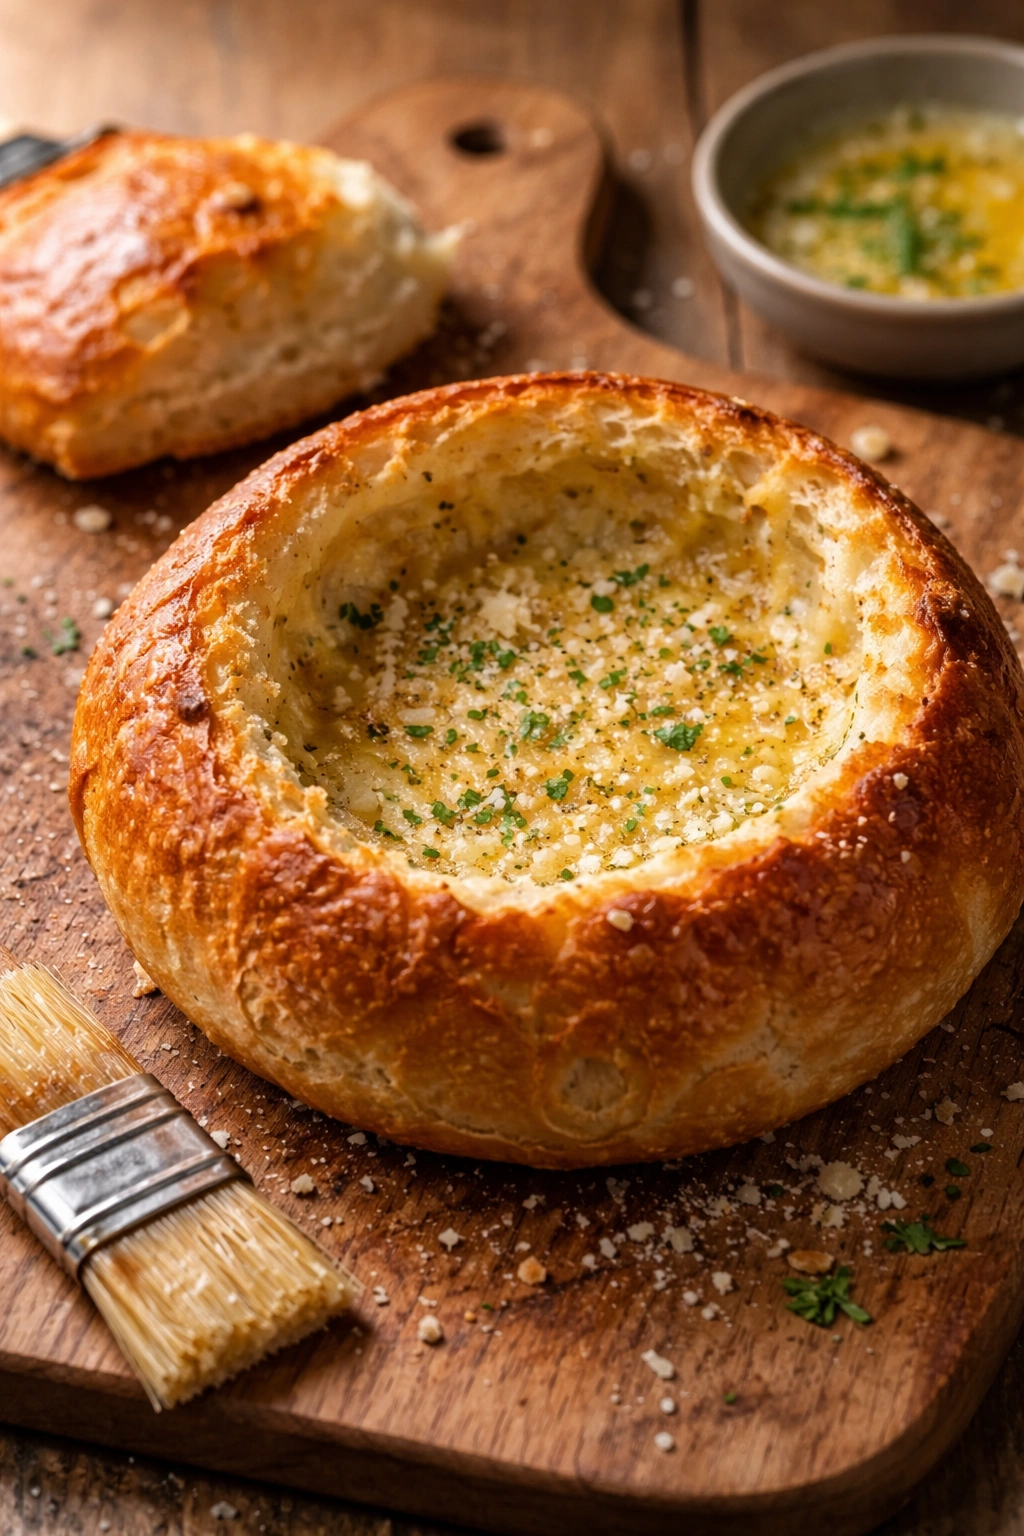
One pro tip that Panera likely uses but most home cooks skip: brush the interior of the toasted bread bowl with melted butter or even better, brush it with a mixture of melted butter and grated Parmesan. This adds flavor, prevents the bread from absorbing too much soup liquid too quickly (since the fat creates a slight barrier), and tastes incredible. Some people add a tiny pinch of garlic powder or Italian seasoning to the butter. This is one of those invisible details that makes the difference between “nice” and “wow, this is really good.”
Understanding Cream-Based Soup Technique

Before we get into the exact recipe, it’s worth understanding how cream-based soups actually work, because this knowledge prevents most home cook failures. The main mistake people make is rushing the process or using low-quality ingredients and expecting restaurant results.
A proper cream soup starts with aromatics—typically onion and garlic—sautéed in butter or oil until softened and fragrant. This is not a step you skip. The onion and garlic add baseline flavor that makes the entire soup taste more complex and less one-dimensional. Next comes the broth, which you bring to a simmer. This is where the flavor is being built—the liquid is absorbing the taste of whatever vegetables and seasonings you add.
The vegetables go in next, and timing matters. Broccoli cooks quickly, so you add it after everything else is going. You want it tender enough to eat easily but not so overcooked that it’s yellow and mushy. The window is usually 8-12 minutes depending on how small you cut the florets.
Once the vegetables are almost done, you add cream and cheese. Here’s where patience matters: add it slowly, stirring constantly, off the heat or over very low heat. High heat can cause cream to break or separate (you’ll see little grainy bits, which is a textural nightmare). Cheese should be added after cream has been incorporated, also off heat, so it melts smoothly into a glossy sauce rather than scorching or separating.
The thickening happens naturally from the cream and cheese creating a richer base, but many recipes benefit from a slurry (cornstarch mixed with a little cold broth) stirred in during the cooking process to achieve proper soup consistency. A good creamy soup is thick enough to coat a spoon but still pourable—not lumpy, not watery, not starchy-tasting.
Panera Broccoli Cheddar Soup Recipe

Yield: Serves 4 to 6 | Makes about 8 cups
Prep Time: 20 minutes
Cook Time: 35 minutes
Total Time: 55 minutes
Difficulty: Beginner—This recipe requires only basic knife skills and stovetop cooking. The steps are straightforward and forgiving; the main thing is patience when heating the cream and cheese to avoid curdling.
For the Soup:
- 4 tablespoons unsalted butter
- 1 large yellow onion, diced into small, even pieces (about 1 cup)
- 4 cloves fresh garlic, minced (about 1 tablespoon)
- 6 cups good-quality vegetable broth or low-sodium chicken broth (if using store-bought, check sodium content—you’ll be adding more salt through cheese)
- 6 cups fresh broccoli florets, cut into bite-sized pieces (about 1.5 pounds whole broccoli)
- 2 medium carrots, peeled and cut into small dice (about 1 cup total)
- 1 teaspoon kosher salt (adjust to taste at the end)
- ½ teaspoon freshly ground black pepper
- ¼ teaspoon ground cayenne pepper (optional but recommended—it adds subtle heat and complexity without making the soup spicy)
- 1 tablespoon cornstarch (or 2 tablespoons all-purpose flour if you prefer)
- 3 tablespoons cold broth or water (for the slurry)
- 1½ cups heavy cream, at room temperature
- 2½ cups sharp cheddar cheese, freshly grated (about 10 ounces—use a box grater, not pre-shredded, which contains anti-caking agents that make it gritty)
- ½ cup whole milk
- 2 tablespoons fresh thyme or 1 teaspoon dried thyme (fresh is better, but either works)
- Pinch of nutmeg (yes, seriously—just a tiny pinch, it adds warmth and sophistication)
Prepare the Aromatics and Vegetables:
-
Melt the butter in a large, heavy-bottomed pot or Dutch oven over medium heat. Once foaming, add the diced onion and a pinch of salt. Cook for 5 to 6 minutes, stirring occasionally, until the onion is translucent and just beginning to soften at the edges—you’re not looking for caramelization yet, just translucency. The onion should smell sweet and aromatic.
-
Add the minced garlic and stir constantly for 30 seconds to 1 minute, just until fragrant. Do not let garlic sit without stirring, or it will burn and taste bitter. You should smell raw garlic transforming into something more mellow and sweet.
-
Pour in the broth, stirring to combine. Increase the heat to medium-high and bring the broth to a gentle simmer—you should see small bubbles breaking the surface, not a rolling boil. This takes about 3 to 4 minutes.
Advertisements
Add Vegetables and Build Base Flavor:
-
Add the carrot pieces and thyme. Simmer uncovered for 5 minutes. The carrots will begin to soften slightly, and the broth will start absorbing the thyme flavor.
-
Add the broccoli florets, salt, black pepper, and cayenne. Stir well to combine. Return to a gentle simmer. Cook uncovered for 8 to 10 minutes, until the broccoli is completely tender but still bright green (not yellow or olive colored—yellow means overcooked). A fork should easily pierce the broccoli, but the florets should still hold their shape.
Thicken and Finish:
-
While the broccoli is cooking, prepare the cornstarch slurry: whisk the cornstarch with the cold broth or water in a small bowl until smooth and completely lump-free. Set aside.
-
Once the broccoli is fully tender, remove the pot from heat. (This is important—you don’t want to add cold slurry to boiling liquid because it can clump.) Slowly pour in the cornstarch slurry while stirring constantly with a wooden spoon or whisk. Stir for 1 to 2 minutes until fully incorporated.
-
Return the pot to medium heat and bring back to a gentle simmer. Stir often for 2 to 3 minutes—the soup should thicken noticeably and become glossy. You’ll see it coat the back of a spoon more heavily than before. If the soup isn’t thick enough after 3 minutes, make another slurry and repeat.
-
Remove from heat and let cool for 2 to 3 minutes. Add the heavy cream and whole milk, stirring slowly and constantly to combine. The mixture should be warm and velvety; do not let it boil.
-
Add the grated sharp cheddar cheese in two or three additions, stirring thoroughly after each addition until fully melted and smooth. The soup will transform from cream-colored to golden orange as the cheese incorporates. Stir constantly to ensure no lumps or gritty texture from the cheese.
-
Add the pinch of nutmeg and taste carefully. Adjust salt and pepper to your preference—remember that the cheese is salty, so you may not need as much salt as you think. The soup should taste rich, cheesy, and slightly peppery, with a subtle warmth from the cayenne and nutmeg.
Advertisements
Serve:
- If serving in bread bowls, ladle the hot soup directly into toasted, buttered bread bowls. If serving in regular bowls, ladle into bowls and enjoy immediately while steaming hot.
Why This Recipe Tastes Like Panera (And Sometimes Better)

The specific choices here aren’t random—they’re designed to replicate what makes Panera’s version so craveable while actually giving you more control than they have. The use of fresh garlic instead of garlic powder means you get rounded, mellow garlic flavor rather than harsh or dusty notes. Freshly grated cheese (not pre-shredded) melts into a silky sauce instead of creating a grainy or slightly gritty texture.
The addition of whole milk alongside heavy cream is a Panera trick. It gives richness without making the soup feel too heavy or cloying. The cayenne pepper isn’t meant to make it spicy—it’s barely noticeable—but it adds a subtle complexity that makes people say “this tastes like more” without being able to identify what they’re tasting. That’s good seasoning.
The cornstarch slurry is more forgiving than making a roux (butter and flour cooked together), and it results in a cleaner taste and smoother texture. Cornstarch has no flavor, while a roux adds a subtle wheat or toasted flour note that some people find distracting.
Most importantly, the soup is actually soup—vegetables you can see and taste, real broth, real cream, real cheese—not a thickened liquid with “cheese flavoring.” That’s the difference between homemade and industrial.
Toasting and Assembling the Bread Bowl
The assembly step is where you actually make this the signature Panera experience. Cold soup in a bread bowl is a sad thing. Hot soup in a properly toasted, buttered bread bowl is transcendent.
Start with your bread bowl—whether homemade or bakery-bought. You want something crusty on the outside and soft inside. If it’s been sitting around for a day or so, even better, as stale bread is actually easier to scoop and won’t fall apart as quickly. Preheat your oven to 375°F and toast the bread bowl directly on the oven rack (place a baking sheet on the rack below to catch any crumbs) for 8 to 12 minutes. You’re looking for it to feel warm all the way through and for the exterior to be crispy and light golden brown.
While the bread is toasting, brush the interior with melted butter mixed with a tiny pinch of Parmesan and dried Italian seasoning if you want to be fancy. This step prevents the bread from immediately absorbing too much soup and turning to mush while also adding a subtle flavor boost that makes people wonder what secret ingredient you’re using (spoiler: it’s just butter and Parmesan).
Ladle the hot soup into the toasted bowl immediately after removing it from the oven. The hot soup will warm the bowl further, and the heat will keep the exterior crispy for at least the first 5-10 minutes of eating, which is the critical window when you’re getting those best bites of textural contrast.
Serve with a spoon sturdy enough to break through the bread without buckling—a regular soup spoon often won’t do the job. You need something more substantial. Many people eat bread bowl soup almost with a fork and knife at first, using the utensils to tear off pieces of bread and dip them into the soup, then eating the bread-and-soup combination together. This is not wrong; it’s actually the most efficient and satisfying way to eat it.
Pro Tips Nobody Tells You About Bread Bowl Soup
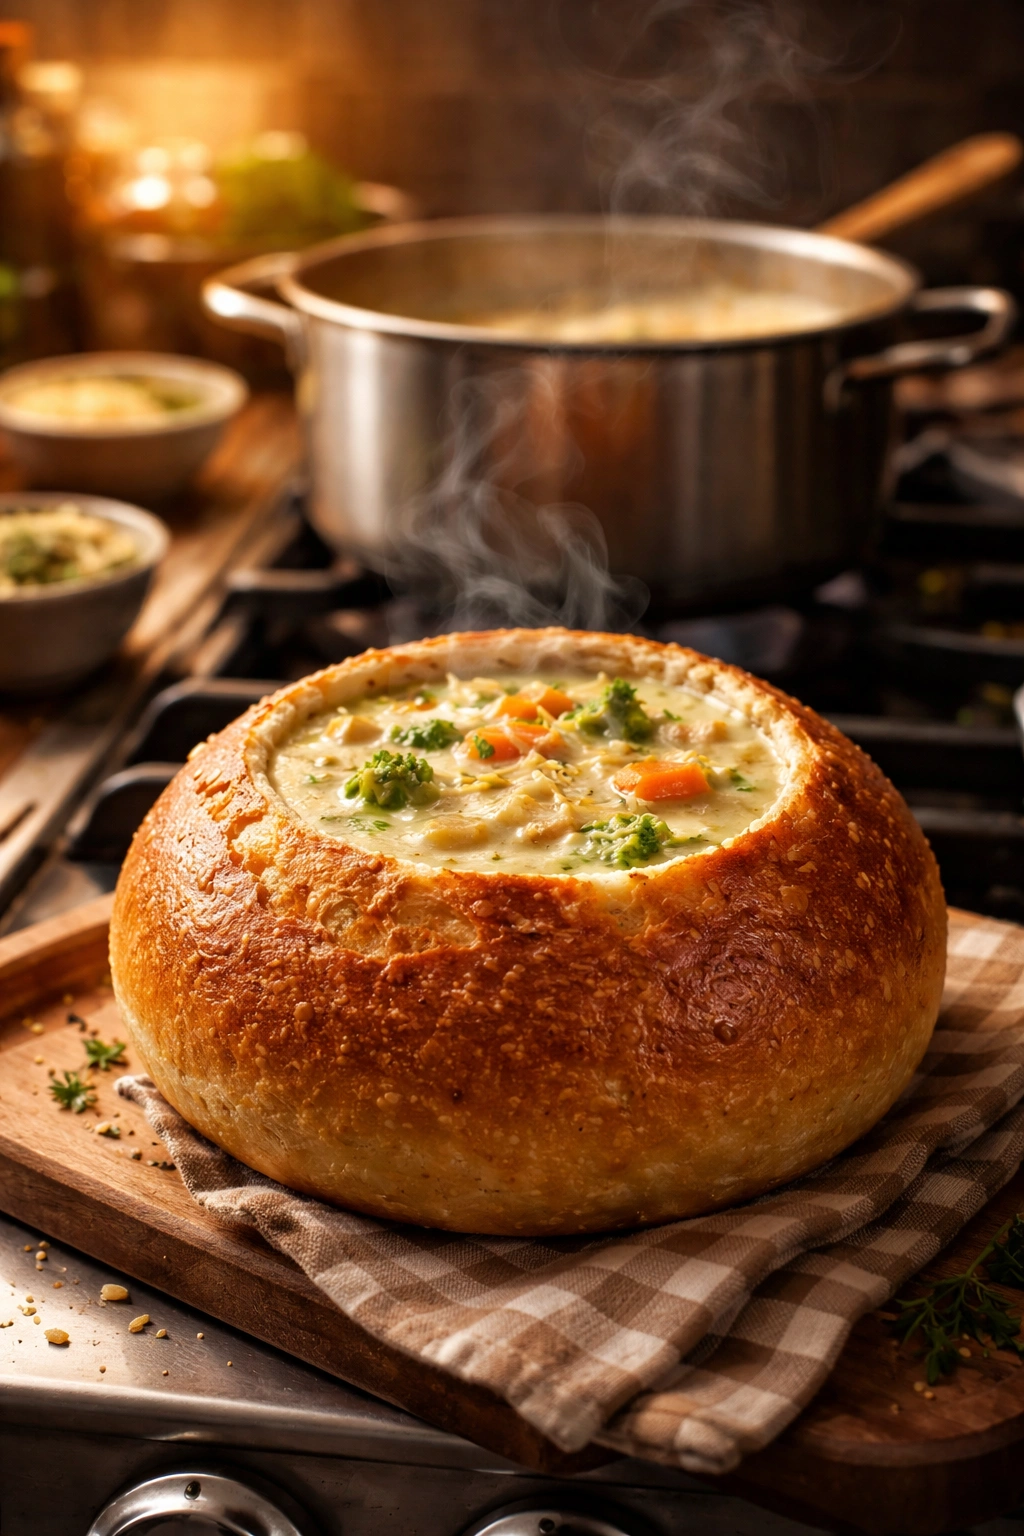
The timing coordination between soup and bread is more important than most people realize. Ideally, you want them both ready at almost the same moment. Soup that’s been sitting cooling down while you toast bread loses some of its charm. Conversely, bread that’s cooled off while you finish the soup isn’t nearly as good. So make the soup fully, keep it on the lowest heat setting (with a lid partially covering it to keep the steam in), and toast the bread toward the very end of your cooking timeline.
If you’re cooking for more than one person and don’t have multiple bread bowls, you can assemble one, then keep the remaining soup on very low heat in a covered pot while someone eats their bowl. You can’t really reheat soup in the microwave without making it taste slightly off, so the low-heat method is better.
The bread bowl will eventually get soggy—this is inevitable and not a failure. The trick is eating it in stages. Eat from the crispy exterior toward the center, following the natural progression of the bowl. By the time you get to the bottom soft bread, you’re ready for it to be soft because you’ve already enjoyed the textural contrast at the beginning.
Fresh thyme actually makes a noticeable difference here. If you don’t have fresh, dried works, but cut the amount in half because dried herbs are more concentrated. The thyme adds an herbaceous note that makes the soup taste more sophisticated and less “canned soup-like.” Same goes for the nutmeg—don’t skip it thinking it won’t matter. It won’t make the soup taste like pumpkin spice; it adds warmth and a subtle earthiness that rounds out the sharp cheddar flavor.
Don’t salt to taste immediately after adding the cheese. The cheese is salty, and what tastes perfectly seasoned when it’s still warm will taste slightly over-salted once it cools a bit. Taste it after 2-3 minutes, when the flavors have settled, before making any final salt adjustments.
Variations and Seasonal Adaptations
The beauty of making soup at home is that you can shift flavors based on seasons, preferences, or whatever you have in your fridge. Here are legitimate variations that actually work and taste intentional, not like you were missing ingredients.
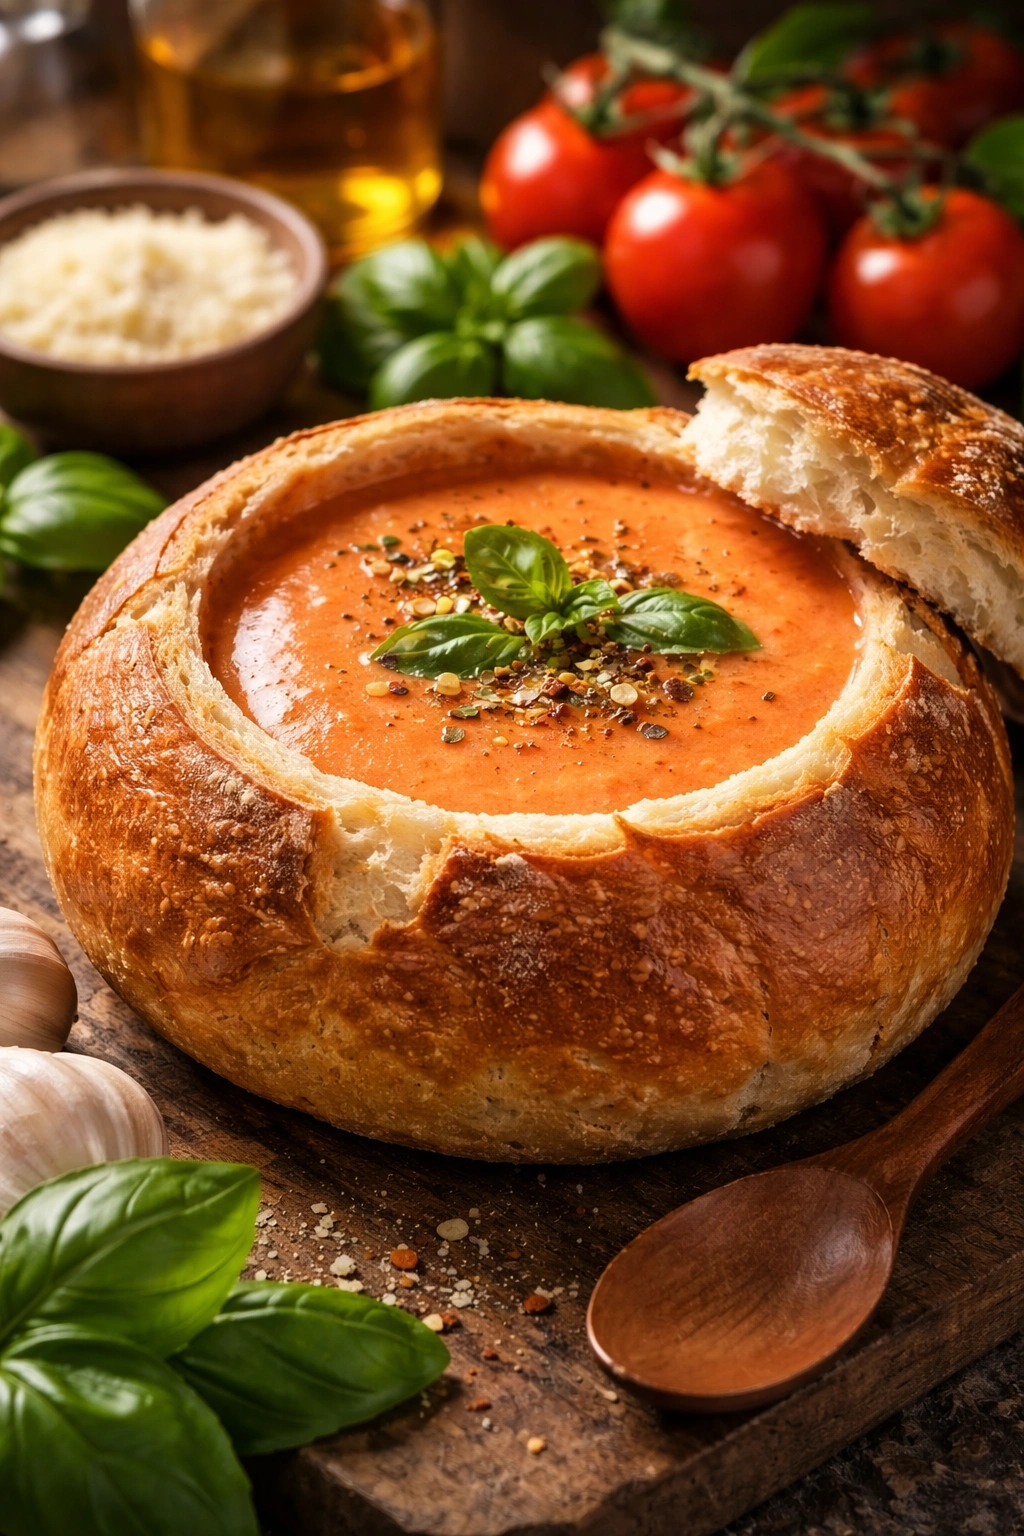
Creamy Tomato Soup Version: Reduce the broccoli to 3 cups and add 2 cans (28 ounces total) of crushed San Marzano tomatoes. Use 1 teaspoon dried basil instead of thyme. Reduce the sharp cheddar to 1½ cups and add ½ cup Parmesan for a more complex cheese profile. The soup will be slightly thinner and more tomato-forward while still being creamy—more Panera’s Tomato Florentine direction.
Potato Leek Variation: Replace broccoli with 2 pounds of Yukon gold potatoes (cut into small dice) and 2 cups sliced leeks (white and light green parts only, cleaned thoroughly). The cooking method stays the same, but potatoes take about 12-15 minutes to fully soften instead of broccoli’s 8-10 minutes. Use the same cheese amount and cream. This makes a heartier, earthier soup.
Roasted Garlic and Broccoli: Make the base soup exactly as written, but instead of using 4 cloves raw garlic, roast a whole head of garlic by wrapping it in foil and roasting at 400°F for 35 minutes until completely soft. Squeeze the roasted garlic out of the skins and add it instead of raw garlic. Roasted garlic tastes sweeter, less sharp, and adds incredible depth.
Spicy Version: Add ½ teaspoon smoked paprika and ¾ teaspoon hot sauce (Tabasco, Frank’s RedHot, or your preference) along with the cayenne. Don’t add more than this or you’ll shift the soup too far away from the classic Panera profile, but this level of heat adds flavor complexity without overwhelming.
Broccoli Cheddar with Bacon: Cook 6-8 slices of bacon until crispy, then chop it. Make the soup exactly as written, then stir in the bacon and drippings (about 2 tablespoons of the fat) just before serving. Garnish with a few extra bacon pieces. This is inspired by Panera’s Broccoli Cheddar with Bacon offering.
Vegetable Add-Ins: The base formula is forgiving of additions. You can add cauliflower florets (same amount, same cooking time as broccoli), diced celery (add with the carrots so it has time to soften), or corn kernels (add in the last 2 minutes so they stay bright and sweet-tasting). Don’t overload with vegetables or the soup becomes chunky rather than creamy.
Storage and Make-Ahead Strategy
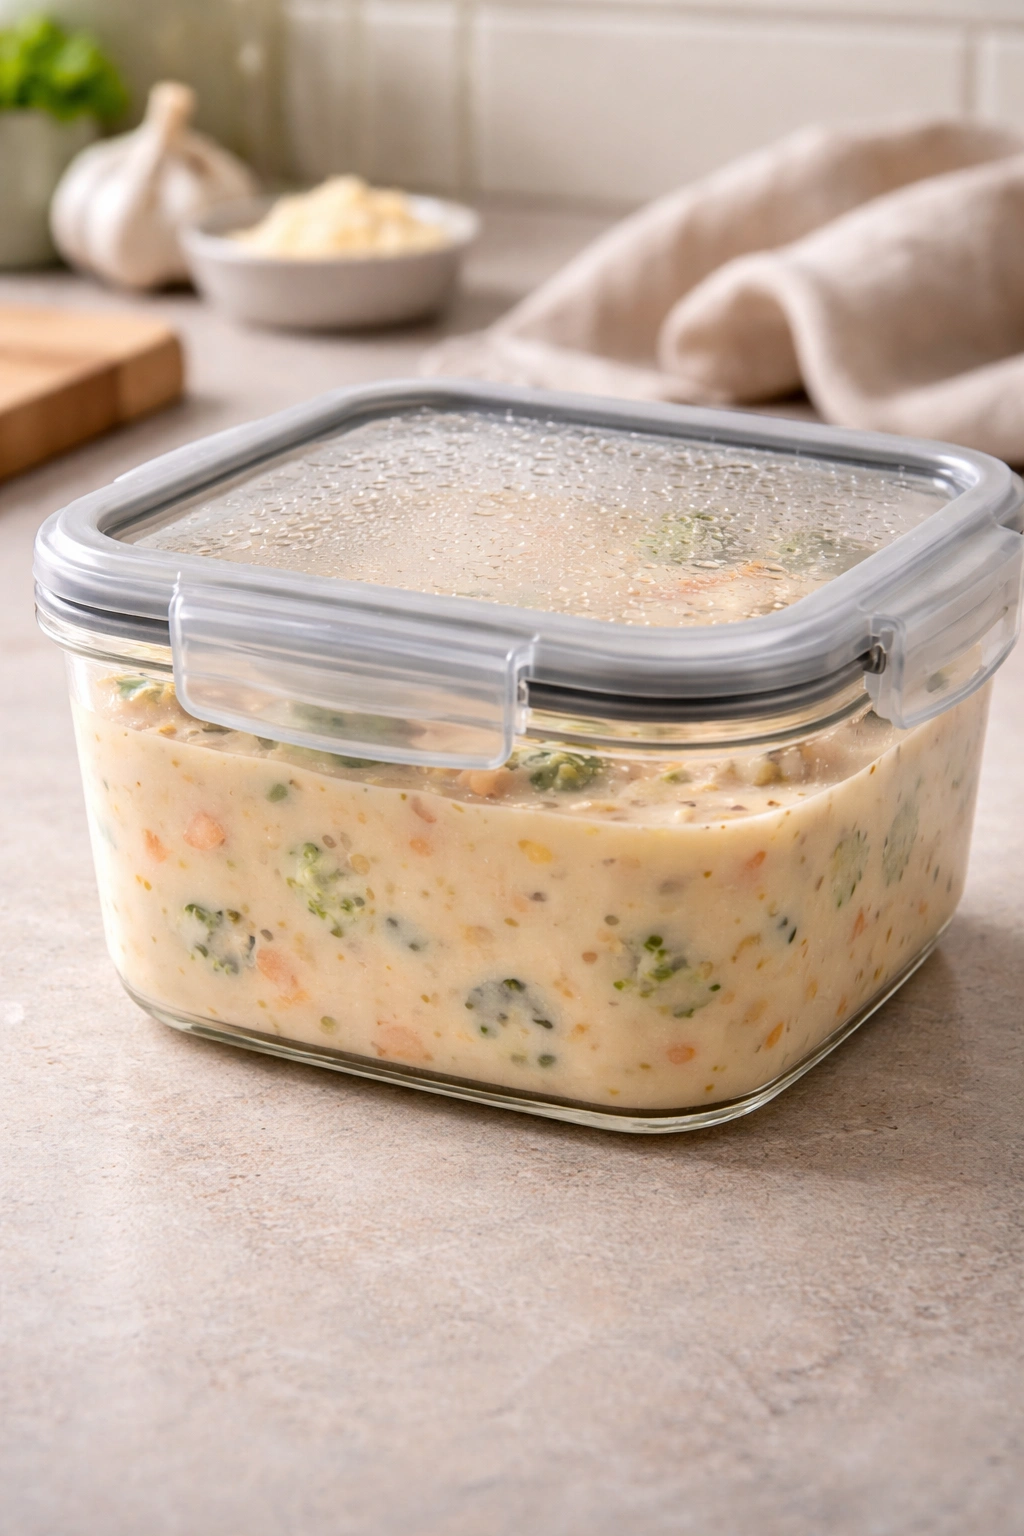
This soup stores beautifully, which is one of the reasons it’s so useful for meal prep or feeding a crowd. In an airtight container in the refrigerator, the soup will keep for 3 to 4 days. The texture stays smooth and the cheese doesn’t separate, which is a testament to how much better real cream and real cheese behave than weird industrial alternatives.
To reheat, use very low heat on the stovetop over medium-low, stirring occasionally and adding a splash of milk or broth if the soup has thickened up in the fridge (cream-based soups always become slightly thicker as they cool). Never use high heat—you risk the cream breaking or the cheese becoming grainy. A gentle warm-through over 5-10 minutes is all you need.
Freezing is possible but requires a caveat: the soup freezes beautifully for up to 2 months, but the texture when thawed will be slightly less smooth than freshly made. The cream separates slightly as it freezes and thaws. It’s still delicious and still tastes like creamy cheese soup, but if you’re being very precise about replicating the fresh version, this is the trade-off. To freeze, let the soup cool completely, then transfer to freezer-safe containers, leaving ½-inch headspace for expansion. Thaw overnight in the refrigerator and reheat gently as described above.
One workaround: make the soup without the cream and cheese, freeze that base (the broth with vegetables and thyme), then add the cream and cheese when you’re ready to serve. This actually works quite well because you’re avoiding the freeze-thaw cycle of the cream, which is what causes the slight separation. Frozen base soup + fresh cream and cheese = nearly indistinguishable from fresh.
Bread bowls are trickier for storage. Homemade bread bowls stay fresh in an airtight container for 1 day at room temperature, then start getting stale. They can be frozen in a freezer bag for up to 1 month—just thaw and toast before serving. Store-bought bread bowls from a bakery have a similar window.
The ideal scenario is making the soup 1-2 days ahead (it actually tastes slightly better after sitting overnight because flavors meld), then toasting fresh bread bowls an hour or two before serving.
Best Soups for the Bread Bowl Experience
While Broccoli Cheddar is the most iconic Panera bread bowl soup, other soups also work beautifully in bread bowls. The key characteristic is that the soup needs to be creamy or at least thick enough that it doesn’t immediately soak through the bread. Thin, clear broths aren’t great in bread bowls because the bread disintegrates too quickly.
Creamy tomato soup works perfectly because the tomatoes add body and the cream creates that luxurious mouthfeel. Potato leek soup is traditional for bread bowls and dates back centuries—the starch from the potatoes creates a naturally thick, creamy soup without needing cream.
Mushroom soup with cream is underrated. The earthy mushroom flavor is sophisticated and the creaminess holds up beautifully against bread. Butternut squash soup works when you’re looking for something slightly sweet with warm spice notes.
Creamy chicken and wild rice soup is hearty enough to count as a meal, especially in a bread bowl. The rice adds texture and substance.
What doesn’t work as well: clear broths, thin vegetable soups, or anything overly watery. Those soak into the bread too quickly and leave you with mushy bread and not much soup left to enjoy. Chili works in bread bowls, but it’s a different experience because the bread doesn’t soak up liquid the same way—it’s more like edible serving vessel than integral component.
Serving and Pairing Ideas
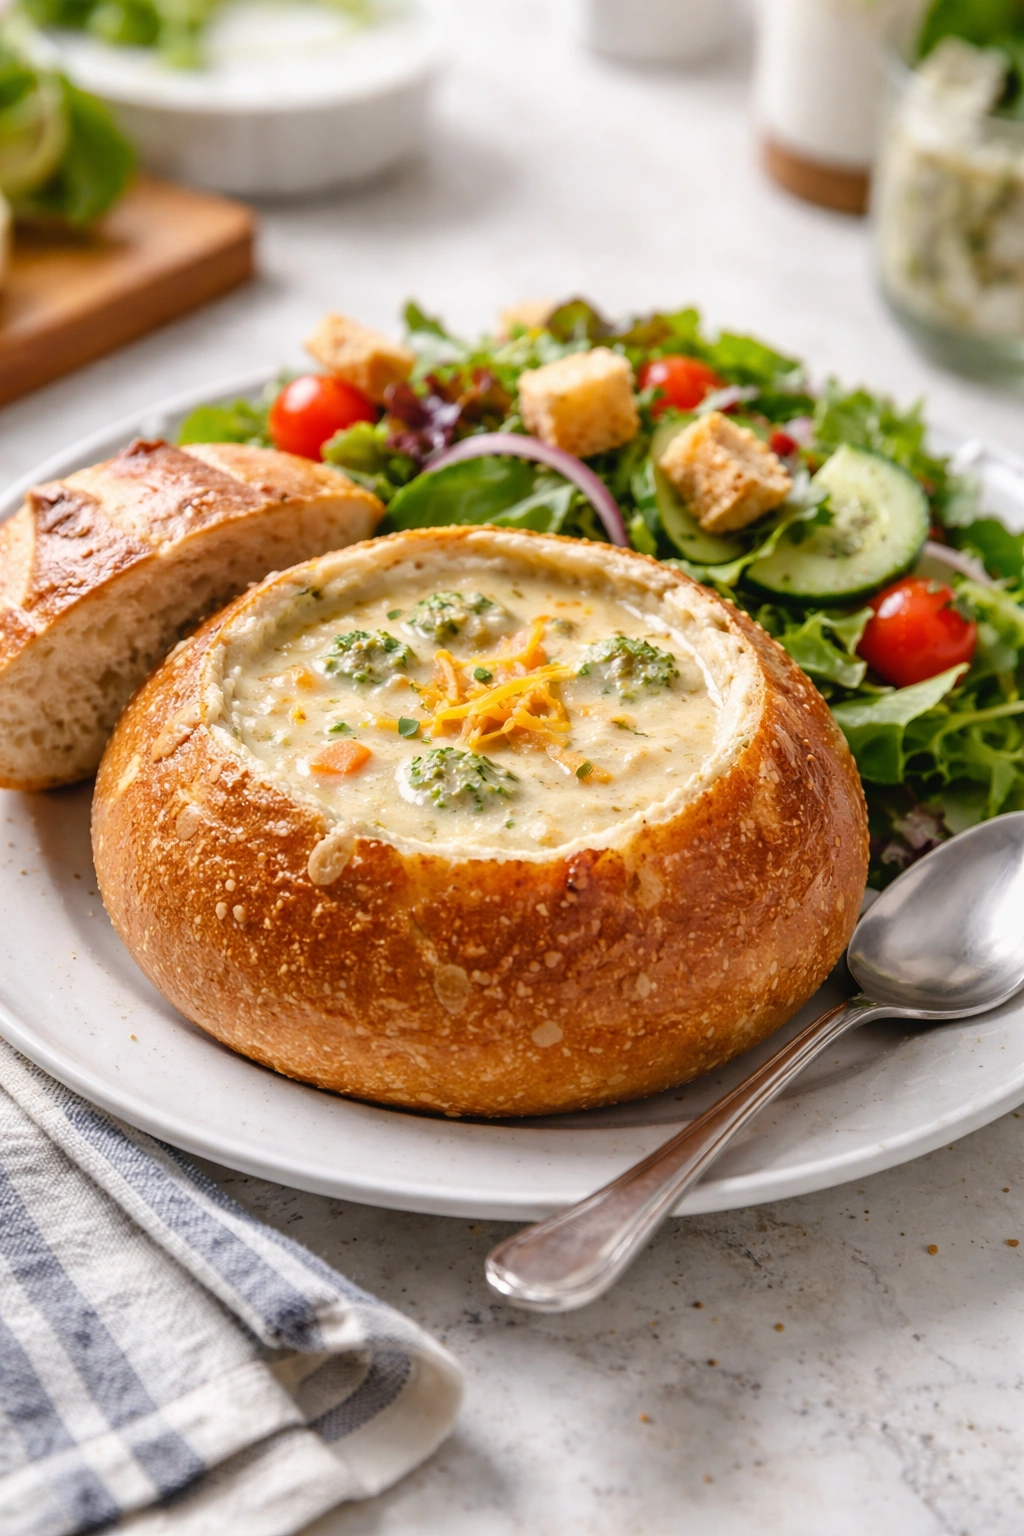
The bread bowl soup is honestly substantial enough to be a complete meal on its own, but pairing it with something simple elevates the experience. A side salad with a sharp vinaigrette provides textural contrast and cuts the richness of the creamy soup beautifully. A simple green salad, or even better, a kale salad with lemon dressing, is ideal.
A simple grilled cheese sandwich on the side is the classic pairing—though this is more of a Panera-inspired combo than something the restaurant necessarily recommends. If you’re doing grilled cheese, make it with the same sharp cheddar you used in the soup for flavor continuity, use good bread, and don’t skimp on butter.
A crusty bread (focaccia, olive oil bread, a roll) on the side also works if you want something lighter than grilled cheese. Use it to soak up any soup that drips or to wipe the edge of your bowl at the end.
For drinks, something acidic cuts through the richness nicely. Iced tea, lemonade, or even a crisp white wine if you’re having this for dinner. Coffee or tea afterward is nice if you’re eating this at lunch.
If you’re plating this nicely (say, for guests), set the bread bowl on a plate or shallow bowl to catch any soup that might drip. A spoon and small bread plate to the side are all you need. Some people put a cloth napkin in the lap while eating because the soup has a tendency to drip down the sides of the bread bowl—this isn’t a failure of the dish, it’s just the nature of eating soup from bread.
Final Thoughts

Making Panera Bread Bowl Soup at home isn’t a compromise or a shortcut compared to buying the real thing—it’s actually an upgrade. You get exactly the creamy, rich, vegetable-studded soup you want, in a bread bowl that’s toasted exactly how you like it, for a fraction of the price, and without the guilt of wondering what industrial ingredients went into it.
The technique is straightforward enough that you’ll nail it on the first try, especially if you follow the specific temperatures and timing. The variations are endless once you understand the basic framework. And the whole experience—the aroma of the soup cooking, the toast-and-butter smell of the bread bowl toasting, the moment you’re about to eat something warm and comforting—is genuinely better when it’s made in your own kitchen.
Try this once and you’ll probably find yourself making it regularly. Not because it’s complicated or special, but because it’s so good and so satisfying, and because once you know how, the effort-to-reward ratio tips heavily in your favor.