Canned chickpeas are one of the most underrated pantry staples in any kitchen. They’re already cooked, require zero planning ahead, and transform into everything from creamy dips to crispy roasted snacks in minutes. Whether you’re cooking for one or feeding a crowd, a can of chickpeas unlocks more possibilities than most people realize — and they cost practically nothing.
The beauty of chickpeas lies in their neutral flavor and incredible texture versatility. They absorb whatever spices and seasonings you pair them with, making them equally at home in Indian curries, Mediterranean salads, Middle Eastern hummus, or even sweet preparations like blondies and energy bites. They’re also a nutritional powerhouse, delivering plant-based protein, fiber, and complex carbs that keep you satisfied for hours.
What follows are ten genuinely different recipes that start with nothing but a single can (or the chickpea equivalent — about 1.5 cups cooked). Each one comes together faster than you’d expect, requires minimal technique, and tastes like you spent way more effort than you actually did. These aren’t one-note recipes either — they’re the kind of dishes you’ll find yourself making repeatedly because they’re that good and that practical.
1. Crispy Roasted Chickpeas With Smoked Paprika and Garlic
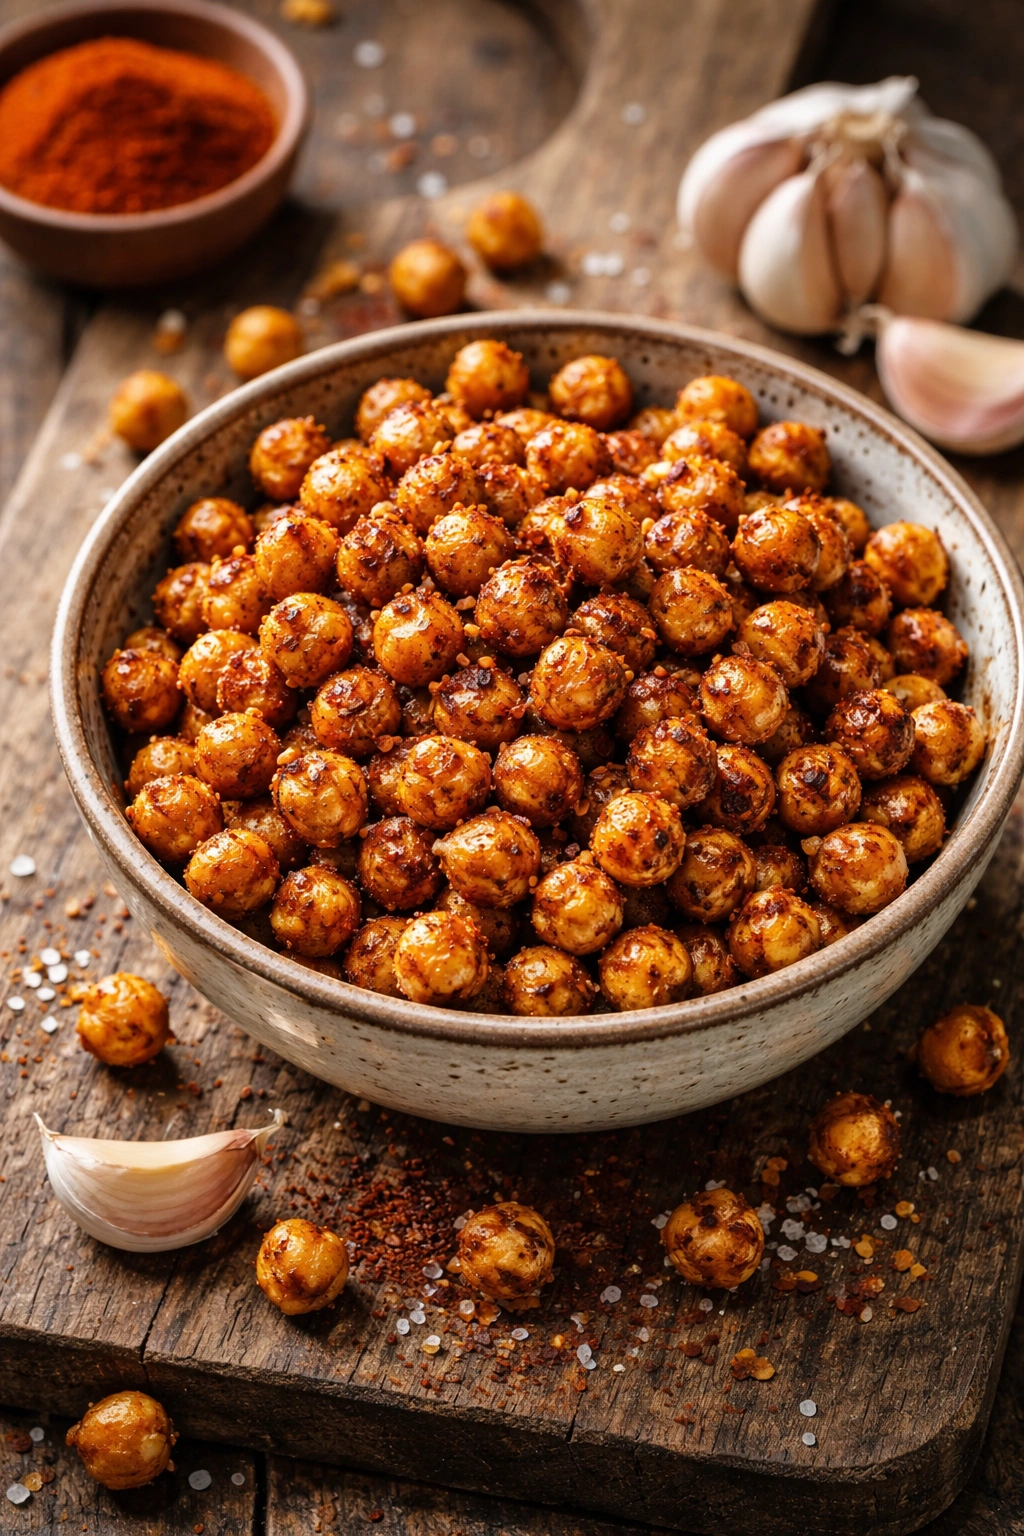
If you’ve never made roasted chickpeas before, this is your entry point. They transform from soft beans into addictively crunchy little nuggets that taste like sophisticated bar snacks, but cost a fraction of store-bought versions. The beauty is that once you master this basic technique, you can swap the seasonings to create completely different flavors — but this version, with smoked paprika and garlic, is hard to beat.
Yield: Serves 4 as a snack | Makes about 2 cups Prep Time: 10 minutes Cook Time: 30 minutes Total Time: 40 minutes Difficulty: Beginner — just drain, toss, and roast. No special equipment needed.
Ingredients:
- 1 can (15 ounces) chickpeas, drained and rinsed thoroughly
- 2 tablespoons extra-virgin olive oil
- 1½ teaspoons smoked paprika
- 1 teaspoon garlic powder
- ½ teaspoon fine sea salt
- ¼ teaspoon cayenne pepper (omit if you prefer no heat)
- ⅛ teaspoon black pepper
Instructions:
- Preheat the oven to 400°F (200°C) and position a rack in the center of the oven.
- Drain the chickpeas in a fine-mesh strainer and rinse them under cold running water until the water runs clear. Transfer them to a clean kitchen towel and pat them completely dry — this is the most important step. The drier they are, the crispier they’ll become. Rub them gently between the towel to remove any loose skins.
- In a medium bowl, combine the olive oil, smoked paprika, garlic powder, salt, cayenne, and black pepper, stirring until well combined.
- Add the dried chickpeas to the seasoned oil and toss gently until every chickpea is evenly coated. Spread them in a single layer on a large baking sheet lined with parchment paper.
- Roast for 25 to 30 minutes, shaking the pan halfway through, until the chickpeas are deeply golden and sound hollow when you shake the pan — they should feel crispy to the touch and make a crunching sound when you bite into one.
- Remove from the oven and let cool on the baking sheet for 5 minutes. They’ll continue to crisp as they cool. Transfer to a bowl and serve immediately, or store in an airtight container at room temperature for up to 5 days.
Tips and Variations
The key to success here is thorough drying and a hot oven. Wet chickpeas will steam rather than roast, and you’ll end up with soft beans instead of crispy nuggets. Don’t skip the towel-drying step, even if it feels tedious.
For different flavor profiles, try Italian herb seasoning with garlic and a pinch of red pepper flakes, curry powder with cumin and turmeric, or everything bagel seasoning for a savory-umami version. You can even make a sweet version with cinnamon, ginger, and a light dusting of maple sugar for a chai-spiced snack.
If some of your roasted chickpeas are still slightly soft when others are deeply crisp, they’ll finish crisping as they cool. Return any obviously soft ones to the oven for another 3 to 5 minutes.
2. Hummus Three Ways: Classic, Roasted Red Pepper, and Everything Bagel
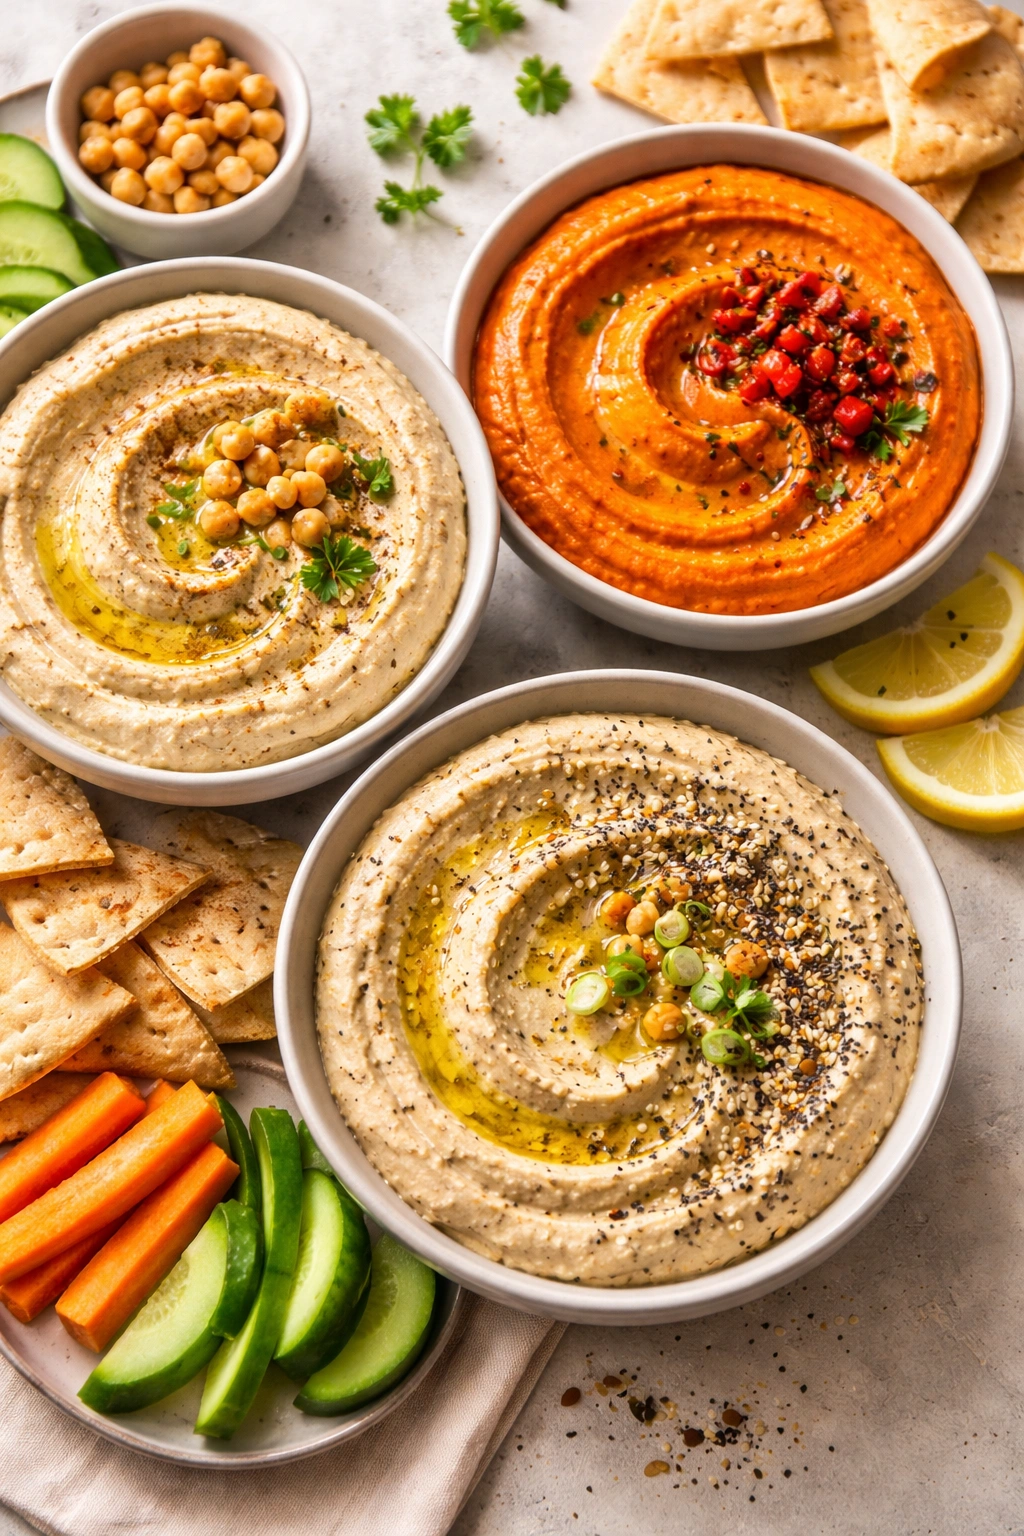
Homemade hummus tastes like a completely different food from store-bought versions — creamier, fresher, and infinitely more customizable. Since the base technique is identical, you can make all three versions using the exact same method, swapping only the flavorings. This is a case where a food processor makes an enormous difference in texture, but you can also use an immersion blender if that’s what you have.
Yield: Makes about 2 cups (roughly 16 servings of 2 tablespoons each) Prep Time: 15 minutes Cook Time: None Total Time: 15 minutes Difficulty: Beginner — mostly just processing and tasting.
For Classic Hummus:
- 1 can (15 ounces) chickpeas, drained and rinsed
- 3 tablespoons tahini
- 3 tablespoons fresh lemon juice
- 2 cloves garlic, minced
- 2 tablespoons extra-virgin olive oil (plus more for drizzling)
- ½ teaspoon fine sea salt
- ¼ teaspoon ground cumin
- 2 to 4 tablespoons ice water (as needed for consistency)
For Roasted Red Pepper Hummus:
- 1 can (15 ounces) chickpeas, drained and rinsed
- ¾ cup roasted red peppers (from a jar, drained, or freshly roasted)
- 2 tablespoons tahini
- 2 tablespoons fresh lemon juice
- 1 clove garlic, minced
- 2 tablespoons extra-virgin olive oil
- ½ teaspoon fine sea salt
- ¼ teaspoon smoked paprika (plus more for garnish)
- 2 to 3 tablespoons ice water
For Everything Bagel Hummus:
- 1 can (15 ounces) chickpeas, drained and rinsed
- 3 tablespoons tahini
- 2 tablespoons fresh lemon juice
- 1 clove garlic, minced
- 2 tablespoons extra-virgin olive oil
- ½ teaspoon fine sea salt
- 2 tablespoons everything bagel seasoning, divided
- 2 to 4 tablespoons ice water
Instructions for All Three Versions:
- Add the chickpeas, tahini, lemon juice, garlic, olive oil, salt, and any specific seasonings (cumin for classic, paprika for red pepper, or 1 tablespoon of the everything bagel mix) to a food processor.
- Process for 1 minute, until the mixture begins to break down. Scrape down the sides of the bowl.
- With the food processor running, add the ice water 1 tablespoon at a time until the hummus reaches your desired consistency. You want it creamy and spreadable, not stiff or overly thin. Stop and taste — add more lemon juice, salt, or garlic if needed.
- Transfer to a serving bowl. Drizzle with a little extra olive oil and garnish with the reserved seasonings (roasted red pepper hummus benefits from a smudge of paprika and a pinch of fresh parsley; everything bagel hummus looks beautiful with the remaining bagel seasoning sprinkled on top).
- Serve with pita chips, fresh vegetables, crackers, or flatbread. Hummus keeps in the refrigerator in an airtight container for up to 5 days.
Tips and Variations
The ice water is crucial — it transforms stiff chickpea paste into silky hummus. Add it gradually and stop before you think you’ve added enough; you can always add more, but you can’t remove it.
Tahini can vary wildly in flavor depending on the brand. If your hummus tastes bitter or harsh, you might have a particularly assertive tahini — try reducing it to 2 tablespoons next time. Conversely, if it tastes thin or flat, add another tablespoon.
Other combinations worth exploring: sun-dried tomato and basil, beet and dill, spiced with za’atar and sumac, or cilantro-lime with a kick of jalapeño. Once you understand the basic formula, the variations become obvious.
3. Chickpea Tikka Masala Curry
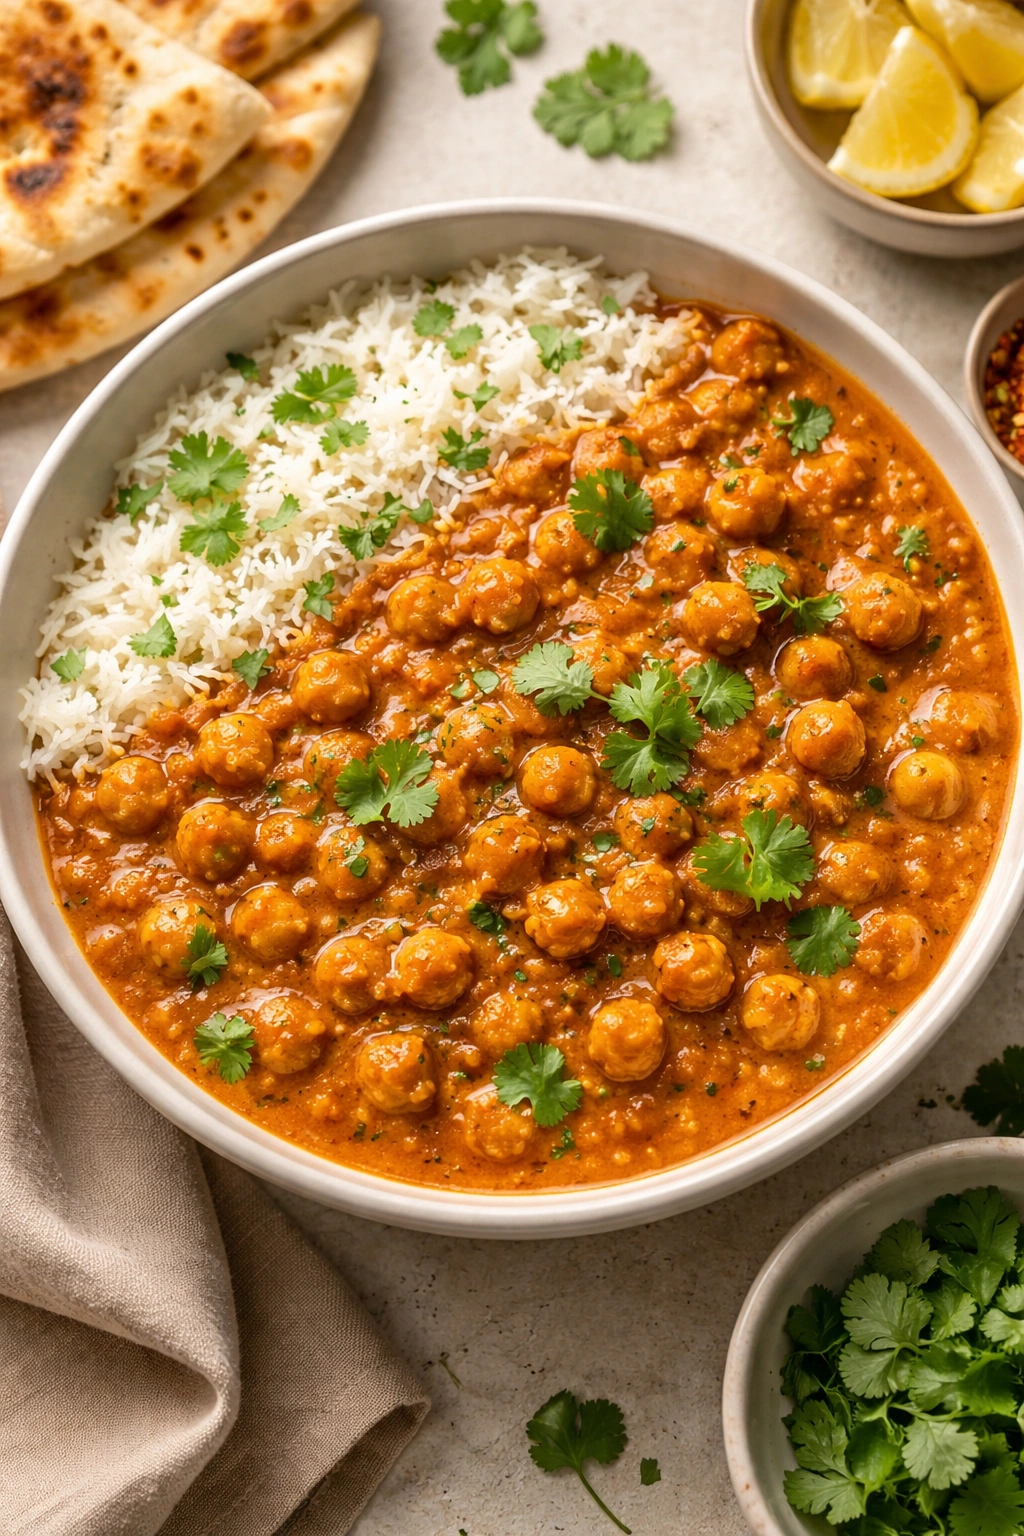
This is the recipe that convinced me canned chickpeas could hold their own in a proper curry. The creamy tomato sauce, warm spices, and soft chickpeas create something deeply satisfying that tastes like you’ve been cooking all evening, when in reality it comes together in about 35 minutes. Serve it over rice, with warm naan, or even with roasted vegetables for a lighter version.
Yield: Serves 4 Prep Time: 15 minutes Cook Time: 25 minutes Total Time: 40 minutes Difficulty: Intermediate — requires sautéing aromatics and balancing spices, but the technique is straightforward.
Ingredients:
- 2 tablespoons ghee or coconut oil
- 1 medium yellow onion, diced
- 4 cloves garlic, minced
- 1 tablespoon fresh ginger, minced
- 2 teaspoons ground cumin
- 1½ teaspoons ground coriander
- 1 teaspoon garam masala
- ½ teaspoon turmeric powder
- ¼ to ½ teaspoon cayenne pepper (adjust to your heat preference)
- 1 can (14.5 ounces) diced tomatoes (or 1¾ cups if using fresh, chopped)
- 1 can (13.5 ounces) coconut milk
- 1 can (15 ounces) chickpeas, drained and rinsed
- 1 teaspoon fine sea salt
- ½ teaspoon black pepper
- Fresh cilantro for garnish (optional)
- Lime wedges for serving
Instructions:
-
Heat the ghee in a large heavy-bottomed pot or deep skillet over medium-high heat. Once it’s shimmering, add the diced onion and sauté for 4 to 5 minutes, stirring occasionally, until the onion becomes translucent and just begins to soften at the edges.
-
Add the minced garlic and ginger and cook for another 1 to 2 minutes, stirring constantly, until fragrant. Do not let the garlic brown — if it burns, the curry will taste bitter and you’ll need to start over.
-
Stir in the cumin, coriander, garam masala, turmeric, and cayenne. Cook for 30 seconds to 1 minute, stirring constantly, until the spices bloom and release their essential oils. You’ll smell a dramatic shift from raw spice powder to warm, fragrant spice — that’s how you know they’re ready.
-
Pour in the canned tomatoes (with their juice) and the coconut milk, stirring well to combine. Bring to a gentle simmer over medium heat.
-
Add the chickpeas, salt, and black pepper. Stir well and allow the curry to simmer gently for 15 to 20 minutes, stirring occasionally, until it darkens slightly and the flavors meld. The sauce should thicken and deepen in color — this is a good sign that the flavors are concentrating.
-
Taste and adjust the seasonings. Add more salt if it tastes flat, more cayenne if you want more heat, or a squeeze of lime if it needs brightness. The curry should taste rich but balanced, not overly spiced.
-
Serve over basmati rice or alongside warm naan, and garnish with fresh cilantro if you’d like. Leftover curry keeps in the refrigerator for up to 4 days and actually improves in flavor as it sits.
Advertisements
Tips and Variations
If you find the curry too rich after cooking, you can thin it with a splash of water or broth. If it’s too thin, simmer it uncovered for an extra 5 minutes to allow some liquid to evaporate and the sauce to concentrate.
For a lighter, dairy-free version, substitute the coconut milk with cashew cream (soak ½ cup raw cashews in hot water for 10 minutes, then blend with ¾ cup water) or use half coconut milk and half vegetable broth.
Add roasted vegetables like cauliflower, sweet potato, or spinach during the simmering phase. Heartier vegetables like cauliflower need about 10 minutes to soften; delicate ones like spinach just need 1 to 2 minutes at the very end.
4. Mediterranean Chickpea Salad With Feta and Herbs

This is the salad that single-handedly changed my mind about eating salads for lunch — it’s hearty enough to be genuinely filling, loaded with bright Mediterranean flavors, and it tastes even better the next day after the dressing has a chance to mingle with everything. The feta adds a salty richness that chickpeas alone wouldn’t provide, and the fresh herbs keep it from tasting heavy.
Yield: Serves 4 as a main course or 6 as a side Prep Time: 20 minutes Cook Time: None Total Time: 20 minutes (plus 30 minutes resting time if you have it) Difficulty: Beginner — just chopping and mixing.
Ingredients:
- 1 can (15 ounces) chickpeas, drained and rinsed
- 1 cup cherry tomatoes, halved
- 1 cucumber, diced (about 1 cup)
- ½ red onion, finely diced
- ¾ cup kalamata olives, pitted and halved
- ¾ cup crumbled feta cheese
- ¼ cup fresh parsley, chopped
- 2 tablespoons fresh dill, chopped (or 1 teaspoon dried dill)
- 1 tablespoon fresh mint, chopped
For the Dressing:
- 3 tablespoons extra-virgin olive oil
- 2 tablespoons red wine vinegar
- 1 tablespoon fresh lemon juice
- 1 clove garlic, minced
- ½ teaspoon Dijon mustard
- ½ teaspoon fine sea salt
- ¼ teaspoon black pepper
- Pinch of dried oregano
Instructions:
-
In a large bowl, combine the chickpeas, cherry tomatoes, cucumber, red onion, olives, feta, parsley, dill, and mint. Toss gently to combine, being careful not to break up the feta too much.
-
In a small bowl, whisk together the olive oil, red wine vinegar, lemon juice, minced garlic, Dijon mustard, salt, black pepper, and oregano until the dressing is well combined and emulsified.
Advertisements -
Pour the dressing over the salad and toss until everything is well coated. Taste and adjust the salt and lemon juice if needed — the salad should taste bright and balanced, not one-note.
-
Let the salad rest at room temperature for 15 to 30 minutes before serving. This allows the flavors to meld and the chickpeas to absorb some of the dressing. If you need to make it ahead, cover it and refrigerate for up to 24 hours; just taste again before serving and add a bit more lemon juice or olive oil if it’s dried out.
Tips and Variations
The key to this salad not getting soggy is to dress it just before serving, or to wait until you’re ready to eat it if you’ve made it ahead. The acidic dressing actually preserves the vegetables, but if left undressed for too long, the cucumbers will weep and make everything watery.
For a heartier version, add crumbled goat cheese instead of feta, toss in some roasted beets, or add grilled chicken or roasted chickpeas for extra protein and crunch.
You can also swap the fresh herbs — cilantro and lime work beautifully with this base, as does basil and oregano for a more Italian angle. The formula is flexible as long as you maintain the balance of fresh vegetables, creamy feta, and briny olives.
5. Chickpea and Vegetable Buddha Bowls
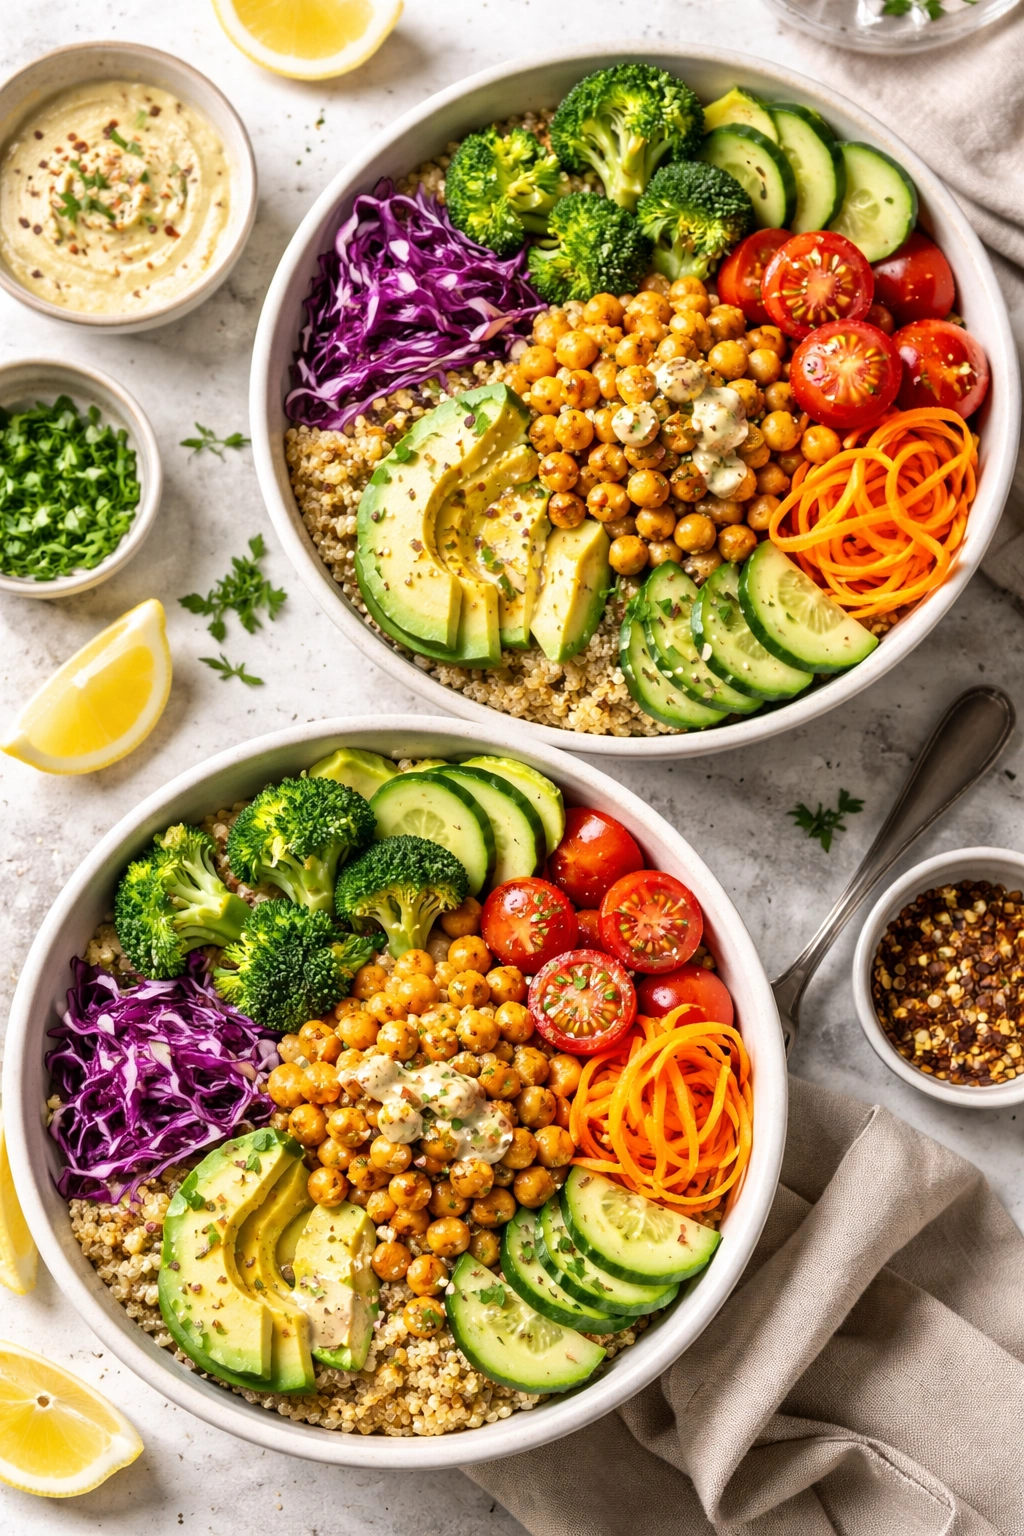
Buddha bowls are as much about visual appeal as they are about nutrition, and that’s partly why they’re so satisfying to eat. You’re building layers of textures and flavors on top of a grain — whatever grain you choose. These bowls come together in the time it takes to cook the grain, making them perfect for meal prep or when you want something that feels restaurant-quality but comes entirely from your kitchen.
Yield: Serves 2 generously Prep Time: 20 minutes Cook Time: 20 minutes (assuming your grain is already cooked or uses quick-cooking rice) Total Time: 40 minutes Difficulty: Beginner — requires some chopping and basic roasting, but nothing technical.
Ingredients:
For the Bowls:
- 1½ cups cooked grain of your choice (quinoa, farro, brown rice, or millet work beautifully)
- 1 can (15 ounces) chickpeas, drained and rinsed
- 2 medium carrots, cut into matchsticks or thin coins
- 1 small head of broccoli, cut into bite-sized florets
- 1 red bell pepper, cut into strips
- 2 cups fresh baby spinach or kale (massaged with a bit of olive oil and lemon if using raw kale)
- ¼ cup fresh cilantro or parsley, chopped
- ¼ cup sliced green onions
- 2 tablespoons sesame seeds (white, black, or a mix)
For the Tahini Drizzle:
- 3 tablespoons tahini
- 2 tablespoons hot water
- 1 tablespoon fresh lime juice
- 1 teaspoon soy sauce or tamari
- ½ clove garlic, minced
- ⅛ teaspoon cayenne pepper (optional)
Instructions:
-
If your grain isn’t already cooked, start cooking it now according to package directions. While that’s happening, prepare the vegetables.
-
Preheat the oven to 425°F (220°C). On a large baking sheet, toss the chickpeas with 1 tablespoon olive oil, salt, and pepper. On a separate section of the same sheet (or a second sheet if they won’t fit), toss the carrot matchsticks, broccoli florets, and bell pepper with 1 tablespoon olive oil, salt, and pepper. Spread everything in a single layer.
-
Roast for 15 to 20 minutes, shaking the pan halfway through, until the vegetables are tender-crisp and the chickpeas are beginning to brown at the edges. The vegetables should still have some firmness; they’ll soften as the bowl sits.
-
While the vegetables roast, make the tahini drizzle. In a small bowl, whisk together the tahini and hot water until it becomes a smooth paste — it’ll look broken at first, but keep whisking and it’ll come together. Add the lime juice, soy sauce, minced garlic, and cayenne, whisking until smooth and pourable. If it’s too thick, add a tablespoon of water at a time until it reaches a drizzle consistency.
-
Divide the cooked grain between two bowls. Arrange the roasted chickpeas, roasted vegetables, and fresh spinach around the grain in a visually pleasing way. Scatter the cilantro, green onions, and sesame seeds on top.
-
Drizzle generously with the tahini dressing and serve immediately. Alternatively, you can pack the components separately and assemble just before eating for meal prep purposes — the dressing stays best in a separate container.
Tips and Variations
These bowls are endlessly customizable based on what vegetables you have on hand. Root vegetables like sweet potato and parsnips roast beautifully alongside chickpeas; add them to the baking sheet.
For different flavor profiles, try an Asian-inspired version with soy sauce, ginger, and sesame oil in the dressing, or a Mediterranean version with olive oil, lemon, and dried oregano. The tahini drizzle is flexible — you can swap it for a lemon-herb yogurt sauce, a spicy sriracha mayo, or a simple balsamic glaze.
You can also add a soft-boiled egg, avocado slices, or roasted tofu for extra protein, depending on your dietary preferences and what you have on hand.
6. Crispy Chickpea Tacos With Avocado Crema
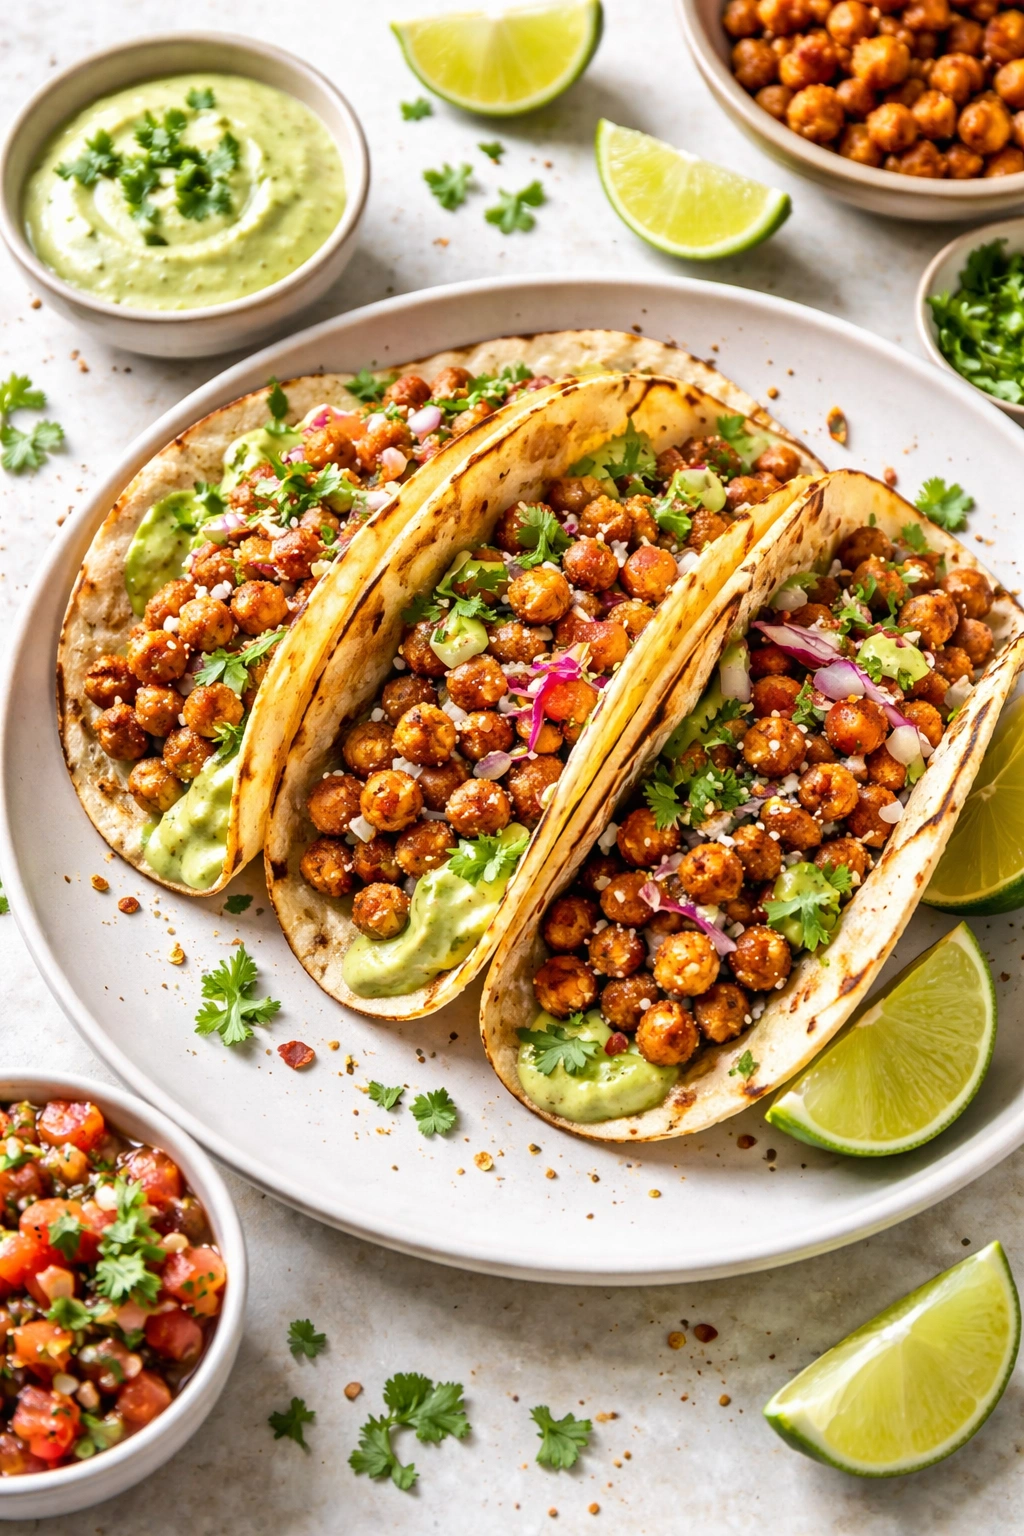
These tacos have a cult following for good reason — the crispy, seasoned chickpeas have the textural satisfaction of something fried, but they’re actually roasted, and they hit all the savory-spicy notes that make tacos craveable. The avocado crema provides cooling richness, and the whole thing comes together faster than you could drive to a taco truck.
Yield: Makes 8 tacos (serves 2 to 3) Prep Time: 15 minutes Cook Time: 25 minutes Total Time: 40 minutes Difficulty: Intermediate — involves a bit of multitasking and spice balancing.
Ingredients:
For the Crispy Chickpeas:
- 1 can (15 ounces) chickpeas, drained and rinsed
- 2 tablespoons olive oil
- 1 teaspoon smoked paprika
- ½ teaspoon cumin
- ½ teaspoon garlic powder
- ½ teaspoon chili powder
- ¼ teaspoon cayenne pepper
- ¾ teaspoon fine sea salt
- 2 tablespoons fresh lime juice
For the Avocado Crema:
- 1 ripe avocado
- ¼ cup Mexican crema or sour cream
- 2 tablespoons fresh cilantro
- 1 clove garlic, minced
- Juice of ½ lime
- Pinch of fine sea salt
For Assembly:
- 8 small corn or flour tortillas
- 1 cup shredded cabbage (green or red)
- ½ cup diced fresh tomato
- ¼ cup diced red onion
- Fresh cilantro leaves
- Lime wedges
- Hot sauce (optional but recommended)
Instructions:
-
Preheat the oven to 400°F (200°C). Pat the chickpeas dry with a clean kitchen towel — moisture is the enemy of crispiness.
-
In a medium bowl, combine the olive oil, smoked paprika, cumin, garlic powder, chili powder, cayenne, and salt. Add the dried chickpeas and toss until evenly coated. Spread them on a baking sheet in a single layer.
-
Roast for 20 to 25 minutes, shaking the pan halfway through, until the chickpeas are golden and sound crispy when you shake the pan. They should feel crunchy to the bite. Remove from the oven and toss with the fresh lime juice while still hot — the citric acid will penetrate the surface and add brightness.
Advertisements -
While the chickpeas roast, make the avocado crema. Cut the avocado in half, scoop the flesh into a small bowl, and mash it roughly with a fork until it reaches your desired consistency — I prefer it slightly chunky rather than completely smooth. Stir in the crema, cilantro, minced garlic, lime juice, and salt. Taste and adjust the salt and lime juice if needed.
-
Warm the tortillas in a dry skillet over medium heat for about 30 seconds per side, or wrap them in a damp kitchen towel and microwave for 30 seconds.
-
Assemble the tacos by spreading about 1½ tablespoons of avocado crema on each tortilla, topping with the warm crispy chickpeas, shredded cabbage, diced tomato, red onion, and fresh cilantro. Serve immediately with lime wedges and hot sauce on the side.
Tips and Variations
The lime juice added after roasting is crucial — it adds brightness and prevents the tacos from tasting flat or one-note. Don’t skip it.
For a chunkier texture, lightly mash some of the roasted chickpeas before assembling the tacos. For extra flavor, toss the warm chickpeas with a pinch of smoked salt before serving.
You can prep the avocado crema and roasted chickpeas ahead, but assemble the tacos just before eating so the tortillas stay soft and the toppings don’t get soggy. The crispy chickpeas will keep in an airtight container at room temperature for up to 24 hours and can be re-crisped in a 350°F oven for 5 minutes if needed.
7. Chickpea Pasta With Garlic, Tomatoes, and Spinach
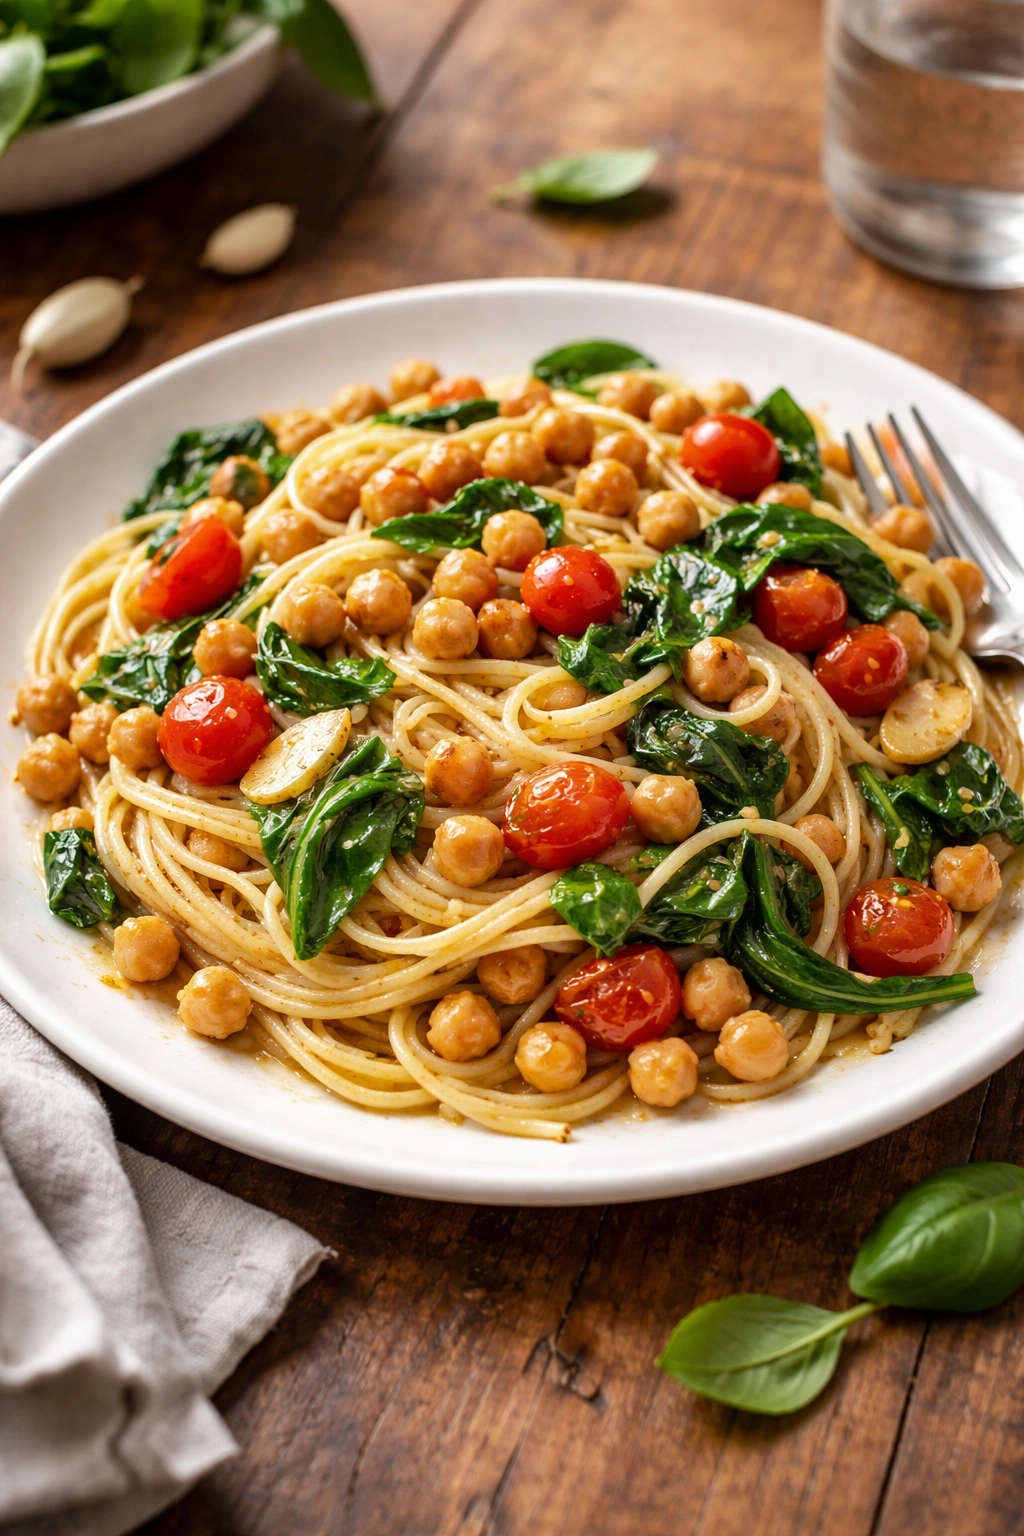
This is pasta in its most honest form — a few quality ingredients, a hot pan, and 20 minutes. There’s no cream, no complicated technique, just the way tomatoes, garlic, and olive oil transform into something greater than the sum of their parts. The chickpeas add protein and substance, making this a complete meal without needing anything else.
Yield: Serves 3 to 4 Prep Time: 10 minutes Cook Time: 20 minutes Total Time: 30 minutes Difficulty: Beginner — just pasta and a simple sauté.
Ingredients:
- 12 ounces pasta of your choice (penne, rigatoni, or spaghetti work well)
- 1 can (15 ounces) chickpeas, drained and rinsed
- 3 tablespoons extra-virgin olive oil
- 6 cloves garlic, thinly sliced
- ½ teaspoon red pepper flakes
- 1 can (28 ounces) crushed tomatoes (or 3 cups fresh tomatoes, crushed)
- ½ teaspoon fine sea salt
- ¼ teaspoon black pepper
- 4 cups fresh spinach, packed
- ½ teaspoon dried oregano
- Parmesan cheese for serving (optional)
- Fresh basil for garnish (optional)
Instructions:
-
Bring a large pot of salted water to a rolling boil. Add the pasta and cook according to package directions until al dente — you want it to have a slight firmness when you bite into it, not mushy. Drain, reserving 1 cup of the starchy cooking water.
-
While the pasta cooks, heat the olive oil in a large skillet over medium heat. Once it’s shimmering, add the sliced garlic and red pepper flakes. Cook for 1 to 2 minutes, stirring frequently, until the garlic is fragrant and just beginning to turn golden at the edges. Watch carefully — once garlic browns, it becomes bitter. If it starts to darken too quickly, remove the pan from the heat immediately.
-
Pour in the crushed tomatoes and stir well. Add the salt, black pepper, and dried oregano. Bring to a gentle simmer and cook for 8 to 10 minutes, stirring occasionally, allowing the tomato sauce to concentrate and deepen slightly in color.
-
Add the chickpeas and stir to combine. Cook for another 2 to 3 minutes just to warm them through. Taste the sauce and adjust the salt and oregano if needed.
-
Add the fresh spinach to the pan in handfuls, stirring after each addition until it wilts into the sauce. This should take about 1 to 2 minutes total.
-
Add the cooked pasta to the skillet and toss everything together, adding pasta water a bit at a time until the sauce coats the pasta but isn’t swimming in liquid — you want a silky, flowing consistency. Start with a quarter cup and add more as needed.
-
Serve immediately, topped with Parmesan cheese and fresh basil if you’d like.
Tips and Variations
The key to this pasta is quality olive oil and not overcooking the garlic. Cheap olive oil will taste flat and a bit greasy, while good olive oil carries the whole dish. And garlic that browns tastes acrid and ruins the delicate balance.
For a richer version, stir in a splash of heavy cream or a dollop of mascarpone at the very end. For something lighter, add fresh lemon zest and juice instead of cream.
Swap the spinach for any other hardy green — kale, arugula, or even chopped broccoli rabe work beautifully. If using something tougher than spinach, add it earlier so it has time to soften.
8. Spiced Chickpea and Lentil Soup
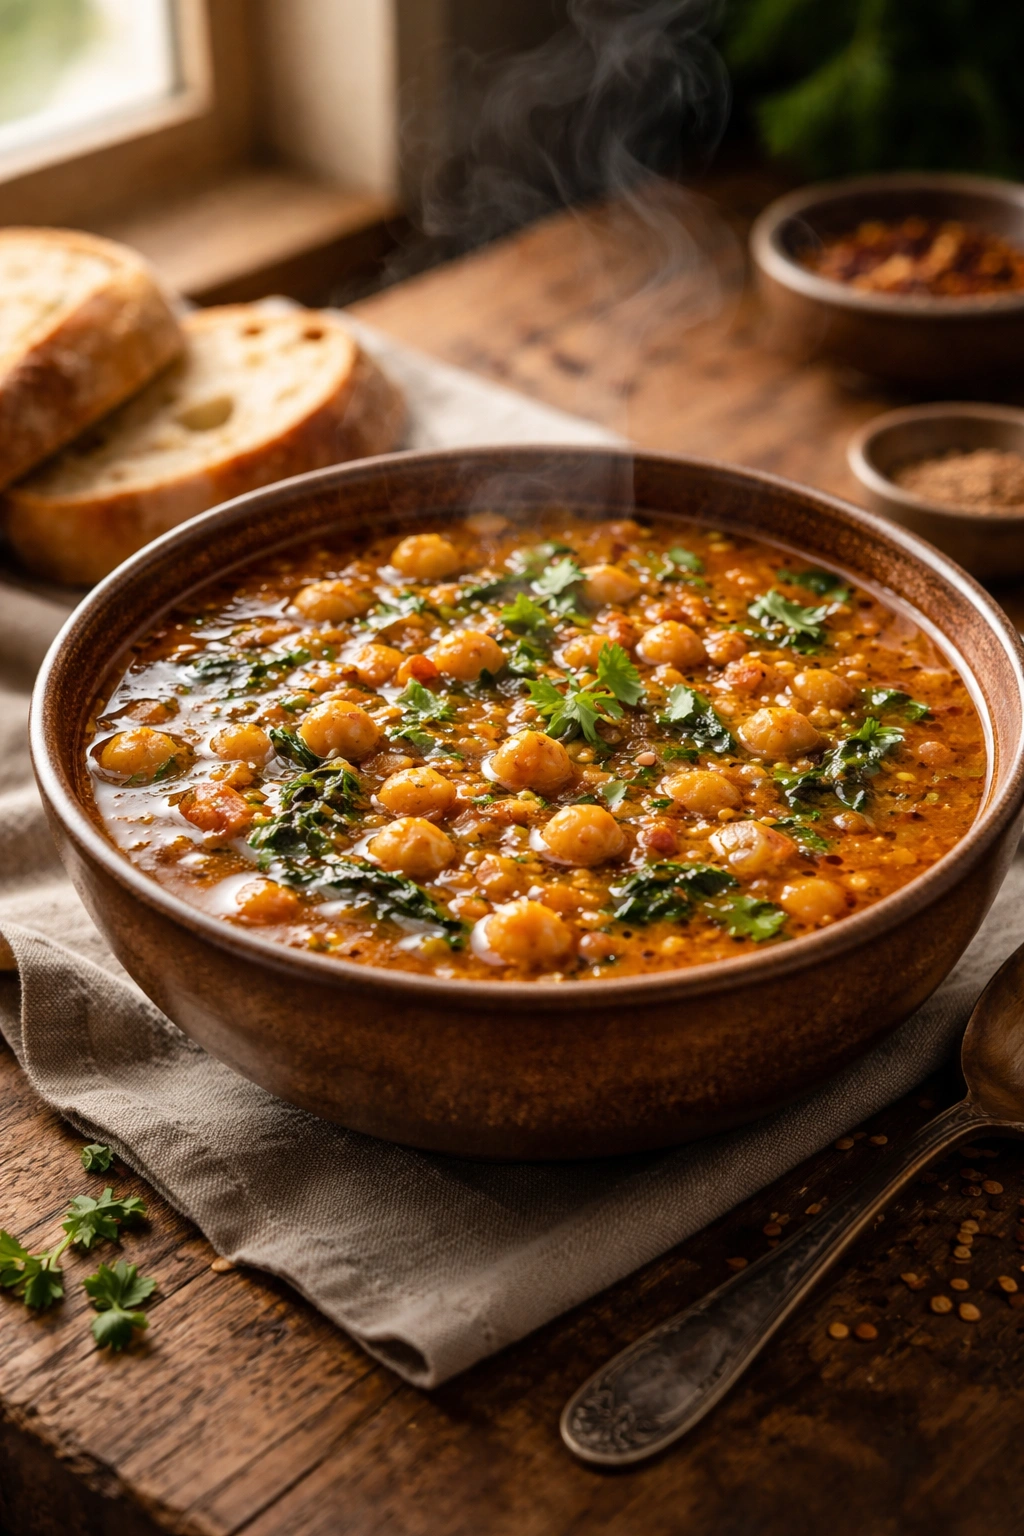
This is the soup you make when you want something deeply warming and substantive but don’t have hours to spend at the stove. The combination of chickpeas and lentils creates a texture that’s neither entirely smooth nor chunky, just right for sopping up with crusty bread. The spices are warm and comforting without being aggressive.
Yield: Serves 4 to 5 Prep Time: 15 minutes Cook Time: 30 minutes Total Time: 45 minutes Difficulty: Beginner — one-pot cooking with simple aromatics and spices.
Ingredients:
- 2 tablespoons olive oil
- 1 large yellow onion, diced
- 3 cloves garlic, minced
- 2 teaspoons ground cumin
- 1 teaspoon ground coriander
- ½ teaspoon turmeric powder
- ¼ teaspoon cayenne pepper
- 6 cups vegetable or chicken broth
- ¾ cup red lentils, rinsed
- 1 can (15 ounces) chickpeas, drained and rinsed
- 1 can (14.5 ounces) diced tomatoes (with juice)
- 1 teaspoon fine sea salt
- ½ teaspoon black pepper
- 2 tablespoons fresh lemon juice
- Fresh cilantro for garnish (optional)
- Plain yogurt for serving (optional)
Instructions:
-
Heat the olive oil in a large heavy-bottomed pot over medium heat. Once it’s shimmering, add the diced onion and cook for 4 to 5 minutes, stirring occasionally, until softened and just beginning to turn translucent.
-
Add the minced garlic and cook for 1 minute, stirring constantly, until fragrant. Add the cumin, coriander, turmeric, and cayenne. Stir well and cook for 30 seconds to 1 minute, allowing the spices to bloom and release their essential oils — you’ll smell a noticeable shift from raw spice powder to warm, fragrant spice.
-
Pour in the broth and bring to a boil over medium-high heat. Add the lentils, chickpeas, diced tomatoes with their juice, salt, and black pepper. Stir well.
-
Reduce the heat to a gentle simmer and cook for 25 to 30 minutes, stirring occasionally, until the lentils are completely soft and beginning to break down into the broth, thickening it slightly. The soup should taste rich and balanced — not thin or brothy, but not thick either.
-
Stir in the fresh lemon juice. Taste and adjust the salt, spices, or lemon juice as needed. The soup should taste bright and balanced.
-
Serve hot, garnished with fresh cilantro if you’d like, and with a dollop of plain yogurt on the side for richness and cooling contrast.
Advertisements
Tips and Variations
Red lentils break down more readily than other varieties, which is exactly what you want here — they thicken the soup naturally without needing any cream or flour. If you can’t find red lentils, use yellow lentils, which behave similarly.
For a creamier soup, blend half of it using an immersion blender and return it to the pot. This creates a luxurious texture while keeping some chunky bits.
Add diced carrots or celery along with the onions, or stir in fresh spinach during the last minute of cooking. A squeeze of pomegranate molasses at the end adds wonderful depth if you have it on hand.
9. Baked Chickpea Fritters (Falafel-Style)
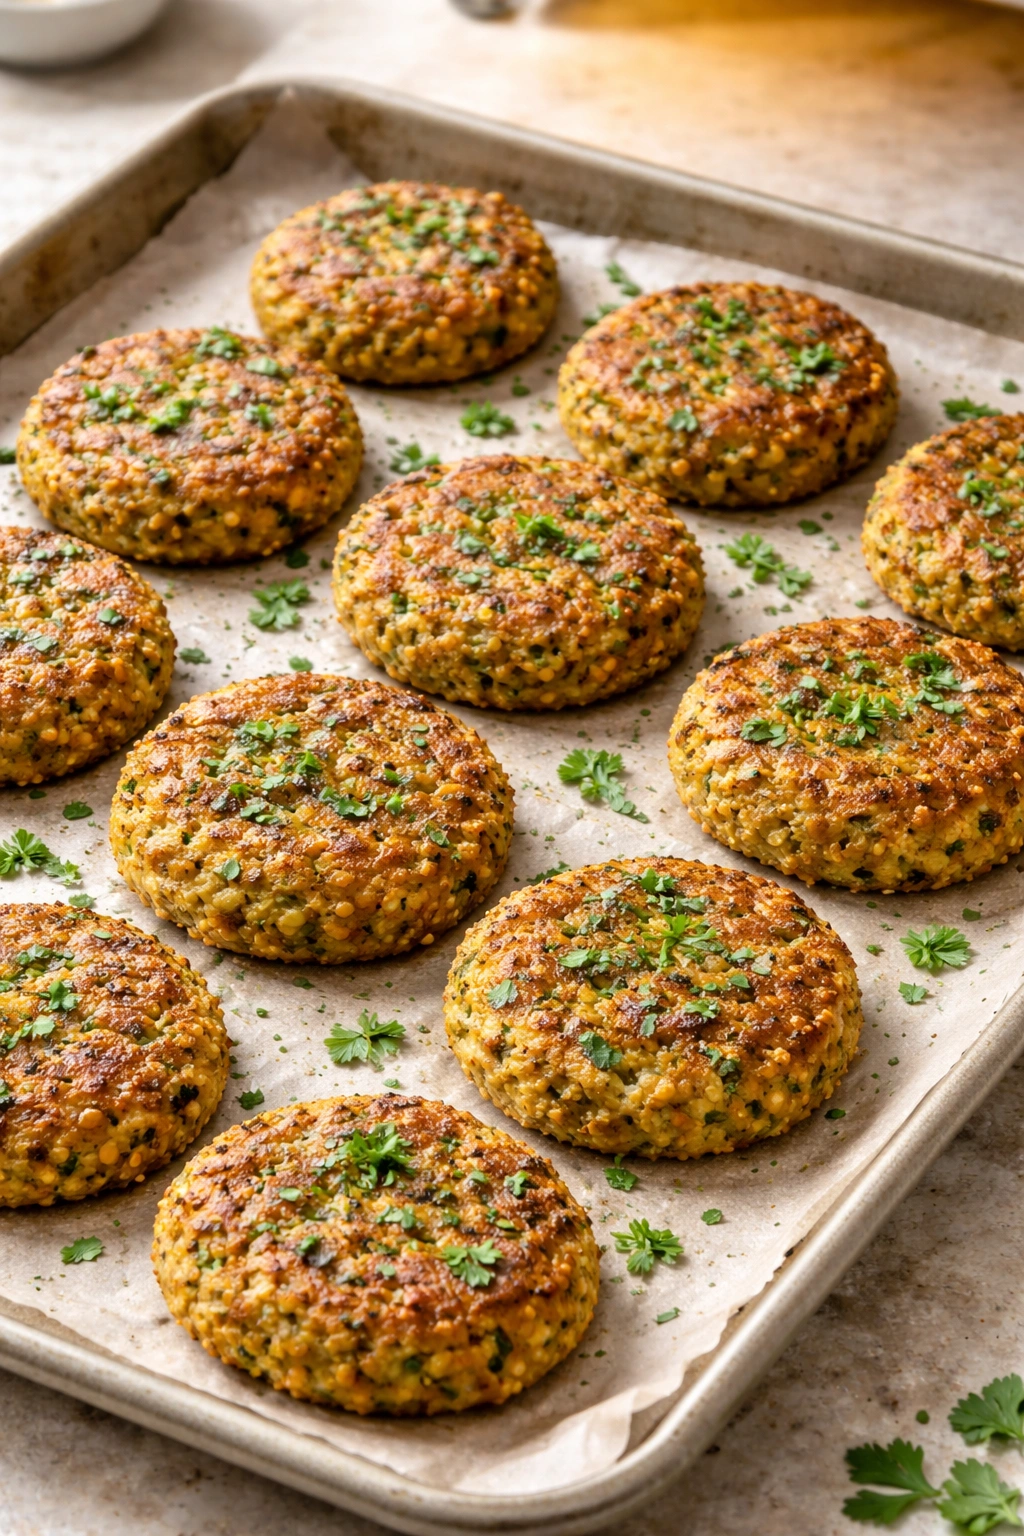
Falafel doesn’t actually require a deep fryer — you can bake these crispy little fritters in a regular oven and get remarkably good results. They’re lighter than their fried cousins but still crunchy on the outside and fluffy within. Serve them tucked into pita with tzatziki and fresh vegetables, or just eat them as a crunchy snack with hot sauce.
Yield: Makes about 20 fritters (serves 4 to 6) Prep Time: 15 minutes Cook Time: 20 minutes Total Time: 35 minutes Difficulty: Beginner — just food processing and baking.
Ingredients:
- 1 can (15 ounces) chickpeas, drained and rinsed very well
- ½ medium yellow onion, roughly chopped
- ⅓ cup fresh parsley, packed
- ⅓ cup fresh cilantro, packed
- 3 cloves garlic, minced
- ½ teaspoon ground cumin
- ½ teaspoon ground coriander
- ¼ teaspoon cayenne pepper
- ¼ cup all-purpose flour (or chickpea flour for a slightly nuttier flavor)
- 1 teaspoon baking powder
- ¾ teaspoon fine sea salt
- ⅛ teaspoon black pepper
- Zest of 1 lemon
- 1 tablespoon lemon juice
- 2 tablespoons olive oil for brushing
Instructions:
-
Preheat the oven to 375°F (190°C) and line a large baking sheet with parchment paper.
-
In a food processor, combine the chickpeas, chopped onion, parsley, cilantro, and minced garlic. Pulse until the mixture is finely chopped but still has some texture — you’re aiming for something like coarse breadcrumbs, not a completely smooth paste.
-
Add the cumin, coriander, cayenne, flour, baking powder, salt, black pepper, lemon zest, and lemon juice. Pulse until everything is well combined and holds together when squeezed in your hand. If it’s too crumbly, add water 1 tablespoon at a time until it comes together.
Advertisements -
Using a cookie scoop or spoon, scoop about 1½ tablespoons of the mixture at a time onto the prepared baking sheet, spacing them about 2 inches apart. You should have about 20 fritters. Gently flatten each one slightly with the back of a damp spoon.
-
Brush the tops of each fritter lightly with olive oil.
-
Bake for 18 to 22 minutes, until the fritters are golden brown and crispy on the outside. They should feel firm to the touch and sound slightly crunchy when you bite into one.
-
Remove from the oven and let cool on the baking sheet for 5 minutes — they’ll continue to firm up as they cool.
-
Serve warm or at room temperature with tzatziki sauce, tahini dressing, or hot sauce for dipping.
Tips and Variations
The herbs are essential — they add flavor and moisture to the fritters, preventing them from tasting dry. Don’t skip them or reduce the amount. Make sure to squeeze excess moisture from your chickpeas before processing; any residual water will make the mixture too wet.
For a different flavor profile, try replacing the cilantro and parsley with fresh mint and dill for a more Mediterranean angle, or use just cilantro with lime zest for a brighter, more citrusy version.
If you don’t have a food processor, you can mash the chickpeas very thoroughly by hand and finely mince the herbs and aromatics before combining — it’ll take longer but the results will be nearly identical.
10. Chickpea Blondies (Chocolate-Free Energy Treats)
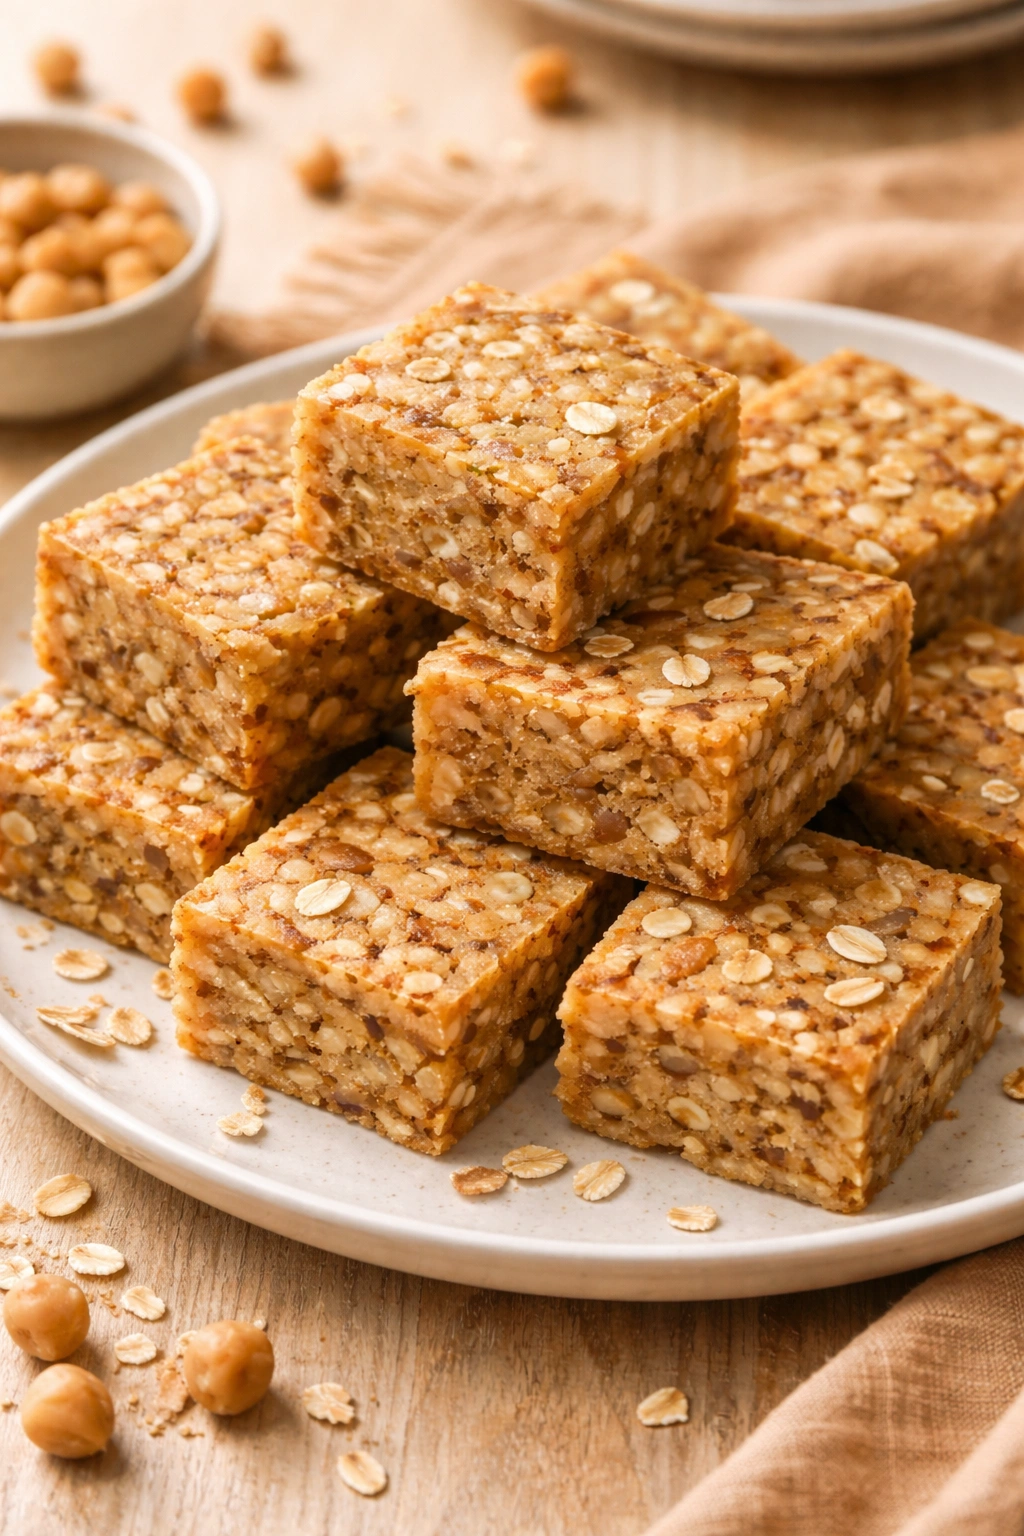
Yes, you can bake with chickpeas, and yes, these taste like an indulgent dessert, not a chickpea-based experiment. The chickpeas add moisture and density to create a fudgy texture without any of the heaviness of traditional brownies. They’re naturally sweetened, require minimal refined sugar, and are gluten-free if you use gluten-free oats.
Yield: Makes 16 squares Prep Time: 15 minutes Cook Time: 20 minutes Total Time: 35 minutes (plus cooling time) Difficulty: Beginner — just mixing and baking.
Ingredients:
For the Blondies:
- 1 can (15 ounces) chickpeas, drained and rinsed thoroughly
- ⅓ cup almond or peanut butter
- ⅓ cup pure maple syrup
- 1 teaspoon pure vanilla extract
- ½ teaspoon fine sea salt
- ½ teaspoon baking powder
- ½ cup rolled oats (old-fashioned or quick oats work equally well)
- ¼ cup coconut oil, melted
- 2 tablespoons raw cacao powder (optional, but adds richness)
- ⅓ cup chopped pecans or walnuts
- ⅓ cup dark chocolate chips (optional)
Instructions:
-
Preheat the oven to 350°F (175°C) and grease an 8×8-inch baking pan with coconut oil or line it with parchment paper, leaving overhang on two sides for easy removal.
-
In a food processor, combine the drained chickpeas, almond butter, maple syrup, vanilla extract, and salt. Process until completely smooth and creamy — this will take 1 to 2 minutes. You want zero visible chickpea pieces; the texture should be silky and uniform.
-
Transfer the chickpea mixture to a large bowl. Add the baking powder, rolled oats, melted coconut oil, and cacao powder (if using). Stir gently until everything is well combined. The batter should be thick and fudgy.
-
Fold in the chopped nuts and chocolate chips (if using) with a rubber spatula.
-
Spread the batter evenly into the prepared baking pan. Smooth the top with an offset spatula or the back of a spoon.
-
Bake for 18 to 22 minutes, until a toothpick inserted in the center comes out clean and the edges are set but the center still has a tiny bit of give. Do not overbake — these are meant to be fudgy and dense, not cakey.
-
Let the blondies cool in the pan for at least 15 minutes before cutting into 16 squares. They’ll continue to set as they cool.
Advertisements -
Store in an airtight container at room temperature for up to 4 days, or freeze for up to 3 months.
Tips and Variations
The longer you process the chickpeas, the creamier and more invisible they become. Don’t stop until the batter is completely smooth — there should be no visible texture from the chickpeas.
These are incredibly forgiving. You can swap the nut butter for tahini for a different flavor, use almond flour instead of rolled oats for extra nuttiness, or add espresso powder to intensify the cocoa flavor. You could also skip the cacao and add 1 teaspoon of instant coffee and 2 tablespoons of unsweetened cocoa powder, or go completely different with 1 teaspoon of cardamom and ½ teaspoon of cinnamon.
The blondies are dense and fudgy — they’re meant to be that way. If they seem undercooked at the edges, that’s just the nature of baking with chickpeas. Let them cool fully; they’ll firm up.
Final Thoughts

A single can of chickpeas is one of those kitchen staples that actually lives up to the hype. Whether you’re roasting them until crispy, blending them into silky hummus, building them into a warming curry, or even sneaking them into your dessert, they disappear into whatever you’re making and add nutrition, protein, and substance without announcing themselves.
The recipes here barely scratch the surface of what’s possible — these are just the dishes that have earned permanent rotation in my kitchen because they’re genuinely delicious and genuinely practical. Once you start thinking of canned chickpeas as a base ingredient rather than a side component, you’ll find yourself reaching for them far more often.
The real magic of cooking with chickpeas is that there’s almost no learning curve. You don’t need special equipment or rare ingredients. You just need a can, a few pantry staples, and the confidence that these humble legumes can become anything you want them to be.