Soup is one of those comforting, satisfying meals that feels complete on its own—but paired with the right side dish, it becomes something truly memorable. The magic happens when you add something that contrasts or complements the soup’s texture, flavor, and richness. A warm, creamy bisque suddenly feels more balanced alongside crispy bread. A light broth becomes more substantial when paired with something hearty. A simple vegetable soup transforms when you add a component with deeper flavor or textural contrast.
The beauty of soup sides is that they don’t need to be complicated. Most of them come together in 15 to 30 minutes, require minimal ingredients, and use basic cooking techniques that work every single time. Whether you’re making a weeknight dinner or hosting guests, having a repertoire of simple, reliable sides means you’re never stuck serving soup alone. You can keep things casual with grilled cheese, go elegant with garlic crostini, or add comfort with buttermilk biscuits—all depending on what the soup calls for and what you’re craving.
This guide covers eight sides that work beautifully with soup. Each one is genuinely easy to make, uses ingredients most home cooks already have on hand, and tastes noticeably better than anything store-bought. You’ll find specific techniques, timing guidance, and the exact reasoning behind why each pairing works so well. Once you master these eight, you’ll have the confidence to pair them strategically with different soups based on flavor, texture, and occasion.
1. Grilled Cheese Sandwich

There’s a reason grilled cheese and tomato soup are a classic pairing—the two seem designed to work together. The buttery, crispy exterior of the sandwich provides textural contrast to a smooth, warm soup, while the melted cheese adds richness and flavor that plays beautifully against bright, tangy tomato-based soups. But grilled cheese works well beyond tomato soup. It pairs with cream soups, broth-based soups, even veggie soups where you want to add a more substantial, indulgent element.
How to Make a Perfect Grilled Cheese
The secret to a truly excellent grilled cheese lies in three things: the right cheese choice, proper butter coverage, and controlled heat. Start with cheese that actually melts smoothly—aged cheddar, gruyere, fontina, or a combination works beautifully. Avoid low-moisture mozzarella, which won’t melt into that creamy, cohesive layer you’re after. Spread softened butter generously on the outside of both bread slices, not the inside—this is what creates that golden, crispy exterior. Use medium heat on your pan or skillet and give the sandwich time to cook slowly. Rushing it with high heat will burn the bread before the cheese fully melts inside.
Pro Technique for Maximum Creaminess
If you want an especially creamy interior, add a small amount of mayo or Dijon mustard between the bread slices before the cheese—these add moisture and flavor without making the sandwich soggy. For a more elevated version, try adding thin slices of apple, tomato, or caramelized onions between the cheese layers. Cook for 4 to 5 minutes on the first side until the bread is deep golden, then flip gently and cook the second side for 2 to 3 minutes. The second side typically needs less time since the pan is already hot.
Quick Customization Ideas
- Classic pairing: sharp cheddar with aged gouda and a thin slice of tomato
- For creamy soups: gruyere with a spread of whole-grain mustard
- For lighter broths: fontina with thin prosciutto slices
- For vegetable soups: a mix of sharp cheddar and smoked gouda
Best served immediately while the cheese is still warm and melted. Cut diagonally for easier dipping into soup.
2. Crusty Bread with Herbed Butter
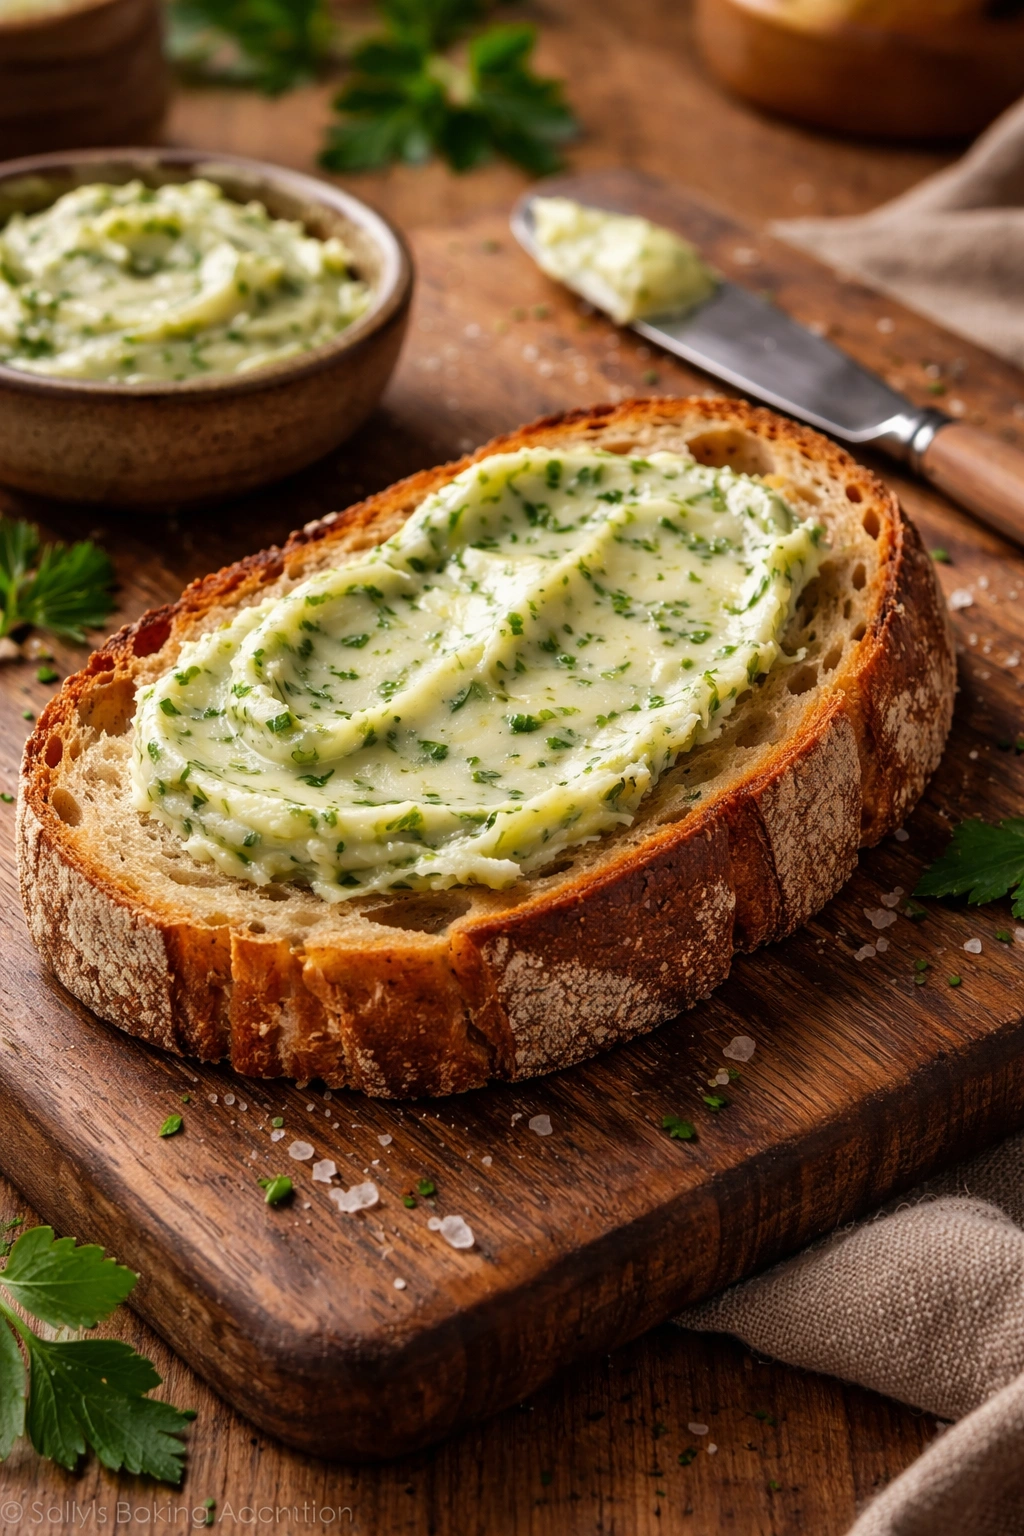
Sometimes the simplest side is the best one. Crusty bread with herbed butter is pure elegance in its simplicity—a slice of good bread, quality butter infused with fresh herbs, and nothing else needed. This works with virtually every soup because it’s neutral enough not to compete, yet flavorful enough to add real interest. The crispy exterior and tender crumb of quality crusty bread soaks up soup beautifully, while the herbs add brightness and sophistication to the overall meal.
Choosing and Preparing the Right Bread
The bread you choose matters significantly. Look for a loaf with a dark, crackly crust and an open, airy crumb structure—a true bakery crusty bread, not a soft supermarket white bread or a dense sourdough. Slice it on a slight diagonal, about ¾-inch thick, which gives you the perfect ratio of crispy crust to tender inside. You can serve it at room temperature, lightly toasted, or even charred lightly over an open flame for extra depth.
Making Herb Butter That Actually Tastes Good
The herb butter is where you add the real flavor. Start with softened butter at room temperature—this matters because cold butter won’t incorporate the herbs evenly. Mix in finely chopped fresh herbs: parsley, chives, and thyme are a beautiful combination that works with most soups. Add a small pinch of fleur de sel or good sea salt and a crack of black pepper. For a more complex flavor, add a tiny squeeze of fresh lemon juice or a small amount of minced garlic. Spread the herbed butter generously onto the bread slices just before serving, so it’s still soft and fragrant.
Herb Combinations That Work
- Classic: fresh parsley, chives, and thyme with a pinch of salt
- Bright and citrusy: parsley, dill, and lemon zest
- Earthy and sophisticated: sage, rosemary, and a touch of garlic
- Delicate: chives, tarragon, and a whisper of white pepper
Pro tip: Make herb butter ahead of time and store it in the fridge or freezer. Roll it in parchment paper into a log, and slice off rounds just before serving. This works beautifully for entertaining.
3. Roasted Vegetables
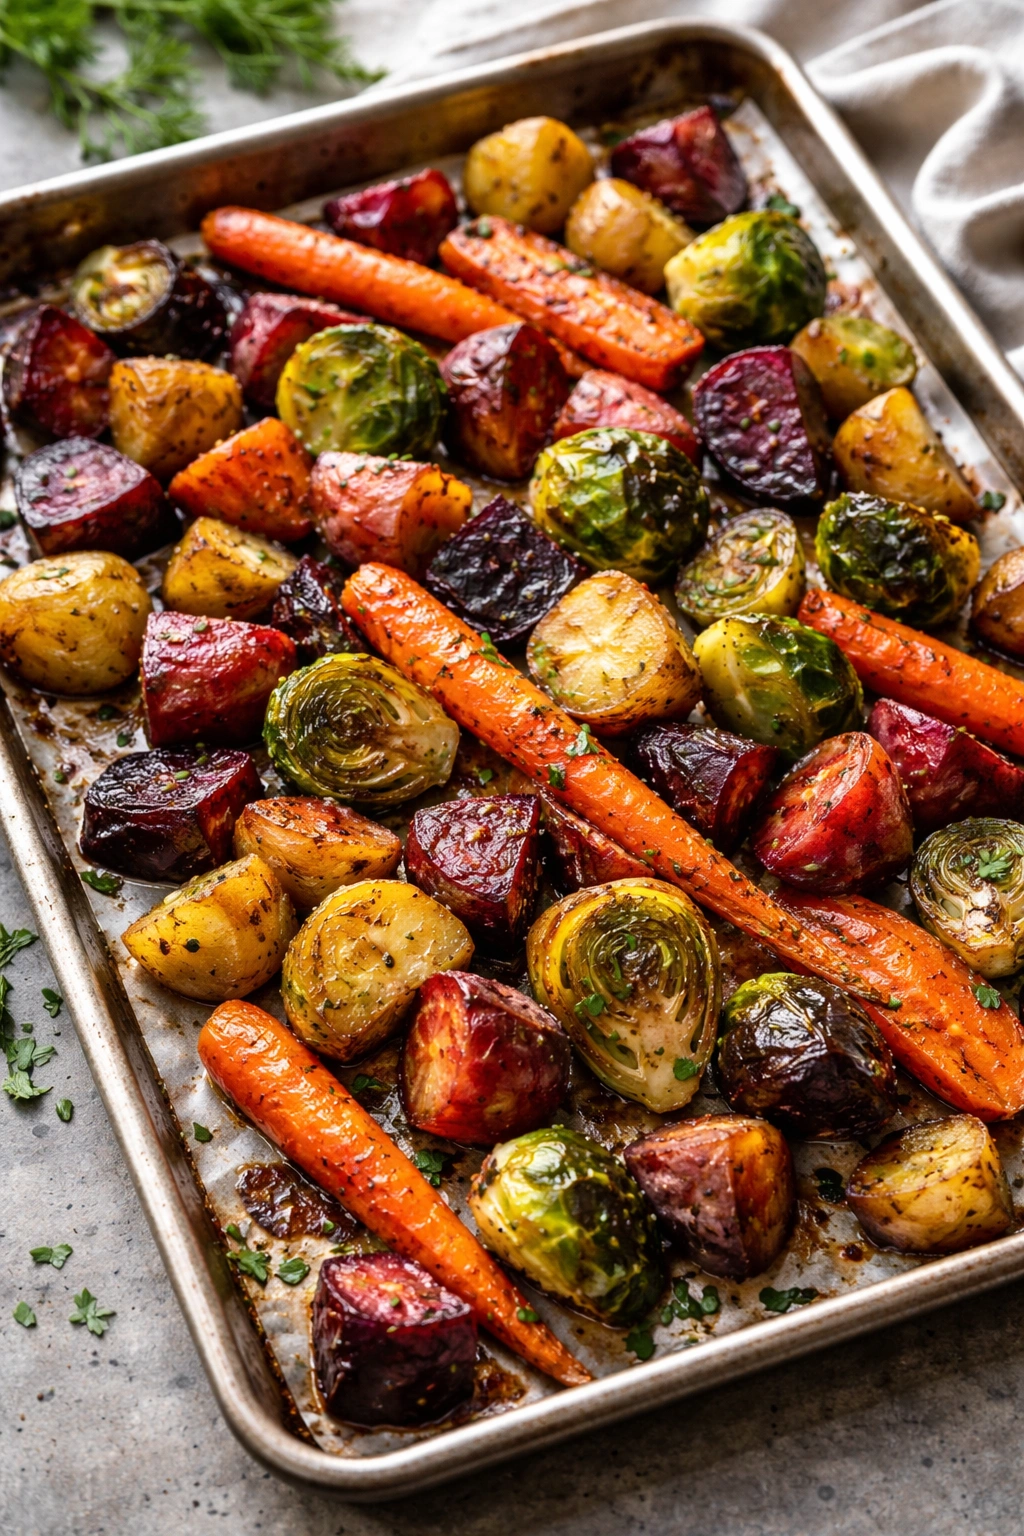
Roasted vegetables make an excellent side to soup because they add nutrition, textural contrast, and flavor complexity without requiring much active work. While the soup simmers, you can have vegetables roasting in the oven—they’re essentially hands-off. The caramelized edges and concentrated flavors that come from roasting add depth that steamed vegetables simply can’t match. Roasted vegetables work particularly well with light, broth-based soups where they become almost a second component of the meal.
Which Vegetables Roast Best
The best roasted vegetable sides are those that become deeply caramelized and develop sweet, complex flavors. Root vegetables like carrots, parsnips, beets, and potatoes are excellent choices—they soften and sweeten as they roast. Brussels sprouts develop nutty, crispy leaves. Broccoli and cauliflower florets get slightly charred edges. Zucchini and summer squash become tender and mellow. Avoid watery vegetables like tomatoes or cucumbers, which release too much moisture and won’t caramelize properly.
The Roasting Method That Works Every Time
Cut vegetables into roughly same-sized pieces—about ¾ to 1 inch—so they cook evenly. Toss them with good olive oil, salt, and pepper, making sure each piece is well-coated. Spread them in a single layer on a sheet pan, giving them space so they can make contact with the hot pan. Roast at 425°F (220°C) for 20 to 30 minutes, depending on the vegetables’ size and moisture content, stirring halfway through. They’re done when the edges are deeply browned and caramelized and a fork easily pierces the centers.
Flavor Boosters to Add Before Roasting
- Smoked paprika and cumin for a warm, Spanish-inspired flavor
- Balsamic vinegar and garlic for rich, deep notes
- Fresh rosemary and thyme for herbaceous depth
- Harissa paste for subtle heat and complexity
Worth knowing: Don’t crowd the pan. Overcrowding creates steam instead of caramelization. If you have a lot of vegetables, use two sheet pans and roast them together, rotating the pans halfway through.
4. Creamy Polenta
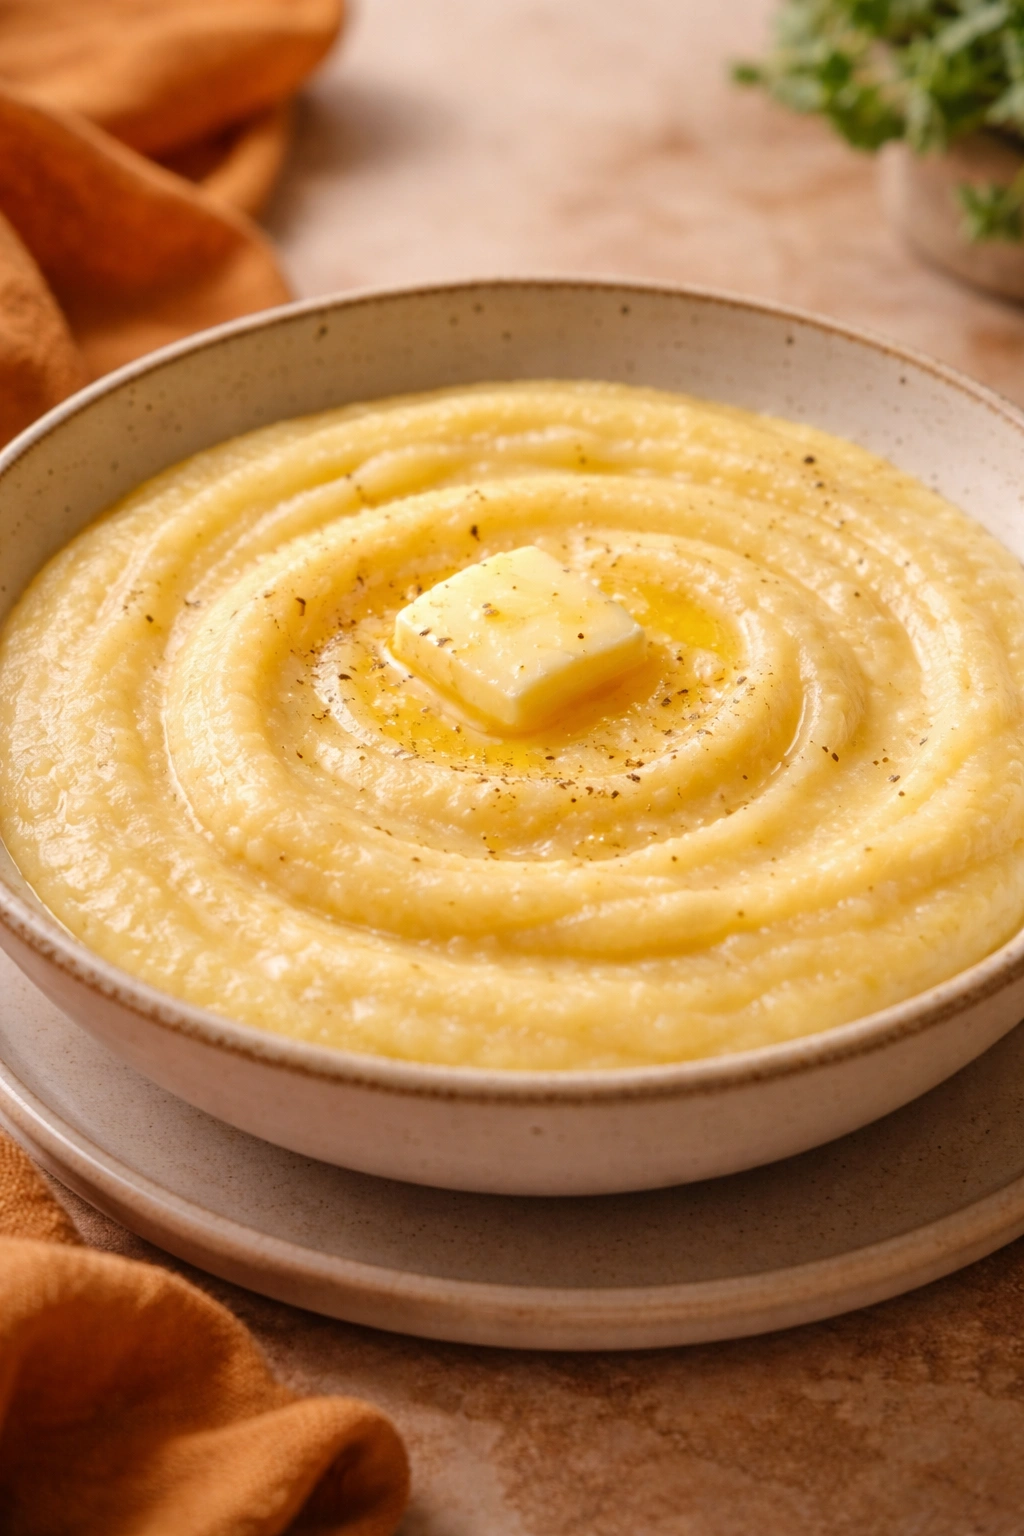
Polenta is a revelation for soup pairing—it’s rich, creamy, and filling without being heavy, and it adds a completely different textural element to the meal. Creamy polenta (as opposed to grilled polenta cakes) is essentially cornmeal cooked slowly with broth and butter until it becomes silky and luxurious. It’s particularly beautiful with vegetable soups, mushroom soups, or any broth-based soup where you want to add comforting substance. The corn flavor is subtle and sweet, so it complements rather than competes with the soup.
Making Polenta from Scratch
Polenta seems intimidating but it’s genuinely simple. Bring 4 cups of broth (vegetable, chicken, or beef depending on your soup) to a gentle simmer in a heavy pot. Slowly pour in 1 cup of polenta cornmeal (not instant), whisking constantly to prevent lumps from forming. Reduce the heat to medium-low and continue cooking, stirring frequently with a wooden spoon, for 20 to 30 minutes. The polenta is ready when it’s thick enough that the spoon leaves a trail behind it as you stir, and when you taste it, there’s no grittiness—the cornmeal is completely tender.
Finishing Polenta for Maximum Richness
Once the polenta reaches the right consistency, finish it with butter and good cheese. Stir in 3 to 4 tablespoons of cold butter, a pinch of salt, and a handful of grated Parmesan or Pecorino Romano. Some cooks add a splash of heavy cream for extra richness, though this isn’t necessary. The butter should melt into the polenta and make it silky. Taste and adjust the seasoning—polenta can usually handle more salt and pepper than you initially think.
Add-in Options for Extra Flavor
- Creamed corn and cheddar for a sweeter, richer version
- Roasted garlic and fresh sage for earthy sophistication
- Crispy pancetta or guanciale stirred in at the end
- Sun-dried tomatoes and fresh basil for brightness
Pro tip: Polenta is best served immediately after cooking, while it’s still creamy and warm. If you make it ahead, it will stiffen as it cools. You can reheat it gently on the stovetop with a splash of broth or cream, stirring frequently.
5. Simple Green Salad
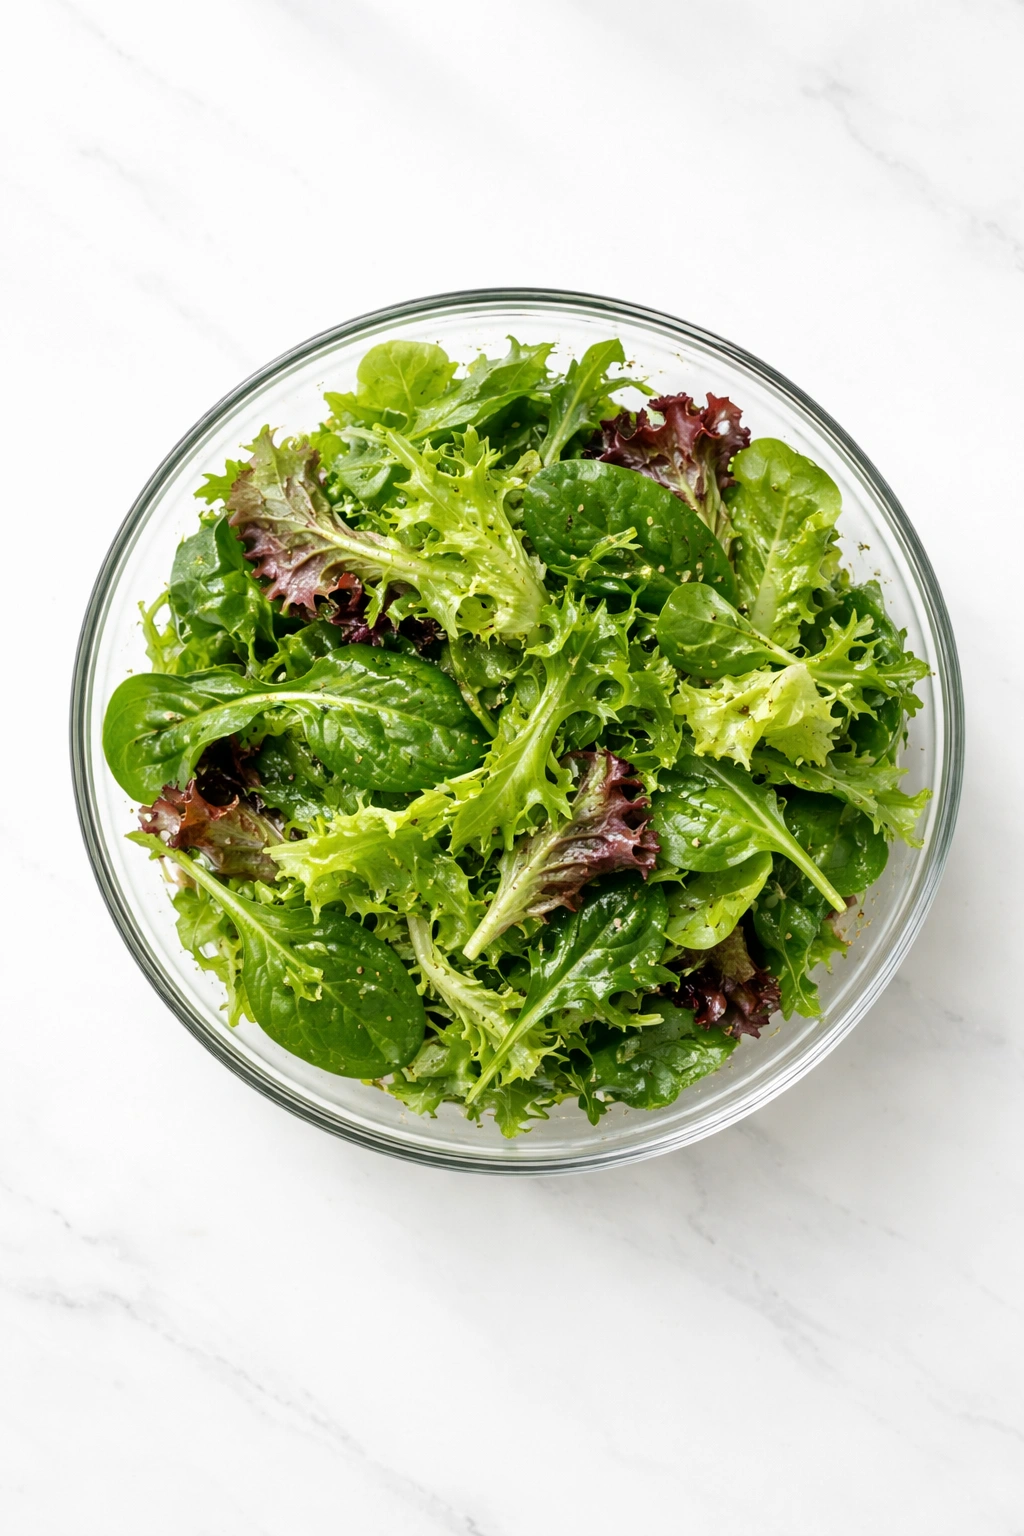
A simple green salad might sound too obvious, but it’s actually one of the most underrated soup accompaniments. When the weather is warmer or you’re serving a hearty, rich soup, a crisp, lightly dressed green salad provides textural contrast and freshness that balances the meal beautifully. The acidity from the vinaigrette also cuts through the richness of cream soups, making the whole meal feel lighter and more balanced. A good green salad is about quality ingredients and restraint—not much more than greens, vinaigrette, and maybe a textural element.
Building a Salad That Actually Tastes Good
Start with mixed greens that are fresh and crisp. Arugula, romaine, mixed lettuces, or spinach all work beautifully. The key is to taste the greens—they should have some flavor and personality, not just be a neutral base. Wash and dry them thoroughly; a salad spinner is worth having just for this purpose because wet greens dilute the vinaigrette and feel soggy. For texture, add one crunchy element: toasted nuts, seeds, crispy croutons, or thinly shaved raw vegetables like radish or carrot.
The Vinaigrette That Makes Everything Better
A simple vinaigrette is just three parts: acid, fat, and seasoning. Combine 1 part good vinegar (red wine, white wine, or sherry vinegar) with 3 parts good olive oil. Add a small pinch of Dijon mustard, which helps emulsify the dressing and adds subtle depth. Season with salt and pepper. The ratio matters—too much vinegar makes it sharp and harsh; too little and it’s just oily. Taste as you go. Some cooks add a tiny pinch of honey or a single shallot minced very fine, but that’s optional. Make the vinaigrette in the bottom of a large bowl, add the greens just before serving, and toss gently to coat.
Simple Add-ins That Add Real Value
- Fresh herbs like tarragon, dill, or chives mixed into the greens
- Shaved Parmesan cheese scattered over the top
- Thinly shaved radish or fennel for crunch and brightness
- Toasted almonds or walnuts for nutty depth
Worth knowing: Dress the salad no more than a few minutes before serving. Dressed greens wilt quickly, and the whole point is to maintain that crisp texture that contrasts beautifully with the warm soup.
6. Buttermilk Biscuits

Buttermilk biscuits are comfort food in their purest form—tender, flaky, and rich, with just enough tang from the buttermilk to keep them interesting. They’re warm, they’re filling without being heavy, and they pair beautifully with virtually every type of soup. A good biscuit should have distinct layers, a golden-brown exterior, and a tender, slightly crumbly crumb inside. The magic is in the technique: keeping everything cold, using just enough liquid, and not overworking the dough.
The Essential Technique for Flaky Biscuits
Flakiness comes from cold butter that stays in distinct pieces rather than being fully incorporated into the flour. Start with cold butter cut into small cubes—it should go straight from the fridge into the flour. Use your fingertips to work the butter into the flour mixture until it resembles coarse cornmeal with some pea-sized pieces of butter still visible. This is important: you don’t want a smooth dough at this stage. Add buttermilk just until the dough comes together, mixing gently with a fork. Overworking develops gluten and makes biscuits tough instead of tender.
Roll, Cut, and Bake for Perfect Results
Turn the dough onto a lightly floured surface and gently press it into a rectangle about ¾-inch thick. Don’t roll it too thin, and be gentle—you’re not trying to develop the dough; you’re just shaping it. Cut biscuits with a sharp, floured cutter (a standard 2-inch biscuit cutter works beautifully) and place them on a baking sheet lined with parchment paper. Brush the tops lightly with buttermilk, then bake at 425°F (220°C) for 12 to 15 minutes, until they’re tall, light, and golden brown on top. They should rise visibly in the oven—if they don’t, the oven might not be hot enough.
Make-Ahead and Freezing Tips
You can prepare biscuit dough ahead of time and refrigerate it for up to 24 hours, which is actually beneficial because it keeps everything cold. You can also freeze cut, unbaked biscuits, then bake them directly from frozen—just add 2 to 3 minutes to the baking time. Fresh biscuits are best eaten warm, but they’re still delicious at room temperature.
Pro tip: A little sugar in the dough—just 1 tablespoon—adds subtle sweetness without making them dessert-like. It also helps them brown more evenly.
7. Garlic Crostini
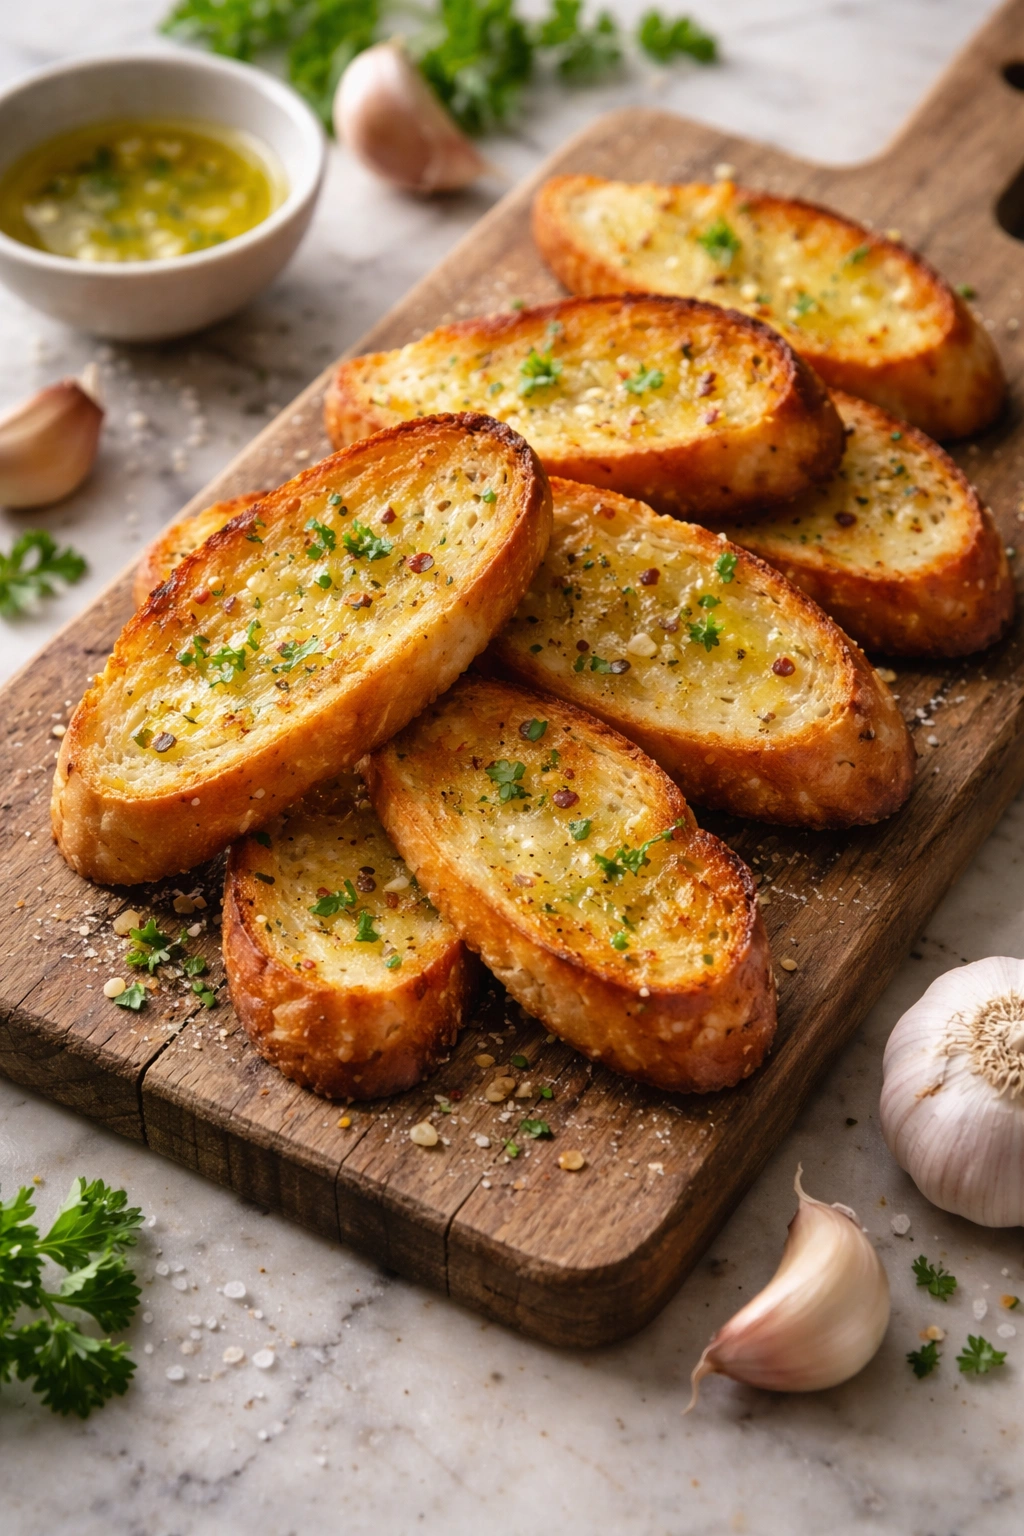
Garlic crostini are crispy, flavorful bread slices that add crunch and garlicky richness to any soup. Unlike breadcrumbs or simple croutons, crostini are large enough to be interesting on their own, and they’re elegant enough for entertaining. They’re also incredibly simple—just sliced bread brushed with garlic-infused olive oil and toasted until golden and crispy. Crostini work especially well with light, broth-based soups, vegetable soups, and any preparation where you want to add textural interest without heaviness.
Slice, Brush, and Toast the Right Way
Slice a good quality crusty baguette or Italian bread on a diagonal about ⅜-inch thick—thin enough to toast through but thick enough not to become hard and brittle. Arrange the slices on a large baking sheet. Combine good olive oil with minced garlic in a small bowl, using about 2 cloves of garlic per ¼ cup of olive oil. Let the mixture sit for a few minutes to allow the garlic to infuse the oil, then brush it generously onto both sides of each bread slice. Sprinkle lightly with salt and bake at 375°F (190°C) for 10 to 12 minutes, stirring halfway through, until they’re golden and crispy all the way through.
Flavor Variations That Make Them Sing
- Classic garlic and a pinch of dried oregano
- Garlic with fresh rosemary sprigs infused in the oil
- Red pepper flakes added to the olive oil for subtle heat
- Garlic with a whisper of aged balsamic vinegar brushed on at the end of toasting
Storage and Make-Ahead
Crostini can be made a day or two ahead and stored in an airtight container at room temperature. If they lose their crispness, you can re-crisp them briefly in a 300°F (150°C) oven for 5 minutes. They won’t be quite as perfect as fresh, but they’ll be perfectly acceptable.
Worth knowing: Don’t let the garlic burn—if the oil is too hot or the heat too high, the garlic turns bitter and acrid. Medium heat and regular stirring prevents this problem.
8. Quesadillas

Quesadillas might seem like an unexpected soup pairing, but they work beautifully—especially with broth-based soups, tortilla soup, or any Mexican-inspired preparation. A simple quesadilla (cheese and perhaps some sautéed vegetables, cooked until the tortilla is crispy and the cheese is melted and gooey) adds substance, richness, and fun to a soup meal. Quesadillas are quick to make, infinitely customizable, and deeply satisfying. Cut into triangles, they’re easy to dip into soup or eat as a hand-held accompaniment.
The Basic Quesadilla Method
Heat a large skillet or griddle over medium-high heat. Place a flour tortilla on the hot surface and let it toast for 30 seconds to 1 minute until it just begins to brown. Flip it, then immediately sprinkle shredded cheese (Oaxaca, Chihuahua, mozzarella, or cheddar all work) onto the toasted side. Add any fillings you like—sautéed peppers and onions, cooked chorizo, sautéed mushrooms, caramelized onions, or fresh herbs. Top with another tortilla, press gently, and cook for 1 to 2 minutes until the bottom is golden and crispy. Flip the whole quesadilla carefully and cook the other side for another minute or two until that side is also golden and the cheese is fully melted inside.
Filling Ideas That Work With Soup
- Cheese, sautéed poblano pepper, and crispy onion
- Cheese, chorizo, and black beans
- Cheese, caramelized onions, and fresh cilantro
- Cheese, cooked mushrooms, and thyme
- Cheese alone is perfect—don’t overcomplicate it
Cook for the Right Texture
The key to a good quesadilla is not overstuffing it—you want the filling to enhance the cheese, not replace it. Cook over medium-high heat so the tortilla gets crispy and golden without burning, while the cheese has time to melt. If the heat is too low, the tortilla becomes tough and leathery; if it’s too high, the outside burns before the cheese melts inside.
Pro tip: Use a large enough skillet that the whole quesadilla lies flat—trying to flip a quesadilla that’s too big for your pan is a recipe for broken tortillas and spilled filling. A 10 to 12-inch skillet is ideal.
Final Thoughts

The right soup side transforms a simple meal into something memorable and satisfying. None of these eight options requires special skills or hard-to-find ingredients. Each one comes together quickly and tastes noticeably better when made with care and quality ingredients. The key is choosing sides that complement your soup rather than compete with it—light soup pairs beautifully with something hearty like biscuits or quesadillas, while rich, creamy soup benefits from crispy bread or fresh greens.
Start by mastering whichever option calls to you most. Once you understand the technique—whether that’s the method for perfect biscuits, the right timing for roasted vegetables, or the trick to flaky polenta—you can make it confidently every time. From there, experiment with the others. Over time, you’ll develop instincts about which side works best with each soup you make, and you’ll have a repertoire that makes weeknight dinners feel like real cooking, not just reheating.