The smell of roasting poblano peppers, the deep richness of mole simmering on the stovetop, the comfort of warm tortillas fresh from the comal—Mexican comfort food has a way of making you feel at home, whether you’re in Mexico City or your own kitchen. These aren’t the bright, fast-casual Mexican restaurants you might grab from on a Tuesday night. These are the dishes that take time, intention, and a little bit of love—the kind of food that’s cooked for family gatherings, celebrations, and quiet weeknight dinners when you want to feel wrapped up in flavors that have been passed down through generations.
What makes Mexican comfort food so deeply satisfying goes beyond just taste. These recipes rely on building layers of flavor through slow cooking, toasting whole spices, charring vegetables, and letting sauces simmer until they reach that perfect velvety consistency. Many of these dishes take a few hours from start to finish, and some are actually even better the next day once the flavors have had time to meld and deepen. Yes, that means some planning ahead, but the payoff is extraordinary—the kind of food that reminds you why people choose to spend their evenings in the kitchen.
If you’ve ever felt intimidated by the length of traditional recipes or worried you didn’t have the “right” ingredients, set that aside for now. Yes, some of these dishes have long ingredient lists, but almost every component serves a real purpose, and most of what you need can be found at a regular grocery store. What follows are eight authentic-style Mexican comfort food recipes that deliver genuine, restaurant-quality results at home. Each one teaches you something about Mexican cooking technique, and each one is absolutely worth the time you invest in making it.
1. Chiles Rellenos with Queso and Ranchero Sauce
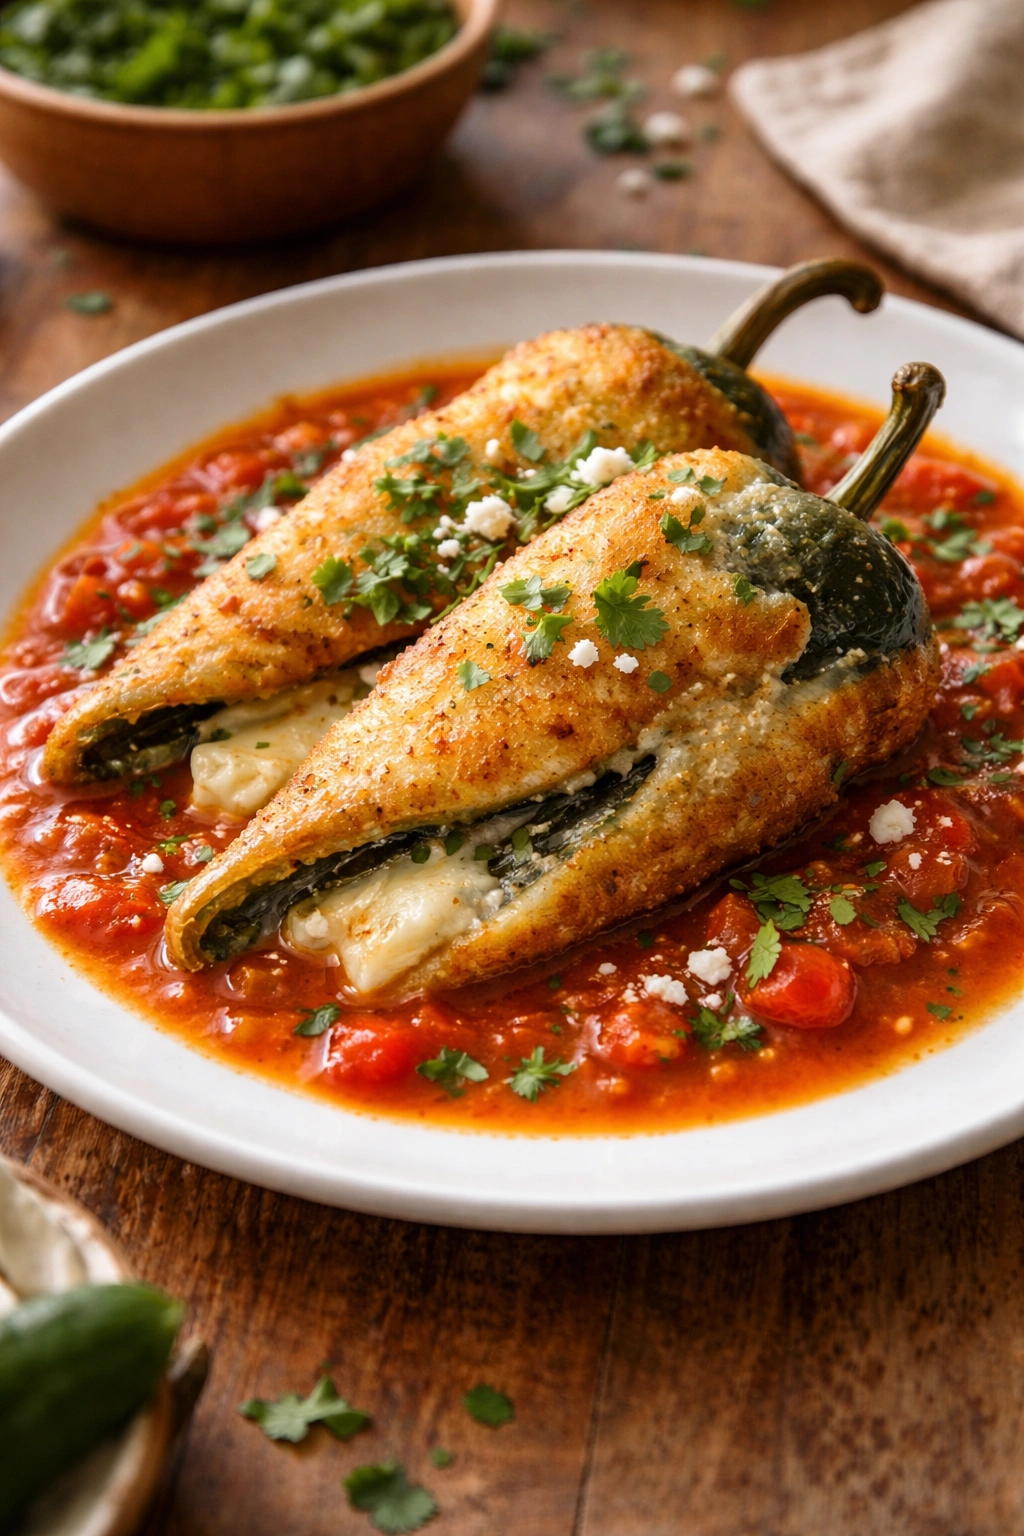
Chiles rellenos represent the very best of Mexican home cooking—a roasted poblano pepper stuffed with melting cheese, coated in a delicate egg batter, and served in a bright, tangy tomato sauce. This is the dish that appears on special occasions, at celebrations, and whenever someone wants to show they’ve put serious effort into dinner. The magic happens when you bite through the crispy exterior into the soft, creamy cheese center, all enveloped in a sauce that’s been simmered just long enough to lose its raw edge but retain its vibrant flavor.
Yield: Serves 4 (makes 4 stuffed peppers)
Prep Time: 25 minutes
Cook Time: 35 minutes
Total Time: 1 hour
Difficulty: Intermediate — The process involves roasting and peeling peppers plus whisking egg whites, but both techniques become straightforward once you understand the technique.
For the Ranchero Sauce:
- 2 tablespoons olive oil
- ½ white onion, roughly chopped
- 3 cloves garlic, minced
- 1 pound fresh roma tomatoes, roughly chopped (or one 28-ounce can whole tomatoes, crushed by hand)
- 1 teaspoon dried oregano
- ½ teaspoon ground cumin
- Salt and fresh black pepper to taste
- Pinch of sugar (if needed to balance acidity)
For the Chiles Rellenos:
- 4 poblano peppers (medium to large, about the size of your palm)
- 2 cups shredded Oaxaca cheese or mozzarella (fresh is better than pre-shredded if you can find it)
- 4 large eggs, separated (whites and yolks in different bowls)
- ¼ teaspoon cream of tartar
- 3 tablespoons all-purpose flour
- Oil for frying (vegetable or canola)
- Salt for seasoning
Make the Ranchero Sauce:
-
Heat olive oil in a medium saucepan over medium heat. Add the chopped onion and cook for 3 to 4 minutes, stirring occasionally, until the onion becomes translucent and softens slightly.
-
Add the minced garlic and cook for another 1 minute, just until fragrant—be careful not to let it brown, which would make the sauce bitter.
Advertisements -
Add the chopped tomatoes (with their juices if using canned), oregano, and cumin. Stir well to combine, then bring to a gentle simmer.
-
Let the sauce simmer for 15 to 20 minutes, stirring occasionally. The sauce will soften and the flavors will marry. You’re looking for it to reduce slightly and deepen in color.
-
Taste and season with salt and pepper. If the sauce tastes too acidic, add a tiny pinch of sugar and stir. Strain the sauce through a fine-mesh sieve if you prefer a smoother sauce, pressing the solids gently with a spoon (or leave it rustic—both are delicious). Keep the sauce warm on very low heat while you prepare the chiles.
Prepare the Peppers:
-
Hold each poblano pepper directly over a gas flame (or place under the broiler on high) and turn it slowly with tongs until the entire skin is blackened and blistered, about 8 to 10 minutes total. The pepper will look dramatically charred—this is exactly what you want. The charring separates the skin from the flesh.
-
Place each charred pepper into a plastic bag or cover them together in a bowl with plastic wrap. Let them sit for 5 to 10 minutes. The steam will loosen the skin and make peeling much easier.
-
Remove each pepper from the bag and gently rub the blackened skin away under cool running water, using your fingers or a soft cloth. Rub gently—you want to remove the skin without tearing the pepper flesh underneath. Once peeled, carefully make a lengthwise slit along one side of each pepper (from the stem end to the pointed end) and gently remove the seeds and internal membranes, keeping the stem intact if possible.
Stuff and Coat the Peppers:
-
Pat the peeled peppers dry gently with paper towels. Stuff each pepper with about ½ cup of the shredded cheese, packing it gently so it holds together but doesn’t spill out. The cheese will melt and hold the pepper together as it cooks.
-
In a clean bowl, combine the egg whites and cream of tartar. Using an electric mixer on medium-high speed (or vigorous whisking by hand), beat the egg whites until they form stiff peaks—this takes 3 to 4 minutes with a mixer. The whites should be glossy, thick, and hold their shape when you lift the beaters.
Advertisements -
In a separate bowl, lightly beat the egg yolks with a pinch of salt. Gently fold the yolks into the beaten whites using a spatula, folding carefully just until combined. The mixture should remain light and fluffy—don’t overmix. Gently fold in the flour until just incorporated.
-
Place the flour on a shallow plate. Heat about ¼ inch of oil in a large skillet over medium-high heat until a drop of the egg mixture sizzles immediately upon contact (around 350°F / 175°C).
-
Working with one pepper at a time, lightly dredge it in flour, shaking off excess, then gently lower it into the hot oil using a spatula to support it. Fry for 2 to 3 minutes on the first side until the coating is golden brown and set, then carefully flip and fry the other side for another 2 to 3 minutes until evenly golden. The egg coating should be crispy outside but still tender inside.
-
Transfer the fried chile to a plate lined with paper towels to drain briefly, then place it in a shallow serving dish. Repeat with the remaining peppers.
Serve:
- Pour the warm ranchero sauce over the finished chiles rellenos. Serve immediately, while the sauce is hot and the chiles are still warm. Accompany with warm flour or corn tortillas.
Tips for Success
Sourcing poblanos: Look for poblano peppers that are thick-walled and relatively unblemished. Thinner-skinned peppers are more likely to tear when you’re peeling them. If you can’t find poblanos, Anaheim peppers work as a substitute, though they’re milder.
The egg coating: This is what makes chiles rellenos special. Don’t skip beating the egg whites—that air is what gives the coating its characteristic light, almost fluffy texture. If your coating comes out dense and heavy, you either didn’t beat the whites long enough or you overmixed when folding. Next time, beat those whites until they’re absolutely stiff.
Make-ahead option: You can roast, peel, and stuff the peppers up to 8 hours ahead. Cover them loosely with plastic wrap and refrigerate. Bring them to room temperature for 20 minutes before frying, and make the sauce fresh just before serving.
Storage: Leftovers keep well in the refrigerator for up to 3 days. Reheat gently in a low oven (300°F / 150°C) for 15 to 20 minutes, covered with foil, to avoid drying them out.
2. Chiles en Nogada with Pomegranate and Walnut Sauce
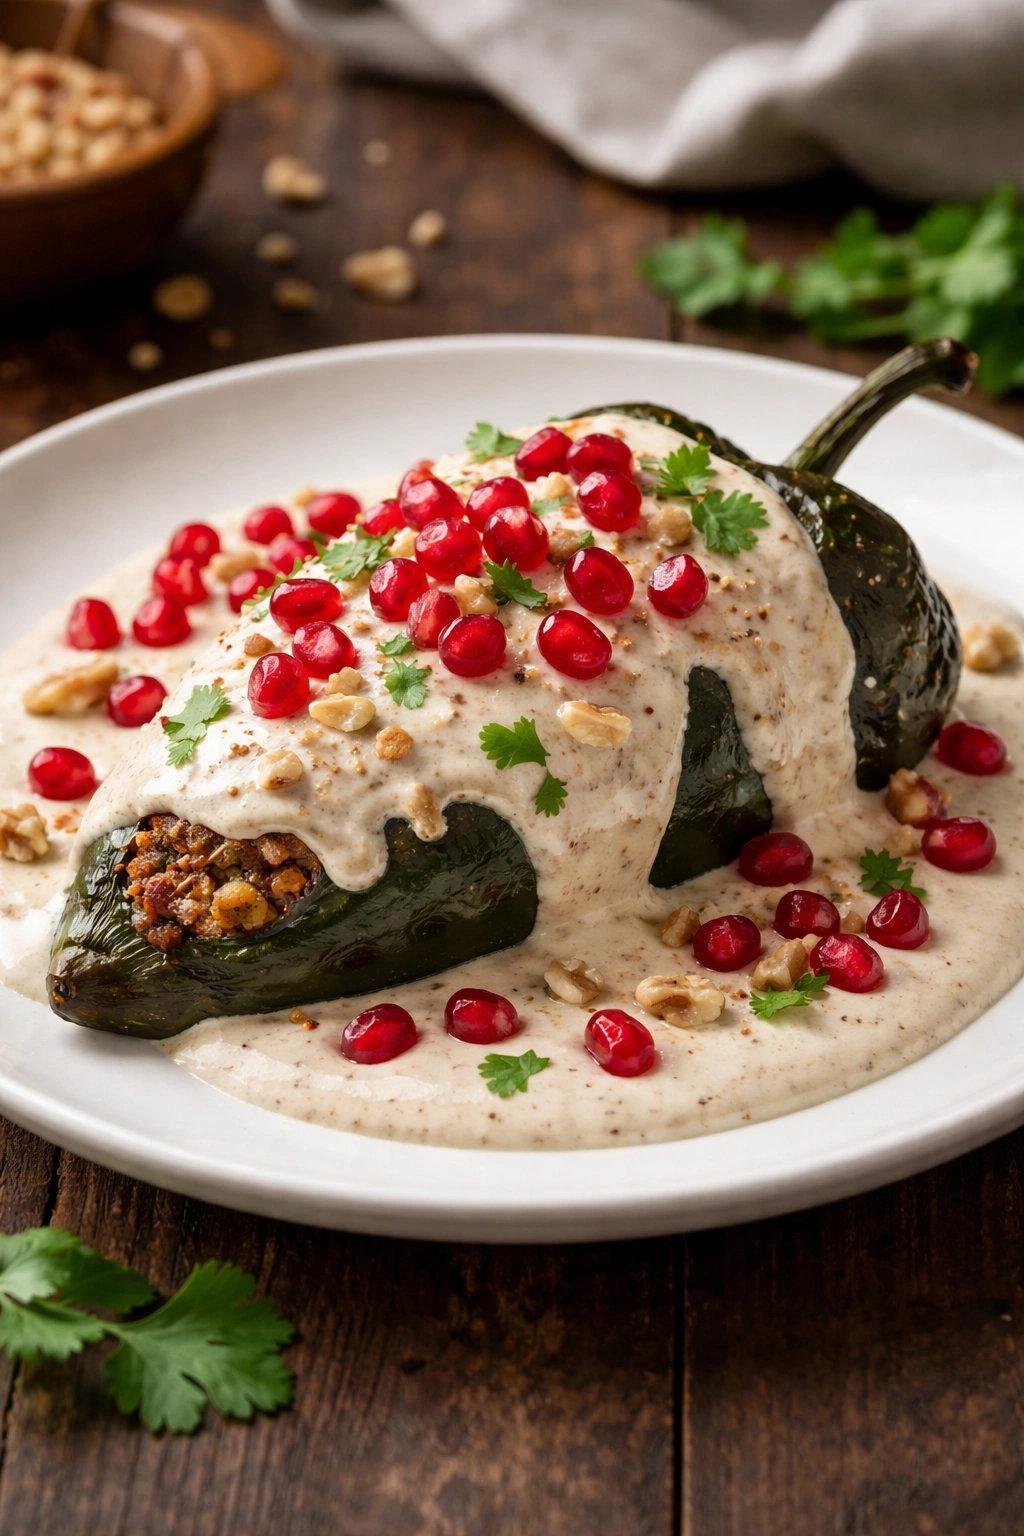
Chiles en nogada is perhaps the most elegant dish in all of Mexican cuisine—a poblano pepper stuffed with a sweet-savory mixture of dried fruit, nuts, and meat, then covered in a luxurious cream walnut sauce and garnished with pomegranate seeds and cilantro. The combination of colors (green pepper, white sauce, red seeds, and green cilantro) reflects the Mexican flag, and the flavors reflect centuries of culinary tradition blending Spanish and indigenous influences. It’s a showstopper, a celebration meal, and absolutely worth making for anyone you want to impress.
Yield: Serves 4 (makes 4 stuffed peppers)
Prep Time: 40 minutes
Cook Time: 45 minutes
Total Time: 1 hour 25 minutes
Difficulty: Advanced — Multiple components and a more complex sauce, but each component is straightforward once broken down. Plan ahead.
For the Filling:
- 3 tablespoons olive oil
- ½ pound ground pork (or a mix of pork and chicken)
- ¼ white onion, finely diced
- 2 cloves garlic, minced
- ½ cup diced peeled apple (tart varieties like Granny Smith work best)
- ⅓ cup diced peeled pear
- ¼ cup golden raisins
- ¼ cup roasted sliced almonds, roughly chopped
- ¼ cup roasted pine nuts
- 2 tablespoons chopped fresh cilantro
- ½ teaspoon ground cinnamon
- ⅛ teaspoon ground cloves
- Salt and black pepper to taste
For the Walnut Sauce (Nogada):
- 1½ cups raw walnuts, shelled
- 1 cup Mexican crema or crème fraîche (or heavy cream mixed with a touch of sour cream)
- ⅓ cup whole milk
- ⅛ teaspoon ground cinnamon (optional, just a whisper)
- Salt and white pepper to taste
For Assembly:
- 4 poblano peppers
- Seeds from ½ pomegranate (about ¾ cup)
- ¼ cup loosely packed fresh cilantro leaves
- 2 tablespoons roasted sliced almonds for garnish
Prepare the Filling:
-
Heat olive oil in a large skillet over medium heat. Add the diced onion and cook for 2 to 3 minutes until it becomes softened and translucent.
-
Add the ground pork and cook, breaking it apart with a wooden spoon as it cooks, for 5 to 7 minutes until the meat loses its pink color and begins to brown slightly. Drain excess fat if necessary.
-
Stir in the minced garlic and cook for another minute until fragrant. Add the diced apple, pear, raisins, almonds, and pine nuts. Cook for 3 to 4 minutes, stirring occasionally, until the fruit softens slightly and the flavors meld.
-
Stir in the cilantro, cinnamon, and cloves. Taste and season with salt and pepper. The filling should taste sweet and savory at once—a pleasant surprise of flavors. If it seems too dry, add a splash of water. Set aside to cool slightly.
Make the Walnut Sauce:
-
Blanch the walnuts by pouring boiling water over them and letting them sit for 2 to 3 minutes, then drain and cool. Rub them gently between your fingers to remove the papery skins. This step removes bitterness and makes the sauce lighter and more refined.
-
Place the blanched walnuts into a blender with the crema, milk, and a pinch of cinnamon (if using). Blend on high speed for 2 to 3 minutes until completely smooth and creamy. The sauce should be thick enough to coat a spoon but still pourable. If it’s too thick, add milk 1 tablespoon at a time.
-
Strain the sauce through a fine-mesh sieve for an ultra-silky texture, pressing gently with the back of a spoon (or skip this step if you prefer a slightly more rustic sauce). Season with salt and white pepper. Set aside.
Prepare the Peppers:
-
Roast the poblano peppers directly over a gas flame using tongs, turning slowly until the entire skin is blackened and blistered (about 8 to 10 minutes). This step is identical to the chiles rellenos preparation.
-
Place the charred peppers into a plastic bag or cover with plastic wrap and let sit for 5 to 10 minutes to steam.
-
Gently remove the charred skin under cool running water, rubbing softly to avoid tearing the flesh. Make a lengthwise slit along one side of each pepper and carefully remove seeds and membranes while keeping the stem intact.
-
Pat the peppers dry gently. Stuff each one with a generous portion of the filling, about ½ to ¾ cup depending on the size of the pepper.
Assemble and Serve:
-
Spoon a generous pool of the walnut sauce onto each serving plate. Place a stuffed chile on top of the sauce.
Advertisements -
Scatter pomegranate seeds over each chile—these provide pops of tartness and brightness against the rich sauce.
-
Sprinkle fresh cilantro leaves and roasted almonds over the top.
-
Serve at room temperature or slightly warm. This dish actually shows its flavors better when not piping hot, so don’t rush to the table straight from the stove.
Pro Tips and Variations
Where to find walnuts: Blanching walnuts takes extra time but absolutely transforms the sauce from bitter to beautifully refined. It’s worth seeking out raw walnuts and doing this step rather than using pre-blanched ones, which often taste stale.
Ingredient substitutions: If you can’t find Mexican crema, a mixture of heavy cream and crème fraîche in equal parts works perfectly. If Mexican groceries aren’t available, you can substitute pork with ground chicken or beef without issue.
Make-ahead strategy: The filling can be made a full day ahead and refrigerated. The walnut sauce can also be made the morning of serving. Prepare and stuff the peppers a few hours before serving, then assemble with sauce and garnish just before plating.
Storage and leftovers: This dish tastes different (and many say better) the next day as flavors settle. Store in an airtight container for up to 3 days. Serve at room temperature or very gently warmed—never in the microwave, which will make the sauce break.
3. Pozole Rojo with All the Toppings
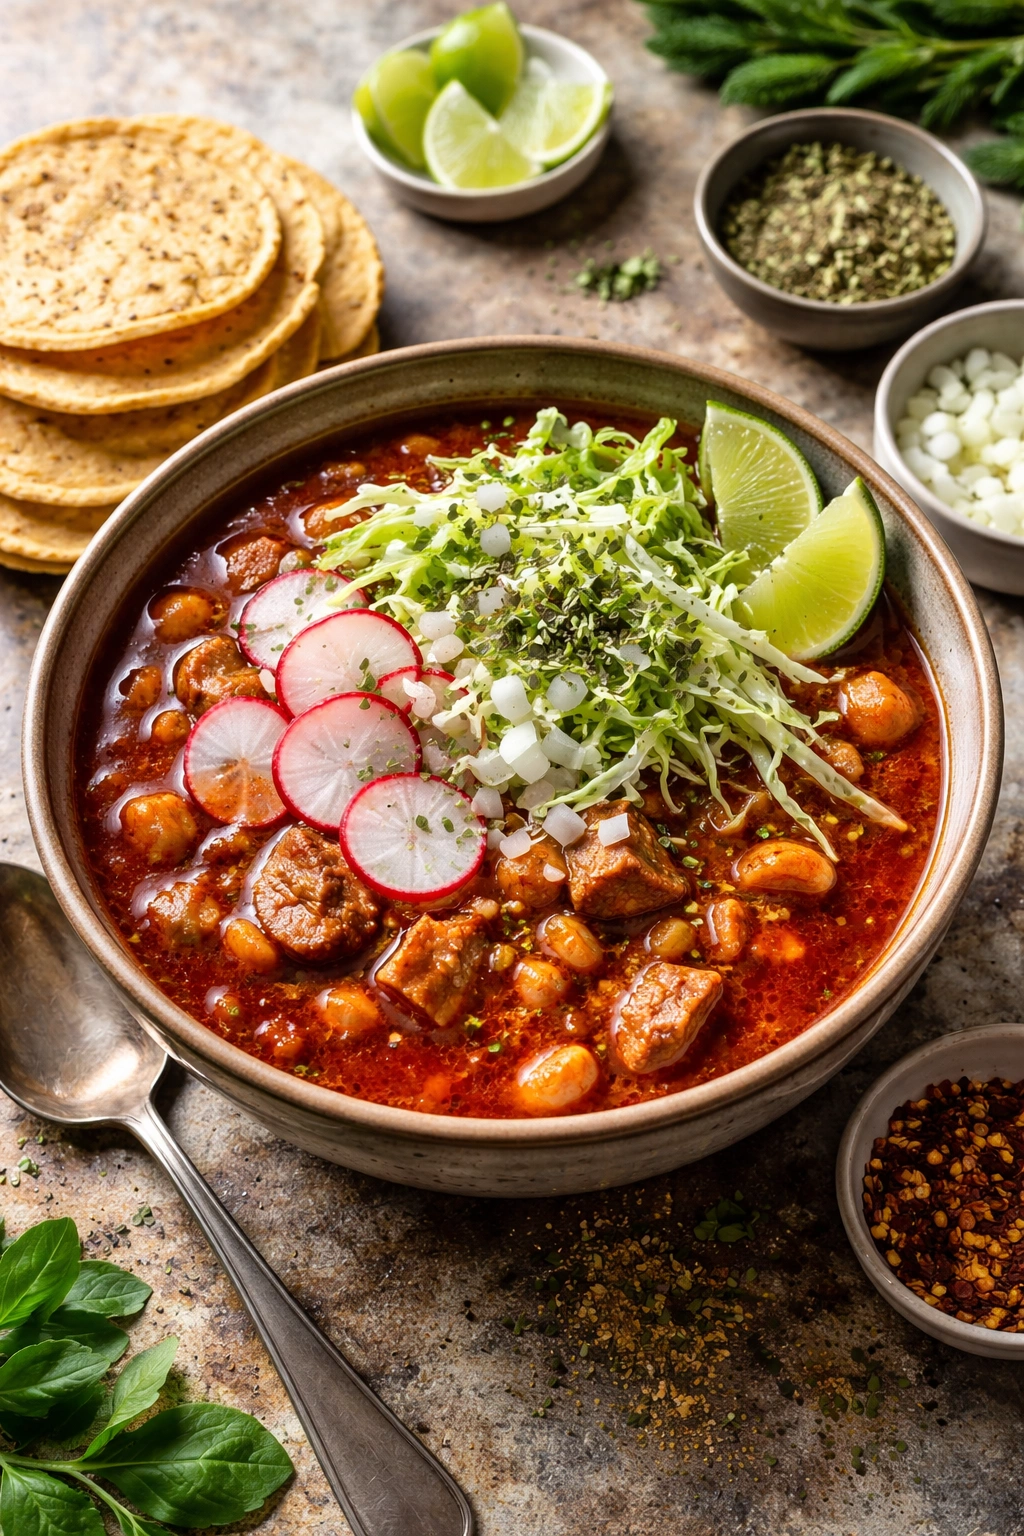
Pozole rojo is the celebration dish, the one that appears at Christmas, New Year’s Eve, and whenever there’s reason to gather. It’s a warming broth studded with tender hominy, flavored with dried chiles and garlic, and topped with an almost overwhelming abundance of fresh garnishes—shredded cabbage, radishes, lime, oregano, and crispy tostadas. What makes pozole different from regular soups is the hominy, which is corn kernels that have been treated with lye to remove the hull and germ. This transforms the corn into something entirely different—tender, slightly sweet, and completely satisfying.
Yield: Serves 6 to 8
Prep Time: 15 minutes
Cook Time: 2 hours
Total Time: 2 hours 15 minutes
Difficulty: Beginner — Long cooking time, but very straightforward. Most of the time is just letting the broth simmer.
For the Pozole:
- 2 pounds pork shoulder or butt, cut into large chunks (about 2 to 3 inches)
- 1 white onion, quartered
- 6 cloves garlic, peeled
- 2 teaspoons salt (plus more to taste)
- 8 cups water
- Two 29-ounce cans hominy, drained and rinsed (or three 15-ounce cans)
For the Red Chile Sauce (Guajillo-Based):
- 6 dried guajillo chiles, seeds and stems removed
- 3 cloves garlic, roughly chopped
- ½ teaspoon dried oregano
- ¼ teaspoon cumin seeds
- 2 cups broth reserved from cooking the pork
- Salt and black pepper to taste
For Serving (the Toppings Matter!):
- 4 cups finely shredded green cabbage
- 1 bunch radishes, very thinly sliced
- 3 limes, cut into wedges
- ½ cup fresh cilantro leaves
- 2 teaspoons dried oregano
- Crispy tortilla chips or fried tortilla strips
- Sliced jalapeños (optional, for heat)
- Diced white onion (optional)
Cook the Pork:
-
Place the pork chunks in a large pot and cover with the 8 cups of water. Add the quartered onion, 6 cloves of garlic, and 2 teaspoons of salt. Bring to a boil over high heat, then immediately reduce to a gentle simmer.
-
Skim any foam that rises to the surface during the first few minutes of cooking. Simmer uncovered for 1 hour, until the pork is completely tender and easily pulls apart when tested with a fork. The meat should shred easily but not be falling apart yet.
-
Remove the pork pieces to a bowl and set aside. Strain the broth through a fine-mesh sieve into a clean pot, discarding the onion and garlic solids. You should have about 6 to 7 cups of broth remaining. Set aside 2 cups for the chile sauce, and keep the rest in the pot for the final pozole.
Make the Red Chile Sauce:
-
While the pork is cooking, prepare the chiles. Heat a dry skillet over medium heat. Add the guajillo chiles (after seeds and stems are removed) and toast them for 1 to 2 minutes, pressing them against the hot surface just until they become fragrant. Be very careful not to burn them, which will make the sauce bitter.
-
Remove the toasted chiles to a bowl and cover with very hot water. Let them soak for 10 to 15 minutes until they’re soft and hydrated.
-
Drain the softened chiles and place them in a blender with the 3 cloves of garlic, oregano, cumin seeds, and the 2 cups of reserved pork broth. Blend on high speed until completely smooth, about 1 to 2 minutes. If the sauce seems too thick, add a splash more broth.
Advertisements -
Strain the chile sauce through a fine-mesh sieve into the pot with the remaining broth, pressing gently on the solids to extract all the liquid. This step removes any remaining chile skin particles and makes the sauce silky. Season with salt and pepper to taste. The sauce should taste deeply savory with a mild chile heat—not spicy, but flavorful.
Assemble the Pozole:
-
Return the cooked pork to the pot with the broth and chile sauce. Stir in the drained hominy. Bring the whole thing to a gentle simmer and cook for an additional 15 to 20 minutes, allowing the flavors to meld together. The hominy will warm through and absorb some of the broth flavor.
-
Taste and adjust seasoning with salt and pepper. The broth should taste rich, garlicky, and warming—deeply savory without being spicy.
Serve:
-
Ladle the pozole into large bowls, making sure each bowl gets a generous amount of pork, hominy, and broth. Serve with all the toppings arranged on the side (in separate bowls if you’re serving a crowd).
-
Let each diner add toppings to taste—some people pile on cabbage and radishes, others prefer just a squeeze of lime and a sprinkle of oregano. There’s no “right” way to eat pozole; the fun is in customizing it.
Key Tips and Variations
About hominy: Canned hominy is convenient and produces excellent results. If you want to make pozole with dried hominy from scratch, you’ll need to soak and cook it for several hours first, but the flavor is slightly more authentic.
Chile options: Guajillo chiles give pozole its characteristic mild, slightly sweet flavor. If you prefer more heat, substitute ancho chiles or add a dried árbol chile or two. If you can’t find guajillos, a combination of ancho and New Mexico chiles works well.
Make-ahead advantage: Pozole actually tastes better the next day or even two days later. Make it completely through step 8, cool, and refrigerate. Reheat gently on the stovetop before serving. The pork will shred even more easily once cooled and reheated.
Storage: Keep pozole in an airtight container in the refrigerator for up to 4 days, or freeze the soup portion (without toppings) for up to 3 months. Reheat gently on the stove, adding a splash of broth if it thickens too much.
Vegetarian version: For vegetarian pozole, omit the pork and use vegetable broth instead. Cook extra vegetables like zucchini, potatoes, or mushrooms in the broth to add substance.
4. Chicken Enchiladas Verdes with Sour Cream Sauce
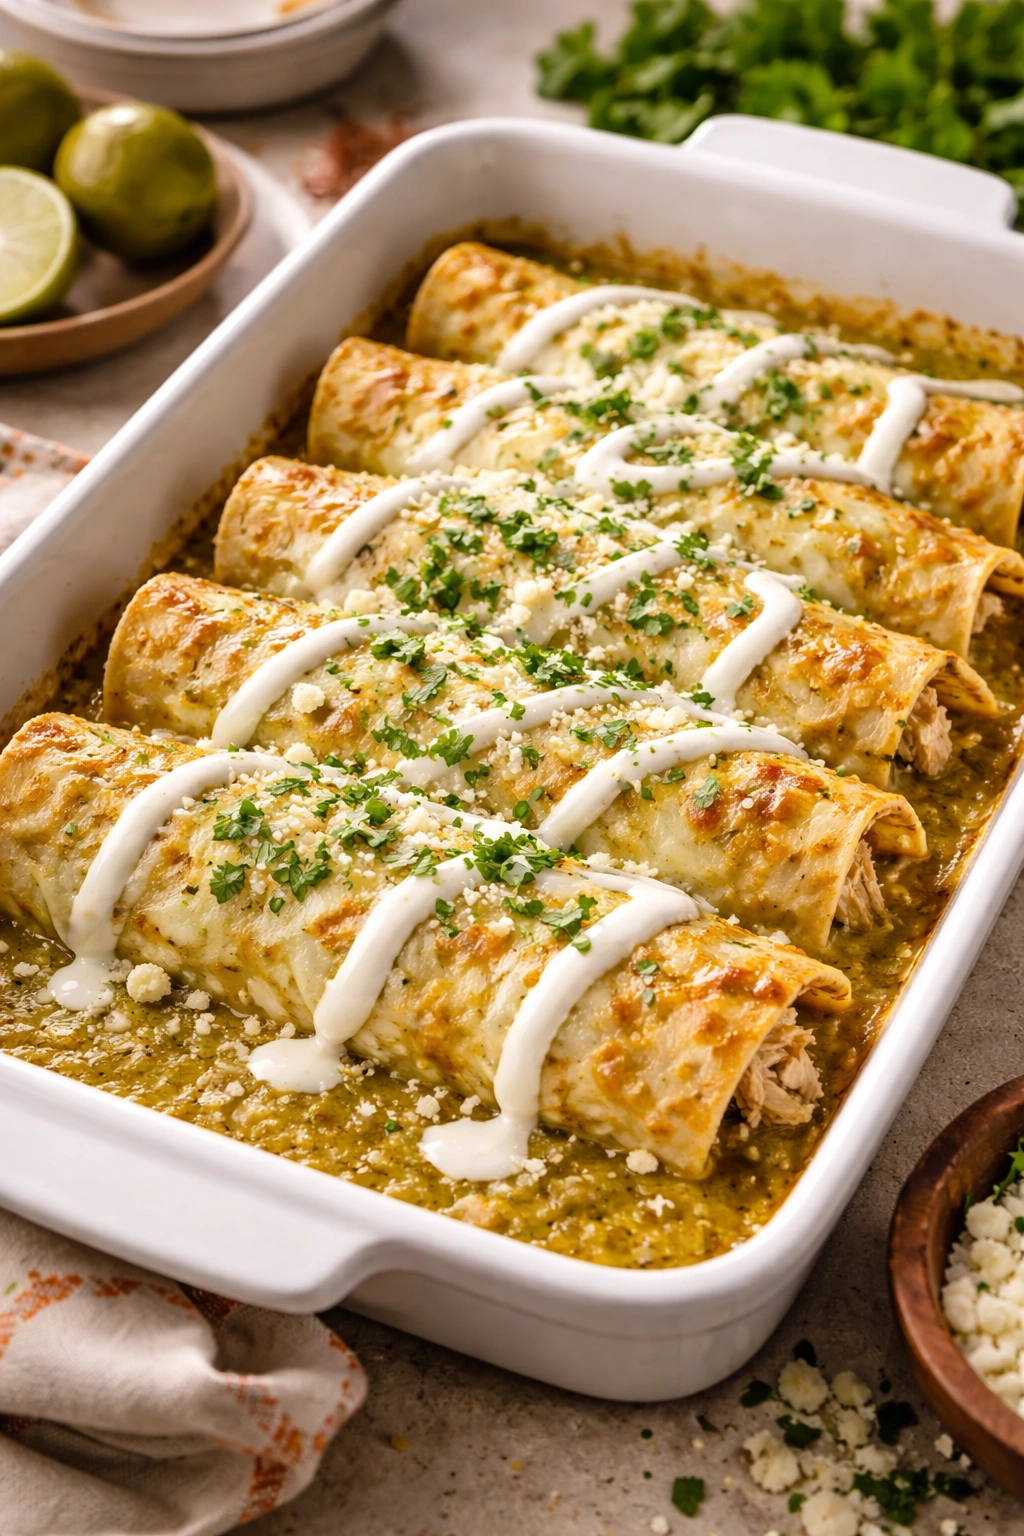
Chicken enchiladas in green sauce are Mexico’s answer to a cozy, comforting casserole. Soft corn tortillas are filled with shredded chicken, rolled tightly, nestled in a baking dish, and covered with a silky green sauce made from tomatillos, jalapeños, and cilantro. Topped with melted cheese and Mexican crema or sour cream, they emerge from the oven bubbling and aromatic. This isn’t fancy food, but it’s deeply satisfying food that tastes like home.
Yield: Serves 4 (makes 8 enchiladas)
Prep Time: 30 minutes
Cook Time: 30 minutes
Total Time: 1 hour
Difficulty: Intermediate — Several components but mostly straightforward assembly and baking. Nothing overly technical.
For the Sauce:
- 1 pound fresh tomatillos, husked and rinsed (or one 13-ounce can, drained)
- 2 jalapeños, roughly chopped (seeds removed for less heat)
- ⅓ cup roughly chopped fresh cilantro
- 2 cloves garlic, minced
- ½ cup Mexican crema or sour cream
- ½ cup chicken broth
- ¼ teaspoon ground cumin
- Salt to taste
For the Enchiladas:
- 2 tablespoons olive oil
- 1 small white onion, diced
- 1 pound boneless, skinless chicken breasts (or thighs for more flavor)
- 2 cups chicken broth
- 2 cloves garlic, smashed
- Salt and black pepper
- 8 corn tortillas (fresh is much better than stale)
- 1½ cups shredded Oaxaca or mozzarella cheese
- ½ cup crema or sour cream (for topping)
- Handful of fresh cilantro for garnish
Cook the Chicken:
-
Place the chicken breasts in a pot and cover with the 2 cups of broth. Add the 2 smashed cloves of garlic, a pinch of salt, and several grinds of black pepper. Bring to a boil, then reduce to a simmer.
-
Simmer for 12 to 15 minutes, until the chicken is completely cooked through and no longer pink in the center. Remove the chicken to a cutting board and let it cool slightly, then shred it into bite-sized pieces with two forks. You should have about 2 cups of shredded chicken. Set aside.
Make the Green Sauce:
-
If using fresh tomatillos, cut them in half and roast them cut-side down on a baking sheet at 425°F (220°C) for 8 to 10 minutes, until they collapse and the cut sides begin to brown. This step caramelizes them slightly and deepens the flavor (you can skip this if you prefer a brighter, fresher sauce).
-
Place the tomatillos (roasted or raw), jalapeños, cilantro, and garlic into a blender. Blend until completely smooth, about 1 minute.
-
Pour the tomatillo mixture into a saucepan over medium heat. Stir in the crema or sour cream and chicken broth, then add the cumin. Simmer gently for 8 to 10 minutes, stirring occasionally, until the sauce reduces slightly and any raw garlic flavor mellows out.
-
Taste and season with salt. The sauce should taste bright, slightly tangy, and fresh—not too thick, but not watery either. If it’s too thick, add a splash more broth.
Assemble the Enchiladas:
-
Preheat the oven to 350°F (175°C). Pour a thin layer of the green sauce (about ½ cup) into the bottom of a 9×13-inch baking dish.
-
Warm the tortillas briefly so they become pliable—either in a dry skillet for about 15 seconds per side, over an open flame, or wrapped in a damp towel in the microwave for 30 seconds. Warm tortillas won’t crack when you roll them.
-
To assemble each enchilada: Place about ¼ cup of the shredded chicken and 2 tablespoons of cheese down the center of a warm tortilla. Roll the tortilla tightly, starting from one side and rolling toward you, so the seam ends up on the bottom. Place it seam-side down in the baking dish.
-
Continue with all 8 tortillas, arranging them in two rows in the baking dish. They should fit snugly but not be squeezed in too tightly.
-
Pour the remaining green sauce evenly over the enchiladas, making sure to coat them all. Drizzle the ½ cup of crema or sour cream over the top in thin ribbons, then scatter the remaining cheese.
Advertisements
Bake and Serve:
-
Bake for 25 to 30 minutes, until the sauce is bubbling at the edges and the cheese is melted and just beginning to brown in spots.
-
Remove from the oven and let rest for 5 minutes—this helps the enchiladas hold together when you plate them. Garnish with fresh cilantro and serve immediately.
Variations and Pro Tips
Cheese options: Oaxaca cheese is traditional and melts beautifully. If you can’t find it, fresh mozzarella, Chihuahua cheese, or even good-quality jack cheese works well. Avoid pre-shredded cheese if possible—it contains anti-caking agents that prevent smooth melting.
Shortcut option: If poaching chicken feels like an extra step, buy a rotisserie chicken and shred the meat. It’s convenient and tastes great.
Make-ahead strategy: You can assemble the enchiladas completely through step 11 up to 8 hours ahead. Cover with plastic wrap and refrigerate. Bake directly from the fridge, adding 5 to 10 extra minutes to the cooking time.
Sauce variations: To make a richer sauce, substitute some of the broth with heavy cream. For more depth, add ½ teaspoon of cumin or a squeeze of lime juice.
Storage: Leftover enchiladas keep for up to 3 days in the refrigerator. Reheat gently, covered with foil, at 300°F (150°C) for 15 to 20 minutes to avoid drying them out.
5. Carne Guisada with Flour Tortillas
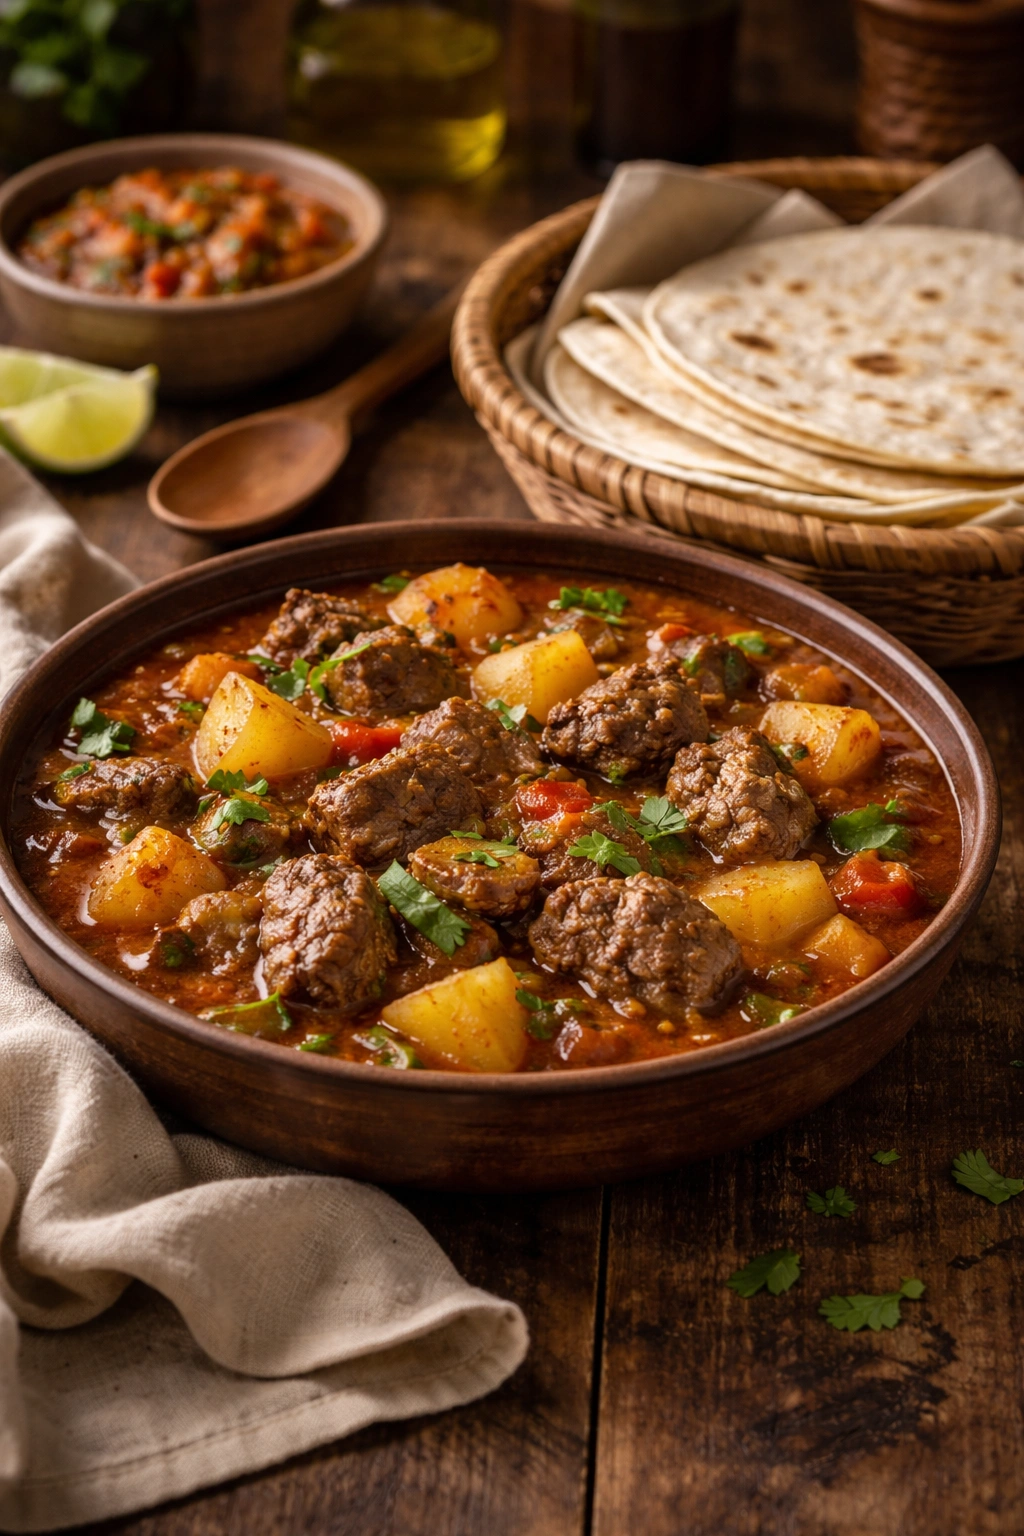
Carne guisada is a rustic, deeply satisfying stew of beef braised slowly with tomatoes, onions, potatoes, and chiles until the meat becomes fall-apart tender and the broth becomes rich and thick. It’s the kind of food that makes your kitchen smell incredible and reminds you why comfort food matters. Served with warm flour tortillas for scooping up the broth and meat, it’s simple, unpretentious, and absolutely delicious.
Yield: Serves 6
Prep Time: 20 minutes
Cook Time: 1 hour 45 minutes
Total Time: 2 hours 5 minutes
Difficulty: Beginner — Just browning meat and letting it simmer. Very forgiving and hard to mess up.
Ingredients:
- 2 pounds beef chuck or stew meat, cut into 1-inch cubes
- 3 tablespoons vegetable oil
- 1 large white onion, diced
- 4 cloves garlic, minced
- 2 poblano peppers or 2 Anaheim peppers, diced (or one 4-ounce can diced roasted chiles)
- 1 pound russet potatoes, peeled and cut into ½-inch cubes
- 1 can (14.5-ounce) diced tomatoes with green chiles (like Rotel brand), with juice
- 1 can (6-ounce) tomato paste
- 2 cups beef broth
- 1 teaspoon ground cumin
- ½ teaspoon dried oregano
- ½ teaspoon paprika
- Salt and black pepper to taste
- Fresh flour tortillas for serving
Brown the Meat:
-
Pat the beef cubes dry with paper towels—this helps them brown better. Heat the oil in a large heavy pot or Dutch oven over medium-high heat until shimmering.
-
Working in batches so you don’t crowd the pan, add the beef cubes and brown them on multiple sides, about 8 to 10 minutes total. You’re not cooking them through, just creating a flavorful brown crust. Transfer the browned beef to a plate and set aside.
-
Reduce the heat to medium. Add the diced onion to the same pot (the browned bits on the bottom are liquid gold) and cook for 3 to 4 minutes until the onion softens and becomes translucent.
-
Add the minced garlic and cook for another minute until fragrant. Stir in the diced poblano peppers (if using fresh; skip this step if using canned) and cook for 2 minutes.
Build the Stew:
-
Stir in the tomato paste and cook for about 1 minute, stirring constantly so it doesn’t stick. This concentrates and darkens the paste slightly.
-
Add the diced tomatoes with their juice, the beef broth, the potatoes, and the canned roasted chiles (if using instead of fresh). Stir in the cumin, oregano, and paprika.
-
Return the browned beef to the pot, stirring to combine. Bring the mixture to a simmer over medium-high heat.
Advertisements -
Once simmering, reduce the heat to low, partially cover the pot, and simmer gently for 1 hour to 1 hour 30 minutes. The meat should become very tender and the potatoes should be completely cooked through. Stir occasionally, about every 20 minutes, to ensure even cooking.
-
The stew is done when the beef shreds easily when pulled with a fork and the potatoes are completely soft. Taste and season generously with salt and black pepper. The broth should taste rich, savory, and warming.
Serve:
- Serve the carne guisada in wide bowls, making sure each serving has plenty of meat, potatoes, and broth. Accompany with warm flour tortillas for scooping and wrapping.
Tips and Make-Ahead Notes
Beef selection: Chuck roast is ideal because it becomes tender with long cooking. Stew meat sometimes comes pre-cubed; just make sure the pieces are roughly 1 inch in size. Avoid very lean cuts like sirloin, which can become tough.
Chile choice: Fresh poblano or Anaheim peppers taste better than canned, but canned roasted chiles are convenient and work very well. If using canned, add them to the pot in step 6 instead of step 4.
Make-ahead and freezing: Carne guisada is excellent made a day ahead—the flavors actually deepen overnight. Cool completely, refrigerate, and reheat gently on the stovetop. The stew also freezes beautifully for up to 3 months.
Slow cooker method: Brown the meat and onions on the stovetop as directed in steps 1-4, then transfer everything (including the browned meat) to a slow cooker with all the remaining ingredients. Cook on low for 6 to 8 hours or on high for 3 to 4 hours.
6. Tamales Rojos with Cheese and Rajas
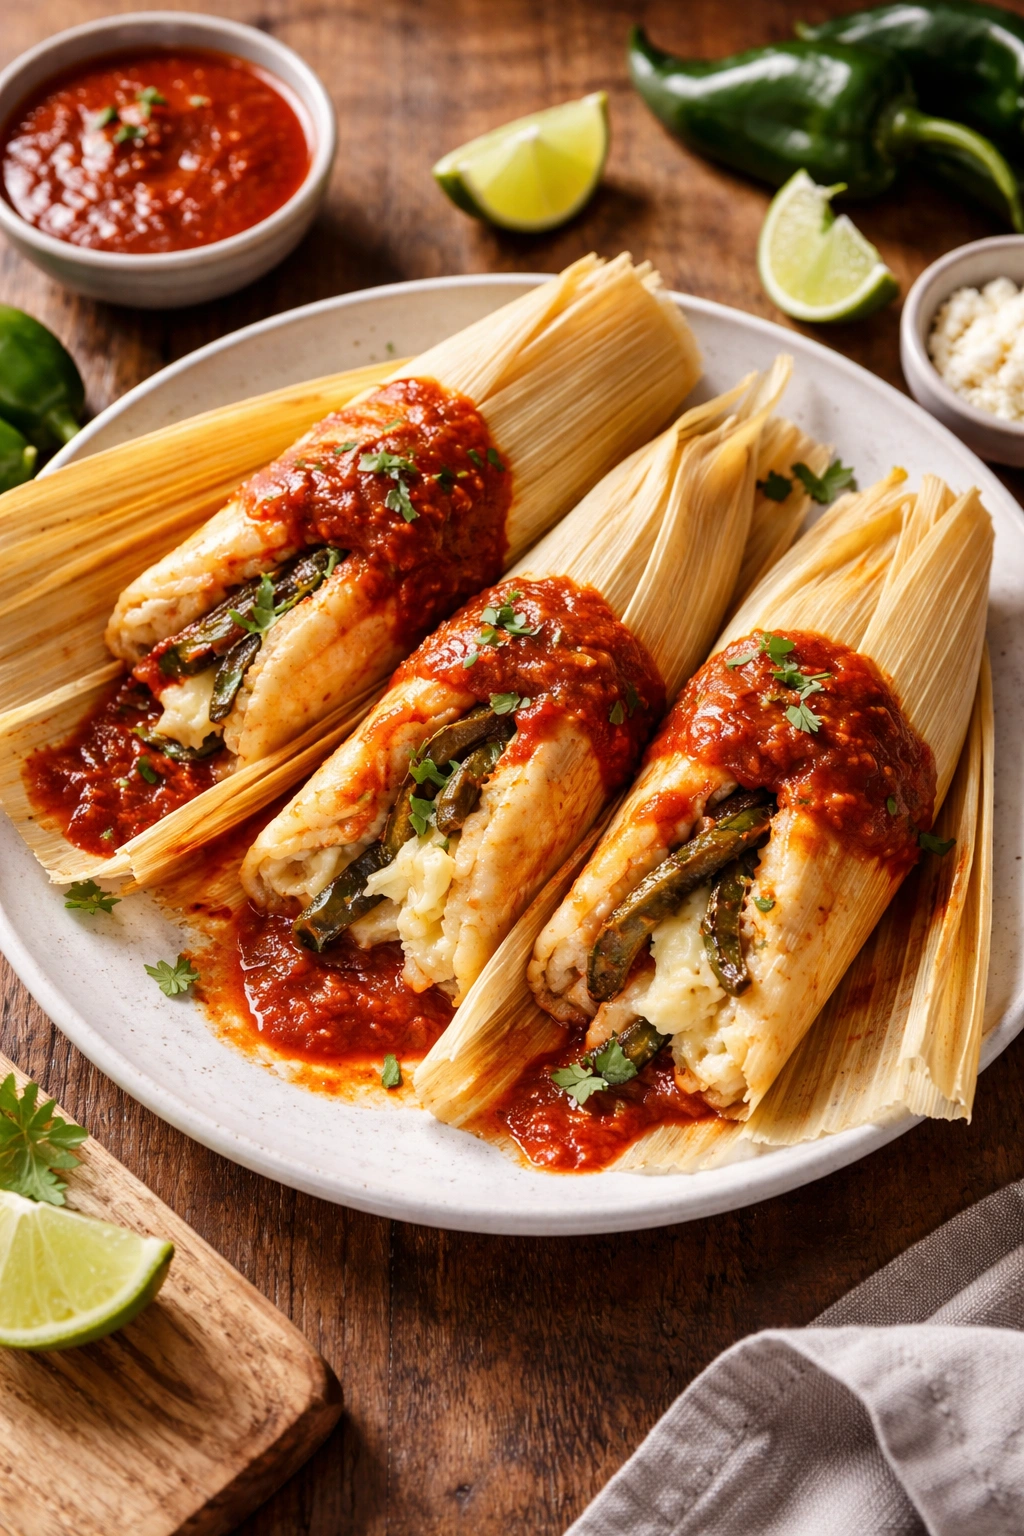
Tamales are one of Mexico’s most iconic and beloved foods—corn masa (dough) flavored with lard and broth, filled with cheese and poblano strips (rajas) or shredded chicken, wrapped in corn husks, and steamed until light and tender. Making tamales is traditionally a community event involving several people and many hours of work, but you can absolutely make them at home for a satisfying (if time-consuming) cooking project. The reward is tamales that taste infinitely better than store-bought versions.
Yield: Makes about 30 tamales (serves 8 to 10)
Prep Time: 1 hour (including soaking corn husks)
Cook Time: 45 minutes
Total Time: 1 hour 45 minutes, plus resting
Difficulty: Intermediate — The technique is straightforward, but there’s a fair bit of prep work and assembly. Best done with a friend.
For the Corn Husks:
- About 50 dried corn husks (one large package), soaked in hot water for at least 30 minutes until pliable
For the Red Chile Sauce (for Tamale Filling):
- 4 dried guajillo or ancho chiles, seeds and stems removed
- 2 cups chicken or vegetable broth
- 2 cloves garlic, roughly chopped
- ½ teaspoon cumin seeds
- Salt to taste
For the Masa (Dough):
- 1 pound (4 sticks) unsalted butter, softened to room temperature
- 4 cups prepared tamale masa flour (masa harina, such as Maseca brand)
- 1½ teaspoons baking powder
- 1 tablespoon salt
- 1½ cups warm chicken or vegetable broth
- 2 tablespoons sugar
For the Filling:
- 2 poblano peppers, roasted, peeled, and cut into strips (or one 7-ounce can roasted poblano strips)
- 2 cups shredded Oaxaca or mozzarella cheese
- 1 cup cooked shredded chicken (optional—tamales can be cheese and rajas only)
Prepare the Corn Husks:
- Place the dried corn husks in a large bowl or sink, cover with very hot water, and let soak for at least 30 minutes (up to 2 hours). The husks should become soft and pliable. Drain them and pat them dry.
Make the Red Chile Sauce:
-
Heat a dry skillet over medium heat. Add the dried chiles (after removing seeds and stems) and toast for 1 to 2 minutes until fragrant, pressing them against the hot pan. Be careful not to burn them.
-
Remove the toasted chiles to a bowl, cover with the warm broth, and let soak for 15 to 20 minutes until softened.
-
Place the softened chiles, soaking broth, garlic, and cumin seeds in a blender and blend until completely smooth. Strain through a fine-mesh sieve into a bowl, pressing to extract all liquid. Season with salt. You should have about 2 cups of sauce.
Make the Masa:
-
In a large bowl, beat the softened butter on medium speed with an electric mixer for 3 to 4 minutes until pale and fluffy. Scrape down the sides and beat for another minute.
Advertisements -
In a separate bowl, whisk together the masa flour, baking powder, and salt.
-
Gradually add the masa flour mixture to the beaten butter, alternating with the warm broth. Begin and end with the flour mixture (flour — broth — flour — broth — flour). Mix on low speed, scraping down the sides frequently, until everything is combined. Add the sugar and mix for 1 to 2 minutes more.
-
The finished masa should be light, fluffy, and spreadable—almost like a thick cake batter. To test if it’s ready, drop a small spoonful into a glass of cool water. It should float. If it sinks, beat the masa a bit more and test again.
Roast the Poblanos (If Using Fresh):
- If using fresh poblanos, roast them directly over a gas flame, turning with tongs until the entire skin is blackened, about 8 to 10 minutes. Place in a plastic bag to steam for 5 to 10 minutes, then peel off the charred skin under cool running water. Remove the seeds and membranes, then slice into strips. Set aside. (Skip this if using canned poblano strips.)
Assemble the Tamales:
-
To assemble each tamale: Lay a corn husk flat on your work surface. Spread about 1½ tablespoons of masa in the center of the husk, leaving space at the top and bottom. Don’t spread it too thin or too thick—about ¼ inch is right.
-
Place a strip or two of poblano and a small handful of cheese (about 1 tablespoon) in the center of the masa. If using cooked chicken, add a small amount alongside the cheese.
-
Fold the long sides of the husk toward the center, so they overlap slightly and encase the filling. Fold the pointed bottom end up. Leave the top end open or fold it over loosely—this is intentional to allow steam to reach the masa.
-
Stand the tamale upright in a steamer pot (with the open end facing up) or lay them on their side. Repeat with remaining husks and filling.
Steam the Tamales:
-
Add about 2 inches of water to a large pot with a steamer basket. Bring the water to a boil.
-
Carefully arrange the assembled tamales in the steamer basket, standing them upright or laying them on their side—they can be close together but shouldn’t be crammed. Drape extra corn husks over the top to help trap steam.
-
Cover the steamer pot with a lid and steam for 40 to 45 minutes. To test for doneness, remove one tamale and let it cool for a minute, then try to separate the masa from the husk. The masa should pull away cleanly without sticking to the husk. If it’s still sticky, steam for another 5 minutes and test again.
Serve:
- Remove the tamales from the steamer and let them rest for 5 to 10 minutes. Serve them in the corn husks, alongside the reserved red chile sauce for dipping.
Making Tamales Easier
Masa source: If making masa from scratch feels daunting, buy fresh prepared tamale masa from a Mexican bakery or market. It saves the beating step but still produces excellent results.
Freezing uncooked tamales: Assemble tamales as directed but don’t steam them. Freeze them on a baking sheet, then transfer to freezer bags. Steam directly from frozen, adding about 10 extra minutes to the cooking time.
Make-ahead fully cooked: Steamed tamales keep in the refrigerator for 4 to 5 days. Reheat them by steaming again for about 5 minutes, or wrap in a damp paper towel and microwave for 1 to 2 minutes.
7. Chilaquiles con Huevos for Breakfast
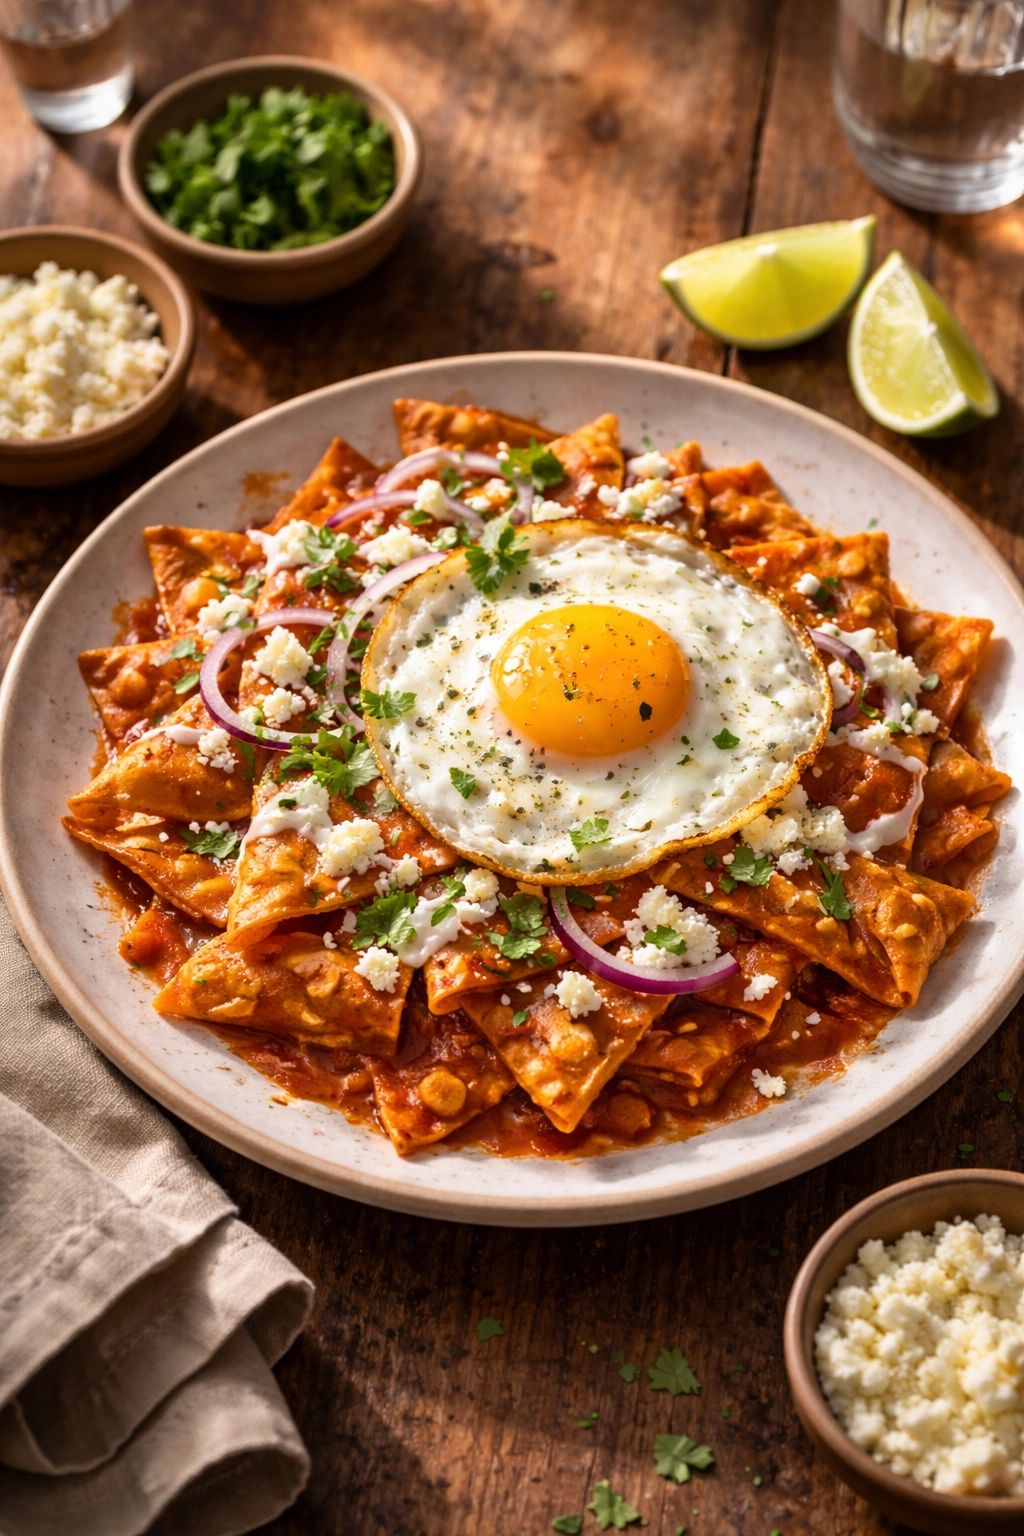
Chilaquiles are crispy tortilla chips simmered in a sauce (red or green) until they soften but still retain texture, then topped with a fried egg, fresh cheese, crema, and cilantro. It’s the perfect breakfast or brunch, a way to transform leftover tortillas into something irresistible, and proof that sometimes the simplest dishes are the most craveable.
Yield: Serves 4
Prep Time: 15 minutes
Cook Time: 20 minutes
Total Time: 35 minutes
Difficulty: Beginner — Quick cooking, minimal ingredients, hard to mess up.
For the Sauce:
- 2 tablespoons olive oil
- ½ white onion, diced
- 2 cloves garlic, minced
- 1 pound fresh tomatoes, diced (or one 14.5-ounce can diced tomatoes, undrained)
- 1 jalapeño, minced (seeds removed for less heat, optional)
- ½ teaspoon ground cumin
- Salt and black pepper to taste
- Pinch of sugar (if needed)
- ½ cup chicken broth
For the Chilaquiles:
- 6 cups crispy corn tortilla chips or fried tortilla strips (about 6 to 8 corn tortillas, cut into quarters and fried until crispy, or store-bought tortilla chips work in a pinch, though fresh fried are better)
- 4 large eggs
- Oil for frying the eggs
- ½ cup crumbled fresh cheese like queso fresco or Oaxaca cheese, torn into pieces
- ¼ cup Mexican crema or sour cream
- Handful of fresh cilantro leaves
- Lime wedges for serving
Make the Sauce:
-
Heat 2 tablespoons of olive oil in a large skillet over medium heat. Add the diced onion and cook for 2 to 3 minutes until softened.
-
Add the minced garlic and jalapeño (if using) and cook for another minute until fragrant.
-
Stir in the diced tomatoes with their juices, cumin, and chicken broth. Bring to a simmer.
-
Let the sauce simmer for 8 to 10 minutes, stirring occasionally, until it reduces slightly and the flavors meld. Taste and season with salt and pepper. If the sauce tastes too acidic, add a tiny pinch of sugar.
Cook the Chilaquiles:
-
Add the crispy tortilla chips to the simmering sauce and stir gently but thoroughly to coat all the chips. The chips will begin to soften immediately—this is exactly what you want.
-
Continue stirring occasionally for 3 to 5 minutes. The chips should soften enough to bite through easily but still have a little texture—they shouldn’t turn into mush. This happens quickly, so watch carefully.
-
Divide the chilaquiles among four plates, spooning extra sauce over each portion.
Advertisements
Fry the Eggs:
-
While the chilaquiles cook, heat about ¼ inch of oil in a small skillet over medium-high heat. When a drop of water sizzles immediately upon contact, carefully crack the eggs into the hot oil.
-
Fry the eggs sunny-side up (or to your preference) for 3 to 4 minutes, until the whites are set but the yolks are still runny. Baste them with hot oil once or twice during cooking if you’d like the yolks cooked slightly.
-
Transfer a fried egg to the center of each plate of chilaquiles.
Serve:
- Top each egg with a dollop of crema, a handful of crumbled cheese, and a sprinkle of fresh cilantro. Serve immediately with lime wedges on the side.
Shortcuts and Variations
Using store-bought chips: If you don’t want to fry your own tortilla strips, good-quality store-bought tortilla chips work fine, though the flavor and texture won’t be quite as good as freshly fried.
Making your own tortilla strips: Cut corn tortillas into quarters, let them air-dry for a few minutes, then fry in about ¼ inch of hot oil until golden and crispy, about 1 to 2 minutes. Drain on paper towels.
Green sauce version: Make the sauce using tomatillos and jalapeños instead of tomatoes for chilaquiles verdes. The ratio is about the same.
Protein variations: Add shredded chicken, crumbled chorizo, or black beans for a heartier version.
Make-ahead note: Make the sauce completely ahead and refrigerate. Reheat it before adding the chips. Fry the chips and eggs fresh just before serving—they don’t hold up well over time.
8. Mole Negro with Chicken
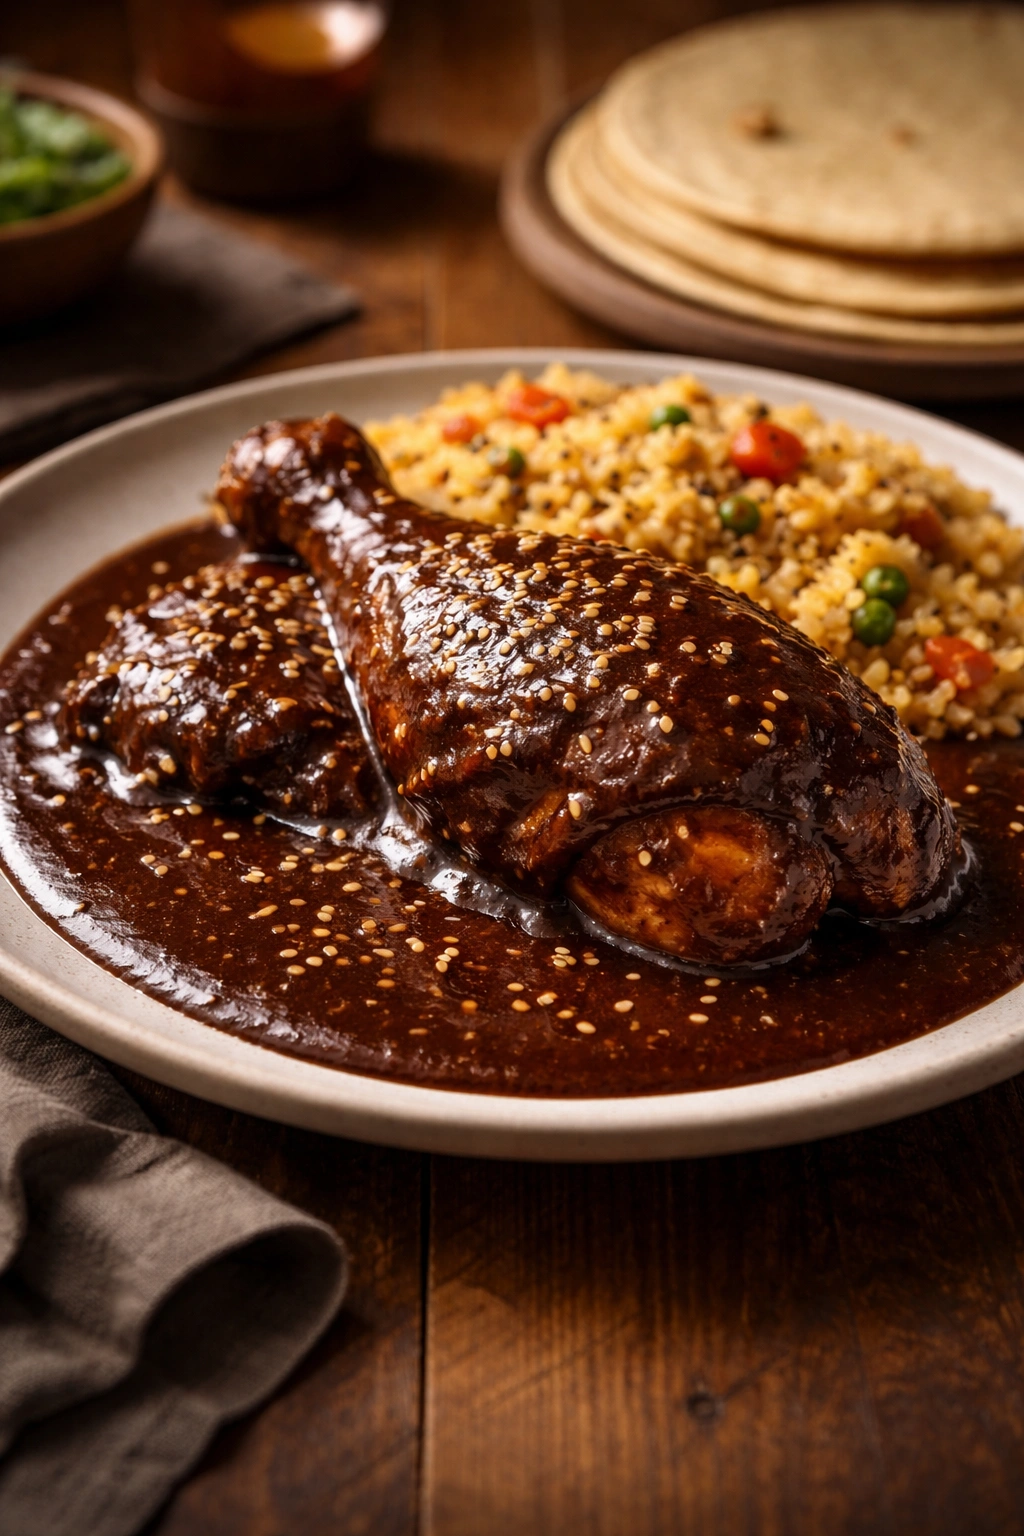
Mole negro is perhaps the most complex and revered sauce in all of Mexican cuisine—a dark, deeply flavored sauce built from dozens of ingredients including dried chiles, chocolate, spices, nuts, and seeds. The sauce simmers for hours, developing layers upon layers of flavor that are simultaneously sweet, savory, spicy, and bitter. Traditionally served over turkey, it’s equally delicious over chicken, and serving it shows real dedication to the craft of cooking.
Yield: Serves 8 to 10
Prep Time: 45 minutes
Cook Time: 2 hours 30 minutes
Total Time: 3 hours 15 minutes
Difficulty: Advanced — Long ingredient list and extended cooking time, but each step is straightforward. This is more of a marathon than a sprint.
For the Mole:
- 6 dried mulato chiles, seeds and stems removed
- 4 dried pasilla chiles, seeds and stems removed
- 3 dried ancho chiles, seeds and stems removed
- 3 dried guajillo chiles, seeds and stems removed
- 4 dried chile de árbol (optional, for more heat)
- ¼ cup sesame seeds
- ¼ cup raw almonds
- ¼ cup raw peanuts
- 2 tablespoons raw walnuts
- 2 tablespoons sunflower seeds
- 1 white onion, roughly chopped
- 6 cloves garlic, roughly chopped
- 2 tablespoons raisins
- 1 tablespoon dried oregano
- 1 teaspoon dried thyme
- 1 teaspoon dried marjoram
- ½ teaspoon ground cloves
- ½ teaspoon ground cinnamon
- ¼ teaspoon black peppercorns
- ¼ teaspoon fennel seeds
- ¼ teaspoon anise seeds
- 3 whole cloves
- 1 slice (about 1 ounce) Mexican chocolate or ¼ cup unsweetened cocoa powder
- 1 corn tortilla, torn into pieces
- 3 tablespoons lard or vegetable oil
- 4 cups chicken broth
- 2 tablespoons sugar
- Salt to taste
For Serving:
- 4 to 5 pounds chicken (a mix of thighs and breasts) or one whole chicken, cut into pieces
- Salt and pepper for seasoning
- 2 tablespoons sesame seeds for garnish
- Chopped fresh cilantro for garnish
Toast and Soak the Dried Chiles:
-
Heat a dry large skillet or griddle over medium heat. Working in batches, add the dried chiles (reserving the chile de árbol for last) and toast them, pressing gently against the hot surface for about 30 seconds to 1 minute per batch until they become fragrant. Be very careful not to burn them.
-
Remove each batch of toasted chiles to a large bowl. Once all chiles are toasted, cover them with very hot water and let them soak for 20 minutes until they’re softened and hydrated.
Toast the Seeds, Nuts, and Spices:
-
In the same dry skillet, toast the sesame seeds for 1 to 2 minutes, stirring constantly, until fragrant and lightly browned. Remove to a separate bowl.
-
Toast the almonds, peanuts, walnuts, and sunflower seeds together for 2 to 3 minutes, stirring frequently, until they’re fragrant and lightly browned. Remove to the bowl with the sesame seeds.
Advertisements -
Toast the oregano, thyme, and marjoram together for about 30 seconds just until fragrant, then transfer to a small bowl.
-
Toast the cloves, cinnamon, peppercorns, fennel seeds, and anise seeds together for about 1 minute until aromatic. Set aside.
Toast the Tortilla:
- Toast the torn tortilla pieces in the dry skillet for 1 to 2 minutes until they’re crispy and beginning to brown.
Begin Building the Mole:
-
Drain the softened chiles, reserving 2 cups of the soaking liquid. Place the chiles in a blender along with the onion, garlic, raisins, toasted seeds and nuts, toasted dried herbs, toasted spices, toasted tortilla, and the reserved chile soaking liquid.
-
Blend on high speed until completely smooth, about 3 to 4 minutes. You may need to do this in two batches depending on your blender size. Strain the mixture through a fine-mesh sieve, pressing with the back of a spoon to extract all the liquid and leave behind any skin particles.
Simmer the Mole:
-
Heat the 3 tablespoons of lard or oil in a large heavy pot over medium heat. Carefully pour in the strained mole mixture (it may splatter) and cook, stirring frequently, for 8 to 10 minutes. The mole will darken slightly and become more fragrant.
-
Add the chicken broth slowly while stirring, bringing it to a simmer. Crumble in the chocolate (or add cocoa powder) and stir until it dissolves completely.
-
Stir in the sugar and season with salt to taste. Reduce the heat to low.
Advertisements -
Let the mole simmer gently, stirring occasionally, for at least 1 hour (up to 2 hours is even better). The longer it simmers, the deeper and more complex the flavors become. The mole should darken further and thicken slightly. You can make mole several days ahead to this point—it actually tastes better once the flavors have settled.
Cook the Chicken:
-
While the mole is simmering, prepare the chicken. Season the pieces generously with salt and pepper.
-
Heat a large skillet with a little oil over medium-high heat. Brown the chicken pieces on both sides, about 4 to 5 minutes per side. The goal is to brown them for flavor, not cook them through—they’ll finish cooking in the mole.
-
Transfer the browned chicken pieces to the pot with the mole, stirring to coat them. Simmer gently for 30 to 40 minutes, until the chicken is completely cooked through and tender. The internal temperature should reach 165°F (74°C).
Serve:
- Transfer the chicken to a platter and pour the mole sauce over it. Garnish with sesame seeds and fresh cilantro. Serve with warm tortillas, Mexican rice, or black beans.
Pro Tips for Mole Success
Ingredient sourcing: Mexican grocery stores and online spice retailers will have dried chiles and Mexican chocolate. If you can’t find Mexican chocolate, use unsweetened cocoa powder plus a pinch of cinnamon and sugar.
Time investment: Yes, mole takes time, but much of it is passive simmering. Once you’ve done the initial prep, the most demanding part is over. The time investment pays off in complexity of flavor you simply cannot achieve faster.
Make-ahead advantage: Make the mole sauce completely a day or two ahead, cool, and refrigerate. Reheat gently, brown the chicken, and simmer in the reheated mole. This actually improves the flavor and makes the actual cooking day much easier.
Freezing: The finished mole sauce (without chicken) freezes exceptionally well for up to 3 months. Thaw in the refrigerator and reheat gently before using with fresh chicken.
Scaling up: Mole freezes beautifully, so many cooks make a large batch and have it on hand for quick, impressive dinners. Double or triple this recipe without issue.
Bringing Mexican Comfort Food Into Your Kitchen
These eight dishes represent the heart of Mexican home cooking—food that takes time, intention, and a genuine love for the people you’re feeding. None of them are quick weeknight dinners, but all of them are absolutely worth the investment.
The beautiful thing about learning to cook these recipes is that each one teaches you something about Mexican cooking technique. You’ll learn how to roast and peel chiles, how to coax layers of flavor from dried spices and chiles, how to build a rich sauce, how to achieve tender meat through long, slow cooking, and how to balance the sweet, savory, spicy, and tangy flavors that make Mexican cuisine so compelling.
Start with whichever dish calls to you most strongly. Make it for people you care about. And don’t be afraid to make it again—each time you cook it, you’ll understand the recipe more deeply and taste it more truly. That’s the real magic of cooking Mexican comfort food: it draws you back, invites you to practice and refine, and rewards your effort with meals that taste like home.