Middle Eastern cuisine is built on bold spices, sun-ripened vegetables, warm hospitality, and recipes that have been perfected over generations. These dishes sing with the flavors of cumin, cinnamon, sumac, and fresh herbs—they’re deeply satisfying, naturally shareable, and far easier to make at home than most people realize. Whether you’re seeking a light meze spread, a hearty main course, or a show-stopping dessert, these eight recipes deliver authentic flavor without requiring specialty equipment or impossible-to-find ingredients.
The beauty of Middle Eastern cooking lies in its simplicity and soul. You’ll find that many of these recipes come together with pantry staples you likely already have—olive oil, garlic, chickpeas, ground meat, and fresh herbs. What makes them extraordinary isn’t complexity; it’s the careful balance of flavors, the quality of your core ingredients, and the willingness to taste and adjust as you cook. Start with any recipe that calls to you, and I promise you’ll understand why these dishes have endured for centuries.
What you’re about to discover is that home versions of these beloved recipes taste better than most restaurant versions. You control the salt, the heat, the aromatics—everything. Once you make fresh hummus from dried chickpeas (not canned), taste real falafel while it’s still warm from the oil, or build your own lamb kofta with your hands, you’ll never go back to shortcuts again.
1. Silky Homemade Hummus
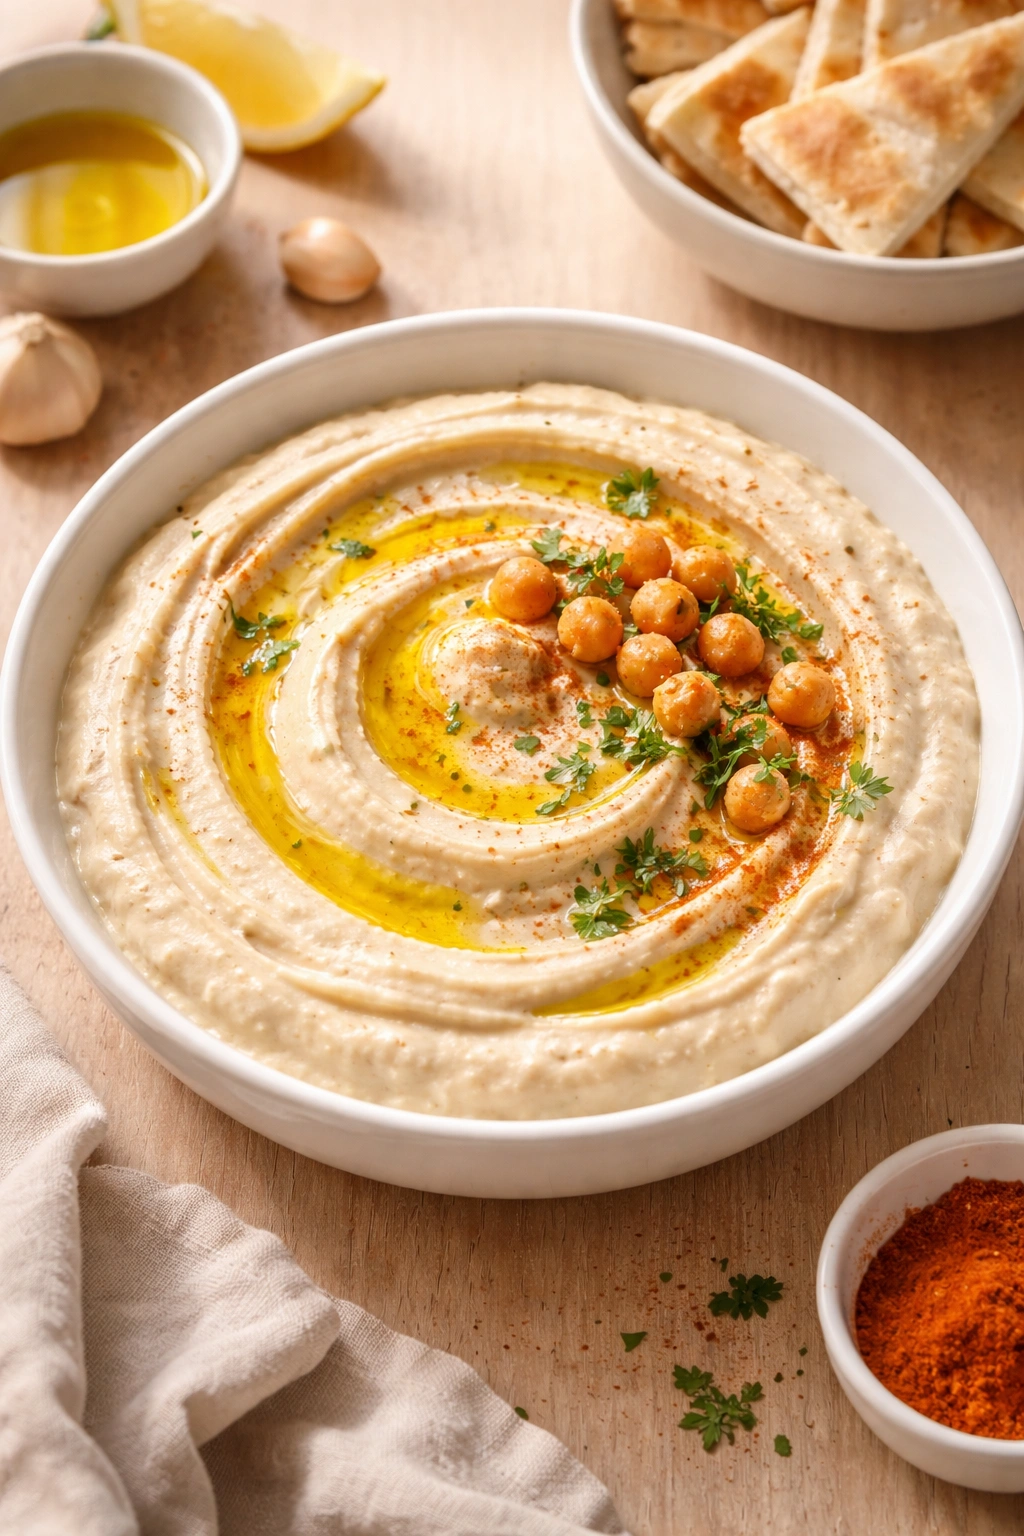
Hummus is the gateway to Middle Eastern cooking, yet nearly every version made outside the region gets it fundamentally wrong—overstuffed with tahini, too thick, lacking that ethereal lightness that makes authentic hummus irresistible. The secret isn’t a fancy technique; it’s starting with properly cooked dried chickpeas, using enough ice water, and blending with patience and confidence.
Yield: Makes about 2 cups | Prep Time: 10 minutes (plus overnight soaking and cooking time for dried chickpeas) | Cook Time: 1-1.5 hours for dried chickpeas | Total Time: Active time 10 minutes + overnight soak + 1.5 hours cooking | Difficulty: Beginner — The only real step is cooking chickpeas properly; the blending is straightforward.
For the Hummus:
- 1 cup dried chickpeas (or 2 cans / 15 oz each, rinsed and drained if using canned)
- ½ cup tahini, well-stirred
- 3 tablespoons fresh lemon juice (about 1 large lemon)
- 3-4 cloves garlic, minced
- ¾ teaspoon fine sea salt, plus more to taste
- ¼ teaspoon ground cumin
- 3-4 tablespoons ice water (add gradually as needed for texture)
- 2-3 tablespoons extra-virgin olive oil, for drizzling
- Pinch of smoked paprika or sumac (optional, for garnish)
- Fresh parsley, chopped (optional, for garnish)
Prepare the Chickpeas:
- If using dried chickpeas, soak them overnight in 3 cups cold water. Drain and rinse thoroughly the next morning.
- Place soaked chickpeas in a large pot, cover with fresh water by 2 inches, and bring to a boil. Reduce heat to a gentle simmer and cook for 1 to 1.5 hours, until the chickpeas are completely tender and the skin slips off easily when you blow on one. Do not skip this step — canned chickpeas produce a grainy, dense hummus, while properly cooked dried chickpeas yield that silky texture.
- Drain the hot chickpeas, reserving ½ cup of the cooking water. Spread them on a clean kitchen towel and rub gently to remove as many skins as possible (this step dramatically improves the final texture, though it’s optional).
Blend into Hummus: 4. Add the chickpeas, tahini, lemon juice, garlic, salt, and cumin to a food processor fitted with the blade attachment. 5. Blend on high speed for 2 minutes, until the mixture looks like wet sand — it will seem too thick at this point. This is the critical moment: with the processor running, drizzle in the reserved chickpea cooking water and the ice water, one tablespoon at a time, blending continuously for 3-5 full minutes. The hummus will suddenly transform into a cloud-like, glossy paste. 6. Taste and adjust: add more salt, lemon, cumin, or garlic as needed. The hummus should taste bright and boldly seasoned — it’s the base for many other dishes, so it needs to stand on its own. 7. Transfer to a shallow serving bowl, drizzle with olive oil, and sprinkle with paprika and fresh parsley if desired.
Why Dried Chickpeas Matter: Dried chickpeas have a natural starch that creates the velvety mouthfeel homemade hummus is famous for. Canned chickpeas are pre-cooked and much more dense — no amount of blending will rescue them. Yes, dried chickpeas require planning (soaking overnight, an hour of cooking), but this is one case where shortcuts genuinely compromise the result.
Pro tip: Save your chickpea cooking water in the fridge for up to four days. It’s liquid gold for adjusting hummus consistency without thinning the flavor with plain water.
Variations:
- Roasted red pepper hummus: Add ½ cup roasted red peppers (jarred is fine) to the food processor along with the chickpeas.
- Roasted garlic hummus: Replace raw garlic with 4-5 cloves of roasted garlic for a sweeter, mellower version.
- Black garlic hummus: Substitute half the tahini with black garlic paste (an increasingly available specialty ingredient) for earthy complexity.
Storage & Serving: Hummus keeps in an airtight container in the refrigerator for up to five days. It also freezes beautifully for up to three months — portion it into ice cube trays, then transfer to a freezer bag. Serve at room temperature with warm pita, fresh vegetables, or alongside other mezze dishes. Drizzle with more olive oil and a sprinkle of sumac just before serving for the most beautiful presentation.
2. Crispy Herb-Loaded Falafel
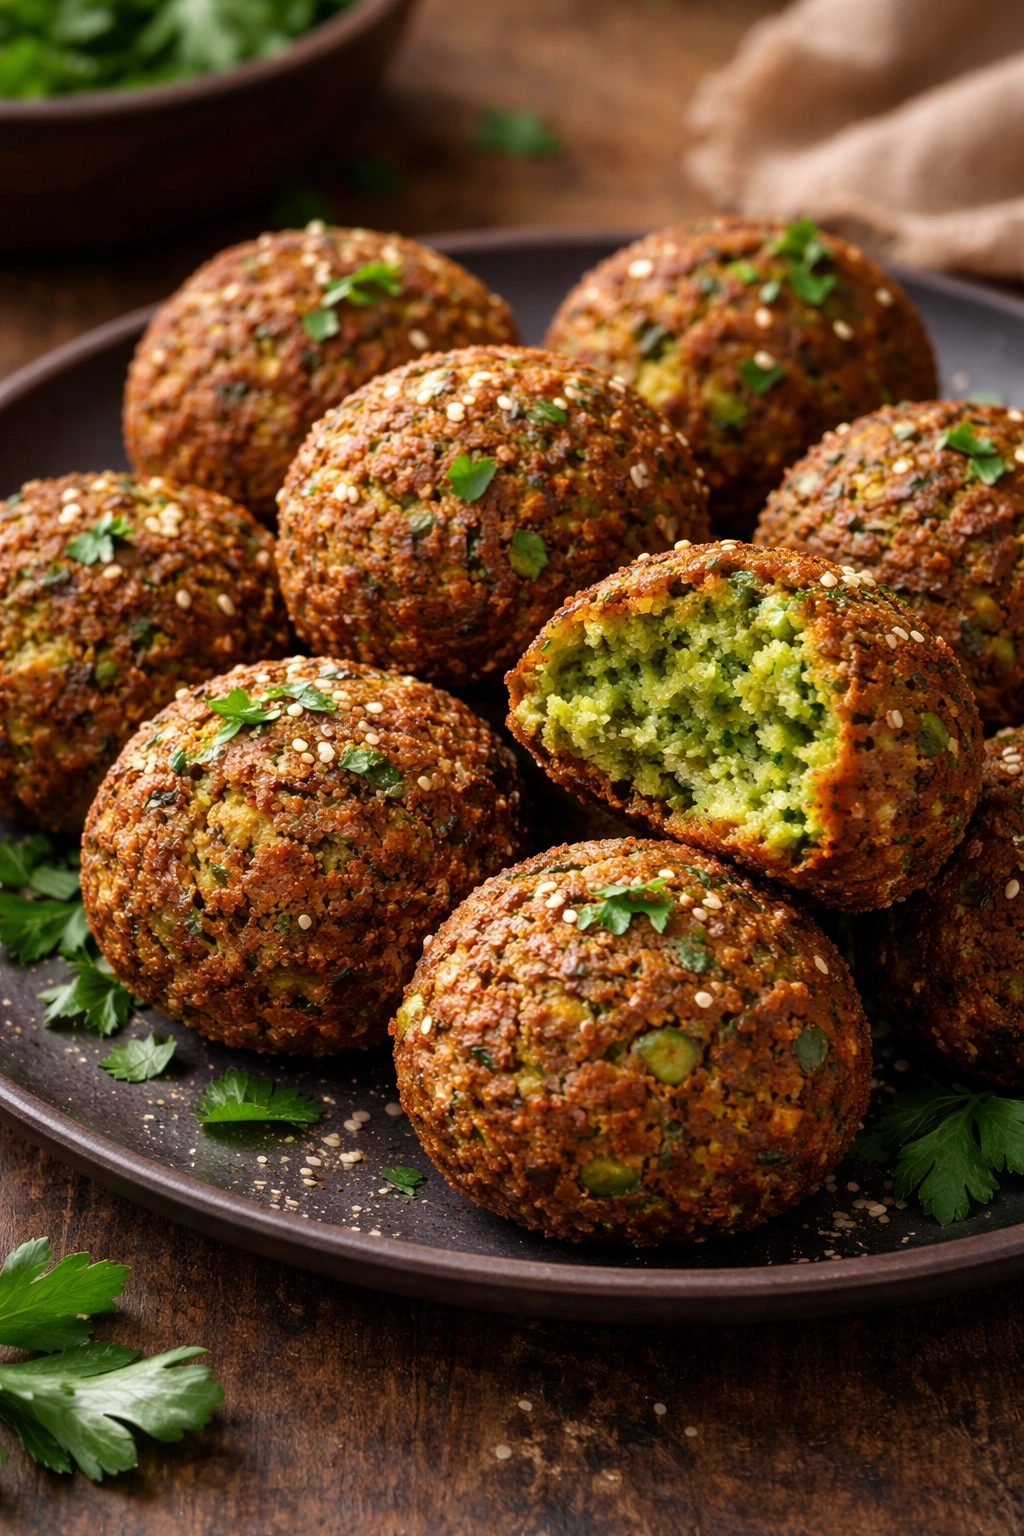
Falafel is where many home cooks struggle — they end up with dense, heavy balls that fall apart in the oil or stay raw inside. The secret is using dried (not canned) chickpeas, not adding baking powder or flour, chilling the mixture thoroughly, and maintaining oil temperature that’s hot enough to create a golden crust in under three minutes.
Yield: Makes about 16-18 falafel | Prep Time: 15 minutes (plus 1 hour chilling) | Cook Time: 12-15 minutes (for deep-frying) | Total Time: Active 15 minutes + 1 hour chill + 15 minutes frying | Difficulty: Intermediate — Frying requires attention to oil temperature, but the mixture is simple to make.
For the Falafel:
- 1 cup dried chickpeas, soaked overnight and drained (do NOT use canned)
- ½ medium yellow onion, roughly chopped
- 1 cup fresh parsley, packed
- ½ cup fresh cilantro, packed
- 3 tablespoons fresh dill (or 1 tablespoon dried dill)
- 4 cloves garlic, minced
- 1 teaspoon ground cumin
- 1 teaspoon ground coriander
- ½ teaspoon cayenne pepper
- ½ teaspoon black pepper
- 1 teaspoon fine sea salt
- ¼ teaspoon baking soda (not baking powder)
- 3 tablespoons all-purpose flour
- Vegetable oil for deep-frying (about 2 quarts)
Make and Chill the Mixture:
- Add the soaked and drained chickpeas, onion, parsley, cilantro, dill, garlic, cumin, coriander, cayenne, black pepper, and salt to a food processor.
- Pulse 10-15 times until the mixture resembles coarse breadcrumbs — the texture should be granular and crumbly, NOT smooth or paste-like. The mixture should hold together when you squeeze it, but individual chickpea bits should still be visible.
- Transfer to a bowl and sprinkle the baking soda and flour over the top. Fold gently to combine.
- Cover and refrigerate for at least 1 hour, preferably 2-4 hours. This resting time is essential — it allows the starches to hydrate and helps the falafel hold together during frying.
Fry the Falafel: 5. Heat the vegetable oil in a heavy-bottomed pot (or use a deep-fry thermometer) to exactly 350°F (175°C). Use enough oil that the falafel will be submerged by at least 2 inches. 6. Working in batches to avoid crowding the pan, use a falafel scoop (if you have one) or a tablespoon to form the mixture into compact balls or slightly flattened patties about 1.5 inches across. Gently lower them into the hot oil. 7. Fry for 2-3 minutes until the exterior is deep golden brown and crispy, turning once if needed to ensure even browning. The inside should still be moist and creamy, not completely dense. 8. Remove with a slotted spoon and drain on paper towels. Do not skip the draining step — it keeps falafel crispy rather than greasy.
Why Fresh Herbs Are Non-Negotiable: Dried herbs will make your falafel taste stale and one-dimensional. Fresh parsley, cilantro, and dill are what give authentic falafel its brightness and complexity. These herbs should make up nearly a quarter of your total mixture by weight — not a garnish, but a core component.
Pro tip: If your oil temperature dips below 325°F, pause and let it come back up before continuing to fry. Oil that’s too cool produces soggy, greasy falafel; oil that’s too hot (above 375°F) creates a burned exterior with a raw interior.
Variations:
- Spiced falafel: Add ½ teaspoon cinnamon and ¼ teaspoon allspice for warmth and depth.
- Herb-forward falafel: Increase fresh herbs to 1.5 cups total and reduce the onion to ¼ cup for a greener, more delicate flavor.
- Baked falafel: For a lower-fat version, form the chilled mixture into patties, brush with oil, and bake at 375°F (190°C) for 20-25 minutes, flipping halfway through. They won’t be quite as crispy, but they’re still delicious.
Storage & Serving: Uncooked falafel dough keeps in the refrigerator for up to three days. Cooked falafel keeps at room temperature for four hours, in the fridge for two days, or frozen for up to one month. Reheat in a 375°F oven for 5-7 minutes to restore crispness. Serve in pita with tahini sauce, hummus, fresh tomatoes, cucumbers, and pickled turnips for the classic experience.
3. Fresh Tabbouleh with Pomegranate
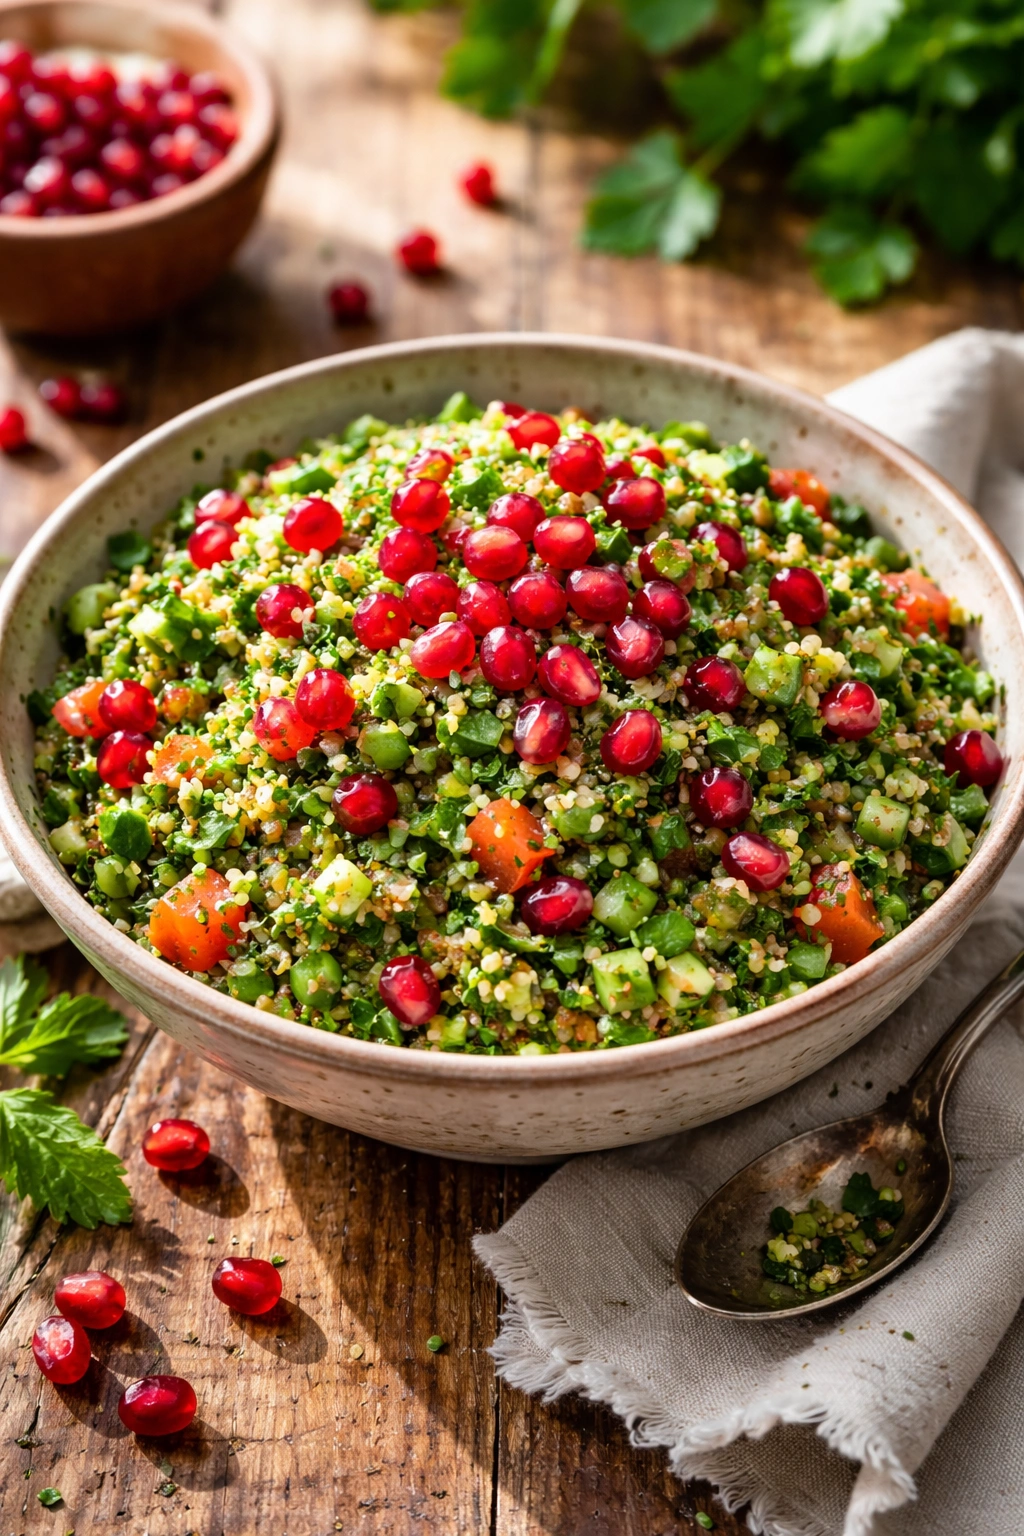
Tabbouleh is the salad that changed how many Western cooks think about grain salads — it’s herbaceous, tangy, and alive. The herb-to-grain ratio should be bold (two parts herbs to one part bulgur), and every ingredient should be cut small and fine. Pomegranate brings sweetness and a jewel-like brightness that elevates this dish from rustic to elegant.
Yield: Serves 4-6 as a side dish | Prep Time: 25 minutes | Cook Time: 0 minutes | Total Time: 25 minutes plus 15 minutes resting time | Difficulty: Beginner — No cooking required; it’s all about knife skills and assembly.
For the Tabbouleh:
- ¾ cup bulgur wheat (cracked wheat), fine grain
- ¾ cup hot vegetable or chicken broth
- 2 cups fresh parsley, finely chopped (about ½ a large bunch)
- ½ cup fresh mint, finely chopped
- ¼ cup fresh dill, finely chopped (optional but recommended)
- ¼ cup scallions, white and light green parts, thinly sliced
- 1 medium ripe tomato, seeds removed, finely diced
- ½ English cucumber, finely diced
- ¼ cup fresh pomegranate seeds (or ¼ cup diced red bell pepper if pomegranate is unavailable)
- ¼ cup extra-virgin olive oil
- 3 tablespoons fresh lemon juice
- 1 teaspoon fine sea salt, plus more to taste
- ½ teaspoon black pepper
- ¼ teaspoon ground allspice (optional but adds authentic Middle Eastern warmth)
Prepare the Bulgur:
- Place the bulgur in a medium bowl and pour the hot broth over it. Cover tightly with a plate or plastic wrap and let sit for 15 minutes, until the bulgur is tender and has absorbed all the liquid.
- Fluff with a fork and allow to cool to room temperature (about 10 minutes). This base can be made up to four hours ahead.
Assemble the Salad: 3. In a large bowl, combine the cooled bulgur, parsley, mint, dill, scallions, tomato, cucumber, and pomegranate seeds. 4. In a small bowl, whisk together the olive oil, lemon juice, salt, pepper, and allspice. 5. Pour the dressing over the salad and toss gently but thoroughly until every grain is coated and the herbs are evenly distributed. 6. Taste and adjust seasoning — tabbouleh should taste bright and herbaceous with a pleasant lemony tang. Add more lemon if it feels dull, more salt if it tastes flat. 7. Let rest at room temperature for 15 minutes before serving, allowing flavors to meld.
The Herb-First Philosophy: Traditional tabbouleh is not a grain salad with some herbs sprinkled on top — it’s a herb salad with just enough bulgur to hold everything together. The herbs should be the dominant voice; the bulgur is the vehicle. If your parsley, mint, and dill aren’t fragrant and vibrant, the dish suffers noticeably.
Pro tip: Remove the watery seeds and excess moisture from the tomato before adding it to the salad. A wet tomato will make tabbouleh soggy and dilute the dressing. Cut the tomato in half, gently squeeze out the seeds, then dice the flesh finely.
Variations:
- Winter vegetable tabbouleh: Substitute roasted beets (diced small) for the tomato, add toasted pine nuts, and use red wine vinegar instead of half the lemon juice.
- Creamy tabbouleh: Fold in ¼ cup of Greek yogurt or tahini-lemon sauce after assembling for a creamier version.
- Tabbouleh with no grains: Use finely diced cauliflower or zucchini (salted and squeezed dry) in place of the bulgur for a lower-carb interpretation.
Storage & Serving: Tabbouleh is best served at room temperature within a few hours of assembly, though it keeps in the refrigerator for up to two days. The flavors actually deepen and meld overnight, making it ideal for meal prep. Bring to room temperature before serving again. Serve alongside fattoush, grilled meats, or simply with warm pita and labneh (yogurt cheese).
4. Crispy-Bread Fattoush Salad
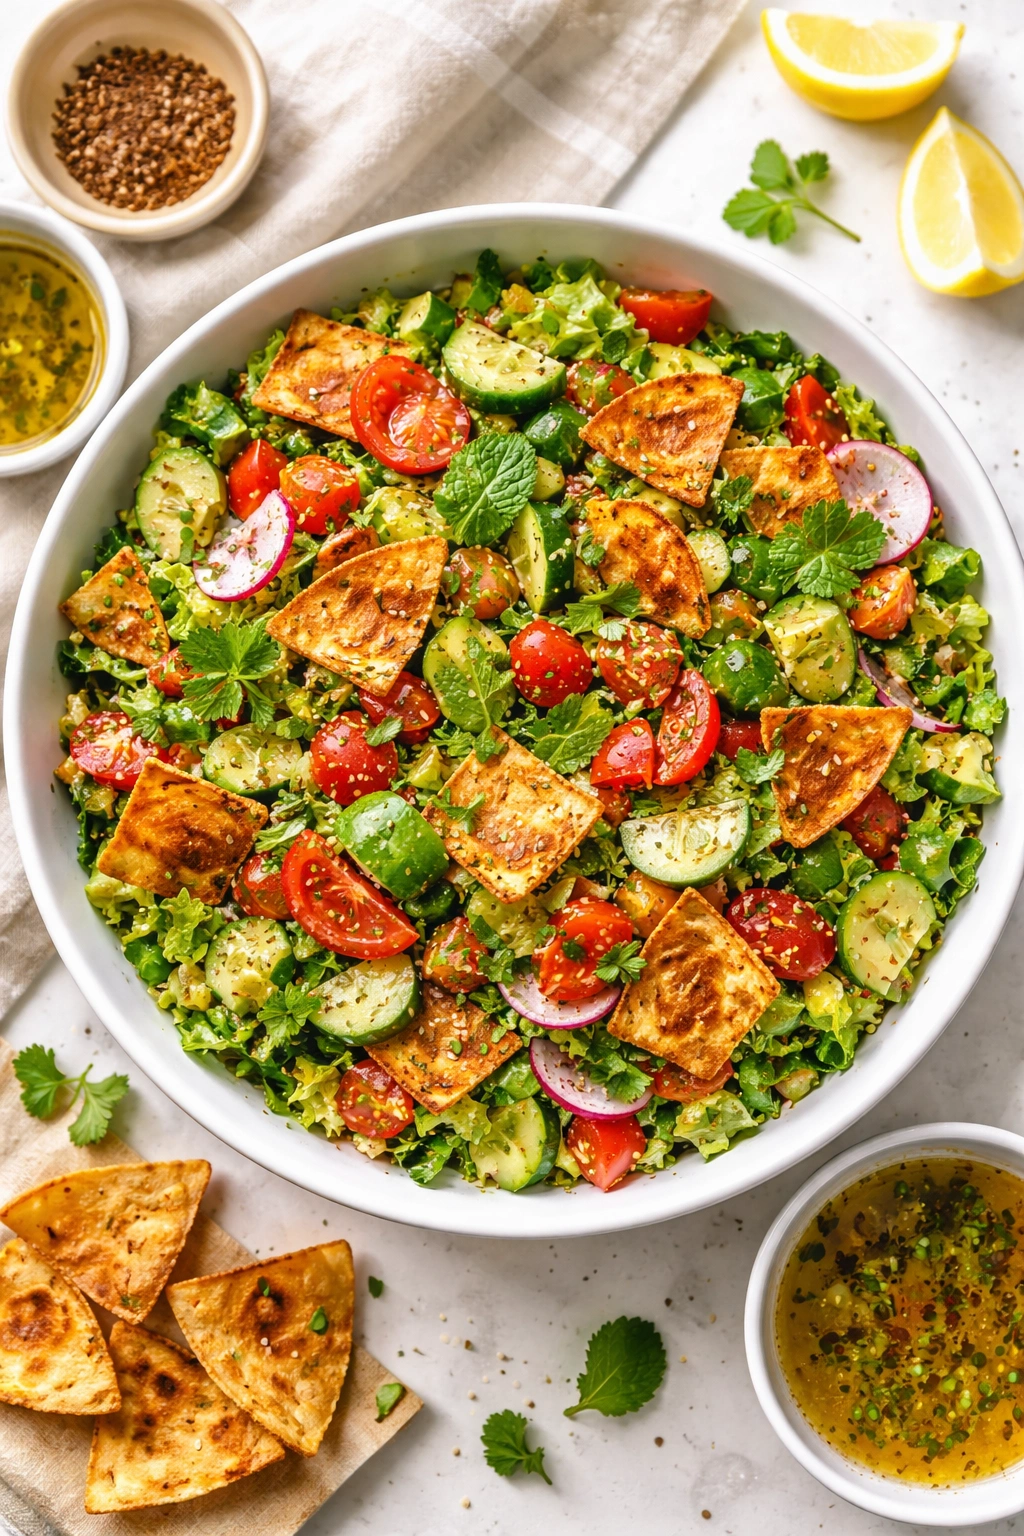
Fattoush is the Arabic salad that taught the Western world that salads could be substantial, filling, and completely satisfying. The star isn’t the vegetables — it’s the toasted pita chips that shatter between your teeth, combined with a tangy-spicy pomegranate molasses vinaigrette that binds everything together with complexity and soul.
Yield: Serves 4 as a main course or 6 as a side | Prep Time: 20 minutes | Cook Time: 8-10 minutes (for pita chips) | Total Time: 30 minutes | Difficulty: Beginner — Just chopping vegetables and toasting bread.
For the Pita Chips:
- 2 large pita breads
- 2 tablespoons extra-virgin olive oil
- ½ teaspoon fine sea salt
- ¼ teaspoon sumac (optional but recommended)
For the Salad:
- 1 large head romaine lettuce, chopped into bite-sized pieces
- 1 large English cucumber, halved lengthwise, sliced into half-moons
- 4 medium radishes, thinly sliced
- 2 medium ripe tomatoes, cut into wedges or chunks
- 1 bunch fresh scallions (white and light green parts), sliced on a diagonal
- 1 cup fresh parsley, chopped
- ½ cup fresh mint, chopped
- ¼ cup fresh dill, chopped
- ¼ cup Kalamata olives, pitted and halved (optional)
For the Pomegranate Molasses Dressing:
- 3 tablespoons pomegranate molasses (or use 2 tablespoons lemon juice + 1 tablespoon balsamic vinegar as a substitute)
- ¼ cup extra-virgin olive oil
- 1 clove garlic, minced
- ½ teaspoon sumac
- ¼ teaspoon red pepper flakes (adjust to taste)
- Fine sea salt and black pepper to taste
Make the Pita Chips:
- Preheat the oven to 400°F (200°C).
- Brush both sides of each pita bread lightly with olive oil and sprinkle with salt and sumac.
- Cut into triangles (about 8 pieces per pita) and spread on a baking sheet in a single layer.
- Bake for 8-10 minutes, tossing halfway through, until golden brown and completely crispy. Watch carefully in the final minutes — they can go from golden to burned quickly.
- Let cool for 2-3 minutes; they’ll continue to crisp as they cool.
Assemble the Salad: 6. In a large bowl, combine the romaine, cucumber, radishes, tomatoes, scallions, parsley, mint, dill, and olives.
Make the Dressing: 7. In a small bowl, whisk together the pomegranate molasses, olive oil, garlic, sumac, and red pepper flakes. Taste and adjust the salt and pepper.
Finish: 8. Just before serving, toss the salad with the dressing — not too far ahead, or the lettuce will wilt. Add the pita chips and toss gently one more time so the chips are evenly distributed but not crushed. 9. Serve immediately while the pita chips are still crispy.
The Pita Chip Secret: Stale pita bread makes the best chips. If your pita is completely fresh and soft, it will steam rather than crisp in the oven. If you have day-old pita, all the better — it will crisp up beautifully. If you only have fresh pita, let it sit uncovered at room temperature for a few hours to dry out slightly before toasting.
Pro tip: Pomegranate molasses is a concentrated, tangy-sweet syrup made from pomegranate juice. It’s becoming widely available in supermarkets, Middle Eastern markets, and online. If you can’t find it, the lemon-balsamic substitute is a legitimate alternative, though it lacks the subtle sweetness and complexity of the real thing — definitely worth seeking out.
Variations:
- Protein-loaded fattoush: Top with grilled chicken, garlicky chickpeas, or spiced ground lamb.
- Seasonal fattoush: Add fresh corn kernels in summer, roasted beets or squash in fall, or blanched green beans in spring.
- Raw fattoush with raw vegetables: Keep it entirely raw — no cooked components — for a super light, refreshing version.
Storage & Serving: Make the dressing and prepare all the vegetables up to four hours ahead, but assemble the salad just before serving. The pita chips stay fresh in an airtight container for two days. This salad is best enjoyed immediately after tossing, while the chips are still crisp.
5. Hand-Formed Lamb Kofta with Warming Spices
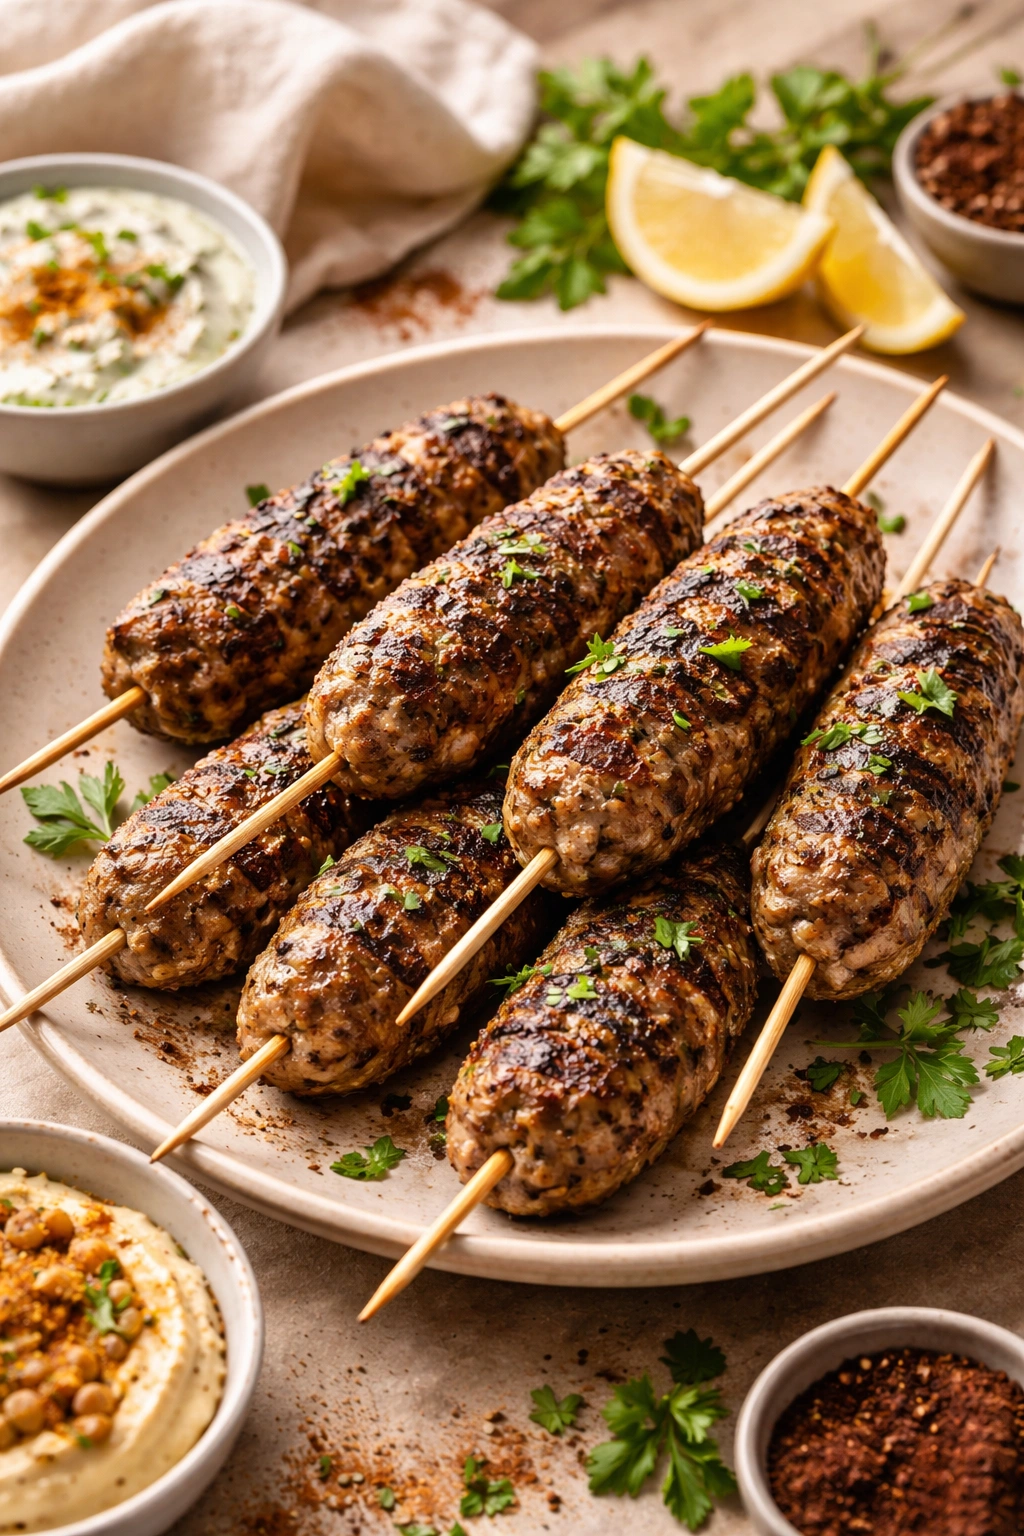
Kofta is ground meat shaped around a skewer, but the magic happens in your hands — the warmth and pressure of your palms create a dense, cohesive texture that holds up during grilling without becoming dense or tough. This version features warm spices, fresh herbs, and enough fat to stay moist and flavorful.
Yield: Makes 8-10 kofta skewers, serving 4 | Prep Time: 15 minutes | Cook Time: 12-15 minutes (for grilling or pan-searing) | Total Time: 30 minutes | Difficulty: Intermediate — Hand-forming takes a light touch and confidence; grilling requires attention to heat.
For the Kofta:
- 1 pound ground lamb (or ground beef as a substitute)
- ½ cup fresh parsley, finely chopped
- ¼ cup fresh mint, finely chopped
- ¼ cup fresh cilantro, finely chopped
- 1 medium yellow onion, finely minced
- 4 cloves garlic, minced
- 1 teaspoon ground cumin
- 1 teaspoon ground coriander
- ½ teaspoon ground cinnamon
- ¼ teaspoon ground allspice
- ¼ teaspoon cayenne pepper
- ¼ teaspoon black pepper
- 1 teaspoon fine sea salt
- 2 tablespoons fresh lemon juice
- 2 tablespoons olive oil
- 8-10 metal or wooden skewers (soak wooden skewers in water for 30 minutes if using)
Combine the Mixture:
- In a large bowl, combine the lamb, parsley, mint, cilantro, onion, garlic, cumin, coriander, cinnamon, allspice, cayenne, black pepper, and salt.
- Gently fold the ingredients together with your hands just until combined — do not overmix or knead the mixture, which will make the finished kofta dense and tough. The mixture should feel loose and herby.
- Drizzle the lemon juice and olive oil over the top and fold gently one more time until barely combined.
Shape the Kofta: 4. Lightly wet your hands with cold water to prevent sticking. Take about 2-3 tablespoons of the mixture in your palm (enough to form a ball about the size of a golf ball). 5. Gently press and shape the mixture into a long oblong patty about 4 inches long and 1.5 inches wide, roughly following the shape of your skewer. 6. Carefully slide a skewer through the center lengthwise, pressing the meat gently around it as you go. The meat should cling to the skewer without gaps. If the mixture feels too soft, refrigerate for 10 minutes and try again. 7. Repeat with the remaining mixture until all skewers are formed.
Cook the Kofta: 8. If grilling: Preheat your grill to medium-high heat (about 400°F / 200°C). Lightly oil the grill grates. Place the kofta skewers on the grill and cook for 2-3 minutes per side (6 sides total, rotating every 2-3 minutes) until the exterior is nicely charred and the interior registers 160°F (71°C) on an instant-read thermometer. 9. If pan-searing: Heat 1 tablespoon of olive oil in a large skillet over medium-high heat. Once shimmering, carefully place the kofta skewers in the pan (work in batches if needed to avoid crowding). Sear for 2-3 minutes per side, turning gently and carefully, until the exterior is browned and the internal temperature reaches 160°F (71°C). 10. Remove from heat and let rest for 3-4 minutes before serving.
Why Warm Spices Matter: The combination of cinnamon, coriander, and allspice is what distinguishes Arabic kofta from Mediterranean variations. These spices don’t overpower — they layer underneath the fresh herbs and lamb, adding warmth and complexity that makes people ask “what’s that amazing flavor?”
Pro tip: If your mixture is too soft to shape, it means either the meat is too warm or you’ve overmixed it. Chill it for 15 minutes and work with slightly damp hands — the moisture helps bind without additional mixing.
Variations:
- Beef kofta: Substitute ground beef for lamb (use a fattier cut like 80/20 ground beef for juiciness).
- Spiced kofta with pomegranate: Add 2 tablespoons pomegranate molasses to the mixture for tartness and slight sweetness.
- Vegetarian kofta: Substitute finely minced mushrooms (squeezed dry) and walnuts for half the lamb and reduce salt slightly.
Storage & Serving: Uncooked kofta keep refrigerated on their skewers for up to two days, or frozen for up to one month. Cook straight from the freezer, adding 2-3 extra minutes per side. Serve with warm pita, tahini sauce, fresh tomatoes, cucumbers, pickled turnips, and lemon wedges. This is stunning alongside grilled vegetables like eggplant, zucchini, or peppers.
6. Roasted Red Pepper and Walnut Muhammara
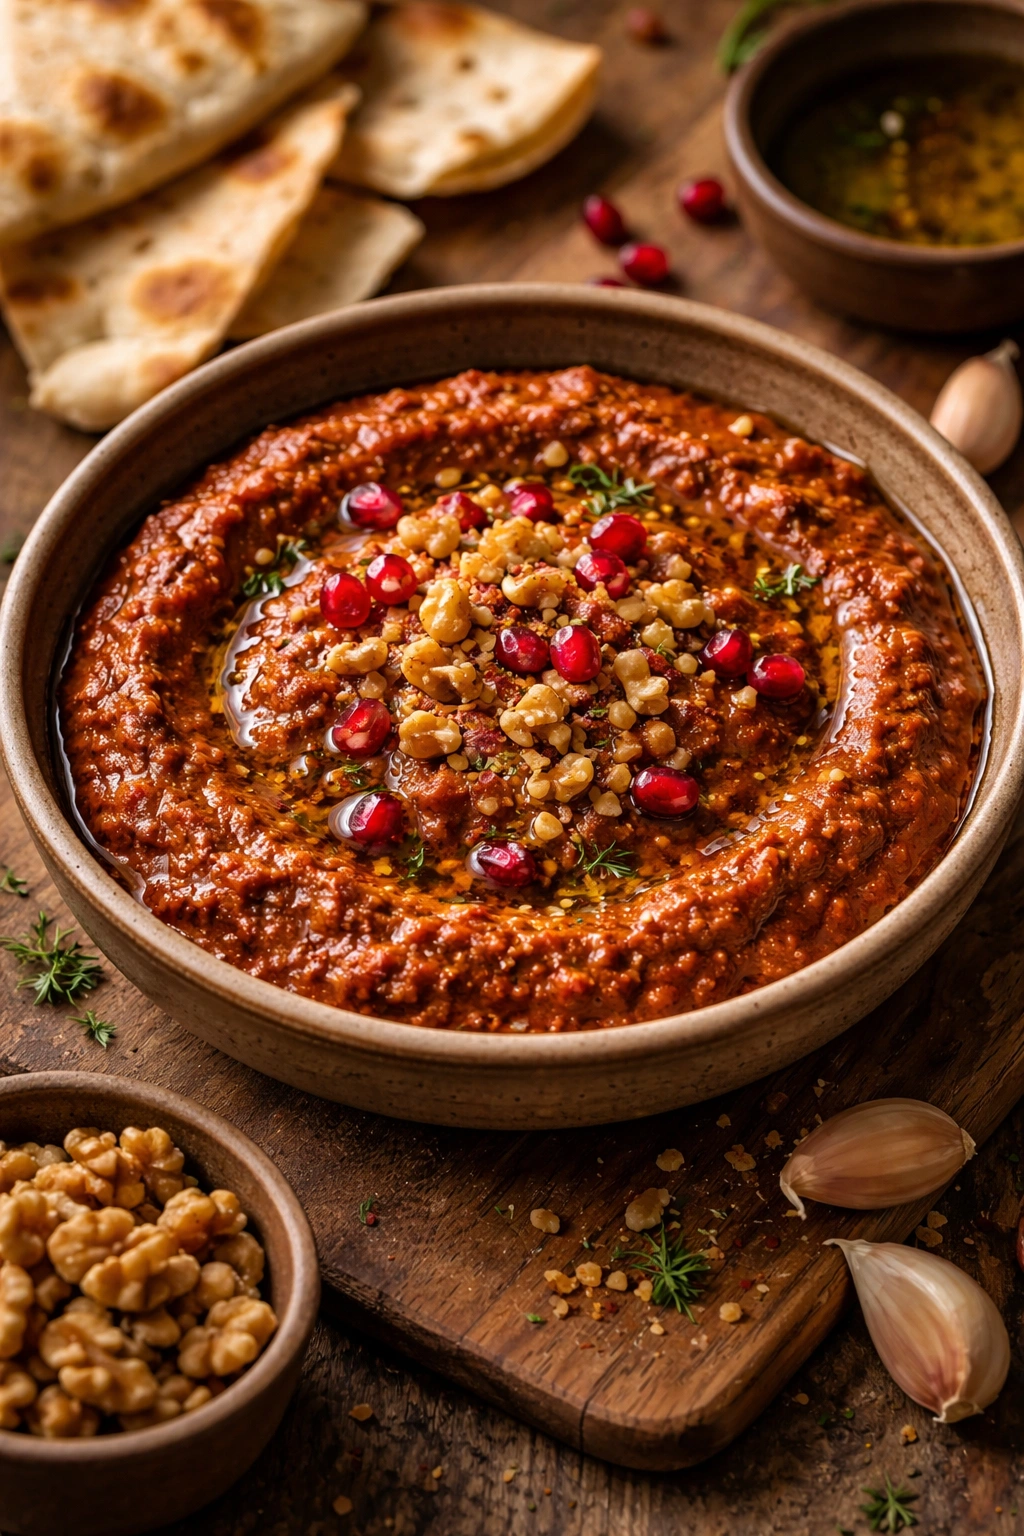
Muhammara is the sweet, savory, slightly spiced dip that deserves far more attention than it gets. Roasted red peppers and toasted walnuts form the base, but pomegranate molasses and warm spices elevate it into something complex and crave-worthy. Serve it as a dip, a sauce, or a spread on grilled bread.
Yield: Makes about 2 cups | Prep Time: 10 minutes | Cook Time: 5 minutes (toasting walnuts) | Total Time: 15 minutes | Difficulty: Beginner — Just roasting, toasting, and blending.
For the Muhammara:
- 2 large roasted red peppers (about 1.5 cups; jarred roasted peppers are perfectly acceptable)
- ¾ cup walnuts, toasted and cooled (or use pine nuts for a milder flavor)
- ½ cup panko breadcrumbs (fine breadcrumbs work too)
- 3 tablespoons pomegranate molasses
- 2 tablespoons extra-virgin olive oil, plus more for drizzling
- 1 tablespoon fresh lemon juice
- 2 cloves garlic, minced
- 1 teaspoon ground cumin
- ½ teaspoon Aleppo pepper or red pepper flakes (adjust heat to taste)
- ¼ teaspoon cinnamon
- Fine sea salt and black pepper to taste
- Fresh pomegranate seeds (optional, for garnish)
- Fresh parsley (optional, for garnish)
Toast the Walnuts:
- If using raw walnuts, heat a dry skillet over medium heat. Add the walnuts and toast for 3-5 minutes, shaking the pan occasionally, until fragrant and lightly darkened. Transfer to a plate to cool completely. Do not skip the toasting step — it dramatically deepens the flavor and removes any slight bitterness from raw walnuts.
Combine and Blend: 2. Add the roasted peppers, toasted walnuts, breadcrumbs, pomegranate molasses, olive oil, lemon juice, garlic, cumin, Aleppo pepper, and cinnamon to a food processor. 3. Pulse 15-20 times until the mixture is chunky but cohesive — muhammara should have a rough texture, not a smooth purée. If it seems too dry, add a tablespoon of water or reserved pepper juice. 4. Taste and adjust: Add more pomegranate molasses for tartness, more lemon for brightness, more salt if it tastes flat, or more spices if you want more warmth.
The Sweetness Balance: Muhammara walks a delicate line between sweet and savory. The roasted peppers and pomegranate molasses contribute natural sweetness, while the cumin and Aleppo pepper provide savory warmth and slight heat. It should taste almost fruity, not candied — if it tastes too sweet, add more Aleppo pepper and a pinch more salt to balance it.
Pro tip: Jarred roasted peppers are perfectly acceptable and will give you nearly identical results to roasting fresh ones yourself. Pat them dry with a paper towel before adding to the food processor to remove excess liquid.
Variations:
- Smoky muhammara: Add ½ teaspoon smoked paprika and ¼ teaspoon sumac for earthy, complex flavor.
- Richer muhammara: Replace 1 tablespoon olive oil with tahini for creaminess and nuttiness.
- Raw walnuts version: Skip toasting and use raw walnuts for a brighter, slightly more delicate flavor.
Storage & Serving: Muhammara keeps refrigerated in an airtight container for up to five days, though the color will gradually deepen. It also freezes beautifully for up to two months. Serve at room temperature (let it come out of the fridge 10 minutes before serving) with warm pita, fresh vegetables, grilled bread, or as a sauce alongside grilled fish or chicken. A drizzle of olive oil and a scatter of pomegranate seeds or fresh parsley on top just before serving adds visual appeal and a fresh pop of flavor.
7. Spiced Shawarma with Garlic Sauce
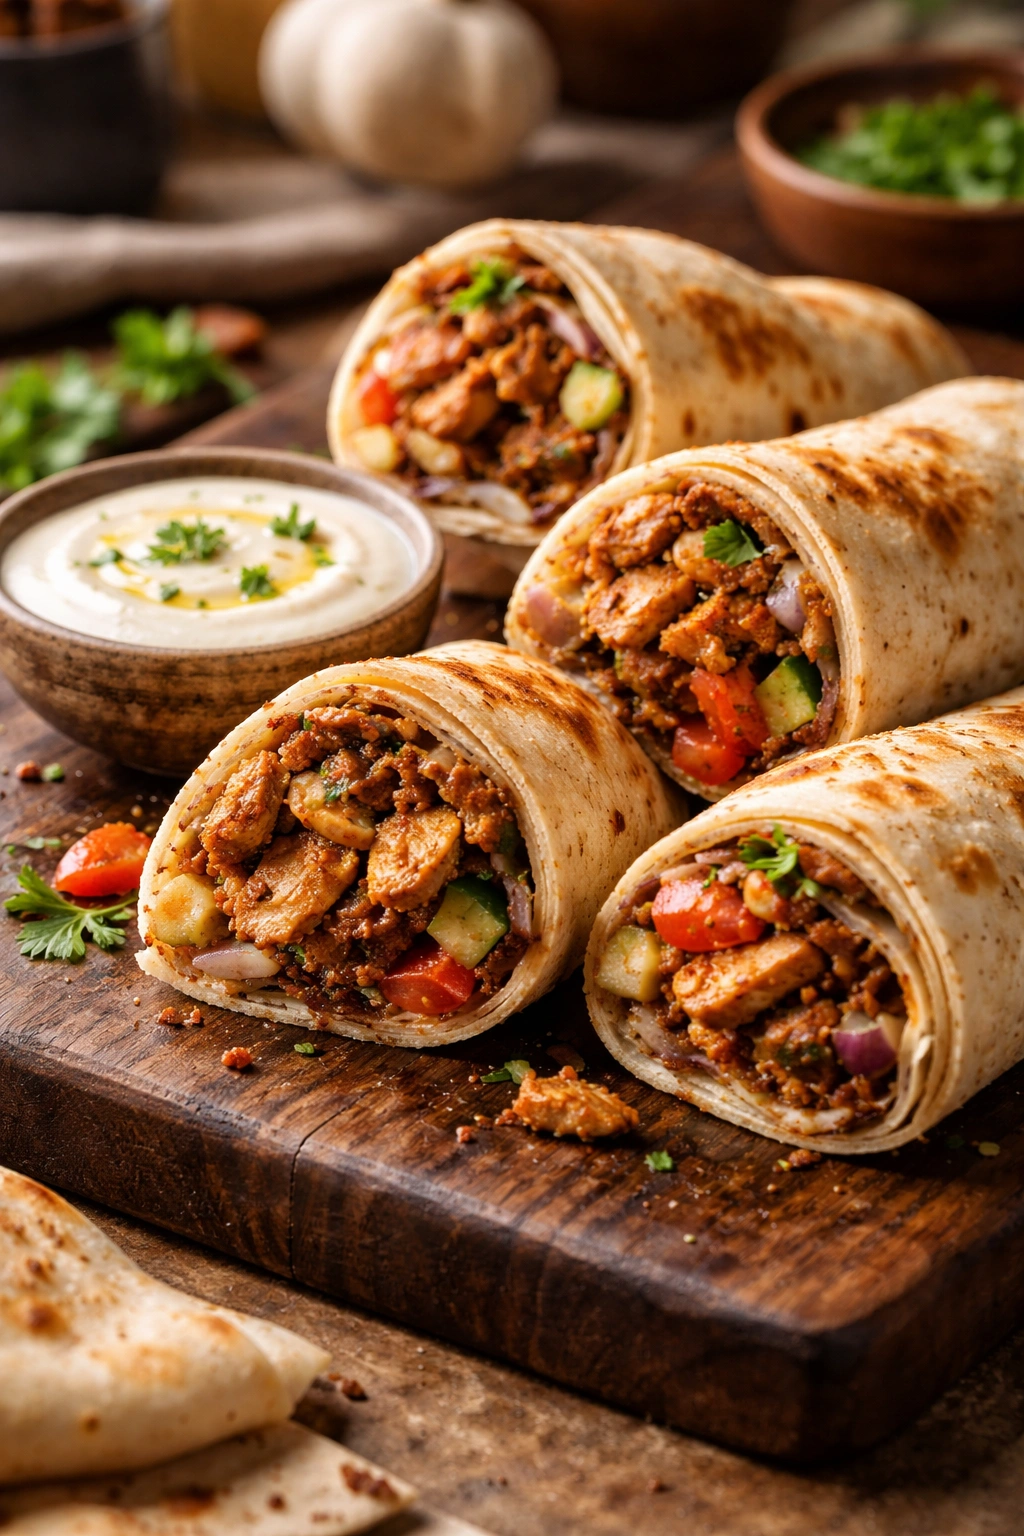
Shawarma is the handheld masterpiece of Middle Eastern street food — meat layered with aromatics, slowly roasted until crispy on the edges and tender inside, then shaved off with a knife and tucked into pita with garlicky sauce. Home versions skip the vertical rotisserie and instead bake a compact roll of seasoned meat that mimics those caramelized edges.
Yield: Serves 4-6 as a main course | Prep Time: 15 minutes | Cook Time: 45-50 minutes | Total Time: About 1 hour | Difficulty: Intermediate — Requires careful rolling and patting; timing is important for texture.
For the Shawarma:
- 1.5 pounds lamb, beef, or chicken, thinly sliced (ask the butcher or partially freeze and slice yourself)
- 3 medium yellow onions, thinly sliced
- 6 cloves garlic, minced
- 3 tablespoons olive oil
- 2 tablespoons tomato paste
- 1 tablespoon ground cumin
- 1 tablespoon ground coriander
- 2 teaspoons smoked paprika
- 1 teaspoon ground allspice
- 1 teaspoon ground cinnamon
- ½ teaspoon ground cloves
- ½ teaspoon cayenne pepper
- ½ teaspoon black pepper
- 1 teaspoon fine sea salt
- 2 tablespoons fresh lemon juice
- 2 tablespoons apple cider vinegar
For the Garlic Sauce:
- 1 cup Greek yogurt (or sour cream)
- 4-5 cloves garlic, minced or pressed
- 2 tablespoons fresh lemon juice
- 1 tablespoon olive oil
- ¼ teaspoon fine sea salt
- Pinch of white pepper
Make the Shawarma:
- In a large bowl, combine the meat, sliced onions, minced garlic, olive oil, tomato paste, cumin, coriander, paprika, allspice, cinnamon, cloves, cayenne, black pepper, and salt. Toss together thoroughly until every slice of meat is evenly coated with spices and onions.
- Let the mixture sit at room temperature for 15 minutes, allowing the spices to hydrate and flavors to meld. Add the lemon juice and vinegar and toss gently.
- Preheat your oven to 425°F (220°C).
- Take a loaf pan or a small baking dish (about 8×5 inches) and line it loosely with parchment paper or lightly oil it. Pack the marinated meat mixture tightly into the pan, pressing it down firmly and packing it as densely as possible. The compactness mimics the layering of a true rotisserie shawarma and helps the edges crisp while the inside stays tender.
- Bake for 45-50 minutes, until the top is deeply caramelized and the edges are crispy and brown. Pour off any accumulated fat if desired (though the fat adds flavor, so many cooks skip this step).
Make the Garlic Sauce: 6. While the shawarma bakes, whisk together the yogurt, minced garlic, lemon juice, olive oil, salt, and white pepper until smooth. Taste and adjust — it should taste boldly garlicky and tangy.
Serve: 7. Remove the shawarma from the oven and let rest for 5 minutes. Using a sharp knife, cut vertical lines into the meat to create slices, then use a thin metal spatula or a slim knife to scrape the meat free from the pan. Shave pieces directly from the cooked mass, capturing the caramelized crust on the edges. 8. Warm the pita breads in a dry skillet or over a gas flame until pliable. Stuff each pita with shawarma meat, tomatoes, cucumbers, pickled turnips, fresh parsley, and a generous dollop of garlic sauce.
The Spice Blend Philosophy: This spice blend is warm, complex, and slightly sweet — it’s the signature flavor of proper shawarma. While you might be tempted to simplify, the combination of cumin, coriander, allspice, and cinnamon creates a depth that no single spice can replicate.
Pro tip: If you can’t find thinly sliced meat at your butcher, buy a 1.5-pound piece of lamb shoulder or beef sirloin, partially freeze it (2-3 hours) until firm but not solid, then slice it as thin as you can with a sharp knife using a slicing motion against the grain.
Variations:
- Chicken shawarma: Use chicken breast or thighs (thighs are juicier), reduce spices by half to avoid overpowering the milder meat, and reduce cooking time to 30-35 minutes.
- Extra-garlic version: Add 8-10 cloves garlic to the meat mixture instead of 6 for a more intensely garlicky result.
- Preserved lemon shawarma: Replace half the lemon juice with minced preserved lemon (a Middle Eastern staple available in specialty markets).
Storage & Serving: Shawarma keeps refrigerated for up to three days and freezes beautifully for up to one month. Reheat gently in a skillet over medium-low heat. The garlic sauce keeps refrigerated for up to four days. Serve shawarma in pita with pickled vegetables, fresh tomatoes, cucumbers, onions, and fresh herbs alongside hummus, tahini sauce, and extra garlic sauce.
8. Honey-Soaked Baklava with Pistachios
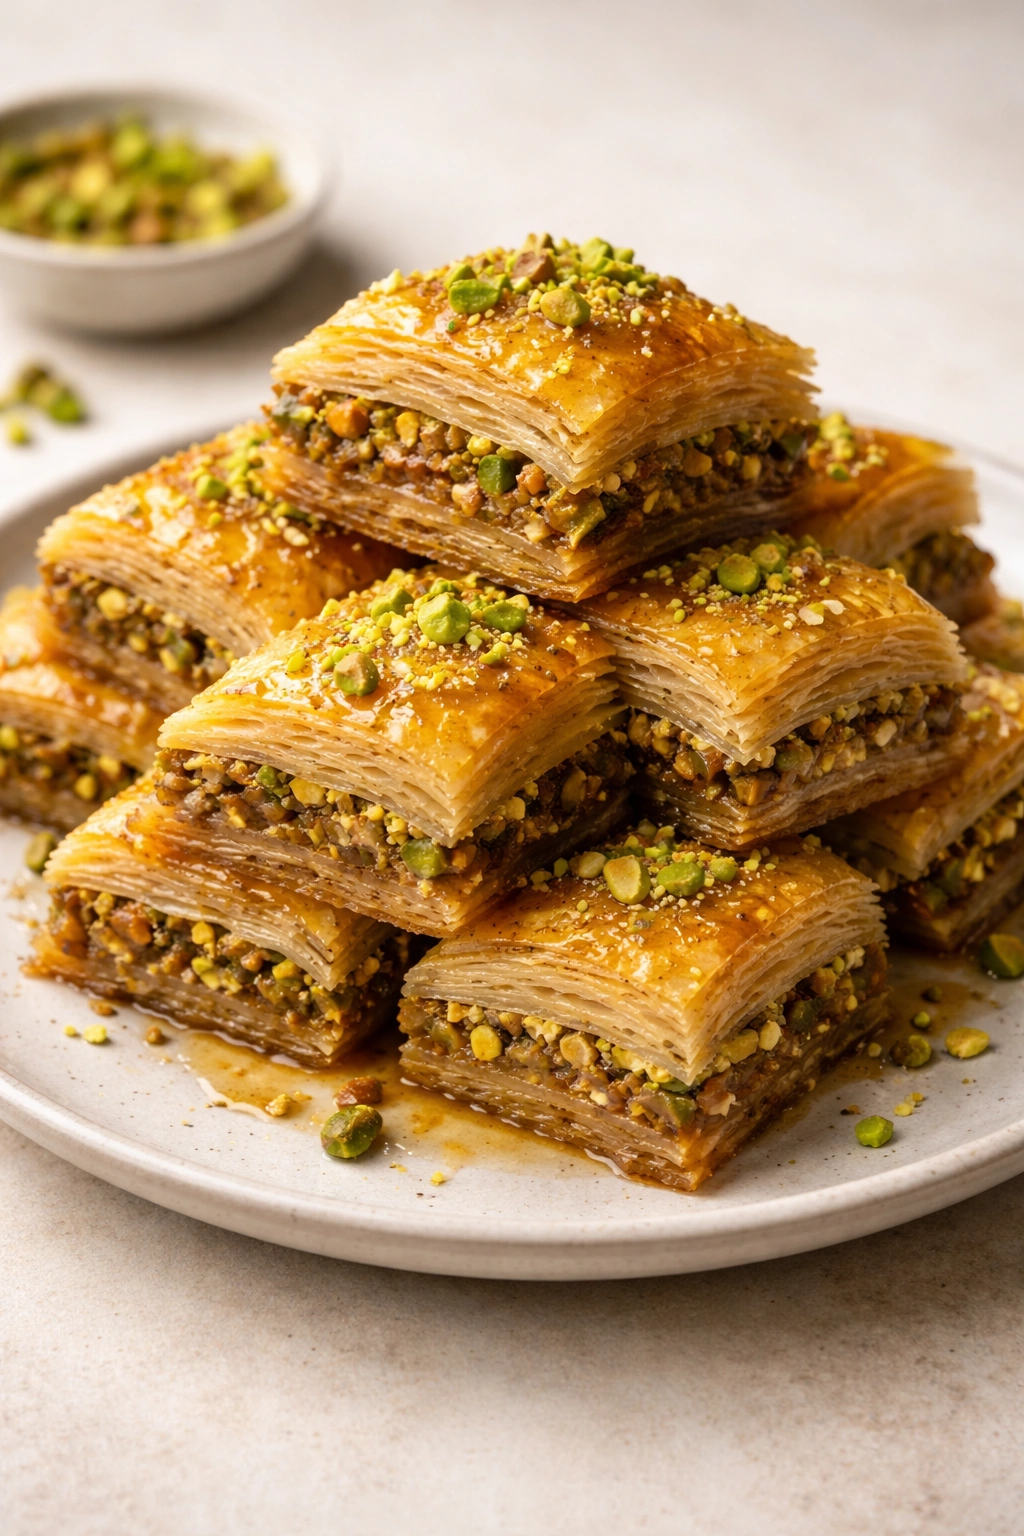
Baklava is the grand finale — paper-thin phyllo pastry layered with spiced nuts, baked until golden, then immediately soaked in hot honey syrup so it absorbs every drop. The result is crispy-shattered layers, crunchy nuts, and a honey sweetness that’s balanced by cinnamon, cardamom, and the butter’s toasted richness. This is easier to make than most people assume, and homemade baklava tastes incomparably better than store-bought versions.
Yield: Makes 24 pieces | Prep Time: 25 minutes | Cook Time: 40-45 minutes | Total Time: About 1.5 hours (includes cooling time) | Difficulty: Intermediate — Phyllo requires a gentle touch and attention to detail, but the technique is straightforward.
For the Baklava:
- 1 pound (about 20-25 sheets) phyllo pastry (thawed if frozen, kept covered with a damp cloth)
- 1 cup (2 sticks) unsalted butter, melted and cooled
- 3 cups roasted unsalted pistachios, finely chopped
- ½ cup walnuts, finely chopped (optional; adds richness)
- ½ cup granulated sugar
- 2 teaspoons ground cinnamon
- ½ teaspoon ground cardamom (optional but traditional)
- Pinch of ground cloves
- 2 tablespoons rose water or orange blossom water (optional but adds authentic complexity)
For the Honey Syrup:
- 1 cup honey
- ¾ cup granulated sugar
- ½ cup water
- 1 tablespoon fresh lemon juice
- 1 cinnamon stick
- 2-3 whole cloves
- 1 tablespoon rose water or orange blossom water (optional, to match the baklava)
Prepare the Filling:
- In a bowl, combine the chopped pistachios, walnuts, sugar, cinnamon, cardamom, cloves, and rose water (if using). Mix thoroughly until evenly combined. Set aside.
Prepare the Pan: 2. Preheat the oven to 350°F (175°C). Have a 9×13-inch baking pan ready. Lightly brush the bottom with melted butter.
Layer the Baklava: 3. Carefully unroll the phyllo and place it on a clean, dry surface. Cover the sheets with a damp kitchen towel to prevent them from drying out as you work. 4. Place one phyllo sheet in the bottom of the buttered pan and brush it lightly with melted butter — use a pastry brush and apply a thin, even layer. Do not drench; you want structure, not soggy pastry. 5. Repeat this process with 4-5 phyllo sheets, brushing each with butter. Do not skip the butter between layers — it’s what creates the shattered, crispy texture. 6. Sprinkle a thin, even layer of the nut mixture (about ¼ to ⅓ cup) over the top phyllo layer. 7. Repeat the layering: 2-3 phyllo sheets brushed with butter, then another layer of nuts. Continue this pattern (phyllo, butter, nuts, phyllo, butter, nuts) until you’ve used all the nut mixture, ending with at least 5-6 phyllo sheets on top. 8. Brush the top layer generously with the remaining melted butter — this ensures a golden, crispy top.
Score and Bake: 9. Using a sharp knife, cut the baklava into diamond or triangle shapes. Cut diagonal lines about 1.5 inches apart in one direction, then cut diagonal lines in the opposite direction to create diamonds. Make your cuts before baking — trying to cut through baked baklava risks cracking the pastry. 10. Bake for 40-45 minutes until the top is deep golden brown and you can see the layers are crispy and pulling away slightly from the edges.
Make the Syrup While Baklava Bakes: 11. In a medium saucepan, combine the honey, sugar, water, lemon juice, cinnamon stick, and cloves. Bring to a gentle simmer over medium-low heat and cook for 5-7 minutes (the syrup should be warm but not boiling). Stir in the rose water if using. Remove the cinnamon stick and cloves before using.
Soak the Hot Baklava: 12. The moment the baklava comes out of the oven, slowly pour the hot (but not boiling) syrup over the hot baklava, distributing it evenly so it seeps into all the layers and crevices. You’ll hear a satisfying sizzle as the hot syrup hits the hot pastry. 13. Set aside to cool completely at room temperature — at least 1 hour. The baklava will continue to absorb the syrup and become more decadently soaked as it cools.
The Phyllo Technique: Phyllo is delicate, but it’s not fragile. Use a gentle touch and work with confidence — hesitant, slow movements are more likely to tear it than smooth, assured ones. Keep it covered with a damp (not wet) cloth, work in a dry environment, and brush butter between every layer for structural integrity.
Pro tip: Frozen phyllo needs to thaw completely in the refrigerator overnight before using — never try to rush the thaw or it will tear apart. Once thawed, use it within a few hours before it dries out.
Variations:
- Walnut baklava: Use all walnuts instead of pistachios for a slightly earthier, less sweet flavor.
- Orange-scented baklava: Use orange blossom water instead of rose water, and add the zest of one orange to the nut filling.
- Butter-poached baklava: Replace ¼ cup of the honey with additional melted butter in the syrup for a richer, less cloying result.
Storage & Serving: Baklava keeps at room temperature in an airtight container for up to five days, though it’s best eaten within two days while still crispy on the edges and tender inside. It also freezes beautifully for up to two months — either baked or unbaked. Serve at room temperature, ideally with strong coffee or mint tea to balance the sweetness.
Final Thoughts

These eight recipes are your entry point into a cuisine that’s been refining itself for centuries. What makes Middle Eastern cooking so compelling isn’t complexity for its own sake — it’s the balance of bold spices, fresh herbs, and techniques that coax maximum flavor from simple, honest ingredients. You’ll notice that many of these recipes share core components: hummus, tahini, fresh herbs, warming spices, olive oil. Once you understand how these elements work together, you can create variations, adapt dishes to what’s in your pantry, and begin building authentic Middle Eastern meals with real confidence.
The best part about cooking these dishes at home is that you taste exactly what you want — the exact saltiness, the precise heat level, the ratio of garlic to everything else. You control every element. Start with whichever recipe calls to you most strongly; there’s no required order, no prerequisite knowledge. Make falafel even if you’ve never made anything fried before. Build a lamb kofta even if you’ve never hand-formed meat. The confidence you’ll feel when you taste crispy-edged falafel that you shaped yourself, or baklava that you layered and soaked, is worth the effort many times over.
These recipes improve with repetition. Your second batch of hummus will be better than your first because you’ll understand the texture, the flavor balance, and how far you can push the blender. Your third batch of falafel will hold together more reliably because you’ll know exactly how the mixture should feel in your hands. Trust the process, taste constantly, and remember that Middle Eastern cooking is as much about generosity and warmth as it is about technique and flavor. Cook with joy, share abundantly, and enjoy.