How To Can Strawberries Properly – The Right Way To Do It
Canning strawberries is a great way to preserve the flavor and nutritional value of fresh strawberries. Properly canned strawberries can last up to a year, and they can be used in a variety of dishes, from desserts to smoothies. In this article, we will guide you through the right way to can strawberries so that you can enjoy their sweet flavor all year round.
Table of Contents
- The Benefits of Canning Strawberries
- What You Will Need
- Preparing the Strawberries
- Filling the Jars
- Adding the Syrup
- Removing Air Bubbles
- Sealing the Jars
- Processing the Jars
- Cooling and Storing
- Safety Precautions
- Troubleshooting Tips
- Conclusion
- Frequently Asked Questions (FAQs)
- Can I can strawberries without sugar?
- Can I reuse old jars and lids for canning?
- Can I add other fruits to my canned strawberries?
- How long do canned strawberries last?
- Can I use a dishwasher to sterilize my jars?
The Benefits of Canning Strawberries
There are many benefits to canning strawberries. Here are a few:
- Extended Shelf Life: Canning preserves the freshness and flavor of strawberries for up to a year, so you can enjoy them long after their season is over.
- Convenience: Canned strawberries are convenient to use in a variety of dishes, from desserts to smoothies.
- Nutritional Value: Canned strawberries retain their nutritional value, including antioxidants and vitamin C.
What You Will Need
Before you start canning strawberries, you will need to gather the following equipment:
- Fresh strawberries
- Mason jars with lids and rings
- Water bath canner or pressure canner
- Jar lifter
- Canning funnel
- Bubble remover tool
- Ladle
- Clean kitchen towels
Preparing the Strawberries
The first step in canning strawberries is to prepare them. Here’s how:
- Wash the strawberries in cool running water and remove the stems and any blemishes.
- Cut the strawberries into halves or quarters, depending on their size.
- Place the strawberries in a large bowl and sprinkle them with sugar (optional).
- Let the strawberries sit for 30 minutes to an hour until they release their juices.
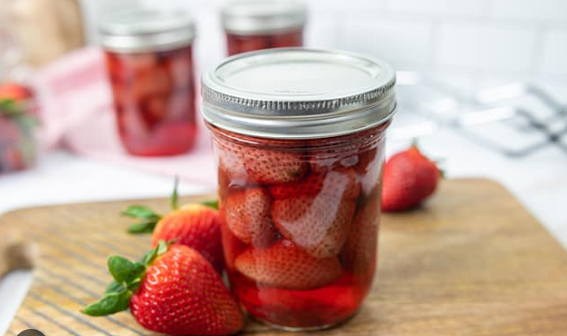
Filling the Jars
Once the strawberries are prepared, it’s time to fill the jars. Here’s how:
- Sterilize the jars and lids by placing them in a pot of boiling water for 10 minutes.
- Using a canning funnel, fill the jars with the strawberries, leaving 1/2 inch of headspace at the top.
- Use a bubble remover tool to remove any air bubbles from the jars.
Adding the Syrup
After filling the jars with strawberries, it’s time to add the syrup. Here’s how:
- In a separate pot, prepare the syrup by mixing sugar and water.
- Bring the syrup to a boil and let it simmer for 5 minutes.
- Using a ladle, pour the hot syrup over the strawberries in the jars, leaving 1/2 inch of headspace at the top.
Removing Air Bubbles
- Run a bubble remover tool along the inside edge of the jar to release any trapped air bubbles.
- Add more syrup if necessary to maintain the 1/2 inch of headspace.
Sealing the Jars
After removing the air bubbles, it’s time to seal the jars. Here’s how:
- Wipe the rim of each jar with a clean, damp kitchen towel to remove any residue.
- Place a lid on each jar and tighten the ring until it’s snug but not too tight.
Processing the Jars
Before storing the jars, they need to be processed. Here’s how:
- Place the jars in a water bath canner or pressure canner, making sure they are covered with at least 1 inch of water.
- Bring the water to a boil and process the jars for the recommended time (usually around 10-15 minutes for water bath canning and 5-10 minutes for pressure canning).
- Remove the jars from the canner with a jar lifter and let them cool on a clean kitchen towel for 12-24 hours.
Cooling and Storing
After processing the jars, it’s important to let them cool and store them properly. Here’s how:
- After the jars have cooled for 12-24 hours, check the seals by pressing down on the center of the lids. If the lid doesn’t pop back, it’s properly sealed.
- Remove the rings and wipe the jars clean with a damp kitchen towel.
- Label the jars with the date and contents and store them in a cool, dark place for up to a year.
Safety Precautions
When canning strawberries, it’s important to take safety precautions to prevent spoilage and contamination. Here are a few tips:
- Always use clean equipment and surfaces.
- Follow a tested recipe for canning strawberries.
- Use fresh, high-quality strawberries.
- Make sure the jars are properly sealed and processed.
- Store the jars in a cool, dark place.
Troubleshooting Tips
Sometimes things don’t go as planned when canning strawberries. Here are some troubleshooting tips:
- If the jars don’t seal properly, try reprocessing them or storing them in the fridge or freezer instead.
- If the strawberries float to the top of the jars, try packing them more tightly or using a heavier syrup.
- If the syrup is too thick or too thin, adjust the ratio of sugar to water.
Conclusion
Canning strawberries is a great way to preserve their fresh flavor and nutritional value. By following the right techniques and safety precautions, you can enjoy delicious canned strawberries all year round. Remember to use high-quality ingredients, follow tested recipes, and store your jars properly for the best results.
Frequently Asked Questions (FAQs)
Can I can strawberries without sugar?
Yes, you can can strawberries without sugar, but they may not be as sweet and flavorful.
Can I reuse old jars and lids for canning?
No, it’s not recommended to reuse old jars and lids for canning because they may not seal properly.
Can I add other fruits to my canned strawberries?
Yes, you can add other fruits like blueberries or raspberries to your canned strawberries for a mixed fruit preserve.
How long do canned strawberries last?
Properly canned strawberries can last up to a year when stored in a cool, dark place.
Can I use a dishwasher to sterilize my jars?
No, it’s not recommended to use a dishwasher to sterilize jars because it may not reach high enough temperatures.