Roasted green beans are one of those dishes that proves the simplest recipes often deliver the most satisfying results. There’s something almost magical about what happens when you toss fresh green beans with a little oil, salt, and heat — the edges get crispy and slightly charred, the insides turn tender-crisp, and the flavor intensifies from a mild vegetable taste into something genuinely delicious. Unlike boiled green beans, which can taste watery and dull, roasting brings out a natural sweetness and depth that makes people actually look forward to eating their vegetables.
The beauty of this side dish is that it requires virtually no culinary skill, special equipment, or exotic ingredients. If you can chop vegetables and turn on an oven, you can make this. It comes together in minutes of prep time, roasts while you finish the rest of your meal, and emerges hot and ready to serve exactly when you need it. Whether you’re cooking a weeknight dinner for your family or preparing a side for a holiday meal, roasted green beans work every single time.
What makes this recipe truly special isn’t complexity — it’s the fact that roasting is actually the best way to prepare green beans, not just an easy way. The dry heat of the oven caramelizes the exterior, creating crispy edges and complex flavor that you simply can’t achieve any other way. Once you’ve tasted proper roasted green beans, you’ll wonder why you ever prepared them any differently.
Why Roasted Green Beans Deserve a Place on Your Dinner Table
Green beans are often overlooked as a side dish, relegated to the same boring boiled or steamed preparation year after year. But when you roast them, they transform into something entirely different — a vegetable side that people actually get excited about eating. The roasting method brings out natural sugars and creates a concentrated flavor that makes the beans taste more flavorful and substantial than their mild raw state suggests.
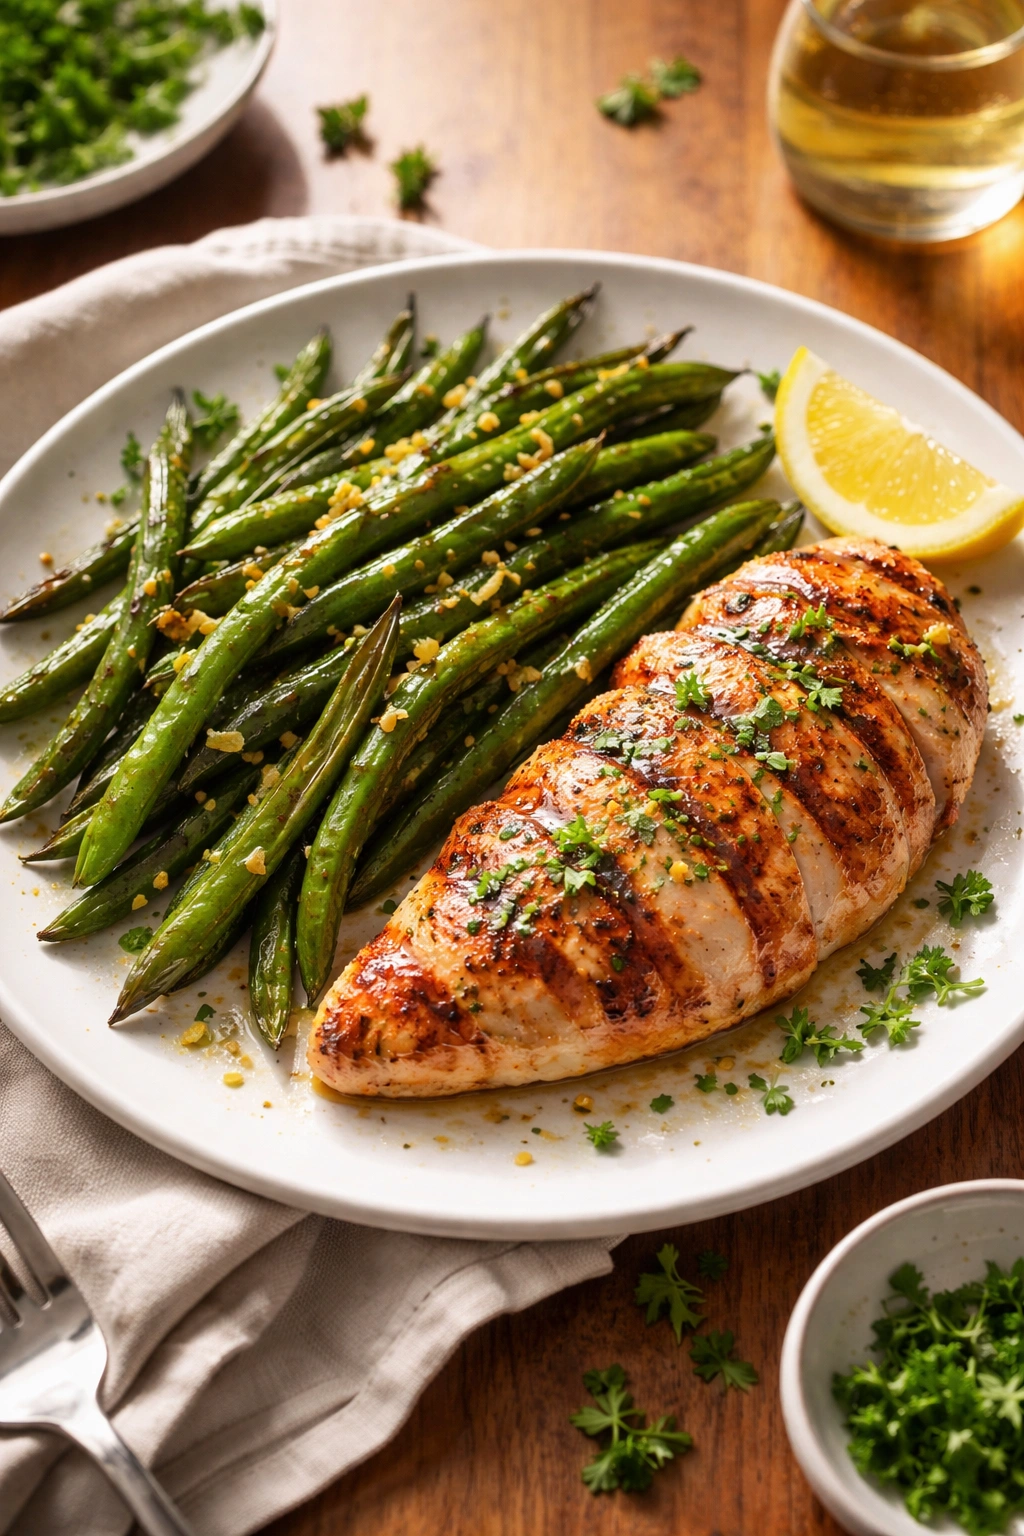
Roasted green beans pair beautifully with almost any main dish you can imagine. They work alongside grilled chicken, roasted fish, steak, pork chops, and plant-based proteins equally well. They complement rich main dishes by adding brightness and crispness, and they enhance lighter meals by providing satisfying substance. This versatility means you can serve them at casual weeknight dinners or elegant dinner parties without missing a beat.
The nutritional profile is impressive too. Green beans are packed with vitamins, minerals, and fiber while remaining low in calories. Roasting them with just a small amount of oil means you’re preserving all those nutrients while creating something that tastes indulgent. You get the satisfaction of a treated-yourself-to-something-good side dish while actually eating something genuinely nourishing.
Perhaps most importantly, roasted green beans are genuinely quick. From the moment you decide to make them to the moment they’re on the table is roughly forty minutes, and most of that time is hands-off oven time while you attend to other parts of the meal. The actual active work — trimming and tossing with oil — takes about five or ten minutes. This is real convenience in the form of a vegetable side dish.
What Makes These Green Beans So Simple and Delicious

The simplicity of roasted green beans comes from embracing rather than fighting the natural properties of the vegetable and the roasting method. You’re not trying to mask the flavor of green beans or transform them into something else — you’re highlighting what makes them good in the first place. This straightforward approach yields better results than more complicated preparations because you’re working with the ingredient instead of against it.
Roasting green beans works through the Maillard reaction, the same chemical process that creates a golden-brown crust on bread or a flavorful sear on meat. When the beans’ exterior reaches about 300°F, the proteins and sugars on the surface begin reacting with heat, creating hundreds of new flavor compounds that didn’t exist in the raw vegetable. This is why roasted beans taste richer and more complex than their boiled counterparts.
The texture you get from roasting is also distinctive and deliberately appealing. The exterior becomes crispy and slightly charred, while the inside stays tender but never mushy. You get two entirely different textures in one bite, which makes the whole eating experience more interesting. Some of the smaller beans might crisp up almost completely, while larger ones maintain a creamy center — this natural variation is actually a feature, not a flaw.
The minimal ingredient list means nothing distracts from the flavor of the actual green beans. You’re not adding cream, cheese, bread crumbs, or complex sauce components. You’re just using oil, salt, and heat to amplify what’s already there. This is cooking that feels simple because it is simple, and the results prove that simplicity is often the right choice.
Choosing and Preparing Your Green Beans
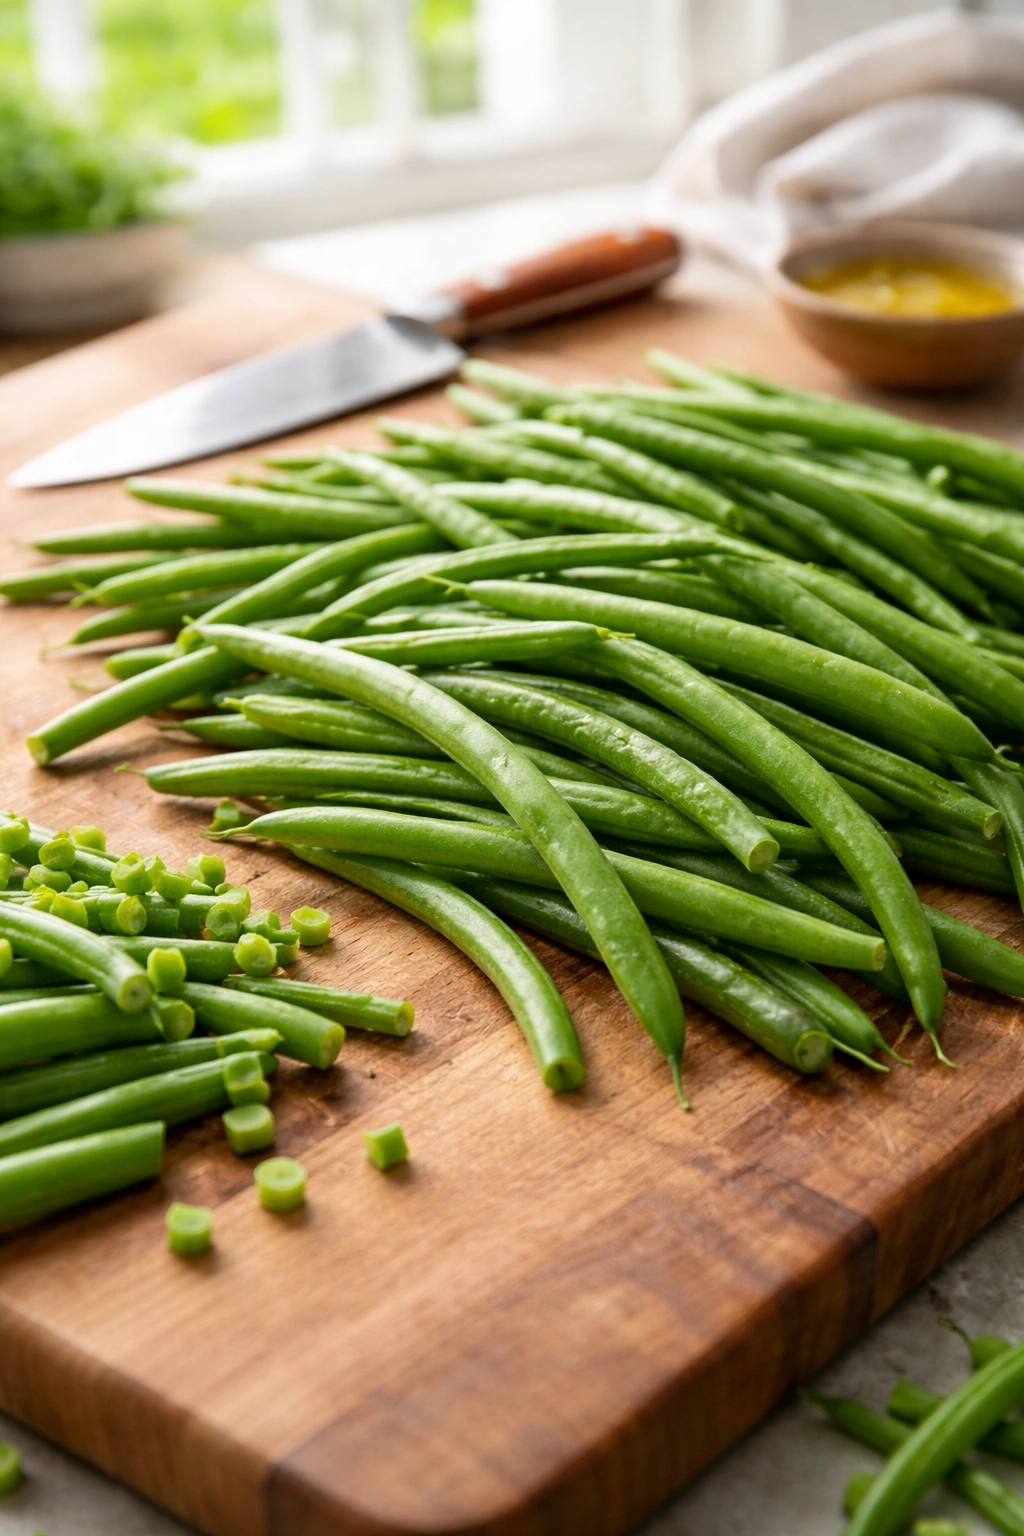
The quality of green beans you start with directly impacts the final dish, so choosing them with intention actually matters. Look for beans that are bright green with no yellowing, brown spots, or soft areas. The beans should feel crisp when you bend them, snapping cleanly rather than bending limply. Avoid any that feel shriveled, slick, or overly soft — these signs indicate age and deteriorating quality. Farmers market green beans or beans from the produce section of a good grocery store will genuinely taste better than pre-packaged ones that have been sitting in plastic for days.
Fresh is genuinely better here, but frozen green beans work perfectly well too if you’re using them. The advantage of frozen is that they’re flash-frozen at peak freshness right after harvest, locking in nutrients and flavor. If using frozen, skip the thawing step and simply toss them straight from the freezer with your oil and seasonings — they’ll cook perfectly fine. The texture will be slightly softer than fresh, but roasting still creates excellent results. Thawed frozen beans tend to release excess water, so I’d recommend against that route.
Preparing the beans is genuinely simple. Rinse them under cool running water and pat them completely dry with a clean kitchen towel. Moisture on the surface of the beans will create steam instead of allowing proper browning, so this drying step actually matters more than you’d think. Trim the ends by snapping off the stem end (the pointy end at the top) — just bend each bean and break it where it naturally wants to snap. You can leave the other end as-is or trim it too; either works fine. Some people prefer to trim both ends for a more uniform appearance, while others leave one end intact. It’s purely aesthetic.
After trimming, spread the beans on a clean kitchen towel or paper towels and let them air-dry for a few minutes while you preheat the oven. This additional drying step ensures maximum crispiness during roasting. Pat them gently if any visible moisture remains on the surface. This seems like a small detail, but it’s genuinely the difference between beans that brown beautifully and beans that steam instead.
Essential Ingredients for Perfect Roasted Green Beans

Yield: Serves 4 to 6 as a side dish | Serves 2 as a light main course
Prep Time: 10 minutes
Cook Time: 25 to 30 minutes
Total Time: 40 minutes active + oven time
Difficulty: Beginner — This recipe requires absolutely no special skills. The steps are straightforward, and there’s virtually no way to ruin a batch. Perfect for anyone picking up a cooking technique for the first time.
For the Roasted Green Beans:
- 1½ pounds fresh green beans, trimmed and patted dry
- 3 tablespoons extra-virgin olive oil
- 1 teaspoon fine sea salt (or ½ teaspoon if using table salt, which is denser)
- ½ teaspoon freshly ground black pepper
- ¼ teaspoon garlic powder (optional, but genuinely enhances the flavor)
- ¼ teaspoon red pepper flakes (optional, for a subtle heat)
Optional Finishing Touches:
- 1 tablespoon fresh lemon juice, squeezed just before serving
- Zest of 1 fresh lemon (bright and aromatic)
- ¼ cup sliced raw almonds or toasted pine nuts (for added crunch)
- 2 tablespoons grated Parmesan cheese (adds umami depth)
- 1 tablespoon balsamic vinegar (a more complex flavor angle)
- Fresh thyme or rosemary sprigs (earthy and aromatic)
The quantity of olive oil might seem small for 1½ pounds of beans, but it’s precisely measured. Too much oil and the beans won’t crisp properly — they’ll instead steam in a puddle of fat. Too little and they won’t brown evenly or develop the golden color and crispy exterior you’re after. Three tablespoons is the exact amount that coats the beans without drowning them. Extra-virgin olive oil has better flavor than regular olive oil, and it genuinely makes a difference in the final taste.
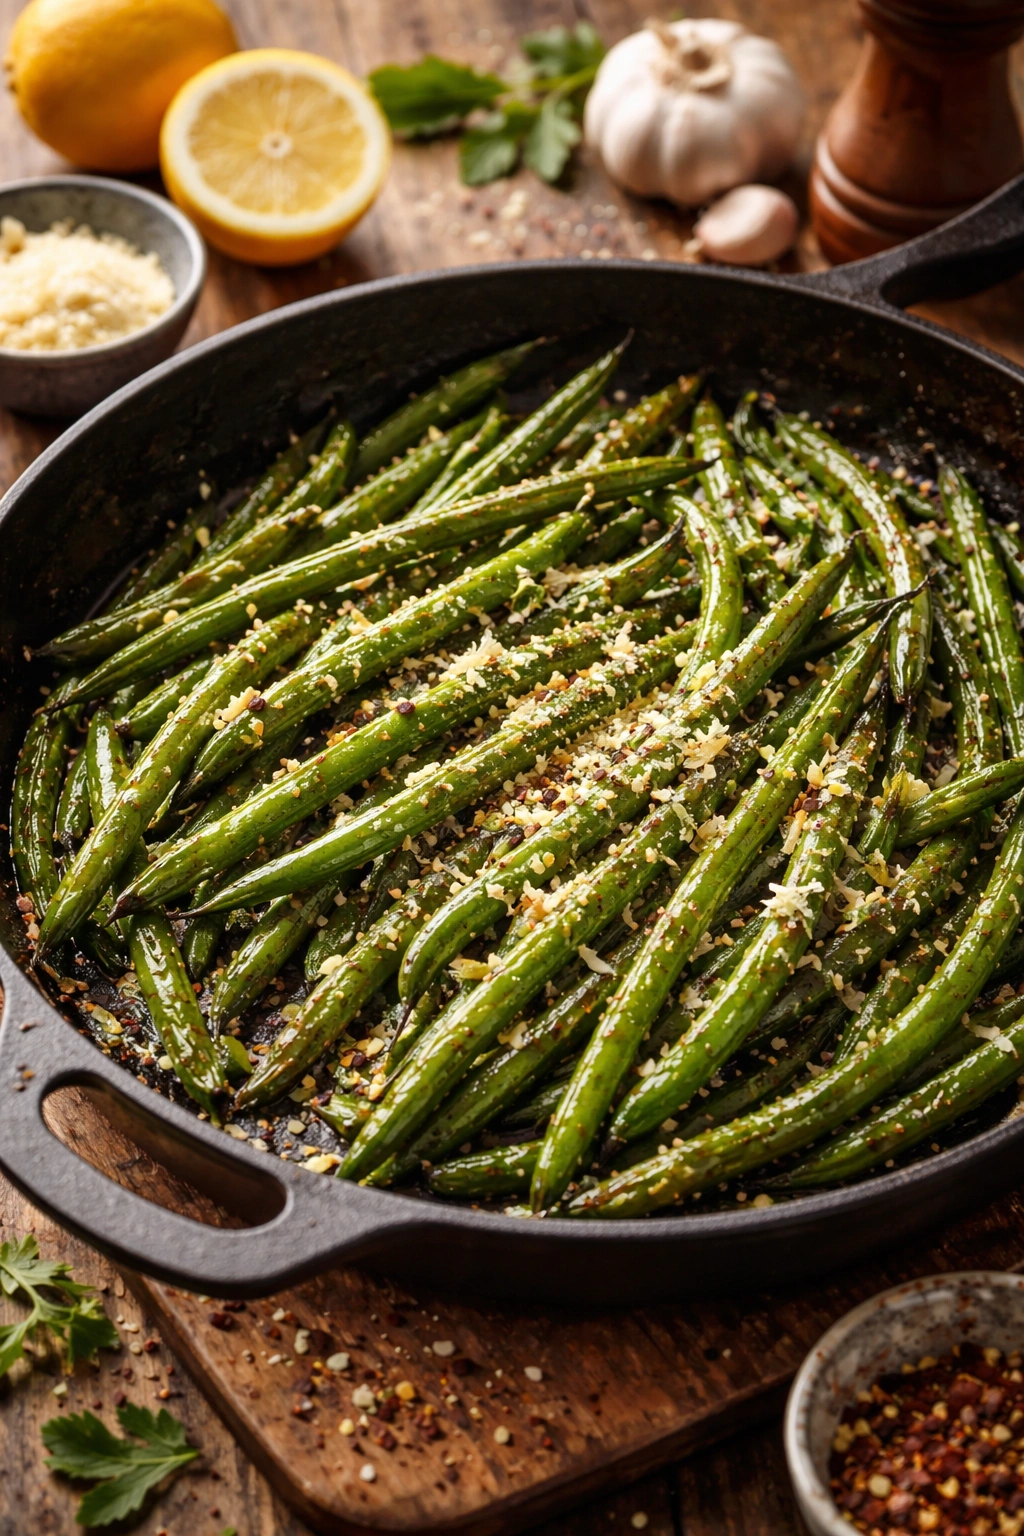
Salt matters more here than in many recipes because there’s almost nothing else adding flavor. Fine sea salt dissolves and disperses evenly, while coarse kosher salt might leave salty pockets. If you only have kosher salt on hand, measure it by weight rather than volume, or use slightly less than the recipe calls for. The garlic powder is optional but recommended — it adds savory depth without requiring you to mince fresh garlic. Black pepper should be freshly ground just before use rather than pre-ground from a tin. Fresh pepper has so much more aromatic quality that you’ll notice the difference immediately.
The optional finishing touches are where you can get creative and personalize this side dish to match your main course or your personal taste preferences. Fresh lemon juice brightens the flavor and cuts through any richness from the oil. Nuts add textural contrast and protein. Cheese adds umami, the savory fifth taste that makes food feel more substantial and satisfying. Vinegar adds complexity and slight acidity. Fresh herbs add earthiness and aroma. You don’t need all of these — even just one transforms the simple roasted beans into something that feels more intentional.
Step-by-Step Instructions
Prepare Your Oven and Sheet Pan:
-
Position your oven rack to the upper-middle position — this is where the intense heat will crisp the exterior of the beans most effectively. Preheat the oven to 425°F (220°C). Let it heat fully for at least 5 minutes before roasting; a properly preheated oven is essential for quick, even browning.
-
Line a large rimmed sheet pan (also called a baking sheet) with aluminum foil for easy cleanup, or leave it bare if you prefer — the foil just prevents staining. No oil is needed on the pan; the beans will be oiled before hitting the hot surface. If you have two sheet pans, use both so the beans aren’t crowded. Crowded beans steam; spread-out beans roast.
Toss and Season the Beans:
-
Place your trimmed, dry green beans in a large bowl. Drizzle the 3 tablespoons of olive oil over the top of the beans.
Advertisements -
Sprinkle the salt, black pepper, and any optional seasonings (garlic powder and red pepper flakes) over the oiled beans. Using your hands, toss everything together for about one full minute, turning and rotating the beans until every single bean is lightly coated with oil and seasonings. You should see a light, even coating on the exterior of each bean, with no dry, uncoated areas. Take this moment seriously — uneven seasoning means uneven flavor.
Arrange for Roasting:
- Spread the seasoned beans in a single layer on your prepared sheet pan or pans. Arrange them so they’re touching but not piled on top of each other. If the beans are crowded, some will be touching others and won’t brown evenly on those sides. It’s fine if they’re snug — just aim for a single layer rather than beans stacked on top of each other.
Roast the Beans:
-
Place the sheet pan in your preheated oven on the upper-middle rack. Set a timer for 15 minutes. The beans will begin roasting and the oil will heat up, causing the exterior to start browning.
-
After 15 minutes, remove the pan from the oven using oven mitts. Using a large spoon or tongs, shake the pan or stir the beans so they roll around and the uncooked side faces the heat. This ensures even browning on all sides. The beans should already be showing some light browning, and you might see the beginning of some darker spots.
-
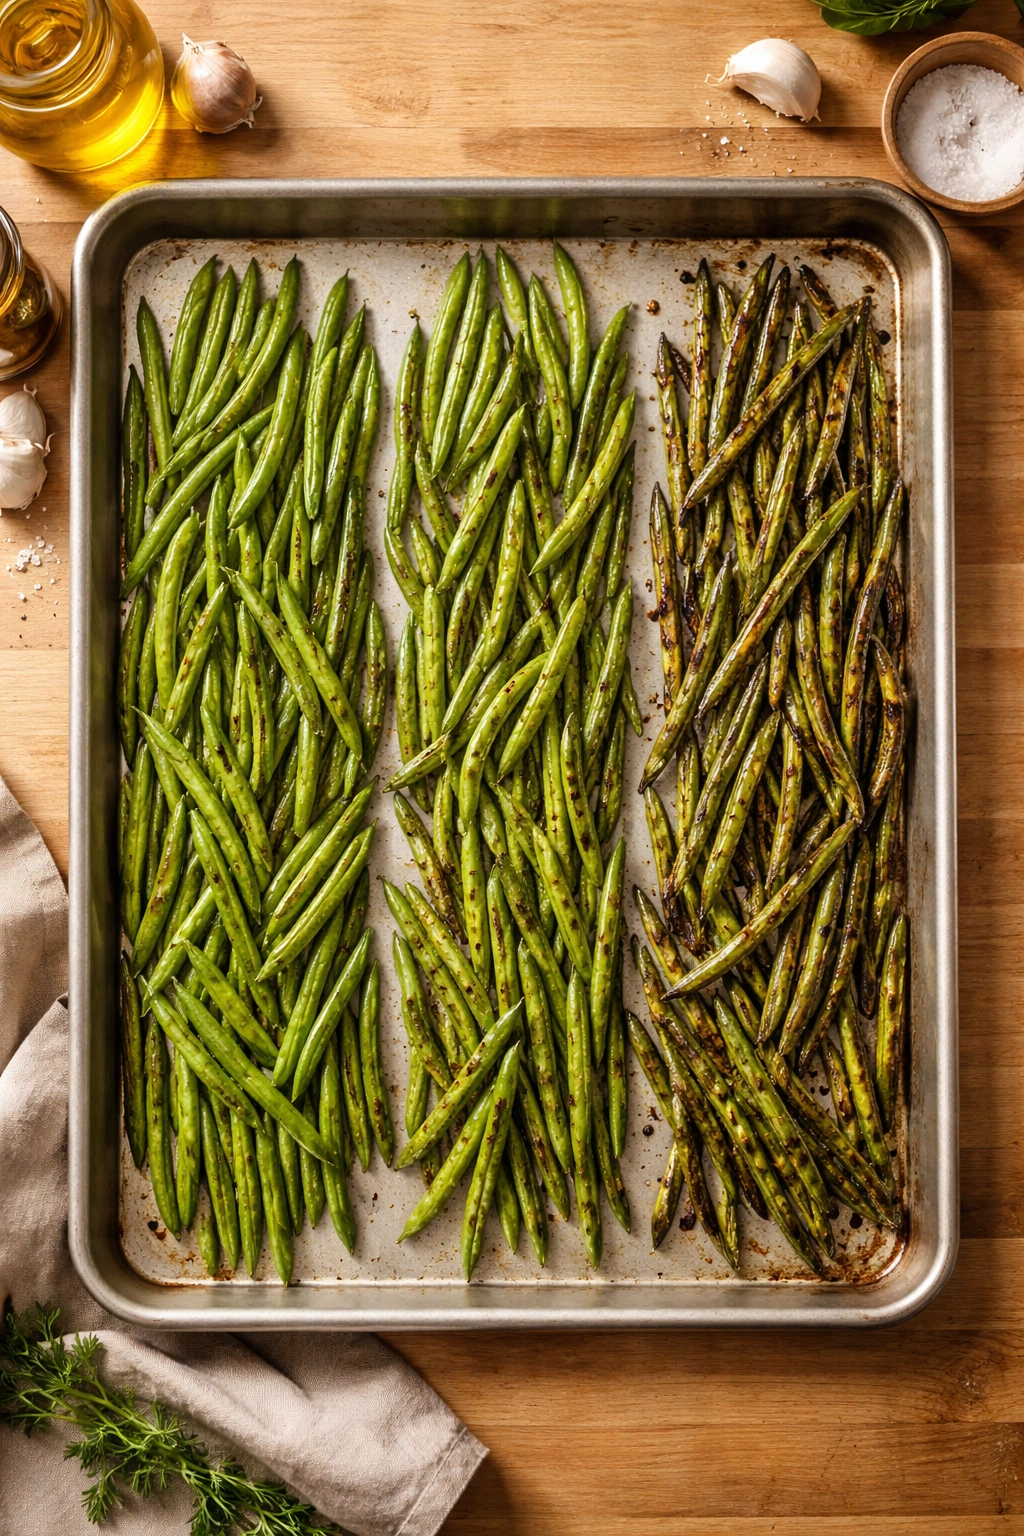
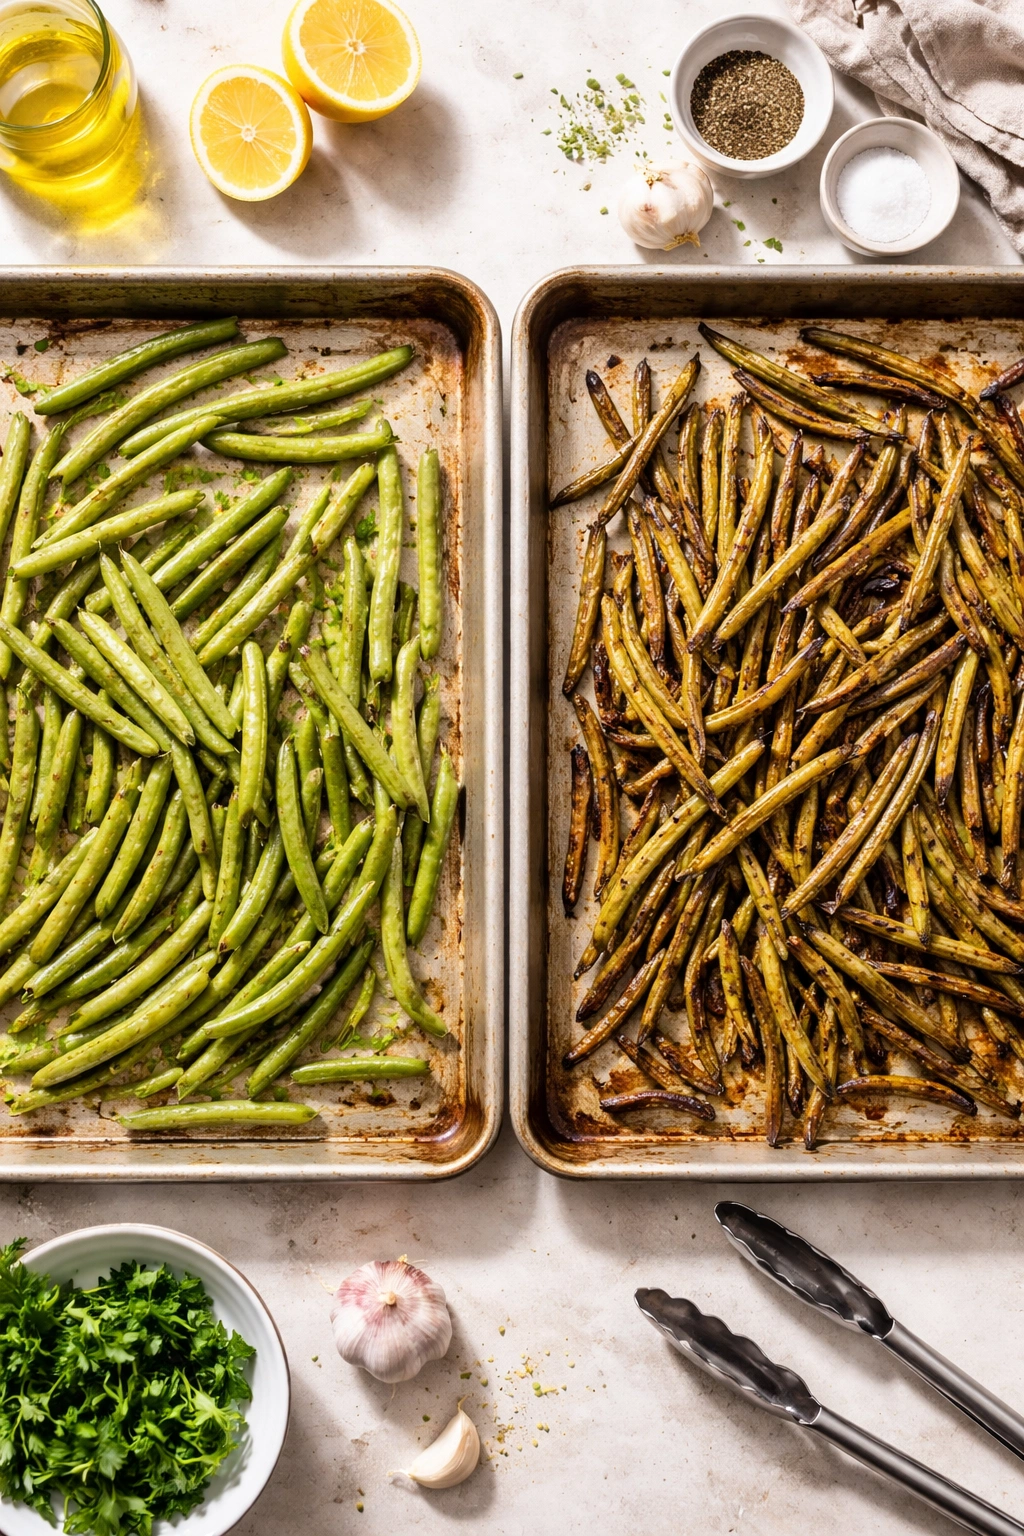
Return the pan to the oven for an additional 10 to 15 minutes. The total roasting time will be 25 to 30 minutes depending on the thickness of your green beans, the exact oven temperature, and how much browning you prefer. Thinner beans cook faster; thicker ones need the full time. Watch during the final minutes — you want deep golden-brown color with some darker charred spots, but you don’t want any completely blackened beans.
-
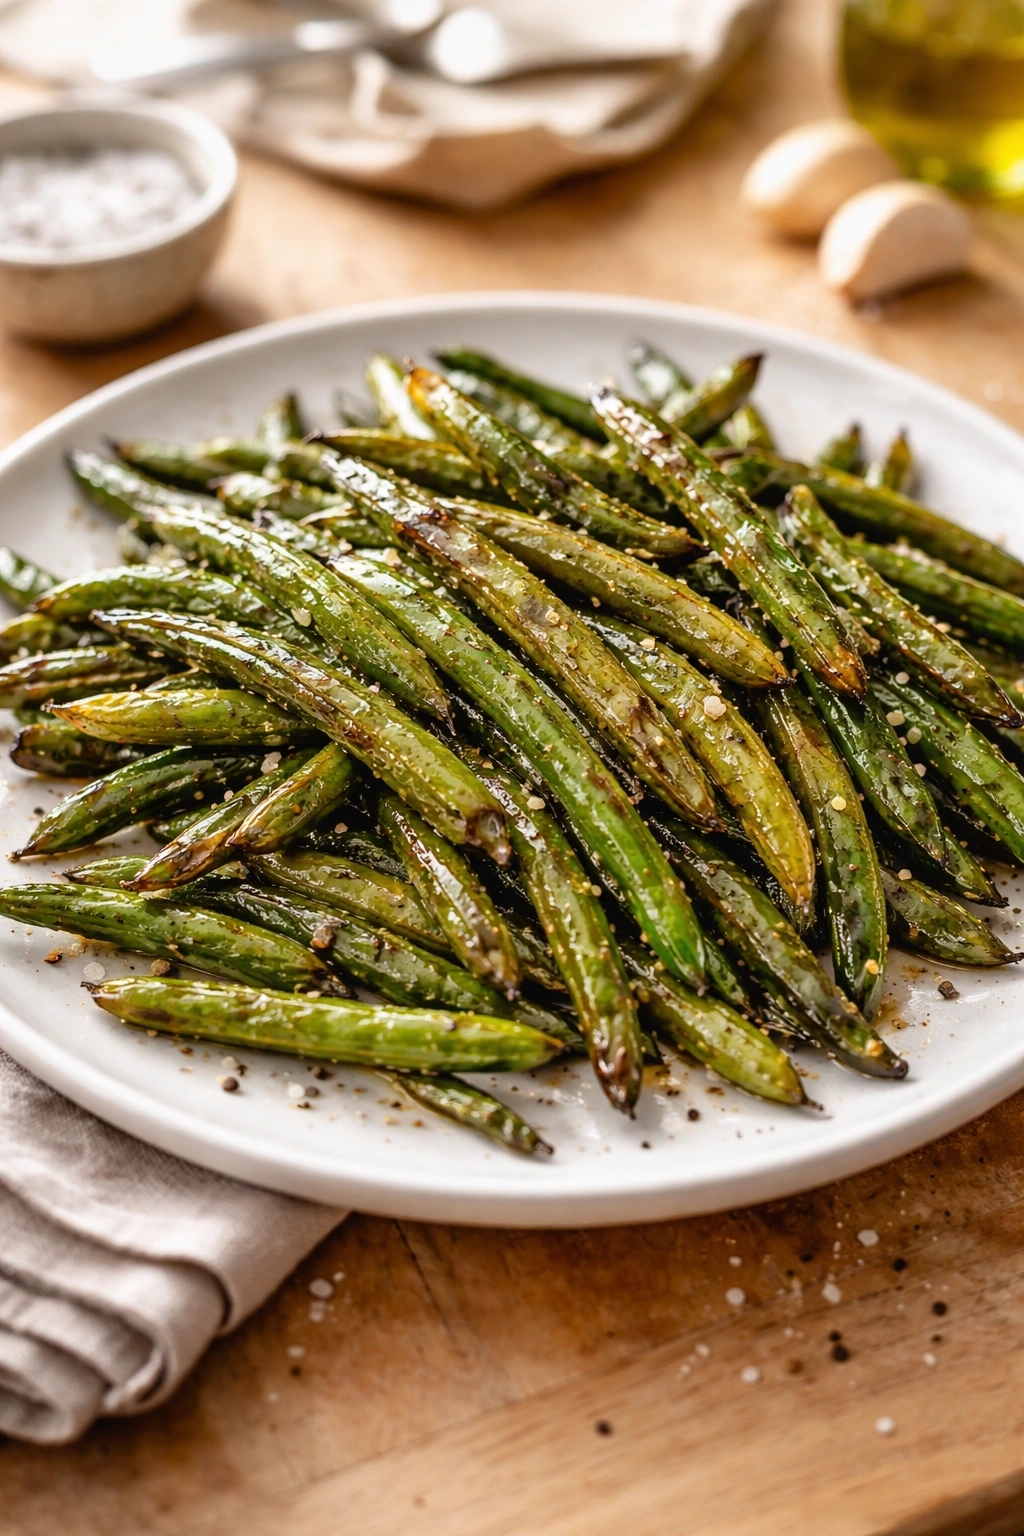
The green beans are done when the exterior is deeply browned with visible charred spots, the skin shows some wrinkling and crisping, and a fork easily pierces the interior. The beans should smell aromatic and slightly toasted. If you prefer beans with more char and crispiness, roast for the full 30 minutes or even a minute or two longer. If you prefer them with brighter color and less charring, they’re perfect at 25 minutes.
Finish and Serve:
-
Remove the pan from the oven and transfer the hot beans to a serving platter or bowl. Be very careful — the pan and the beans are extremely hot. If you’re adding fresh lemon juice, drizzle it over the hot beans immediately so it releases its aromatics and slightly softens the crispy exterior. If you’re adding fresh lemon zest, cheese, nuts, or fresh herbs, scatter them over the top while the beans are still hot.
-
Taste a bean and adjust the seasoning if needed. Add a pinch more salt if they taste flat, or a squeeze more lemon juice if you want added brightness. Serve immediately while the beans are hot and crispy. They’re best enjoyed right from the oven, but they’ll stay reasonably good for up to 10 minutes if necessary.
Advertisements
The Science Behind Perfectly Charred, Crispy Green Beans
Understanding what’s actually happening to the green beans during roasting helps you recognize when they’re perfectly done and makes you feel more confident in the process. The transformation isn’t random — it’s reliable chemistry that happens every time if you give the beans the right conditions.
When green beans first hit the hot oven, the water on their surface begins to evaporate. This is why that drying step matters so much. If your beans are wet, they spend the first several minutes steaming off that water instead of browning. Once the surface is dry, the oil heats up and the actual browning begins. The exterior of the beans, composed of proteins, sugars, and other organic compounds, undergoes the Maillard reaction at around 300°F. This creates hundreds of new flavor compounds, resulting in the complex, savory taste that makes roasted beans so much better than raw or boiled ones.
The intense heat of the upper-middle oven rack is deliberately chosen to maximize this browning. At 425°F, the exterior can brown and crisp while the interior has time to cook through without drying out. If your oven runs cool, you might need to increase the temperature slightly to 450°F. If it runs hot, you might reduce it to 400°F. You’ll learn your oven’s personality over time. The beans are done when they’re deeply browned and slightly blistered on the exterior, not pale golden — pale color indicates they haven’t reached the optimal browning temperature.
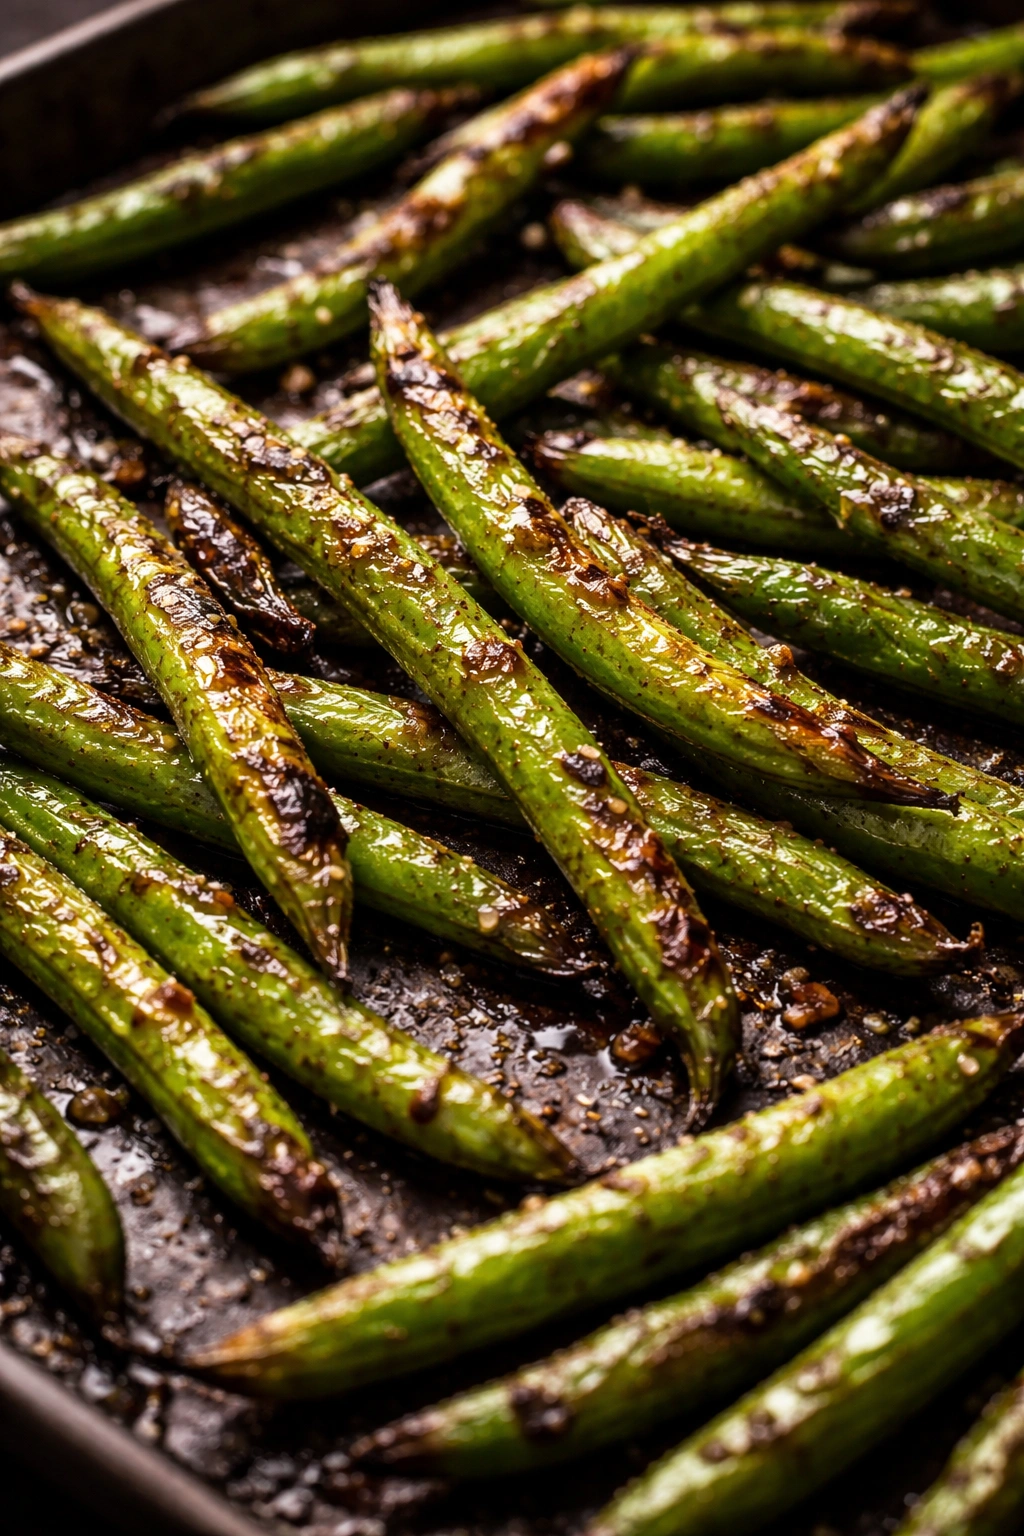
The slight charring and dark spots that appear are actually a sign of excellence, not a mistake. When the beans get hot enough to caramelize the sugars, you see browning. When they get even hotter, those sugars begin to carbonize slightly, creating darker brown and almost black spots. These charred spots are packed with intense, complex flavor. Food scientists call this point “optimal browning” — it’s the sweet spot between perfectly caramelized and actually burnt. Burnt beans are acrid and bitter; perfectly roasted beans with some char are aromatic, slightly sweet, and deeply flavorful.
The wrinkled, blistered skin you see on perfectly roasted green beans is the skin shrinking slightly as water evaporates from the bean’s interior and the heat causes the cellular structure to change. This textural shift is exactly what you want — it means the interior is cooked through while the exterior is crispy. If the beans look smooth and tight-skinned, they haven’t roasted long enough yet.
Common Mistakes That Ruin Roasted Green Beans
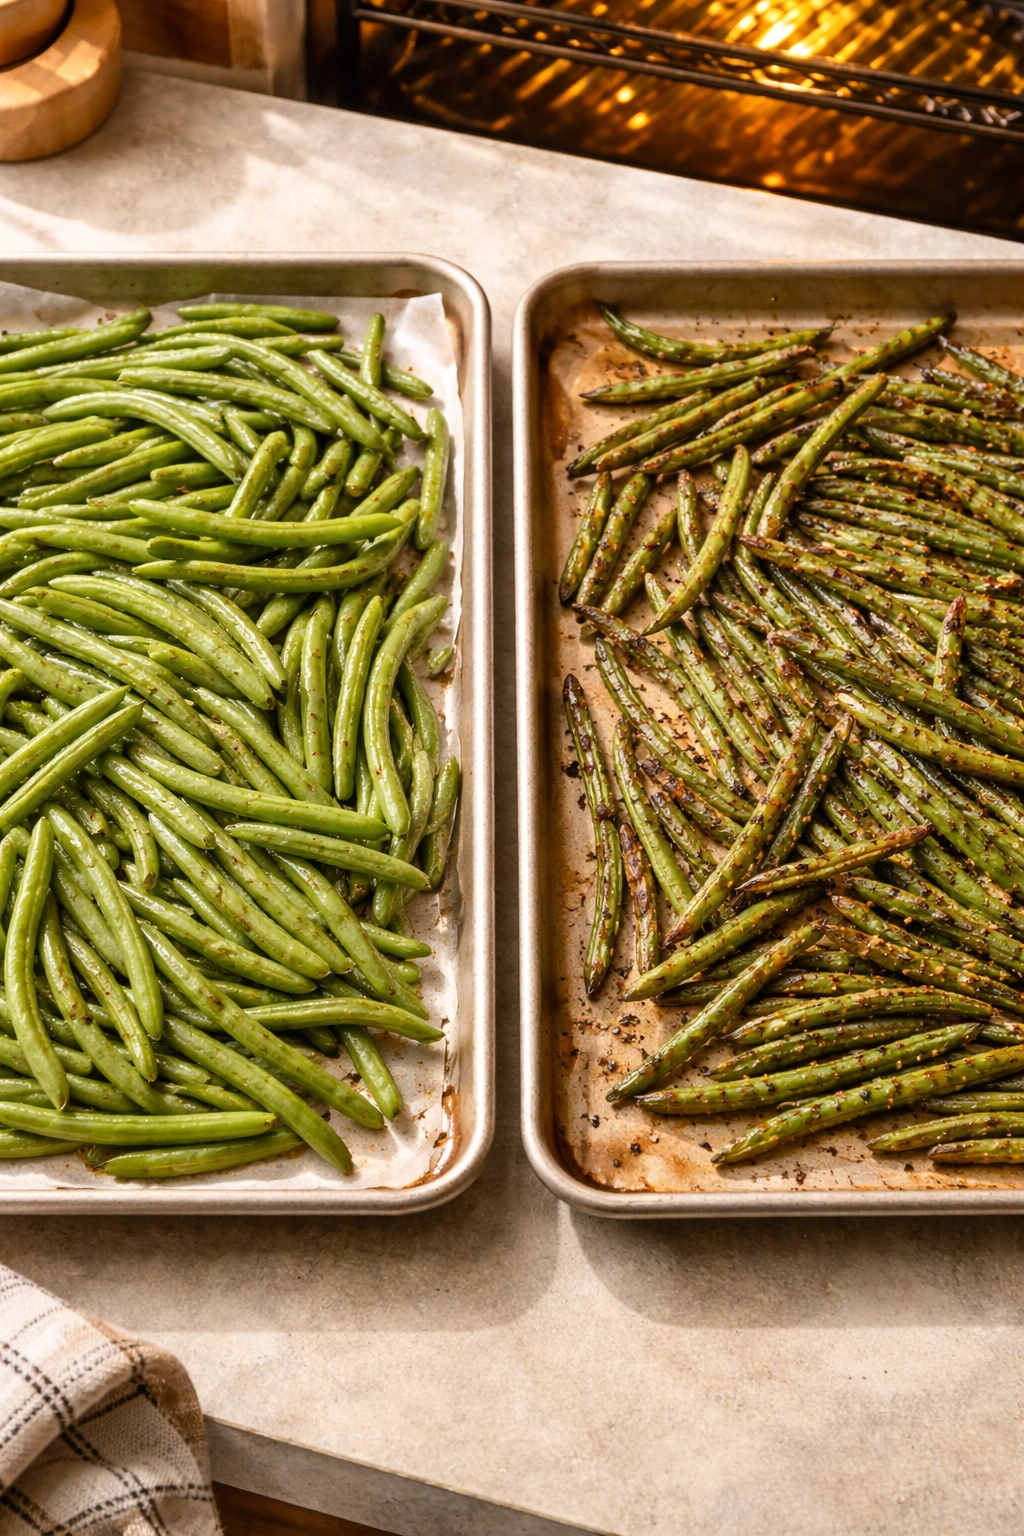
The most common mistake is crowding the beans on the pan, and it’s the single biggest factor in whether you end up with crispy, charred beans or pale, steamed ones. When green beans are piled on top of each other or packed tightly, the sides touching each other don’t get exposed to the hot air of the oven. Those sides steam from trapped moisture instead of browning. You end up with some crispy beans and some pale, soft ones, creating inconsistency. Use two sheet pans if necessary to ensure every single bean is in a single layer with air circulating around it. This genuinely matters.
Not drying the beans before roasting causes similar problems to crowding. Excess surface water creates steam, which keeps the temperature around each bean below 212°F — the point at which water boils. The beans can’t brown if the surface stays wet. Spending an extra two minutes to pat them completely dry makes an enormous difference in the final result. Pat them with paper towels or a clean kitchen towel right before tossing with oil.
Using too much oil is another frequent mistake. More than three tablespoons for 1½ pounds of beans actually prevents proper browning because the beans essentially cook in a pan of hot oil rather than roasting in dry heat. You want just enough oil to coat them lightly, not enough to pool in the bottom of the pan. Three tablespoons is exact — less oil and they’ll brown unevenly; more oil and they’ll steam or fry instead of roast.
Under-seasoning is surprisingly common with this dish. Because the ingredient list is so minimal, there’s nowhere for bland flavor to hide. If you salt the beans lightly, the result tastes flat and underwhelming. The recipe calls for 1 teaspoon of salt for a reason — it’s enough to actually season the beans throughout, not just the surface. Taste them right after roasting and don’t hesitate to add a tiny pinch more if they need it. The salt brings out the green bean flavor rather than making them taste salty.
Removing the beans from the oven too early is common among people cooking them for the first time. Pale, light golden beans are still slightly soft. Properly roasted beans have dark golden-brown color with visible charred spots and a crispy, slightly blistered exterior. If your beans look pale, they need more time. The total time will typically be 25 to 30 minutes, but don’t panic if yours need 32 or 33 minutes — ovens vary significantly. Judge doneness by appearance and feel, not strictly by clock time. The beans are done when they look deeply browned, not when the timer goes off.
Forgetting to stir them halfway through causes uneven browning on one side. After about 15 minutes, the side touching the hot pan has browned significantly while the top side is still pale. Stirring or shaking the pan ensures all sides get exposure to heat. This step takes five seconds and makes an enormous difference in the final product.
Creative Flavor Variations to Try
The basic roasted green beans are genuinely perfect as-is, but once you’ve mastered the technique, playing with flavor variations is genuinely fun. Each of these variations stays simple — you’re still just adding a few items to the bowl before roasting or sprinkling things on top after roasting.
Roasted Green Beans with Garlic and Parmesan tastes more substantial and works beautifully alongside chicken or fish. Before roasting, toss the beans with the oil, salt, pepper, and garlic powder as specified in the main recipe. After roasting, immediately sprinkle generously with grated Parmesan cheese while the beans are still hot so the cheese softens slightly into the nooks and crevices of the beans. Add fresh lemon zest if you like brightness. The umami-rich cheese transforms this into something that feels like a more intentional side dish.
Balsamic-Glazed Green Beans work perfectly with richer main dishes or alongside steak. After roasting, transfer the hot beans to a serving bowl and drizzle with 1 to 1½ tablespoons of balsamic vinegar. Toss gently so the vinegar coats everything. The acidity of the balsamic cuts through the richness of the roasted beans and adds a complex sweetness. A tiny sprinkle of fresh thyme leaves adds herbaceous depth.
Roasted Green Beans with Almonds and Lemon brings Mediterranean flavors to the plate. Toast ¼ cup of sliced raw almonds in a dry skillet over medium heat for about 4 minutes until fragrant and lightly golden, then set aside. Roast the green beans as directed, then toss them with the toasted almonds and the juice of one fresh lemon. The nuts add crunch that contrasts beautifully with the soft interior of the beans, and lemon brings brightness that cuts through the richness.
Spicy Roasted Green Beans are perfect if you enjoy heat. When tossing the beans with oil before roasting, increase the red pepper flakes to ½ teaspoon or even ¾ teaspoon depending on how spicy you like things. After roasting, sprinkle the hot beans with a tiny pinch of cayenne pepper or a dash of hot sauce if you want even more heat. This version works beautifully alongside milder main dishes or with rice and beans as a vegetarian meal.
Roasted Green Beans with Crispy Bacon are genuinely craveable as a side dish. Cook 4 to 6 slices of bacon until crispy, then crumble it. After roasting the green beans, toss them with the crumbled bacon and sprinkle with a small handful of grated sharp cheddar cheese if you like. The salty, savory bacon pairs perfectly with the crispy exterior and tender interior of the roasted beans.
Dijon Mustard-Roasted Green Beans bring tangy, complex flavor that works alongside pork or chicken. Before roasting, mix the oil with 1 tablespoon of whole-grain Dijon mustard and toss with the beans along with the salt and pepper. The mustard creates a flavorful coating that develops even more complexity during roasting. Finish with a squeeze of fresh lemon juice if you like.
Make-Ahead and Storage Solutions
Roasted green beans are genuinely best eaten immediately after roasting when the contrast between crispy exterior and tender interior is at its peak. However, they’re remarkably forgiving if you need to make them ahead or store leftovers.
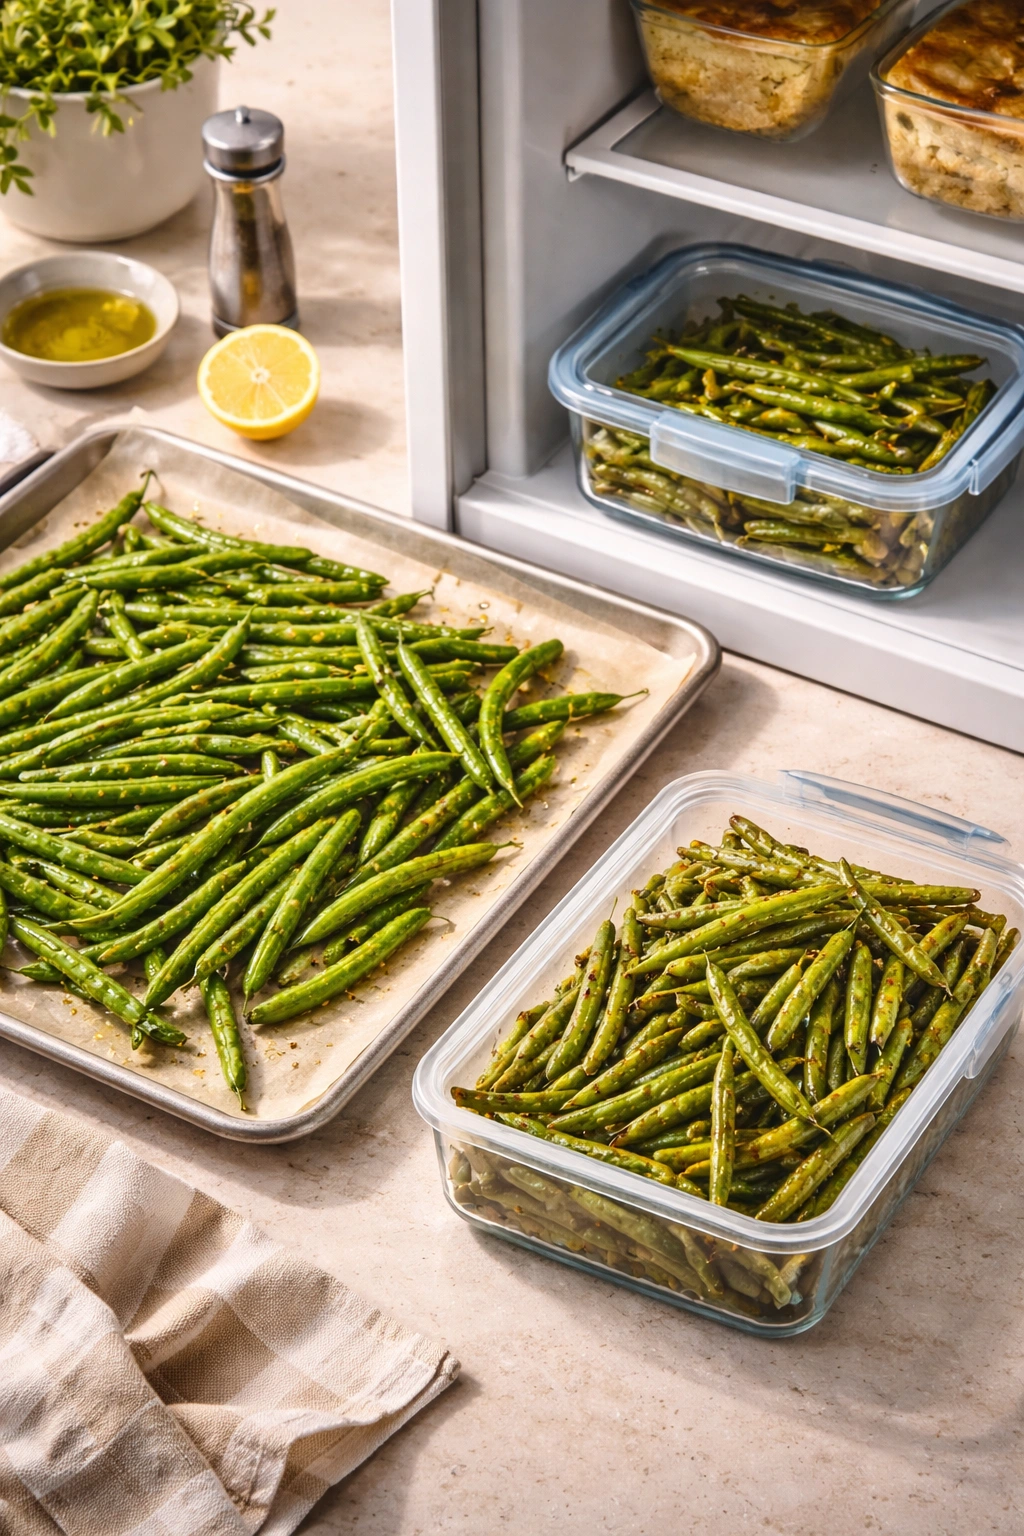
For Make-Ahead Preparation, you can trim and prepare the beans up to 6 hours in advance. Trim them, pat them dry, and store them in the refrigerator in a sealed container or wrapped in paper towels to keep them from absorbing excess moisture. When you’re ready to roast, bring them to room temperature for about 10 minutes, then toss with oil and seasonings and roast as directed. The room temperature step ensures even cooking. Alternatively, you can toss the trimmed, prepared beans with oil and seasonings up to 2 hours in advance, let them sit in the refrigerator, and roast them straight from cold. They’ll take an extra 2 to 3 minutes in the oven, but they’ll roast beautifully.
For Storage After Roasting, spread the cooled beans in a single layer on a sheet pan and refrigerate them uncovered for about 30 minutes until completely cold, then transfer them to an airtight container. They’ll keep in the refrigerator for up to 4 days. The texture will be softer than the first day, but they’ll still taste good. Cold roasted green beans are actually delicious in salads or served alongside cold protein for a simple lunch.
Reheating Roasted Green Beans is most successful in the oven rather than the microwave, which will make them mushy. Preheat your oven to 375°F and spread the beans on a sheet pan. Reheat them for about 8 to 10 minutes until heated through. They’ll regain some of the crispiness from initial roasting, though not quite as much as fresh-roasted beans. If you want to restore more crispiness, increase the oven temperature to 400°F and shorten the time to 6 to 7 minutes, checking them carefully so they don’t dry out.
Freezing roasted green beans is possible but not recommended. Roasted vegetables are best enjoyed fresh because the texture becomes softer and less crispy after freezing and thawing. If you do freeze them, spread them in a single layer on a sheet pan, freeze until solid, then transfer to a freezer bag where they’ll keep for up to 2 months. Thaw them in the refrigerator overnight, then reheat in the oven as directed above. They’ll be softer than fresh, but still edible.
For the Best Results with Leftovers, eat them within 2 days of roasting. After that, the beans become increasingly soft and the flavors flatten. They’re still safe to eat, but they’ve passed their prime. If you’re making them specifically for leftovers, consider making them slightly less crispy by roasting for 2 to 3 minutes less — they’ll be softer when reheated, but the result will be closer to what you actually prefer to eat.
Pairing Ideas and Serving Suggestions
Roasted green beans work alongside virtually any main protein because they provide textural contrast and bright flavor without being heavy or rich. They’re an especially smart choice to balance heavier mains because the crispy texture and slight char cut through richness.
With Grilled or Pan-Roasted Chicken, roasted green beans are genuinely ideal. The mild flavor of chicken allows the green beans to shine without competing. Finish the beans with fresh lemon juice and a pinch of lemon zest for brightness that complements the protein. If you’ve made the Parmesan variation, that’s even better because the umami richness of the cheese balances with the lean protein.
With Steak or Grilled Beef, roasted green beans bring elegance to a simple plate. The crispy exterior of the beans echoes the crust on the steak, and the slight char adds complementary depth. Finish them with a drizzle of balsamic vinegar and fresh thyme for a more sophisticated presentation.
With Roasted or Grilled Fish, roasted green beans provide crispy texture that contrasts with the delicate, flaky protein. Finish them with fresh lemon juice and maybe a pinch of sea salt — the lemon brightness works beautifully with fish. The almonds variation is also excellent with fish because nuts echo the delicate, slightly nutty flavor of many fish varieties.
With Pork Chops or Pork Roast, roasted green beans are traditional for a reason. The slight sweetness that develops during roasting complements the richer, meatier flavor of pork. Finish them with Dijon mustard (which also pairs beautifully with pork) or keep them simple with just lemon.
For Vegetarian or Vegan Meals, roasted green beans can actually be the centerpiece of a satisfying plate. Serve them alongside grains like quinoa or farro, roasted chickpeas, and a flavorful sauce. Toss them with tahini and lemon juice for richness, or add crispy tofu for protein. The Parmesan-Garlic variation is delicious (using dairy-free Parmesan if needed for a vegan version) or the Bacon variation with tempeh bacon for a plant-based take.
For Holiday Dinners and Entertaining, roasted green beans look elegant and taste impressive without requiring last-minute fussing. You can roast them earlier in the day, reheat them briefly right before serving, and plate them on a serving dish with fresh herbs scattered over the top. They stay warm enough for 10 minutes if covered loosely with foil, which gives you flexibility in timing. Finish them with a fancy touch like toasted nuts or fresh herbs to make them feel special.
As Part of a Vegetable-Forward Meal, roasted green beans pair beautifully with other roasted vegetables like carrots, broccoli, cauliflower, or Brussels sprouts. You can roast them all on the same pan if you time it right — add longer-cooking vegetables like carrots first, then add the green beans halfway through. They’ll finish cooking at the same time, creating a simple, gorgeous vegetable side dish.
For Casual Family Dinners, roasted green beans feel more intentional and exciting than boiled or steamed vegetables while requiring no additional work. Kids who normally turn up their noses at vegetables often surprise themselves by enjoying the crispy, charred exterior and slightly sweet taste that roasting creates.
Troubleshooting Your Roasted Green Beans
If Your Beans Are Too Pale or Barely Browned, they need more roasting time. The oven temperature might be lower than 425°F, so check your oven thermometer if you have one. Pale beans indicate the Maillard reaction hasn’t fully occurred, which means the flavor won’t be as developed. Next time, roast for the full 30 minutes or even slightly longer, and position the oven rack higher up where the heat is more intense. Don’t remove the pan until the beans show deep golden-brown color.
If Your Beans Are Completely Black or Charred Beyond Crispy, the oven temperature was too high or they roasted too long. Next time, reduce the oven temperature to 400°F or remove them after 25 minutes instead of 30. The goal is deep golden-brown with darker spots, not all-over black. Completely charred beans taste acrid and bitter rather than complex and flavorful. However, if you like extra-crispy, almost-burnt beans, that’s entirely a matter of preference — just keep it intentional.
If Your Beans Are Soft or Mushy With No Crispiness, they likely steamed rather than roasted. Check that the pan wasn’t crowded and that the beans had space for air to circulate. Also make sure they were patted completely dry before roasting. Next time, dry them extra carefully and spread them with plenty of space between each bean. If you prefer softer beans, that’s fine — they’ll taste good even if they’re not crispy — just accept that’s your texture preference rather than a mistake.
If Half the Batch Is Crispy and Half Is Soft, the pan was likely crowded or the beans weren’t stirred halfway through. Some beans had more heat exposure than others. Next time, use two sheet pans if necessary to ensure every bean is in a single layer, and stir them at the 15-minute mark. Also make sure all the beans are roughly similar in size before roasting — tiny beans cook faster than jumbo ones, so sorting by size helps everything finish at the same time.
If Your Beans Taste Bland, they didn’t get enough salt during roasting. The recipe calls for 1 teaspoon of salt specifically to season the beans through and through. Next time, use the full amount and don’t reduce it. If you did use the full amount but they still taste bland, your salt might be old or low-quality — salt has flavor, and old salt loses its aromatics. Buy fresh salt and try again.
If Your Beans Taste Waterlogged or Oily, they probably steamed rather than roasted. This is usually a crowding issue. Next time, spread them with plenty of space between each bean. Also double-check the amount of oil — more than 3 tablespoons for 1½ pounds is too much and will cause this issue.
If Your Beans Are Unevenly Cooked, the oven has hot spots where temperature varies. This is normal in many home ovens. Rotate the pan halfway through roasting so it’s cooked evenly. Also make sure the oven was fully preheated to temperature before you put the beans in — it needs a full 5 minutes to stabilize.
Final Thoughts

Roasted green beans might be the simplest side dish you learn to make, but they’re also one you’ll come back to again and again because they work beautifully and taste genuinely delicious. The technique is foolproof once you understand the core principle: you need high heat, properly spaced beans, and enough time for the exterior to brown and crisp.
The genius of this dish is that the simplicity actually serves it well. There’s nowhere to hide if the green beans themselves aren’t good quality or if your seasoning is off. This forces you to pay attention and do the small things right — choosing good beans, drying them completely, seasoning them properly, and giving them adequate space to roast. These attentive choices lead directly to better results, which builds confidence in the kitchen generally.
Once you’ve made roasted green beans a few times, you’ll understand the fundamental cooking principle they demonstrate: proper heat, proper timing, and proper technique create flavors and textures that no amount of complicated ingredients or fancy techniques could replicate. This is core cooking knowledge that makes you genuinely better in the kitchen. You’ll start applying these principles — high heat for browning, proper spacing for air circulation, seasoning adequately for flavor — to other recipes and other techniques. Roasted green beans are a gateway to better cooking overall.