The first time someone serves you hasselback potatoes at a dinner party, you might think they spent hours slicing and fussing. Those accordion-like layers, the golden crispy edges, the buttery insides — it looks like restaurant-level technique. Here’s the secret that’ll change your dinner game: hasselback potatoes are genuinely easier than they look. Seriously. If you can hold a knife and turn on an oven, you can make restaurant-quality hasselback potatoes that’ll have everyone wondering when you learned to cook fancy.
What makes these potatoes so deceptively simple is that the hard part—the slicing—happens once, at the very beginning. You’re not doing anything complicated or time-sensitive after that. You just nestle them in a baking dish, brush them with butter and seasonings, and let the oven do the actual work. The thin slices crisp up beautifully on the outside while the inside stays tender and fluffy. You end up with a side dish that looks like you spent far more effort than you actually did, which is honestly the dream when you’re cooking for people.
The Story Behind Hasselback Potatoes
Hasselback potatoes come from Hasselbacken, a restaurant in Stockholm, Sweden, where the chef created this technique sometime in the 1950s as an elegant way to serve potatoes. The thin slices meant more surface area for butter and seasonings to soak in, creating maximum flavor and texture contrast—crispy outside, tender within. What started as a fancy European restaurant technique became a classic dinner-party side dish that home cooks realized wasn’t nearly as complicated as it looked.
The beauty of this recipe is that it bridges the gap between “casual weeknight dinner” and “I’m impressing people tonight.” You can make it with just salt, pepper, and butter for understated elegance, or you can load it up with garlic, herbs, and different cheeses depending on what you’re serving it alongside. Either way, the technique stays exactly the same.
Why They Look Harder Than They Actually Are
The secret anxiety around hasselback potatoes comes from that slicing step. The thin cuts make people nervous—they worry about cutting all the way through the potato, or about the knife slipping, or about whether they’re doing it “right.” But here’s what actually happens: you’re not trying to separate the slices completely. You’re making shallow cuts that go most of the way through but leave the bottom intact, so the potato stays as one piece while the layers fan out during cooking.
Think of it like this: you’re basically creating controlled cracks in the potato’s structure. These cracks fill with butter and seasonings, which then get roasted until everything is golden and crispy. The slices don’t fall apart during cooking because the bottom stays connected, and that structural integrity is what creates the signature layered appearance.
Once the slicing is done—which takes maybe ten minutes for four potatoes with a little practice—you’re essentially just seasoning and roasting. There’s no stirring, no flipping, no stress. You butter them, season them, and forget about them for an hour while they become this golden, crispy-edged masterpiece. That’s it.
Choosing and Preparing Your Potatoes
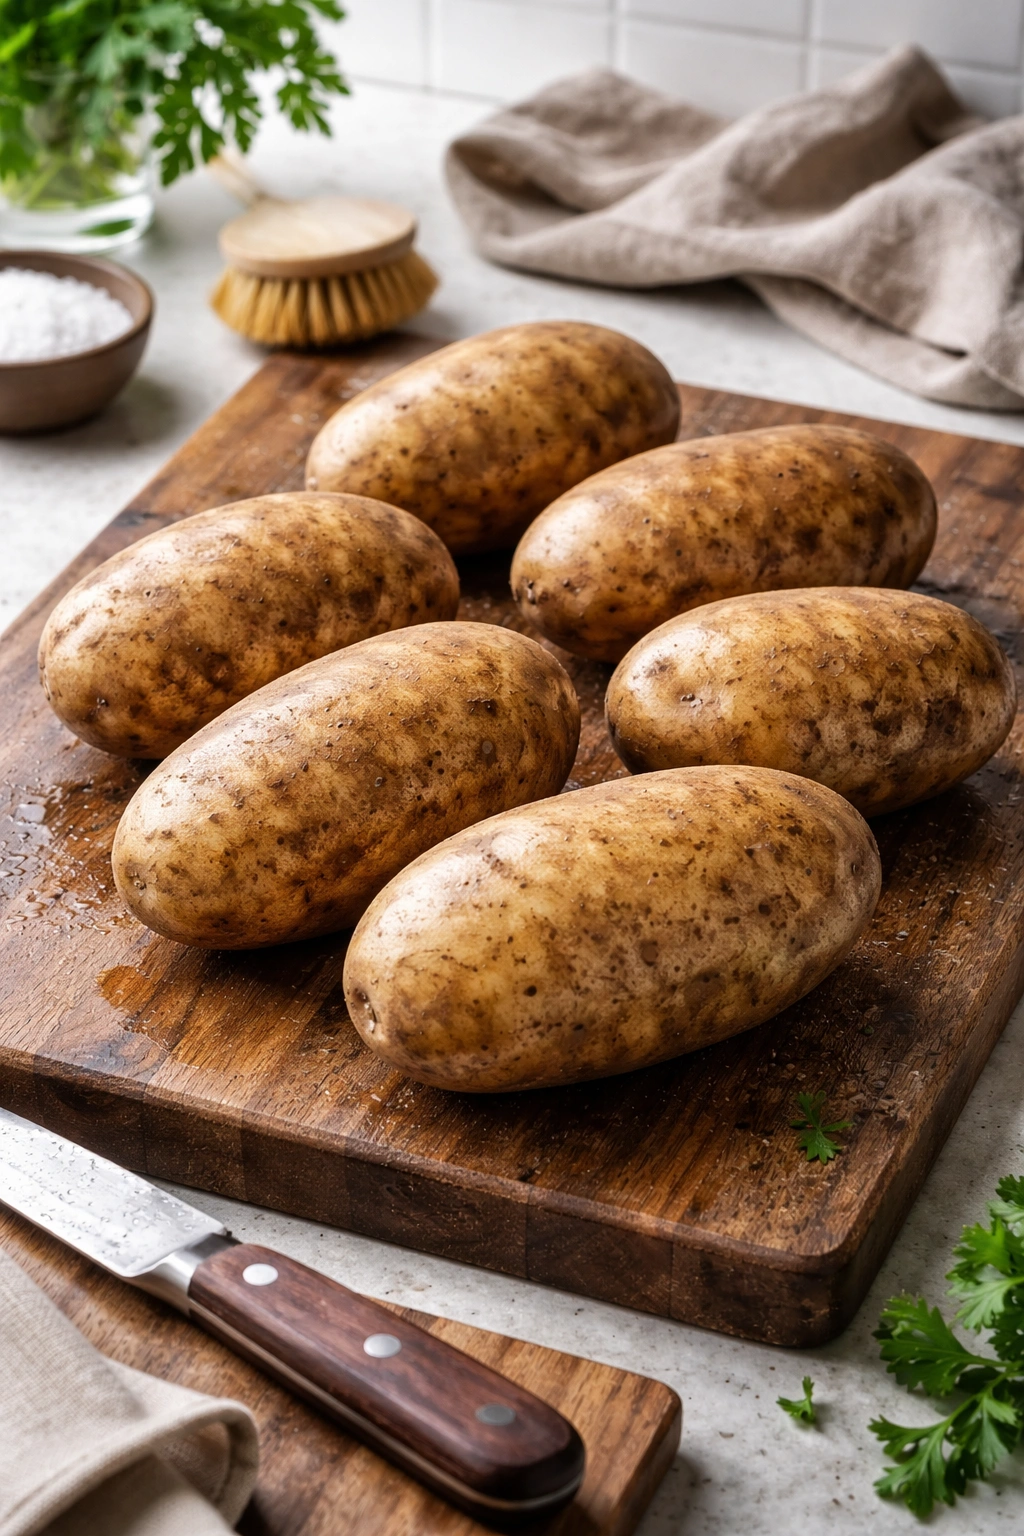
Potato selection matters more than most recipes acknowledge. You want medium-sized russet potatoes—roughly four to five inches long—because they’re sturdy enough to hold their shape during cooking and have that ideal ratio of surface area to depth. Russets have enough starch to get crispy on the outside while staying fluffy on the inside, which is exactly what you want here.
Avoid waxy potatoes like red or fingerling potatoes—they’re lower in starch and won’t crisp up the same way. You also want to skip really huge potatoes because they won’t cook through properly before the outsides burn. Medium is genuinely the sweet spot.
Start by scrubbing your potatoes under cold running water to remove any visible dirt. If you have a vegetable brush, great; if not, a clean kitchen towel works fine. You don’t need to peel them—the skin is entirely edible and actually adds to the visual appeal of the finished dish. Pat them completely dry with a clean towel after washing, because moisture on the surface interferes with browning.
Essential Equipment and Setup
You need surprisingly little to make hasselback potatoes successfully. The key tool is a sharp knife—a chef’s knife or a serrated bread knife both work, though a chef’s knife gives you more control. Dull knives are dangerous because you have to apply more pressure, which increases the risk of slipping and cutting yourself rather than the potato cleanly.
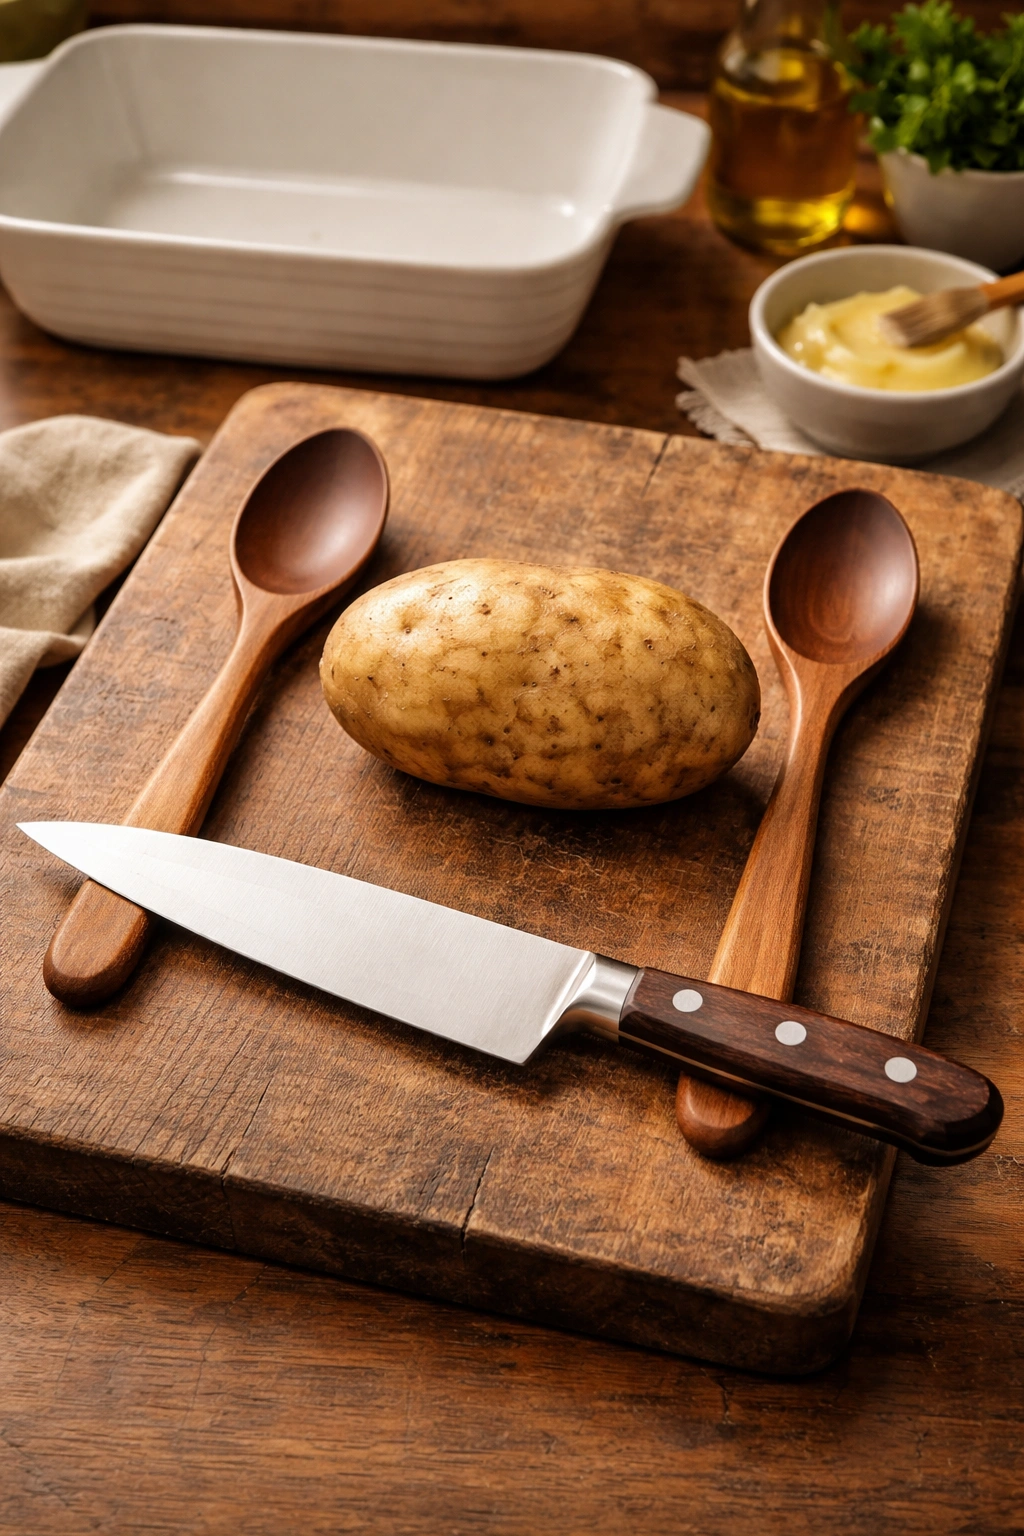
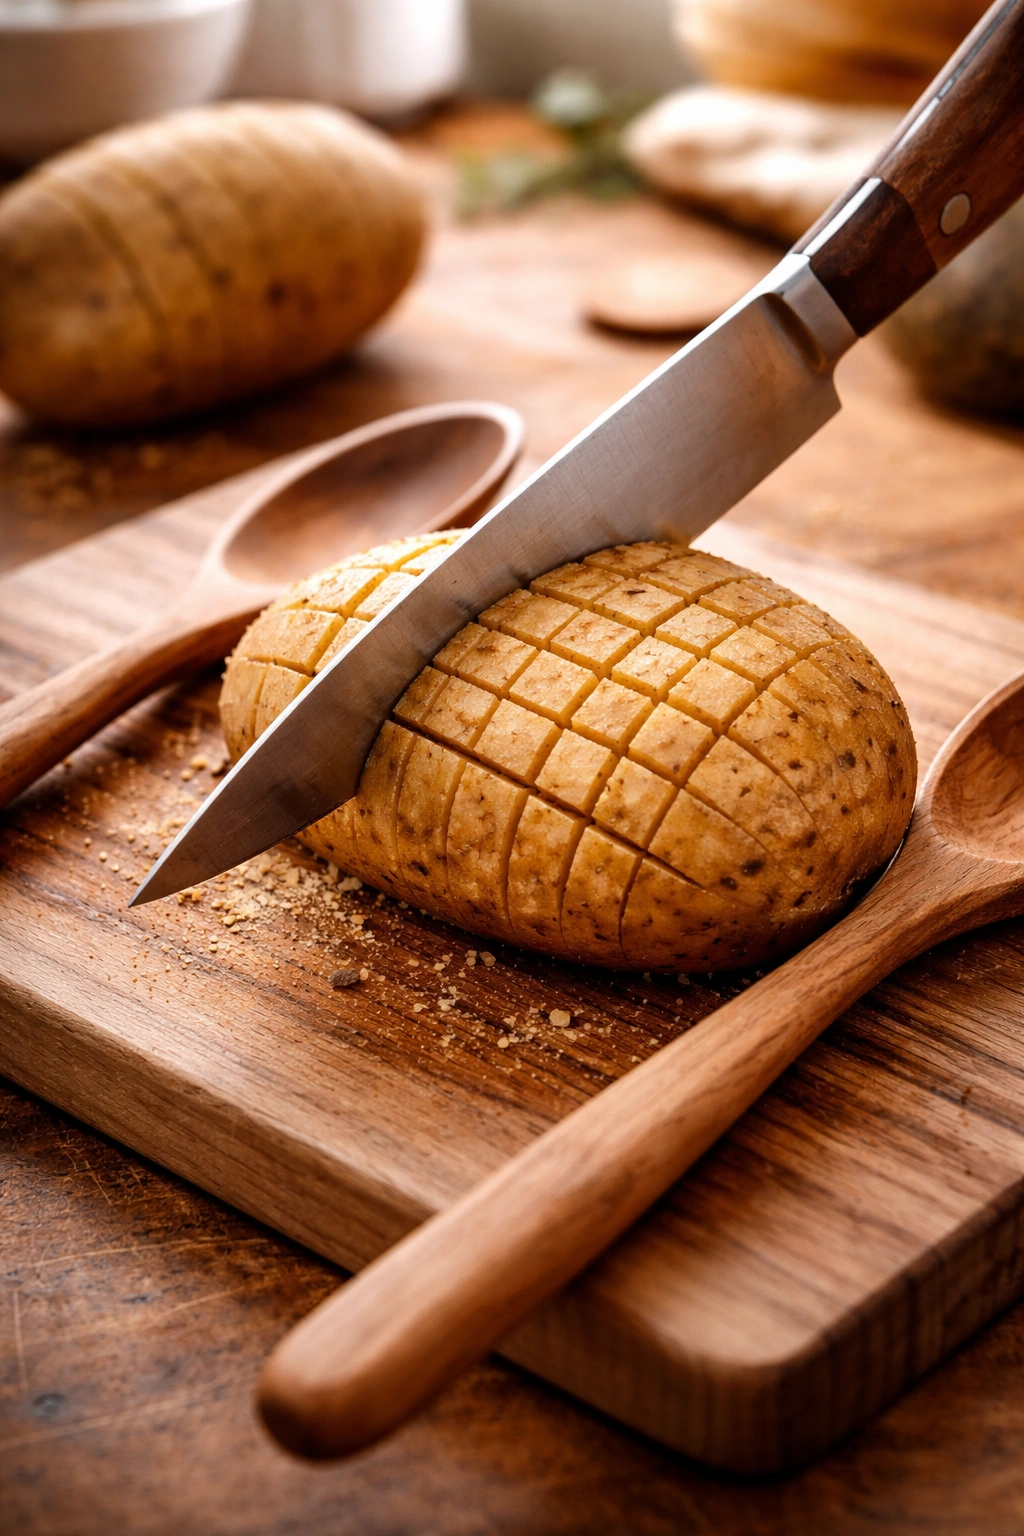
If you’re nervous about slicing accuracy, there’s a helpful trick: place the potato on a wooden cutting board and position two wooden spoons, one on each side of the potato. The spoon handles create a natural stopping point—when your knife blade hits the wooden spoon, you know you’ve gone deep enough without cutting all the way through. This visual guide takes the guesswork out of depth.
For cooking, you need a baking dish or baking sheet that’s large enough to hold your potatoes without crowding them. An 8×10 inch or 9×13 inch baking dish works perfectly for four to six potatoes. Avoid anything too small because the potatoes need room for air to circulate around them for even browning. A pastry brush (silicone or natural bristle) makes brushing butter and seasonings much easier than a spoon, but you can absolutely use a spoon if that’s what you have.
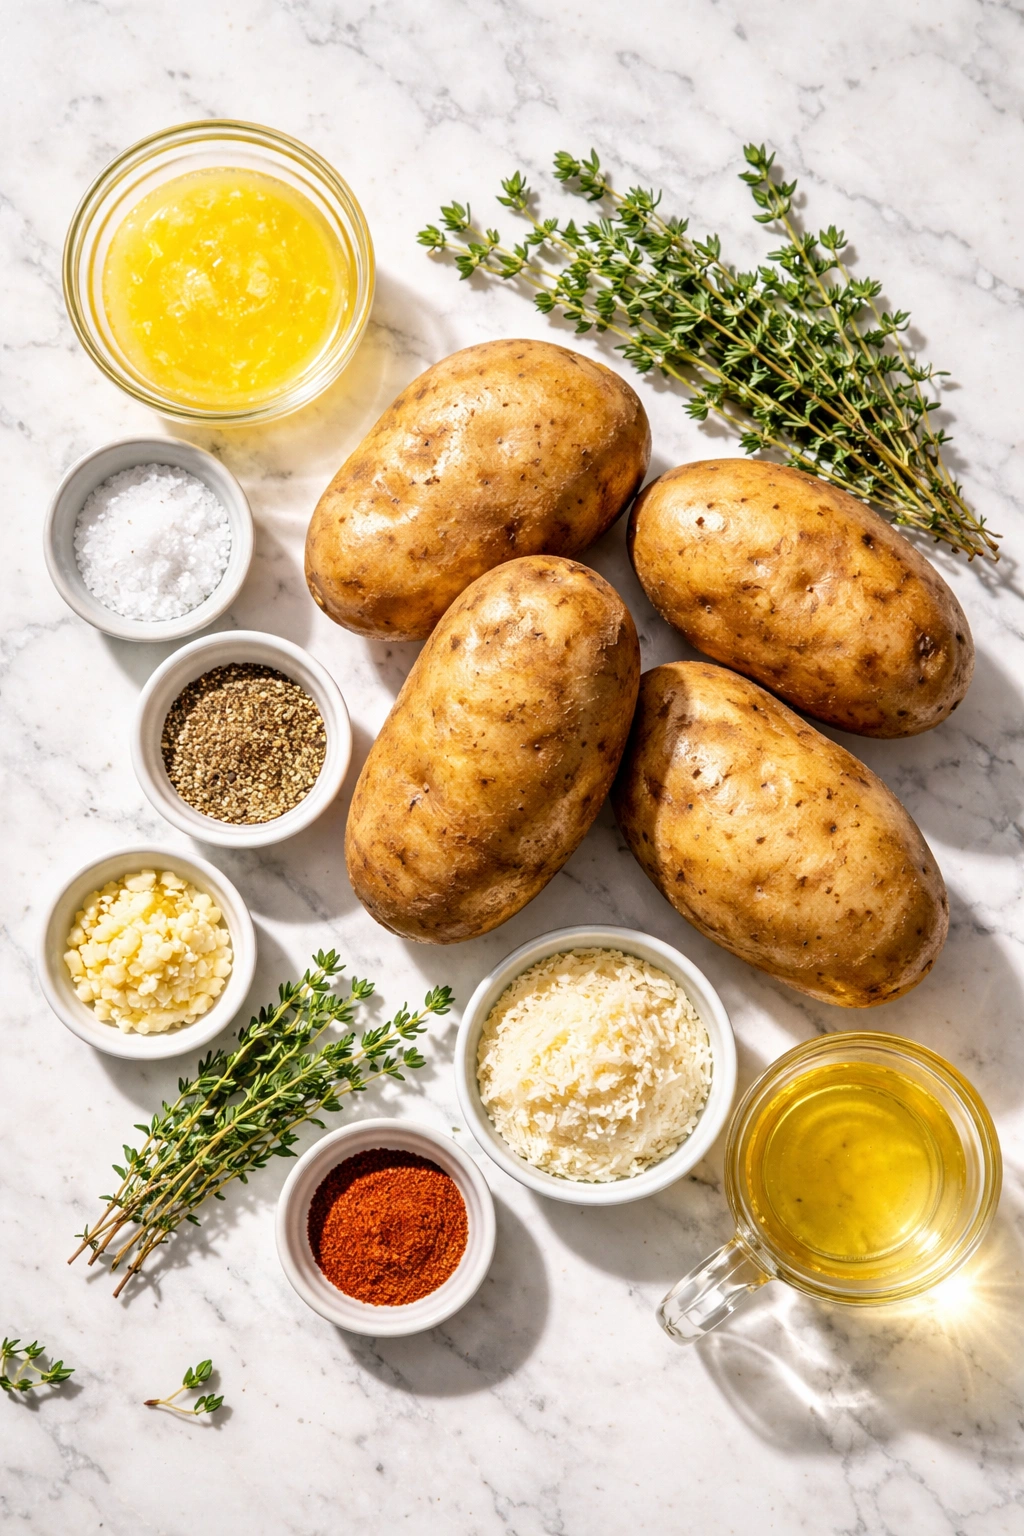
What You’ll Need: Ingredients and Timing
Yield: Serves 4 as a side dish | Makes 4 large potatoes
Prep Time: 20 minutes (mostly slicing)
Cook Time: 50 to 60 minutes
Total Time: About 1 hour 15 minutes
Difficulty: Beginner — The slicing requires some care and attention, but there’s no advanced cooking technique required, and the roasting is entirely hands-off. Even first-time cooks succeed consistently with this recipe.
For the Potatoes:
- 4 medium russet potatoes (about 6 to 8 ounces each)
- 5 tablespoons unsalted butter, melted
- 1 teaspoon fine sea salt
- ½ teaspoon freshly ground black pepper
- 3 cloves garlic, minced very fine (or 1 teaspoon garlic powder if you prefer)
- 1 teaspoon fresh thyme leaves (or ½ teaspoon dried thyme)
- ¼ teaspoon smoked paprika (optional but adds lovely color and depth)
- 2 tablespoons fresh parmesan cheese, finely grated (optional)
- ½ cup low-sodium vegetable or chicken broth (or water — this keeps the potatoes moist)
Optional Additions for Variations:
- Rosemary, sage, or oregano in place of thyme
- A pinch of cayenne pepper or red pepper flakes for subtle heat
- Sharp cheddar or gruyere cheese for more savory depth
- A squeeze of fresh lemon juice brushed on just before serving
Step-by-Step Instructions
Prepare the Potatoes:
-
Preheat the oven to 400°F (200°C) and position the rack in the center. Line a baking sheet with aluminum foil for easy cleanup, though it’s optional.
-
Scrub the potatoes under cold running water until completely clean, then pat them absolutely dry with a clean kitchen towel. Any remaining moisture will interfere with browning.
-
Place a potato on a cutting board. Position two wooden spoons, one on each side of the potato lengthwise, so the handles extend parallel to the potato — they’ll act as depth guides.
-
Using a sharp chef’s knife or serrated bread knife, slice perpendicular to the cutting board at roughly ¼-inch intervals, working from one end of the potato to the other. Slice all the way down until the knife blade touches the wooden spoon handles — stop there. The spoons prevent you from cutting completely through the potato’s bottom.
-
Rotate the potato 90 degrees and repeat the slicing process with the same spacing, creating a cross-hatch or grid pattern of thin slices. The potato will start to look like it’s slightly fanned, but it still holds together as one piece. This is exactly right.
-
Repeat the slicing process with the remaining three potatoes. This entire step usually takes 10 to 15 minutes — don’t rush it, but don’t obsess over perfect spacing either. Consistency matters more than perfection.
Season and Prepare for Roasting:
-
Arrange the sliced potatoes cut-side up in a single layer in a 9×13-inch baking dish. Place them so they’re snug but not crowded — you want them to touch each other slightly so they stay upright, but not so squeezed that steam can’t circulate.
-
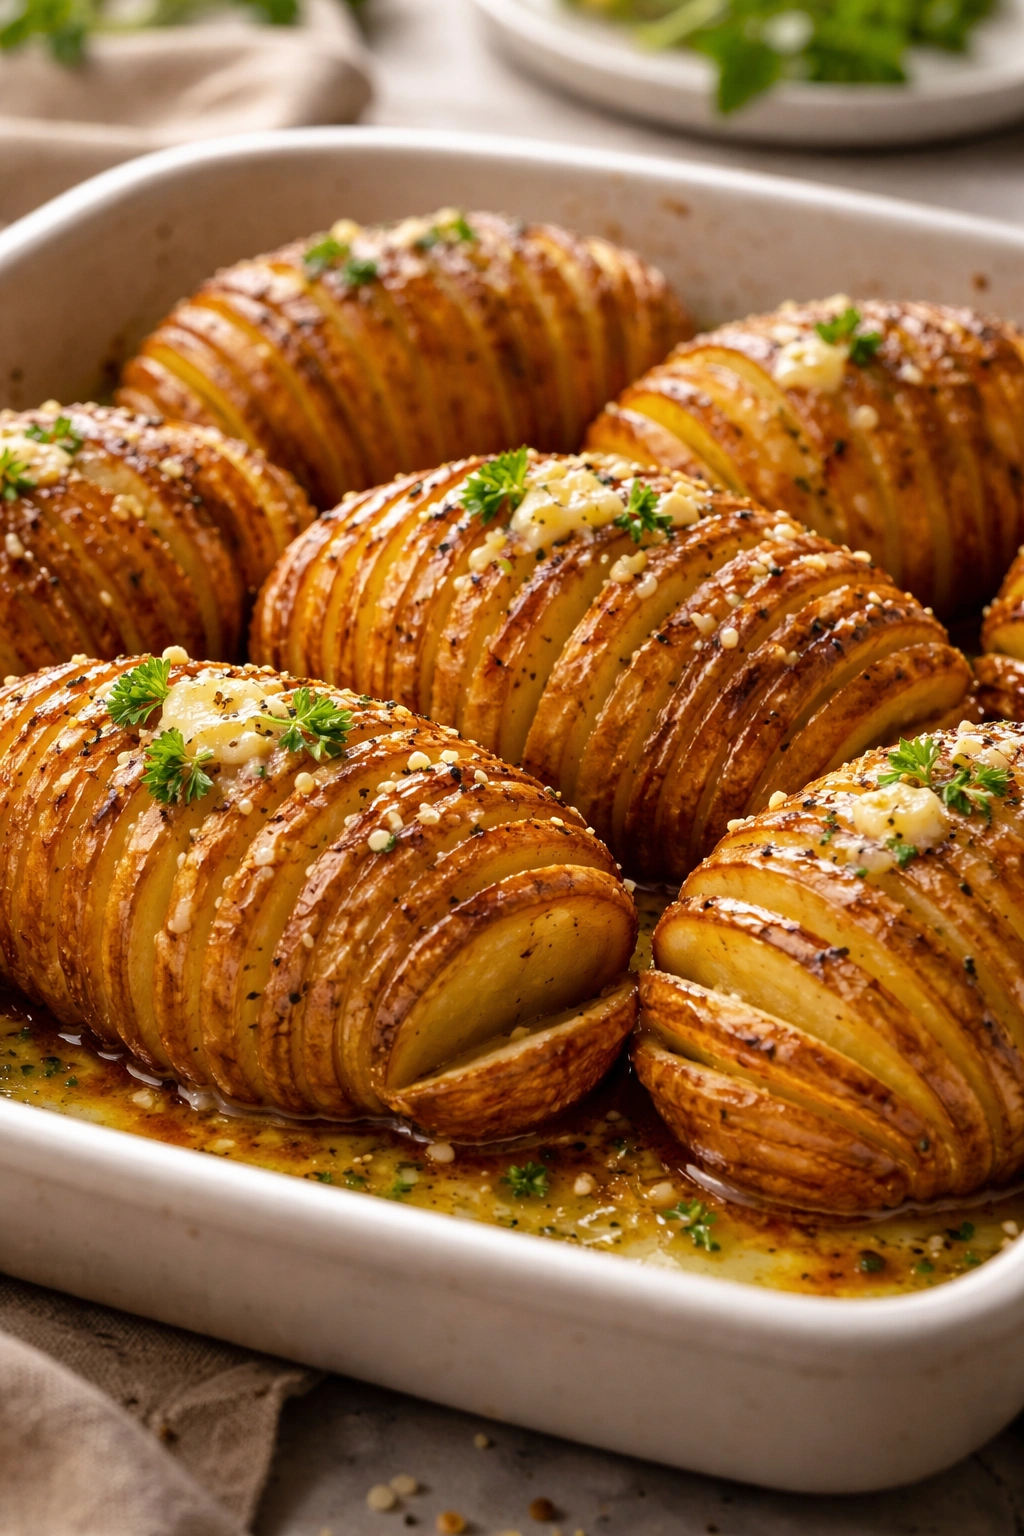
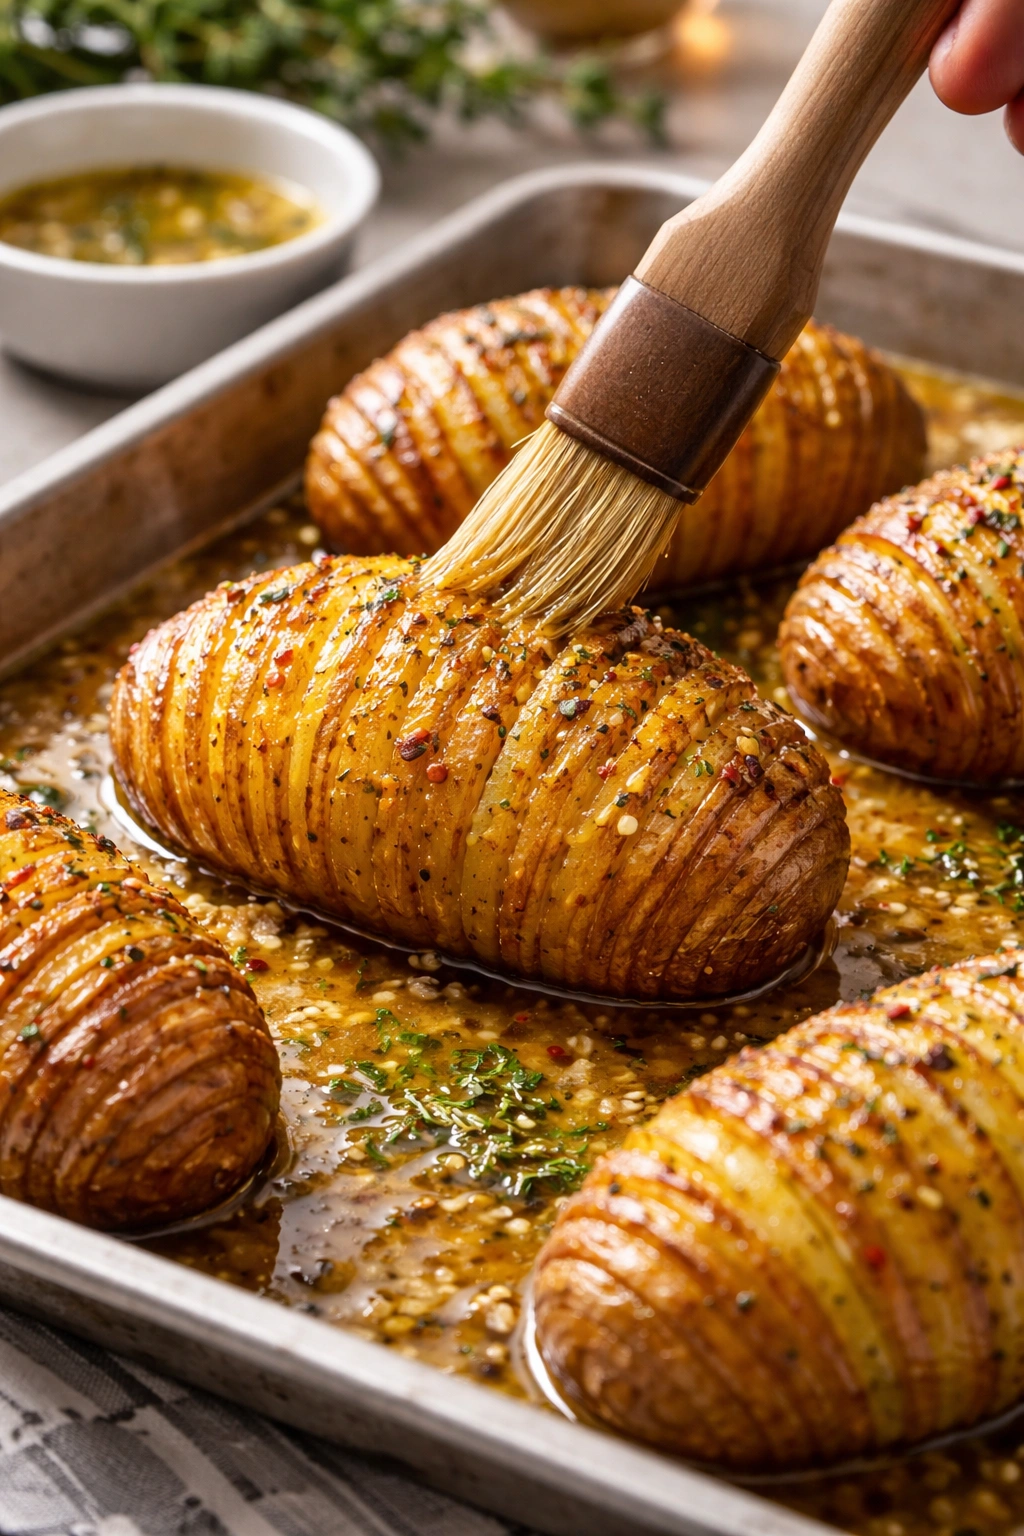
In a small bowl, whisk together the melted butter, minced garlic, thyme, salt, black pepper, smoked paprika (if using), and parmesan cheese (if using) until fully combined. The butter should turn a light golden-brown with visible specks of herb and garlic.
Advertisements -
Using a pastry brush or the back of a spoon, brush this butter mixture generously all over the tops and sides of the sliced potatoes. Don’t be stingy — work the mixture down between the slices so it gets into all those crevices. The butter is what creates the golden crust and carries flavor into every layer.
-
Pour the broth (or water) into the bottom of the baking dish around the potatoes, being careful not to pour it directly over the buttered tops. The liquid keeps the potatoes moist during cooking while the tops crisp up from the dry heat of the oven.
Roasting:
-
Place the baking dish in the preheated oven. Set a timer for 50 minutes — do not skip this step. The potatoes will seem to take forever and then suddenly they’re done, so a timer prevents the guessing game.
-
After 25 to 30 minutes of roasting, brush the tops again with any remaining seasoned butter mixture to ensure even browning and flavor distribution. The tops should already be turning golden at this point.
-
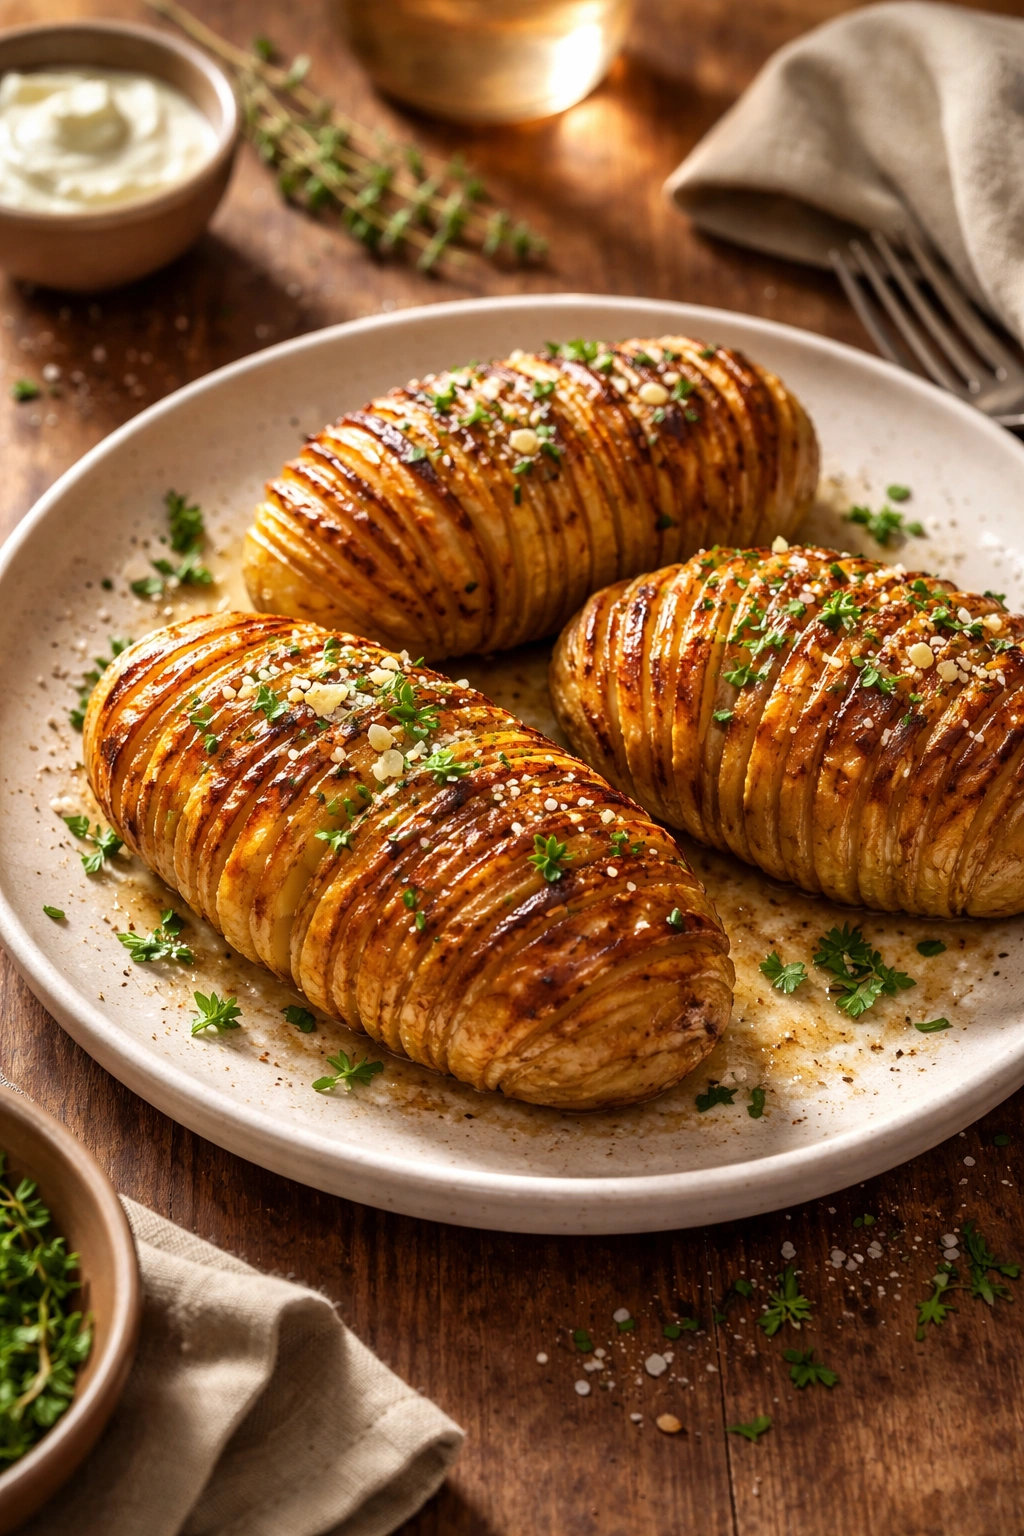
Continue roasting for another 20 to 30 minutes, until the potatoes are deeply golden brown on top and the edges of the slices are turning crispy and slightly caramelized. A fork should pierce the center of the largest potato with no resistance — the insides are perfectly tender.
-
Remove the baking dish from the oven and let the potatoes rest for 5 minutes. This allows the exterior to firm up slightly and makes them easier to transfer if needed. The residual heat continues gently crisping the surface.
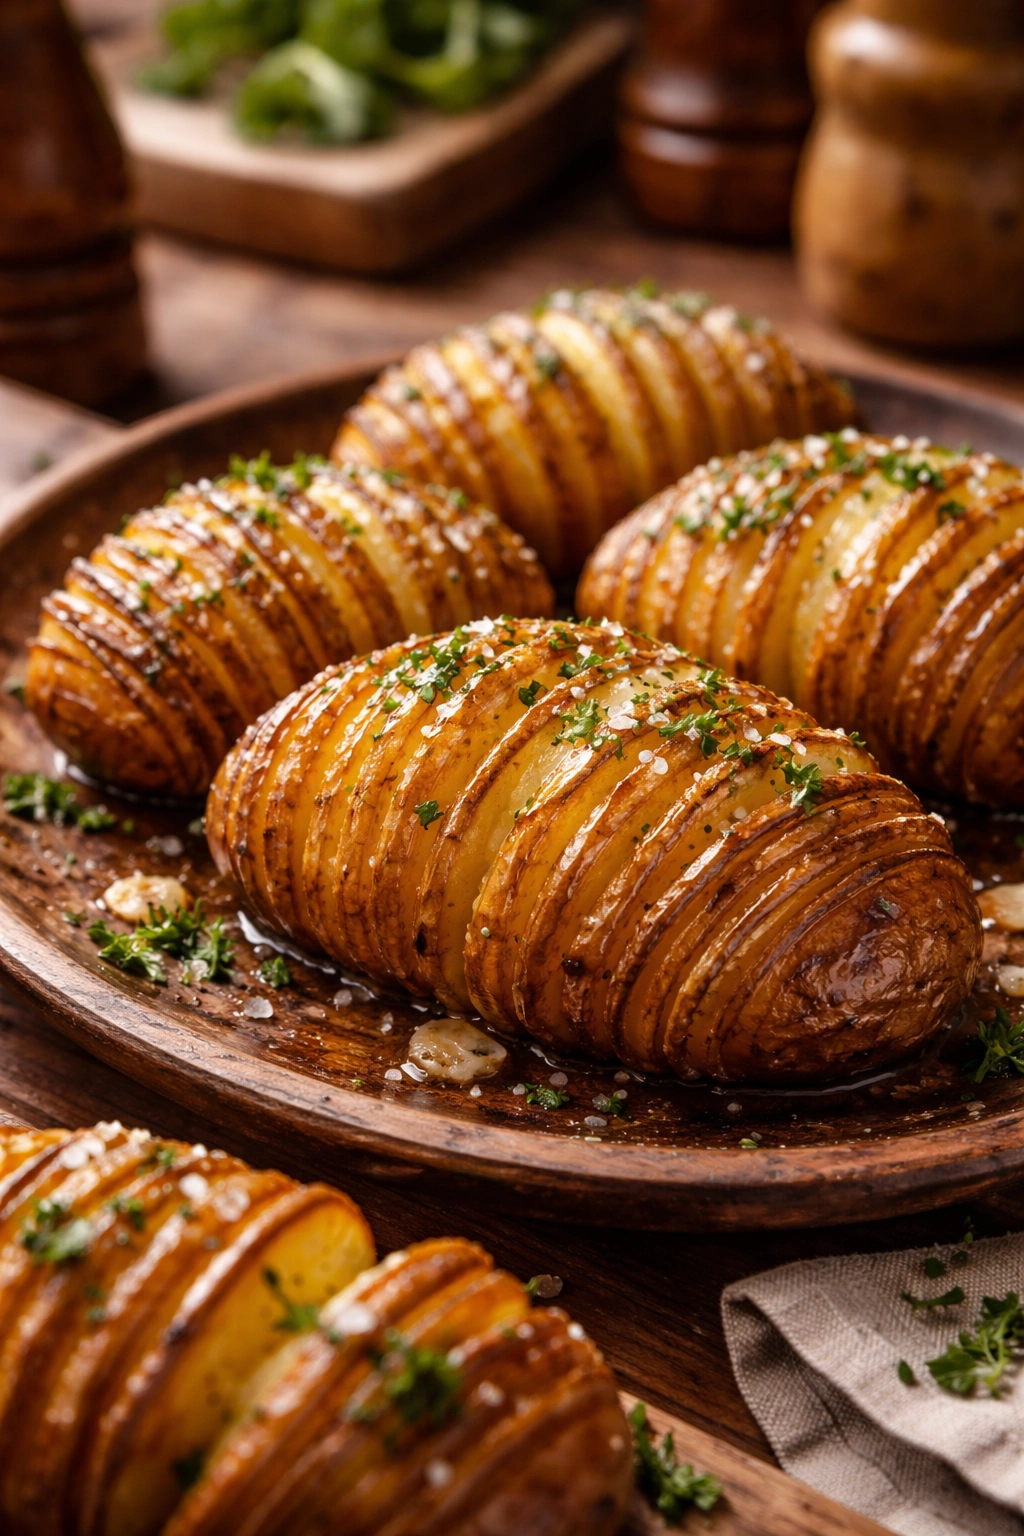
-
Transfer the potatoes to a serving platter and, if desired, spoon any buttery pan juices from the bottom of the baking dish over the top. Finish with a pinch of fleur de sel or fresh cracked pepper and a small sprinkle of fresh thyme if you have it.
Pro Tips to Avoid Common Mistakes
The most common mistake people make is cutting the slices too thick. At ¼-inch, you’re getting maximum surface area for browning while still keeping the potato structurally sound. Anything thicker than ⅜-inch won’t crisp up properly and won’t have that signature accordion appearance. Anything thinner than ⅛-inch risks the slices separating and becoming fragile.
Another frequent issue is skipping the liquid at the bottom of the pan. The broth or water is essential—without it, the potatoes dry out on the insides before the outsides finish cooking. The evaporating liquid creates steam that keeps the interior tender while the direct oven heat browns the exterior. You need both.
People also often fail to brush the potatoes a second time halfway through cooking. That second brushing ensures even browning all over and keeps the seasonings distributed. Set a timer for the halfway point so you don’t forget it.
Make sure your oven temperature is truly accurate. An oven thermometer costs about five dollars and is one of the best kitchen investments you’ll make. Many home ovens run 25 to 50 degrees off from what they claim, which can result in either burnt-on-the-outside-raw-on-the-inside potatoes or pale underseasoned ones. If you suspect your oven runs hot, reduce the temperature to 375°F and add about 10 minutes to the cooking time.
One final tip that nobody talks about: don’t overcrowd the baking dish. When potatoes are touching too tightly, steam builds up on the underside and prevents browning there. You want them close enough to stay upright but loose enough that you can see the bottom of the pan between them.
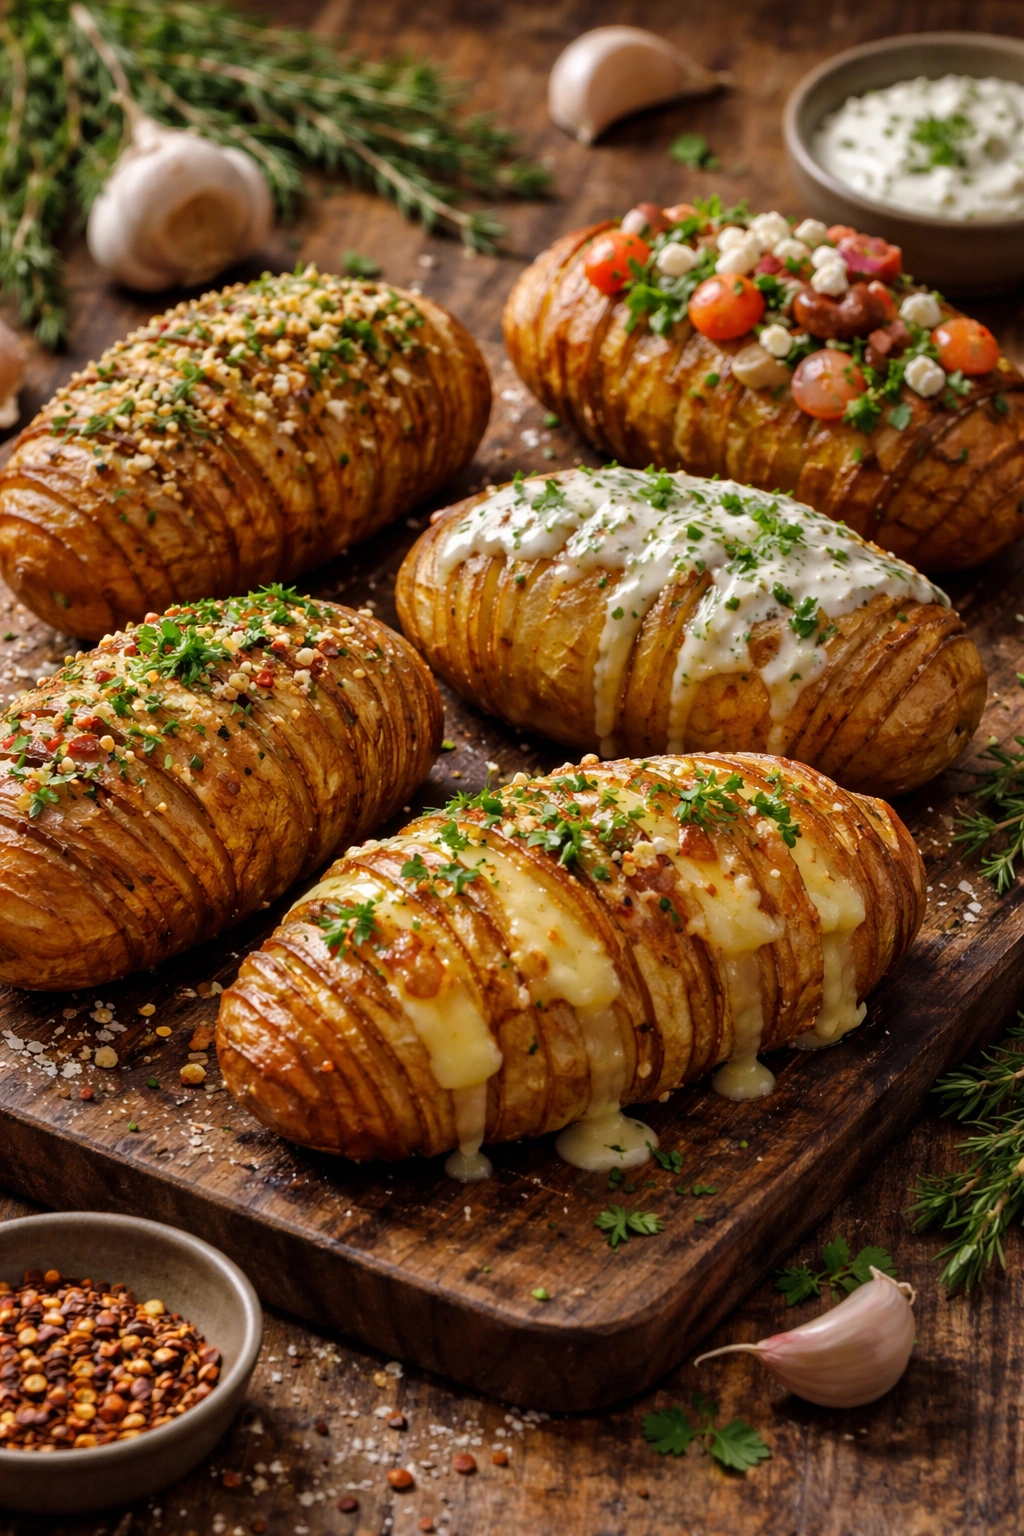
Flavor Variations to Try
The beauty of hasselback potatoes is how adaptable they are. Once you master the basic technique, you can play with flavors endlessly while keeping the method exactly the same.
Garlic and Herb Version: Use fresh rosemary or sage in place of thyme. Add a full four minced garlic cloves instead of three. Brush on fresh lemon zest just before serving. This version is sophisticated and pairs beautifully with roasted meats.
Cheese-Loaded Version: Mix grated sharp cheddar or gruyere cheese directly into the butter mixture instead of just sprinkling it on top. The cheese will melt into the layers, creating pockets of savory richness. You can use up to ½ cup of cheese without overwhelming the dish.
Creamy Herb Version: Mix two tablespoons of sour cream or crème fraîche into the butter mixture. This creates a slightly creamier texture and mellow flavor that works wonderfully with fresh dill or tarragon.
Spicy Version: Add ¼ to ½ teaspoon of cayenne pepper, smoked paprika, or red pepper flakes to the butter mixture, depending on heat preference. A squeeze of fresh lime juice just before serving brightens the spice.
Mediterranean Version: Use oregano and thyme instead of just thyme, add three minced garlic cloves, and finish with a handful of chopped fresh parsley. This pairs perfectly with Greek-inspired mains or with tzatziki for serving.
Truffle Version: Drizzle a small amount of truffle oil (just ½ teaspoon) over the potatoes after they come out of the oven. Finish with fleur de sel. This is a special-occasion variation that feels extremely fancy but requires almost zero extra effort.
When experimenting with variations, remember that fresh herbs roughly triple in intensity when dried, so if you’re substituting dried for fresh, use one-third the amount. Also, stronger flavors like sage and rosemary should be used sparingly—start with less and taste as you go.
Make-Ahead and Storage Guide
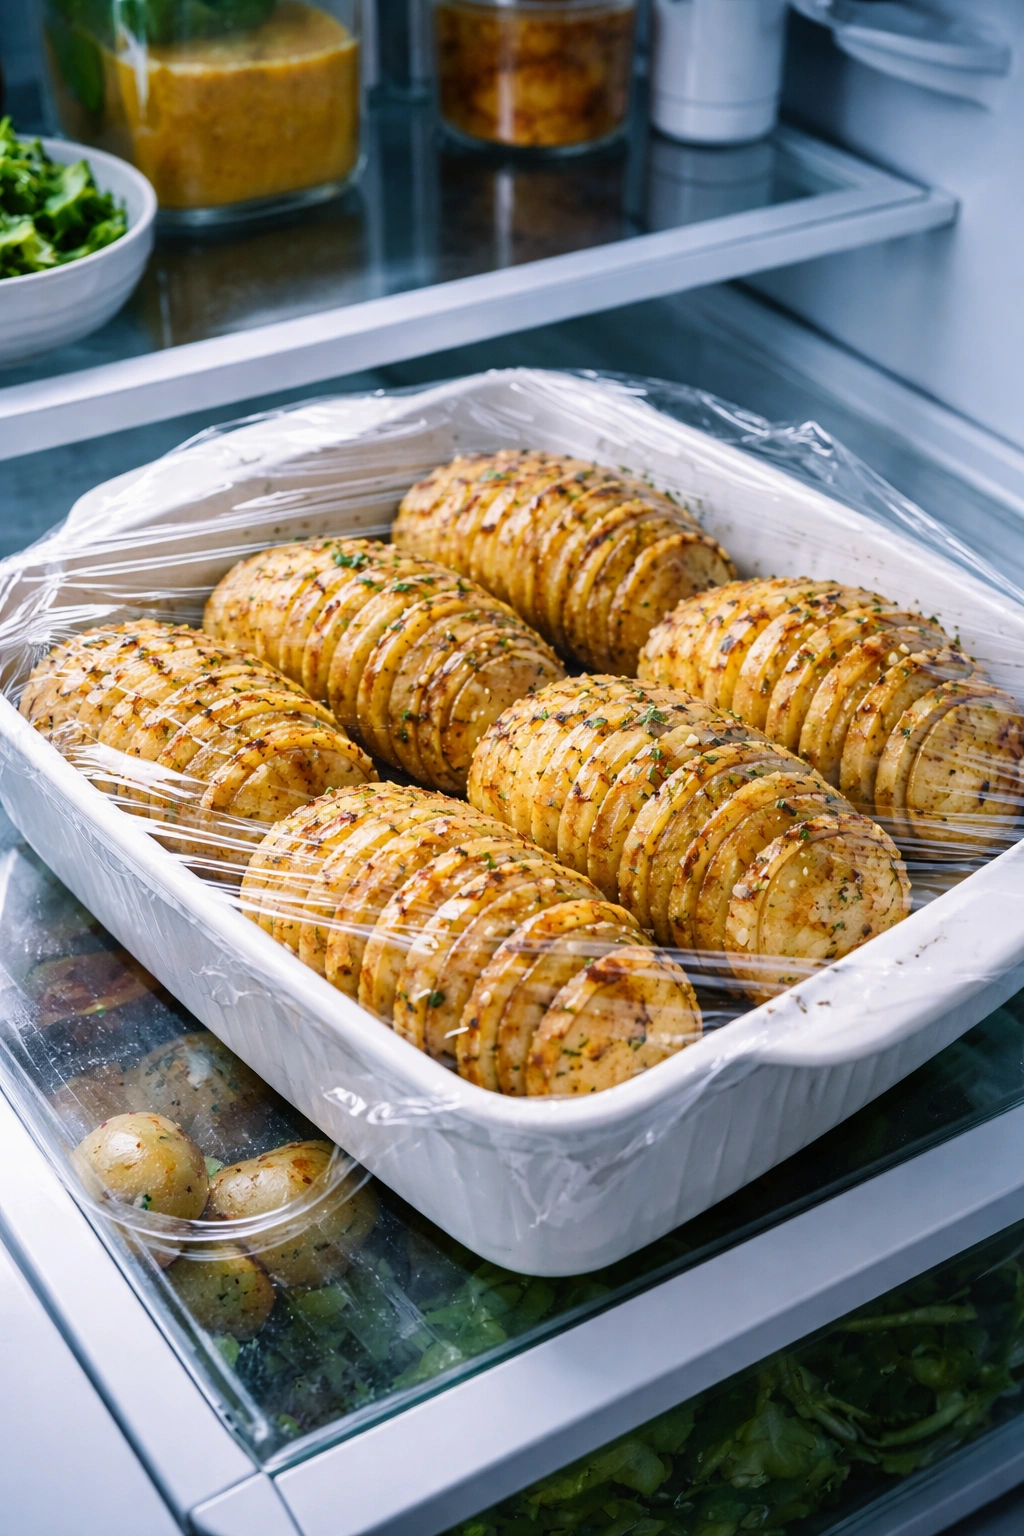
One of the best-kept secrets about hasselback potatoes is how well they work as make-ahead food for entertaining. You can slice and season the potatoes completely up to 12 hours in advance. Place them in the baking dish, cover tightly with plastic wrap or aluminum foil, and refrigerate. When you’re ready to cook, simply add the broth and roast as directed—you may need to add 10 to 15 minutes to the cooking time since they’ll be starting from cold.
Alternatively, you can fully roast the potatoes several hours ahead of serving, let them cool to room temperature, cover them loosely, and reheat them in a 350°F oven for about 15 minutes just before serving. They won’t regain the absolute peak crispness of freshly roasted potatoes, but they’ll be delicious and require minimal effort at serving time.
Leftovers keep in a covered container in the refrigerator for up to four days. Reheat them in a 350°F oven for about 10 minutes until warmed through. You can also reheat a single potato or small batch in the microwave, though the exterior won’t recrisp as well. Honestly, cold hasselback potatoes are also delicious—they make a great potato salad base if you roughly chop them and toss with a vinaigrette.
These potatoes do not freeze well because the texture becomes mushy and watery after thawing. Stick to refrigerator storage if you’re planning to save them.
Perfect Serving Suggestions and Pairings

Hasselback potatoes work as a side dish for almost any protein, but they shine particularly well alongside roasted chicken, steak, lamb, or baked fish. The crispy-yet-tender texture and savory flavor complement these mains without competing.
For a casual dinner, serve them alongside a simple green salad and crusty bread. The potatoes are rich enough that you don’t need anything overly elaborate to feel satisfying. For more formal entertaining, they’re elegant enough to be the centerpiece of the vegetable course alongside a roasted vegetable medley.
If you’re serving them as a vegetarian main course, plate them with a simple salad, roasted asparagus, and a dollop of Greek yogurt mixed with fresh herbs. You could also serve them alongside roasted mushrooms or eggplant, which share a similar earthy flavor profile.
These potatoes pair exceptionally well with sour cream or crème fraîche on the side—either mixed into the plain yogurt version or offered separately for guests to dollop on top. A small bowl of fresh chives, parsley, or dill scattered on the table also lets people customize their plate.
For wine pairing, crispy roasted potatoes pair beautifully with white wines like Sauvignon Blanc or Pinot Grigio, especially if your version includes fresh herbs. If you go for the cheese-loaded variation, fuller-bodied wines like Chardonnay or lighter reds like Pinot Noir work beautifully.
Final Thoughts
Hasselback potatoes genuinely do look fancy. People will absolutely be impressed. But the secret you now know is that they’re not remotely complicated—they’re just potatoes with some intentional slicing and smart seasoning that yields maximum results. The first time you make them, you’ll think, “That was it? That was the whole thing?” The second time you make them, you’ll have the confidence to serve them to people you’re trying to impress. The third time, they’ll become a regular part of your cooking rotation because they’re reliable, delicious, and honestly kind of fun to make.
The beauty of this dish is that it works whether you’re cooking for yourself, your family on a Tuesday night, or a full dinner party on Saturday. You can keep it simple with just butter and herbs, or you can load them up with garlic, cheese, and whatever flavor combination you’re craving. The technique stays the same. The effort required stays minimal. The payoff stays impressive.
Start with the basic version until you’ve got the slicing technique down and understand how the potatoes should look when they’re perfectly done. Then start experimenting with flavors. You’ll develop your favorite version, and eventually someone will ask you for the recipe, and you’ll get to share the secret: they’re easier than they look.