Canned tuna is one of the most underrated pantry staples in modern cooking. It’s affordable, shelf-stable, packed with protein, and honestly, it tastes a lot better than people expect when you actually know what to do with it. The problem isn’t canned tuna — the problem is that most people reach for it only when they’re desperate for a quick lunch and dump it into a mayo-heavy salad without thinking twice. But there’s so much more you can do.
The reality is that canned tuna can become the foundation for genuinely delicious meals that your family will actually ask for. Whether you’re looking for a quick weeknight dinner, something to bring to a potluck, or a meal-prep option that doesn’t taste like, well, desperation, canned tuna has your back. The key is treating it with intention — choosing good-quality canned tuna, understanding how to season it properly, and pairing it with complementary flavors instead of just drowning it in mayo.
What’s remarkable is how versatile canned tuna actually is. You can go Asian-inspired with sesame and ginger, Mediterranean with olives and feta, spicy with jalapeños and cilantro, or creamy and comforting in a casserole. Each approach transforms the same ingredient into something completely different. Once you realize this, those cans of tuna in your pantry stop looking like emergency backup and start looking like dinner possibilities.
1. Classic Tuna Salad With Fresh Herbs
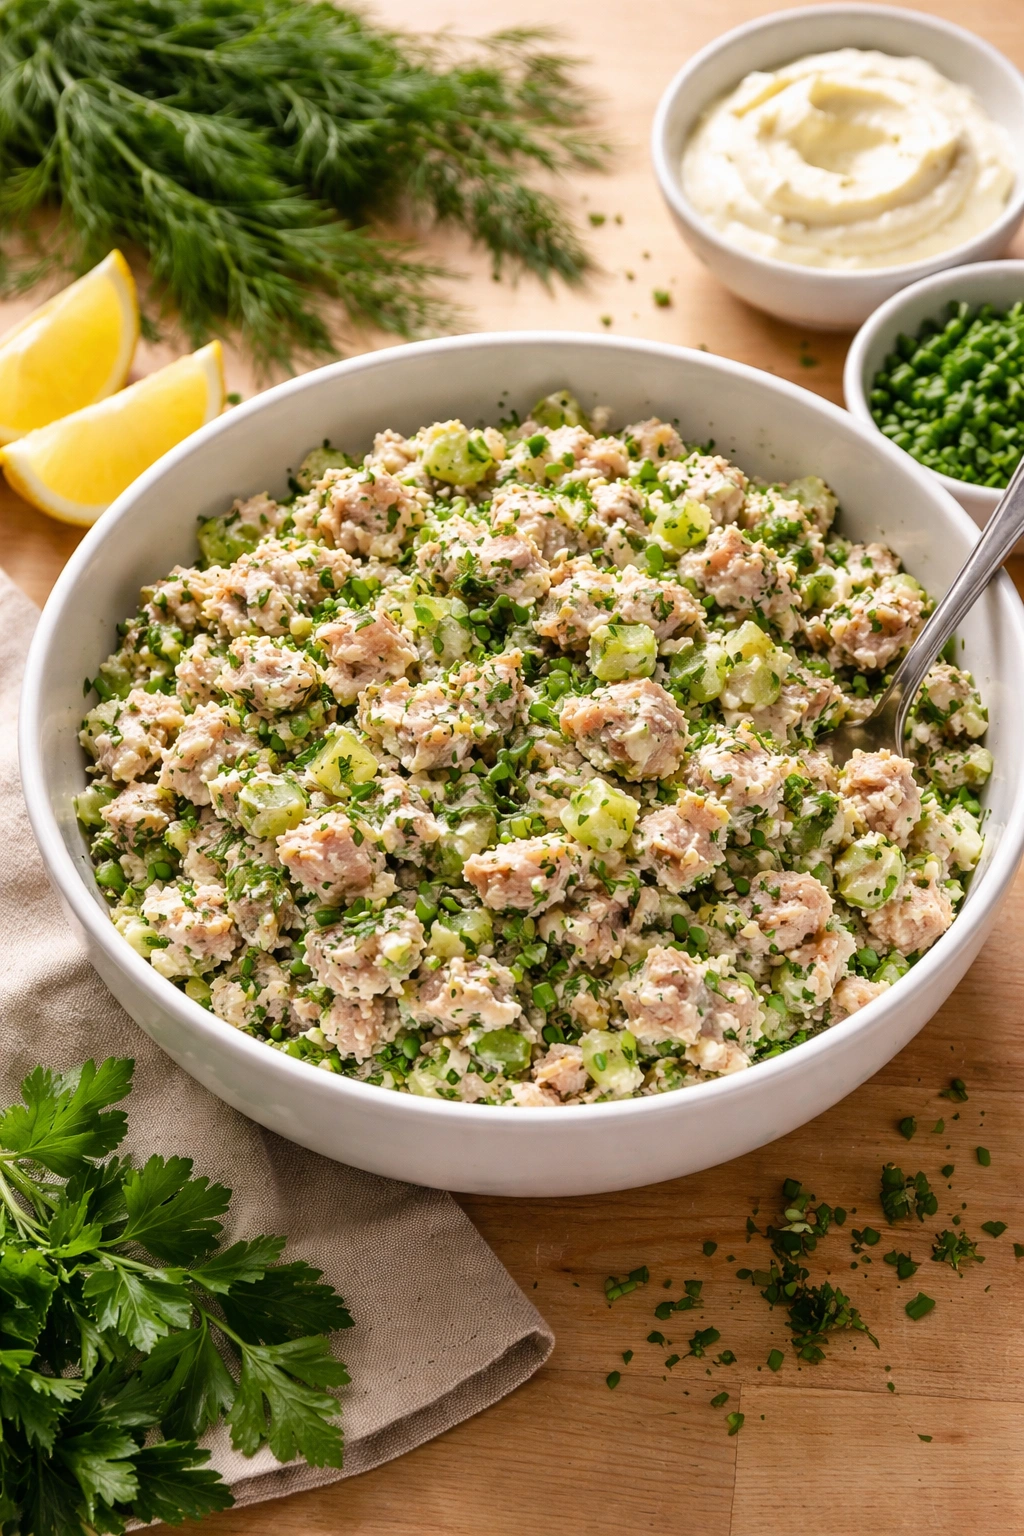
This is the foundation, but done right — not the sad mayo-heavy version you remember from school lunches. The secret is using good-quality canned tuna (look for solid or chunk varieties, not flaked), generous amounts of fresh herbs, and knowing exactly how much mayo to use. You want tuna salad that tastes fresh and bright, not like a mayo delivery system.
Why This Works So Well
The beauty of a proper tuna salad is its simplicity and how easily it adapts to whatever you have on hand. Fresh herbs make all the difference — they lift the tuna and prevent that fishy, canned flavor from dominating. The acid from lemon juice or vinegar brightens everything and helps balance the richness of the mayo. You end up with something that’s genuinely crave-able, whether you’re eating it on bread, crackers, or over lettuce.
Building Your Base
Drain your canned tuna thoroughly and break it into small, bite-sized pieces with a fork. For every two cans of tuna, use about ⅓ cup of real mayonnaise (not more), a squeeze of fresh lemon juice, and finely diced celery for crunch. Add chopped fresh dill, parsley, and chives — these herbs are essential, not optional. A pinch of sea salt and freshly cracked black pepper rounds it out. Taste as you go; the tuna itself carries salt from the brine, so you might need less than you think.
Mix-Ins That Make the Difference
- Capers or finely diced pickles for briny pop
- Diced red onion for sharpness and bite
- Halved cherry tomatoes if you’re serving it on lettuce
- Toasted pine nuts or sliced almonds for unexpected crunch
- Hard-boiled egg pieces for richness and substance
- Avocado chunks (add these right before serving so they don’t brown)
Pro tip: Make this salad a few hours ahead, but if you’ve added avocado or anything delicate, wait to mix those in until 20 minutes before serving. The base flavors actually meld and improve over a few hours of sitting.
2. Mediterranean Tuna Pasta
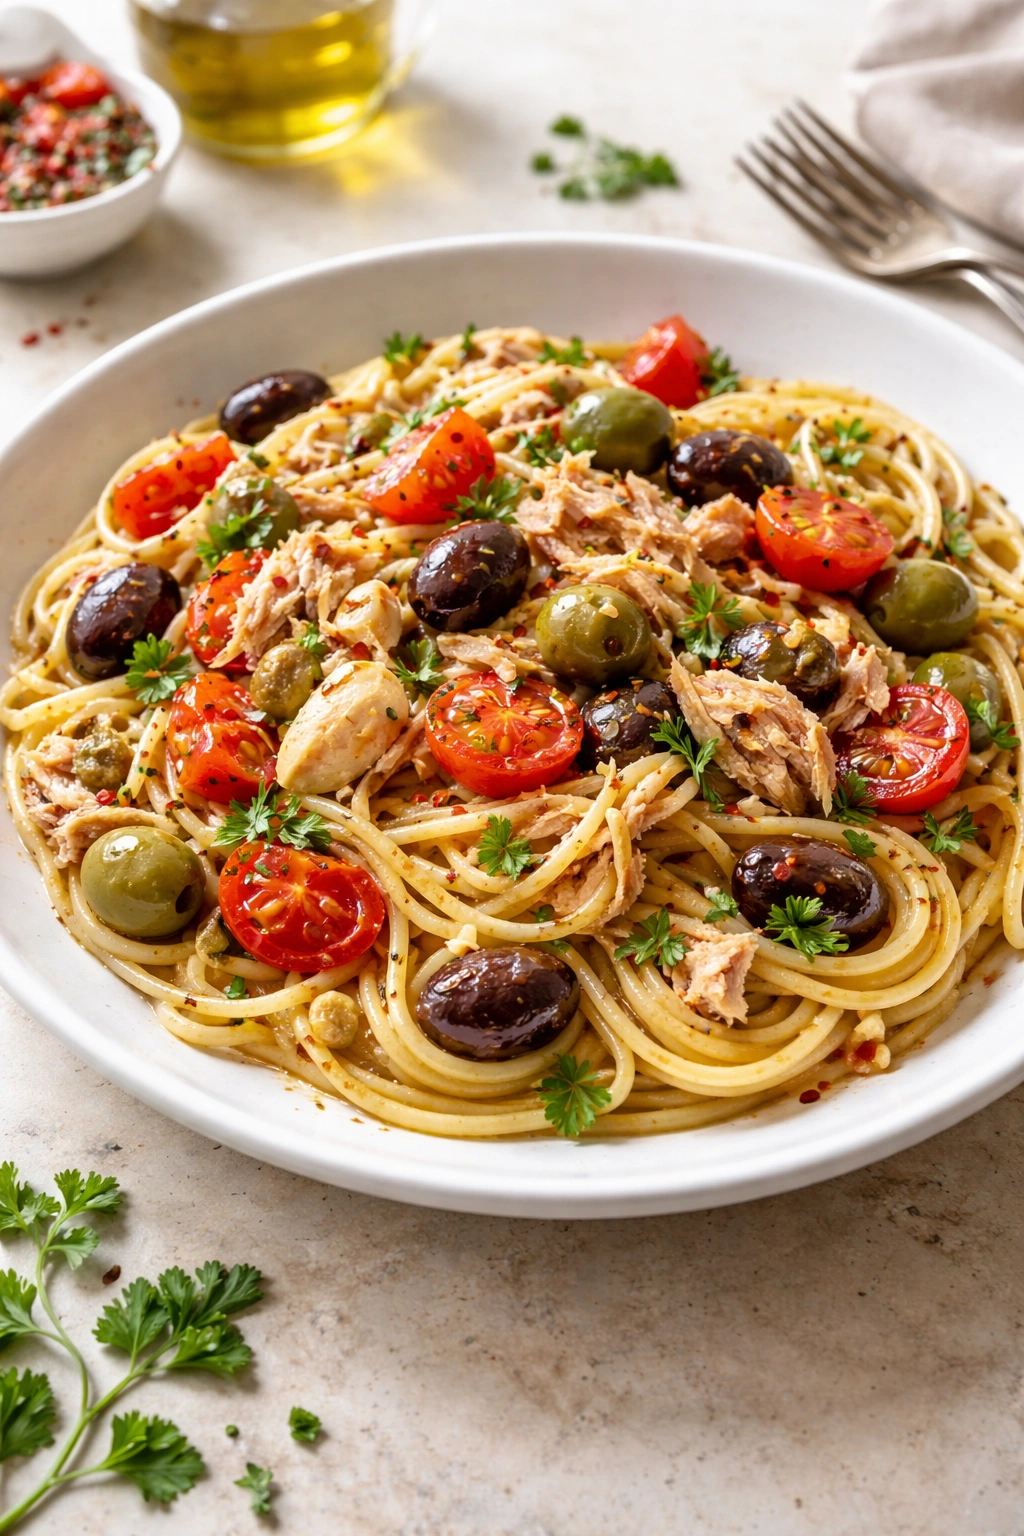
This is one-pot simplicity that tastes like you’ve been cooking all day. The pasta becomes the vehicle for delivering tuna, olives, tomatoes, and bright Mediterranean flavors directly to your plate. It’s the kind of dish that works for a casual weeknight dinner, a light lunch, or even room-temperature for a summer picnic.
What Makes It Come Together
The magic happens because you’re building depth through a combination of salty (olives and capers), acidic (tomatoes and lemon), and garlicky elements. When the hot pasta hits these components, it absorbs all those flavors. The tuna doesn’t need to be cooked separately; you’re just folding it in at the end, which means everything stays tender and the dish comes together in about 20 minutes flat.
The Core Components
Cook your pasta one minute under al dente (it’ll continue cooking slightly when you combine it with everything else). While it cooks, warm a good glug of olive oil in a large skillet with minced garlic, then add canned diced tomatoes (or halved cherry tomatoes if you prefer fresh), kalamata olives, and capers. Let this simmer for 5 minutes while the pasta finishes. Add the drained tuna, a squeeze of fresh lemon, and toss everything together gently with the hot pasta. Finish with fresh basil and maybe some crumbled feta if you want richness.
Flavor Variations Worth Trying
- Swap kalamata olives for green olives and add a pinch of oregano
- Make it spicy by adding red pepper flakes and fresh red chili
- Include sun-dried tomatoes for concentrated umami
- Add roasted red peppers from a jar for sweetness and depth
- Toss in fresh spinach at the end and let the pasta heat wilt it
Worth knowing: This pasta tastes even better the next day after the flavors have melded, making it excellent for meal prep. Serve at room temperature or reheat gently in a skillet with a splash of water.
3. Tuna Melts With Crispy Cheese
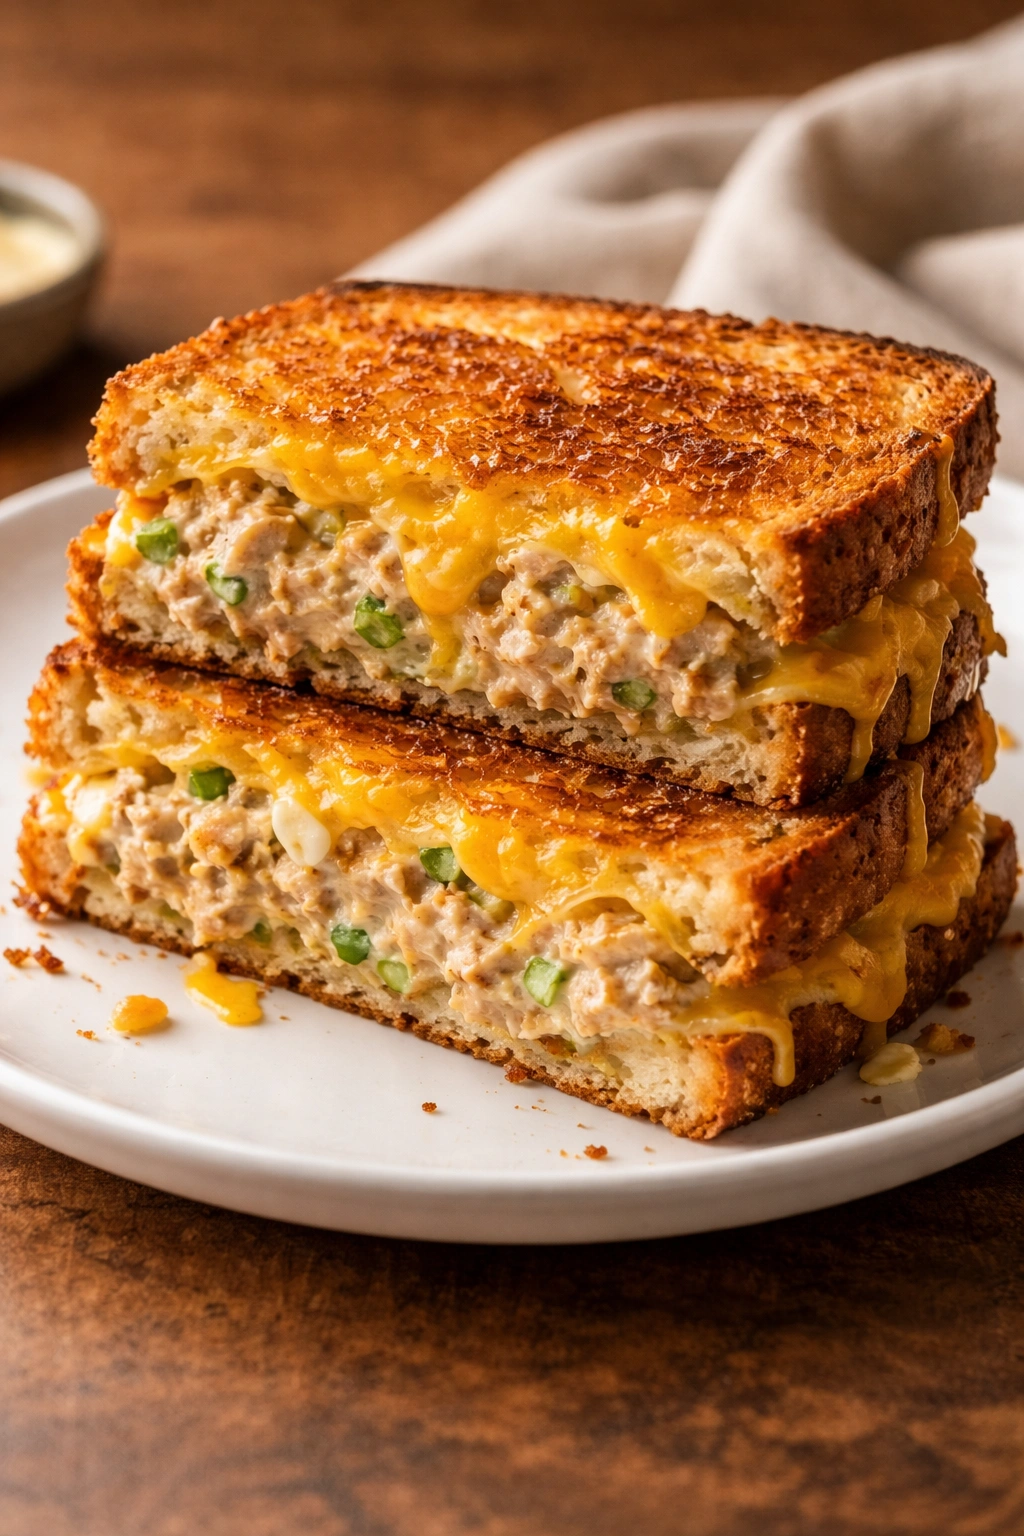
The tuna melt is peak comfort food — melted cheese and warm tuna between toasted bread, with that perfect contrast between crispy exterior and creamy interior. It’s elevated enough for lunch with friends but homey enough for a solo dinner. The tuna salad here is closer to classic, but the true star is what happens when it hits the heat.
Why This Sandwich Technique Matters
Most tuna melts get made by just heating the sandwich from the outside, but the real magic comes from broiling the top so the cheese gets bubbly and slightly charred while the bread underneath gets toasted. This creates multiple layers of texture — crispy, creamy, tender, and rich all at once. Using quality bread is non-negotiable; you want something sturdy enough to contain all that filling without turning into a sad, soggy mess.
Assembling Your Melt
Start with your best tuna salad (similar to the classic version, but you can be a bit more generous with mayo here since it’ll balance the heat). Spread it on thick slices of good bread — sourdough, rye, or a sturdy white bread all work beautifully. Top generously with cheese (a combination of sharp cheddar and Swiss is excellent, but use what you love). Place the open sandwich on a baking sheet and broil 4 inches from the heat for 2-3 minutes until the cheese is melted, bubbly, and has some golden brown bits.
Flavor Combos for Different Preferences
- Swiss cheese with arugula and a swipe of whole-grain mustard
- Sharp cheddar with sliced tomato and crispy bacon
- Creamy Havarti with sautéed mushrooms and dill
- Aged Gruyère with caramelized onions and thyme
- Pepper jack with roasted red pepper and fresh cilantro
Pro tip: Butter the top surface of your bread before adding the cheese — this creates an extra layer of crispiness and prevents it from burning while you’re waiting for the cheese to melt.
4. Asian-Inspired Tuna Lettuce Wraps
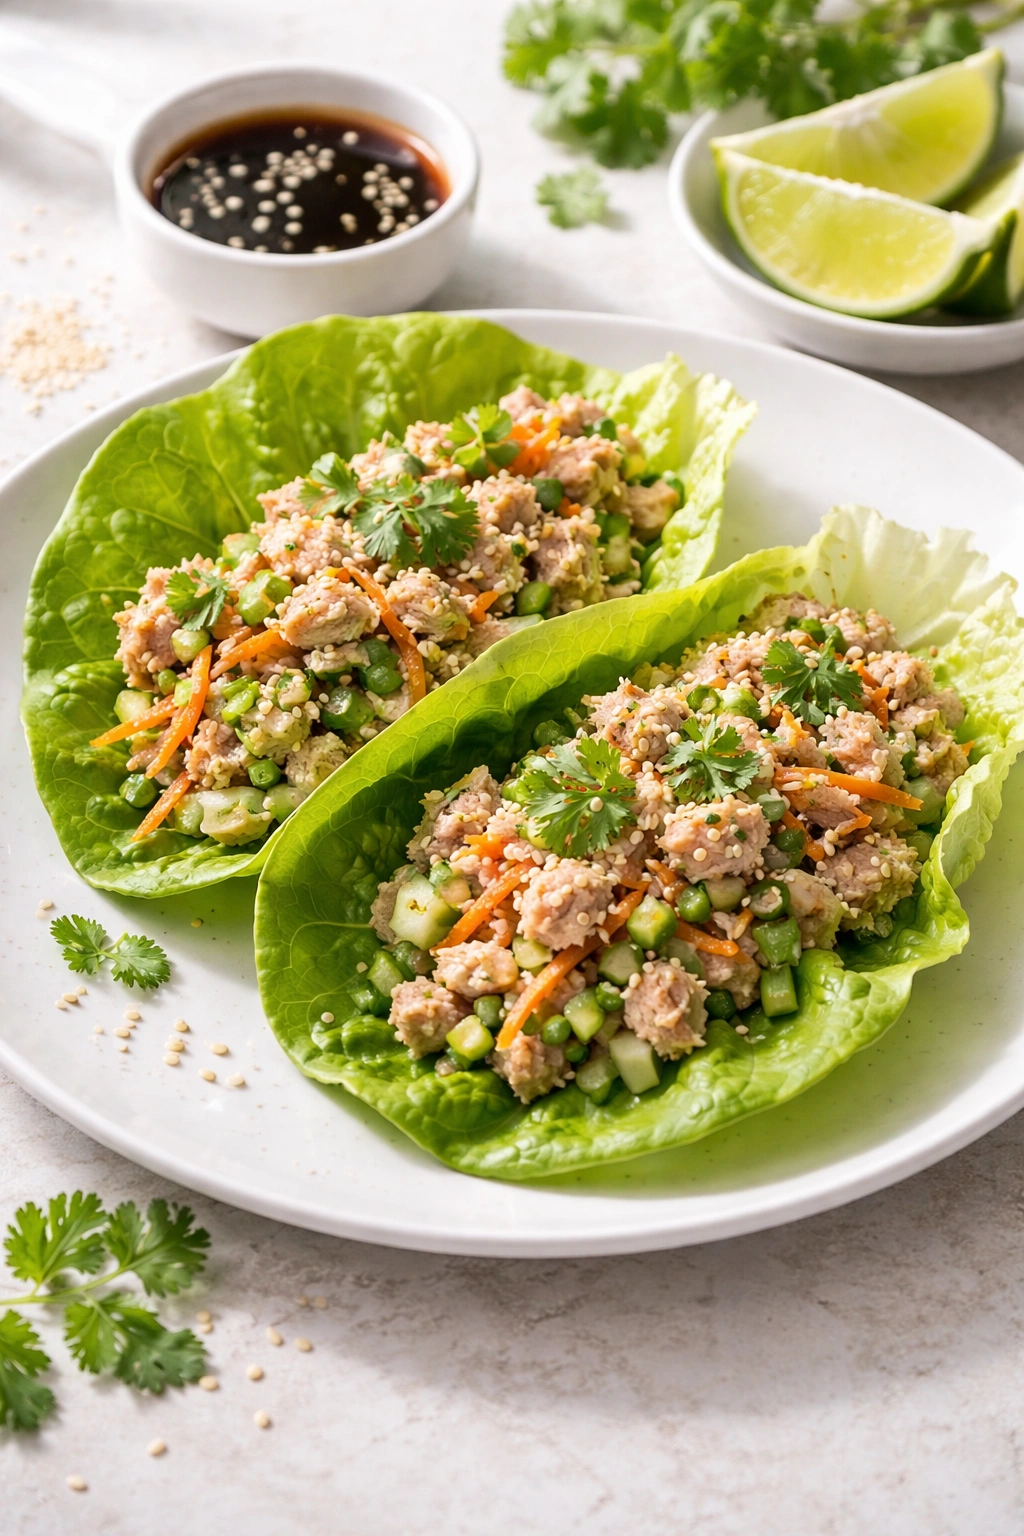
These are the definition of easy elegance — a light, crunchy meal that comes together in 10 minutes and requires zero cooking equipment beyond a bowl. They’re perfect when you want something fresh and bright, maybe after a heavy meal the day before, or when you need lunch that doesn’t make you feel sluggish.
The Flavor Profile That Makes Them Work
You’re layering tuna with crisp lettuce, crunchy vegetables, and an Asian-inspired sauce that brings everything together. The sauce is the hero here — soy sauce, rice vinegar, sesame oil, ginger, and garlic create a combination that’s savory, tangy, and deeply flavorful. When this hits the cold tuna and vegetables, you get a completely different eating experience than the mayo-based salads.
Building Your Wraps
Mix drained canned tuna with minced fresh ginger, finely sliced green onions, and shredded carrots. In a separate small bowl, whisk together 3 tablespoons soy sauce, 2 tablespoons rice vinegar, 1 tablespoon sesame oil, minced garlic, and a pinch of sriracha if you want heat. Combine the tuna mixture with this sauce. Use large lettuce leaves (butter lettuce, romaine, or napa cabbage leaves) as your wraps, fill with the tuna mixture, and top with crunchy elements like sliced cucumber, shredded radish, and toasted sesame seeds.
Add-Ins for Extra Dimension
- Diced avocado for creaminess
- Crispy wonton strips for texture contrast
- Edamame for pop and protein
- Cilantro and Thai basil for freshness
- Sliced jalapeño for heat
- Crispy fried shallots for aromatic crunch
Worth knowing: These wraps are best assembled and eaten immediately, but you can prep all the components ahead and let people assemble their own. It’s fun and interactive, and nothing gets soggy that way.
5. Tuna Fried Rice
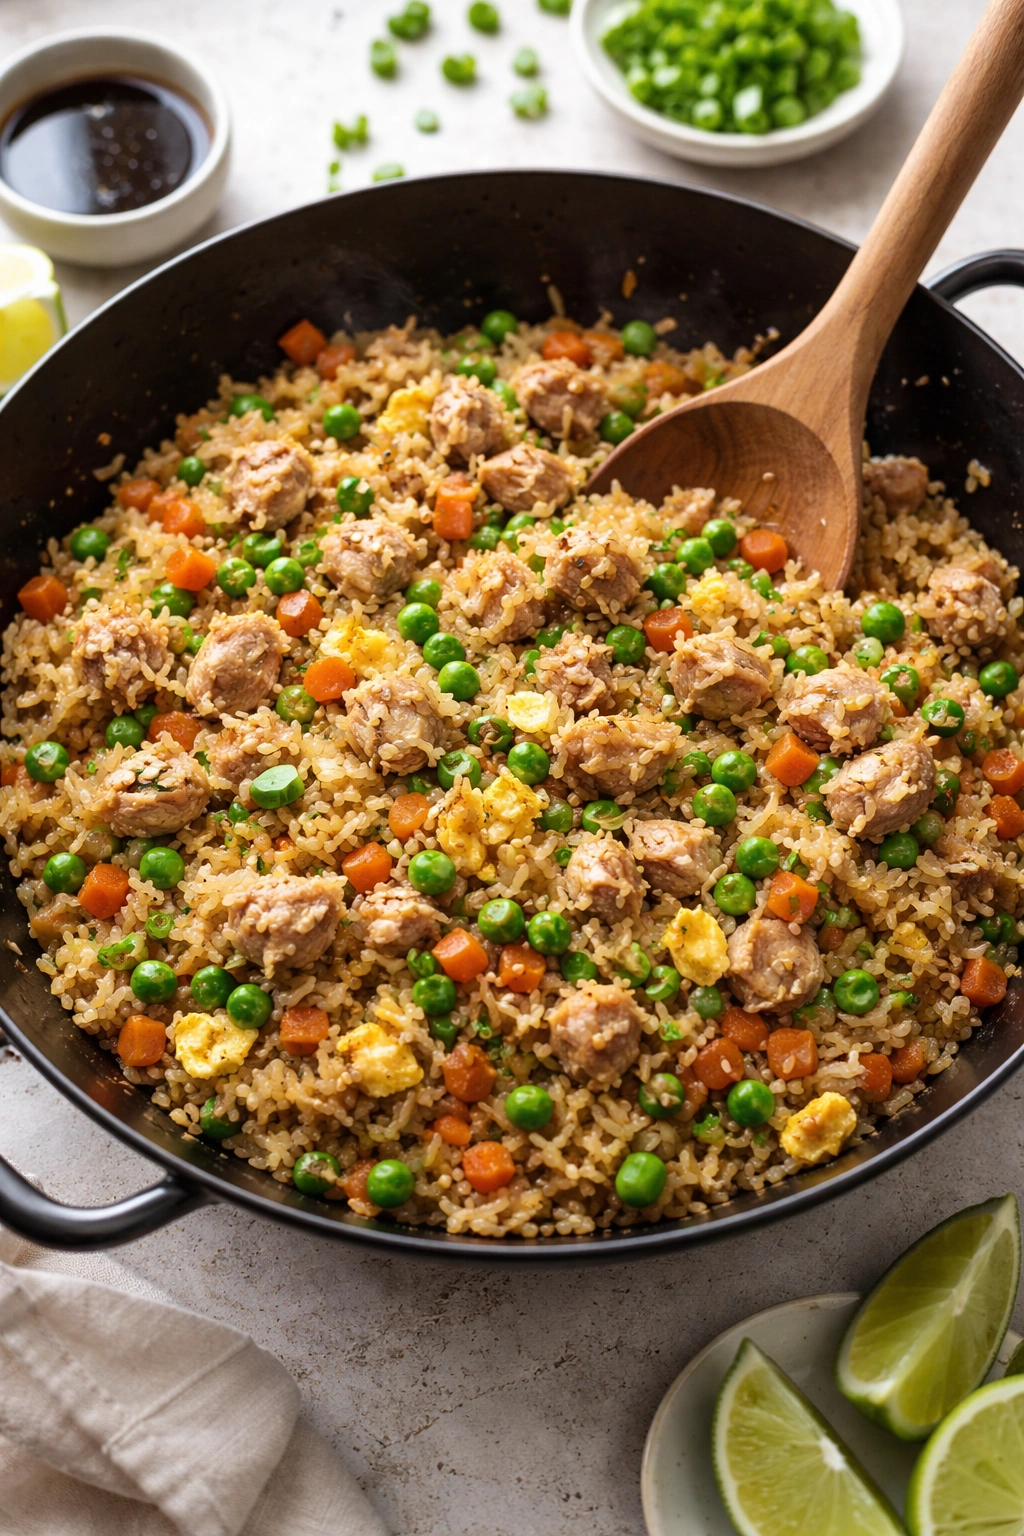
This is the kind of dish that makes you grateful for canned tuna every single time you make it. It transforms pantry staples into something that tastes like takeout but costs a fraction of the price. The key is using day-old cooked rice (which has less moisture) and keeping your heat high to get that slightly charred, restaurant-quality flavor.
The Technique That Elevates Fried Rice
Fried rice lives or dies based on proper technique. Your pan needs to be screaming hot, and you need to work quickly so everything gets a slight char rather than steaming. Using cold, day-old rice is crucial because fresh rice breaks down and becomes mushy. The tuna adds protein and a savory depth that chicken or shrimp can’t quite match, and because it’s already cooked, you’re just heating it through.
Step-by-Step Structure
Heat a large skillet or wok over high heat with a couple tablespoons of neutral oil. Add minced garlic and ginger, then diced onion and whatever vegetables you want (peas, carrots, bell peppers work beautifully). Cook until just tender-crisp, about 2 minutes. Add your cooked rice and break it up with a spoon, stirring frequently to coat everything in oil and get some char on the rice. Drain your tuna and add it gently, folding it in to avoid breaking it up too much. Drizzle with soy sauce and sesame oil, finish with green onions and sesame seeds.
Vegetable and Protein Add-Ins
- Corn and edamame for sweetness and color
- Diced mushrooms and green beans for earthy depth
- Broccoli florets for texture
- Cashews or peanuts for crunch
- A beaten egg stirred in at the end for richness
- Crispy bacon pieces for umami
Pro tip: If you don’t have day-old rice, spread freshly cooked rice on a sheet pan and refrigerate it for at least an hour. The colder temperature is what matters most for getting proper fried rice texture.
6. Creamy Tuna Casserole (Elevated)
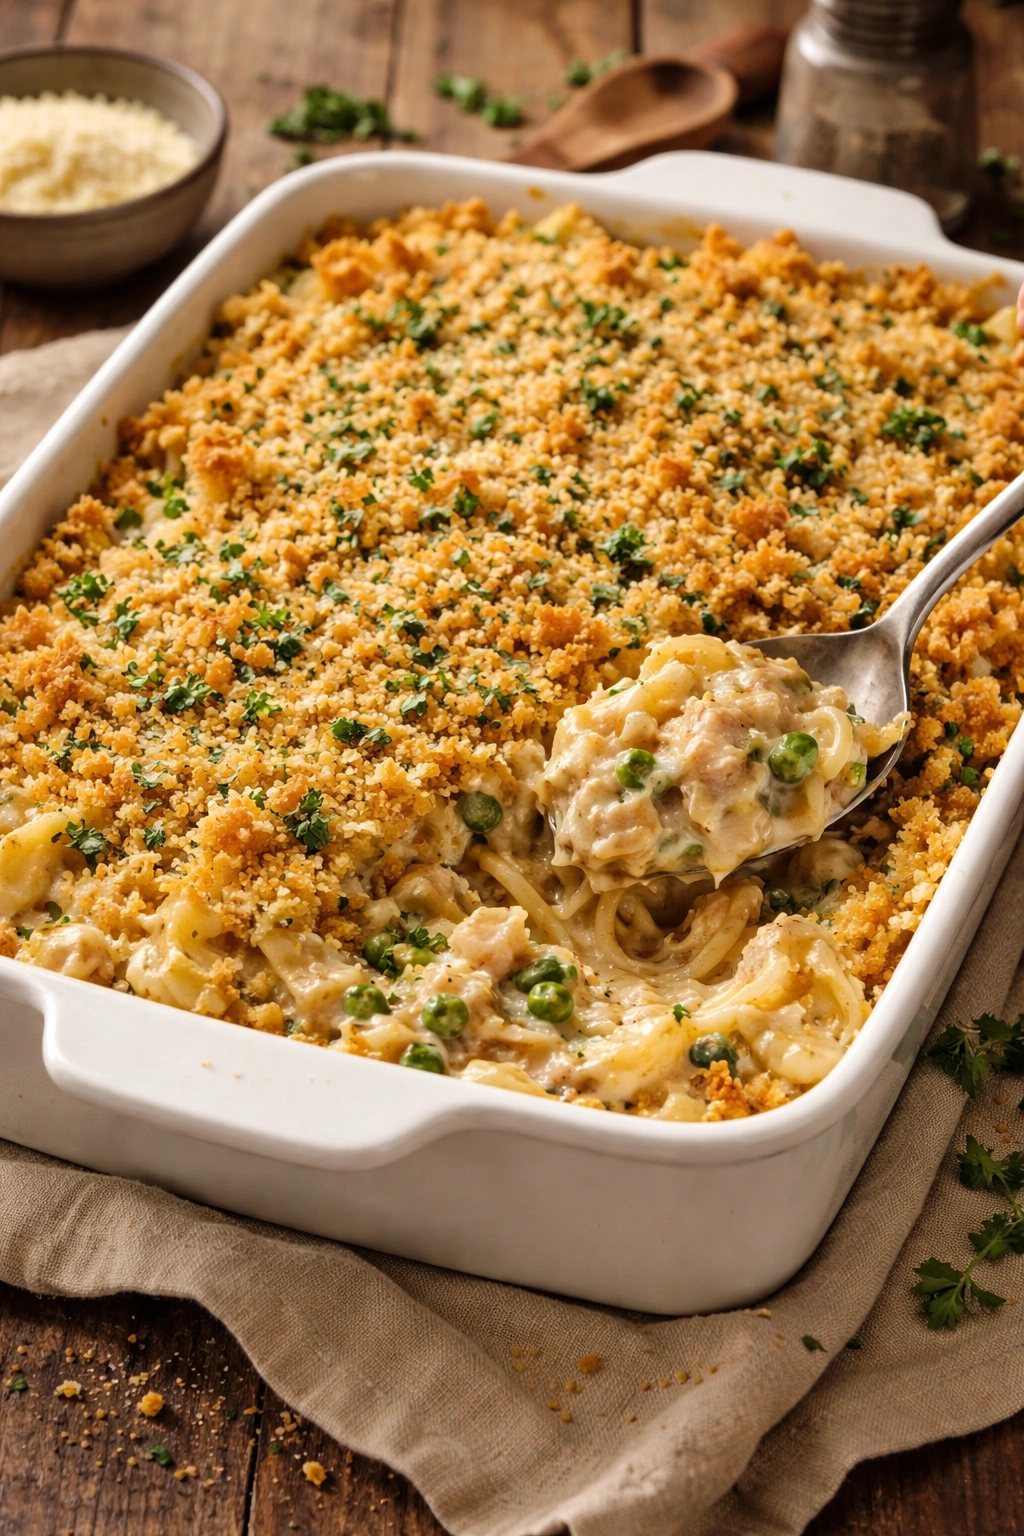
Forget everything you think you know about tuna casserole. This isn’t the mushy, sad dish from decades past. This is the elevated version that uses good ingredients, proper technique, and the result is genuinely comforting without being heavy or unappetizing.
Why This Version Is Different
The traditional tuna casserole got a bad reputation because it relied too heavily on canned cream soup and minimal seasoning. Here, you’re making a proper béchamel sauce from scratch (butter, flour, and milk), which is faster than opening a can anyway. You’re using good pasta, real cheese, and fresh herbs. The tuna isn’t an afterthought; it’s the star, contributing real flavor and nutrition.
The Base Sauce and Assembly
Melt butter and whisk in flour to create a roux, cooking for about a minute. Gradually whisk in whole milk, heating gently until thickened. Season with salt, pepper, and a pinch of nutmeg (trust me on this). Stir in grated Gruyère or sharp cheddar, then fold in your drained canned tuna, cooked egg noodles, peas, and diced roasted red peppers. Pour into a buttered baking dish, top with breadcrumb mixture (panko mixed with melted butter and fresh herbs), and bake at 375°F until golden and bubbling, about 25-30 minutes.
Flavor Variations for Different Moods
- Italian version: Add sun-dried tomatoes, fresh basil, and mozzarella
- Curry version: Season the béchamel with curry powder and add sliced green onions
- Mediterranean version: Add olives, capers, and lemon zest
- Dill and lemon version: Fresh dill in the sauce with a big squeeze of lemon juice
- Spicy version: Red pepper flakes in the breadcrumb topping and in the sauce
Worth knowing: This casserole actually tastes better the day after you make it, as the flavors meld and deepen. Make it ahead and reheat gently in a 350°F oven for 15-20 minutes, covered with foil so the top doesn’t burn.
7. Spicy Tuna Tacos With Crispy Shell
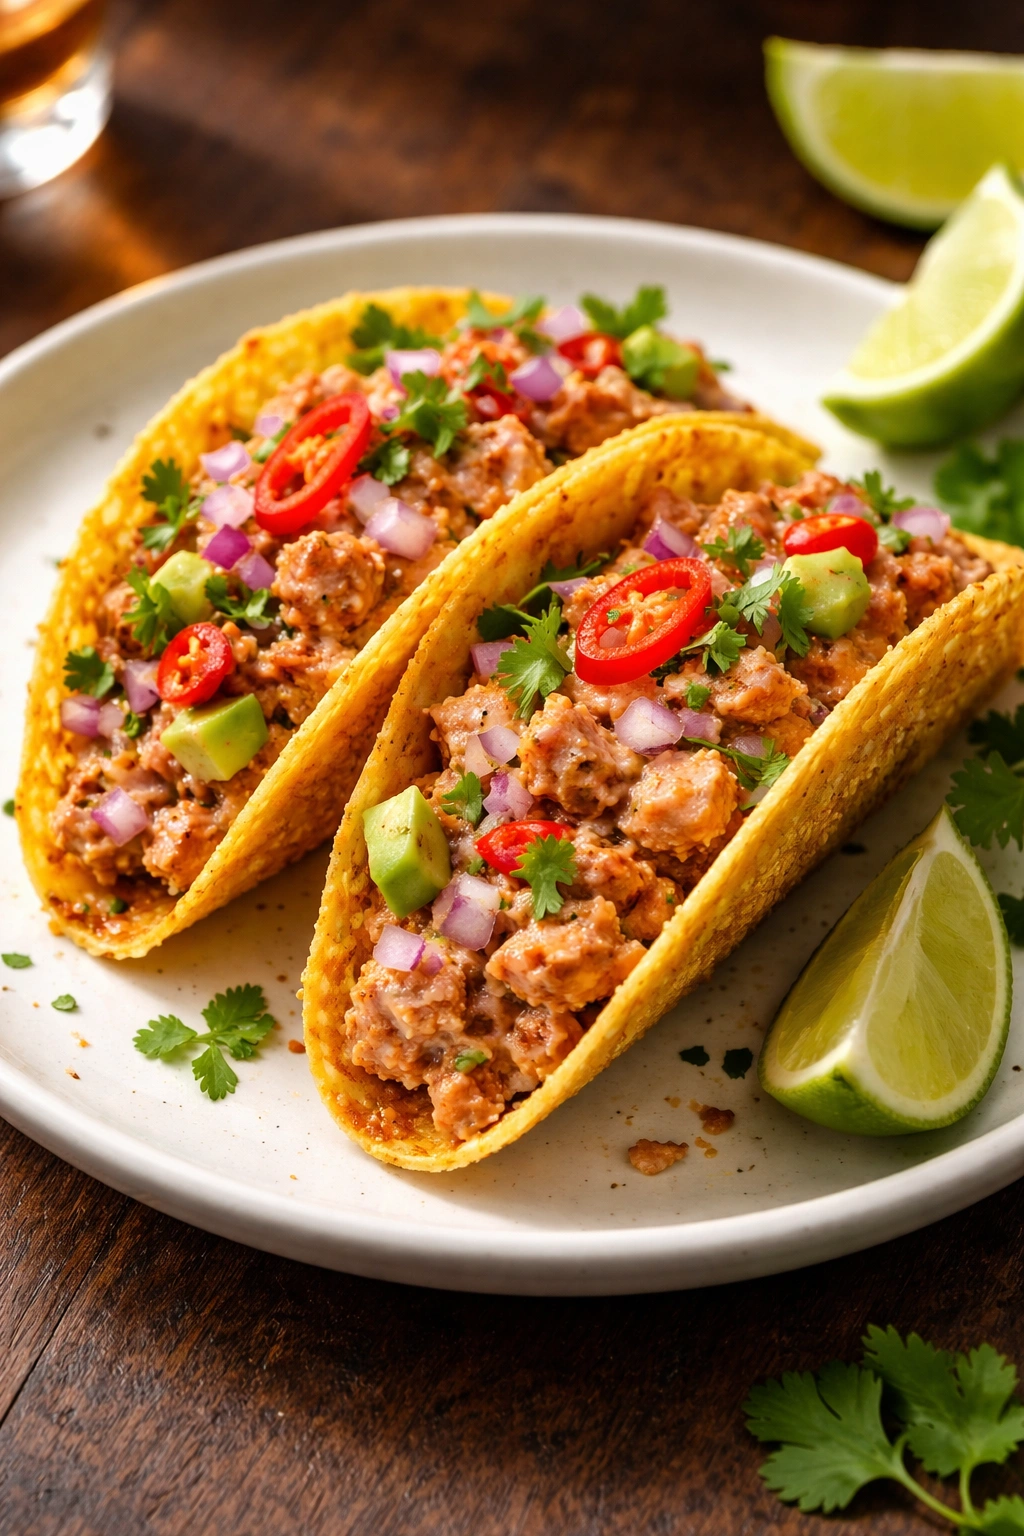
These tacos walk the perfect line between quick and impressive. They’re the kind of thing you can throw together on a Tuesday night when you’re tired, but they taste special enough that you’d serve them to guests. The spicy tuna filling has real depth, and when you combine it with crunchy shells and cool toppings, every bite is texturally interesting.
Building the Spicy Tuna Base
Drain your canned tuna and combine it with mayo, sriracha, lime juice, and minced jalapeño. Add finely diced red onion, fresh cilantro, and a pinch of cumin. The mixture should taste bold and flavorful on its own before it hits the taco shell. Some people add a tiny bit of honey to balance the heat, and honestly, it’s a smart move if you don’t want the tacos to be brutally spicy.
Assembly and Topping Strategy
Warm your taco shells (hard or soft, your choice — both work beautifully). Fill each one with the spicy tuna mixture, then add toppings in this order: shredded cabbage or lettuce for crunch, diced avocado for creaminess, diced tomato for freshness, and a drizzle of lime crema (sour cream mixed with lime juice and salt). A sprinkle of crispy fried onions on top adds unexpected texture.
Flavor Combinations Worth Exploring
- Asian twist: Sesame oil, ginger, and green onions instead of cilantro
- Chipotle version: Chipotle peppers in adobo sauce mashed into the mayo
- Korean-inspired: Gochujang mayo, cucumber, and pickled radish
- Poke-style: Soy sauce, sesame oil, and nori strips
- Tropical version: Mango salsa and fresh mint
Pro tip: Keep the tuna filling and toppings separate until you’re ready to serve. This prevents sogginess and lets people customize their tacos however they like.
8. Tuna Poke Bowls
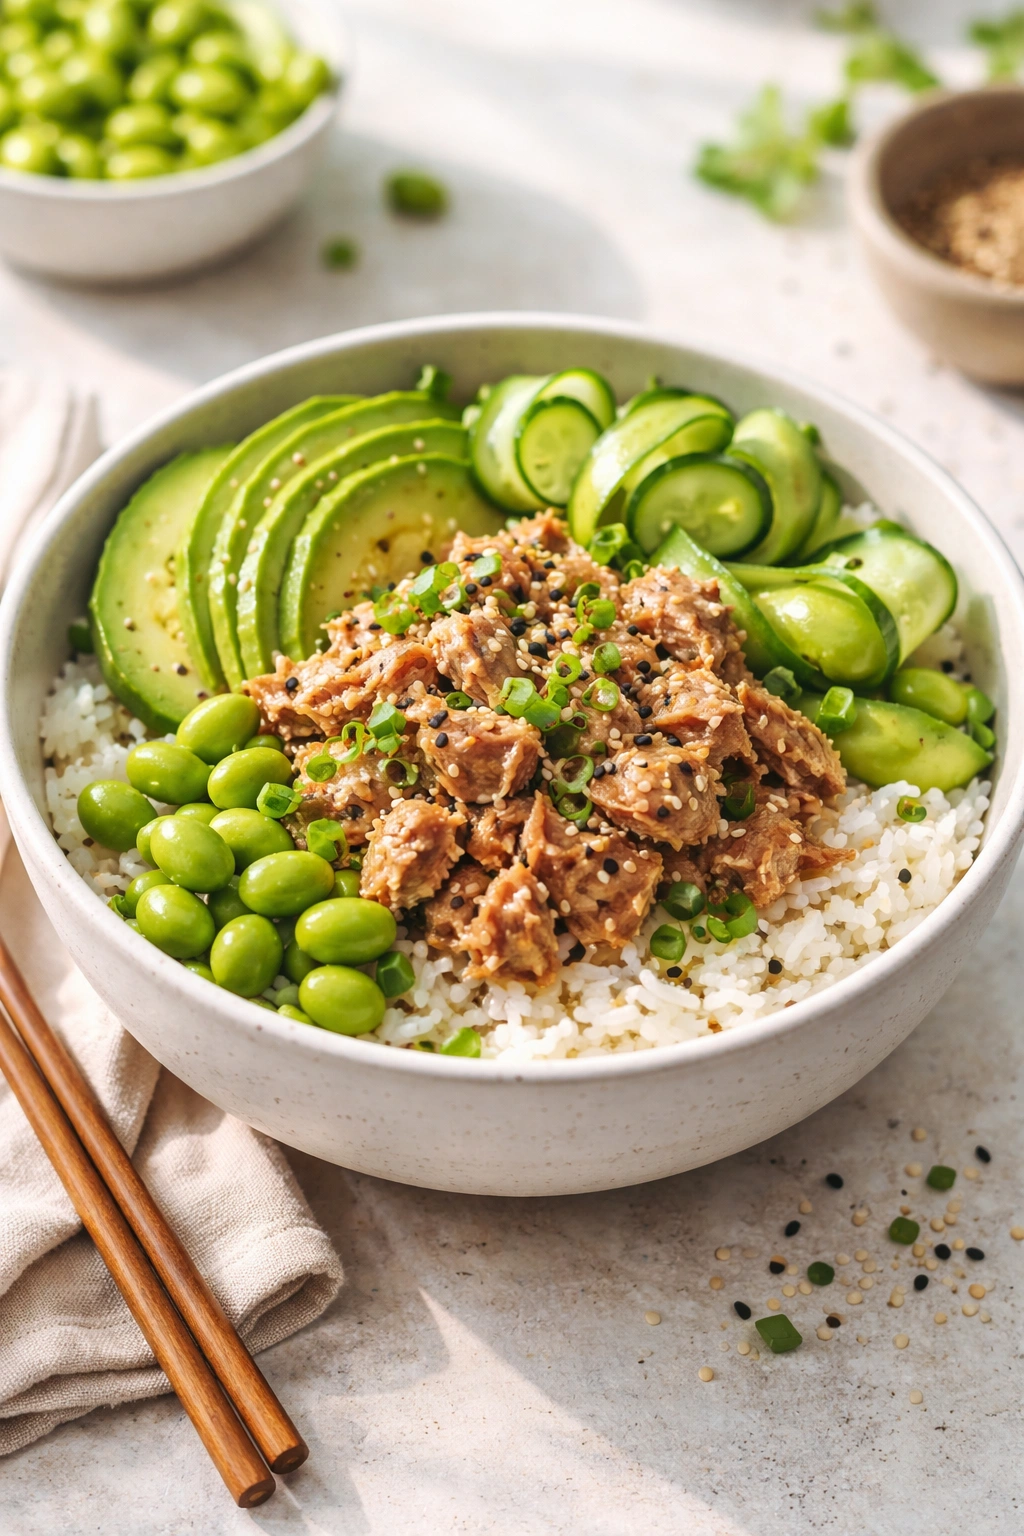
Poke bowls are technically raw fish, but since you’re using canned tuna (which is already cooked), you’re creating a deconstructed, cooked version that’s equally delicious and substantially easier. The beauty of a poke bowl is the combination of temperature, texture, and flavor — warm rice, cold marinated tuna, crispy vegetables, creamy avocado.
What Makes a Poke Bowl Satisfying
A proper poke bowl is balanced. You’ve got warm, comforting rice as your foundation. Cold, seasoned tuna provides the protein and umami. Raw vegetables add crunch and freshness. Creamy elements like avocado or mayo-based sauce provide richness. Crispy elements like seeds, nuts, or fried onions give you textural contrast. Every spoonful has multiple things happening, which is why bowls are so crave-able.
Building Your Bowl Layer by Layer
Start with warm sushi rice or regular cooked rice as your base. Drain your canned tuna and marinate it briefly in a mixture of soy sauce, rice vinegar, sesame oil, minced ginger, and a pinch of wasabi. Let it sit for 5-10 minutes so the flavors penetrate. Arrange marinated tuna on top of the rice, then add strips of cucumber, shredded carrots, sliced avocado, edamame, and thinly sliced radish. Garnish generously with sesame seeds, nori strips, crispy fried shallots, and green onion slices.
Sauce Variations for Different Preferences
- Spicy mayo: Mayo mixed with sriracha and lime juice
- Sesame-ginger dressing: Sesame oil, rice vinegar, ginger, and garlic
- Ponzu sauce: Citrus-based and bright, perfect for seafood
- Sriracha-soy glaze: Equal parts sriracha and soy sauce with a touch of honey
- Wasabi mayo: Mayo mixed with wasabi and a hint of honey to balance heat
Worth knowing: Assemble your bowl right before eating so the hot rice, cold tuna, and crispy elements stay distinct. If you need to make this ahead, keep components separate in the refrigerator.
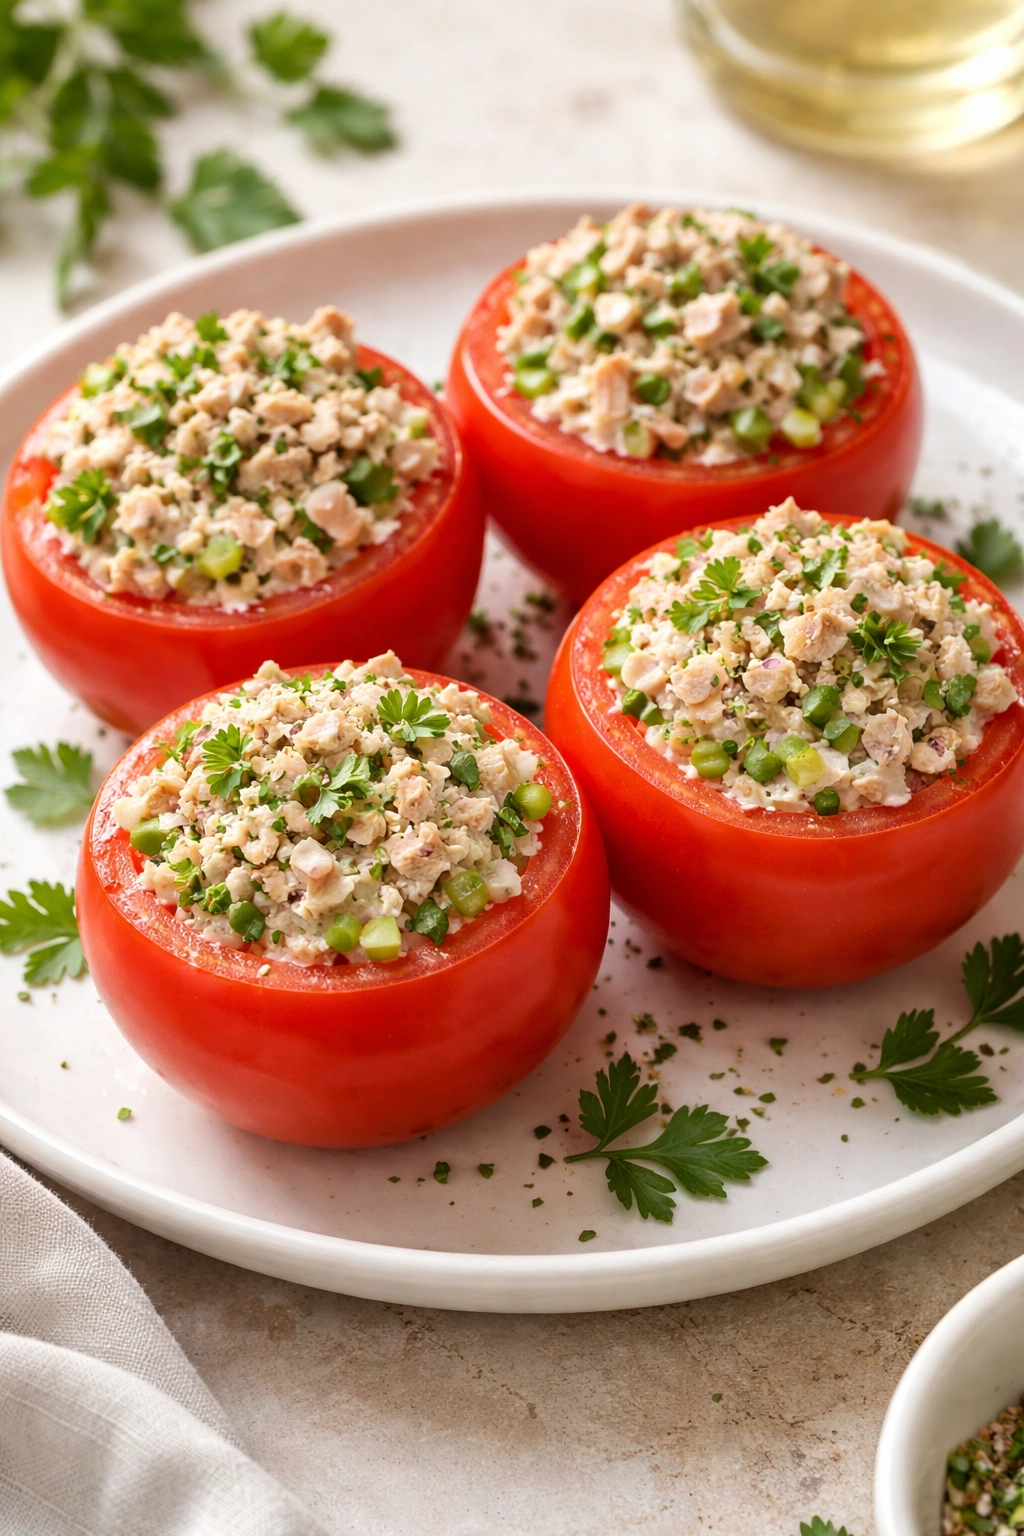
9. Tuna-Stuffed Tomatoes
This is elegant enough to serve at a dinner party, yet simple enough to make on a random Tuesday. Stuffed tomatoes are visually impressive, naturally portioned, and honestly delicious. They feel light and fresh while still being genuinely satisfying.
Why Tomatoes Make Perfect Containers
Tomatoes are about 95% water, so when you hollow them out and fill them with a flavorful tuna mixture, you create something that’s both substantial and refreshing. The tomato flesh adds natural sweetness and acidity that balances the richness of the tuna salad filling. You can serve them warm or at room temperature, which makes them perfect for different occasions and seasons.
Preparation and Filling
Choose medium to large tomatoes that are ripe but still firm. Cut off the top quarter and scoop out the interior flesh and seeds with a small spoon or melon baller, creating a hollow cavity. Sprinkle salt and pepper inside each tomato shell. Make a tuna salad mixture with drained canned tuna, finely diced celery, fresh herbs (parsley, basil, dill), a touch of mayo, lemon juice, capers, and diced red onion. Fill each hollowed tomato generously with this mixture, mounding it slightly on top. You can serve these immediately at room temperature, or chill them for a couple hours.
Flavor Profiles for Different Tomato Fillings
- Mediterranean: Add kalamata olives, feta cheese, and oregano
- Herby and fresh: Load up on dill, parsley, chives, and a squeeze of lemon
- Creamy dill: Use Greek yogurt instead of mayo with fresh dill
- Spicy and bright: Add jalapeño, cilantro, lime juice, and a touch of sriracha
- Italian: Add sun-dried tomatoes, pesto, and mozzarella cheese
Pro tip: If your tomatoes feel wobbly when filling, cut a thin slice off the bottom so they sit flat. Alternatively, place them in a muffin tin to keep them upright.
10. Tuna Croquettes With Lemon-Aioli Sauce
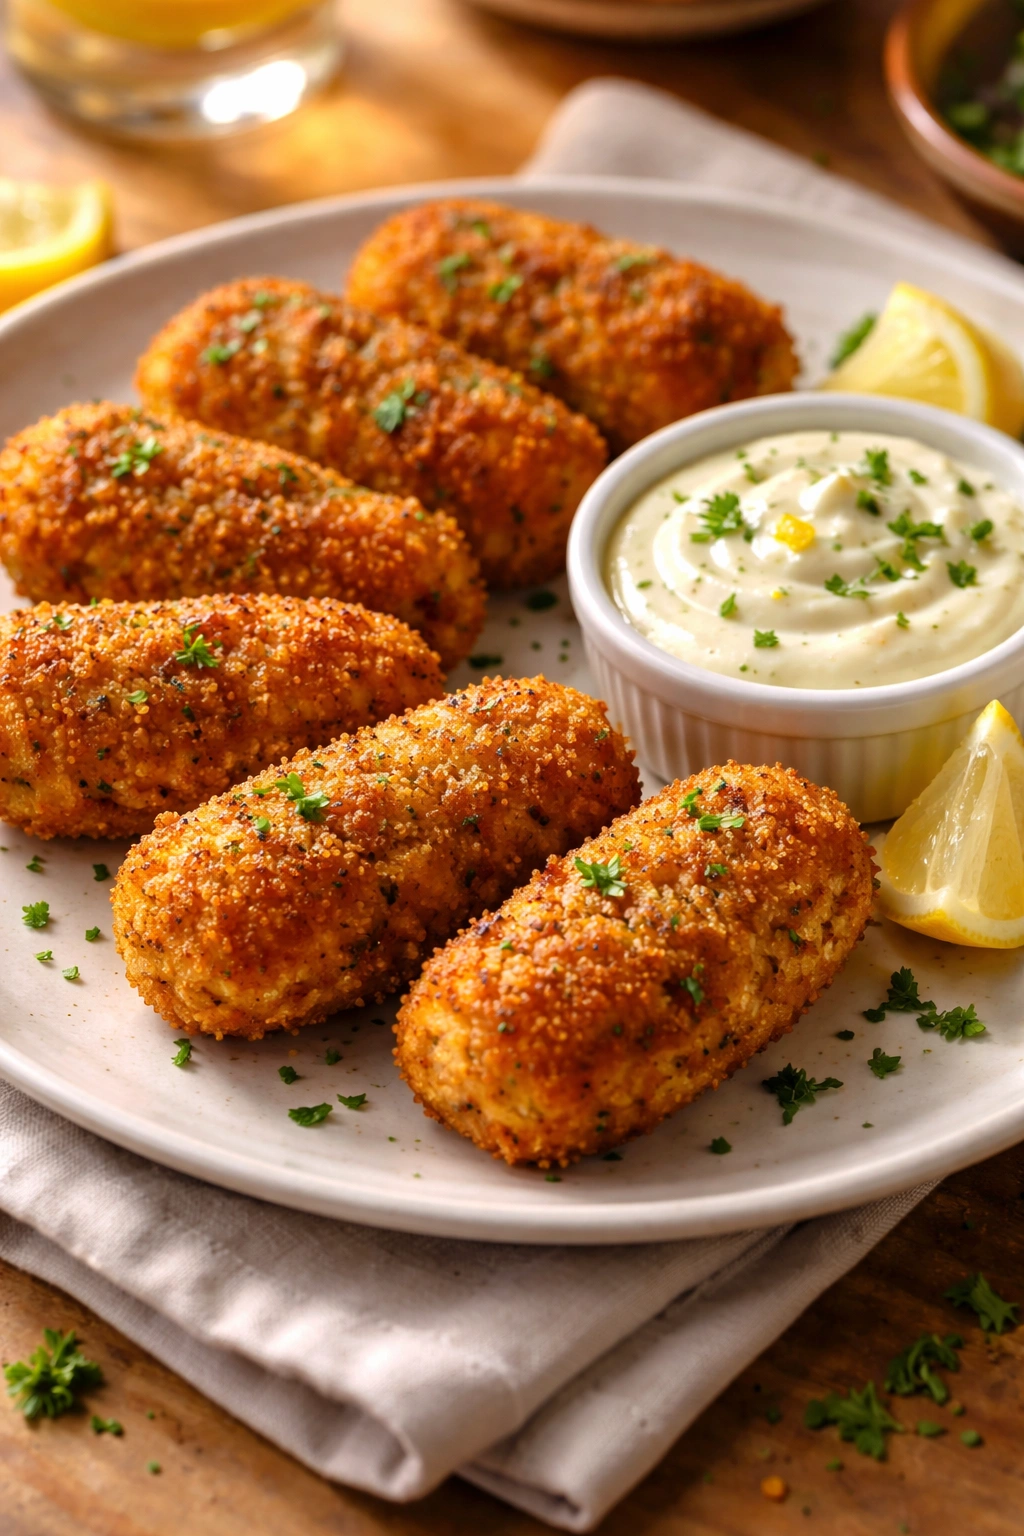
These are crispy, golden-brown patties that are simultaneously elegant and deeply comforting. They’re the kind of thing that proves canned tuna can be genuinely sophisticated. Serve them as an appetizer, on a salad, in a sandwich, or as the main with roasted vegetables.
The Technique for Perfect Croquettes
Croquettes rely on proper binding and a sturdy exterior that gets golden and crispy when fried. You’re combining canned tuna with mashed potatoes, breadcrumbs, egg, fresh herbs, and seasonings to create a mixture that holds together. The potato serves dual purposes: it adds substance and helps bind everything, while absorbing the flavor of the tuna and aromatics. You’ll shape them into small patties, chill them (this is crucial for keeping them intact while frying), then pan-fry or shallow-fry until golden.
The Mixture and Assembly Process
Drain canned tuna thoroughly and combine it with mashed potatoes (about 1 cup potato to 2 cans tuna), minced shallots, fresh dill or parsley, lemon zest, and Dijon mustard. Mix in breadcrumbs (enough to bind everything without making it dense), beaten egg, salt, and pepper. The mixture should hold together when squeezed but still be moist. Shape into golf-ball-sized balls or small patties, roll them in panko breadcrumbs, and refrigerate for at least 30 minutes (or up to overnight).
Serving and Sauce Ideas
Pan-fry in olive oil over medium heat for about 3-4 minutes per side until deeply golden and crispy. Make a simple lemon-aioli sauce by whisking together mayo, minced garlic, lemon juice, and a pinch of saffron for color. Serve the warm croquettes immediately with the sauce on the side.
Flavor Variations Worth Making
- Add capers and cornichons for briny pop
- Include crispy diced bacon for umami depth
- Mix in sautéed mushrooms for earthiness
- Add roasted red peppers for sweetness
- Use smoked paprika instead of fresh herbs for a different profile
- Include grated Gruyère cheese for richness
Worth knowing: These croquettes freeze beautifully, either before or after frying. If you freeze them uncooked, you can pan-fry them from frozen — they’ll just need an extra minute or two per side. Already-cooked croquettes can be reheated in a 375°F oven for about 10 minutes until warmed through and the exterior is crispy again.
Final Thoughts

Canned tuna deserves way more respect than it typically gets. These ten recipes prove that with a little intention and the right flavor combinations, canned tuna becomes the foundation for genuinely crave-able meals. Whether you’re reaching for it because you need dinner on the table in minutes or because you’re actually excited about what you’re going to create, you’ve got options that go far beyond mayo-heavy salads.
The best part is the flexibility. Every single one of these recipes can adapt to what you have on hand — your preferred vegetables, the herbs in your garden, the cheese in your fridge. Start with the version that appeals to you most, then make it your own. Once you realize how many directions you can take canned tuna, you’ll stop seeing those cans as backup ingredients and start seeing them as building blocks for actual good food.
Keep a few cans of quality tuna in your pantry at all times. Combine that with some pantry staples — pasta, rice, canned tomatoes, nuts, herbs — and you’re never more than 20 minutes away from a meal that tastes intentional and delicious. That’s not just convenient; that’s freedom.