Avocados are one of those rare foods that seem to work perfectly at any time of day. They’re rich and creamy when you need something indulgent, but light and fresh when you want something clean. Whether you’re rushing through breakfast, packing a lunch, preparing dinner, or looking for something unexpected to serve guests, an avocado-based dish can elevate the meal with minimal effort. What makes avocados so versatile is their ability to complement almost anything — they pair beautifully with bold spices, delicate fish, earthy vegetables, bright citrus, and even chocolate. The key is understanding how to balance their natural creaminess with complementary flavors and textures so the avocado becomes the star without overwhelming the plate.
The challenge with avocados isn’t that there aren’t enough ways to use them — it’s choosing which recipe to make. Do you reach for something savory or sweet? Something substantial enough to be a meal, or something lighter that works as part of a spread? That’s where having a collection of reliable, genuinely delicious avocado recipes becomes invaluable. The eight recipes below span breakfast, lunch, dinner, and snacks, and they all share one important quality: they’re built on the principle that avocado should taste like avocado. You won’t find it buried under heavy sauces or overwhelmed by competing flavors. Instead, each recipe uses the avocado’s natural qualities as the foundation, with supporting ingredients that enhance rather than mask.
These aren’t gimmicky recipes or internet trends that disappoint once you actually cook them. They’re straightforward, tested dishes that work because they respect the ingredient. You’ll notice recurring techniques and flavor combinations across them — the brightness of citrus, the grounding of sea salt, the textural contrast of something crispy or crunchy — because these pairings genuinely work. Once you internalize why these combinations succeed, you’ll start inventing your own avocado creations with confidence. Let’s get started.
1. Creamy Avocado Toast with Everything Bagel Seasoning
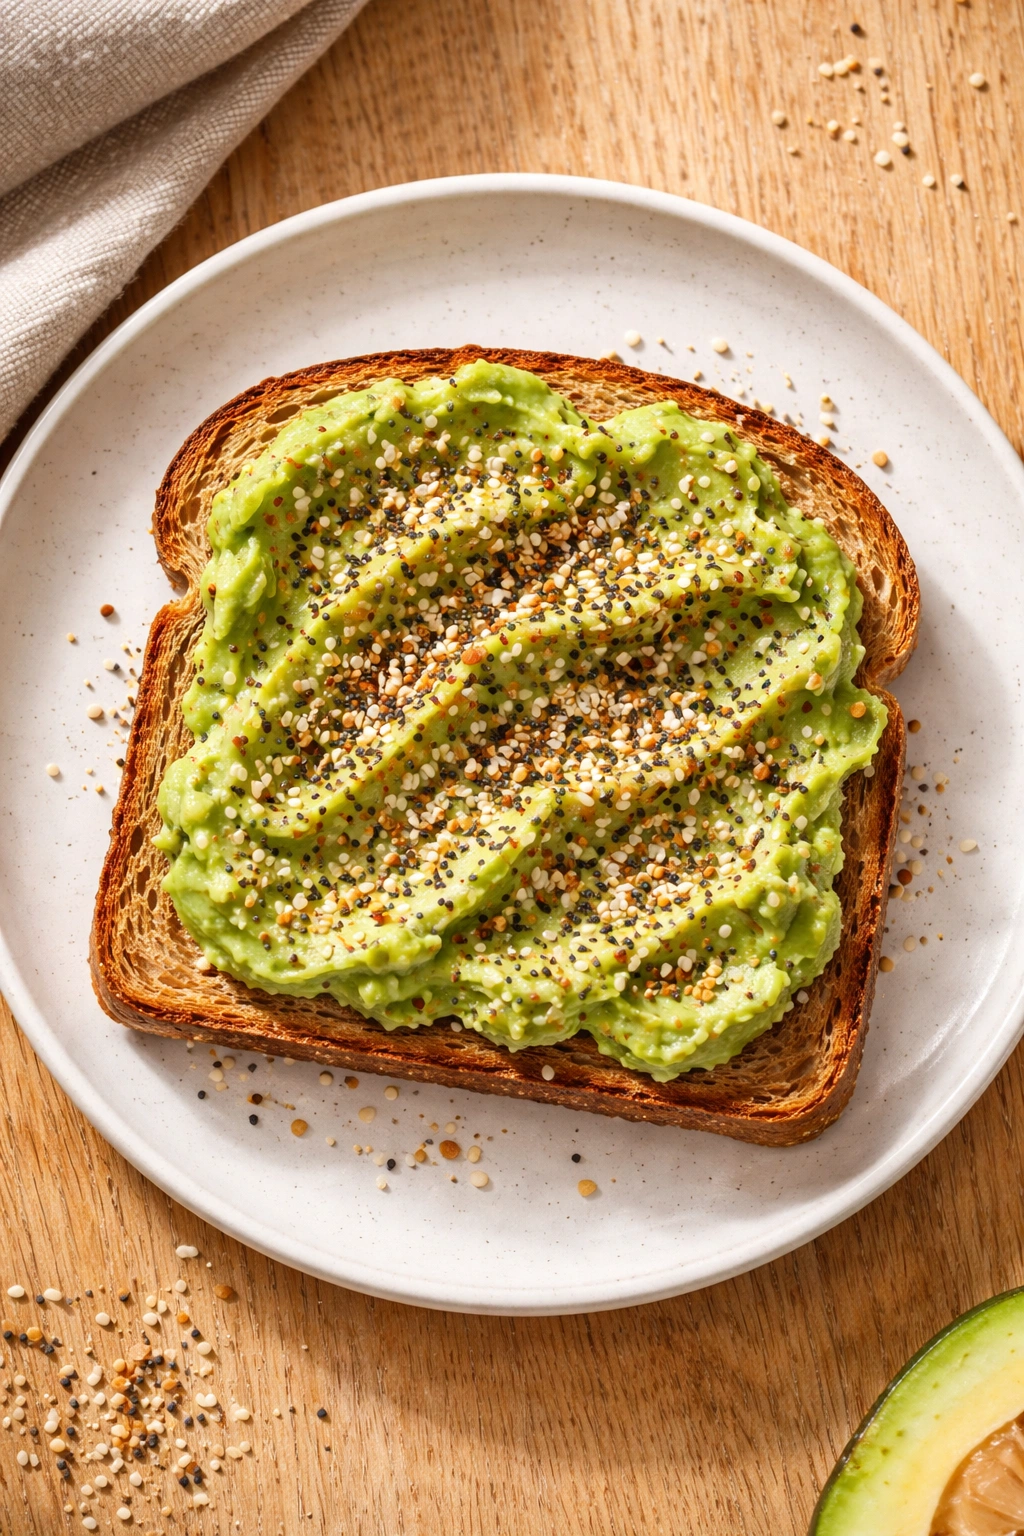
This is breakfast done right — not a trendy Instagram prop, but actually satisfying. A properly made avocado toast should be crispy on the outside, creamy inside, with salt and acid balanced just so. The avocado needs to be perfectly ripe (yield just slightly to gentle finger pressure, not mushy), and the bread deserves to be substantial enough to support the toppings without becoming soggy. The everything bagel seasoning adds a savory depth with its blend of sesame seeds, poppy seeds, dried garlic, dried onion, and sea salt that elevates simple avocado toast into something restaurant-quality.
Why This Works for Breakfast
The combination of fat from the avocado and from the olive oil keeps you satisfied for hours without that mid-morning energy crash. The fiber from the whole-grain bread slows digestion, and the lemon juice adds vitamin C absorption while brightening the whole plate. Crispy bread provides textural contrast that makes the creamy avocado feel more interesting to eat.
What You’ll Need
Yield: Serves 1 (easily multiplied) Prep Time: 5 minutes Cook Time: 4 minutes Total Time: 9 minutes Difficulty: Beginner — this requires no special skills, just good timing and a hot toaster.
Ingredients:
- 1 slice of quality whole-grain or sourdough bread, cut ¾-inch thick
- ½ ripe avocado (select one that gives slightly to gentle thumb pressure, not hard, not mushy)
- 1 tablespoon extra-virgin olive oil, divided
- Juice of ½ lemon (about 1 tablespoon)
- ¼ teaspoon fleur de sel or fine sea salt
- ¼ teaspoon freshly cracked black pepper
- 1½ teaspoons everything bagel seasoning
- ½ teaspoon red pepper flakes (optional, for gentle heat)
- 1 soft-boiled egg (optional but recommended)
Step-by-Step Instructions:
-
Place your bread in the toaster and set it to medium-high heat, toasting until the exterior is deeply golden and crispy with brown spots (you should hear a light crunch when you bite it), but the inside still has a bit of give — approximately 3 to 4 minutes depending on your toaster’s strength. The goal is crispy, not burnt or hard throughout.
-
While the bread toasts, cut the avocado in half lengthwise, working around the large pit in the center. Twist the halves gently to separate them, then use a small spoon to scoop the flesh directly onto a cutting board. Slice it lengthwise into ¼-inch thick slices — this keeps the pieces together visually instead of mashing them.
Advertisements -
As soon as the toast emerges from the toaster, immediately rub it with ½ tablespoon of the olive oil (it will sink into the hot bread quickly). This prevents the avocado from making the toast soggy and adds richness.
-
Arrange the avocado slices on the oiled toast, gently pressing them down so they adhere without tearing apart. Drizzle with the remaining olive oil and fresh lemon juice immediately — the acid prevents the avocado from browning and brightens the entire dish.
-
Sprinkle evenly with the salt, pepper, and everything bagel seasoning. Top with the soft-boiled egg if using, breaking the yolk so it runs across the avocado toast. Finish with red pepper flakes if you like a bit of heat.
-
Serve immediately while the toast is still hot and crispy.
Tips and Variations for Success
Timing is everything with avocado toast. The bread must be hot when the avocado hits it, and you should eat it immediately after assembling — avocado toast sits beautifully for exactly zero minutes. Choose your bread wisely; a thin, delicate slice will collapse under the toppings, while an overly dense bread won’t toast properly. Sourdough, whole grain, or sturdy multigrain all work beautifully. A regular soft white bread will toast too quickly and won’t provide the structure you need.
The avocado ripeness matters more here than in almost any other preparation. If it’s too firm, it won’t spread across the toast and will taste bitter. If it’s overripe and soft, it’ll turn brown by the time you’re finished making the toast. Aim for that sweet spot where a gentle squeeze yields slightly. If you’re buying avocados for the week, select them at different stages of ripeness so you have properly ripe ones throughout.
For variations, try smoked salmon with capers and a squeeze of lime instead of the egg. Or go in a Mediterranean direction with crumbled feta, sliced radish, and a drizzle of pomegranate molasses. Even the simplest version — just avocado, salt, lemon, and those crispy-salty sesame seeds — is elegant enough for a weekend breakfast when you want something special.
Storage
Avocado toast is meant to be eaten immediately. Once assembled, it will hold for about 2 minutes before the toast begins absorbing moisture from the avocado and losing its crispness. If you’re preparing toast for multiple people, assemble each one in order so they’re warm when served.
2. Soft Scrambled Eggs with Avocado and Herbs
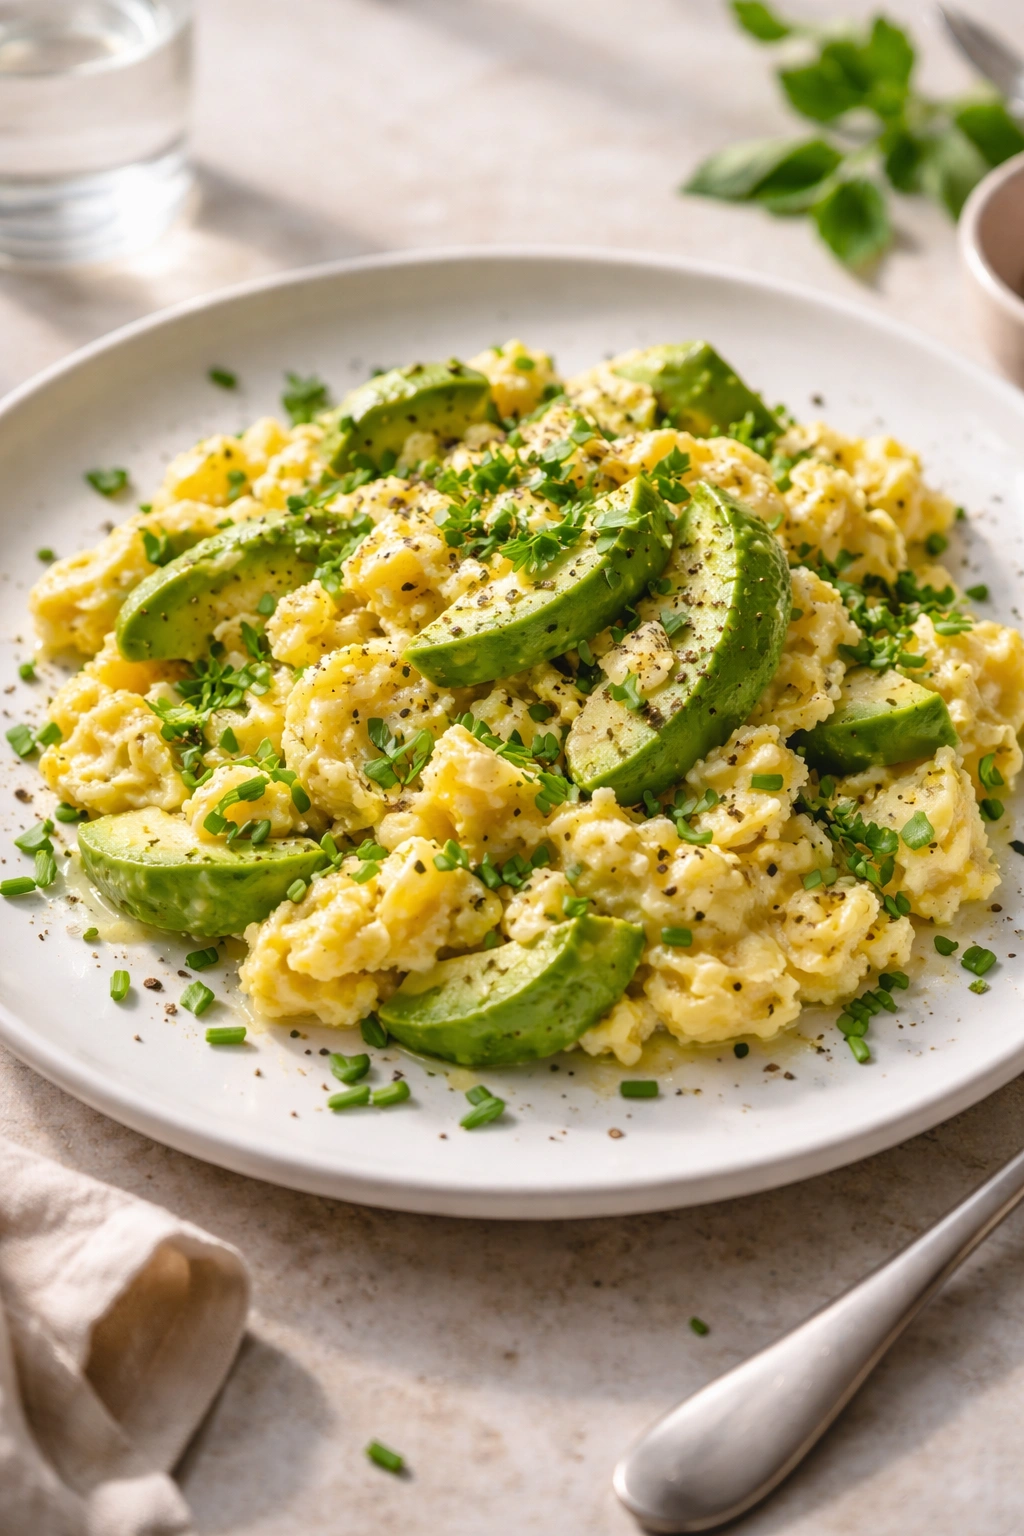
Scrambled eggs paired with avocado might sound simple, but this is where technique reveals itself. The secret isn’t the avocado — it’s understanding that scrambled eggs reach their best texture when cooked low and slow over medium-low heat, with plenty of butter, and when you stop cooking them just before they look fully set (they’ll continue cooking from residual heat). The avocado slices are folded in at the very last second, warming slightly but staying silky and intact. Fresh herbs brighten the entire dish and prevent it from feeling heavy.
Why This Combination Works
Eggs and avocado both contain complementary fats and proteins that satisfy deeply. The yolk’s richness pairs with the avocado’s creaminess without becoming excessive, while the egg white provides structure. The herbs — whether chives, dill, tarragon, or cilantro — add freshness that cuts through the richness and adds complexity. This breakfast keeps you full for hours without feeling heavy.
What You’ll Need
Yield: Serves 1 Prep Time: 5 minutes Cook Time: 8 minutes Total Time: 13 minutes Difficulty: Intermediate — this requires attention and a bit of practice to nail the soft, creamy texture, but it’s absolutely learnable.
Ingredients:
- 3 large eggs, room temperature
- 2 tablespoons unsalted butter
- ¼ ripe avocado, sliced into thin slices
- 2 tablespoons fresh herbs (chives, dill, tarragon, or a mix), finely chopped
- 1 tablespoon whole milk or heavy cream
- ¼ teaspoon fine sea salt
- ⅛ teaspoon freshly cracked black pepper
- Squeeze of lemon juice
Step-by-Step Instructions:
-
Crack the eggs into a bowl and add the milk, salt, and pepper. Whisk gently until well combined — don’t over-whisk; you’re looking for uniform color, not vigorous aeration.
-
Place a medium nonstick skillet or well-seasoned cast iron pan over medium-low heat and add the butter. Let it melt completely, coating the entire pan base, and allow it to get foamy (about 1 minute). The heat should feel warm but not hot to your hand held above the pan.
-
Pour the egg mixture into the pan. Let it sit untouched for 15 to 20 seconds as the bottom just barely starts to set.
-
Using a silicone spatula, gently push the egg mixture from the edges toward the center, then tilt the pan so uncooked egg flows to the edges. Repeat this motion every 20 to 30 seconds — you’re coaxing the eggs to set slowly and create large, soft curds, not stirring constantly and creating small, grainy ones.
-
After 5 to 6 minutes total, the eggs will look almost set but slightly wet and glossy on the surface. Remove the pan from heat at this exact moment. The residual heat will continue cooking the eggs for another 30 to 45 seconds. If you wait until the eggs look fully set in the pan, they’ll overcook and become rubbery.
-
Gently fold in the avocado slices and fresh herbs in the last moment while the eggs are still in the pan (about 10 to 15 seconds of contact heat), being careful not to break the avocado apart. Squeeze lemon juice over top.
-
Immediately transfer to a warm plate and serve.
Advertisements
Tips and Variations for Success
Temperature control is everything here. Medium-low heat feels almost too gentle, but that’s exactly the point. If your pan feels hot to the touch, it’s too hot. Use butter, not oil — the butter’s milk solids add flavor and the lower smoke point helps prevent overcooking. Room temperature eggs cook more evenly than cold ones straight from the fridge, so pull them out about 10 minutes before cooking.
The mistake most people make is cooking the eggs in the pan until they look fully set. They’ll taste like rubber. You’re cooking them until they look slightly underdone, then removing heat immediately. The residual heat finishes the job with their tender texture intact.
For variations, try crumbled crispy bacon, aged cheddar, and scallions instead of fresh herbs. Or make it Mediterranean with cherry tomatoes, feta, and fresh basil. You can even add a pinch of smoked paprika or a tiny bit of truffle oil for elevated brunch. The fundamental technique stays the same; the add-ins are your creative choice.
Storage
Leftover scrambled eggs don’t reheat beautifully (they toughen), so this is best eaten immediately. Prepare only the portion you’ll eat right away.
3. Creamy Avocado and Chicken Salad for Lunch
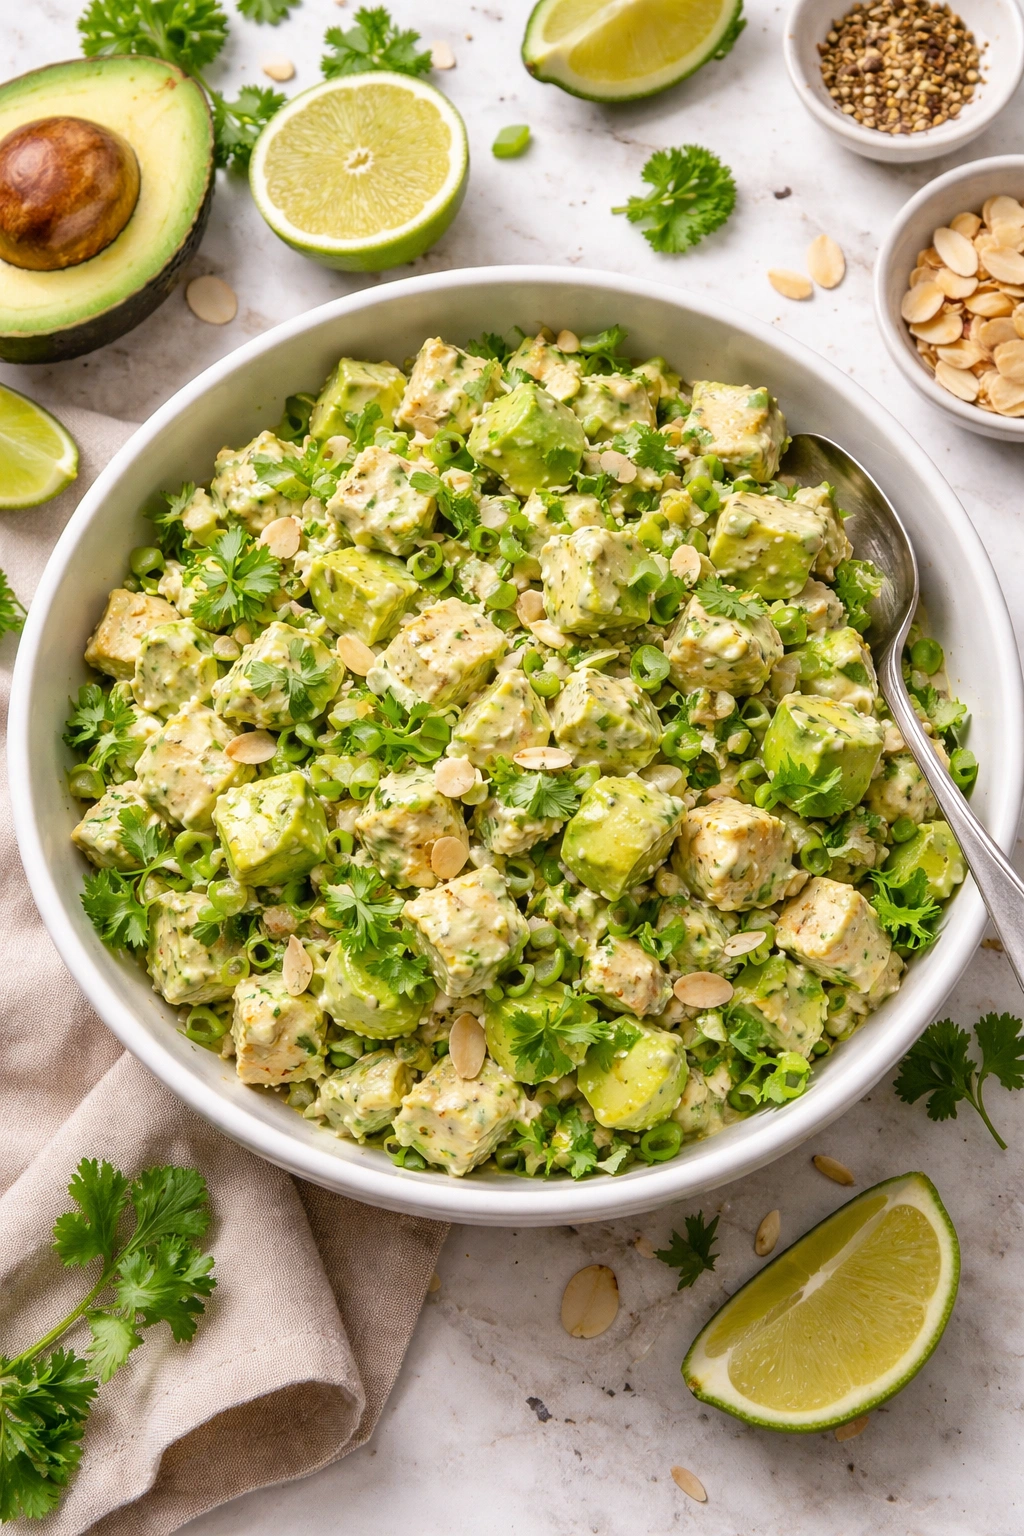
This isn’t the heavy mayonnaise-heavy chicken salad of decades past. This version uses avocado as the binder instead of excessive mayo, which makes it feel lighter while remaining incredibly satisfying. The avocado creates a naturally creamy texture with minimal added fat, and the fresh lime juice adds brightness that prevents the salad from tasting rich or dull. Crisp vegetables, toasted almonds, and fresh cilantro add texture and flavor depth that make every bite interesting.
Why This Works as a Lunch
The combination of lean protein from chicken, healthy fats from avocado, and fiber from vegetables keeps your energy stable through the afternoon. You can prepare it ahead of time (if you keep the avocado separate and add it just before eating), pack it in a container with bread or crackers on the side, and have a lunch that tastes restaurant-quality but came from your own kitchen.
What You’ll Need
Yield: Serves 2 Prep Time: 15 minutes (mostly chopping) Cook Time: 20 minutes for chicken (or use rotisserie chicken for zero cook time) Total Time: 35 minutes active (or 15 minutes if using cooked chicken) Difficulty: Beginner — this is straightforward assembly with no technical cooking required if using rotisserie chicken.
Ingredients:
- 1 pound boneless, skinless chicken breasts (or 2 cups cooked rotisserie chicken, shredded)
- 1 ripe avocado
- 3 tablespoons Greek yogurt
- 2 tablespoons mayonnaise
- Juice of 1 lime (about 2 tablespoons)
- ½ red onion, finely minced
- ½ cup diced celery (about 1 medium stalk)
- ½ cup diced cucumber, seeds removed
- ¼ cup fresh cilantro, roughly chopped
- ¼ cup sliced almonds, lightly toasted
- ¼ teaspoon fine sea salt
- ⅛ teaspoon freshly cracked black pepper
- ⅛ teaspoon ground cumin (optional but adds depth)
- Red pepper flakes to taste
Step-by-Step Instructions:
Prepare the Chicken (if starting from raw):
-
If using raw chicken, pat the breasts dry and season both sides lightly with salt and pepper. Place them in a skillet over medium-high heat with a bit of oil or butter.
-
Cook for 6 to 7 minutes per side until the internal temperature reaches 165°F (74°C) when checked with an instant-read thermometer in the thickest part. The chicken should be golden on the outside and cooked through inside.
-
Transfer to a cutting board, let cool for 5 minutes, then shred or chop into bite-sized pieces.
Assemble the Salad:
-
Cut the avocado in half lengthwise and remove the pit. Scoop the flesh into a medium bowl and mash gently with a fork — you want some texture remaining, not smooth guacamole (about 30 seconds of mashing).
-
Add the Greek yogurt, mayonnaise, and lime juice to the mashed avocado. Stir until combined and creamy, scraping down the sides of the bowl.
-
Fold in the cooked chicken, red onion, celery, cucumber, cilantro, and toasted almonds. Season with salt, pepper, and cumin if using.
-
Taste and adjust seasoning — add more lime juice if it needs brightness, more salt if the flavors feel muted. A tiny pinch of red pepper flakes adds a gentle warmth without heat.
-
Serve immediately on greens, in a sandwich, or with crackers on the side.
Tips and Variations for Success
The avocado timing matters here. If you’re making this salad to eat later, prepare everything except the avocado ahead of time. Add the mashed avocado just before eating or no more than 30 minutes before, since the avocado will brown if exposed to air for too long. Store the prepared (avocado-free) salad in an airtight container in the fridge for up to 2 days.
For variations, try diced pineapple and jalapeño for a tropical version, or roasted red peppers and fresh basil for something more Italian. You can swap the Greek yogurt for full-fat sour cream if you prefer a tangier salad, or add crumbled bacon, caramelized onions, or sun-dried tomatoes if you want more richness. For a lighter version, increase the Greek yogurt and reduce the mayo.
Toast your almonds briefly in a dry skillet over medium heat (about 2 to 3 minutes) until fragrant before adding them — this releases their oils and makes them taste much more interesting than raw almonds.
Storage
Keep the avocado-free chicken salad base in an airtight container in the refrigerator for up to 2 days. Add mashed avocado within 30 minutes of eating for best color and texture. You can also freeze the avocado-free salad for up to 1 month (though the cucumber and celery will soften slightly when thawed).
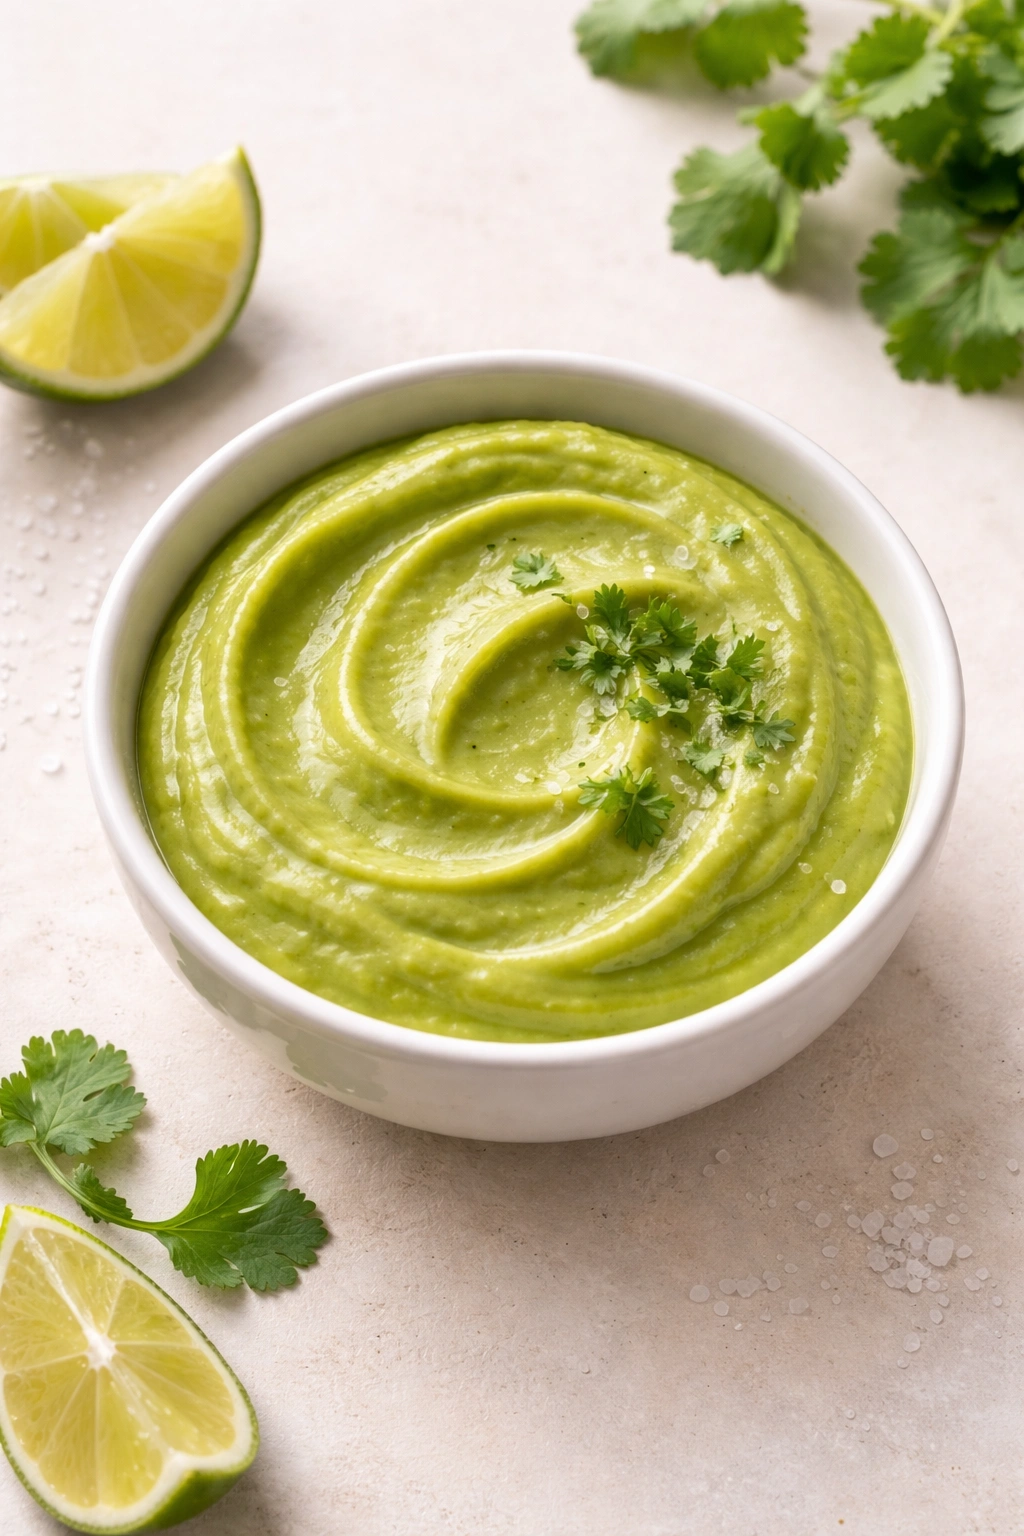
4. Silky Avocado Pasta with Garlic and Lemon
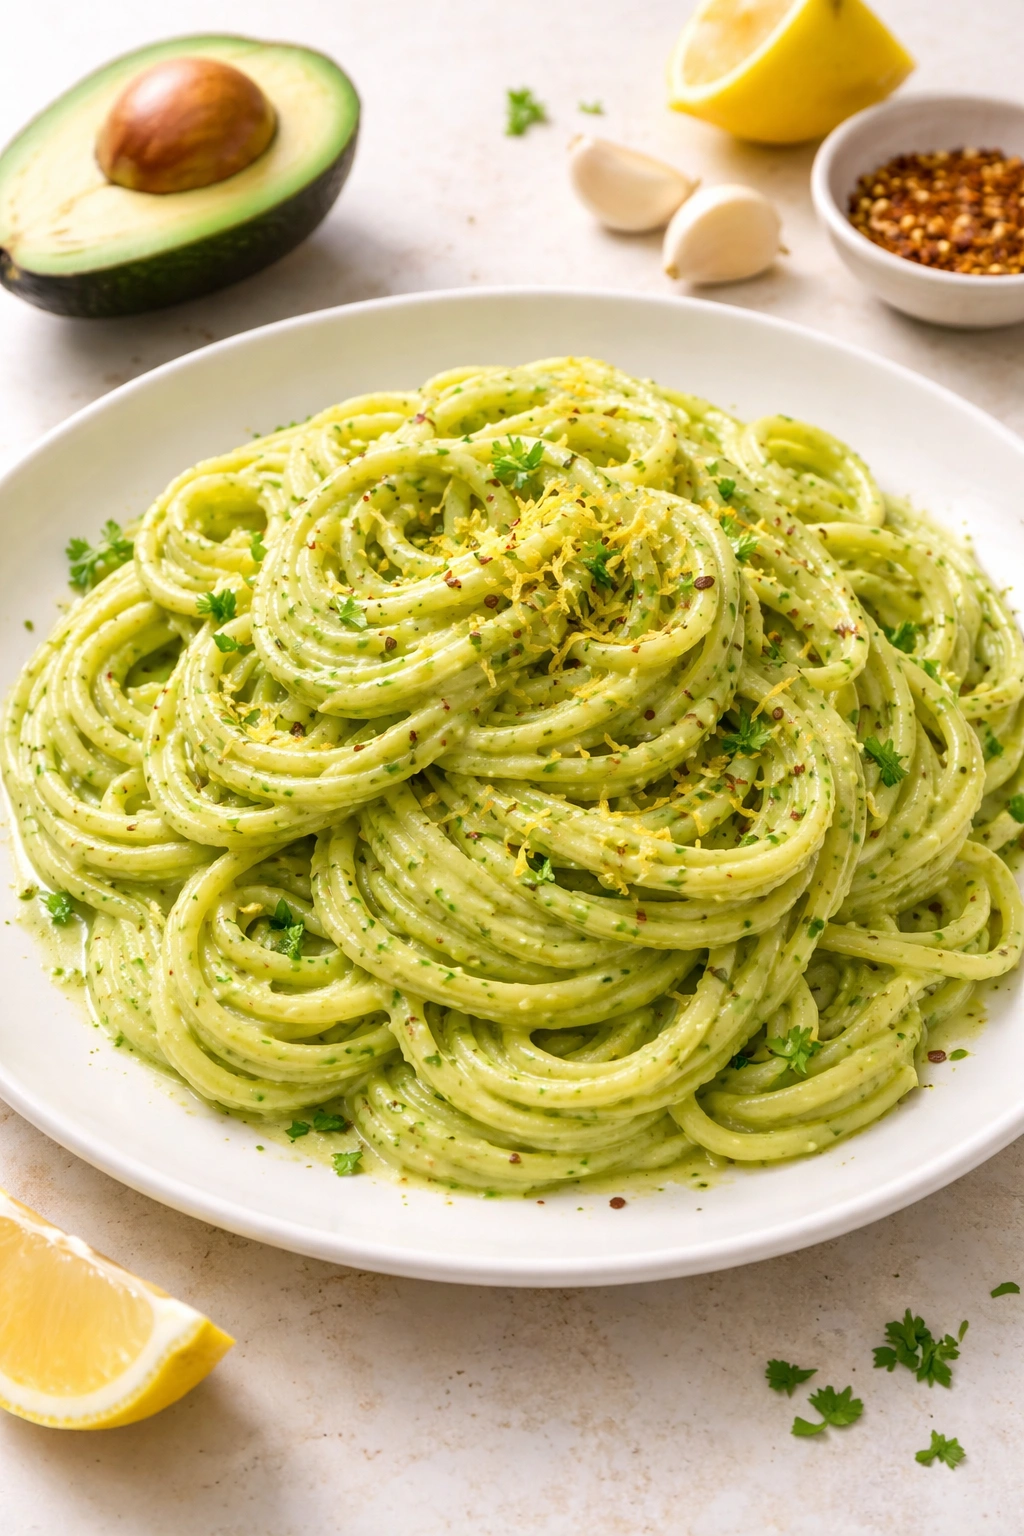
Avocado transforms into something entirely different when tossed warm with pasta. It becomes a silky sauce without any cream or cheese needed, coating every strand of pasta with richness. The key is using ripe avocado and hot pasta water to create an emulsion — the heat softens the avocado slightly while the starchy water helps it coat the pasta evenly. Garlic and lemon provide savory depth and brightness, making this dish taste complex despite being remarkably simple.
Why This Works as a Light Main Course
This pasta delivers satisfaction without the heaviness of cream-based sauces. The fat content keeps you full, while the lack of excess dairy prevents that post-meal sluggishness. It’s elegant enough for guests, quick enough for a weeknight dinner, and completely vegetarian while feeling genuinely indulgent.
What You’ll Need
Yield: Serves 2 as a main course Prep Time: 10 minutes Cook Time: 12 minutes Total Time: 22 minutes Difficulty: Beginner — straightforward, though timing the pasta and sauce together requires basic planning.
Ingredients:
- 8 ounces pasta (spaghetti, linguine, or pappardelle all work beautifully)
- 1 ripe avocado
- 3 cloves garlic, minced very fine
- 3 tablespoons extra-virgin olive oil, divided
- Juice of 1 lemon (about 3 tablespoons)
- ½ cup reserved pasta water
- ¼ teaspoon fine sea salt, plus more to taste
- ⅛ teaspoon freshly cracked black pepper
- ⅛ teaspoon red pepper flakes
- 2 tablespoons fresh basil or parsley, roughly chopped (or a combination)
- Zest of ½ lemon
- Fleur de sel for finishing (optional but lovely)
Step-by-Step Instructions:
-
Bring a large pot of generously salted water (it should taste like seawater) to a rolling boil. Add the pasta and cook according to package directions, stirring occasionally, until it’s al dente — tender with a slight firm bite at the center of each strand. Do not overcook; the pasta will continue softening slightly from the warm avocado sauce.
-
While the pasta cooks, mash the avocado in a large serving bowl with a fork until mostly smooth with some small chunks remaining. Add 2 tablespoons of the olive oil, the lemon juice, salt, pepper, and red pepper flakes. Stir until you have a loose sauce that’s not quite the consistency you want — it will thicken slightly once tossed with hot pasta.
Advertisements -
When the pasta is done, reserve ½ cup of the pasta water in a small bowl, then drain the pasta (do not rinse it).
-
While the pasta is still hot, add it to the bowl with the avocado mixture. Toss gently and continuously for 1 to 2 minutes. The heat from the hot pasta will slightly soften the avocado, and the starch from the pasta water (which you’ll add next) will help create an emulsion — the sauce will become silky and coat every strand evenly.
-
Add the reserved pasta water a little at a time — you may not need all of it. Start with ¼ cup, toss continuously for 30 seconds, then add more if needed. You’re looking for a sauce that coats the pasta without being soupy. This is the crucial step that transforms chunky avocado into a silky pasta sauce.
-
Stir in the remaining tablespoon of olive oil and taste. Adjust seasoning with more salt, lemon juice, or red pepper flakes as needed.
-
Divide between serving bowls and top with fresh basil, lemon zest, and a pinch of fleur de sel. Serve immediately while hot.
Tips and Variations for Success
The pasta water’s starch is what transforms this from mashed avocado on pasta into an actual sauce. Don’t skip this step — the combination of hot pasta, avocado, and starchy water creates an emulsion that coats the pasta evenly. If you make this and the sauce seems grainy or separated, you didn’t use enough pasta water. Toss constantly to incorporate the starch throughout.
Timing is everything. Serve this immediately after mixing. If it sits, the avocado will darken and the sauce will thicken. Make it just before you want to eat.
For variations, add toasted pine nuts or panko breadcrumbs for texture contrast, crispy bacon or smoked salmon for protein, or roasted cherry tomatoes and fresh mozzarella for a summer twist. You can also incorporate fresh herbs like tarragon or chives instead of basil. A light pinch of chili flake adds warmth, while a tiny grating of parmesan (if you eat dairy) adds a savory note.
Storage
This pasta is meant to be eaten fresh, immediately after making. Leftover pasta doesn’t hold well as the avocado continues to darken and the sauce thickens. It’s not suitable for reheating.
5. Smooth Guacamole for Any Occasion
Real guacamole is simply avocado, salt, lime juice, and cilantro — nothing more is needed for something perfect. But the technique matters more than the ingredient list. The key is using a mortar and pestle (or a fork and a bowl) to mash the avocado to just the right texture: creamy and smooth, but with some small pieces remaining for visual interest and texture. The lime juice is added immediately to prevent browning and to season properly. This guacamole is a blank canvas that works as a dip, a topping, or a condiment, and it tastes like avocado first, not like an overstuffed salsa.
Why This Works as a Crowd-Pleaser
Guacamole’s versatility is its greatest strength. Serve it with crispy tortilla chips as an appetizer, top tacos with it, add it to sandwiches, or use it as a dipping sauce for vegetables. Everyone can customize their additions based on preference, while you’ve ensured the base is perfect. The brightness of lime juice and cilantro prevents guacamole from tasting heavy or one-dimensional.
What You’ll Need
Yield: Makes about 1½ cups (serves 4 to 6 as an appetizer) Prep Time: 8 minutes Cook Time: 0 minutes Total Time: 8 minutes Difficulty: Beginner — this is genuinely difficult to mess up if you follow the steps.
Ingredients:
- 2 ripe avocados
- ½ teaspoon fine sea salt, plus more to taste
- Juice of 1 lime (about 2 tablespoons)
- 2 tablespoons fresh cilantro, finely chopped (or more if you prefer)
- Pinch of freshly cracked black pepper
- Tiny pinch of ground cumin (optional but adds subtle warmth)
- ⅛ teaspoon red pepper flakes (optional)
Optional Additions (Choose Based on Your Mood):
- 1 small jalapeño, minced very fine (for gentle heat)
- ⅓ cup finely minced red onion (for bite and texture)
- ¼ cup diced tomato, seeds removed (for freshness)
- 1 clove garlic, minced very fine (for pungency)
Step-by-Step Instructions:
-
Cut each avocado in half lengthwise, working around the large pit. Twist the halves gently to separate them. Using a small spoon, scoop the flesh into a medium bowl.
-
Add the salt and lime juice immediately — this prevents the avocado from browning. The salt also begins seasoning and helps begin breaking down the avocado’s texture.
-
Using a fork (or a mortar and pestle for even more control), mash the avocado gently but firmly, working it against the side of the bowl. You’re looking for mostly smooth with pea-sized chunks still visible throughout — not silky smooth guacamole, but not chunky either. This takes about 1 to 2 minutes of consistent pressure.
-
Fold in the cilantro, pepper, cumin, and red pepper flakes if using. Taste and adjust seasoning — add more salt if the flavors feel muted, or more lime juice if you want brightness.
-
If using optional additions, fold them in now, gently incorporating without overmixing. The guacamole should still look textured, not like a smooth dip.
Advertisements -
Transfer to a serving bowl, leaving a gentle dimple in the center. This dimple will naturally hold a small amount of the lime juice on top, protecting the surface from browning. Cover with plastic wrap pressed directly against the surface if not serving immediately.
Tips and Variations for Success
Avocado ripeness is critical for guacamole. You want avocados that yield just slightly to gentle thumb pressure — not hard (they won’t mash into a creamy texture), not mushy (they’ll taste bitter and look brown). If your avocados aren’t ripe yet, place them in a brown paper bag with a banana or apple overnight; the ethylene gas these fruits release will speed ripening.
The lime juice’s role is twofold: it seasons the guacamole and it prevents browning. Add it immediately after mashing. If you’re making guacamole ahead of time (up to a few hours), cover the surface tightly with plastic wrap pressed directly onto the guacamole’s surface — air exposure causes browning. The pit from one avocado half, placed directly on the guacamole’s surface and pressed down slightly, also slows oxidation.
For variations, try adding roasted garlic for sweetness, crumbled cotija cheese for a salty edge, smoked paprika for complexity, or mango for sweetness. In California-style guac, diced tomato and red onion are standard — add them if you like, but know that guacamole’s greatest strength is its simplicity.
Storage
Guacamole is best served immediately, but it keeps in an airtight container in the refrigerator for up to 2 days. To minimize browning, press plastic wrap directly onto the surface. You can also freeze guacamole (without tomato or onion) for up to 1 month in a freezer-safe container, though it will lose some of its bright texture upon thawing. Use thawed guacamole for cooking (in quesadillas, etc.) rather than serving it fresh.
6. Pan-Seared Fish with Avocado Salsa and Crispy Skin
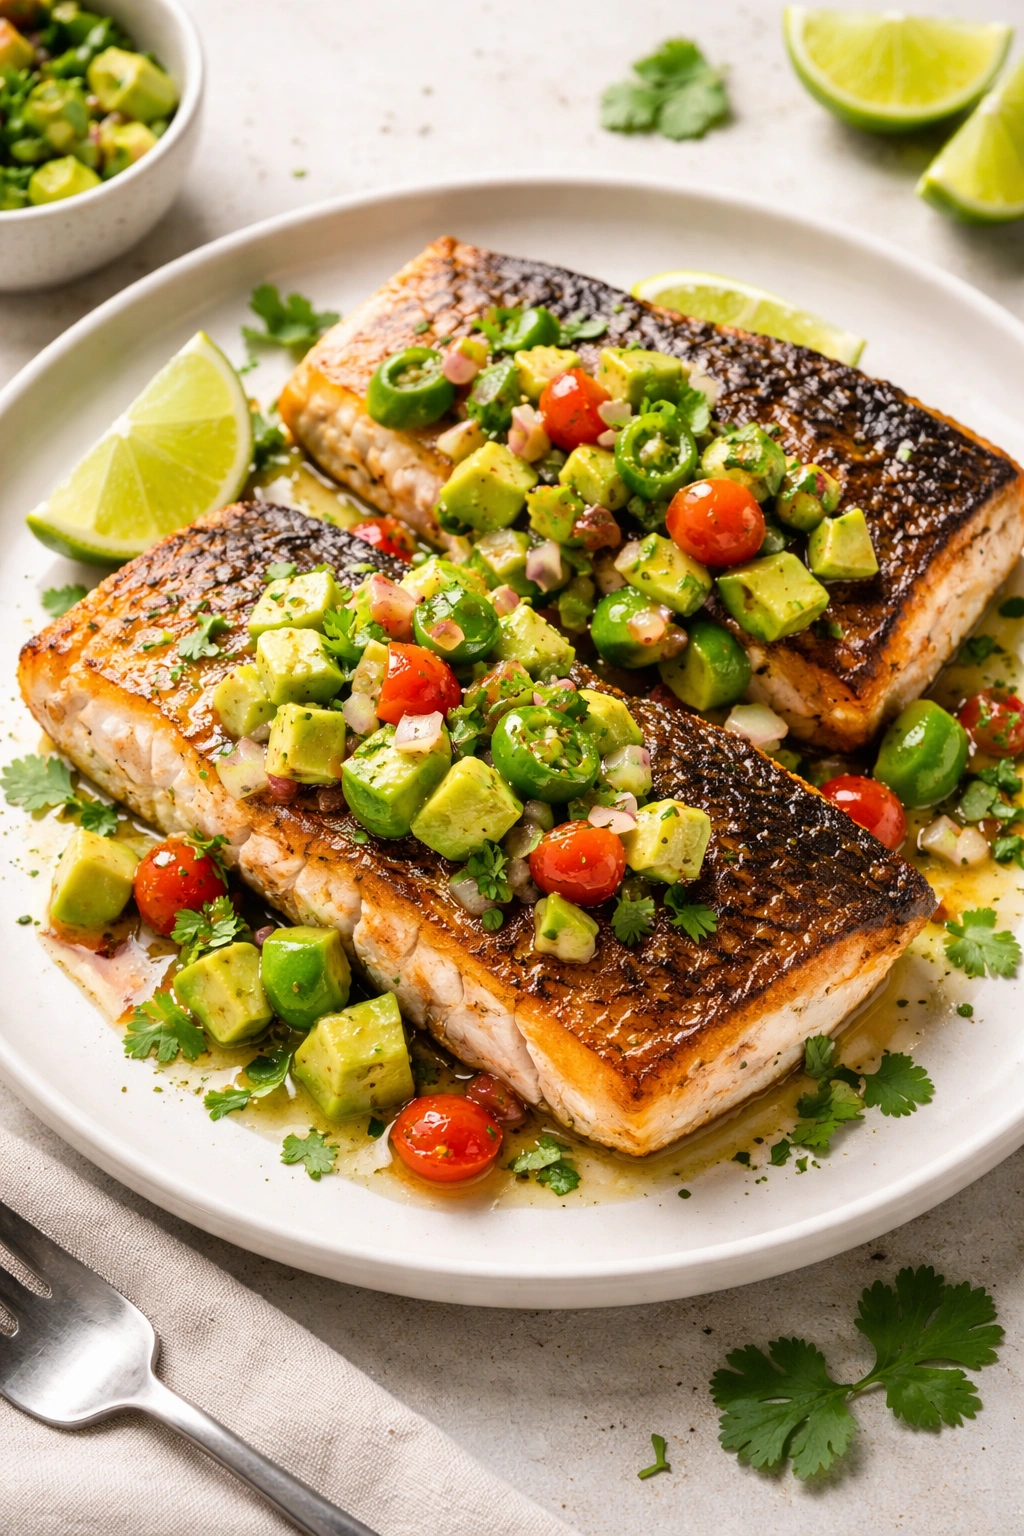
This is elegant, restaurant-quality dinner that comes together in under 20 minutes. The fish — whether salmon, halibut, or snapper — is seared skin-side down until golden and crispy, then finished in a hot oven to cook through gently. While the fish cooks, a bright avocado salsa comes together: cubed avocado, lime juice, cilantro, and jalapeño that’s light enough not to overwhelm delicate fish but bold enough to make the plate interesting. The crispy skin provides textural contrast against the creamy avocado.
Why This Works as an Impressive Dinner
This dish takes advantage of avocado’s creamy texture to create a sauce without any cream. The salsa is bright, fresh, and has enough acidity to cut through the richness of the fish’s natural oils. This meal tastes sophisticated but requires no special skills, just proper technique and good timing.
What You’ll Need
Yield: Serves 2 Prep Time: 10 minutes Cook Time: 10 minutes Total Time: 20 minutes Difficulty: Intermediate — Pan-searing fish skin-side down to crispy requires proper heat management, but once you nail it, it’s consistent.
Ingredients:
For the Fish:
- 2 fillets of fish with skin (salmon, halibut, snapper, or similar), about 5 to 6 ounces each
- ½ teaspoon fine sea salt
- ¼ teaspoon freshly cracked black pepper
- 1 tablespoon olive oil
- 1 tablespoon unsalted butter
For the Avocado Salsa:
- 1 ripe avocado, cut into ¼-inch cubes
- Juice of ½ lime (about 1 tablespoon)
- 1 small jalapeño, minced very fine (remove seeds if you prefer less heat)
- 2 tablespoons fresh cilantro, finely chopped
- 2 tablespoons finely minced red onion
- Pinch of fine sea salt
- Pinch of freshly cracked black pepper
Step-by-Step Instructions:
Prepare the Salsa:
- In a small bowl, gently toss together the cubed avocado, lime juice, jalapeño, cilantro, red onion, salt, and pepper. Set aside at room temperature — do not make this more than 10 minutes before serving, or the avocado will darken. The lime juice slows this process, but timing is still important.
Cook the Fish:
-
Preheat your oven to 400°F (200°C).
-
Pat the fish fillets completely dry with paper towels — this is essential for crispy skin. Season both sides lightly with salt and pepper.
-
Place a large oven-safe skillet over medium-high heat and let it get hot — you should feel significant heat radiating from it when you hold your hand above (about 1 minute of preheating). Add the olive oil and let it shimmer and just barely smoke.
-
Place the fish skin-side down in the hot skillet. Do not move it. Let it sit undisturbed for 3 to 4 minutes until the skin is golden brown and crispy and the flesh has turned opaque about ¼-inch up the side of the fillet.
-
Flip the fish over gently, add the butter to the pan (it will immediately start foaming), then transfer the entire skillet to the preheated oven.
-
Bake for 5 to 6 minutes until the fish flakes easily with a fork in the thickest part and the internal temperature reaches 145°F (63°C) for salmon or 140°F (60°C) for other fish — this prevents it from drying out. The fish will continue cooking slightly from residual heat even after you remove it from the oven.
Advertisements -
Remove from the oven and let rest in the skillet for 1 minute. Transfer the fish to plates skin-side up and top with a generous spoonful of the avocado salsa. Serve immediately.
Tips and Variations for Success
Dry skin is non-negotiable for crispiness. Pat the fish dry immediately before cooking — any moisture on the surface creates steam and prevents browning. Room temperature fish cooks more evenly than cold fish straight from the fridge, so remove it from the refrigerator about 10 minutes before cooking.
The heat level matters for crispy skin. Medium-high is the target — hot enough to sear without burning. If your heat is too high, the skin chars before the flesh cooks. If it’s too low, the skin never crisps. Your skillet should be hot and your oil shimmering, but not smoking excessively.
For variations, try mango salsa instead of avocado for something tropical, diced grapefruit and pomegranate seeds for brightness, or keep the avocado base but add capers and diced egg for something more Mediterranean. You can also prepare a silky avocado sauce: mash one ripe avocado with lime juice, garlic, and a bit of Greek yogurt, then thin with water or fish stock until it’s sauce consistency. Drizzle this over the fish instead of making a chunky salsa.
Storage
This dish is best eaten immediately. Leftover cooked fish doesn’t reheat well without drying out. The avocado salsa will darken within an hour. Fish should not be reheated.
7. Creamy Avocado and White Bean Soup for Comfort
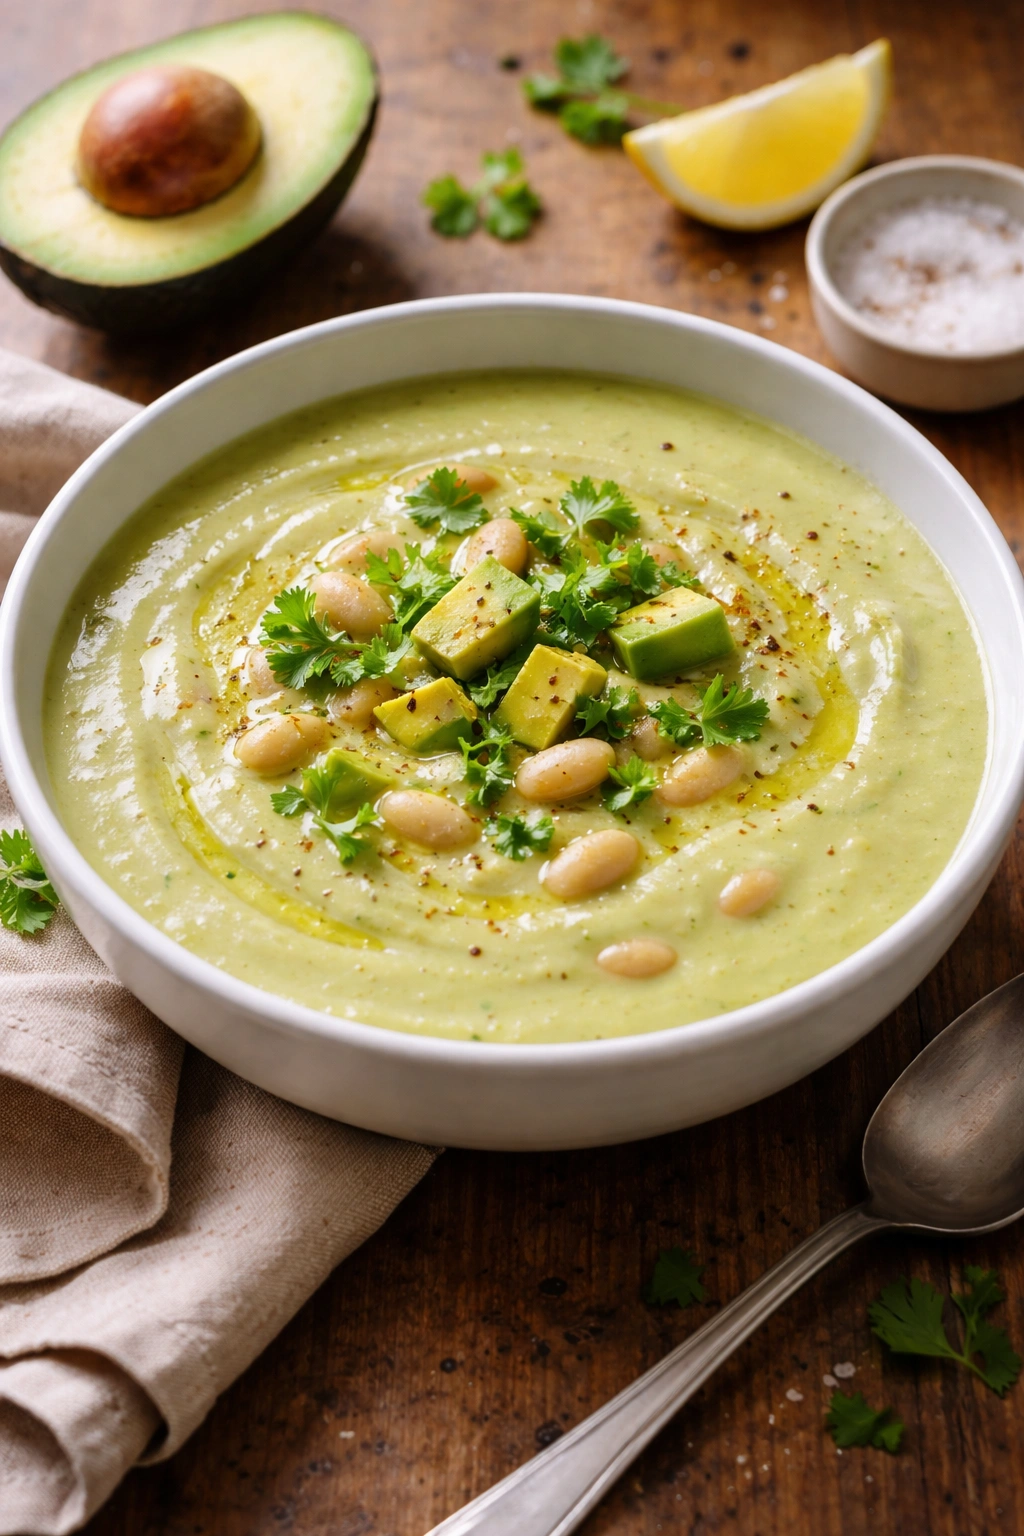
This soup proves that avocado doesn’t always belong in a salad or on toast — it becomes a luxurious, silky base for a warm, comforting main course. White beans and vegetable broth provide substance and heartiness, while the avocado (stirred in at the very end) creates creaminess without any cream. Garlic and a touch of cumin add warmth, while fresh lime juice and cilantro bring brightness. The soup is vegan, but tastes completely indulgent.
Why This Works as a Satisfying Meal
The combination of beans and avocado provides complete protein, healthy fats, and fiber that keeps you satisfied for hours. The soup is mild enough for delicate palates but can be seasoned bolder with jalapeños or hot sauce if you prefer. It’s elegant enough for guests but humble enough for a weeknight dinner. Best of all, it’s done in about 20 minutes.
What You’ll Need
Yield: Serves 4 Prep Time: 10 minutes Cook Time: 15 minutes Total Time: 25 minutes Difficulty: Beginner — straightforward, no special techniques required.
Ingredients:
- 2 tablespoons olive oil
- 1 medium yellow onion, diced
- 3 cloves garlic, minced
- 1 teaspoon ground cumin
- 4 cups vegetable broth or chicken broth
- 2 cans (15 ounces each) white beans, drained and rinsed
- 1 cup fresh spinach (optional but adds nutrition)
- 1 ripe avocado
- Juice of 1 lime (about 3 tablespoons)
- ¼ cup fresh cilantro, chopped
- ½ teaspoon fine sea salt, plus more to taste
- ⅛ teaspoon freshly cracked black pepper
- Pinch of red pepper flakes (optional)
For Serving:
- Crispy tortilla strips or croutons
- Sour cream or Greek yogurt
- Lime wedges
- Fresh cilantro sprigs
Step-by-Step Instructions:
-
Heat the olive oil in a large pot over medium heat. Add the diced onion and cook, stirring occasionally, for 3 to 4 minutes until it starts to soften and become translucent.
-
Add the minced garlic and cumin, stirring constantly, cooking for about 1 minute until fragrant — you should be able to smell the toasted cumin scent immediately.
-
Pour in the vegetable broth and bring to a simmer (you’ll see small, regular bubbles at the surface). Add the white beans and stir to combine. If using spinach, add it now (it will wilt within 30 seconds of hitting the hot broth).
-
Simmer gently for 10 minutes, allowing the flavors to meld. The soup should smell warm and welcoming.
-
While the soup simmers, cut the avocado in half, remove the pit, and scoop the flesh into a bowl. Mash it roughly with a fork, then add the lime juice and cilantro. This prevents the avocado from browning and seasons it simultaneously.
-
Just before serving, ladle about ½ cup of the hot broth into the mashed avocado mixture and whisk until smooth and creamy — this tempers the avocado without cooking it entirely. Fold this mixture back into the pot of soup, stirring gently and continuously for about 30 seconds. Do not boil the soup after adding the avocado, or it may break. Taste and adjust seasoning with salt, pepper, and additional lime juice.
-
Ladle into bowls and top with crispy tortilla strips, a dollop of sour cream, and fresh cilantro. Serve with lime wedges on the side.
Tips and Variations for Success
The avocado must be added at the very end of cooking and the soup must not boil afterward. If you add avocado to boiling soup, the heat can break the emulsion and the soup may separate. By mixing the avocado with hot broth first (tempering it), you gently warm it while creating a smooth mixture that incorporates evenly into the soup.
For a more substantial soup, add cooked chicken, shredded rotisserie chicken, or diced ham. You can also make this soup slightly thicker by mashing some of the beans before cooking, which creates a creamier base. For a spicier version, add diced jalapeño when you add the garlic, or stir in some red pepper flakes.
This soup freezes beautifully — but only freeze it without the avocado. Let the soup cool completely, then freeze in airtight containers for up to 1 month. When you want to eat it, thaw in the refrigerator overnight, reheat gently, then stir in mashed avocado just before serving.
Storage
This soup keeps in an airtight container in the refrigerator for up to 3 days, but do not add the avocado until just before serving (the avocado portion will darken when stored). You can prepare the soup base ahead of time and add fresh mashed avocado when reheating.
8. Silky Chocolate Avocado Mousse for Dessert
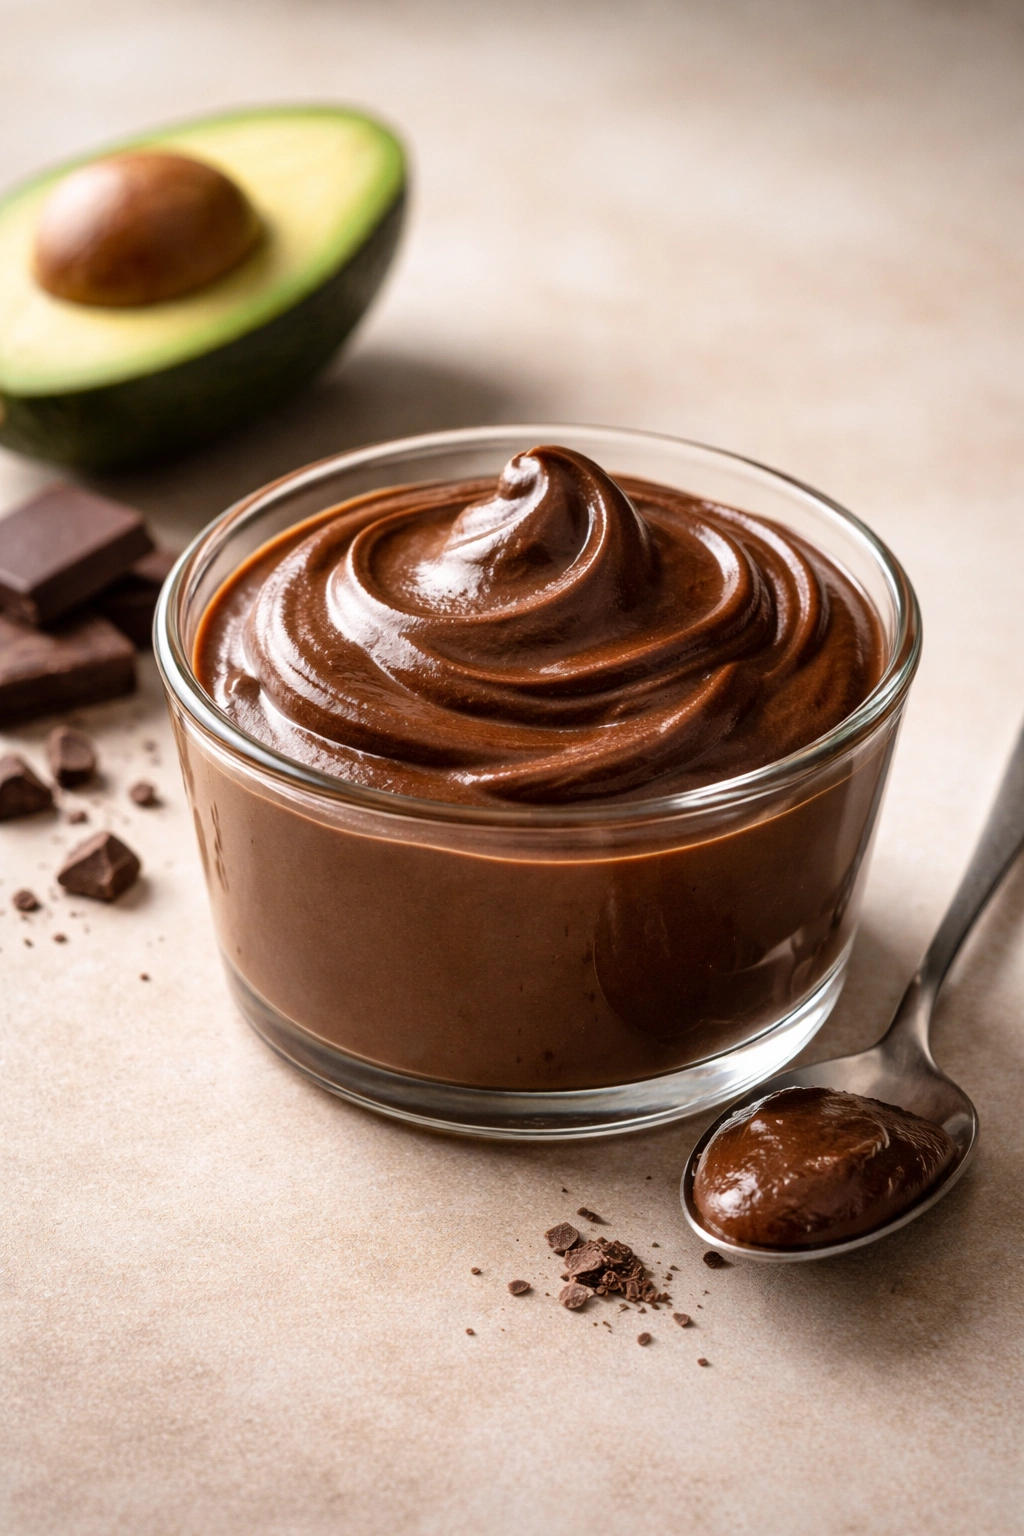
This might sound unusual, but chocolate and avocado are genuinely delicious together. The avocado provides silky richness and a subtle earthiness that deepens chocolate’s flavor. This is truly decadent — it tastes like mousse or chocolate pudding — but it contains no cream, butter, or eggs. It’s simply avocado, dark chocolate, cocoa powder, and just enough sweetness to balance the chocolate’s bitterness. The result is elegant, indulgent, and seriously creamy.
Why This Works as an Elegant Finish
Avocado’s neutral taste lets the chocolate shine while its fat content creates the silky, mousse-like texture that makes this feel genuinely indulgent. This dessert is naturally vegan, and it’s nutritious enough to be a breakfast bowl topper if you want to blur the lines. It comes together in 5 minutes and tastes like you spent far more effort.
What You’ll Need
Yield: Serves 2 generously Prep Time: 5 minutes Cook Time: 0 minutes (if using melted chocolate) or 3 minutes (if melting chocolate yourself) Total Time: 5 minutes Difficulty: Beginner — no cooking required, just blending.
Ingredients:
- 1 ripe avocado
- ½ cup dark chocolate (60% to 70% cacao), melted and cooled slightly
- ¼ cup unsweetened cocoa powder, sifted
- ¼ cup pure maple syrup or agave nectar
- ¼ cup almond milk or whole milk
- 1 teaspoon vanilla extract
- Tiny pinch of fine sea salt
- Pinch of espresso powder (optional but amplifies chocolate flavor)
For Serving:
- Fresh berries (raspberries, blackberries, or strawberries)
- Whipped coconut cream or regular whipped cream
- Toasted sliced almonds or chocolate shavings
- Honey for drizzling
Step-by-Step Instructions:
-
If your chocolate isn’t already melted, chop it finely and place it in a heatproof bowl. Set the bowl over a pot of simmering (not boiling) water, making sure the bottom of the bowl doesn’t touch the water. Stir occasionally as it melts, about 2 to 3 minutes. Once melted, remove from heat and let cool for 1 minute.
-
Cut the avocado in half, remove the pit, and scoop the flesh into a food processor or blender.
Advertisements -
Add the melted chocolate, cocoa powder, maple syrup, milk, vanilla extract, salt, and espresso powder if using.
-
Process or blend until completely smooth and silky, about 30 to 45 seconds. Stop and scrape down the sides if needed. The mixture should look like mousse — creamy, thick, and glossy.
-
Taste and adjust sweetness — different brands of chocolate have varying sweetness levels. Add more maple syrup by the teaspoon if you want something sweeter, or more cocoa powder if you want deeper chocolate flavor and less sweetness.
-
Divide between serving glasses or bowls immediately (or cover and chill in the refrigerator until serving time).
-
Top with fresh berries, a dollop of whipped cream, toasted almonds, or chocolate shavings just before serving.
Tips and Variations for Success
The avocado’s ripeness matters here, but slightly less than in other recipes. Even a nearly overripe avocado works — its softness actually creates a silkier mousse. If your avocado is very firm, the mousse will be thicker and slightly less creamy.
Do not use warm melted chocolate. If you add hot chocolate to the blender, the heat can make the mixture break or separate. Let it cool for at least 1 minute after melting — it should still be warm enough to blend smoothly, but not hot.
For variations, try adding 1 tablespoon of coconut oil for extra silkiness, a pinch of cayenne pepper for subtle heat that deepens chocolate flavor, or 1 tablespoon of almond butter for nuttiness. You can also make this boozy: add 1 tablespoon of rum, bourbon, or coffee liqueur for an adult version. For a minty mousse, add 1 teaspoon of peppermint extract (start with ½ teaspoon — it’s potent).
This mousse also makes an incredible smoothie base: blend it with a frozen banana, a bit of almond milk, and some ice for a chocolate-avocado smoothie that tastes like dessert for breakfast.
Storage
This mousse keeps in an airtight container in the refrigerator for up to 2 days. The avocado will darken slightly, but the taste remains delicious. It also freezes beautifully in freezer-safe containers for up to 1 month — thaw it in the refrigerator overnight, then serve directly from the fridge. You can also freeze it in small servings in ice cube trays for smoothie portions.
Key Takeaways
These eight recipes prove that avocado’s versatility extends far beyond guacamole and toast. When you understand avocado’s essential characteristics — its creaminess, its mild flavor that lets other ingredients shine, its ability to work as a binder or sauce base — you can apply these lessons to countless other dishes.
The common threads across all these recipes matter: ripeness is non-negotiable, acid (usually citrus) both seasons and preserves the avocado, and avocado works best when it’s not overcomplicated. You don’t need fancy ingredients or techniques. You need good avocados, quality supporting ingredients, and confidence in the ingredient itself.
Start with whichever of these recipes appeals to you most, then experiment with variations and adaptations. Once you’ve made the creamy avocado pasta, try swapping in different herbs or adding vegetables. Once you’ve nailed the chocolate mousse, experiment with different melting methods or flavor additions. The fundamental techniques stay consistent; your creativity shapes where they go next.