Flavored butters are one of the simplest, most transformative cooking techniques you can master at home — yet they’re so easy that most home cooks overlook them entirely. A compound butter is simply softened butter mixed with herbs, spices, citrus, or other flavorings, then chilled until firm. What makes them extraordinary is their versatility and impact. A single pat of herb compound butter can transform a grilled steak, roasted vegetables, or even a simple piece of fish into something restaurant-quality in seconds. These butters also keep beautifully in the freezer for weeks, making them the ultimate ingredient to have on hand when you want to elevate a meal with minimal effort.
Beyond the flavor boost, flavored butters solve a real cooking problem: how to add complexity and richness without spending extra time at the stove. Whether you’re finishing a pan-seared piece of fish, dotting a bowl of pasta, melting over fresh corn, or topping a hot steak, a spoonful of good compound butter does more work than you’d expect. The fat carries flavor molecules directly to your palate, making even modest herbs taste bold and intentional. Home cooks who understand this one technique often get complimented on their cooking more than they probably deserve — and that’s the whole secret.
The best part? Once you understand the basic formula, you can create dozens of variations based on what you love and what you have on hand. The recipes below represent eight of the most useful and delicious flavored butters to make at home, each one paired with suggestions for how to use it.
1. Herb Compound Butter
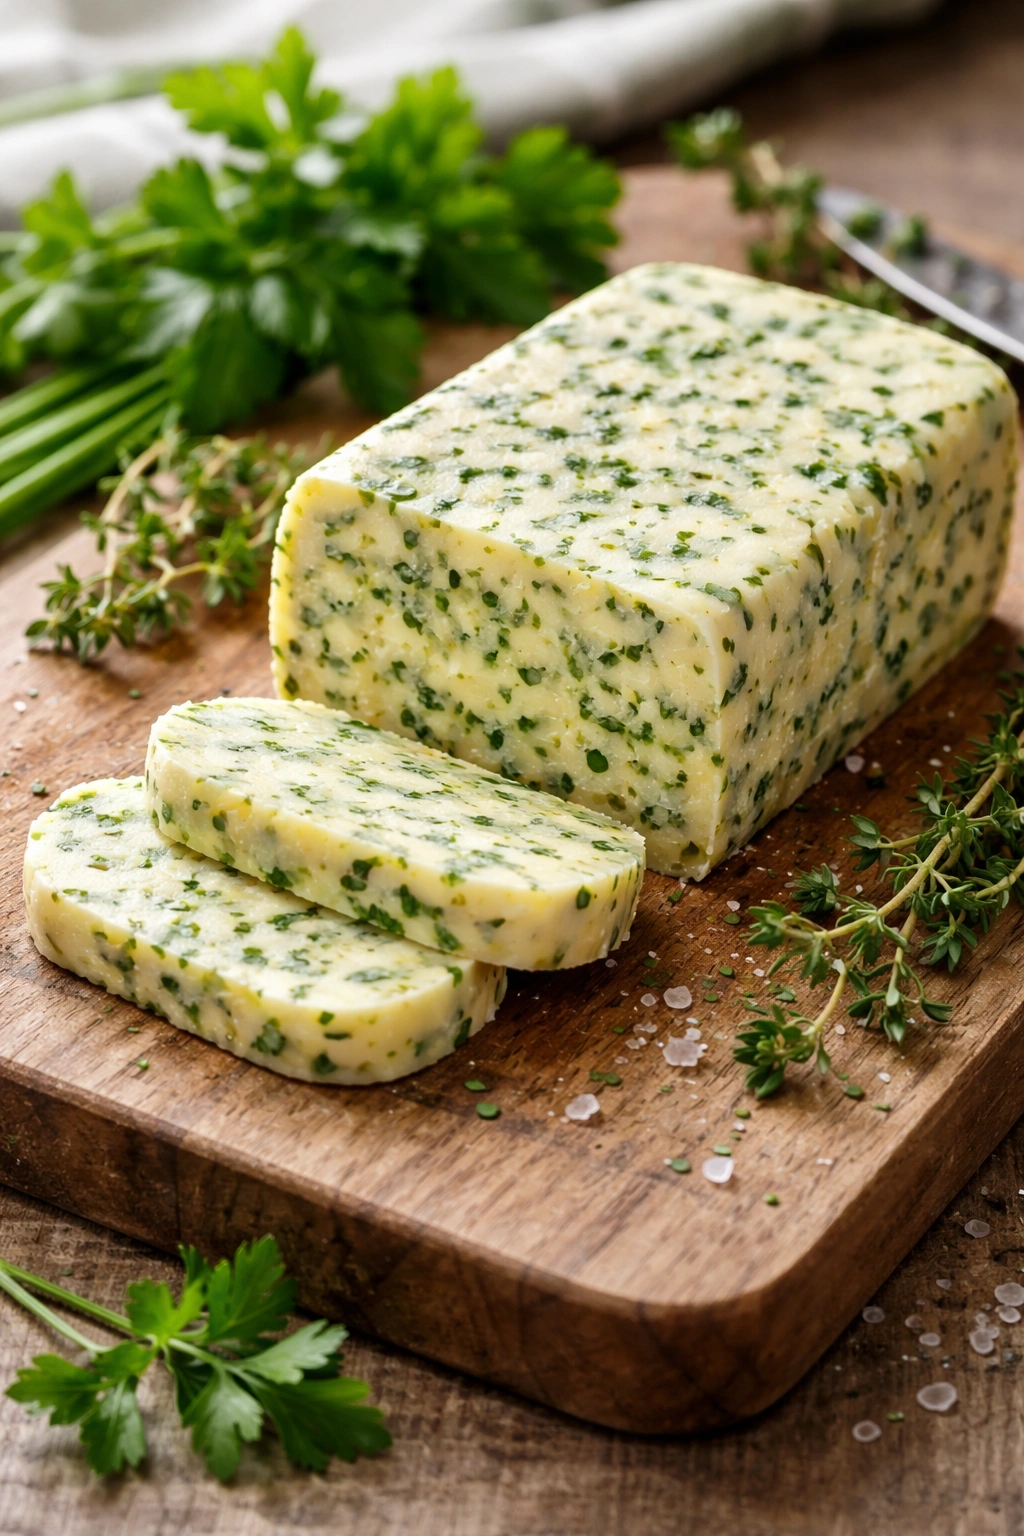
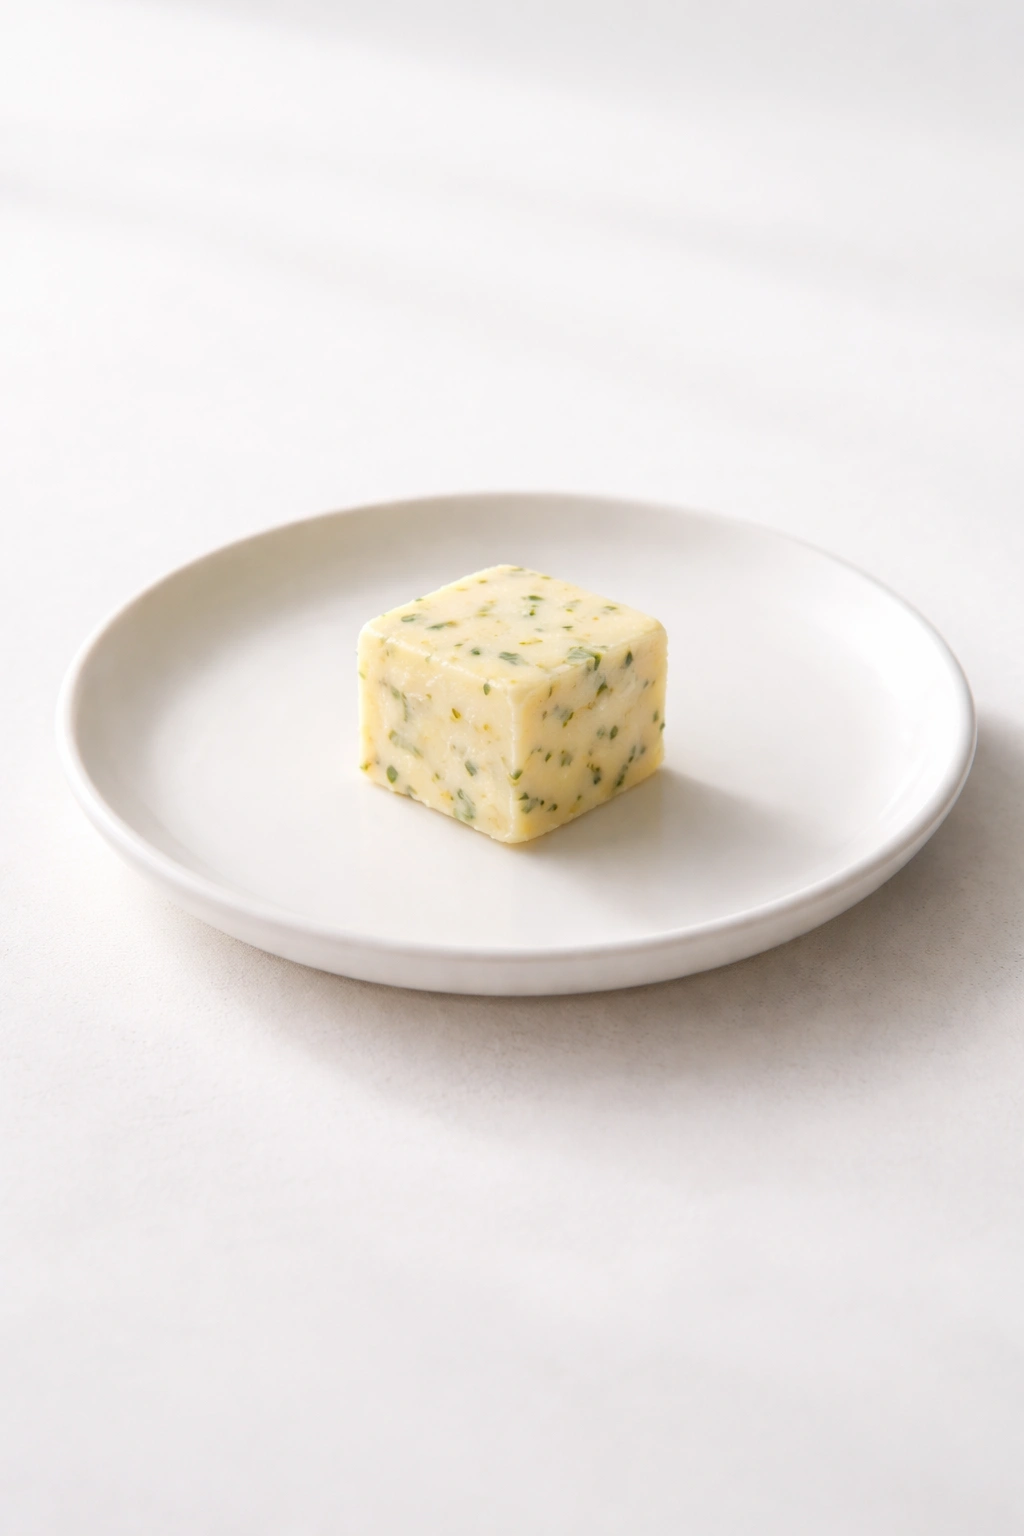
This is the foundational flavored butter — the one that should be in every home cook’s freezer. It’s the classic combination of fresh herbs, garlic, and quality butter that works on almost anything: roasted chicken, grilled vegetables, fresh bread, pasta, fish, or steak. The beauty of a true herb butter is that it balances multiple flavors without letting any single one dominate. You get brightness from parsley, earthiness from thyme, a subtle licorice note from tarragon, and the backbone of garlic holding everything together. This is the butter to make first if you’re new to compound butters — it’s forgiving, versatile, and works with nearly any meal you’ll prepare over the next few weeks.
The key to an excellent herb butter is using fresh herbs, not dried. Dried herbs will rehydrate slightly as the butter softens and chills, but fresh herbs are where the aromatic oils and bright flavors live. Choose a combination that appeals to you, but classic French herbs are parsley, chives, tarragon, and thyme — they complement each other without fighting. Beyond the flavor, there’s a textural consideration: finely chopped herbs distribute more evenly through the butter and create a more refined appearance when the butter is sliced. Visible flecks of green scattered throughout speak to quality and care.
Yield: Makes about ½ cup (enough for 8-10 servings) Prep Time: 10 minutes Chill Time: 30 minutes Difficulty: Beginner — no special skills required; it’s simply mixing and chilling.
Ingredients:
- ½ cup (1 stick) unsalted butter, softened to room temperature
- 3 tablespoons fresh flat-leaf parsley, finely chopped
- 1 tablespoon fresh chives, finely chopped
- 1 tablespoon fresh tarragon, finely chopped (or 1 teaspoon dried if fresh is unavailable)
- 1 teaspoon fresh thyme leaves, finely chopped
- 2 cloves garlic, minced to a paste (use the side of your knife to crush it)
- ½ teaspoon fine sea salt
- ¼ teaspoon freshly ground black pepper
- Optional: juice of ½ lemon
Instructions:
-
Place the softened butter in a medium bowl and let it sit at room temperature for 2-3 minutes to ensure it’s genuinely soft but not melting. You should be able to press your finger into it easily without resistance.
-
Add the chopped herbs, garlic paste, salt, and black pepper directly to the butter. If using lemon juice for brightness, add it now.
Advertisements -
Using a rubber spatula or wooden spoon, fold the herbs into the butter gently but thoroughly, mixing until the herbs are evenly distributed throughout and no patches of plain butter remain. Work quickly so the butter doesn’t warm up further.
-
Scrape the butter mixture onto a piece of plastic wrap or parchment paper. Shape it into a log approximately 1 inch in diameter by rolling the wrap tightly around it, using the plastic to help create an even cylinder.
-
Place the wrapped butter log in the refrigerator for at least 30 minutes until completely firm. Chill for at least 2 hours before slicing and using.
Storage & Make-Ahead: This butter keeps in the refrigerator for up to 5 days, or wrapped tightly in plastic and then foil, it keeps frozen for up to 3 months. Slice into ½-inch thick coins and use as needed — no need to thaw completely.
Best Uses: Top grilled chicken breasts or steaks immediately after cooking, dollop onto roasted potatoes or root vegetables, melt over fresh pasta, or place a pat on top of a bowl of soup for luxurious richness.
Pro tip: Make a double batch and freeze half in an ice cube tray instead of a log shape. Once frozen solid, pop the cubes into a freezer bag — now you can add exactly one portion to a pan of vegetables without thawing a whole log.
2. Garlic and Rosemary Butter
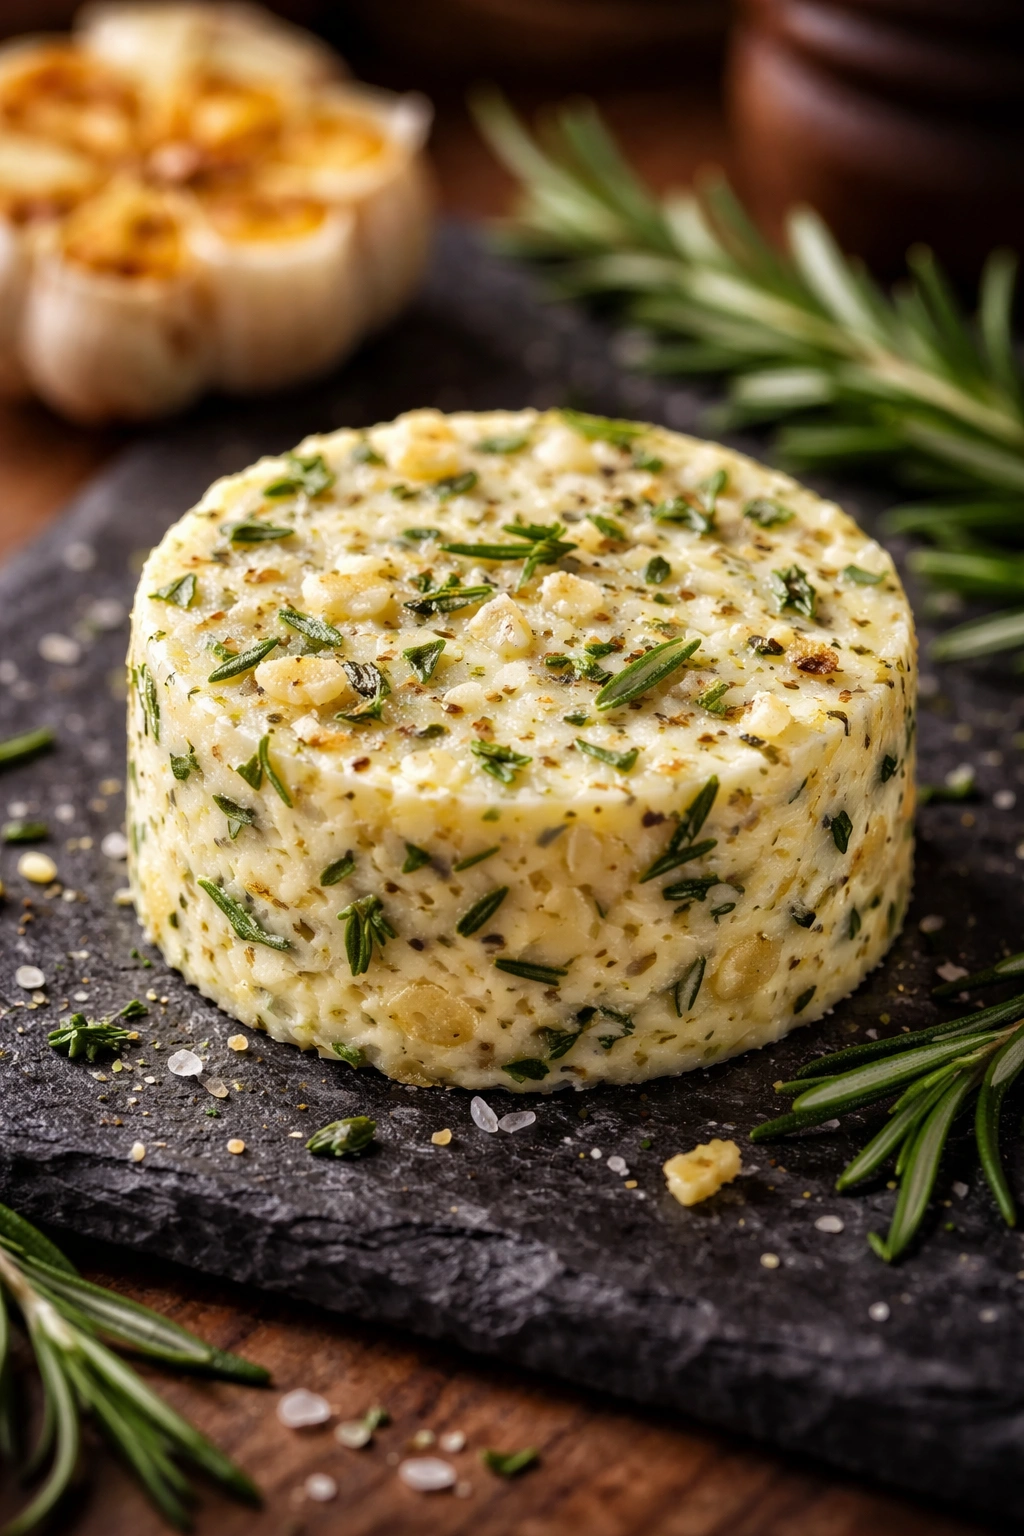
Where herb compound butter is refined and balanced, garlic and rosemary butter is bold and assertive. Rosemary is one of the few herbs that actually benefits from a generous hand — its woody, piney intensity doesn’t get lost or become overwhelming the way some delicate herbs might. This is the butter for grilled meats, roasted potatoes, crusty bread, or anywhere you want serious savory depth. The combination of slow-roasted garlic cloves (not raw garlic paste) and fresh rosemary creates something warmer and more complex than the straight-ahead flavor of garlic alone.
The technique matters here: you’re not adding raw minced garlic, which would be harsh and sharp. Instead, you’re either using roasted garlic cloves that have become sweet and mellow, or you’re allowing finely minced raw garlic to sit in the butter for a bit so it matures and mellows slightly. Roasted garlic is preferable if you have time — it’s sweeter and more sophisticated. The rosemary should be very finely chopped so the needle-like pieces distribute throughout the butter rather than creating chewy bits that don’t integrate.
Yield: Makes about ½ cup (8-10 servings) Prep Time: 15 minutes (or 5 minutes if using roasted garlic from a jar) Chill Time: 30 minutes minimum Difficulty: Beginner — roasting garlic is optional but straightforward.
Ingredients:
- ½ cup (1 stick) unsalted butter, softened to room temperature
- 4-5 cloves roasted garlic, mashed to a smooth paste (or 2 raw cloves minced very fine, mixed with a pinch of salt)
- 2 tablespoons fresh rosemary, very finely chopped (about 1 tablespoon dried if fresh is unavailable — but fresh is strongly preferred)
- ½ teaspoon fine sea salt
- ¼ teaspoon freshly ground black pepper
- Optional: zest of ½ lemon for brightness
Instructions:
-
If using roasted garlic cloves, mash them thoroughly with the back of a fork or a mortar and pestle until completely smooth. Raw garlic should be minced very fine and mixed with a small pinch of salt to help break it down.
-
Cut the softened butter into small pieces in a medium bowl. Add the garlic paste, finely chopped rosemary, salt, and black pepper.
-
Fold the ingredients together gently but completely until the rosemary and garlic are evenly distributed throughout the butter. The mixture should be uniform in color with no patches of plain butter visible.
-
Place the mixture on a piece of plastic wrap and shape it into a log about 1 inch in diameter. Wrap tightly and refrigerate for at least 30 minutes.
Storage: Refrigerator: up to 7 days. Freezer: up to 3 months, wrapped in plastic and then foil.
Best Uses: This is your butter for grilled steaks, lamb chops, roasted potatoes, crusty bread, or finishing a pan of mushrooms. A single pat melting over a hot steak is all you need.
Variation: Add ½ teaspoon of Dijon mustard for a subtle complexity that works especially well with beef.
Worth knowing: If you make this with fresh rosemary and then freeze it, the herb flavor actually intensifies slightly over the first 1-2 weeks as the oils continue to infuse into the butter. It’s at its absolute best after 1-2 weeks of freezing.
3. Lemon and Dill Butter
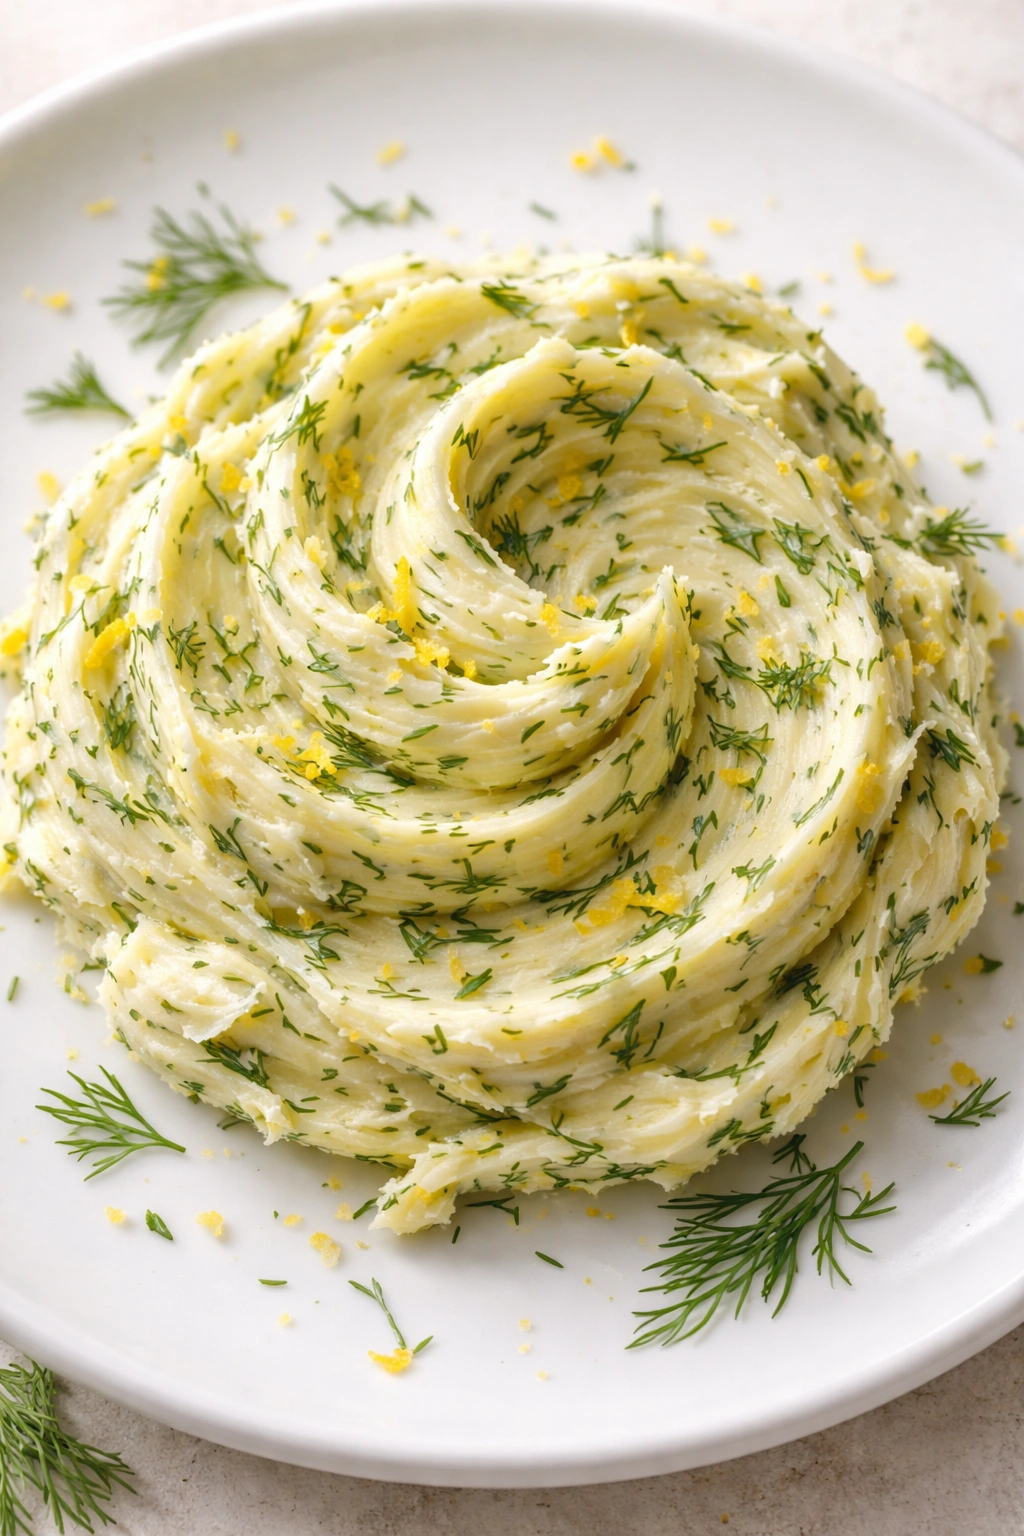
This is the butter for seafood, but don’t stop there. Lemon and dill work beautifully on roasted vegetables, fresh pasta, steamed green beans, or even spooned into a cup of soup. The brightness of fresh lemon juice cuts through rich fish or butter itself, while dill adds a fresh, slightly sweet herbal note that feels a bit Scandinavian and sophisticated. This combination also works on chicken surprisingly well — particularly on pan-seared or poached chicken breast where the sauce would otherwise feel heavy.
The key technique here is using fresh lemon zest in addition to lemon juice. The zest gives you the bright, volatile oils that make lemon taste intensely lemony without adding extra liquid that could soften the butter’s texture. Lemon juice does add some liquid, but the amount is small enough that it won’t prevent the butter from firming properly. Fresh dill is essential — dried dill turns dull and sulfurous, and you lose what makes this butter special.
Yield: Makes about ½ cup (8-10 servings) Prep Time: 10 minutes Chill Time: 30 minutes Difficulty: Beginner — zesting a lemon is the most technical step.
Ingredients:
- ½ cup (1 stick) unsalted butter, softened to room temperature
- Zest of 1 large lemon (about 2 teaspoons), minced fine
- 1 tablespoon fresh lemon juice
- 2 tablespoons fresh dill, finely chopped
- 1 clove garlic, minced to a paste
- ½ teaspoon fine sea salt
- Pinch of white pepper (preferred over black pepper for the bright appearance and milder flavor)
Instructions:
-
Mince the lemon zest as fine as possible — this distributes the bright citrus flavor throughout the butter.
-
Zest the lemon and juice it into a small bowl. Whisk the lemon juice with the garlic paste and salt, allowing the salt to dissolve slightly into the juice and help the garlic break down further.
-
Place the softened butter in a medium bowl and add the lemon zest, finely chopped dill, and white pepper.
-
Add the lemon juice mixture to the butter and fold everything together gently but thoroughly until uniform.
-
Shape the mixture into a log on plastic wrap, wrap tightly, and refrigerate for at least 30 minutes until completely firm.
Storage: Refrigerator: up to 5 days. Freezer: up to 3 months.
Best Uses: Place a pat on top of grilled salmon, halibut, or sea bass just before serving. Use on steamed or roasted asparagus, green beans, or artichokes. Add to a bowl of pasta with nothing else and it becomes a complete, elegant side dish.
Pro tip: This butter is especially delicious on cod or other white fish where the flavors aren’t competing with the fish’s own delicate taste.
Variation: Add ½ teaspoon of whole grain Dijon mustard and a splash of dry white wine reduction (if you have it) for an even more sophisticated butter sauce.
4. Honey and Thyme Butter
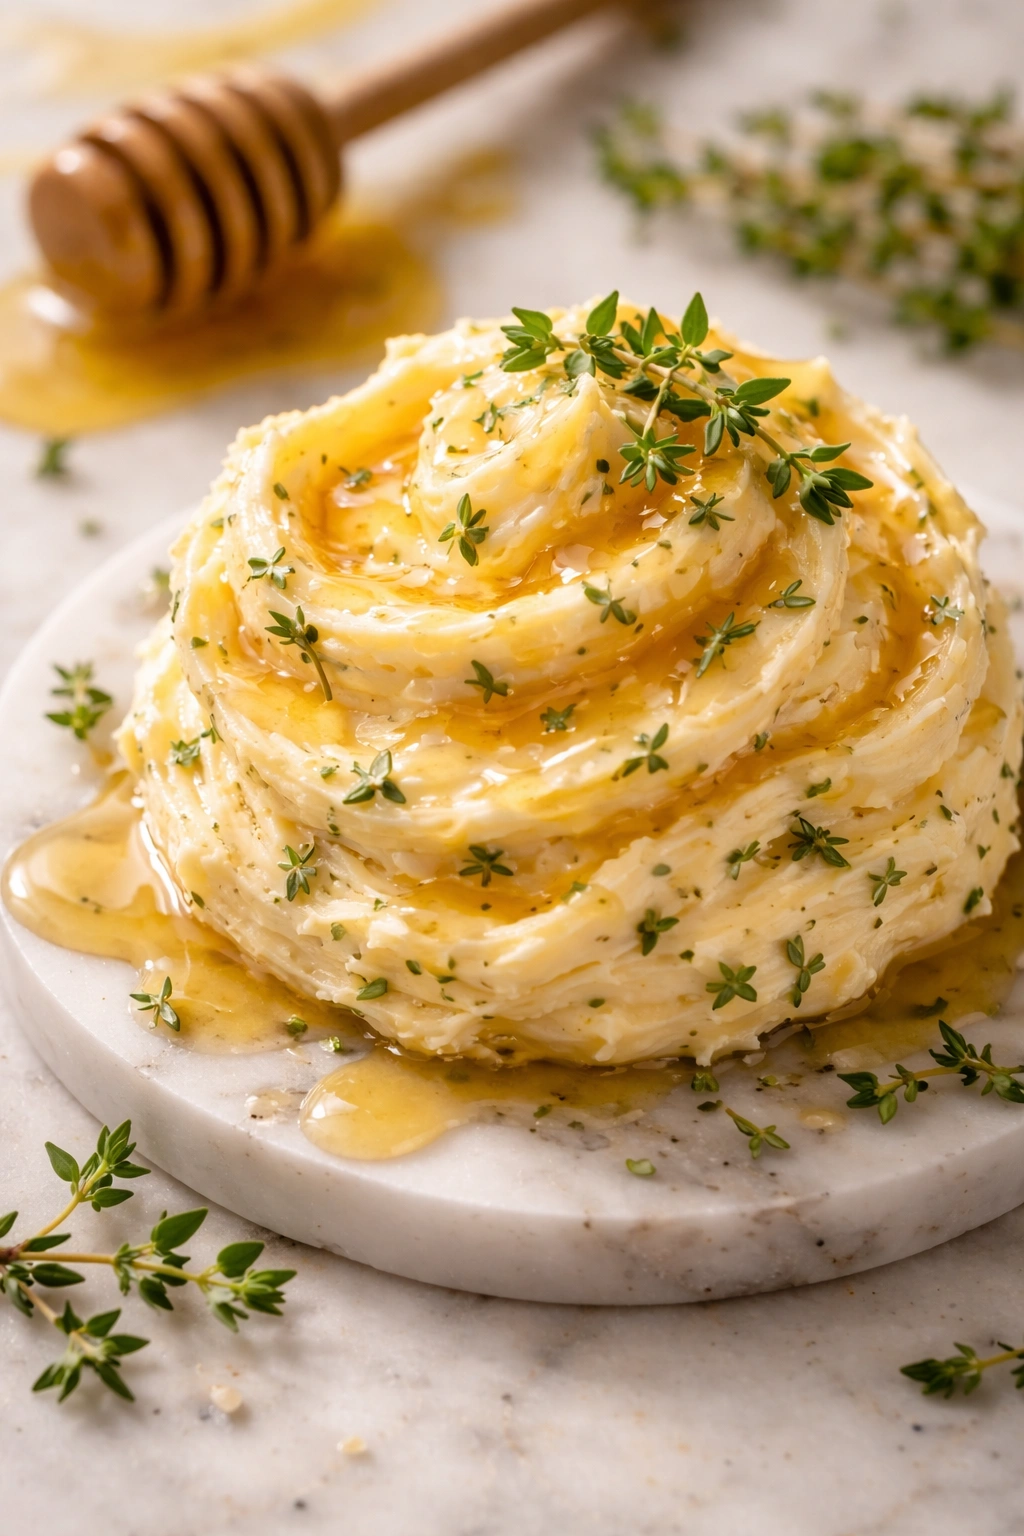
This butter walks the line between savory and sweet in a way that feels sophisticated rather than confused. Honey adds a subtle floral sweetness that makes thyme taste more complex and nuanced. It’s not a dessert butter — the honey is just a small amount that rounds out the flavors and adds a silky quality to the mouthfeel. This is the butter for roasted root vegetables, winter squash, ham, roasted chicken, or even drizzled over aged cheese and a piece of good bread.
The technique here requires restraint: you’re using a modest amount of honey that you’ll warm slightly so it integrates smoothly into the softened butter rather than creating sweet pockets. Warm honey flows and combines more easily than cold honey, which would be stiff and hard to mix through evenly. Thyme is the herb that stands up to honey beautifully — its slightly minty, slightly lemony quality complements the honey without being overwhelmed by it.
Yield: Makes about ½ cup (8-10 servings) Prep Time: 8 minutes Chill Time: 30 minutes Difficulty: Beginner — the only step is warming honey slightly, which is straightforward.
Ingredients:
- ½ cup (1 stick) unsalted butter, softened to room temperature
- 1½ tablespoons raw or pure honey, warmed slightly
- 1 tablespoon fresh thyme leaves, finely chopped
- Zest of ½ orange or ½ lemon (optional but recommended)
- Pinch of fine sea salt
- Small pinch of cayenne pepper (optional, adds subtle heat that complements honey)
Instructions:
-
Warm the honey for 10-15 seconds in the microwave, or gently warm it in a small pan — it should be pourable and slightly warm, but not hot. Let it cool for 30 seconds before adding to the butter.
-
Place the softened butter in a medium bowl. Add the warm honey and fold gently with a spatula until the honey is starting to incorporate.
Advertisements -
Add the finely chopped thyme, citrus zest if using, salt, and cayenne if using. Continue folding until everything is evenly distributed and the mixture is uniform in color.
-
Scrape onto plastic wrap, shape into a log, wrap tightly, and refrigerate for at least 30 minutes until firm.
Storage: Refrigerator: up to 5 days. Freezer: up to 3 months.
Best Uses: Place a pat on top of roasted winter squash, roasted Brussels sprouts, or roasted carrots. Use on roasted chicken. Melt over ham. Spread on warm cornbread. Dollop into a cup of butternut squash soup for richness and warmth.
Worth knowing: This butter is particularly good in early fall and winter when root vegetables are abundant and your cooking naturally turns toward roasting and comfort food.
Variation: Substitute fresh sage for thyme and add ¼ teaspoon of smoked paprika for a more savory, deeper flavor that still balances with the honey.
5. Sriracha Butter
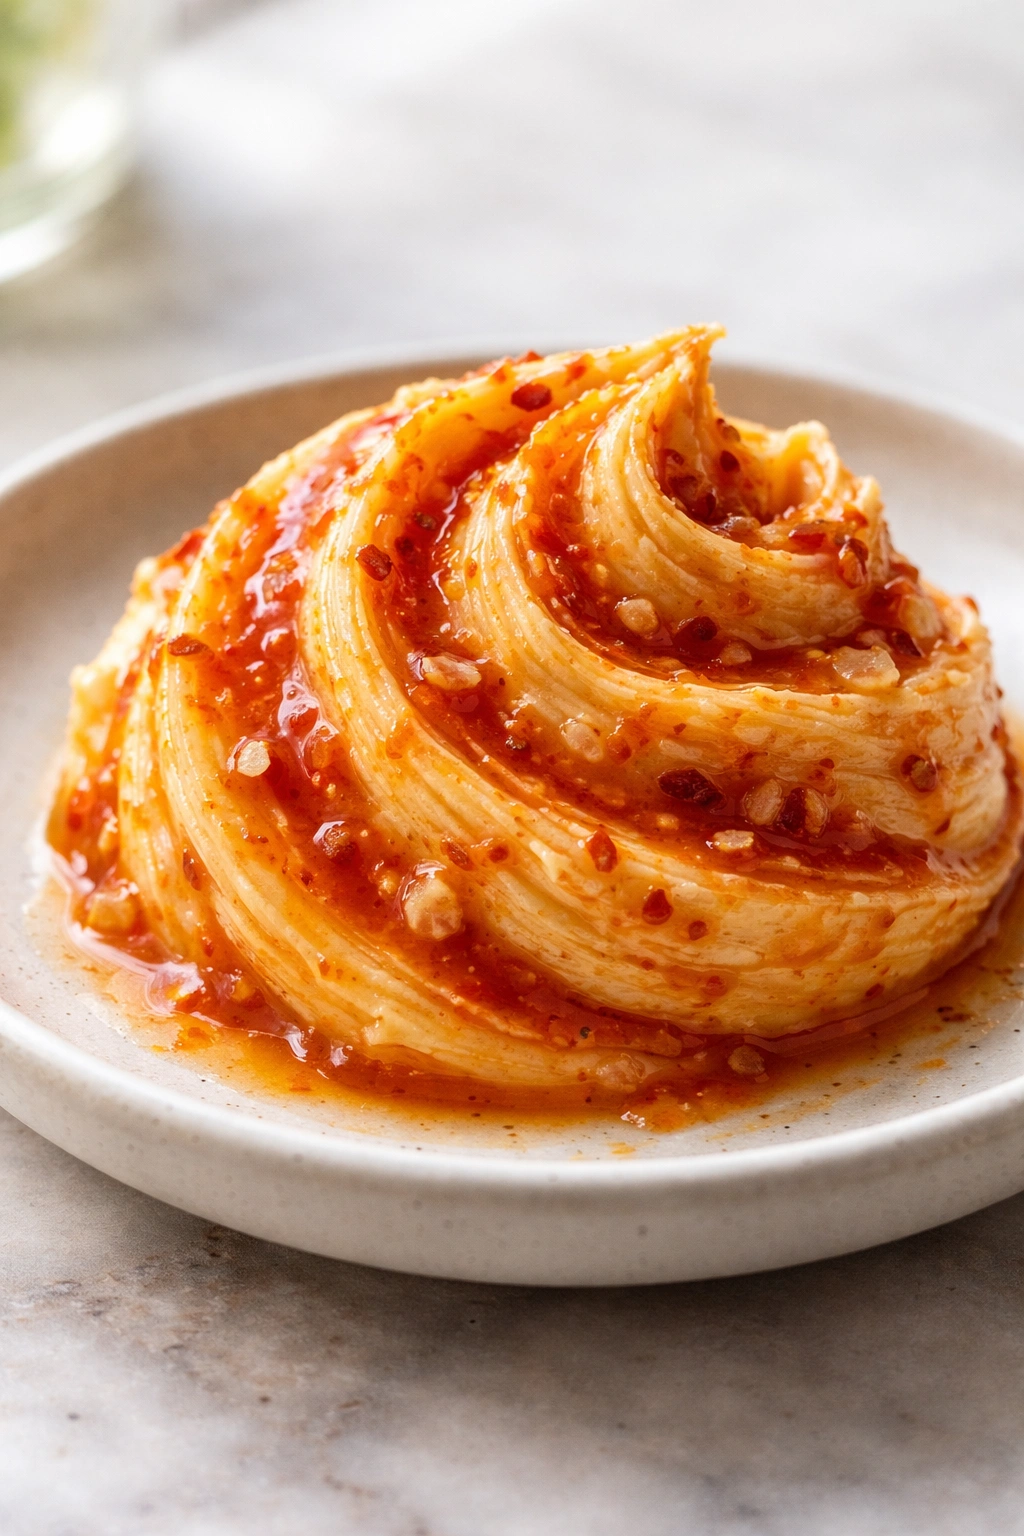
This is the butter for anyone who loves heat and bold flavors. Sriracha brings a particular kind of spice — it’s not just capsaicin heat but also garlic, vinegar, and sweetness, so the heat feels rounded and complex rather than one-dimensional. This butter melts beautifully over grilled corn, vegetables, seafood, or eggs. It works on popcorn, drizzled over pizza, or dolloped onto roasted chicken. The heat is present but not overwhelming when you’re using just a tablespoon of sriracha per stick of butter — it’s more about adding depth and a kick than making something painful.
The key is using a sriracha you actually like, because its flavor drives this entire butter. Different brands vary in heat level and specific flavor profile — some are garlicky, some are more vinegary. Taste yours and adjust the amount accordingly. Lime juice brightens the heat and prevents the butter from feeling heavy. This is the butter to make if you enjoy Southeast Asian flavors, or if you simply love food with an edge.
Yield: Makes about ½ cup (8-10 servings) Prep Time: 8 minutes Chill Time: 30 minutes Difficulty: Beginner — essentially just mixing.
Ingredients:
- ½ cup (1 stick) unsalted butter, softened to room temperature
- 1-1½ tablespoons sriracha sauce (adjust to your heat preference)
- 2 cloves garlic, minced to a paste
- 1 tablespoon fresh cilantro, finely chopped
- Zest of ½ lime
- 1 teaspoon fresh lime juice
- ¼ teaspoon fine sea salt
Instructions:
-
Place the softened butter in a medium bowl. Add the sriracha, garlic paste, and lime zest.
-
Fold together with a spatula until the sriracha is fully incorporated and the butter is uniformly reddish throughout.
-
Add the finely chopped cilantro and lime juice, folding gently until everything is evenly distributed.
-
Shape onto plastic wrap into a log, wrap tightly, and refrigerate for at least 30 minutes.
Storage: Refrigerator: up to 7 days. Freezer: up to 3 months.
Best Uses: Melt over grilled corn, roasted cauliflower, or roasted broccoli. Use on grilled shrimp or fish. Spread on warm tortillas. Top popcorn. Dollop onto eggs. Add a pat to a bowl of rice for instant flavor.
Pro tip: This butter transforms simple grilled corn into something memorable — all the richness of butter with a spicy, garlicky kick that makes you want another bite.
Variation: Add ½ teaspoon of honey for sweetness that mellows the heat, or add a teaspoon of sesame oil for deeper, toastier flavor that works especially well on Asian-inspired dishes.
6. Brown Butter with Sage
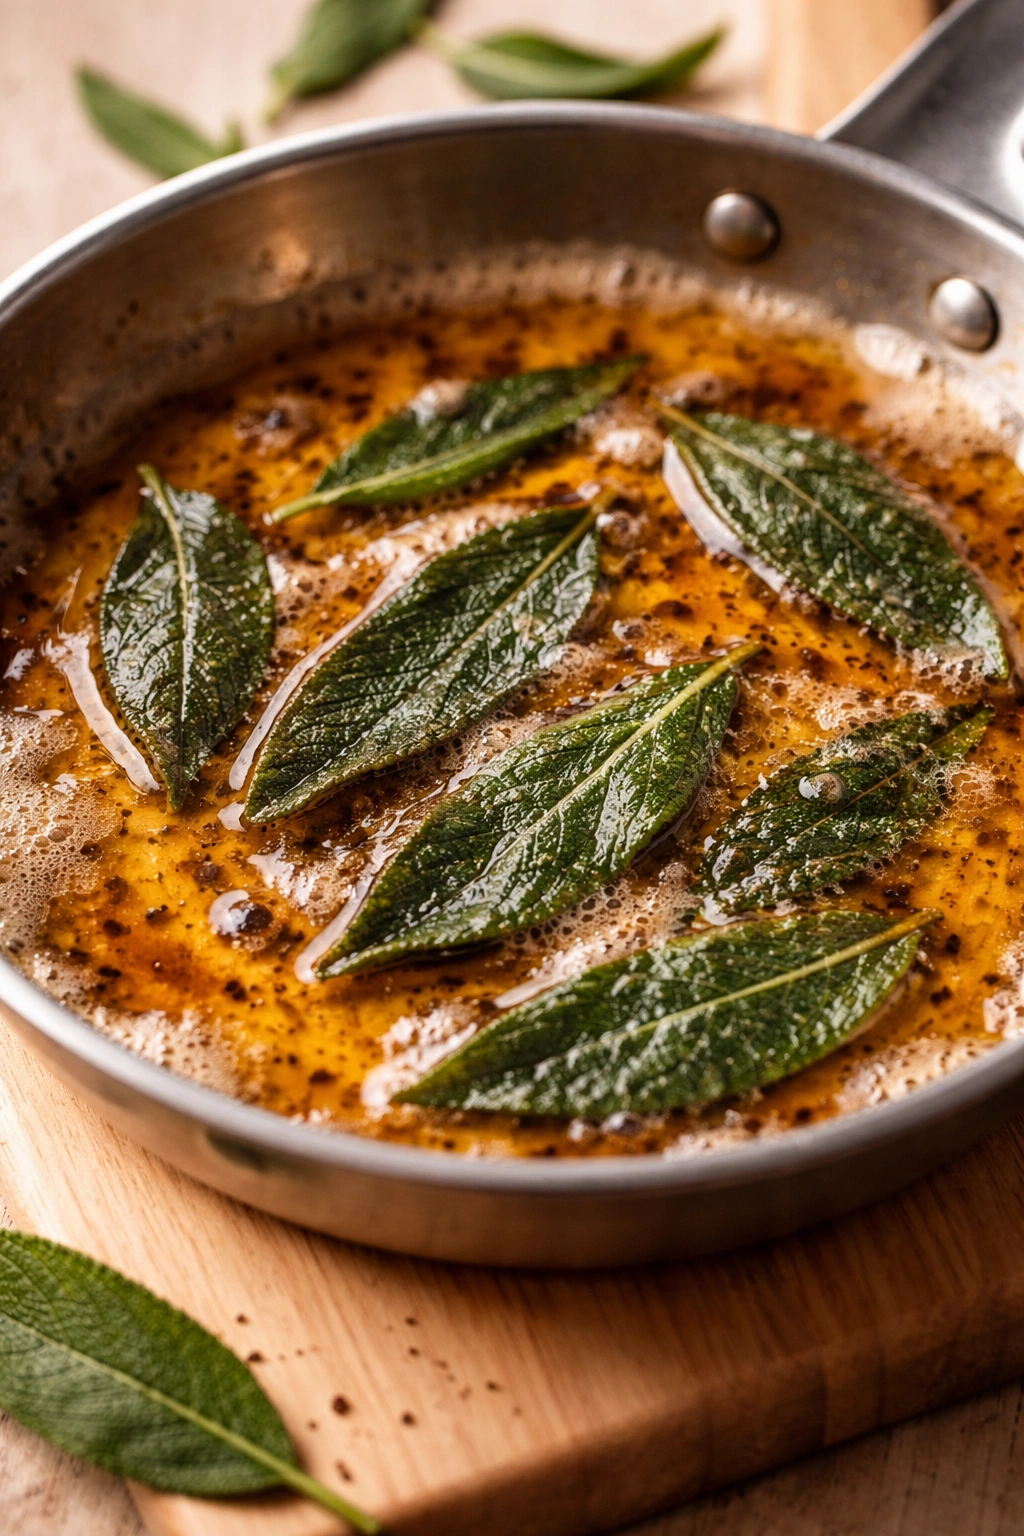
Brown butter is butter that’s been slowly heated until the milk solids toast and turn golden brown, developing a deep, nutty flavor that tastes nothing like ordinary butter. When you combine brown butter with crispy sage leaves, you get something truly special — the earthiness of sage intensified by the savory, almost caramel-like quality of brown butter. This is sophisticated, restaurant-quality stuff that’s actually simple to make at home.
The technique requires a bit more attention than mixing cold butter and herbs, but it’s worth learning. You’re melting butter gently, watching as it foams, then waiting for the foam to subside and the milk solids to turn golden and fragrant. This butter then needs to be cooled before you can incorporate the sage. It’s not difficult, just requires some presence and attention at the stove. The result is a butter that tastes more complex and interesting than any seasoning you could add to plain softened butter.
Yield: Makes about ½ cup (8-10 servings) Prep Time: 5 minutes hands-on Cook Time: 10-12 minutes for browning the butter Cool Time: 20 minutes before you can mix in the sage Chill Time: 30 minutes Total Time: About 1 hour (mostly hands-off cooling time) Difficulty: Intermediate — you need to monitor the browning process and understand when it’s reached the right color.
Ingredients:
- ½ cup (1 stick) unsalted butter
- 12-15 fresh sage leaves
- Pinch of fine sea salt
- Pinch of freshly ground black pepper
Instructions:
-
Cut the butter into a few chunks so it melts more evenly. Place it in a small saucepan over medium heat. Watch carefully — do not turn away.
-
The butter will begin to melt, then it will foam as the water content evaporates. As it continues to heat, the milk solids will sink to the bottom and begin to toast.
-
Continue cooking, listening for a nutty aroma and watching the color deepen. The milk solids should turn from white to light tan to a deeper golden brown. This entire process takes about 8-12 minutes depending on your heat level. Stop the moment the solids are golden and the aroma is rich and nutty — it goes from golden to burnt very quickly if you’re not paying attention. Burnt brown butter tastes bitter and acrid, and there’s no saving it.
-
Pour the brown butter through a fine-mesh strainer into a clean bowl, leaving as many of the brown milk solids behind as you can. (These can be discarded, though some people save them for drizzling over vegetables separately.) Let the strained brown butter cool for at least 20 minutes until it’s just barely warm but still liquid.
-
While the brown butter cools, finely chop the sage leaves (or leave them slightly larger if you prefer visible herb pieces). When the brown butter has cooled enough that it won’t begin to set, add the chopped sage, salt, and pepper and stir to combine.
-
Pour the mixture into a small bowl or onto plastic wrap. If you used a bowl, place it in the refrigerator until firm. If using plastic wrap, shape it into a log and wrap tightly.
Advertisements
Storage: Refrigerator: up to 7 days. Freezer: up to 2 months (the brown butter can separate slightly during longer freezing, but will come back together when you use it).
Best Uses: This is the butter for delicate seafood like halibut, for butternut squash, roasted root vegetables, or pasta with no other sauce. It’s restaurant-quality on its own — even a simple piece of fish benefits enormously from a pat of this butter.
Worth knowing: The flavor of brown butter actually deepens and becomes more complex over the first 2-3 days in the refrigerator, so making this butter a day ahead is actually better than using it immediately.
Variation: Add ½ teaspoon of fresh lemon zest for brightness that cuts through the richness, or add a tiny pinch of cayenne for subtle heat.
7. Truffle and Parmesan Butter
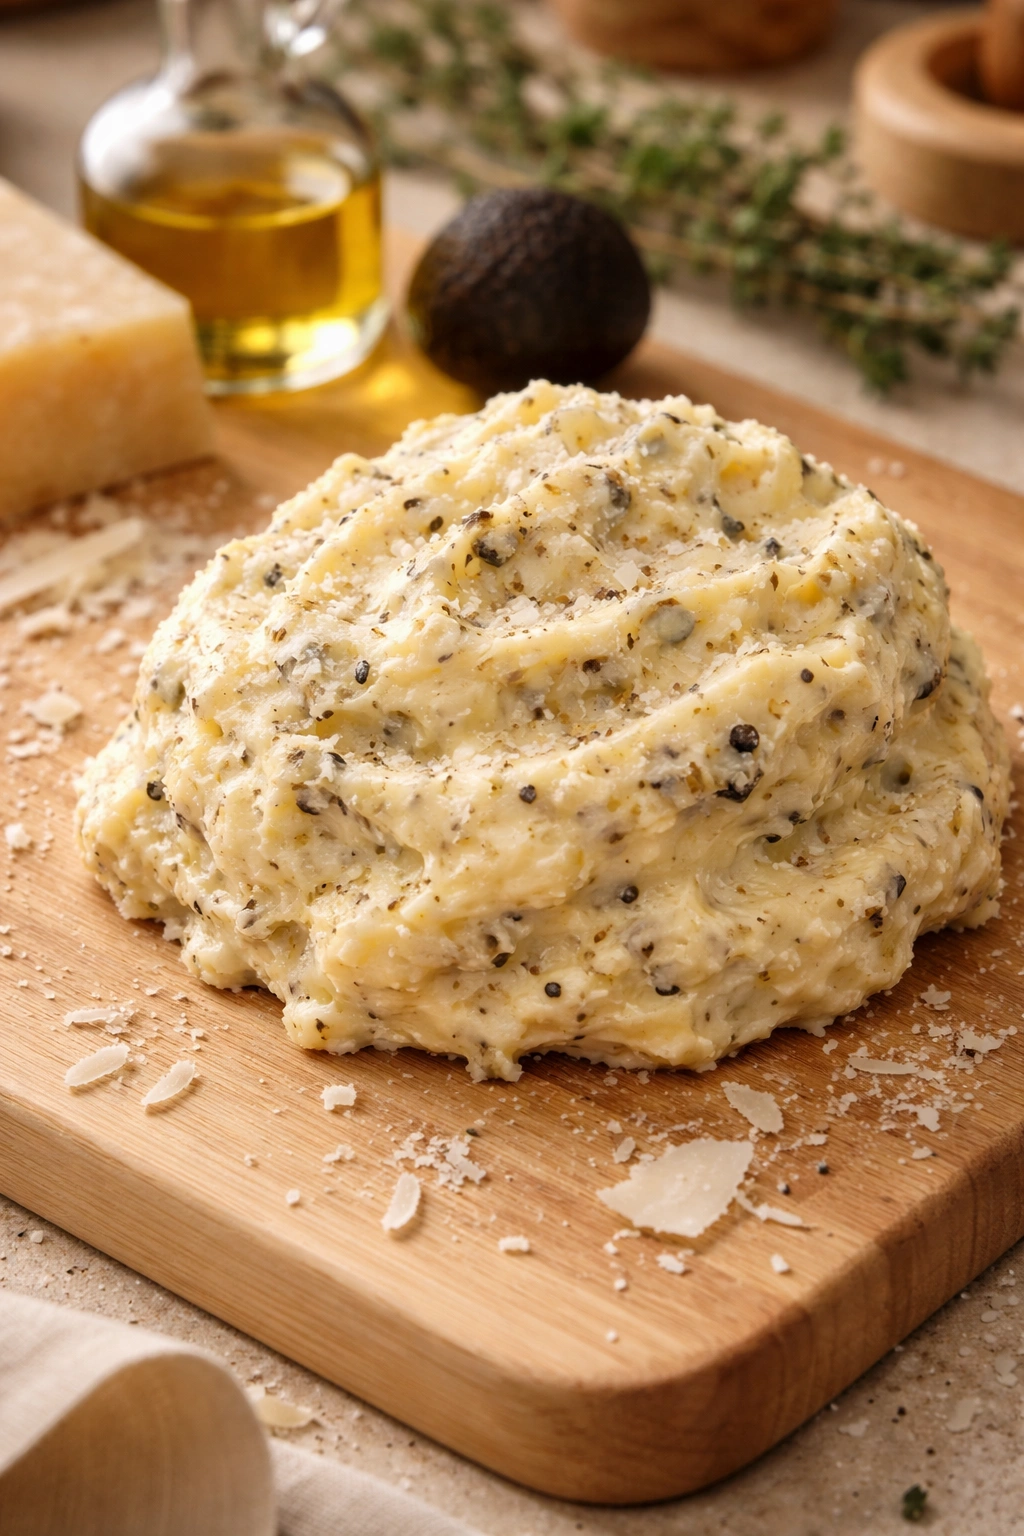
This is unquestionably the most luxurious butter on this list — truffle oil is expensive, and Parmigiano-Reggiano is a quality ingredient that commands respect. But a little goes a long way here. A teaspoon of good truffle oil and a tablespoon of finely grated Parmigiano-Reggiano create something deeply savory and rich that transforms simple foods into something special. This is the butter for finishing a hot steak, melting over pasta, topping roasted mushrooms, or drizzled over fresh egg noodles with nothing else.
The combination is sophisticated without being fussy — truffle oil and Parmesan are both umami powerhouses, so together they create an intensely savory flavor that feels indulgent but not over-the-top. You’re using restraint and quality ingredients rather than quantity. This butter won’t have visible herbs, so it looks almost plain — but the first taste reveals layers of salty, savory, earthy depth that lingers.
Yield: Makes about ½ cup (8-10 servings) Prep Time: 5 minutes Chill Time: 30 minutes Difficulty: Beginner — the only consideration is grating fresh Parmesan.
Ingredients:
- ½ cup (1 stick) unsalted butter, softened to room temperature
- 1-1½ teaspoons truffle oil (adjust to your preference — truffle oil is potent and some find it polarizing)
- 3 tablespoons Parmigiano-Reggiano, finely grated on a microplane
- ¼ teaspoon fine sea salt
- 2-3 grinds of black pepper
Instructions:
-
Place the softened butter in a medium bowl. Add the truffle oil, finely grated Parmesan, salt, and black pepper.
Advertisements -
Fold together gently but thoroughly until everything is evenly distributed. The butter should be uniformly pale gold with flecks of Parmesan visible.
-
Shape onto plastic wrap into a log, wrap tightly, and refrigerate for at least 30 minutes until completely firm.
Storage: Refrigerator: up to 7 days. Freezer: up to 2 months.
Best Uses: Place a pat on top of a hot steak or roasted beef tenderloin. Melt over egg noodles or pasta with absolutely nothing else. Use on roasted mushrooms or wild mushrooms. Place on top of a thick slice of toasted bread brushed with olive oil.
Pro tip: This is an excellent butter to make if you’re hosting a dinner and want to impress without spending an hour cooking. A beautiful piece of beef or a simple pasta can feel elevated and special with just this butter.
Worth knowing: Good truffle oil is expensive, but a small bottle lasts for months because you use it in tiny amounts. One bottle can flavor many batches of this butter, so the cost per use is actually reasonable.
8. Peppercorn Butter
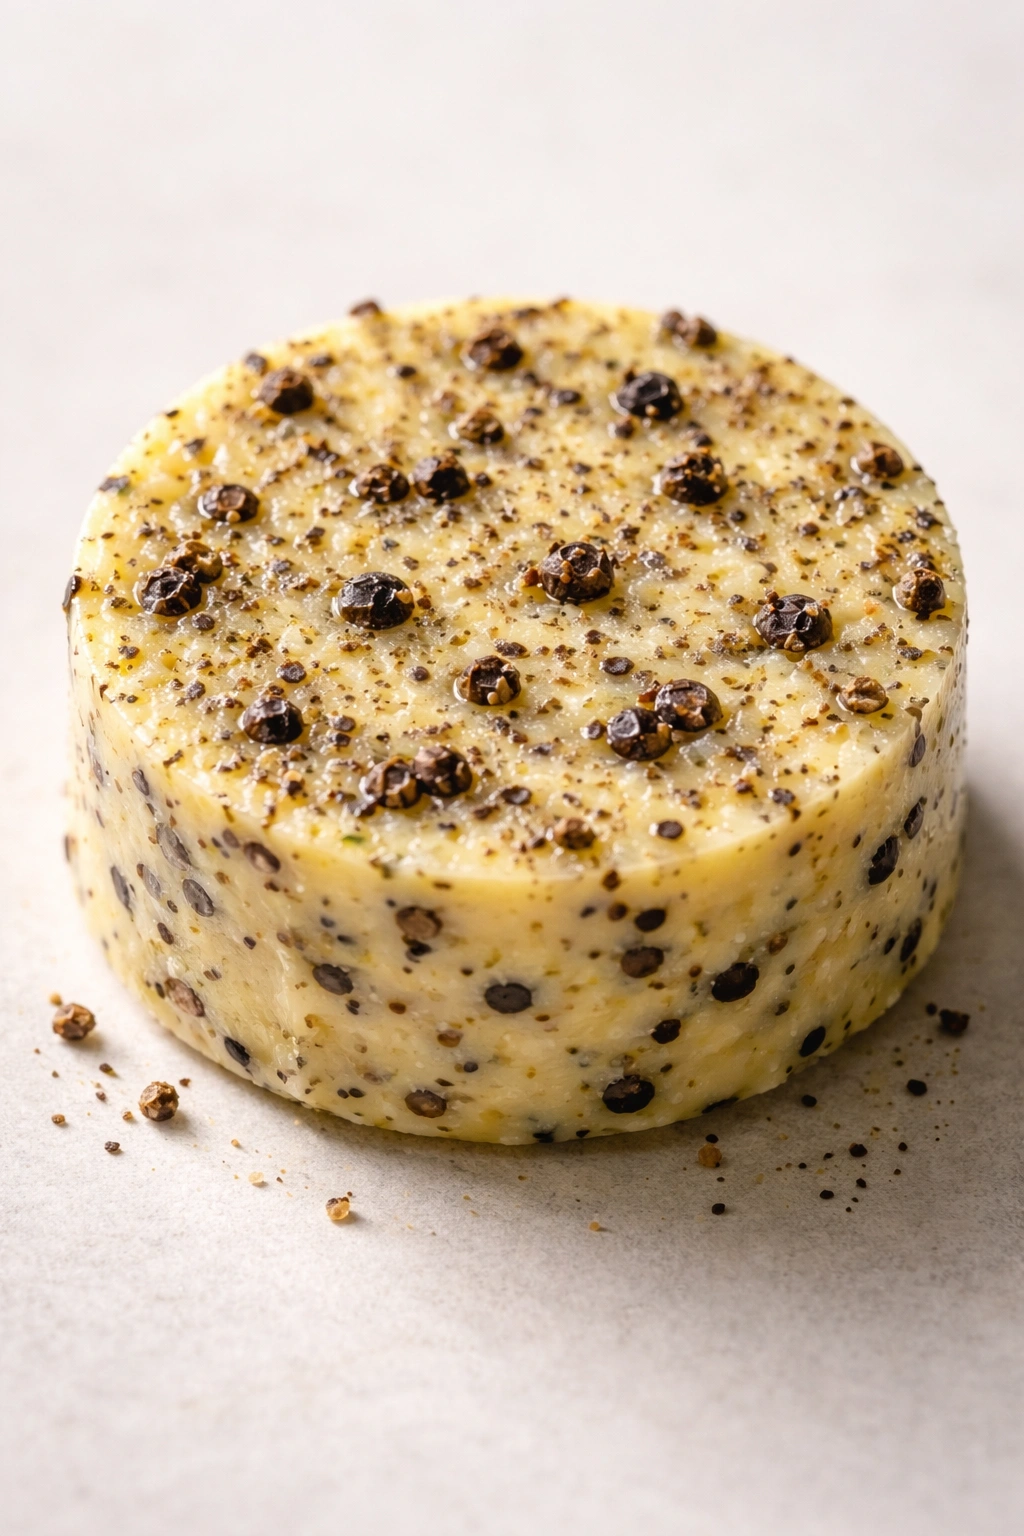
This is the butter for grilled steak, period. It’s also excellent on roasted beef or lamb, but its true home is a hot steak coming off the grill. The combination of coarsely cracked peppercorns, a touch of sharp Dijon mustard, and a whisper of cognac or brandy creates something bold, savory, and utterly classic. You’re not adding much — this butter is about quality and intention rather than complicated flavor layering.
The technique here requires one small step: cracking whole peppercorns rather than using pre-ground pepper. Whole peppercorns have volatile oils that are released when you crack them, and these oils give you a peppery flavor that’s fresh and bright. Pre-ground pepper has often lost some of those oils to oxidation, so it tastes duller and flatter. For this particular butter, the quality of the pepper matters more than usual.
Yield: Makes about ½ cup (8-10 servings) Prep Time: 8 minutes Chill Time: 30 minutes Difficulty: Beginner — cracking peppercorns is straightforward.
Ingredients:
- ½ cup (1 stick) unsalted butter, softened to room temperature
- 1 tablespoon whole black peppercorns, coarsely cracked (use a mortar and pestle or the bottom of a heavy pan)
- 2 teaspoons Dijon mustard
- 1 teaspoon finely chopped fresh thyme (optional but nice)
- ¼ teaspoon fine sea salt
- ½ teaspoon cognac or brandy (optional, adds depth; can substitute with a splash of red wine reduction if you have it)
Instructions:
-
Crack the whole peppercorns using a mortar and pestle, or place them on a cutting board, cover with the bottom of a heavy pan or skillet, and press down firmly until the peppercorns are cracked (not finely ground). You want visible pepper pieces, not powder.
-
Place the softened butter in a medium bowl. Add the cracked peppercorns, Dijon mustard, salt, and cognac if using.
-
Fold everything together gently but thoroughly until the peppercorns and mustard are evenly distributed throughout the butter.
-
If adding the thyme, fold it in at this point.
-
Shape the mixture onto plastic wrap into a log, wrap tightly, and refrigerate for at least 30 minutes until completely firm.
Storage: Refrigerator: up to 7 days. Freezer: up to 3 months.
Best Uses: This butter’s job is simple: place a generous pat on top of a hot grilled steak, grilled ribeye, or grilled New York strip the moment it comes off the heat. Let it melt into all the crevices. This is the finish that makes a steak restaurant-quality at home.
Worth knowing: The peppercorn butter actually gets better after a day or two as the pepper flavor infuses further into the butter. Make it a day ahead if you’re planning a steak dinner.
Variation: Add ½ teaspoon of finely minced anchovy for a savory, deeply umami-forward butter that’s incredible on beef. It sounds odd, but the anchovy dissolves into the butter and doesn’t taste fishy — it just adds profound savory depth.
Final Thoughts
The eight butters above represent the essential flavored butter recipes every home cook should know how to make. Once you understand the basic technique — softened butter, flavorings, gentle mixing, chilling until firm — you’ll find yourself creating custom variations constantly based on what you’re cooking and what you have on hand.
The real power of flavored butters is that they solve the problem of finishing a meal. Roasted chicken is good, but roasted chicken topped with herb compound butter is restaurant-quality. Grilled vegetables are fine, but grilled vegetables finished with a pat of honey thyme butter feel luxurious and intentional. A simple steak is excellent, but a steak topped with peppercorn butter is unforgettable.
Start by making whichever of these butters appeals most to your cooking style. Once you’ve made one successfully, you’ll feel confident enough to make all the others. Keep a log or two in your freezer at all times — slice off a pat whenever you need it. This single habit will elevate your everyday cooking more than almost any other technique you could learn. You’ll find yourself reaching for these butters constantly, adding them to vegetables, proteins, grains, and bread with the confidence of a chef who knows that a small amount of good butter, properly seasoned, is never wasted.