Charcuterie cups have quietly become the MVP of stress-free entertaining—and once you understand why, you’ll wonder how you ever threw a party without them. Traditional charcuterie boards look stunning on Instagram, but the reality hits the moment your first guest reaches for a slice of prosciutto: crumbs everywhere, fallen olives, cheese sliding around, and somehow everyone’s holding a napkin in one hand while desperately trying to balance a plate in the other. Charcuterie cups solve this entirely. They’re individual portions of cured meats, cheeses, fruits, and accompaniments layered into edible or reusable vessels—creating something that looks as impressive as a full charcuterie board but lets your guests actually enjoy the food without the mess. Better yet, they can be assembled hours ahead, require zero plating as guests arrive, and feel instantly elegant without any fancy technique required.
What makes this format so powerful isn’t just practicality—it’s that charcuterie cups work for literally every type of gathering, from casual backyard hangouts to upscale cocktail events. You can customize each cup based on dietary preferences, build flavor combinations that tell a story, and create a presentation that stands out because almost no one else is doing it. The investment in time is minimal if you plan thoughtfully, and the result looks like you spent hours in the kitchen when you really assembled them in waves while watching a show.
Why Charcuterie Cups Beat Traditional Boards for Parties
The appeal of a full charcuterie board is real—it’s beautiful, impressive, and offers variety. But the moment you place one on a table surrounded by hungry guests, the problems compound quickly. A traditional board becomes disorganized within minutes, with serving spoons disappearing, items crushed under careless hands, and the overall presentation degrading as people pick randomly across the surface. Everything sits exposed to room temperature for hours, and if you’re hosting outdoors on a warm day, soft cheeses start sweating and cured meats begin drying out.
Charcuterie cups eliminate those headaches entirely. Each person gets a contained, balanced portion that holds its integrity from the first bite to the last. The individual portions mean no one has to navigate spatial politics around the table or wonder if they’re taking too much. Guests with specific preferences—people avoiding certain proteins, those with dairy sensitivities, anyone preferring more vegetables—can be accommodated with customized cups rather than hoping you’ve included their preferred items on a shared board.
They’re also inherently portable. At an outdoor event, people can hold a cup in one hand while mingling with a drink in the other. At a cocktail party, cups can be passed around on a tray, or guests can grab them from a display table and keep moving. You don’t need to tie up valuable table space with a sprawling board, and cups stack efficiently for storage and transport if you’re bringing them to a venue.
The visual impact shouldn’t be underestimated either. A thoughtfully assembled cup with visible layers of color, texture, and variety catches the eye far more effectively than a scattered arrangement. When you have 20 or 30 identical cups lined up on a display, they create an almost decorative effect—a grid of abundance that signals “we put real thought into this” far more than a casual board ever could.
Choosing Your Cups and Vessel Options

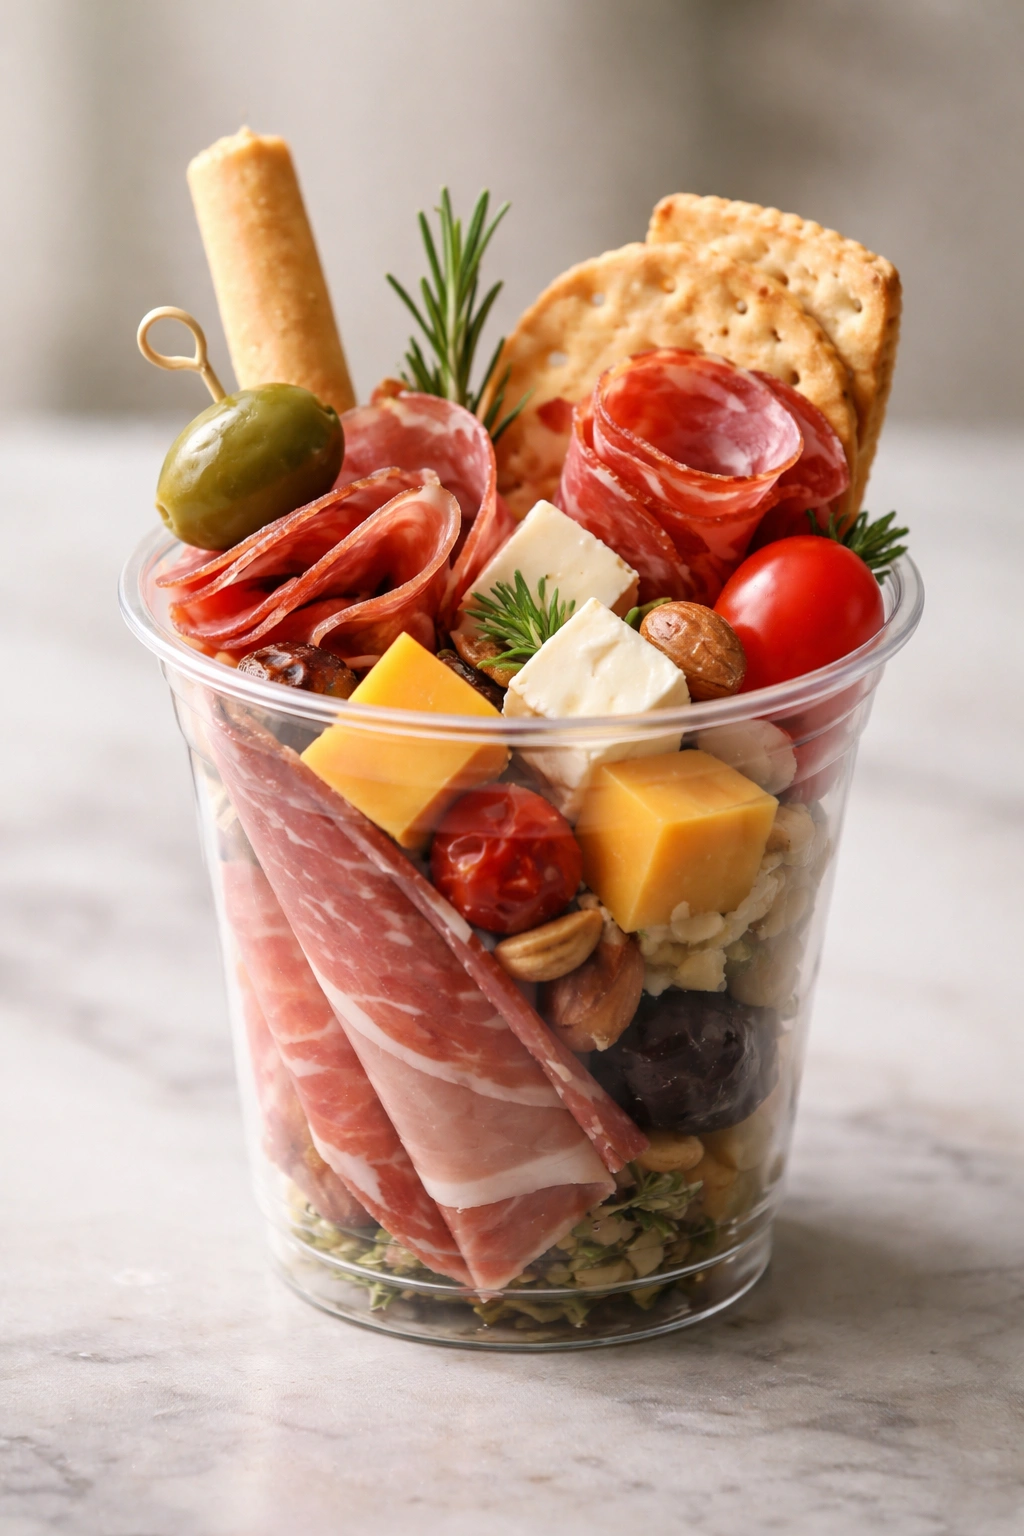
The vessel you choose dramatically shapes both how your cup looks and how practical it is to eat from. Clear cups are the most visually effective option because they showcase all those gorgeous layers—the deep reds of pepperoni, the cream of brie, the jewel tones of olives and grapes. Transparent plastic cups in 5-ounce to 8-ounce sizes work beautifully and are completely disposable, which eliminates any cleanup concern for your guests. They’re also inexpensive enough that you can have plenty on hand without worrying about breakage.
For a more upscale look, small mason jars (pint-size or smaller) create a farmhouse-elegant aesthetic, especially if you’re going for a rustic or outdoor vibe. Glass jars let the contents shine through and feel more substantial than plastic, though they require careful handling and dishwashing afterward. Some people tie twine around the jar or add a small label, which elevates the presentation further if you’re giving these as gifts or serving them at a formal event.
Edible vessels open up entirely different possibilities. Small edible cups made from crispy waffle cones, dried tortillas, or even phyllo dough add a genuine wow factor and eliminate any waste concern. You can use small bread bowls, hollowed-out bell pepper halves, endive leaves, or crispy pita chips folded into a cup shape. The downside is that edible vessels soften over time as they’re exposed to moisture from cheeses and oils, so they’re best assembled closer to serving time. But the visual and textural interest they add can be worth the timing coordination.
For a minimalist approach, some people skip vessels entirely and use small slate tiles, wooden planks, or even decorative plates as the base. You layer items directly onto the surface—more of a deconstructed approach that works best for a smaller gathering or a more sophisticated presentation. This method requires more care during plating and doesn’t offer the same grab-and-go convenience, but it’s undeniably striking.
Sizing Your Cups for the Right Portion
A 5-ounce cup is perfect if you’re serving charcuterie cups as part of a larger menu where guests will also have other food and drinks. At this size, each cup is roughly 2 to 3 bites worth of food—substantial enough to feel meaningful but not so large that it becomes a meal. If charcuterie cups are your primary offering, aim for 8-ounce containers so guests feel genuinely satisfied without needing to assemble their own plate of additional items.
Think about your event timing too. An evening cocktail party calls for smaller portions; an afternoon open house or bridal shower where people will be grazing for hours benefits from slightly more generous cups. You can always prepare a mix of sizes—some smaller cups for handing out as appetizers, some larger ones for a display table where people can grab and return to their conversations.
Building the Foundation: Cheeses for Charcuterie Cups
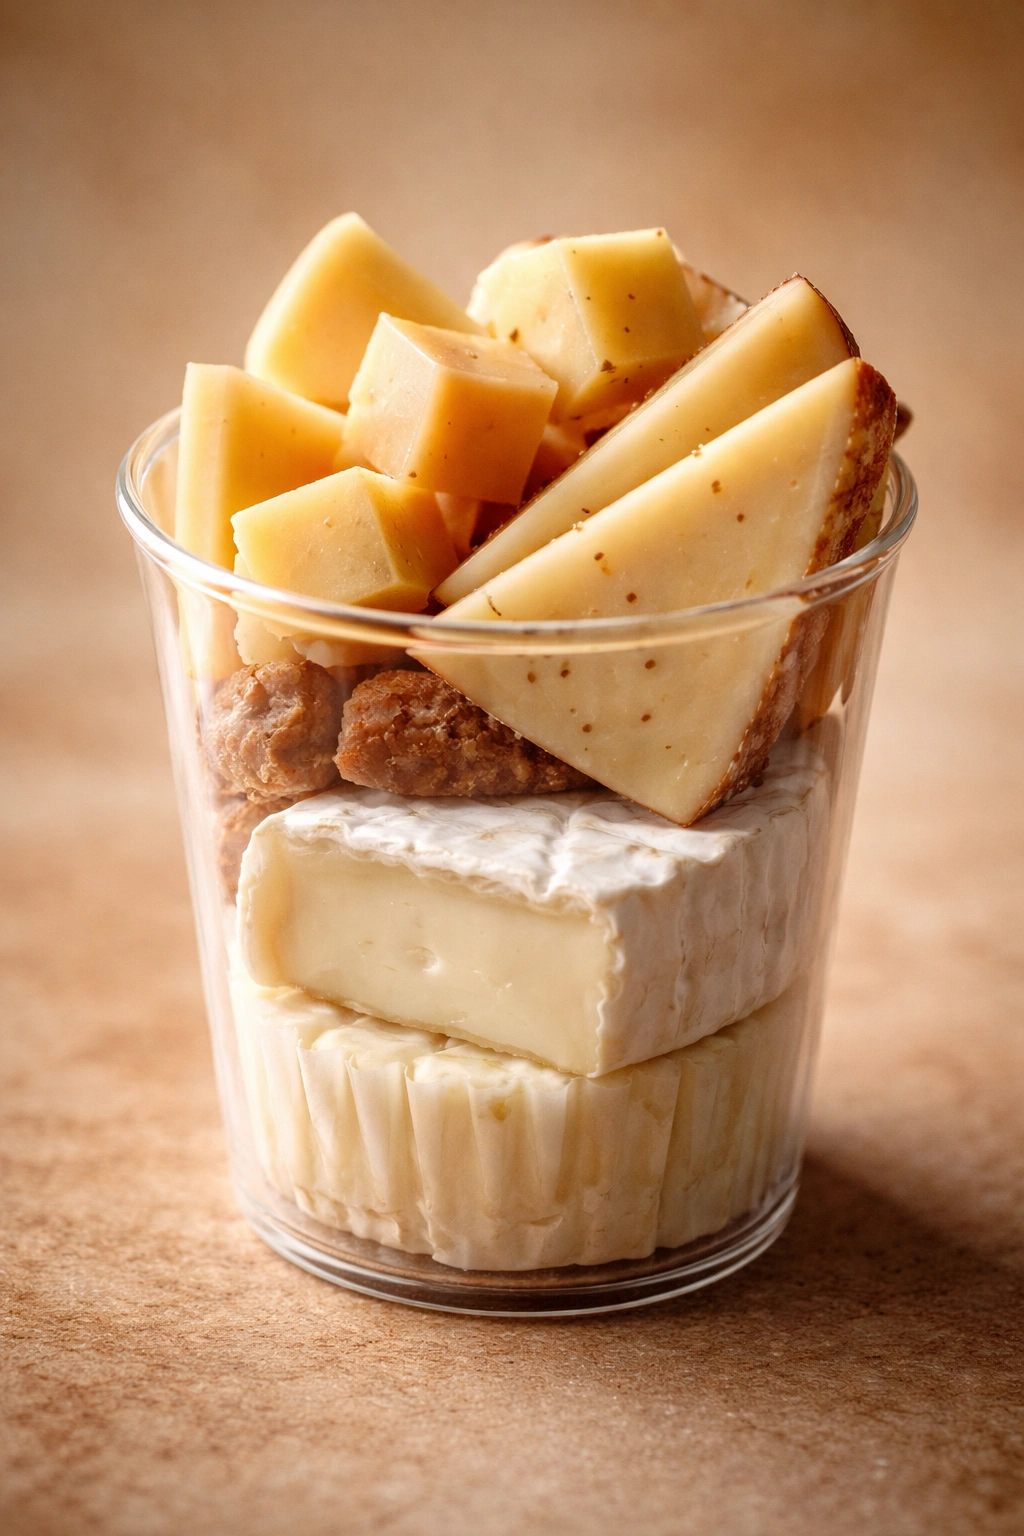
The cheese foundation is what transforms a random assortment of food into something cohesive and delicious. Start with a soft cheese as your anchor—something that will hold the other components in place and provide creamy richness as the first bite. Brie is the obvious choice, and for good reason. Its pale color creates a neutral backdrop that makes everything else pop, it tastes reliably delicious to almost everyone, and it spreads easily if you choose to smear a bit on the bottom of the cup before layering. Cream cheese works similarly and is slightly more affordable. Whipped feta, ricotta, or fresh chevre offer tangier alternatives that pair beautifully with cured meats and create a more interesting flavor base.
Layer a semi-firm cheese next. This is where aged cheddar, fontina, gruyère, or gouda shine. They contribute real flavor without being so assertive that they overwhelm the other components. Cut them into small cubes or thin slices—thin slices layer more effectively in a cup, while cubes are easier to eat without forks. The visual contrast of different colored cheeses (ivory, golden, pale orange) creates natural visual interest that makes even a simple cup feel intentional and attractive.
A firm, crumbly cheese like aged manchego, parmesan, or asiago adds texture and a sharp flavor note. You can add small shards rather than large pieces; the delicate texture breaks apart easily and distributes throughout the cup rather than dominating it. Many people skip this category in smaller cups, but in 8-ounce portions it adds genuine sophistication.
Choosing Cheese That Won’t Fall Apart
Cheeses that are too warm will be soft and won’t hold their shape. Allow hard and semi-firm cheeses to sit out for 10 to 15 minutes before cutting, but keep soft cheeses and spreads refrigerated until just before assembly. Cut cheese right before layering so edges don’t dry out. For soft cheeses like brie, slightly chilling the cup before adding the cheese makes it easier to layer other items on top without sinking.
If you’re assembling cups more than a few hours ahead, place them in the refrigerator immediately after assembly. This firms up cheeses and helps the whole structure set so items don’t shift when guests pick up the cup. Remove from the fridge about 15 minutes before serving so cheeses can soften slightly and release their full flavor.
Selecting the Best Cured Meats
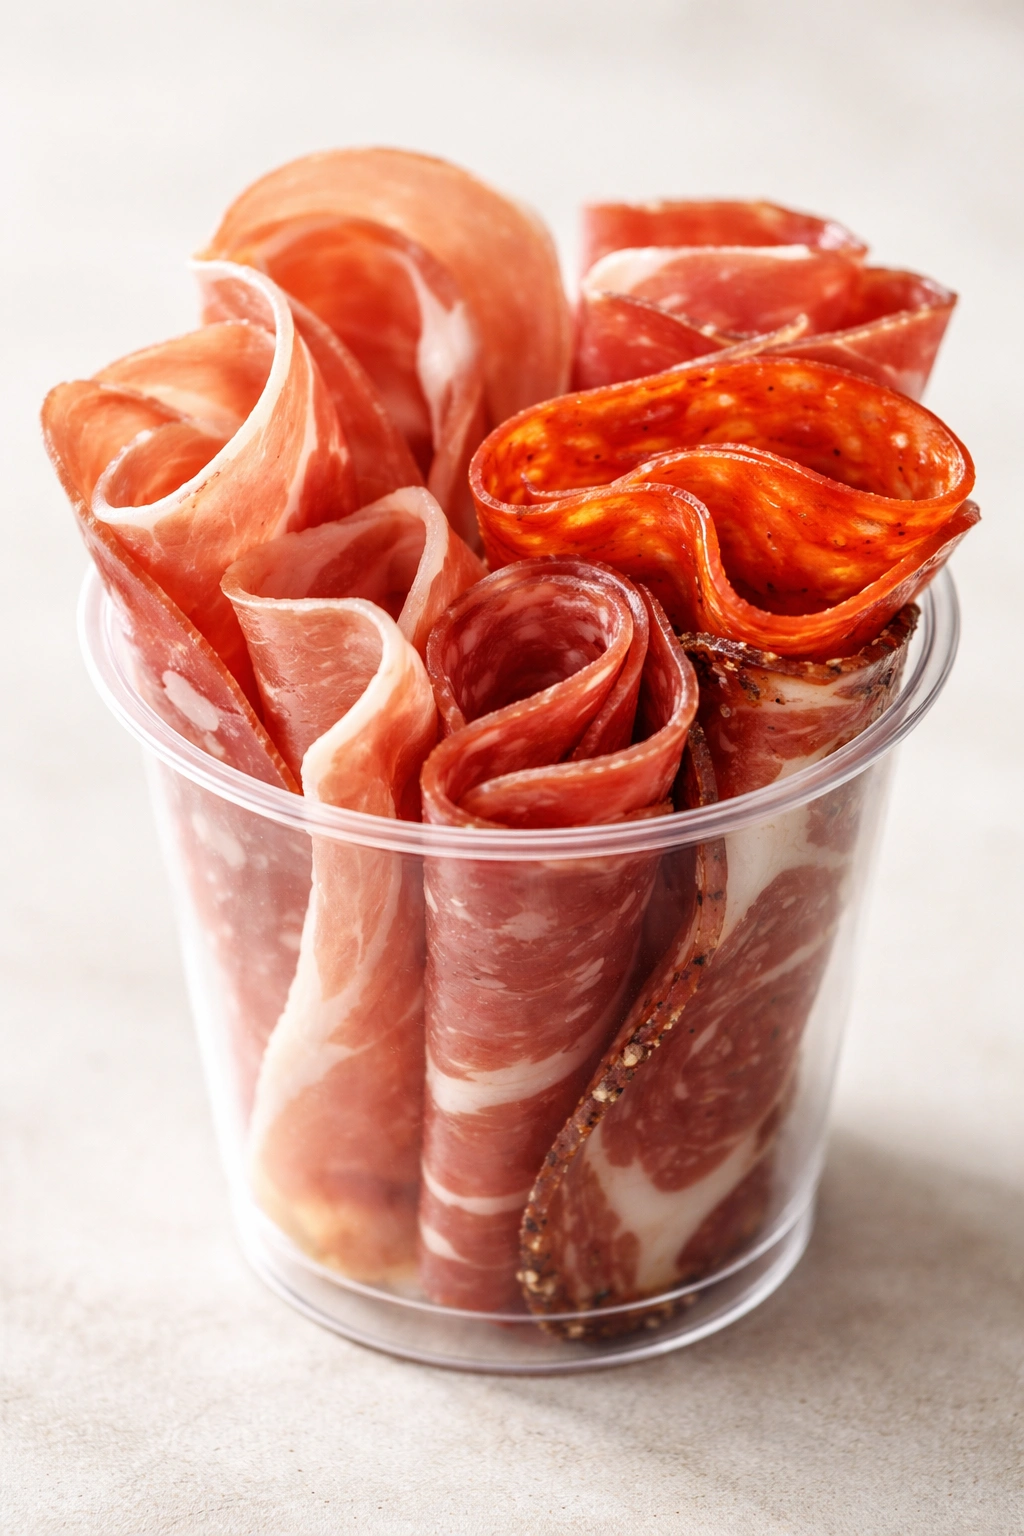
Cured meats are what give a charcuterie cup its depth and identity. Prosciutto is the classic choice for a reason—its delicate, salty, almost nutty flavor works with virtually everything, and when draped or folded into small pieces, it looks beautiful. The challenge is that prosciutto dries out quickly once exposed to air, especially in a warm room. For cups assembled a couple of hours ahead, prosciutto works fine. For longer lead times, reserve some of the prosciutto to arrange on top just before serving.
Pepperoni adds a spicy, slightly smoky quality and holds up extremely well temperature-wise. It doesn’t dry out as quickly as prosciutto, and the distinct red color creates visual contrast in the cup. Use traditional pepperoni or Spanish chorizo depending on your flavor direction. Salami (especially varieties like soppressata or capicola) brings deeper, earthier flavors and a more substantial presence than the delicate meats. The fattier varieties are more flavorful than lean versions.
Speck—a smoked prosciutto from Italy—offers a middle ground: the delicate texture and elegance of prosciutto with more assertive flavor and better durability. If you can find it, it’s worth the extra cost for this application. Guanciale (cured pork jowl) is intense and amazing if your guests appreciate bold, savory flavors, but it’s not the right choice if you’re entertaining people with very conservative palates.
Layering Meats So They Stay Put
Fold or roll pieces of thin-sliced cured meats into thirds or quarters so they take up less space and stay in place rather than sliding around inside the cup. If you’re using thicker slices, cut them into bite-sized rectangles. Alternating the direction of layered meats (some arranged horizontally, some vertically) helps them hold each other in place. For cups assembled ahead of time, place the most delicate meats (prosciutto) closer to the top so they remain visible and attractive, and use sturdier varieties as foundational layers.
Adding Vegetables and Fresh Produce
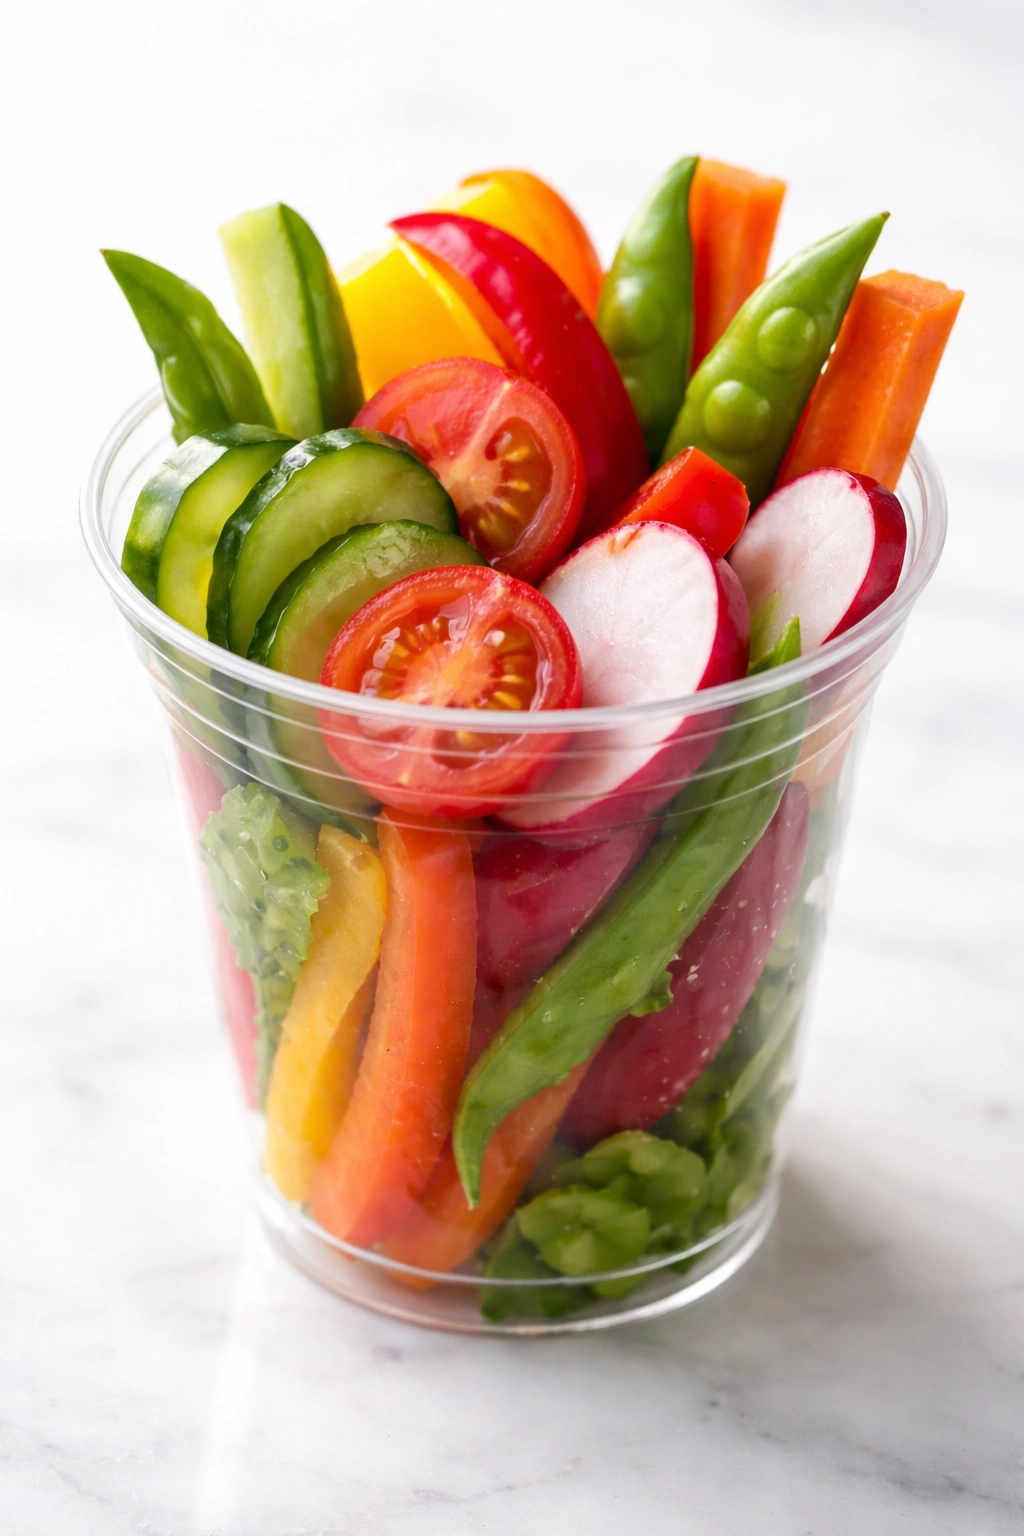
Fresh vegetables provide essential color contrast, textural variety, and a palate-cleansing brightness that cuts through rich cheeses and salty meats. Without vegetables, a charcuterie cup feels one-dimensional and heavy. With them, it becomes a balanced, complete bite.
Crisp, crunchy vegetables work best because softer vegetables will wilt and lose their textural appeal. Small cherry tomatoes (cut in half if they’re large), cucumber rounds, bell pepper strips, and thin carrot slices stay crisp for hours. Radish slices add peppery spice and brilliant color. Snap peas are tender and sweet. Celery hearts (the lighter inner stalks) are less tough than outer stalks and hold their crunch beautifully.
Olives are non-negotiable in a traditional charcuterie context—they’re flavorful, distinctive, and add to the sophistication of the presentation. Use castelvetrano olives (the buttery, mild green ones), briny kalamata olives, or a mix of varieties. Pit them before adding to cups so guests don’t have to wrestle with pits while eating from a cup. Small cornichons (tiny pickled cucumbers) offer sharp, salty-sour notes that brighten the whole cup. They’re sturdier than larger pickles and take up minimal space.
Roasted red peppers add sweetness and silky texture. You can buy them jarred to save time, though draining them well prevents the cup from becoming soggy. Sun-dried tomatoes contribute concentrated tomato flavor and a chewy texture that contrasts with crisp vegetables.
The Hydration Problem: Keeping Cups From Getting Soggy
The biggest challenge with vegetables in charcuterie cups is moisture. Wet vegetables release liquid that softens crispy components and creates a soggy bottom. Pat vegetables thoroughly dry after washing. If using jarred olives, roasted peppers, or other brined items, drain them extremely well and pat them dry with paper towels. Consider placing a small piece of brie or cream cheese between wet vegetables and drier components to create a moisture barrier. For cups assembled several hours ahead, add the crispest vegetables as a top layer just before serving.
Incorporating Fruits for Sweet-Savory Balance
Fruit might seem like an unconventional addition to a charcuterie cup, but the sweet-tart contrast against salty meats and rich cheese is absolutely essential to the balance. Without fruit, you’re left with an intensely savory experience that can feel heavy after just a few bites.
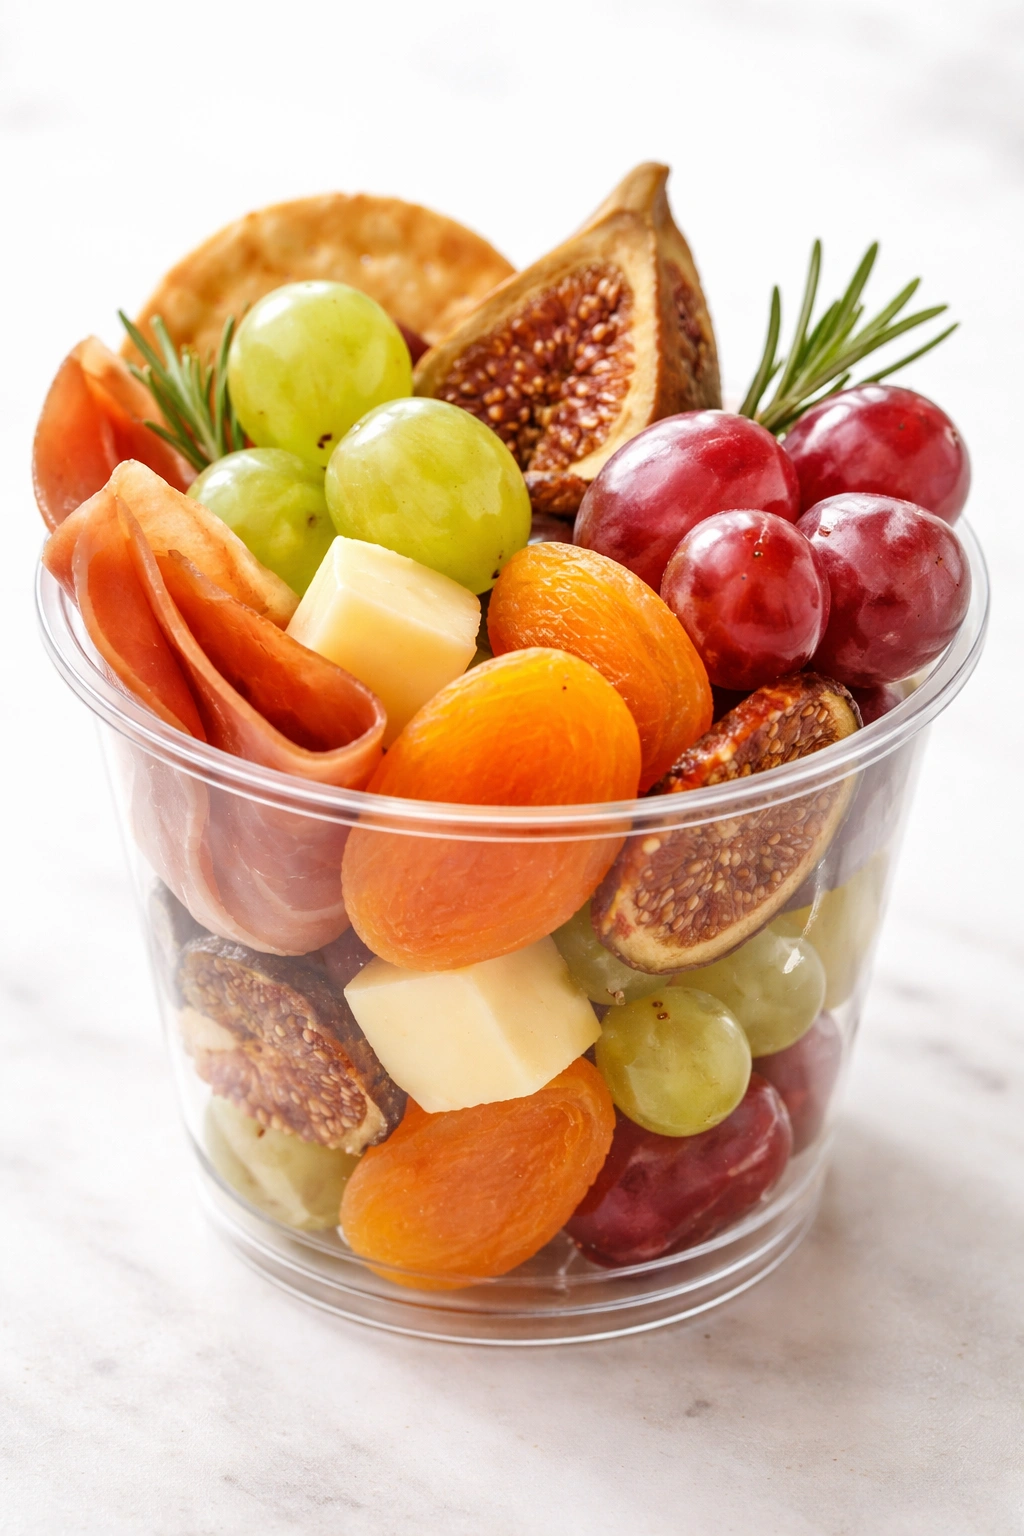
Dried fruits work best for stability and long holding times. Apricots, figs, cranberries, and raisins are classic charcuterie companions. They won’t release moisture into the cup, they look beautiful, and they provide genuine sweetness and chewiness. Choose unsweetened or lightly sweetened varieties if possible—overly sugary dried fruit creates a jarring contrast rather than a harmonious one.
Fresh grapes are the go-to fresh fruit for charcuterie cups. They’re sturdy enough to hold their integrity, small enough to fit naturally into the composition, and offer simple sweetness without complexity. Red grapes have more flavor than green ones. Sliced pears offer delicate sweetness and a creamy texture that contrasts beautifully with crispy vegetables. Apple slices work similarly but oxidize quickly, so toss them in a tiny bit of lemon juice right before assembly.
Berries (blueberries, raspberries, strawberry pieces) add color and tartness, but they’re delicate and release juice easily. Reserve them for cups being eaten within 1 to 2 hours of assembly, and add them as a top layer just before serving. Pomegranate arils contribute jewel-like color, tartness, and textural crunch. Fresh fig halves are stunning when in season and pair magnificently with aged cheeses and cured meats.
Achieving Sweet-Savory Harmony
The fruit should never dominate the cup—it’s an accent, a moment of sweetness in each bite, not a fruit salad component. A single dried apricot, a small handful of grapes, and maybe a fig or two is the right amount for a 5 to 8-ounce cup. This restraint keeps the focus on the cheese and meat while ensuring every few bites offer a moment of textural or flavor contrast. The sweetness of fruit amplifies the perception of saltiness in cured meats, so you can actually get away with less salt overall by including fruit strategically.
Spreads, Dips, and Flavor Boosters
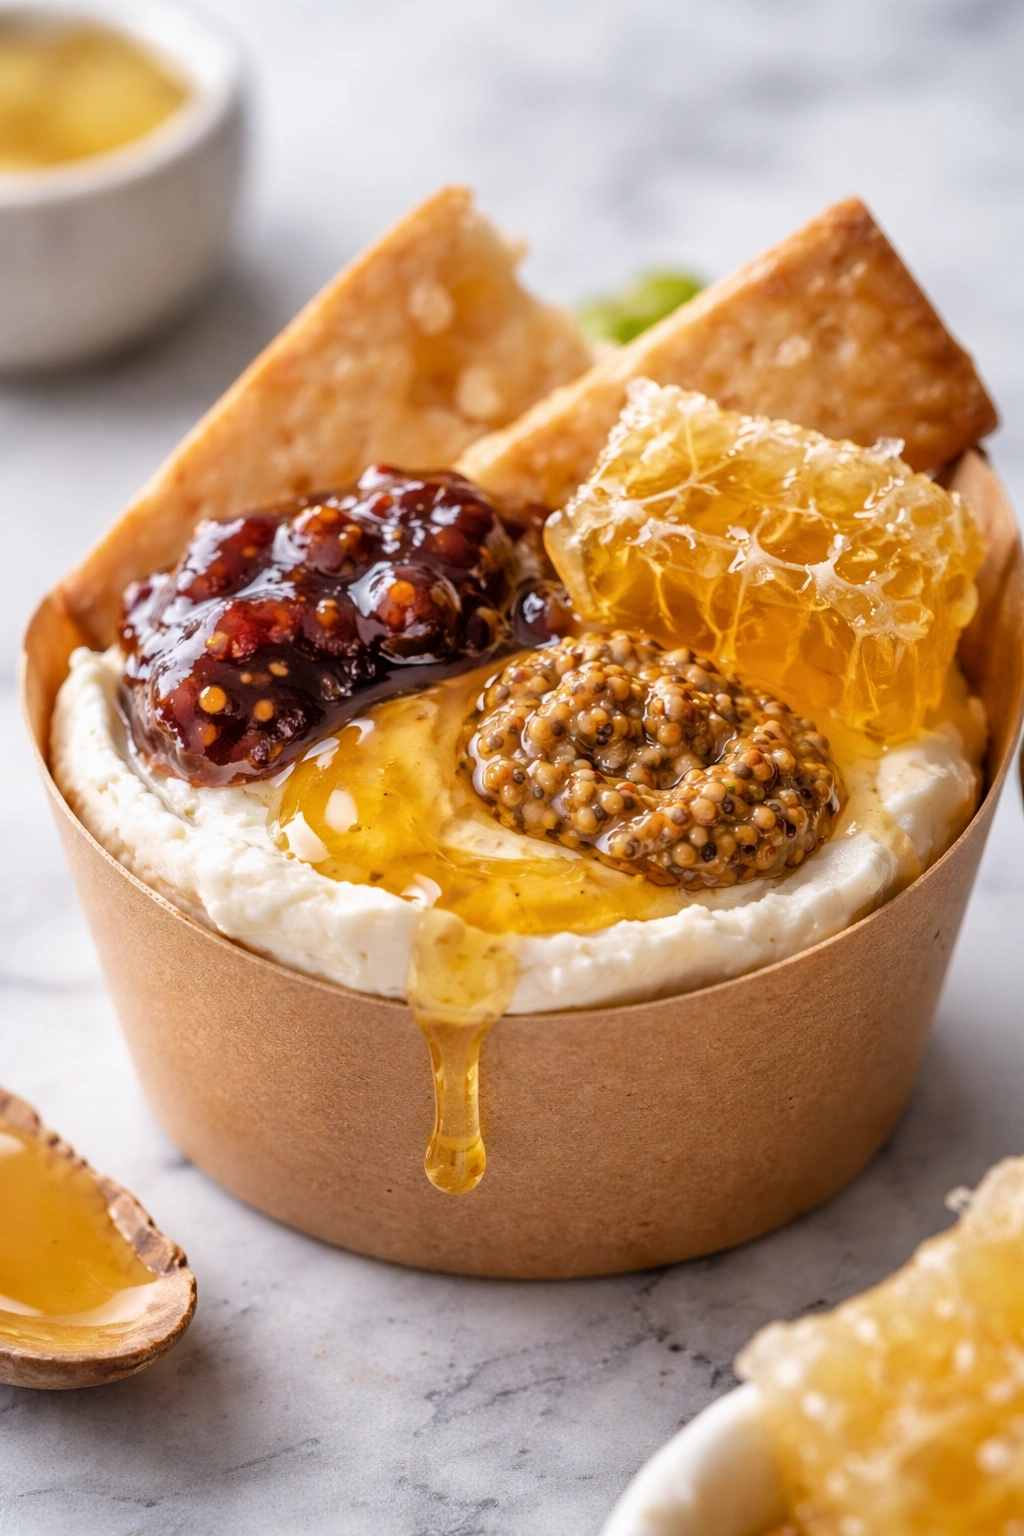
A small component of something creamy, spreadable, or intensely flavorful transforms a basic cup into something more interesting. Honey is perhaps the most versatile option—a light drizzle over aged cheese and prosciutto is the definition of simple elegance. Use good quality honey; the flower source (wildflower, clover, chestnut) will influence the overall flavor profile subtly. Honeycomb pieces (if you can find them) add textural interest alongside the honey.
Fruit preserves or jams (fig jam, apricot preserves, or hot pepper jelly) add concentrated flavor and sweetness. A small spoonful takes up minimal space but provides serious flavor impact. Whole grain mustard, Dijon mustard, or spicy brown mustard offers brightness and complexity. Many people skip the mustard in cups because they’re not sure about it, but even those who rarely reach for mustard at home appreciate the subtle enhancement here.
Hot honey (honey infused with chili peppers) has become incredibly popular and for good reason—it hits all the notes. Start with less than you think you need; it’s intensely flavored. Pesto (basil, walnut, or sun-dried tomato varieties) adds herbaceous brightness. Whipped feta with herbs, za’atar, or everything bagel seasoning creates a flavor dimension that takes the cup from basic to exceptional without much effort.
Marcona almonds or candied nuts add crunch and substance. A small handful scattered through the cup provides something to break up the soft cheeses and rich meats. Crunchy elements are essential to textural variety—even a tiny component makes an enormous difference in how satisfying the eating experience feels.
Keeping Spreads From Shifting
Thick spreads like jam or whipped cheese stay in place best if spread directly onto the bottom or a middle layer of the cup, rather than sitting loose on top. For very loose spreads like honey, either incorporate it into a drizzle at the final moment before serving, or add it as a very thin layer that you then top with something that won’t shift into it (small cheese cubes, for example). Think of spreads as a layer, not a topping.
The Art of Layering and Packing Your Cups
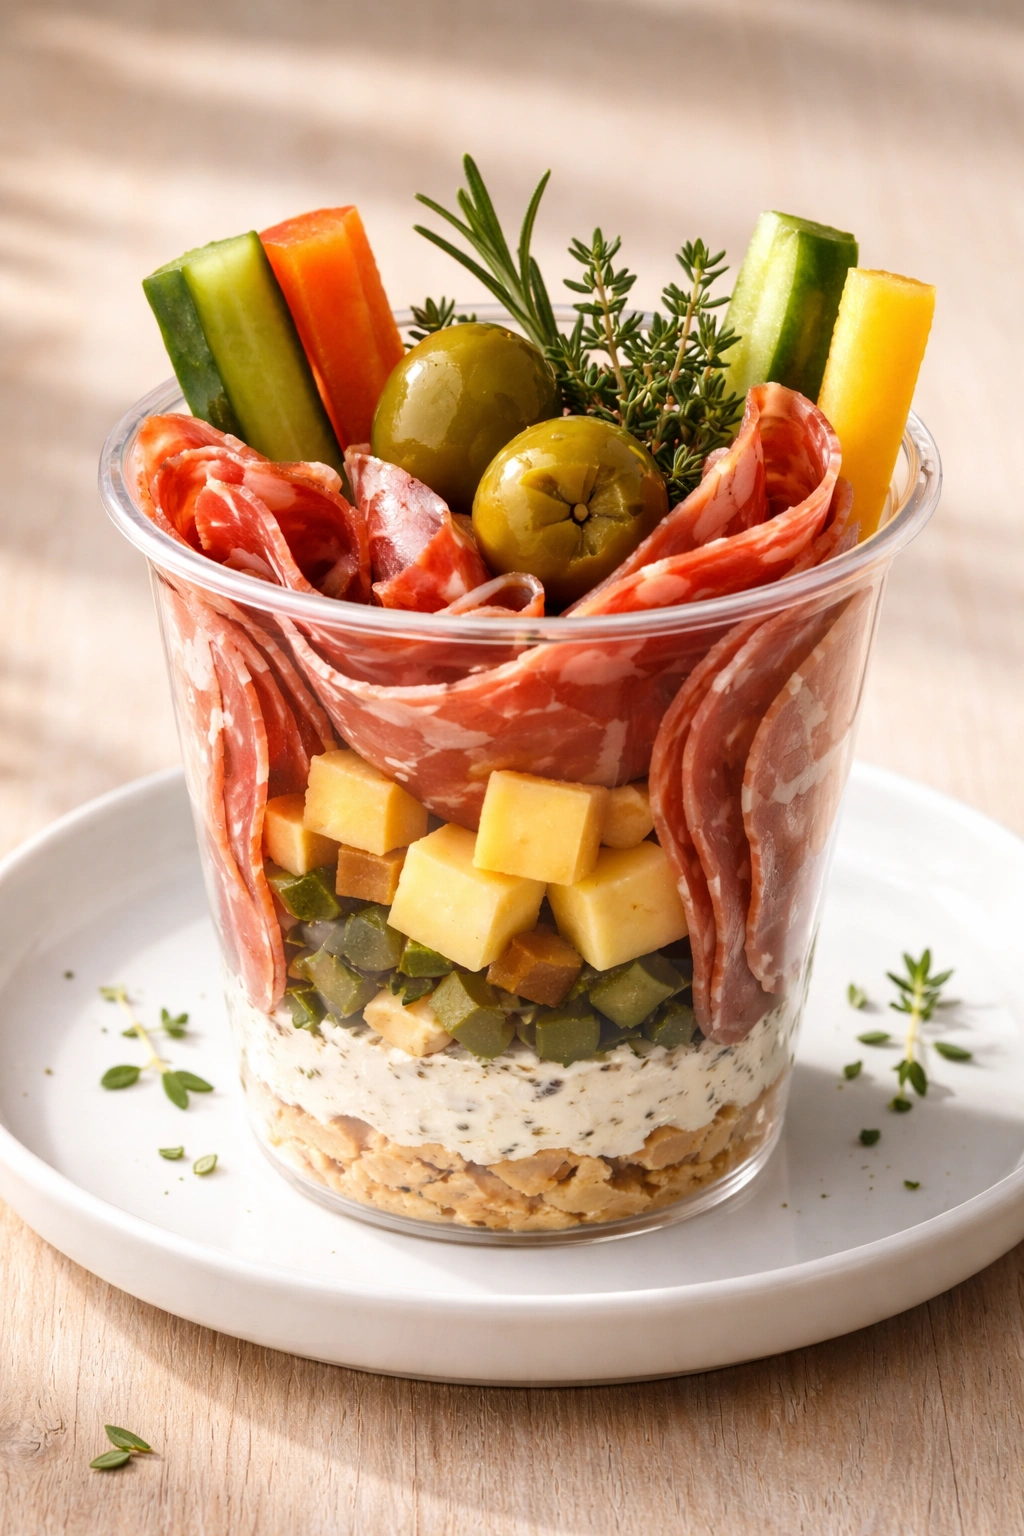
Assembly technique matters far more than most people realize. The difference between a cup that looks intentional and beautiful and one that looks haphazard comes down to thoughtful layering. Start with a small base layer that acts as an anchor and adhesive for everything else—this is your soft cheese spread, either smeared across the bottom or mounded into a small pile. Press down gently to create a secure foundation.
Layer thicker, sturdier components next: larger cheese cubes, folded cured meats, vegetables with structure like cucumber or carrot. These items should lean against each other slightly and against the sides of the cup, creating a structure that prevents smaller items from falling to the bottom. Think of building a small edible structure, not just dumping things in randomly.
Place more delicate items higher up in the cup—prosciutto, herbs, berries, and the most visually striking components should be visible from the top and sides. When someone looks at the finished cup, the first thing they should see is something appealing. This means building from sturdy at the bottom to delicate at the top, and ensuring the top layer tells you what flavors are inside.
A Specific Packing Strategy
Here’s a practical order that works well for most combinations: soft cheese base, small cubes of harder cheese, folded cured meats, sturdy vegetables, olives or pickles, dried fruit, fresh fruit or herbs as a top garnish. This progression builds structure as you go up and ensures everything is visible and accessible. Some items will shift slightly as the cup is picked up and moved—that’s normal and fine as long as the overall composition holds together.
Pay attention to how full you’re filling the cup. Completely packed to the brim feels overstuffed. Fill to about three-quarters capacity, leaving room for someone’s fingers to grab items without squishing everything. This also makes the cup easier to eat from without items tumbling out.
Creative Flavor Combinations to Try
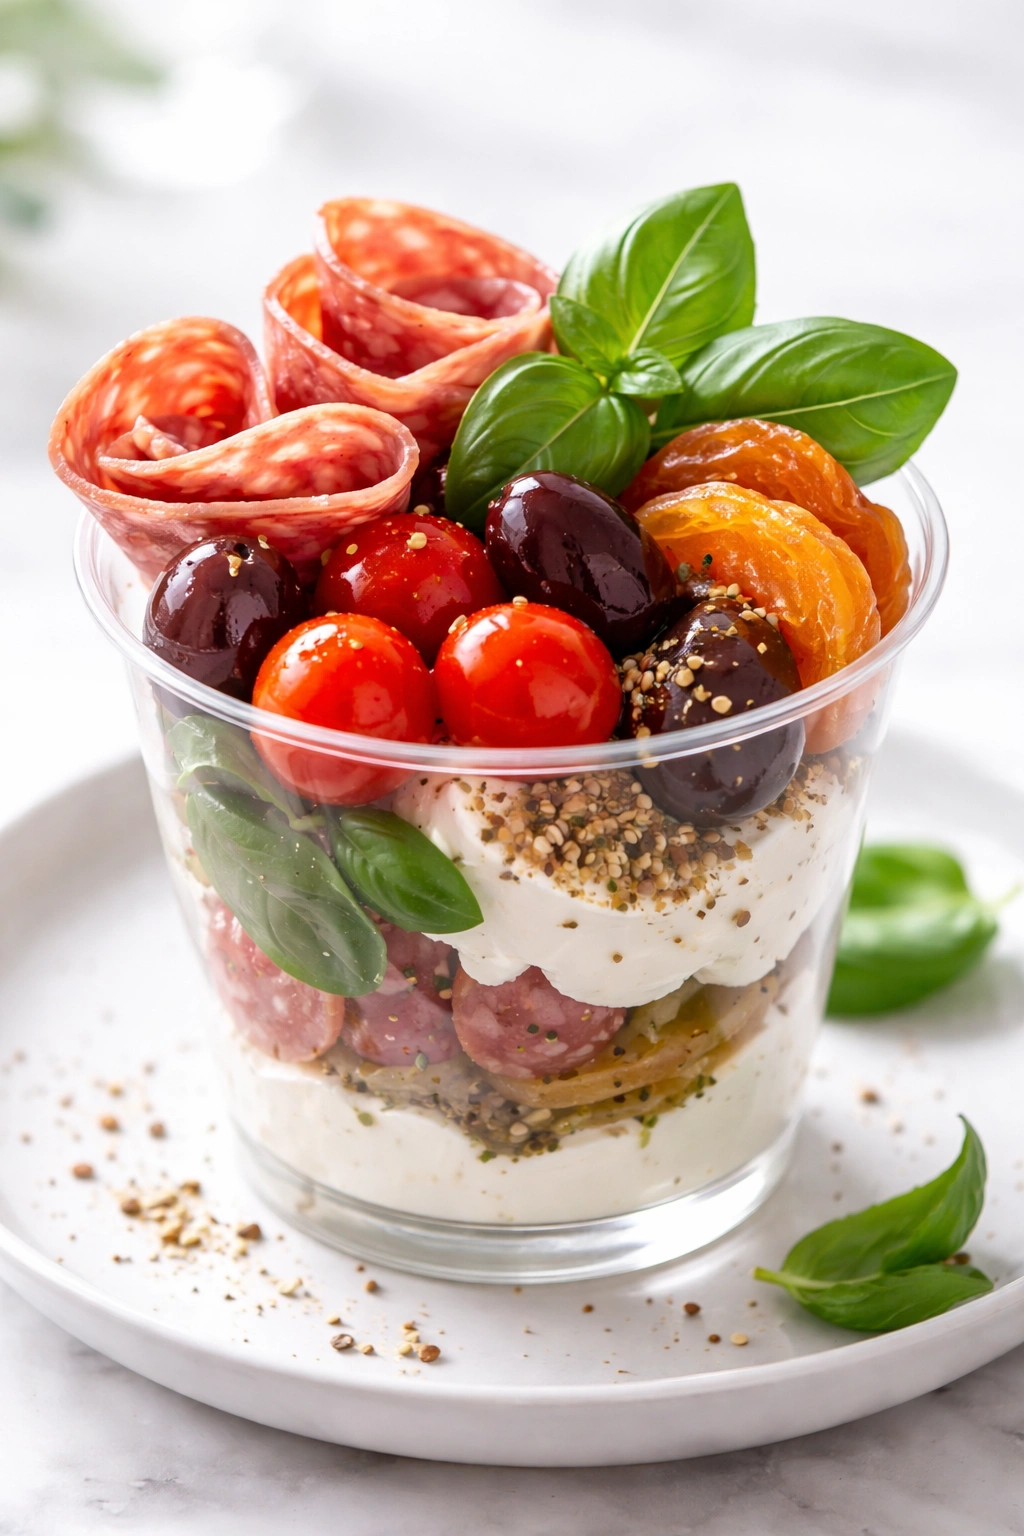
Once you understand the basic formula, you can build combinations that feel cohesive and intentional rather than random. A Mediterranean combination pairs creamy whipped feta, cherry tomatoes, kalamata olives, thin slices of salami, dried apricots, a sprinkle of za’atar, and fresh basil. The tangy feta, salty olives, and bright basil create an instantly recognizable flavor profile.
A Spanish-inspired version uses aged manchego, jamón serrano or speck, Spanish chorizo, roasted red peppers, manchego nuts (or just almonds), dried figs, and a small drizzle of sherry vinegar. The nutty aged cheese and sweet figs play beautifully against the intense jamón.
An Italian countryside approach starts with creamy burrata or fresh mozzarella, adds prosciutto di Parma, aged parmigiano-reggiano shards, fresh figs or grapes, roasted red peppers, a few pine nuts, and a tiny piece of honeycomb. The simplicity and quality of the individual components let each one shine.
A French bistro version combines brie, pâté, cornichons, thin slices of salami, Dijon mustard (a tiny dab), crusty breadcrumbs for texture, and a few capers. This one leans into classic French charcuterie traditions.
For vegetarian or vegan guests, build a cup with hummus or tahini-based spreads as the base, add roasted vegetables, fresh vegetables, marinated artichokes, olives, dried fruit, nuts, and herbs. It’s delicious and substantial without any animal products.
Each combination tells a story. When guests taste the cup, they should recognize the coherence—this isn’t random items thrown together, it’s a thought-out flavor journey. This is what makes charcuterie cups feel special rather than like a lazy appetizer option.
Preparing and Assembling in Advance
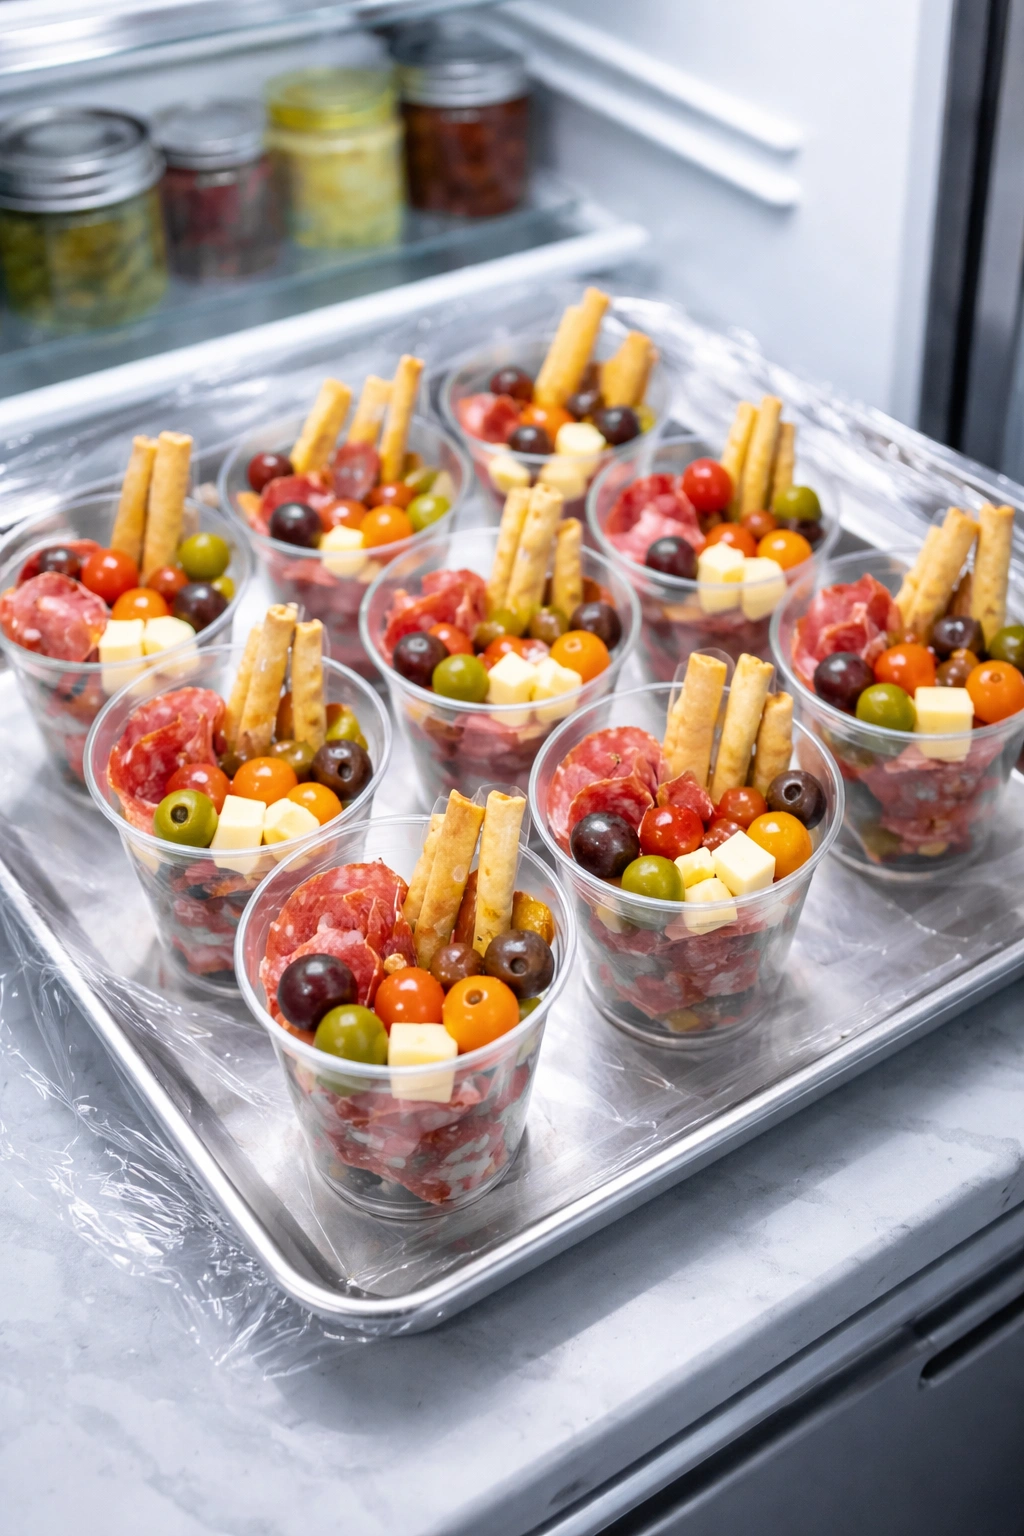
Charcuterie cups can be assembled up to 12 hours ahead, which is their secret superpower. For an evening party, assemble them in the morning and refrigerate them on a flat surface. The cold firms up the cheese and helps everything set so items don’t shift when guests pick up the cups.
About 15 to 20 minutes before guests arrive, remove the cups from the refrigerator. This allows cheeses to soften slightly and regain their flavor complexity (cold dulls the taste of cheese noticeably). At this point, you can add any components you’ve held back—delicate herbs, fresh berries, a final drizzle of honey, or any meat that might dry out from sitting too long.
If you’re assembling further ahead (like the day before), hold back on any cured meats, fresh fruits, and fresh herbs, adding them just a few hours before the event. The sturdier components (hard cheeses, vegetables, olives, dried fruit, spreads) will absolutely hold overnight in the refrigerator.
A Prep Timeline That Works
Two days before: Shop and do your pantry check. Buy anything dried (nuts, dried fruits) and nonperishable condiments.
One day before: Purchase fresh cheeses, cured meats, fresh vegetables, and fresh fruits. If assembling completely, do it now—refrigerate everything in a flat container covered with plastic wrap or on a baking sheet covered with foil.
A few hours before: If you prepped the day before, remove cups from the fridge and add any items you held back (fresh herbs, delicate meats, fresh berries). If you haven’t assembled yet, now is the time to build all your cups. Refrigerate them until serving.
30 minutes before: Remove from the refrigerator and do a final visual check. Arrange on a display surface or tray. A tiered cake stand, wooden board, or shallow box with a decorative cloth creates a beautiful presentation that draws the eye.
Serving Tips and Party Presentation Ideas
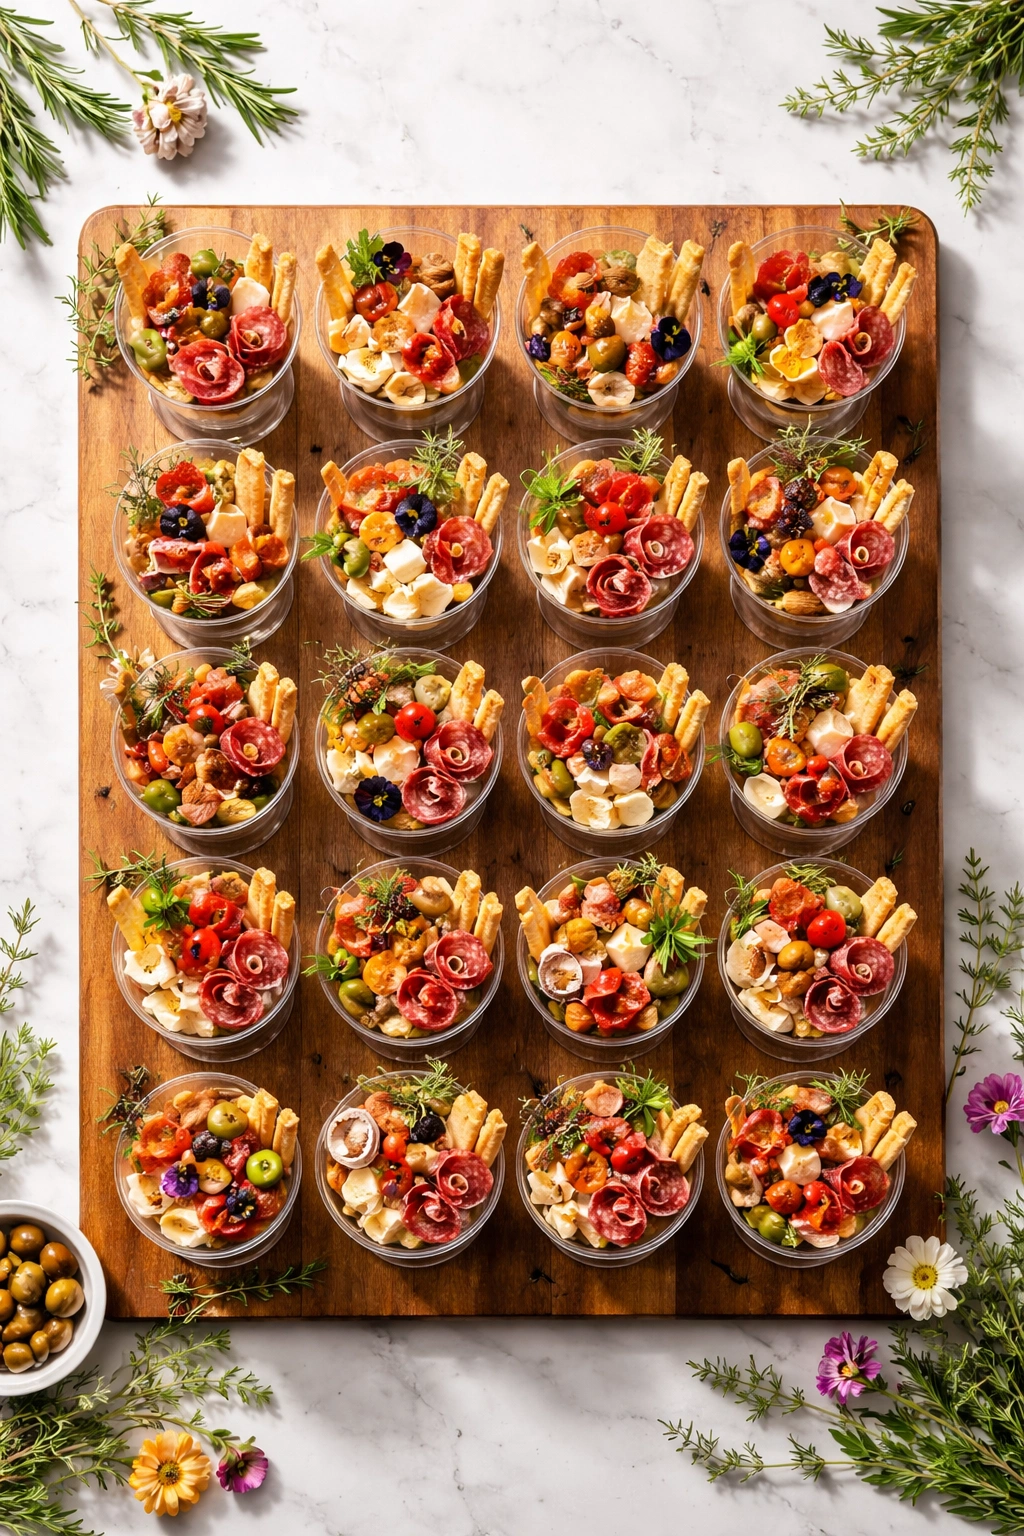
The way you display your charcuterie cups dramatically impacts how guests perceive them. A casual pile on a plate feels lazy, while an intentional arrangement signals thoughtfulness. Arrange cups in neat rows or a circular pattern on a serving surface. If you have 20 cups, create a 4 x 5 grid. If you have 30, arrange them in a circle or tiered pyramid. This visual organization makes them feel intentional and abundant at once.
Use a decorative serving surface—a wooden board, marble slab, white ceramic platter, or even a decorative tray. Add fresh herbs, edible flowers, or additional whole fruits and vegetables around the cups as negative space. This creates visual interest and reinforces the flavor profile you’ve chosen without adding to the cups themselves.
Label your cups if you’re serving guests with dietary restrictions or allergies. Simple small cards identifying the main components (or what to avoid) next to each cup removes any guesswork and shows consideration for your guests’ needs.
For a cocktail party where you’re passing cups around on trays, choose one or two signature combinations rather than offering five different varieties. This makes service easier and creates a unified look. You can have vegetarian and omnivore options, but trying to pass around too many variations makes logistics complicated.
Position your display so guests can comfortably access cups without reaching awkwardly. Eye level is ideal—not so high they’re hard to grab, not so low people have to bend significantly. If you’re using a high side table or counter, arrange the cups toward the front so they’re easily reachable.
Storage and Keeping Your Cups Fresh
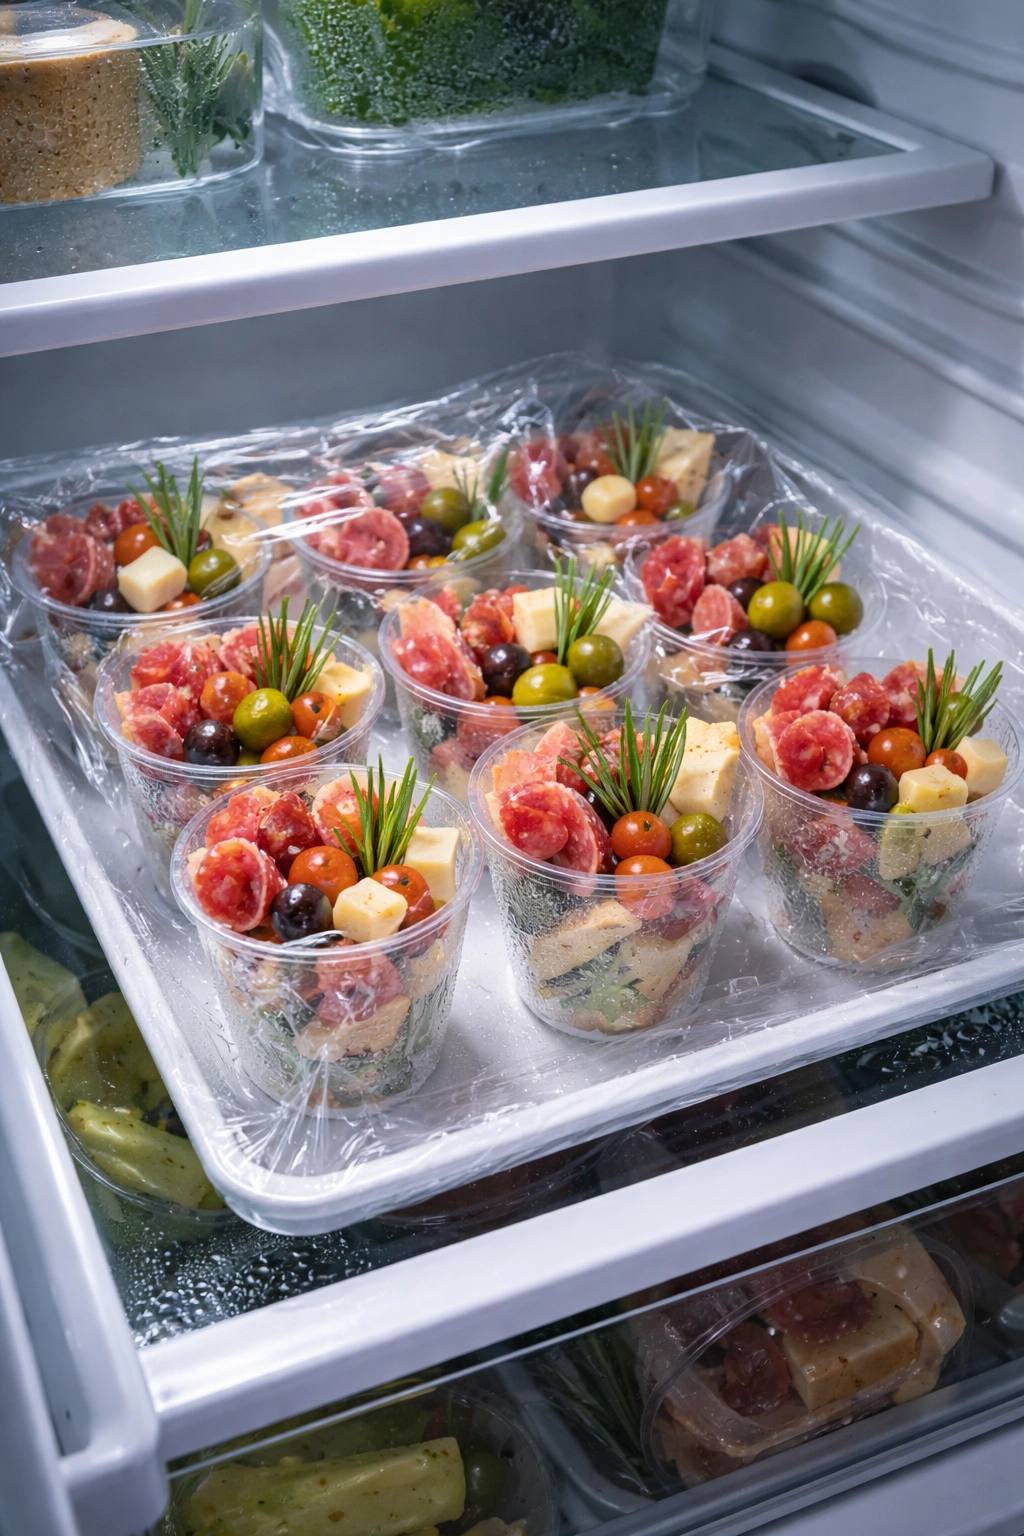
Properly stored charcuterie cups keep beautifully for the duration of a party. Once assembled and refrigerated, they’ll hold for 12 to 14 hours without any deterioration. The key is using a flat container or tray and covering them snugly with plastic wrap so they don’t dry out or absorb refrigerator odors.
If you have leftover cups after a party, they can technically be eaten the next day, but the texture and overall quality decline. Fresh vegetables will soften, cured meats will dry further, and cheeses will harden in the cold. Eat any leftover cups within 24 hours of assembly, and only if they’ve been continuously refrigerated.
For cups with fresh herbs or delicate components, eat them within a few hours of adding those elements. The herbs will wilt over time, and fresh berries lose their firmness. If you’re preparing cups for a next-day event, skip these delicate elements until the morning of the party.
Make-Ahead Freezing Considerations
The structure of a charcuterie cup doesn’t translate well to freezing because of the variety of components. Frozen and thawed cheeses develop unwanted texture changes, cured meats become tough and flavorless, and vegetables become mushy. Don’t attempt to freeze assembled cups. However, you can prepare individual dry components in advance: cube your cheeses, slice your meats and layer them between parchment, chop vegetables and store them in separate containers. This prep work speeds up assembly time without the quality issues of freezing the final product.
Final Thoughts
Charcuterie cups represent the evolution of entertaining—they maintain the elegance and sophistication of a full charcuterie board while solving all the practical problems that make traditional boards frustrating. They’re mess-free, portion-controlled, customizable, and they genuinely make guests feel taken care of. The quality of your cups comes entirely from the quality of what you put in them; there’s no technique that can compensate for mediocre ingredients, and there’s no trick that beats simply choosing excellent cheese, proper cured meats, fresh vegetables, and thoughtful flavor combinations.
The beauty of this format is that it scales. Whether you’re preparing six cups for an intimate dinner party or sixty for a catered event, the approach remains the same. You build a solid foundation, layer thoughtfully, and refrigerate until serving. There’s no last-minute plating stress, no worries about food sitting out too long, and no regret about the effort involved because honestly, the effort is minimal once you’ve done it once or twice.
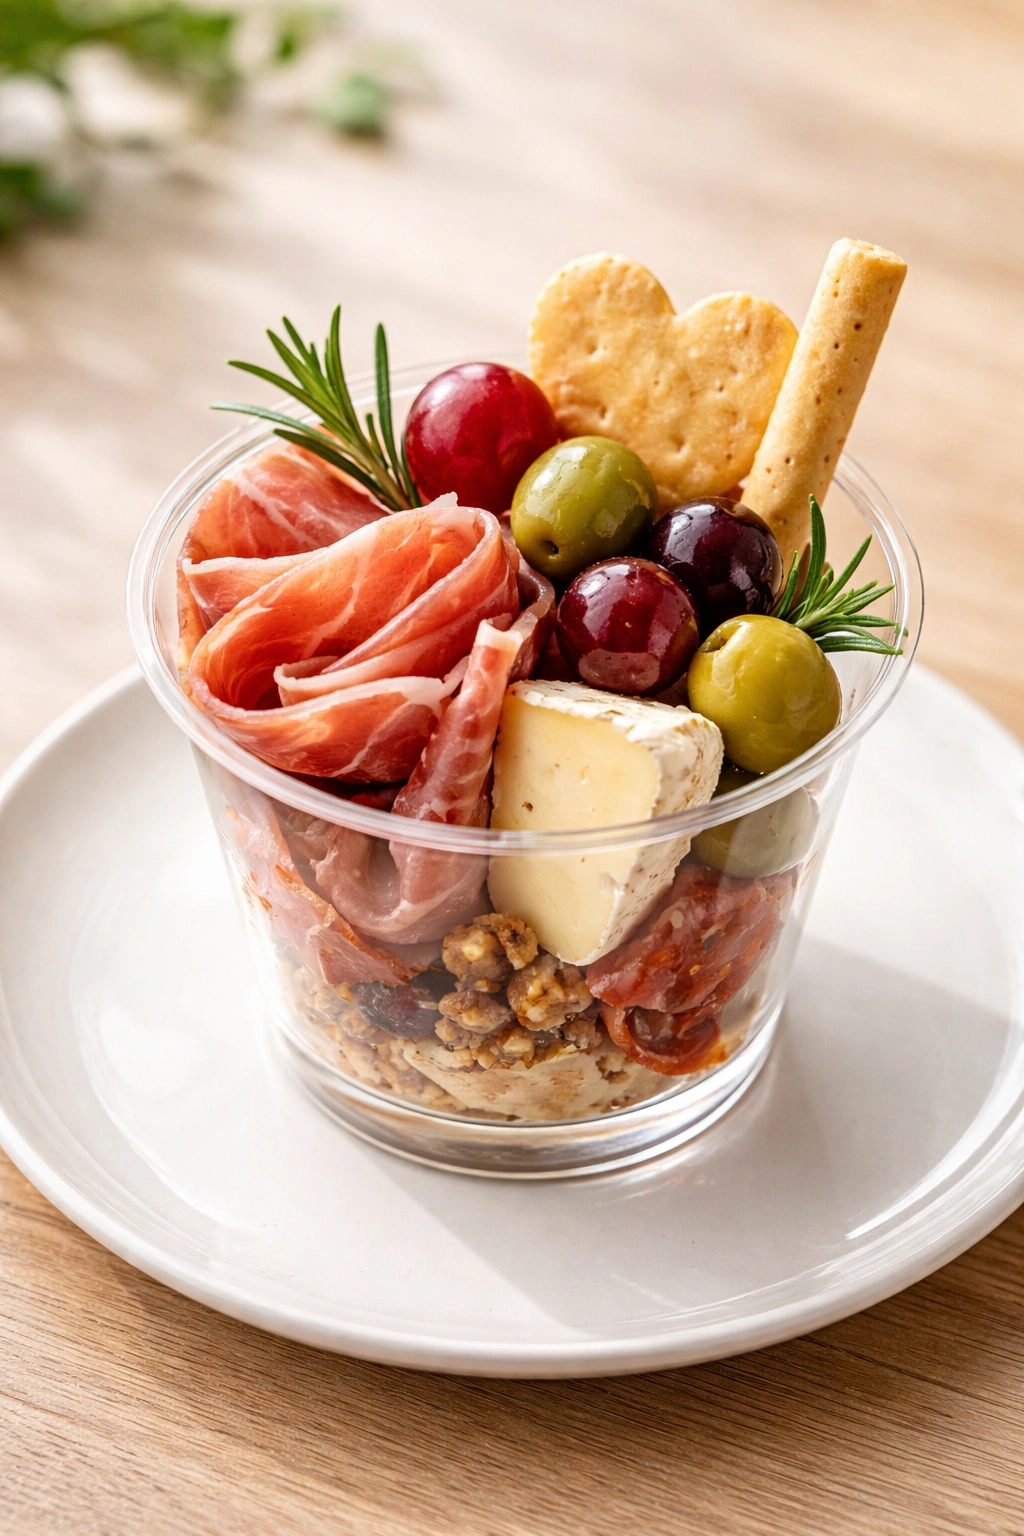
Start with one simple combination—prosciutto, aged cheddar, brie, grapes, and olives is a tried-and-true formula that’s almost impossible to get wrong. Once you’re comfortable with that basic approach, branch out into other flavor profiles that excite you. Your guests will notice the difference between a thrown-together appetizer and something that was actually thought through. That recognition—that moment when someone tastes your cup and realizes they’ve landed on exactly the right balance of flavors and textures—that’s what makes the tiny investment of planning and assembly completely worthwhile.