These little golden pockets of melted cheese are the kind of appetizer that makes you look like you spent hours in the kitchen when, in reality, you assembled them in under five minutes. The secret to their success isn’t technique or exotic ingredients — it’s the elegant simplicity of letting three or four really good components do all the heavy lifting. A sheet of quality puff pastry, sharp cheese, a touch of butter or egg wash for that deep amber color, and maybe a pinch of salt and pepper. That’s genuinely all you need to create something that tastes restaurant-quality and disappears from the serving platter before anything else.
What’s remarkable about a cheesy puff pastry bite is how the magic happens in the oven. The butter in the puff pastry releases as it heats, creating those gorgeous, shatteringly crispy layers that shatter when you bite into them. Meanwhile, the cheese melts from the inside out, getting creamy and warm and wonderfully oozy right at the center. When you pull them from the oven, they’re still puffed and light — not dense or heavy, but genuinely luxurious. Homemade versions taste better than anything you’d buy frozen because you control the cheese quality, the thickness of the bites, and how much golden color you develop on the outside.
Whether you’re making these for a party, a casual snack, or that moment when you need something impressive on short notice, this approach never lets you down. They’re reliable, they’re simple, and honestly, they taste like something you should have trained to make but didn’t need to. Let’s walk through exactly how to nail them every time.
Why Just 4 Ingredients Is Actually Brilliant
Most appetizer recipes overwhelm you with ingredient lists that stretch down the page. This one refuses to do that. The 4-ingredient approach isn’t about being minimal for minimalism’s sake — it’s about clarity. When you’re working with very few ingredients, each one has to be genuinely good quality, and their individual flavors shine instead of getting buried under a crowd of other components.
This constraint also means you’re focusing your effort where it matters. You’re not worried about getting a sauce consistency right or balancing five different spices. You’re thinking about cheese quality, pastry handling, and oven timing. Those are the three levers that actually control whether your bites turn out incredible or just okay.
It also makes shopping faster and your prep more pleasant. You’re not tracking down specialty items or obscure pantry staples. You’re picking up the same ingredients you probably already have — good puff pastry (the non-negotiable star), cheese you actually like eating, butter or an egg, and salt. That’s it. This simplicity is what makes the recipe genuinely repeatable. You can make these on a Tuesday afternoon without planning, and they’ll taste as good as something you prepped for days.
About Puff Pastry and Why Quality Matters
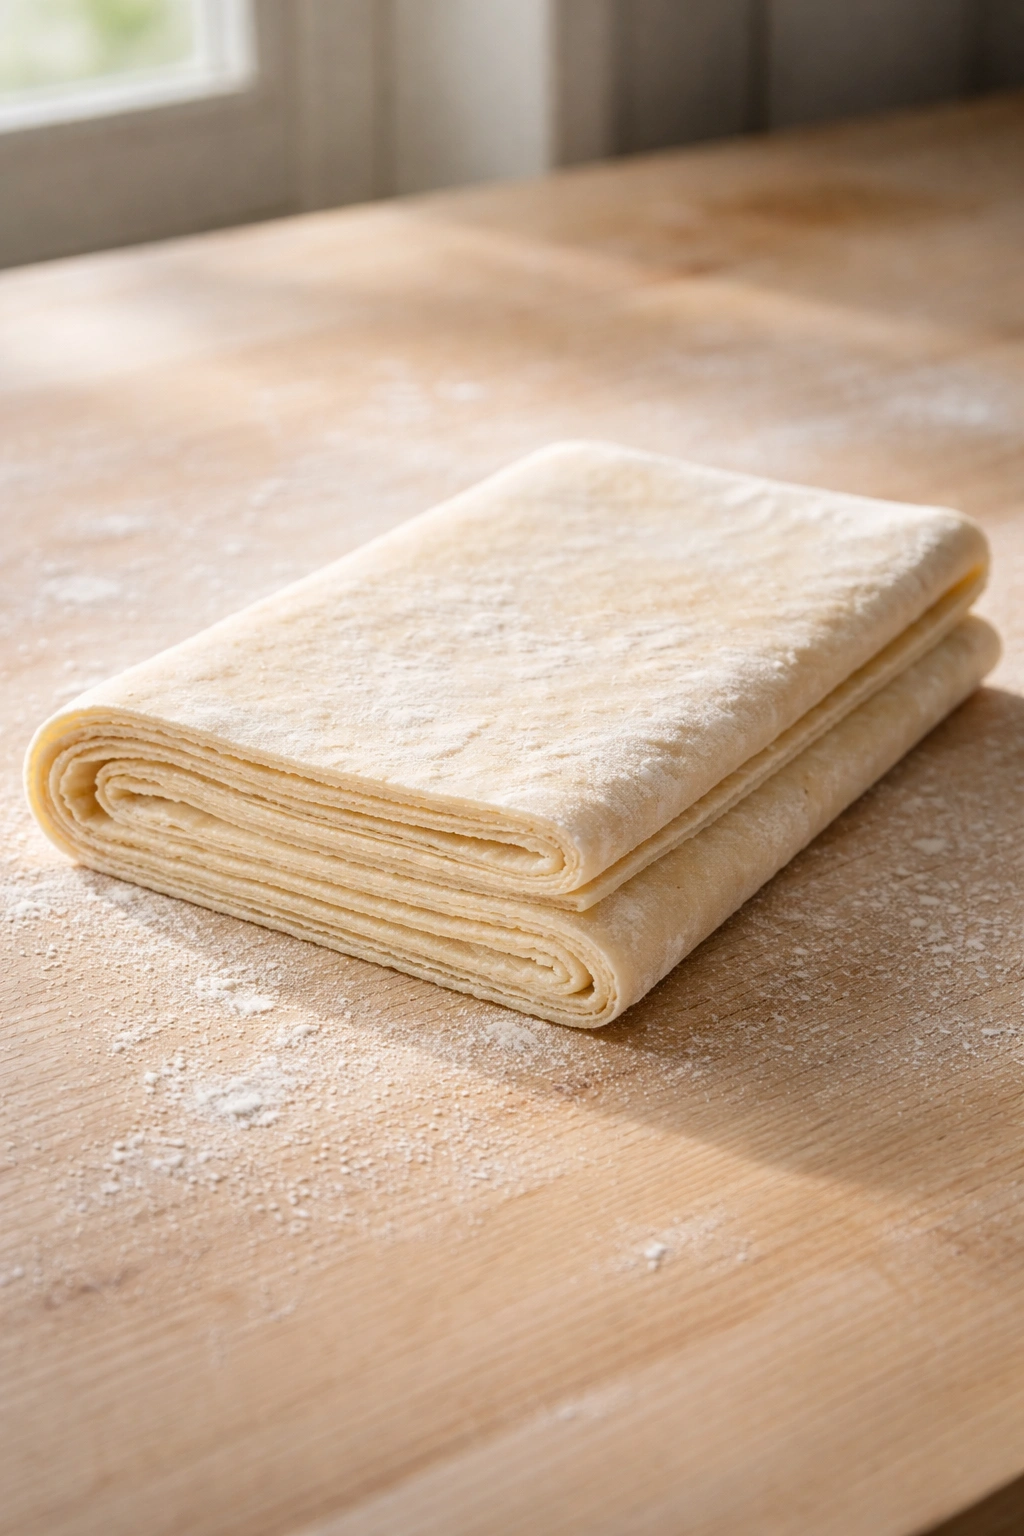
Here’s where your 4-ingredient recipe lives or dies: the puff pastry. This is the single most important ingredient, and choosing the right one completely changes the outcome. All-butter puff pastry is what you want, whether you buy it from the freezer section of your grocery store or a bakery counter. All-butter versions create deeper golden layers, taste richer, and have that satisfying shatter when you bite into them.
The alternative — puff pastry made with vegetable shortening or a mix of butter and oil — will work technically, but it won’t have the same flavor or that distinctive crispy texture. It’ll taste more like a generic frozen pastry product. All-butter pastry is worth the few extra dollars and the small effort of thawing it properly. Look for brands that list “butter” as the first fat ingredient, not hydrogenated oil or shortening.
Thawing is critical and often where people mess up. Don’t thaw your pastry in a warm kitchen or microwave it. Thaw it in the refrigerator for 30 minutes to 2 hours, depending on how thick the sheets are. Cold pastry is more cooperative — it’s less sticky, easier to cut cleanly, and it puffs better in the oven because the butter layers haven’t started melting before baking begins. If your pastry gets too warm before it hits the oven, the layers lose definition and you get a doughy, flat result instead of crispy, layered bites.
Cheese Selection for the Perfect Bite
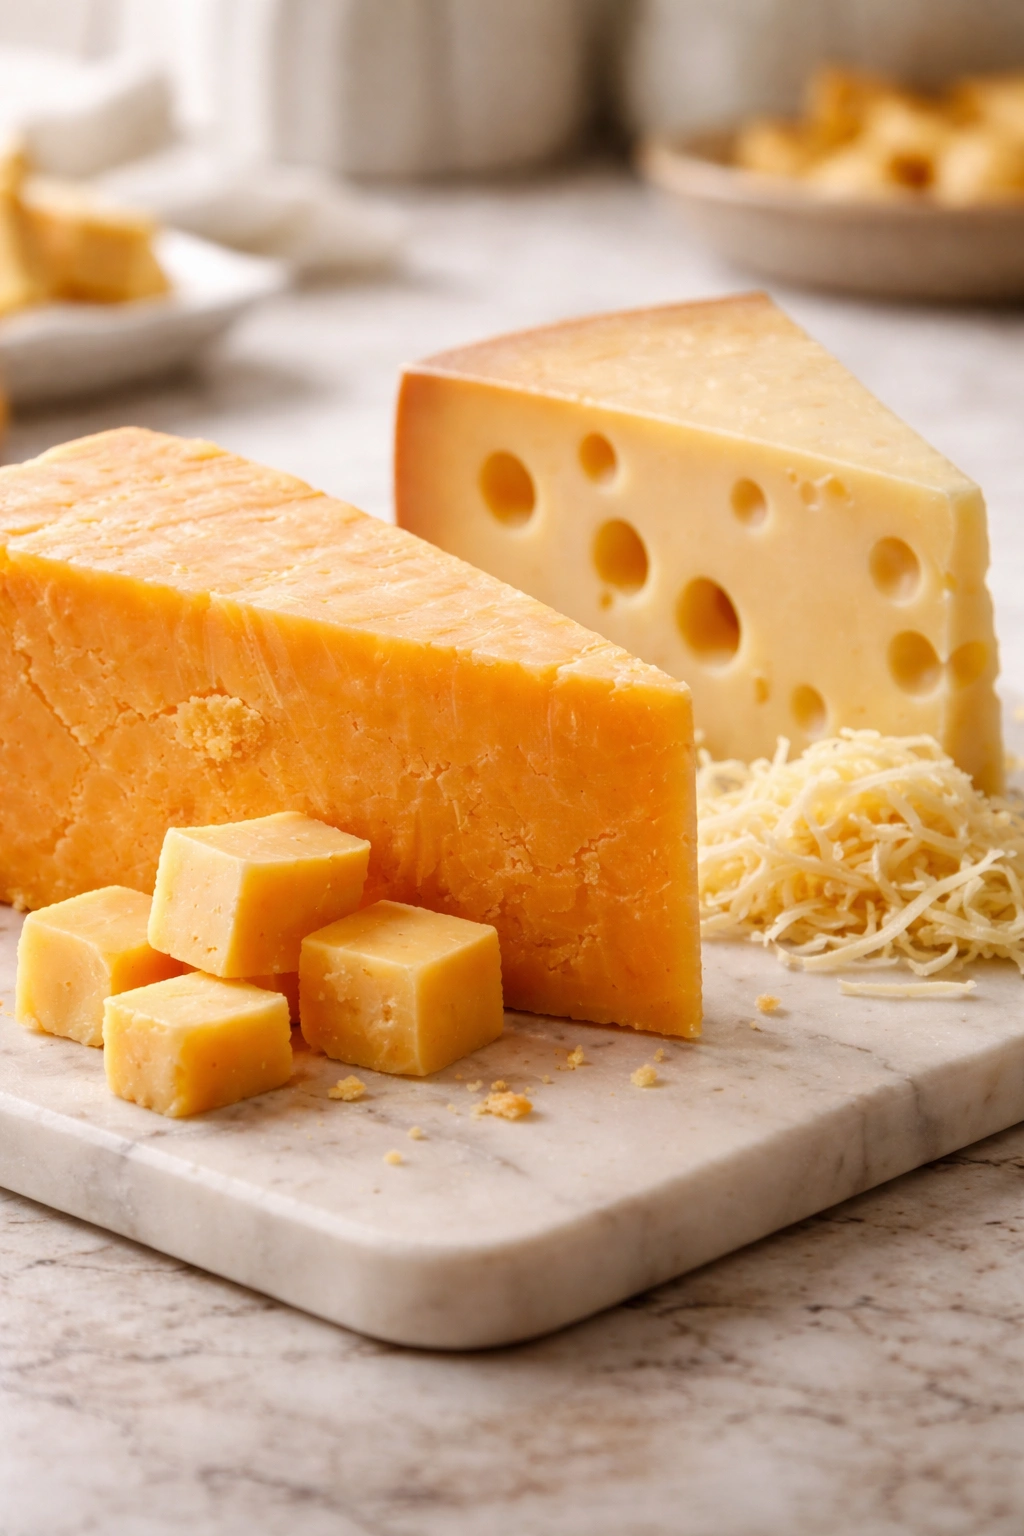
The cheese is your second star ingredient, and you have real flexibility here depending on what you love and what works with your other plans. The goal is cheese that melts smoothly, tastes bold enough to be the centerpiece, and doesn’t weep grease all over the pastry as it heats. Aged cheddar is the classic choice — sharp aged cheddar has enough depth and flavor that a little goes a long way. The older the cheddar, the more complex and butterscotch-like its flavor becomes.
Gruyère is another excellent option with a nuttier, slightly sweeter profile than cheddar. It melts beautifully and has that sophisticated edge that makes appetizers feel elevated. Some versions are saltier than others, so taste a small piece before committing to the quantity. Emmental or Jarlsberg work similarly. If you’re craving something with more personality, a combination like half aged cheddar and half Gruyère layers the flavors nicely.
Avoid fresh cheeses like mozzarella or feta — they’ll either not melt well or they’ll release too much moisture and make your pastry soggy. Processed American cheese or pre-sliced supermarket cheddar will technically work but produces a flavorless, plastic-textured result that doesn’t justify why you made these from scratch. The whole point of the 4-ingredient approach is that each ingredient gets to taste like itself. Get cheese you actually enjoy eating on its own.
Grating or shredding your cheese fresh from a block is notably better than pre-shredded cheese, which has anti-caking agents that sometimes interfere with smooth melting. A box grater makes short work of it, and you get better texture in your finished bites. If pre-shredded is your only option, it’s fine — just give it a quick chop with a knife to break up any clumps.
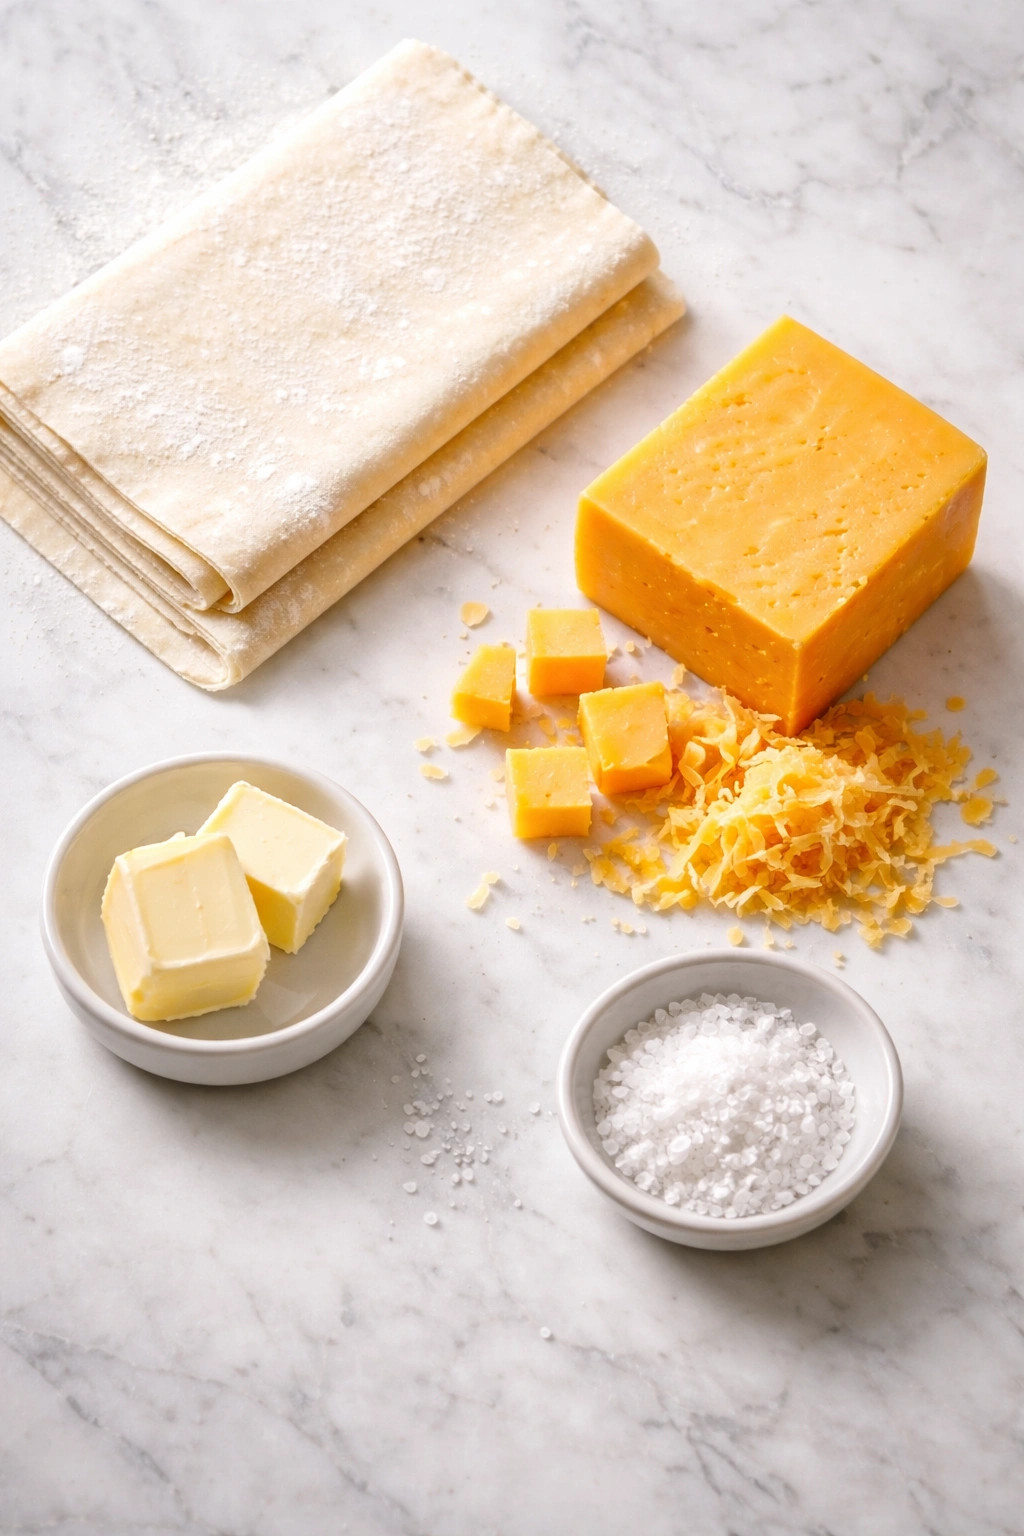
The Complete Ingredient List
Yield: Makes 24 to 32 bites | Prep Time: 10 minutes | Cook Time: 15 to 18 minutes | Total Time: 25 to 28 minutes | Difficulty: Beginner — no special equipment beyond a knife and a baking sheet; the steps are straightforward, and there’s almost no room for error.
For the Bites:
- 1 sheet (about 9×9 inches) thawed all-butter puff pastry, such as Pepperidge Farm
- 1½ cups (about 5 ounces) freshly grated sharp aged cheddar, Gruyère, or a combination
- 1 tablespoon unsalted butter, melted, or 1 egg, beaten with 1 tablespoon water (for egg wash)
- Fine sea salt and freshly cracked black pepper to taste
Step-by-Step Instructions
Prepare Your Pan and Preheat:
-
Preheat the oven to 400°F (200°C) and position a rack in the upper third of the oven.
-
Line a large baking sheet with parchment paper. This prevents sticking and makes cleanup effortless. Set it aside while you prepare the pastry.
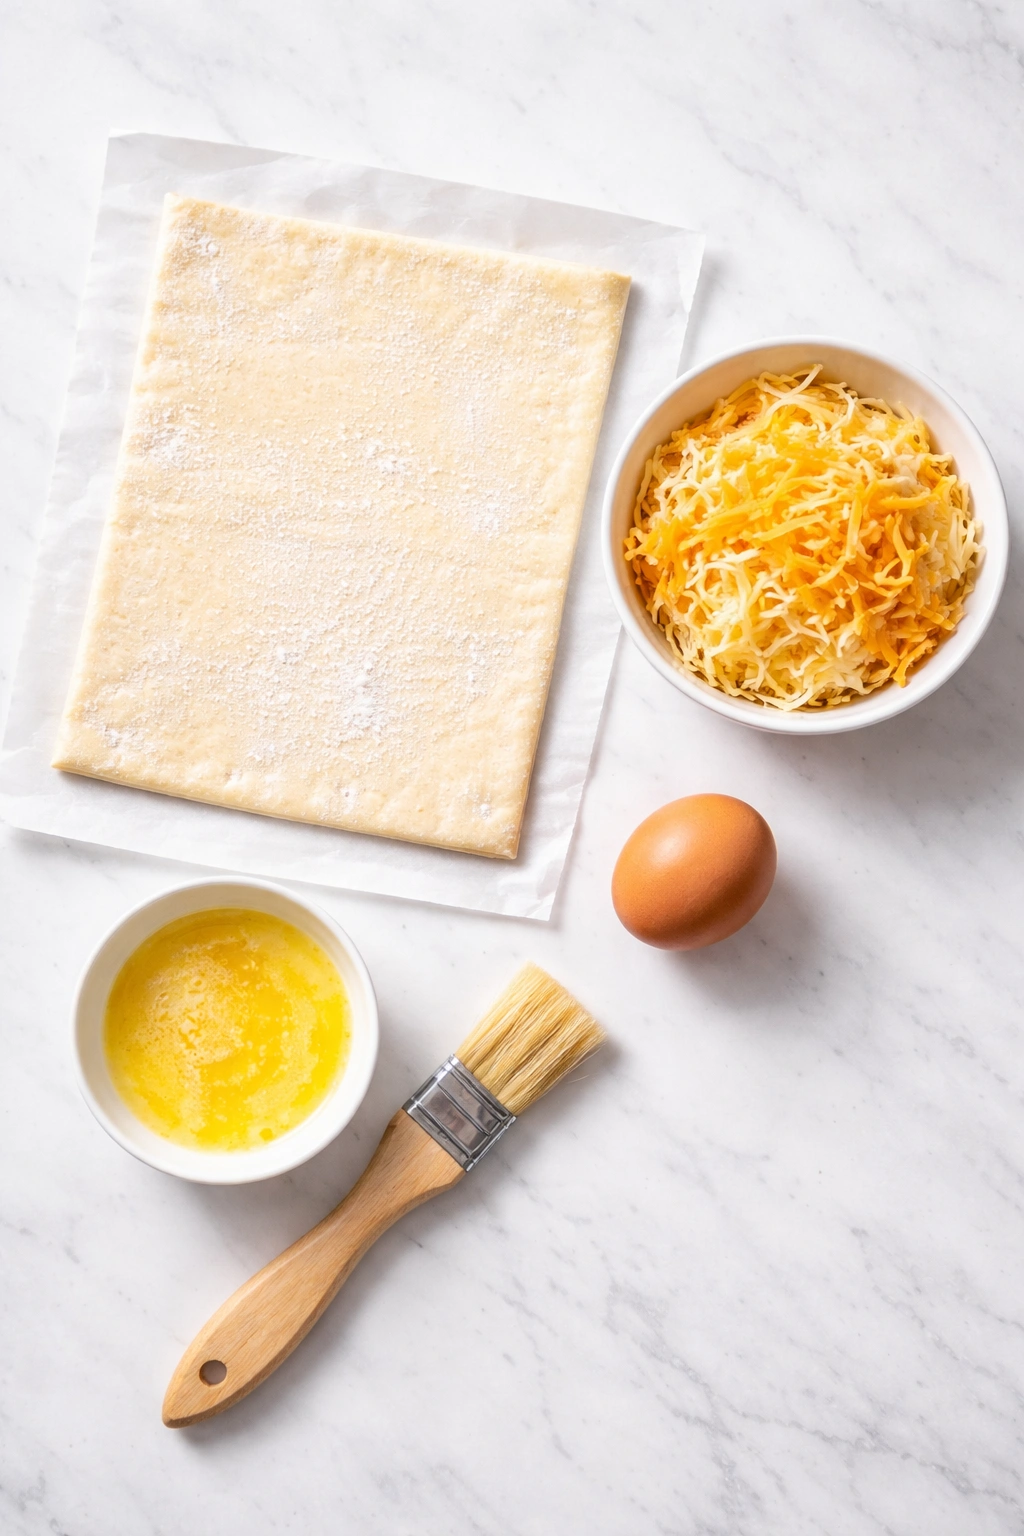
Prepare the Pastry:
-
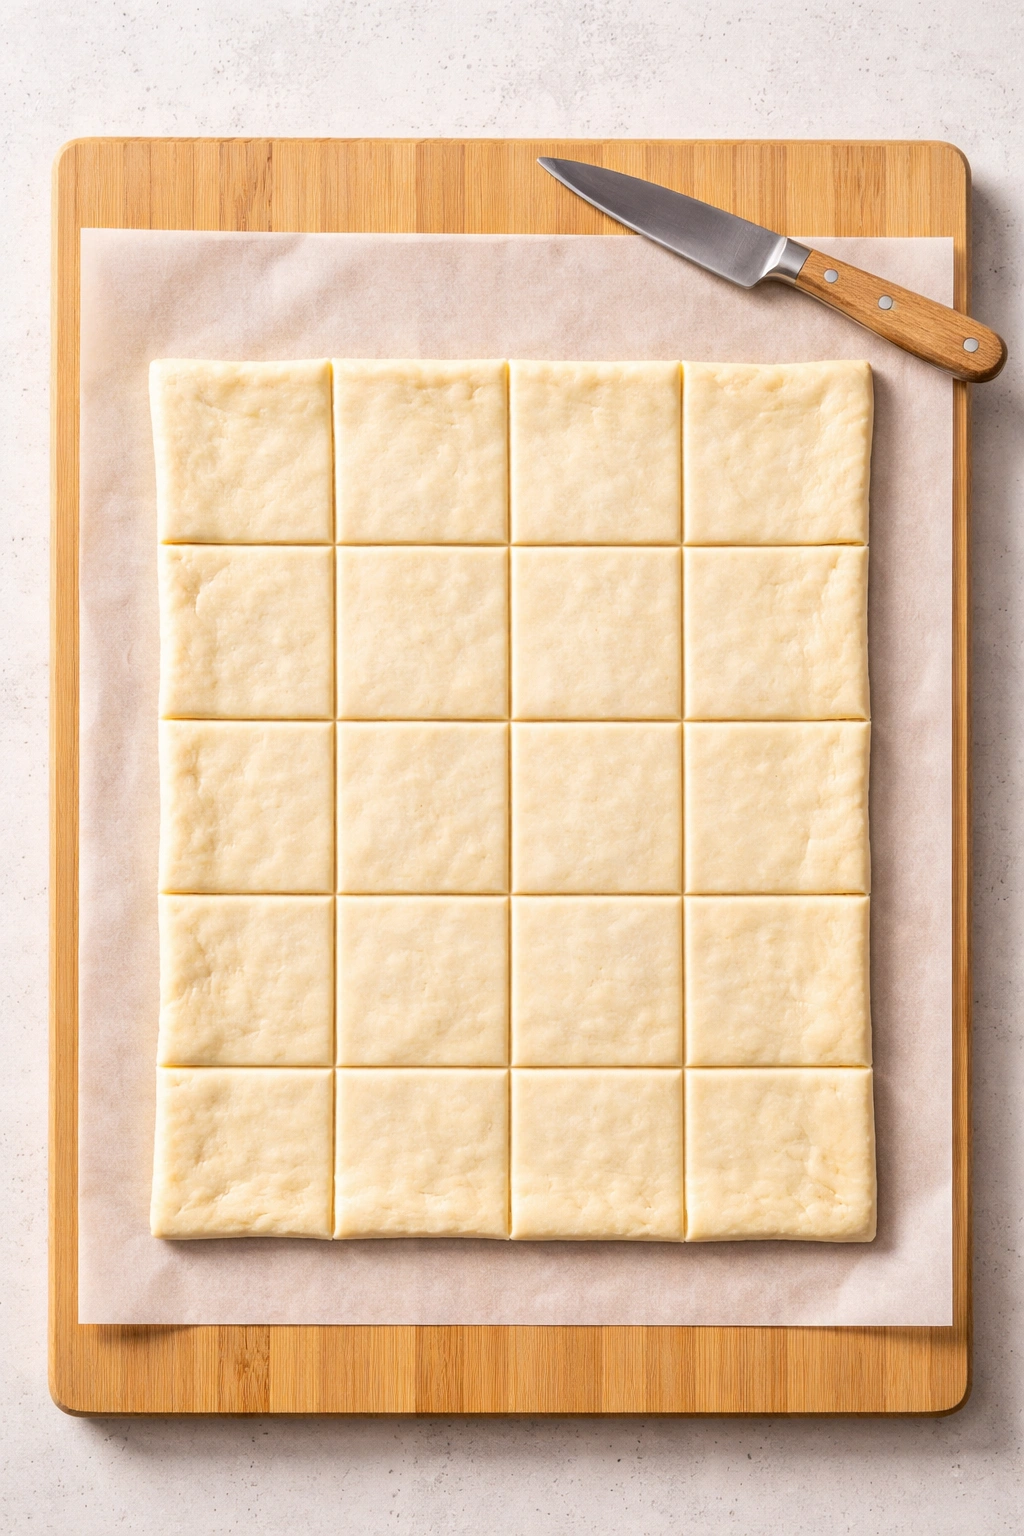
Unwrap your thawed puff pastry and lay it flat on a cutting board. Gently score the pastry into a 4×4 grid with a sharp knife, creating 16 equal squares. Don’t cut all the way through — you’re just marking where to cut. This helps you eyeball even pieces.
Advertisements -
Now cut along your score lines cleanly and decisively with a sharp knife. You should have 16 squares roughly 2 inches per side. The key is a sharp knife and a confident cut — a dull knife will drag the pastry and distort the layers. If you’re feeling adventurous, you can cut smaller 1-inch squares for 32 daintier bites, though the larger ones are easier to handle and more dramatic to eat.
-
Arrange the squares on your prepared baking sheet, leaving about ½ inch between each piece so they can puff without touching and fusing together. If your baking sheet is crowded, use two sheets instead of squishing them.
Assemble the Bites:
-
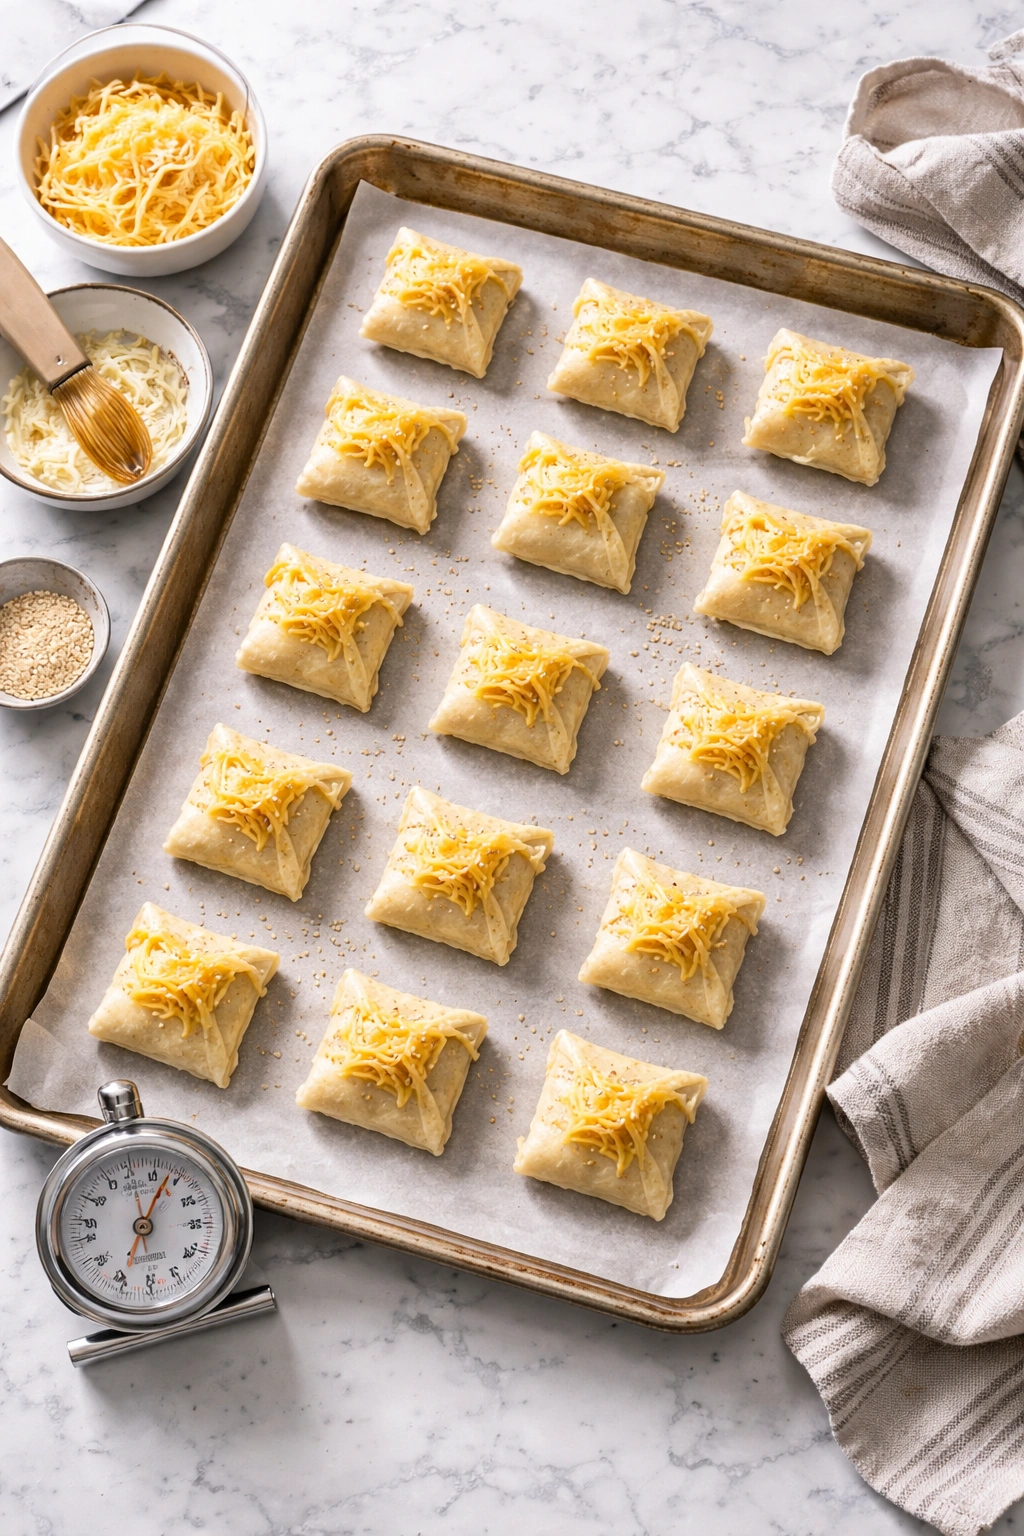
Pat the grated cheese into compact clusters so it doesn’t scatter everywhere when the pastry goes into the oven. You want roughly 1 tablespoon of cheese per square, distributed evenly across the surface of each piece.
-
Divide the cheese evenly among all the pastry squares, mounding a small heap in the center of each one. Don’t overload the cheese — too much and it’ll melt over the sides, burn on the bottom, and create a greasy mess. The cheese should look like a small generous pile on each square, leaving a thin border of bare pastry showing around the edges.
-
If you’re using melted butter for the gloss, drizzle it lightly over the cheese on each bite using a small spoon or pastry brush. If you prefer egg wash for a shinier, more golden result, use a pastry brush to dab a tiny amount on each piece — a light touch is all you need.
-
Season lightly with fine sea salt and freshly cracked black pepper. Taste your cheese first to understand its own salt level, then season accordingly. If your cheese is very salty, go easy on the additional salt. If it’s milder, a pinch per bite makes all the difference. Black pepper adds a subtle spicy note that brings out the cheese’s depth.
Bake Until Golden:
-
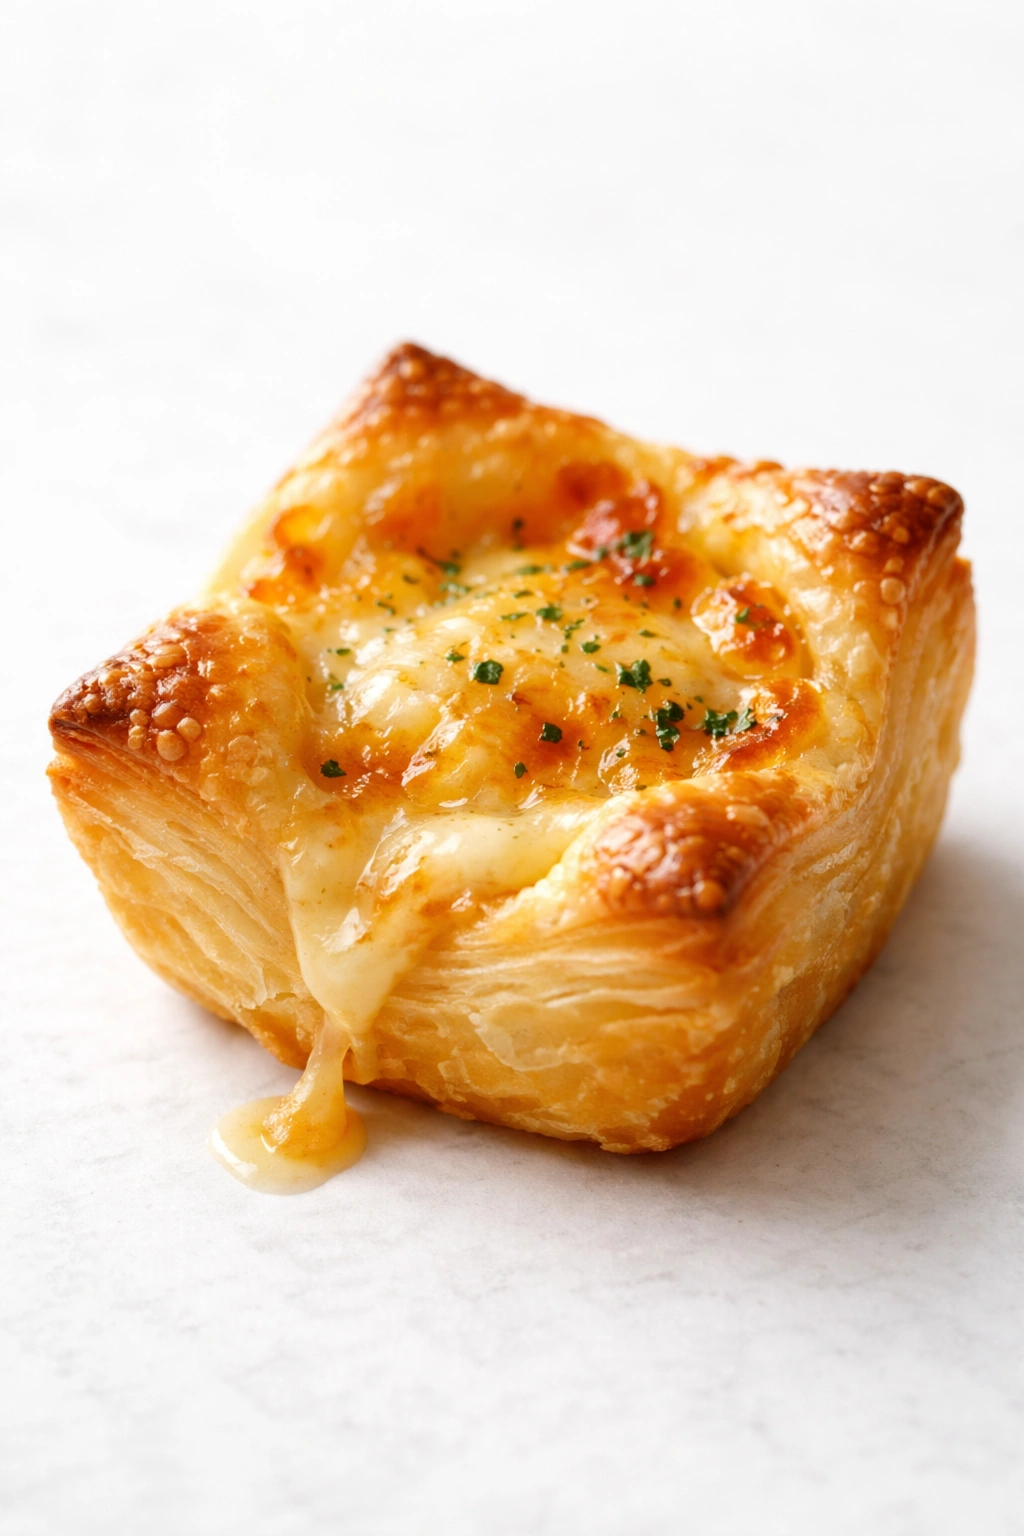
Bake for 15 to 18 minutes, watching carefully after the 12-minute mark. The pastry should puff dramatically (it’ll nearly double in height), and the cheese should be melted and golden at the edges, with some browned, crispy bits for texture. The pastry itself will turn a deep golden amber, and you’ll smell that intoxicating butter-toasted aroma that means they’re ready.
-
Remove the baking sheet from the oven and set it on a wire cooling rack. Don’t cut into them immediately — they’re still steaming internally and the cheese is dangerously hot. Wait at least 3 to 4 minutes before your first bite so the filling sets slightly and you don’t burn the roof of your mouth. They’ll firm up a bit as they cool while still staying warm.
Advertisements
Expert Tips to Avoid Common Mistakes
Most failures with these bites come from pastry-handling mistakes or oven timing, not the ingredients themselves. The most common error is thawing your pastry wrong or warming it up too much during assembly. If your puff pastry gets warm and starts sticking, just pop it back in the freezer for 5 minutes to chill it down. Cold pastry is forgiving pastry.
Another classic mistake is overloading the cheese. I know the impulse — more cheese sounds better, right? But puff pastry has structural limits. Too much cheese melts over the sides, burns on the pan, and weighs down the pastry so it doesn’t puff properly. You end up with flat, dense, greasy bites instead of light, crispy ones. Stick with that 1-tablespoon-per-bite measurement and trust the process.
Oven temperature accuracy matters more than you’d think. If your oven runs hot, your bites might brown too fast on the outside before the pastry finishes puffing. If it runs cool, they might cook through without developing that gorgeous golden color. Use an oven thermometer to verify your actual temperature, not what the dial says. A poorly calibrated oven is invisible until you taste the results.
Underbaking is tempting when you’re worried about burning them, but skip the impulse to pull them out early. The pastry needs sufficient time in the heat to develop its crispy structure and the water needs to fully escape the layers. You want deep golden amber color on the pastry, not pale golden. The darker they are (without blackening), the crispier and better they’ll taste.
Creative Flavor Variations

Once you nail the plain version, the variations are endless because the framework is so solid. Add fresh herbs directly to the cheese before assembling — ½ teaspoon of fresh thyme, rosemary, or chives mixed into your grated cheese changes the whole vibe without adding complexity. Dried herbs work too, but use half the amount since they’re concentrated.
Crumbled crispy bacon or prosciutto scattered under or over the cheese creates a salty, savory depth that makes people immediately ask what your secret ingredient is. A tablespoon of finely minced crispy bacon mixed into your cheese is all you need per batch. You could also top the cheese with a tiny pinch of smoked paprika, which adds color and a subtle smokiness that reads as “elevated” without tasting spicy.
For something slightly sweet and complex, add a small pinch of hot honey or a brush of honey mixed with a touch of cayenne or Aleppo pepper drizzled on top of the cheese before baking. The honey caramelizes and the heat balances the richness. Just keep it minimal — a light drizzle, not a glaze, or everything gets too sweet.
Fancy white cheese variations work beautifully too. A mix of crumbled goat cheese and Gruyère creates a tangy, rich combination. Taleggio or another washed-rind cheese gets incredibly aromatic when melted and creates an unexpectedly sophisticated bite. Fresh black truffle oil or white truffle oil drizzled over warm bites post-baking is simple sophistication, though it’s expensive and really only worth it if you’re impressing specific people.
Spicy versions work for crowds that like heat. Red pepper flakes mixed into the cheese, a tiny bit of cayenne, or freshly cracked black pepper with some smoked paprika and a touch of hot sauce on the pastry before baking creates compelling heat without overwhelming the cheese. The key with any spicy addition is restraint — you want people to taste the bite first and then notice the heat, not bite into something that makes them cough.
Making Them Work for Dietary Needs

These bites are naturally vegetarian, which covers a good portion of dietary restrictions right there. For vegan versions, vegan puff pastry exists and works fine, though it’s harder to find. Vegan cheese is your challenge — it doesn’t melt as smoothly as dairy cheese. Brands like Miyoko’s or Violife melt better than earlier generations of vegan cheese, and cashew-based cheeses have surprisingly good texture. You might need to extend the baking time slightly since vegan cheese takes longer to soften.
Gluten-free puff pastry is available in most grocery stores’ frozen section and behaves almost identically to regular pastry, though it’s often more fragile and prone to tearing. Handle it with slightly more care and allow it to warm to room temperature before cutting so it’s less brittle. The baking time usually stays the same.
Dairy-free but not vegan? Use dairy-free butter for the gloss and regular cheese. Some people do the reverse — dairy-free cheese with regular butter. The result is still good, just slightly different in mouthfeel. Experiment with what you have or what matters most to your dietary needs.
For low-FODMAP diets, these bites are fine as long as you use low-FODMAP cheese (most aged hard cheeses are) and avoid garlic or onion additions. Stick with herbs like thyme, rosemary, or chives. For keto, these are excellent — low-carb, high-fat, protein-rich. The pastry has carbs, so they’re not strict keto, but they’re not terrible in a pinch.
Storing, Freezing, and Make-Ahead Guide
Baked bites keep at room temperature for 1 day in an airtight container, though they taste best eaten the same day within a few hours of baking. The pastry gradually loses crispness as it absorbs moisture from the environment and the cooled cheese. If you need them to stay crispy longer, store them in a single layer uncovered in a cool, dry place so air can circulate around them, but this only adds a few hours to their window.
Refrigerate cooled bites for up to 3 days in an airtight container. Reheat them in a 325°F (160°C) oven for about 5 minutes to re-crisp the pastry and warm the cheese back up. The microwave will make them soggy, so avoid that temptation. A toaster oven works beautifully if you’re reheating just a handful.
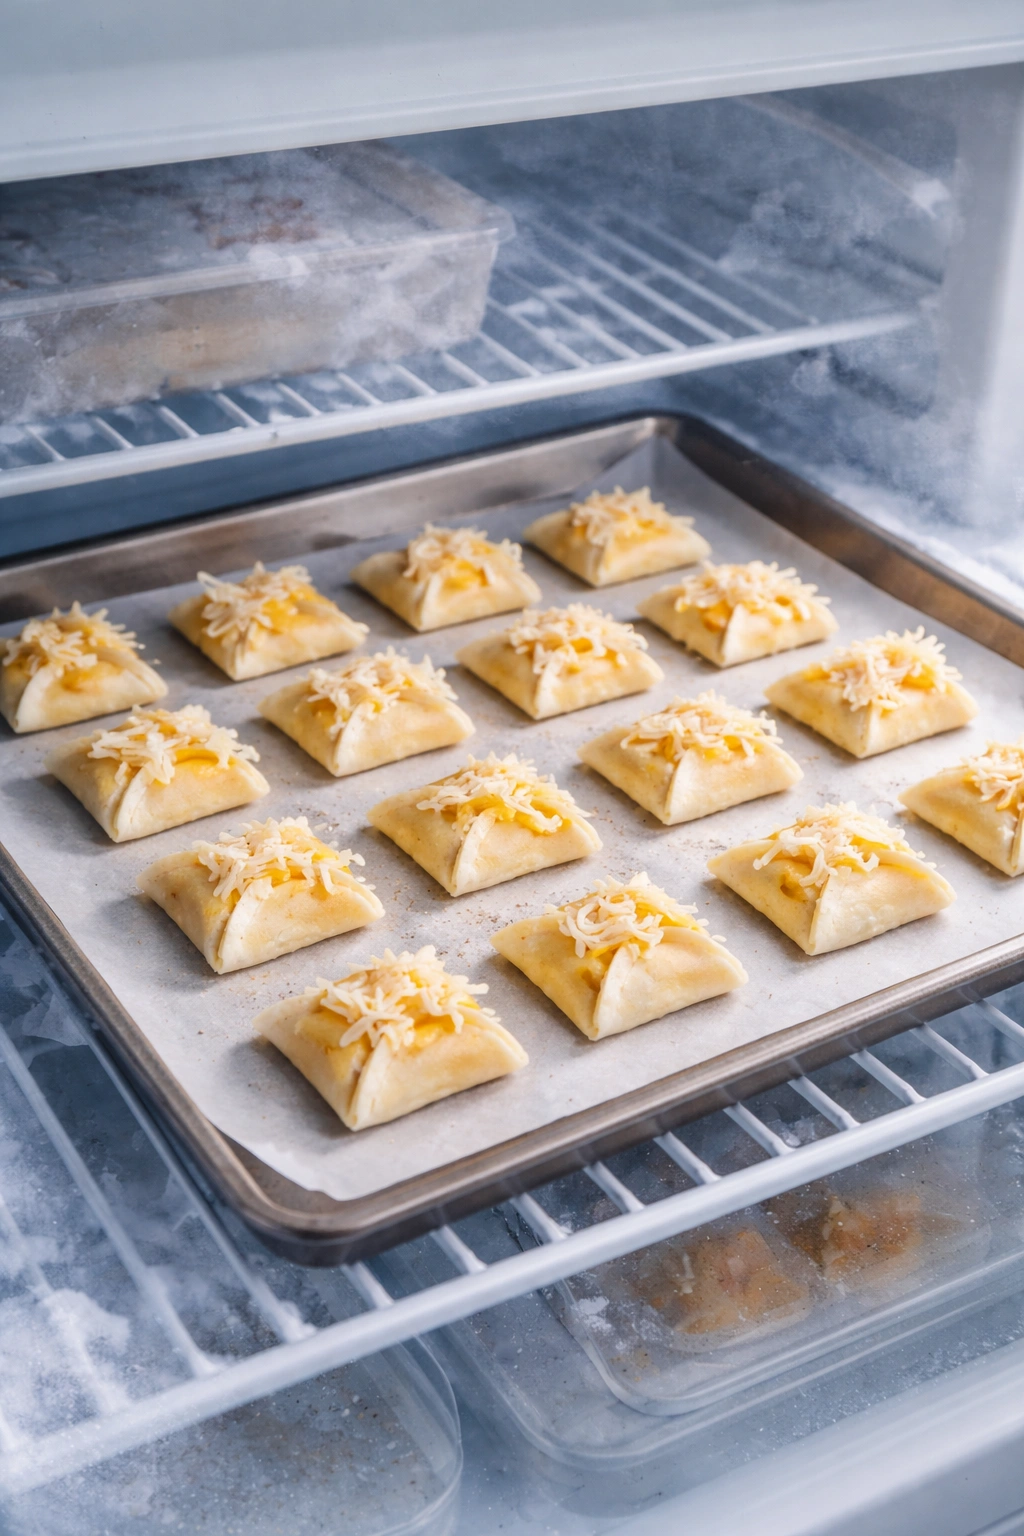
Freeze unbaked assembled bites, which is the real game-changer for entertaining. Arrange the assembled (but unbaked) bites on a baking sheet, freeze them uncovered for about 1 hour until the cheese is solid, then transfer them to a freezer bag or container. They keep frozen for up to 3 months. When you’re ready to bake, transfer them straight from the freezer to your preheated oven — don’t thaw them first. Add 2 to 3 minutes to the baking time since they’re starting cold, but they’ll bake beautifully.
You can also freeze baked bites for up to 2 weeks in an airtight, freezer-safe container. Thaw them at room temperature for 20 minutes, then reheat in a 325°F oven for 5 minutes to refresh the pastry and warm the cheese. The quality is better with unbaked freezing, but frozen baked bites are convenient if you’ve miscalculated quantities.
Impressive Serving Presentations

These bites are visually gorgeous if you plate them with intention. Arrange warm bites in a pyramid or tower formation on a white plate or wooden board for visual height and drama. Serve them standing up on one edge so the golden pastry and melted cheese are visible from the front, not face-down on a flat surface.
A scattering of fresh herbs — microgreens, small basil leaves, or fresh thyme sprigs — on the platter around the bites adds color and reads as more refined than serving them naked. A tiny pinch of fleur de sel or finishing salt sprinkled over a few of them draws the eye and signals care.
For a cocktail party, arrange them on small pieces of parchment paper so guests can grab them easily without getting greasy fingers. Provide small cocktail napkins nearby. If you’re doing a composed cheese board or charcuterie spread, cluster cheesy puff pastry bites in one corner with complementary items — a small pot of fig jam, some candied nuts, perhaps a small handful of arugula or microgreens.
Serve them warm from the oven if at all possible, as the cheese is most luxurious at that temperature. If you’re making a large batch and baking them in waves, keep finished bites warm in a low oven (200°F / 95°C) on a clean baking sheet covered loosely with foil for up to 30 minutes. They’ll lose some crispness but stay hot and inviting.
Perfect Pairings and Hosting Ideas

These bites pair beautifully with champagne or sparkling wine — the acidity cuts through the richness of the cheese and pastry in a satisfying way. Dry white wines like Sauvignon Blanc or Pinot Grigio work wonderfully. For red wine drinkers, a light, cool Pinot Noir or Beaujolais won’t overwhelm the delicate pastry.
For non-alcoholic pairings, sparkling water with lemon feels appropriately elegant, or a bright tomato juice with a touch of hot sauce offers contrast. Serve the bites with a small bowl of Dijon mustard mixed with a touch of honey, or a spicy aioli, or even hot honey on the side for dipping. Even though they’re complete on their own, a dipping sauce makes the experience feel more interactive and special.
Pair them with a simple green salad as a light appetizer before dinner. The freshness and acidity of dressed greens balance the richness perfectly. Or make them the centerpiece of a wine and cheese gathering alongside fresh fruit, olives, and some cured meats. They’re sophisticated enough for that context.
For casual entertaining, serve them alongside other easy appetizers that don’t compete for oven space. Crudités with a dip, a charcuterie board, or something cold like shrimp with cocktail sauce lets you focus your oven energy on these bites. Since they only need 15-18 minutes of baking, they’re the perfect timing component of a party strategy — bake them right before guests arrive and serve them warm.
Troubleshooting Common Issues
If your bites don’t puff, it’s almost always because the oven temperature was too low or the puff pastry was overworked or warmed during assembly. Puff pastry needs precise heat to create steam between its butter layers, which is what causes it to rise. Verify your oven temperature with a thermometer. Make sure your pastry stayed cold until the moment it went into the oven.
If they’re golden on the outside but the cheese inside is barely melted, your bites came out too early. The pastry and cheese finish cooking at slightly different rates, and it’s tempting to pull them out when the pastry looks done. Wait until you see the cheese visibly bubbling at the edges — that’s your signal they’re truly finished inside.
If they’re flat and greasy instead of puffed, you likely overloaded the cheese or your pastry was too warm before baking. The weight of excess cheese presses down on the pastry and prevents rise. Cold pastry is essential — if yours seemed at all sticky during assembly, it was too warm.
If the bottoms are burning while the tops are still pale, your oven rack is too low. Move the baking sheet to the upper third of the oven. If only the edges are burning and the centers are fine, the oven heat is uneven — rotate the pan halfway through baking next time.
If they taste greasy instead of buttery, you likely used too much butter for the egg wash or drizzle. A light brushing or minimal drizzle is all you need. The pastry already contains plenty of butter, so you’re just adding a light gloss to encourage browning, not drenching them.
Final Thoughts

These little bites represent something important in cooking: the idea that constraint breeds creativity and simplicity often tastes better than complexity. You’re not trying to hide weak flavors under a pile of additions. You’re letting good cheese and good pastry be exactly what they are, with just enough preparation to make them shine.
The genius of making them is that you’ve done almost nothing, and yet they taste like something you studied. You’ve outsourced the real technical work — the lamination of the puff pastry — to someone who specialized in it, and you’re just assembling and baking. This is cooking at its most efficient and most pleasurable.
They’re the kind of appetizer that works for almost any occasion. A weeknight snack when you’re craving something special. A party appetizer that disappears faster than you expected. A bridge item between courses at a dinner. A contribution to a potluck that people remember. The 4-ingredient approach means you can make them on impulse without a shopping trip or advance planning. Keep puff pastry and good cheese on hand, and you’re always 20 minutes away from something restaurant-quality on your table.