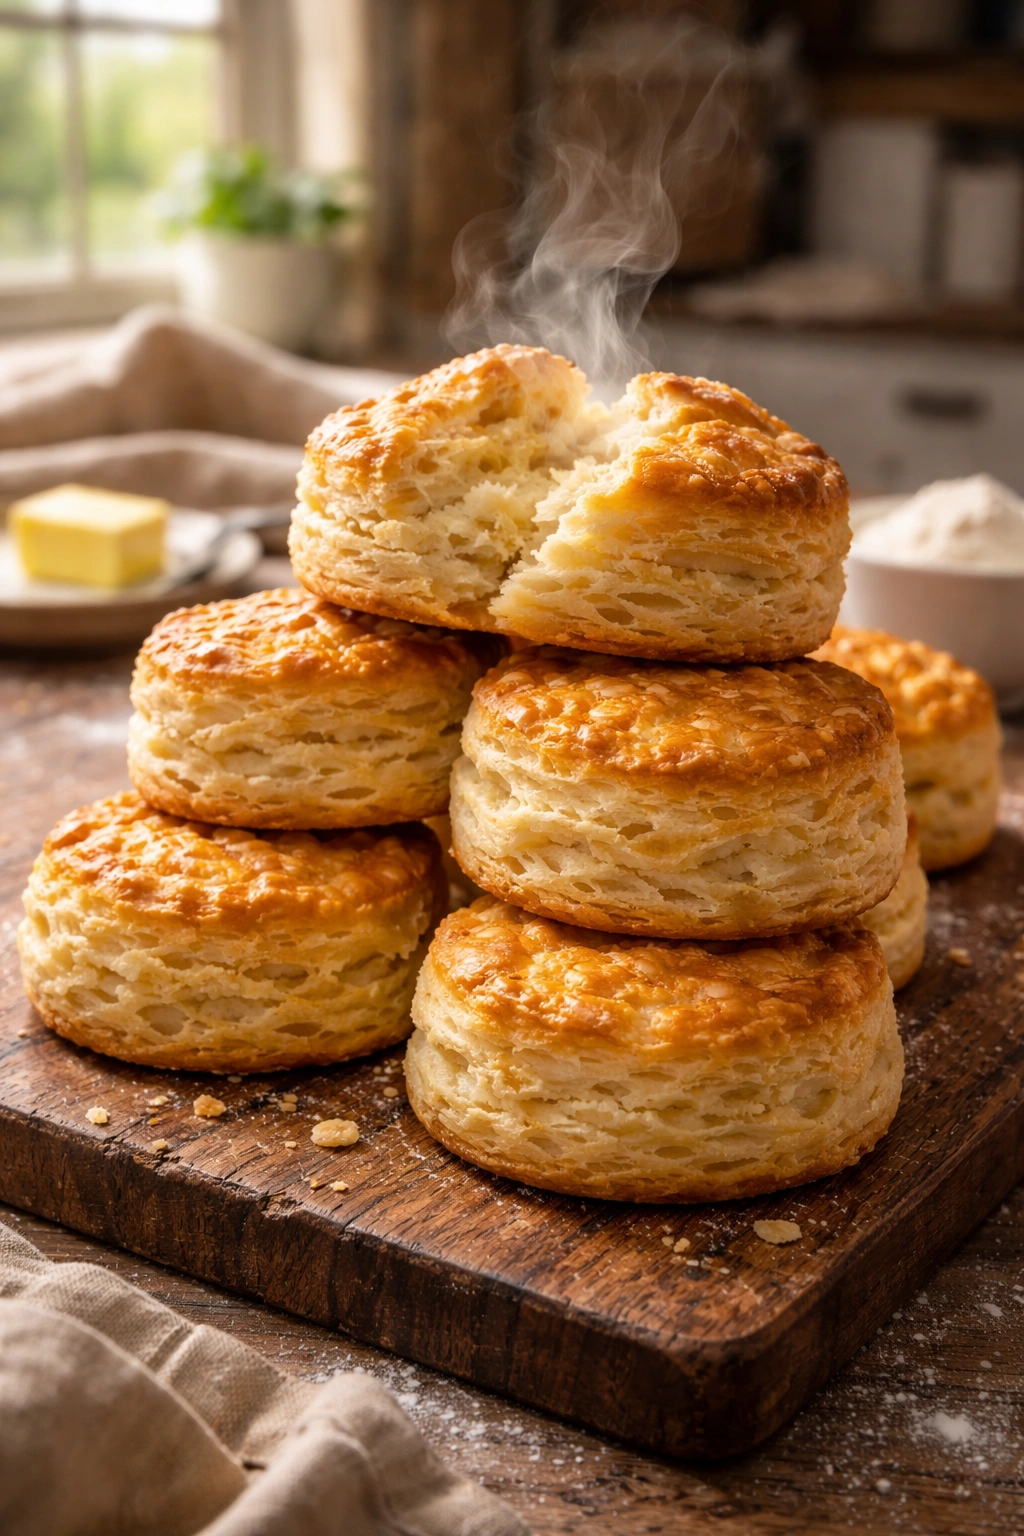
There’s a moment that separates a good biscuit from a truly exceptional one—it happens when you break one open and steam rises from dozens of delicate, shattered layers that practically dissolve on your tongue. That’s the moment when all the care you took actually pays off. The thing is, most people assume that kind of biscuit requires some kind of food processor hack, a special ingredient, or a technique so finicky you need pastry school credentials just to attempt it. That’s backwards. The best flaky buttery biscuits don’t come from shortcuts—they come from understanding exactly what makes layers form and respecting a few non-negotiable details during mixing and baking.
The gap between a dense, tough biscuit and a tender, flaky masterpiece isn’t about magic or expensive equipment. It’s about why you do each step, when you do it, and how you do it without overworking the dough. Once you understand the mechanism—cold butter creating pockets of steam, gentle handling that preserves those pockets, and dry heat that sets the layers before they have a chance to compress—everything becomes clearer. You’ll stop second-guessing yourself and start making biscuits that are genuinely better than anything a bakery sells.
This recipe uses techniques that have worked for generations because they’re based on flour science and butter physics, not trends or Instagram aesthetics. You’ll use ingredients you already have, equipment sitting in your kitchen right now, and a method that’s actually faster than you’d expect. By the end of this article, you won’t just have a biscuit recipe—you’ll understand biscuits deeply enough that you can troubleshoot any problem and adapt the recipe confidently.
Why Homemade Biscuits Beat Store-Bought Every Time
Store-bought biscuits contain emulsifiers, dough conditioners, and shelf-stable fats that create a texture that’s uniform and fine—which also means it’s boring and forgettable. The moment you taste a genuinely fresh, homemade biscuit, the difference becomes impossible to ignore. Real butter has a flavor that no substitute can replicate, and fresh-baked warmth releases those buttery aromas into every bite in a way that room-temperature packaged biscuits simply cannot.
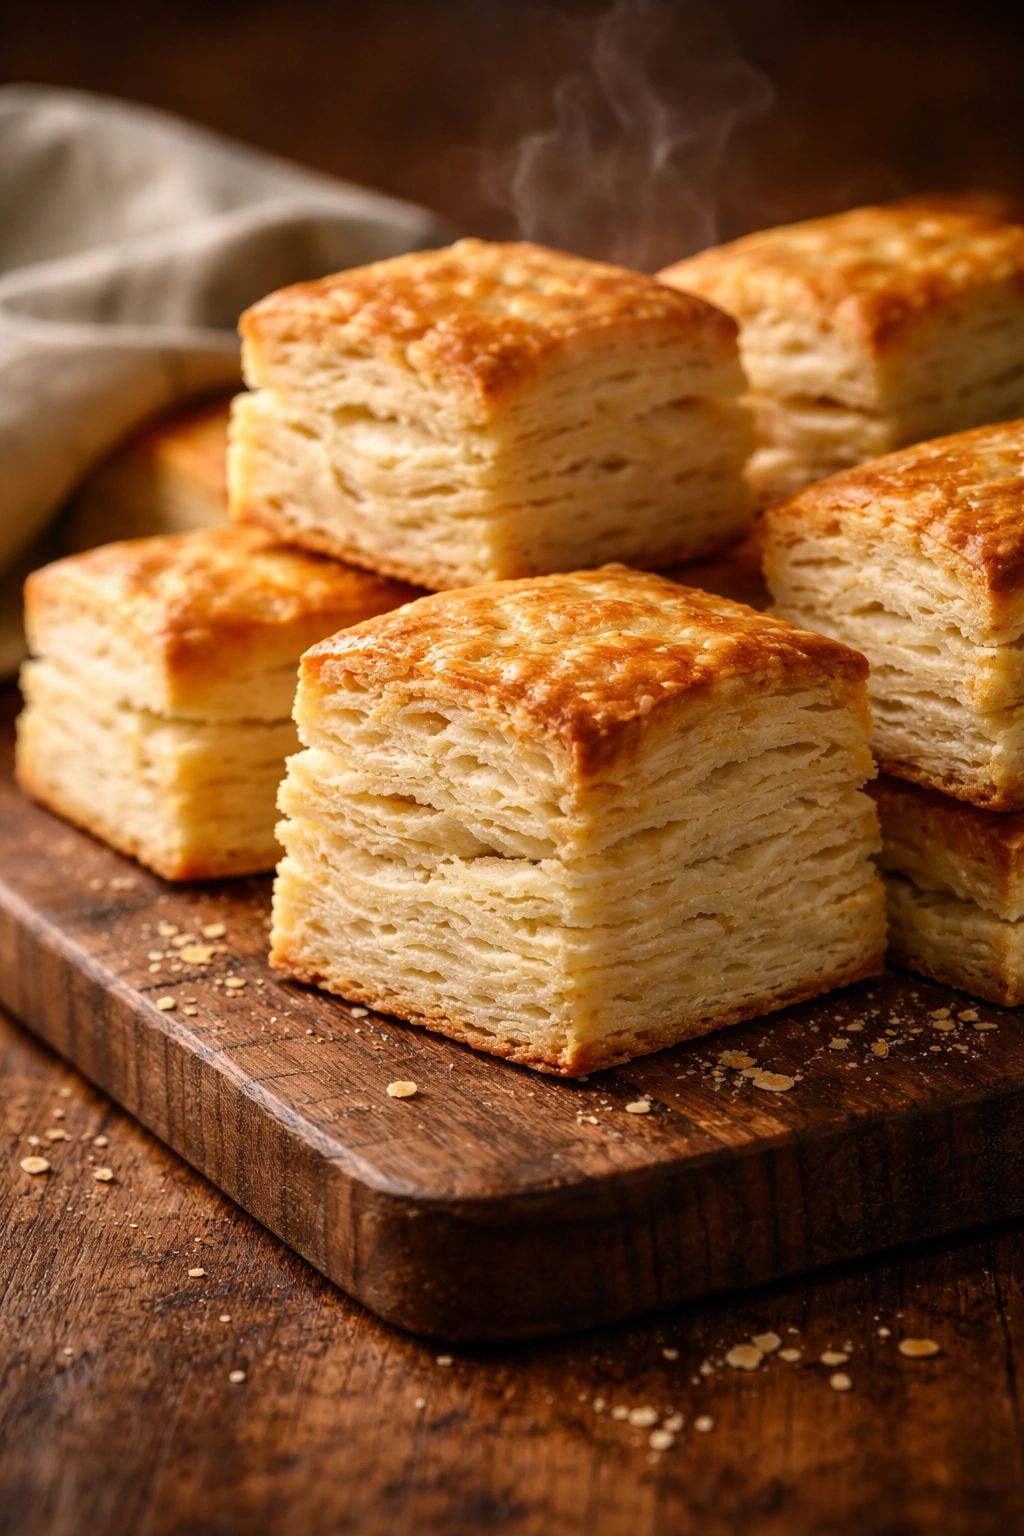
There’s also a texture difference that matters more than most people realize. Homemade biscuits develop irregular, uneven layers—those craggy, broken surfaces that catch light and look rustic and real. That texture comes from the butter particles staying distinct throughout the mixing and rolling process, creating little walls between layers of dough. Those walls steam during baking, puffing up the layers and creating that shatter-when-you-touch-it texture that defines a great biscuit.
The speed advantage surprises most people too. A batch of eight to ten biscuits takes about twenty minutes of active hands-on time from measuring to oven, and you’ve got fresh-baked breakfast or dinner bread ready in under an hour total. That’s not more work than running to a bakery or heating pre-made biscuits from a can—it’s actually faster once you’ve made them a couple of times and your hands know the feel of properly mixed dough.
The Science of Flaky, Buttery Layers
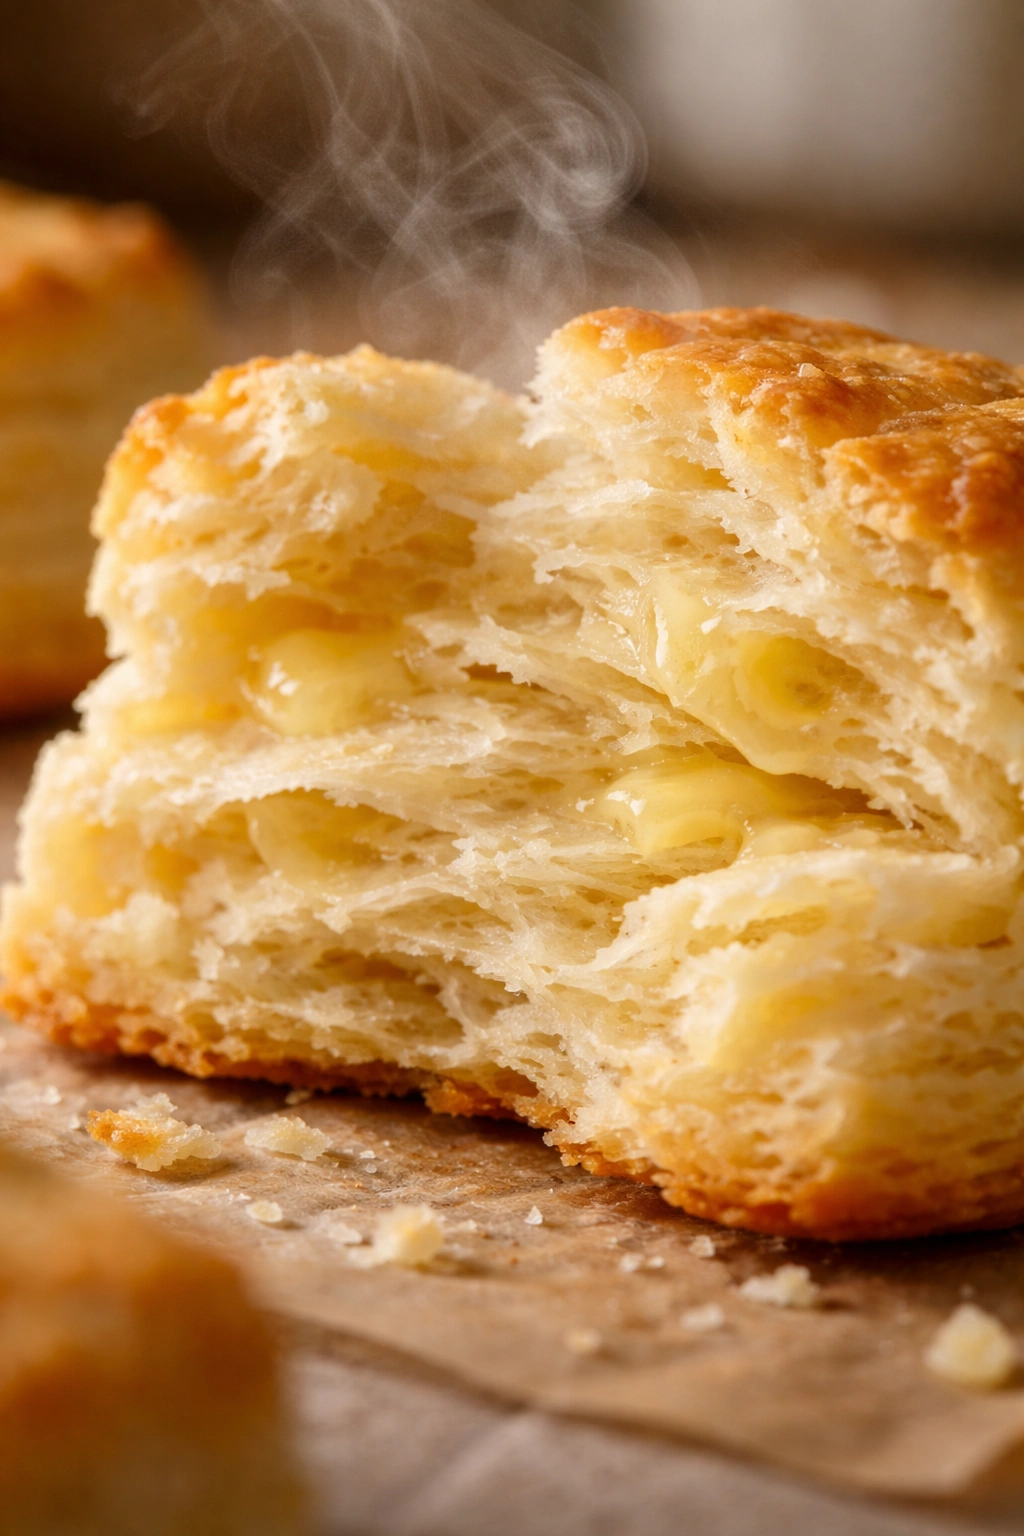
Understanding flakiness starts with understanding what butter does in biscuit dough. Unlike cake or cookie dough, where you cream butter and sugar together to incorporate air throughout the entire mixture, biscuit dough keeps the butter in distinct, separate particles. Each little piece of cold butter is surrounded by flour, and when heat hits that butter in the oven, it melts and creates steam. That steam separates the dough layers, puffing them up and creating the flakiness you’re after.
This is why temperature control matters so much more than most recipes acknowledge. Warm butter mixes smoothly into the dough, disappearing completely—and that sounds efficient, but it actually prevents flakiness. You want the butter to stay visible as small, pea-sized pieces even after you’ve mixed everything together. Those visible pieces are exactly what you’re looking for.
The second critical factor is moisture—or more specifically, the right amount of moisture. Too little moisture and the dough becomes impossible to work with and bakes into something tough and crumbly. Too much moisture and the dough becomes sticky and dense, and the layers fuse together instead of staying separate. The water in the recipe does two things: it hydrates the flour so it develops structure, and it creates the steam that actually puffs the layers. Getting this balance right is where real biscuit-making separates from guesswork.
Lamination—the technique of folding dough repeatedly to create layers—is what makes these biscuits genuinely exceptional. Each fold redistributes the butter and creates new surfaces for steam to work on. You’re not actually folding the dough like you would a croissant or Danish; instead, you’re using a gentle folding motion to encourage the butter to create more distinct layers without overworking the gluten. That restraint is crucial.
Essential Equipment and Ingredients for Perfect Biscuits
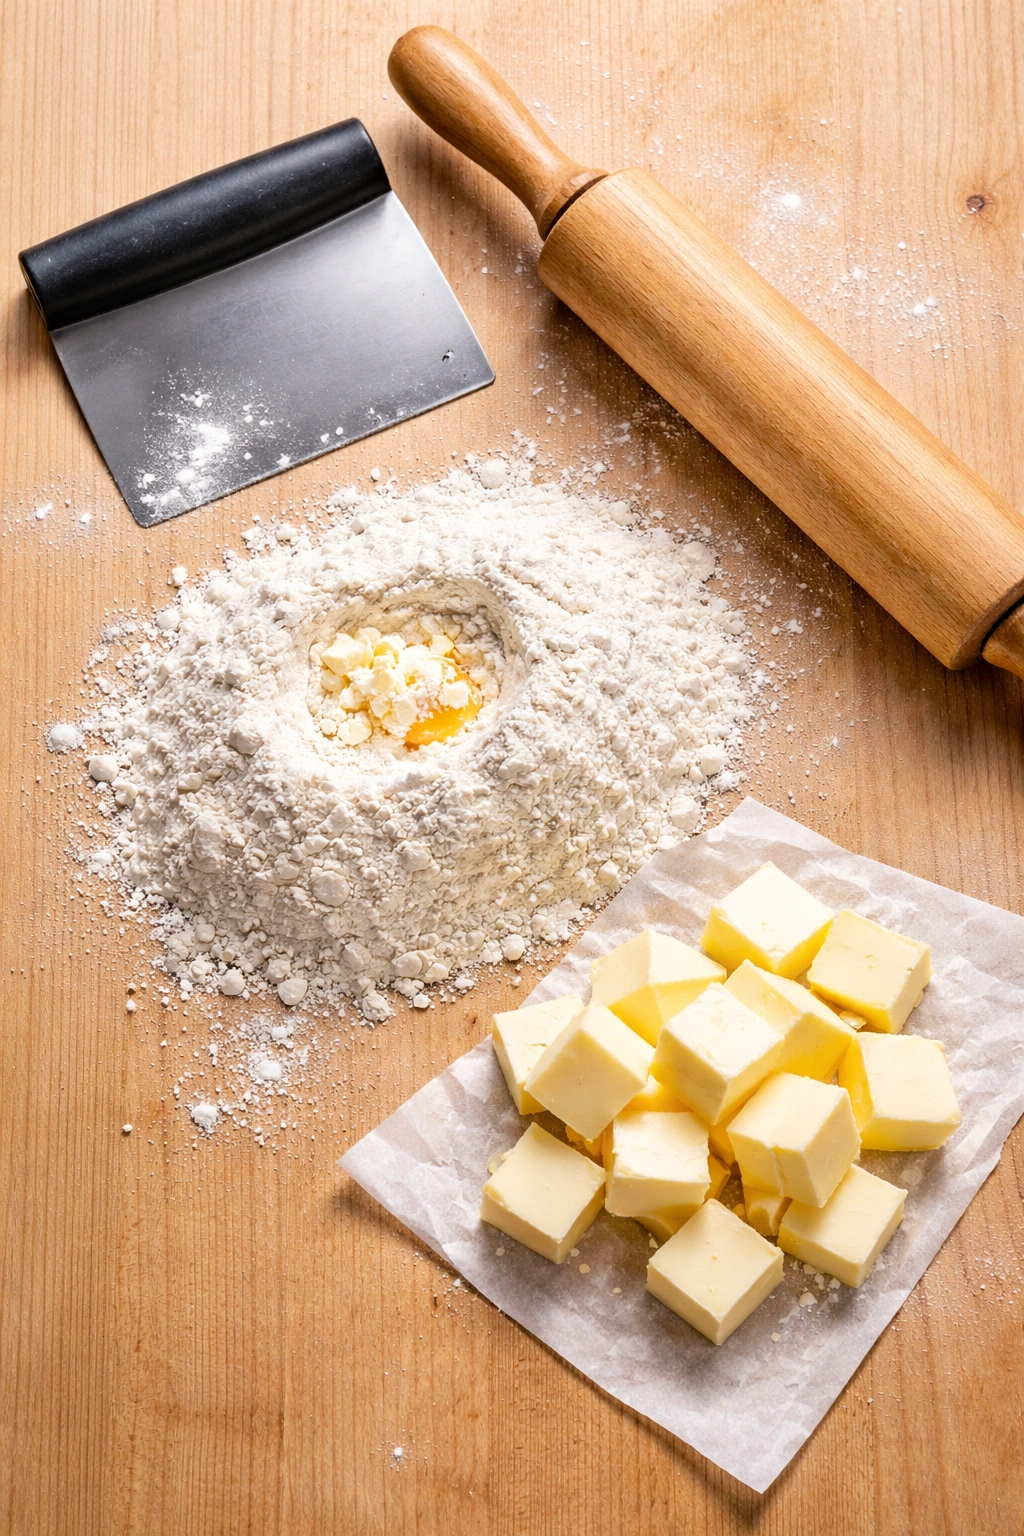
You don’t need fancy equipment for genuinely great biscuits, but having the right tools absolutely changes the experience. A bench scraper or dough cutter—a flat, rectangular metal tool with a handle—is invaluable for turning dough and cleaning your work surface without adding extra flour. If you don’t have one, a sturdy knife works fine, but a bench scraper is maybe five dollars and is one of those kitchen tools that pays for itself on the first batch.
A rolling pin or even a straight-sided measuring cup works for flattening dough. Some biscuit makers skip this entirely and gently flatten the dough with their hands, which actually works beautifully once you develop a feel for how thin to go. For biscuit cutters, a straight-sided cutter about 2½ inches in diameter is traditional—but honestly, a glass or the open end of a piping tip works just fine. The critical detail isn’t the shape; it’s that you cut straight down without twisting, which seals the edges and prevents proper rise.
Ingredients matter more than equipment. All-purpose flour works perfectly for this recipe—you don’t need pastry flour or cake flour. Real butter is non-negotiable; this isn’t a place where margarine or shortening will deliver the same result. Buttermilk is the other crucial ingredient; regular milk doesn’t react with baking soda the same way, creating a different texture and taste. If you don’t have buttermilk, you can make a substitute with regular milk and white vinegar or lemon juice, letting it sit for five minutes to curdle, but real buttermilk is genuinely worth buying if you make biscuits regularly.
Salt, baking powder, and baking soda all work together to create structure and lift. They’re not just flavoring—they’re structural ingredients that fundamentally change how the dough behaves and how the biscuits rise and brown. Skipping any of them or significantly reducing the amounts will change the results noticeably.
Yield: Makes 8 to 10 biscuits | Serves 4 to 6

Prep Time: 20 minutes
Cook Time: 12 to 15 minutes
Total Time: 32 to 35 minutes
Difficulty: Beginner — No special skills required, though the technique of keeping butter cold and visible takes one batch to feel natural. The mixing is genuinely straightforward, and the results are impressive even on your first attempt.
Best Served: Warm from the oven while the butter is still soft and the layers are at their most tender. They’re also wonderful at room temperature later the same day, and they reheat beautifully.
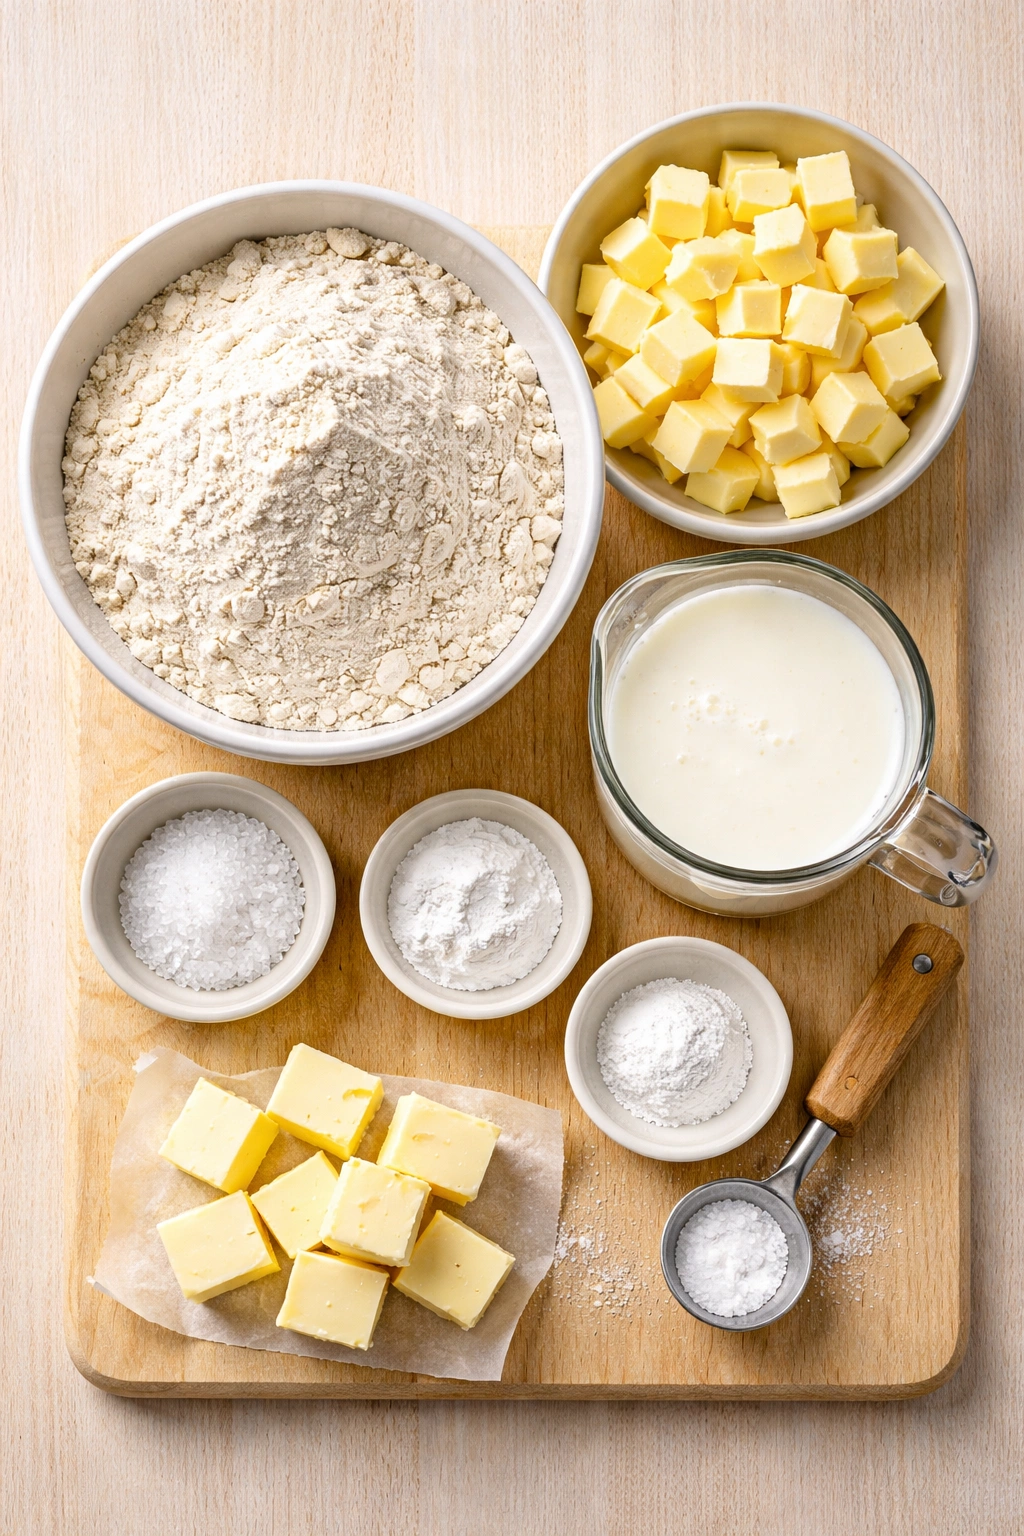
Ingredients for Flaky Buttery Biscuits
For the Biscuit Dough:
- 2 cups all-purpose flour
- 1 tablespoon baking powder
- ½ teaspoon fine sea salt
- ¼ teaspoon baking soda
- 8 tablespoons (1 stick) unsalted butter, cut into ½-inch cubes and kept very cold
- ¾ cup plus 2 tablespoons buttermilk, chilled (or substitute: ¾ cup whole milk mixed with 1 tablespoon white vinegar or lemon juice, allowed to sit 5 minutes before using)
For Finishing:
- 1 tablespoon unsalted butter, melted
- Fleur de sel or flaky sea salt for the tops (optional but genuinely makes a difference)
Making the Dough Without Overworking It
Measuring flour correctly is the first small detail that prevents disaster. Spoon flour into a measuring cup and level it off with a straight edge—do not scoop the measuring cup directly into the flour bag, which compacts the flour and throws off the ratio. Measuring flour by weight is even more reliable (260 grams for this recipe), but by-volume works fine if you use the spoon-and-level method.
Whisk together the flour, baking powder, salt, and baking soda in a large bowl. Whisking these dry ingredients together rather than just stirring ensures even distribution of the leavening agents, which is essential for uniform rise. You want every bite of every biscuit to have the same amount of lift.
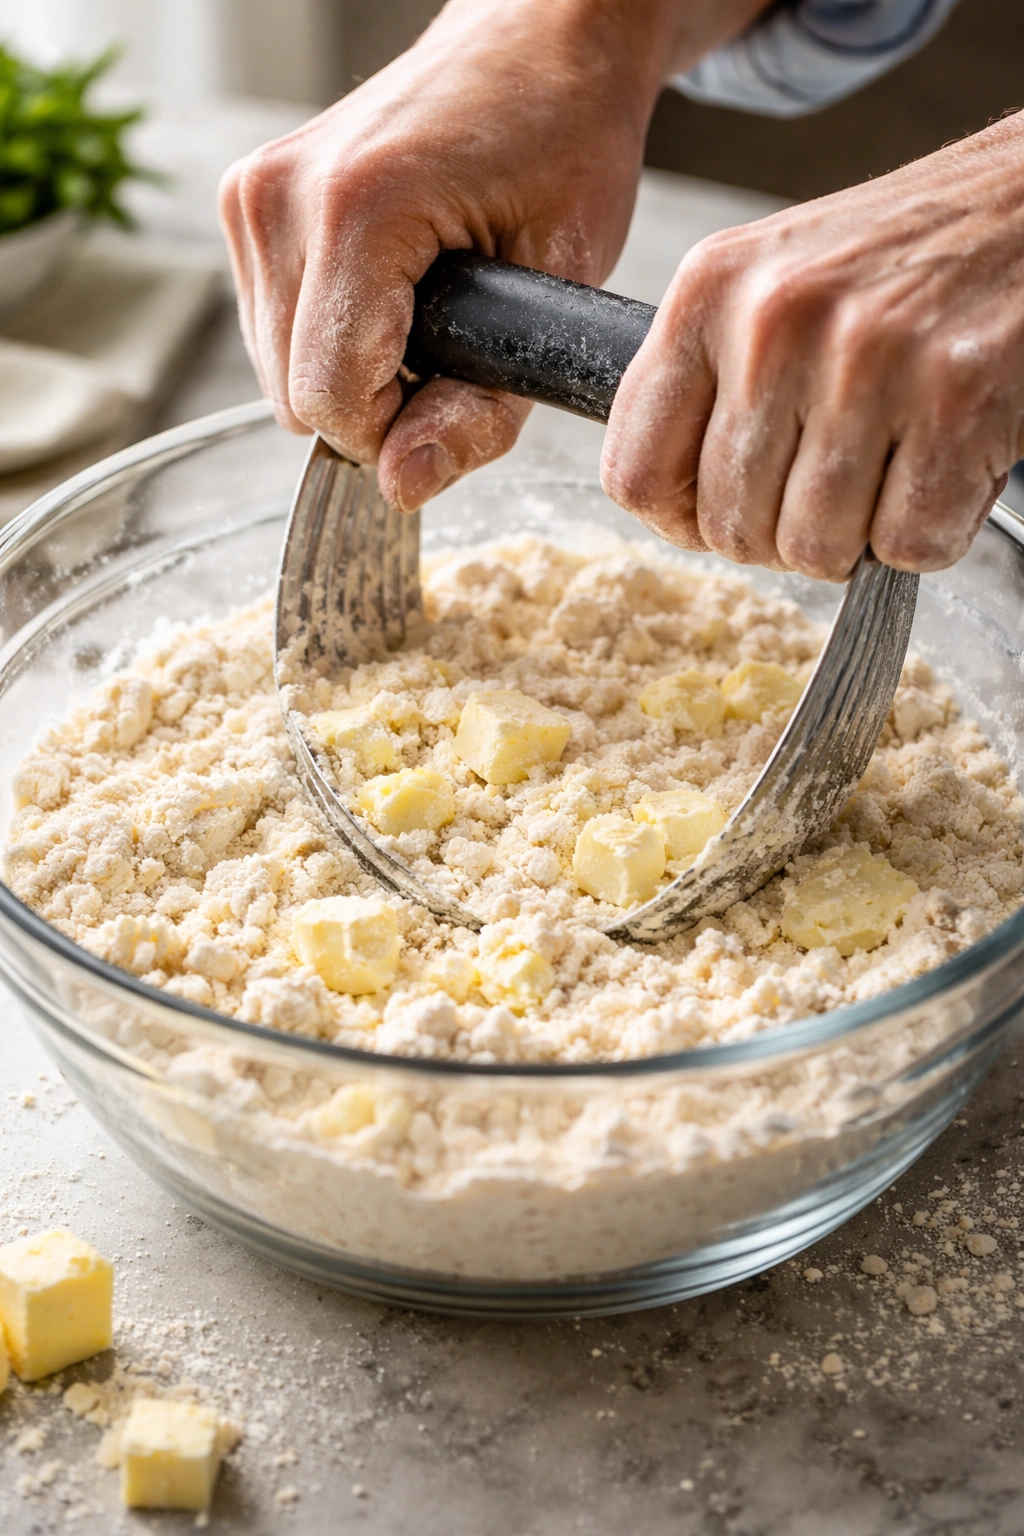
Add the cold butter cubes to the flour mixture. This is where you set yourself up for flakiness. The butter should be so cold that it’s very firm but not rock-hard straight from the freezer. If your kitchen is warm, cut the butter and put it back in the refrigerator for five minutes before adding it to the flour. Using a pastry cutter, two knives, or even your fingertips, work the cold butter into the flour until the mixture resembles coarse breadcrumbs or oatmeal. You’ll see visible pea-sized pieces of butter throughout the mixture—that’s exactly what you want.
Pour the chilled buttermilk into the mixture all at once. Using a fork, gently stir everything together just until the dry ingredients are moistened and the dough comes together. This should take maybe thirty seconds of stirring. You want a slightly shaggy, barely combined dough—not a smooth, fully unified ball. Overmixing here overdevelops gluten, which creates tough, chewy biscuits instead of tender ones.
Turn the dough out onto a lightly floured work surface. The dough will feel slightly sticky and loose at this point, which is completely normal. Gently press it together with your hands into a rough rectangle about 1 inch thick. Don’t knead it or overwork it; just bring it together into a cohesive mass.
How to Shape and Cut Biscuits for Maximum Height
Roll or gently pat the dough out to about ¾ inch thick. If the dough resists rolling, let it rest for a minute—the gluten is relaxing and it will cooperate more readily in a moment. Aim for a rectangle or square, which is easier to work with than a circle and prevents too much scrap dough that you’d need to re-roll (which can lead to overmixing). The thickness is important: too thin and you won’t get the height you want; too thick and the insides won’t bake through properly before the outsides brown.
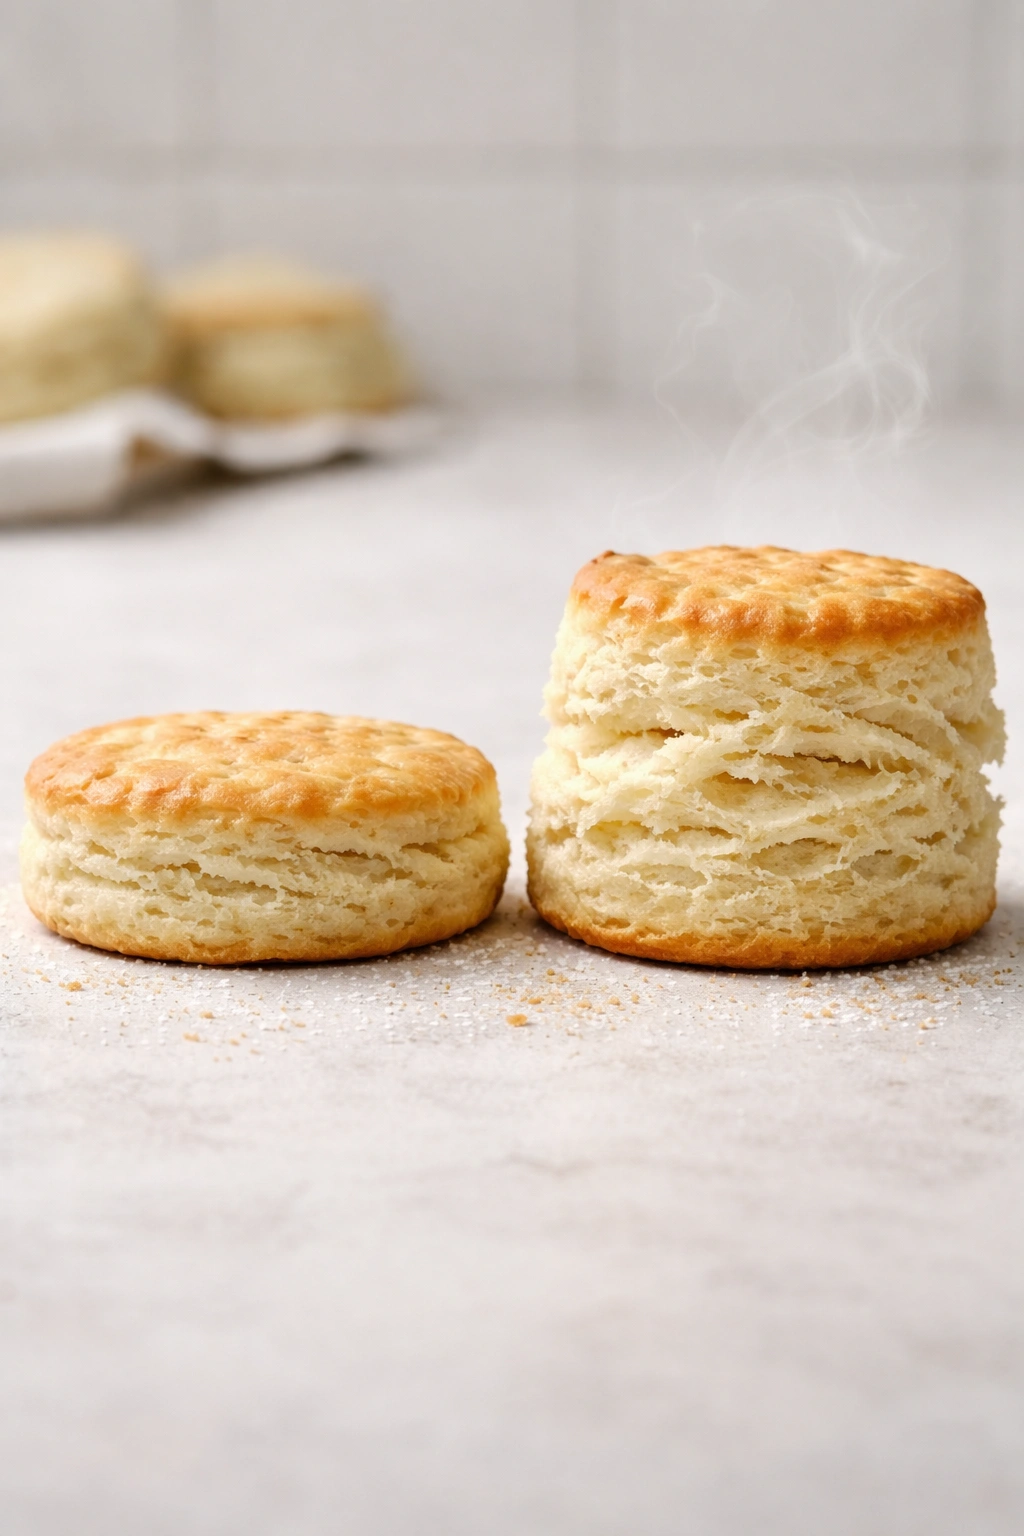
Fold the dough in half, creating a double layer. Gently press the layers together—not hard enough to fuse them, just enough so they stay stacked. Fold in half again perpendicular to the first fold. Unfold completely. You’ve just created crease lines that will encourage the biscuits to separate into distinct layers as they bake. This gentle lamination is what elevates these biscuits from good to genuinely exceptional.
Pat the dough back out to ¾ inch thick if it’s compressed from the folding. Using a straight-sided biscuit cutter or a glass, cut out biscuits in one clean, downward motion. Do not twist the cutter—twisting seals the edges, which prevents proper rise and creates stubby biscuits instead of tall, layered ones. If your cutter sticks, dip it in flour or warm water between cuts.
Gather the scraps and gently press them together into a ball. Let this rest for five minutes (the gluten needs to relax again), then pat it out to ¾ inch and cut additional biscuits. You might get one or two more biscuits from the scraps, which is fine. Some people prefer to save scraps for a separate batch of slightly tougher (but still good) biscuits rather than overworking the dough by re-rolling multiple times.
Place biscuits on a parchment-lined baking sheet, leaving about 2 inches of space between each one. If you prefer to stack them in a cast iron skillet or heavy baking pan (which creates taller biscuits with softer sides), place them just barely touching each other. The choice is yours—oven baked gives you crispy sides all around; skillet baked gives you biscuits with some softer edges where they touched each other. Both are delicious for different reasons.
Baking the Perfect Golden Biscuits

Position your oven rack in the center position and preheat the oven to 425°F (220°C). High heat is essential for biscuits—you want the outside to set and brown before the inside steam finishes puffing the layers. Lower temperatures create pale, dense biscuits that never achieve proper flakiness.
While the oven preheats, brush the tops of the biscuits very lightly with melted butter. If you have fleur de sel or another flaky sea salt, sprinkle just a tiny pinch on top of each biscuit. This isn’t necessary, but it adds a subtle flavor contrast and a professional finish that makes people wonder what your secret is.
Bake for 12 to 15 minutes, until the tops are deep golden brown and the biscuits have visibly puffed. You’ll know they’re done when they feel light in your hand and sound hollow if you tap the bottom. If you pull them out too early, the insides will be gummy; if they go too long, the interiors will be dry. Start checking at 12 minutes, especially if your oven runs hot.
Remove the biscuits from the oven and transfer them to a wire cooling rack if you have one, or just let them rest on the baking sheet for a few minutes. They’ll continue cooking slightly from residual heat, which is fine. These biscuits are best eaten warm, while the butter is still soft and the layers are at their most tender. Fresh is truly the goal here.
The Most Common Biscuit Mistakes and How to Avoid Them
Dense, tough biscuits almost always come from overmixing the dough. Once you’ve added the buttermilk, you’re done. Mixing more than thirty seconds or so develops the gluten, which makes biscuits chewy and tight instead of tender and flaky. If you find yourself making dense biscuits consistently, mix even less—aim for just barely combined, with a slightly shaggy appearance.
Flat biscuits that don’t rise properly usually means one of two things: either the batter leaveners (baking powder or baking soda) have aged and lost potency, or the dough was overworked enough that the gluten is so tight it can’t expand. Baking powder loses power over time, especially if you keep it in a humid bathroom (which many people do). If your biscuits aren’t rising, check the expiration date on your baking powder. If it’s old, replace it. Fresh leavening makes a dramatic difference.
Butter that melts and disappears into the dough, instead of creating visible pea-sized pieces, means the butter wasn’t cold enough when you mixed it. Warm butter can’t create the distinct pockets that steam needs. Next time, keep your butter in the freezer until you’re ready to use it, cut it quickly, and add it to the flour immediately. Some people even put the bowl in the freezer for a few minutes before adding butter to the flour.
Uneven browning or burning on the edges while the inside is underbaked happens when the biscuits are too thick or the oven temperature is uneven. Cut to a consistent ¾ inch and verify your oven temperature with an oven thermometer (many ovens run 25 degrees off from what they claim). If edges brown too quickly, consider rotating the pan halfway through baking, moving the back of the pan to the front.
Dry, crumbly biscuits usually indicate not enough buttermilk in the dough, or they were baked too long. The dough should feel slightly sticky when you’re working with it—slightly wetter than most bread doughs. If your biscuits came out dry this time, add a tablespoon or two more buttermilk next time. Buttermilk adds both moisture and fat (from its small amount of butter), both of which create tender biscuits.
Biscuits that separate into two distinct layers instead of many thin layers might mean you didn’t fold the dough at all, or you folded only once. Try the two-fold technique described in the shaping section: fold in half, press gently, fold perpendicular, unfold. This creates crease lines that encourage proper lamination.
Flavor Variations and Add-In Ideas

Cheese biscuits require only a small change: reduce the salt to ¼ teaspoon (since cheese is salty), and add 1 cup of finely shredded sharp cheddar cheese to the dry ingredients before adding the butter. Sharp white cheddar is particularly good here because it has more flavor punch than mild varieties. Mix the cheese in thoroughly before adding the cold butter, so the cheese is evenly distributed.
Herb biscuits let you add brightness and freshness to otherwise rich biscuits. Add 2 tablespoons of finely chopped fresh herbs—chives, thyme, or dill work beautifully—to the dry ingredients. For dried herbs, use 1 teaspoon total, since dried herbs are more concentrated than fresh. Rosemary is wonderful but pungent, so use just ½ teaspoon dried rosemary and add it finely minced. Mix herbs into the dry ingredients before adding the butter.
Savory biscuits with a touch of spice come from adding ¼ teaspoon of cayenne pepper and ½ teaspoon of smoked paprika to the dry ingredients. This creates a subtle heat and depth without making the biscuits obviously spicy. Serve these with chili, soup, or alongside scrambled eggs for breakfast.
Everything bagel biscuits have become trendy for good reason: they’re genuinely delicious. After brushing the biscuits with melted butter but before baking, sprinkle the “everything” seasoning mix (usually a combination of sesame seeds, poppy seeds, dried garlic, dried onion, and fleur de sel) generously on top. The sesame and poppy seeds toast as the biscuits bake, adding texture and nutty flavor.
Lemon and herb biscuits pair the zest of one lemon (finely minced) with 1 tablespoon of fresh thyme. Add both to the dry ingredients. These are exceptional with fish or alongside a light salad, and they’re wonderful on their own with butter and good jam.
Sweet variations are possible too, though they start to edge toward scone territory. Add 2 tablespoons of sugar to the dry ingredients and reduce the salt to ¼ teaspoon. Then add 1 teaspoon of vanilla extract when you add the buttermilk. Brush with melted butter mixed with a tiny bit of cinnamon and sugar after baking if you want them sweeter.
Storage, Reheating, and Make-Ahead Tips
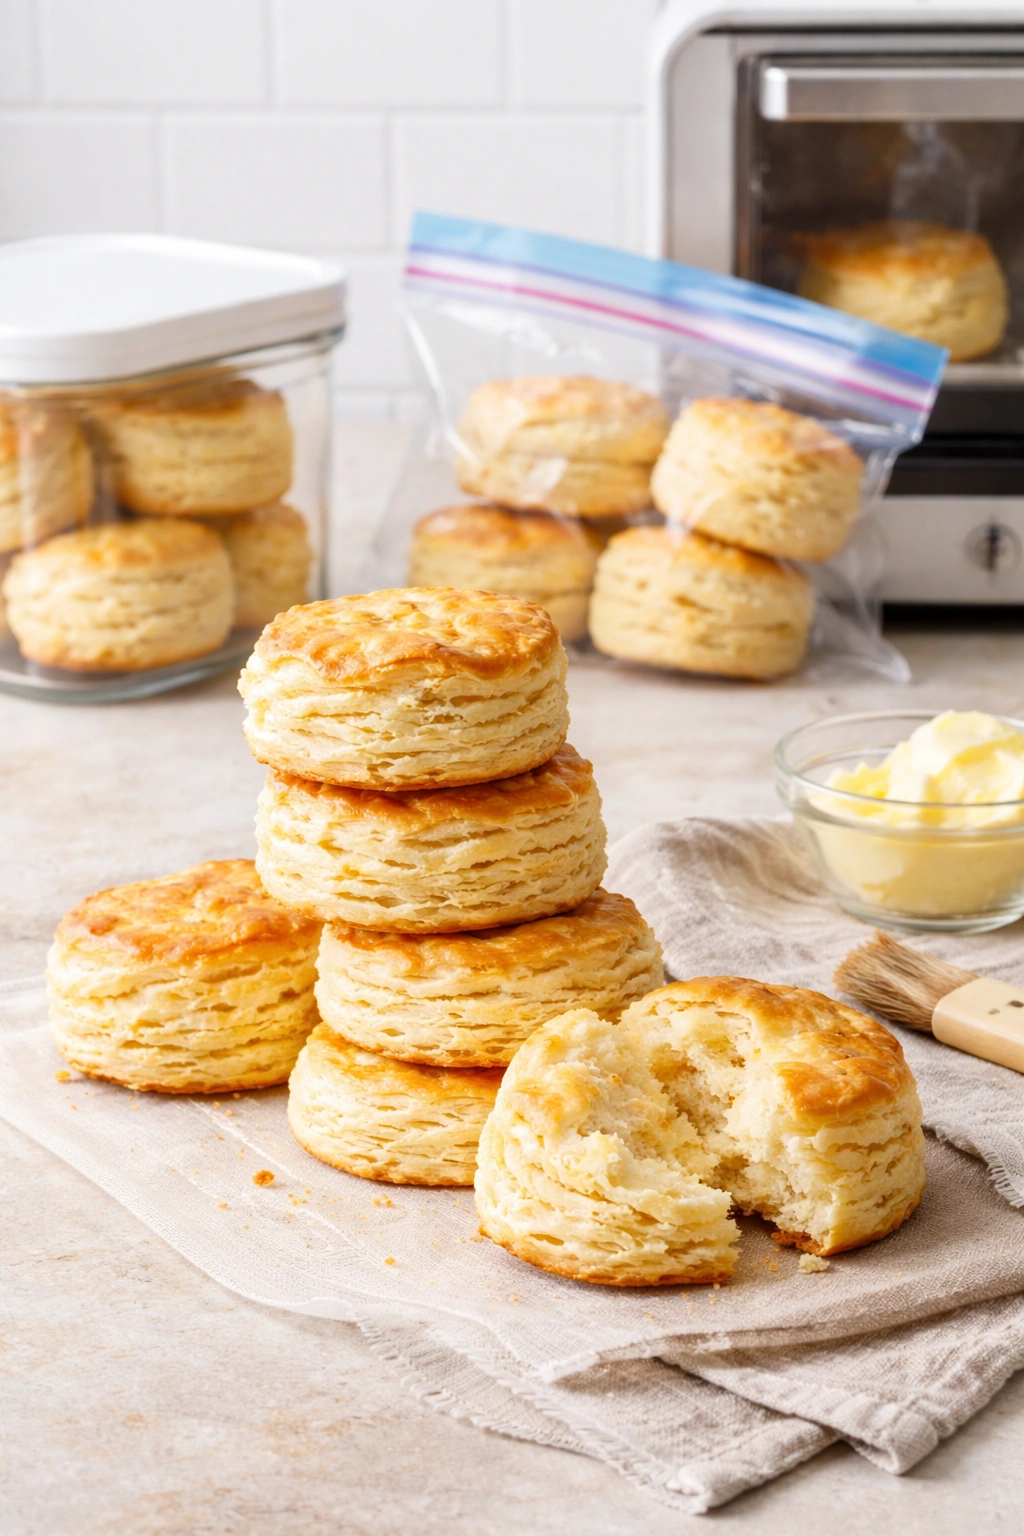
Freshly baked biscuits stay soft and tender at room temperature for about 6 hours, covered loosely with a kitchen towel (not sealed in a container, which traps steam and creates a gummy texture). If you need to store them longer, wrap them in foil once they’ve cooled completely and refrigerate for up to 3 days.
To reheat, wrap the foil-wrapped biscuits in a damp paper towel and microwave for about 20 seconds per biscuit, or wrap them in foil and warm them in a 300°F oven for 10 minutes. They won’t be quite as perfect as fresh-baked, but they’ll be notably better than eating them cold and hard. The steam from the damp paper towel or the foil helps soften them again.
Biscuits freeze beautifully for up to 2 months if wrapped individually in plastic wrap and then placed in a freezer bag, or placed in an airtight freezer container. You can reheat them frozen: wrap in foil and place in a 350°F oven for about 15 minutes until warmed through. This actually often produces results very close to fresh-baked because the gentle reheating allows the layers to steam again.
The dough itself also freezes well if you’ve mixed it but haven’t cut and baked it yet. Flatten the dough into a disk, wrap it tightly in plastic wrap and foil, and freeze for up to 1 month. When you’re ready to bake, thaw it in the refrigerator overnight, then cut and bake as normal. This is genuinely convenient if you want fresh biscuits on a busy morning—mix the dough the night before, freeze it, then bake fresh biscuits while coffee brews.
You can also freeze the cut biscuits on a baking sheet before baking them. Freeze until solid (about 2 hours), then transfer to a freezer bag and store for up to 1 month. Bake directly from frozen, adding 2 to 3 minutes to the baking time. Fresh-baked biscuits whenever you want them, no advance prep required.
Serving Suggestions and Perfect Pairings

Warm biscuits with salted butter are genuinely all you need, but these biscuits work wonderfully with almost everything. Serve them alongside breakfast with scrambled eggs, bacon, and a good jam. They’re exceptional with fried chicken—biscuits with crispy chicken and hot sauce is a combination that stands up to any meal. With soup or stew, biscuits become the side dish that everyone competes for, soaking up savory broth and adding a buttery textural contrast.
Breakfast sandwiches built on these biscuits are infinitely better than anything from a drive-through. Split a warm biscuit, add fried or scrambled eggs, a slice of cheese, maybe some bacon or sausage, and you’ve got breakfast that takes five minutes and costs a fraction of what you’d pay elsewhere.
For dinner, serve biscuits alongside roasted chicken, pulled pork, or beef stew. They’re also wonderful with fish and seafood—a delicate flaky biscuit complements mild white fish beautifully. Brush them with herb butter instead of plain butter for extra flavor.
Consider biscuits for entertaining, too. They’re genuinely impressive to serve to guests, and most people have never experienced biscuits that are actually flaky and buttery from scratch. Warm biscuits from your oven signal that you’ve put thought and care into the meal, even if the rest is simple.
These biscuits also take condiments exceptionally well. Beyond butter and jam, try them with chicken salad, tuna salad, or pimento cheese. A slather of creamy goat cheese topped with honey and fresh herbs turns a biscuit into an appetizer. Smoked salmon, cream cheese, and fresh dill transform a biscuit into something elegant enough for a brunch party.
Final Thoughts

The best biscuits you’ll ever make start with understanding that flakiness isn’t luck or a special technique—it’s the result of respecting a few fundamental principles about how butter, flour, and steam interact. Keep your butter cold and visible. Mix just until combined. Fold gently to create layers. Bake at high temperature. That’s truly the entire secret.
Once you’ve made these biscuits once or twice, your hands will know the feel of properly mixed dough and you’ll stop overthinking the process. You’ll notice how the dough feels slightly sticky and shaggy before the buttermilk is fully absorbed, and you’ll trust that thirty seconds of mixing is enough. You’ll see the pea-sized butter pieces in the flour mixture and know you’ve done it right.
These biscuits are genuinely faster than most people expect, more reliable than you’d think, and infinitely better than any shortcut could deliver. When someone asks how you made something so perfect, the answer is actually simple: you didn’t cut corners, and you didn’t make it more complicated than it needed to be. That’s the whole thing.