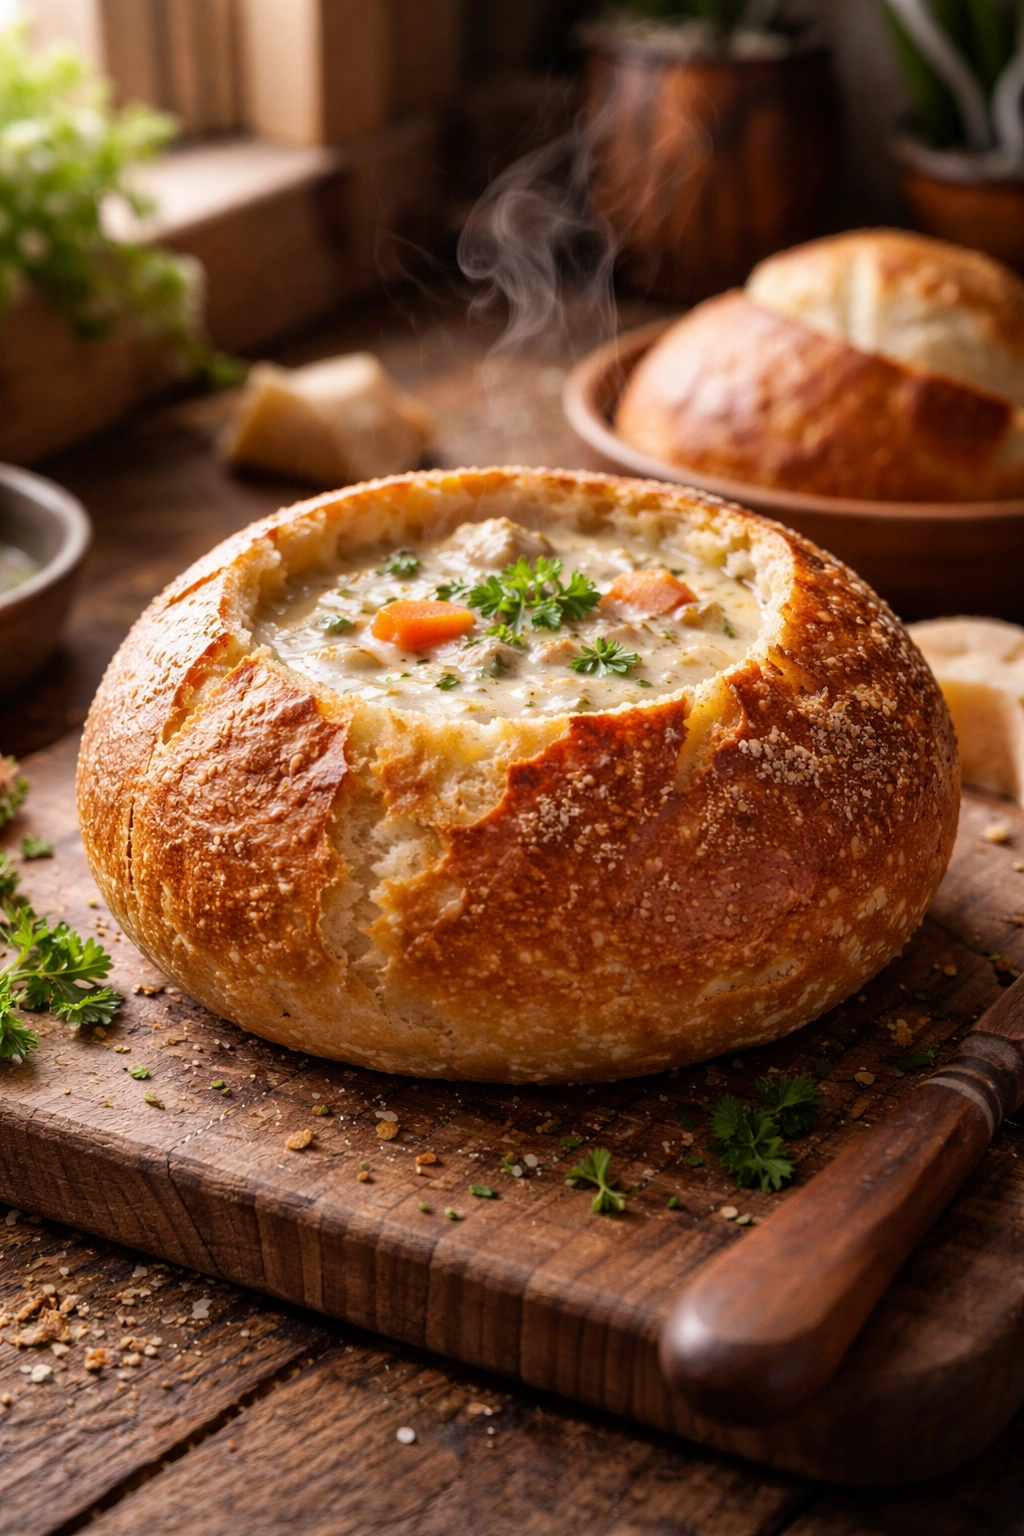
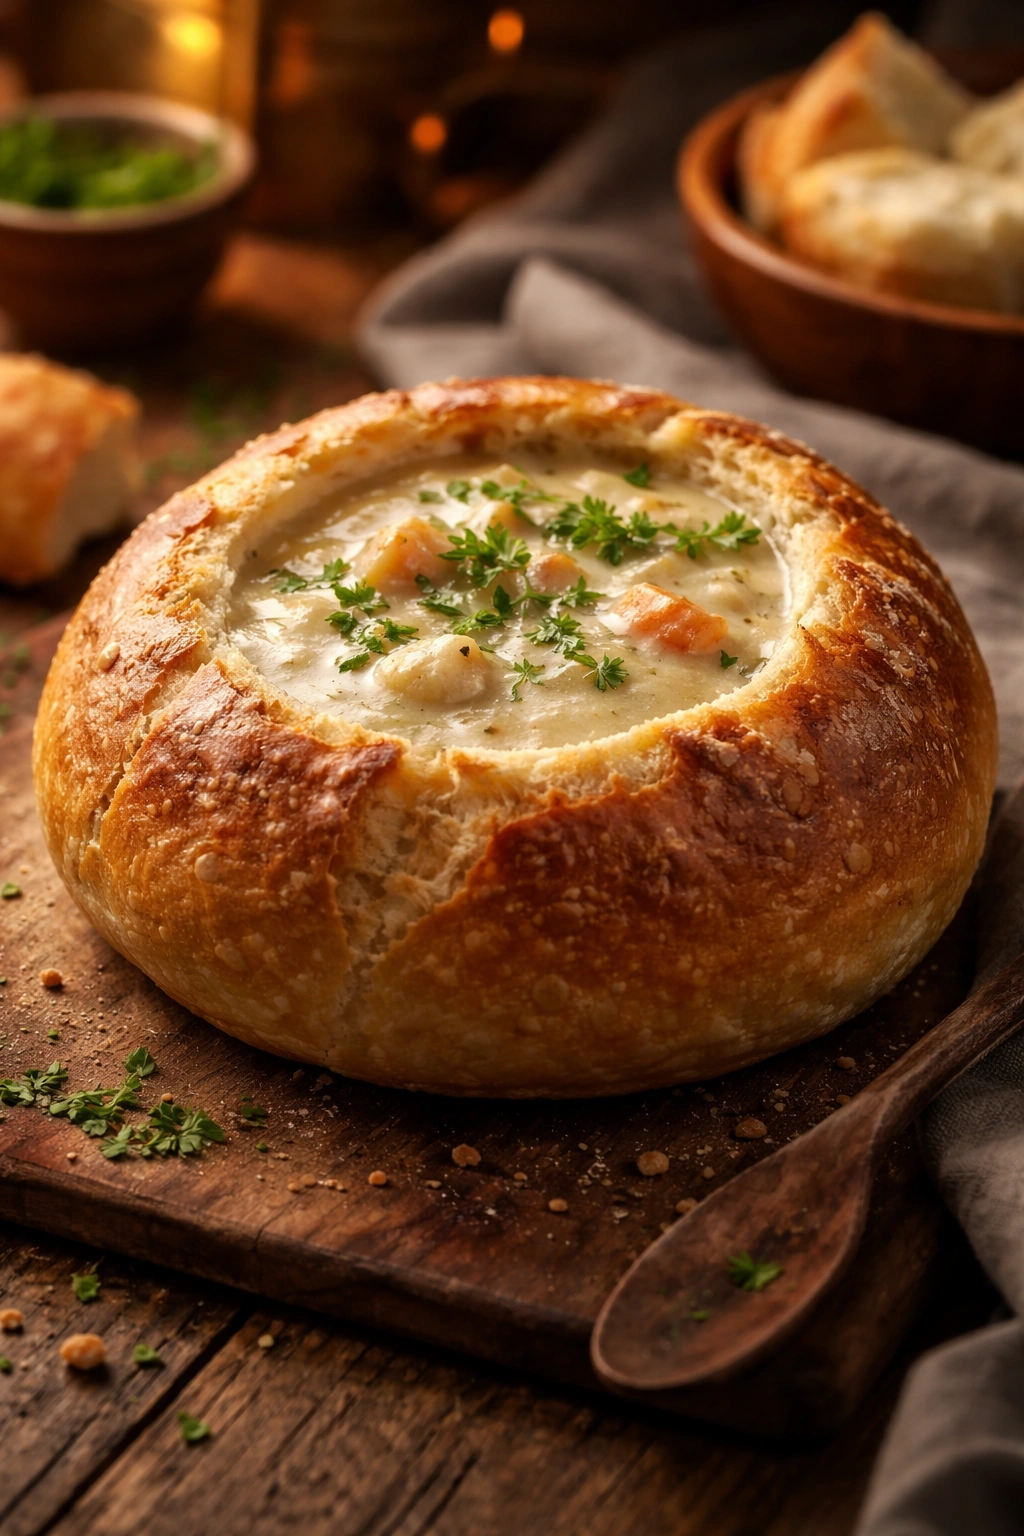
There’s something genuinely magical about tearing into a warm, crusty bread bowl and discovering it’s filled with creamy soup instead of empty carbs. Homemade bread bowls transform an ordinary bowl of soup into an edible vessel that soaks up every drop of broth while adding texture, warmth, and an entirely new dimension to the meal. The bread itself becomes part of the eating experience—sturdy enough to hold the liquid without falling apart, but tender and flavorful enough to taste like the star of the show. What makes them truly special isn’t complicated baking science or a secret ingredient; it’s the confidence that comes from understanding how dough behaves, why timing matters, and exactly what separates a bread bowl that’s crispy outside and soft inside from one that’s tough and dense.
If you’ve ever bought store-bought bread bowls and felt disappointed by their cardboard texture or stale flavor, homemade versions will change your perspective entirely. The difference between a supermarket bread bowl and one you’ve shaped, proofed, and baked yourself is the difference between instant soup and a carefully simmered broth—it’s absolutely worth the effort. This guide walks you through the entire process from mixing dough to the moment you ladle soup into a bowl you made with your own hands.
The Charm of Homemade Bread Bowls
Bread bowls aren’t a new invention—bakers and cooks have been using bread as edible serving vessels for centuries. Medieval banquets featured trenchers, thick slices of stale bread designed to catch drippings and sauce from roasted meats. Modern bread bowls evolved from that humble tradition into a genuine culinary technique that shows up in restaurants from casual bistros to fine dining establishments.
What makes homemade bread bowls so appealing is the complete control you have over every variable. You choose the flour, decide the hydration level, control the fermentation time, and determine exactly how dark the crust gets. The bread can be studded with herbs, infused with roasted garlic, topped with seeds, or brushed with flavored oil before baking—endless possibilities that a commercial bakery simply can’t offer. You also get to experience the entire transformation: watching dough rise, shaping it over oven-safe bowls, seeing it expand in the oven’s heat, and pulling out a golden-brown vessel that’s still steaming.
Beyond the sensory experience, there’s practical efficiency at play. One bread bowl serves as both plate and food simultaneously. Diners get the satisfaction of eating the container their meal came in, which is equal parts delightful and functional. For dinner parties and casual gatherings, bread bowls spark conversation and add a memorable touch that shows genuine effort and thoughtfulness.
Why You Should Make Bread Bowls at Home
The texture difference between homemade and store-bought is immediate and significant. Homemade bread bowls have structure and substance—they’re sturdy enough to hold a full serving of hot soup without collapsing, yet tender and flavorful throughout. The crust develops real color and crackle. The interior has an open, irregular crumb structure that actually absorbs broth rather than remaining impermeable. You taste actual bread, not the slightly stale, one-dimensional flavor of a mass-produced product.
Cost is another compelling reason. A single artisanal bread bowl from a bakery costs $3 to $5 USD; homemade versions cost less than fifty cents in ingredient expense. If you’re making six to eight bread bowls for a dinner party, you’re saving money while actually improving quality. The dough is forgiving and versatile enough that even an inexperienced baker can succeed with clear instructions and reasonable expectations.
There’s also the flexibility factor. You can bake bread bowls ahead of time and store them frozen, ready to warm and serve whenever soup night happens. You can customize them for dietary needs—whole wheat versions, higher-hydration doughs for more open crumb structure, additions of seeds or grains for nutrition and visual interest. You can make mini bread bowls for appetizers or oversized ones for hearty stew. The foundational technique opens up dozens of possibilities.
Essential Ingredients for Perfect Bread Bowls
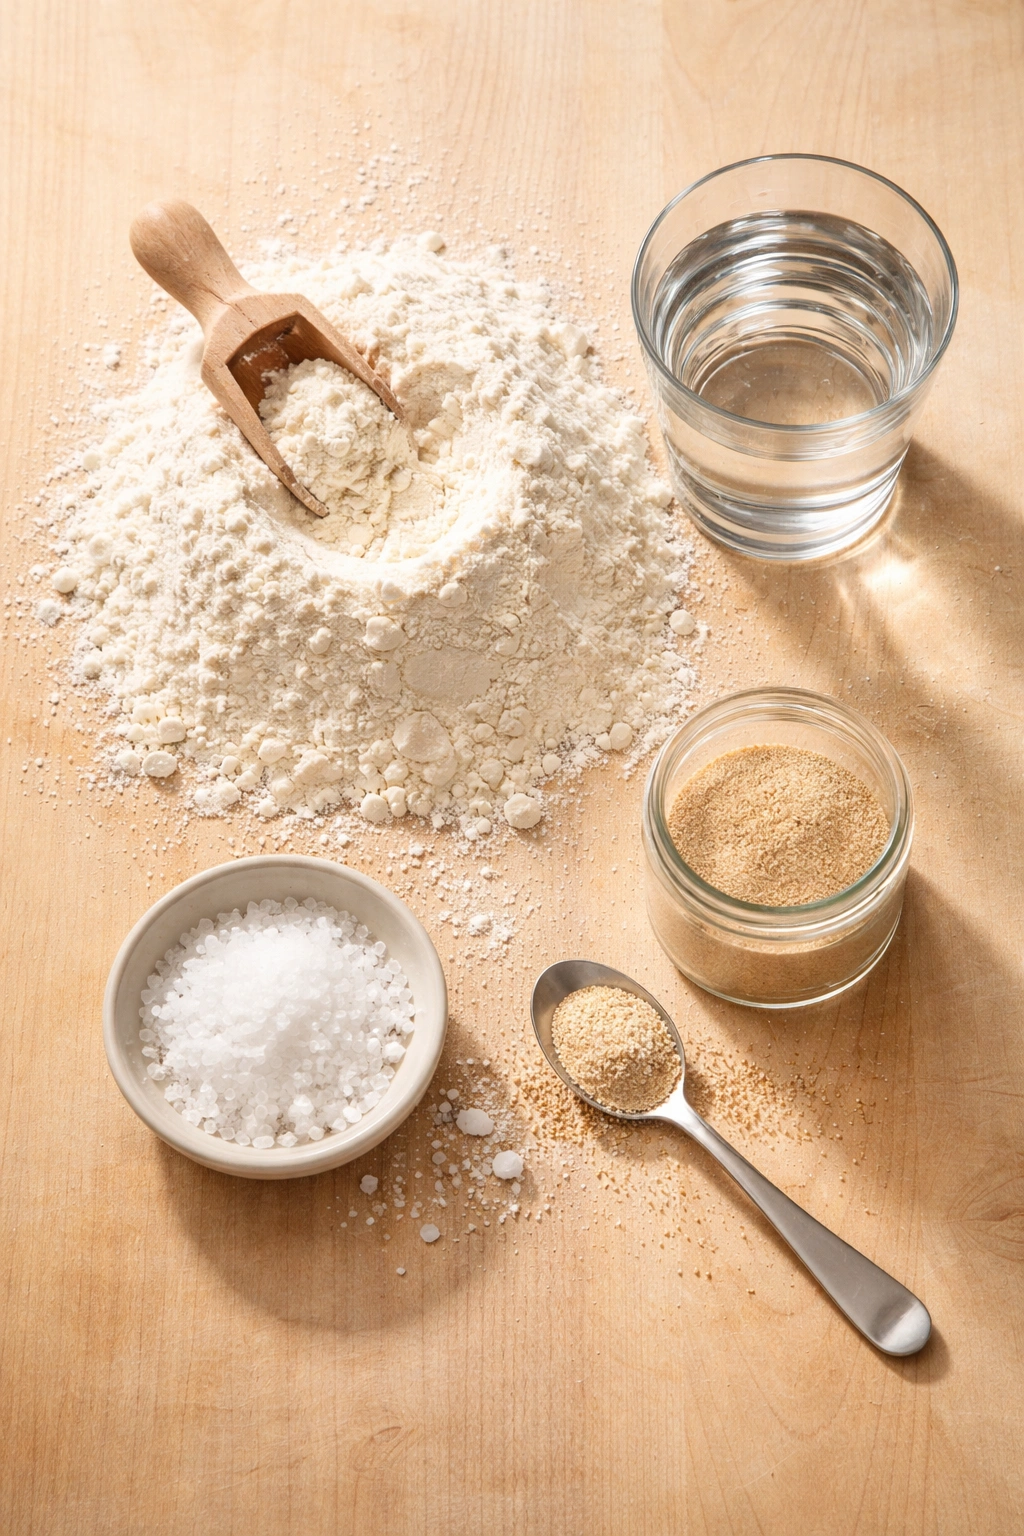
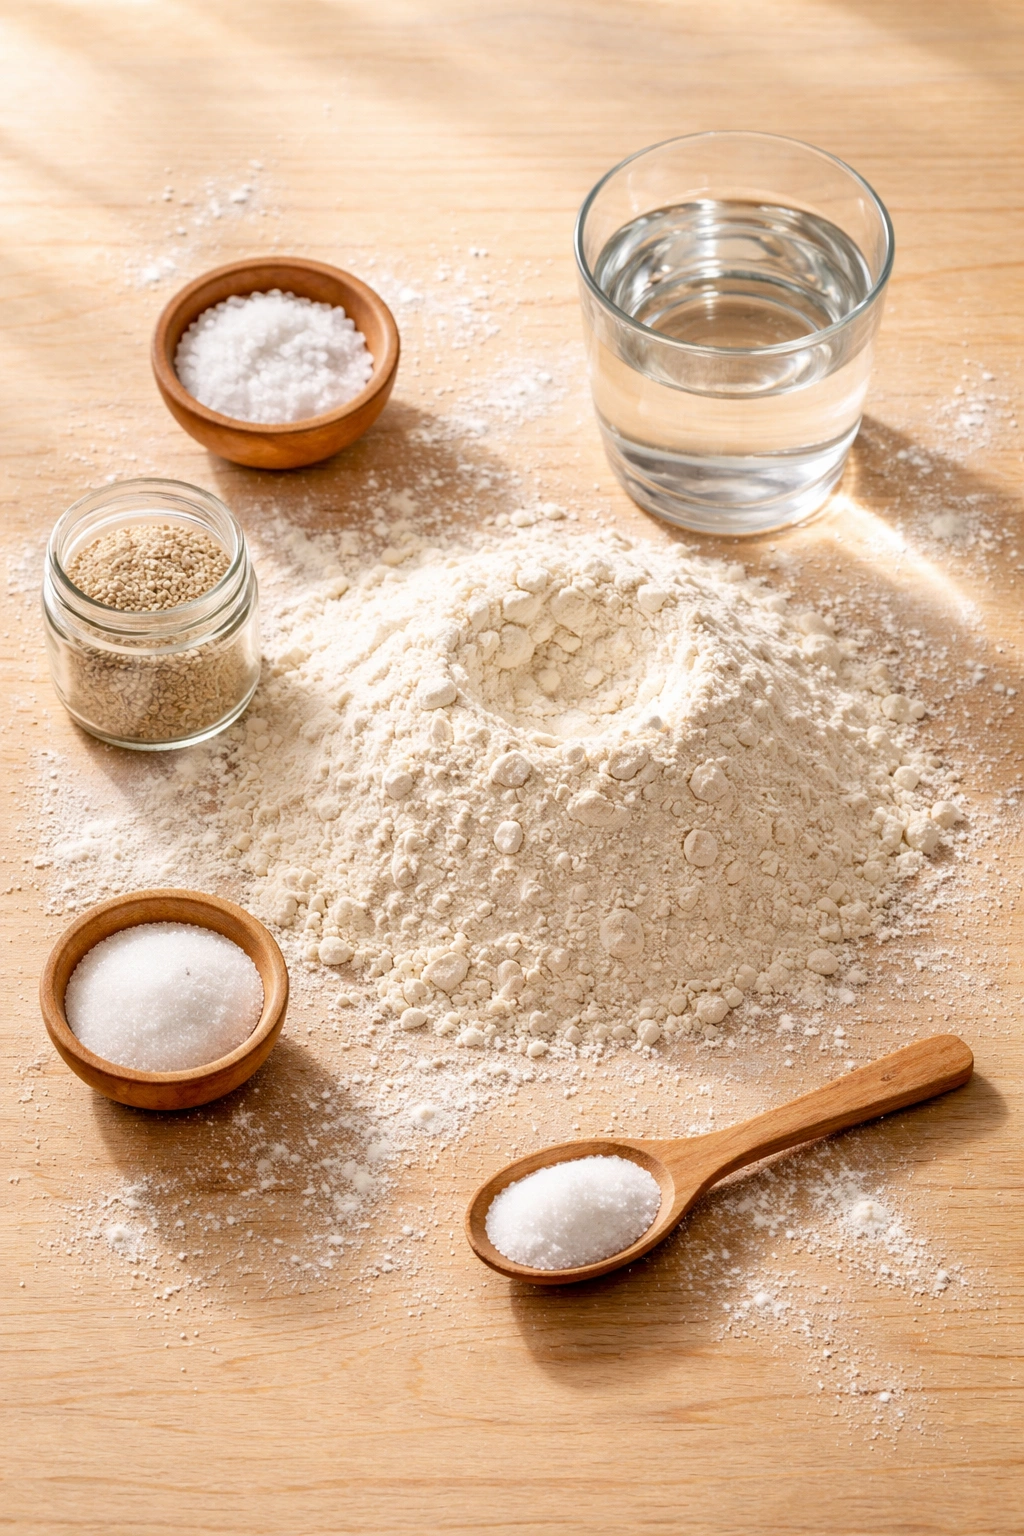
Bread bowl dough requires minimal ingredients: flour, water, salt, and yeast. The beauty of bread baking is that this incredibly simple list creates something far greater than the sum of its parts. The quality of each ingredient matters more than the number of ingredients.
Flour matters more than most home bakers realize. All-purpose flour works reliably for bread bowls, but bread flour—which contains slightly more protein—creates structure that holds shape during rising and baking more effectively. The protein content helps develop gluten, the network that traps gas and creates that open crumb structure inside. If you can only access all-purpose flour, you’ll still get good results; just be prepared for slightly softer dough and a crumb that’s a bit more tender.
Water quality and temperature affect fermentation timing. Filtered or tap water works perfectly fine; the minor minerals in tap water actually benefit yeast development. Temperature is more consequential. If your kitchen is cold (below 65°F / 18°C), bulk fermentation takes longer. Warm kitchens (75°F / 24°C and above) speed fermentation considerably. This isn’t bad or good—it’s simply something to observe and adjust for. The dough will tell you when it’s ready through visual cues, not a fixed timeline.
Salt does more than add flavor. Salt strengthens gluten development, which means it improves dough structure and contributes to that crispy crust. It slows fermentation slightly, giving more controlled rising and developing deeper flavor through longer fermentation. Don’t skip salt or reduce it significantly—around 2% of flour weight (about 1¾ teaspoons for the recipe below) is the standard target.
Yeast ferments dough and creates the rise. Instant yeast and active dry yeast work identically for bread bowls; use whichever you have on hand. One teaspoon of either works for this dough. Some bakers prefer instant yeast because the granules are slightly smaller and dissolve more readily, but the difference is negligible. What matters is that yeast is fresh (check the expiration date) and stored in a cool, dry place.
Yield, Prep Time, Cook Time, Total Time, Difficulty

Yield: Makes 6 bread bowls (or 8 smaller bowls)
Prep Time: 20 minutes
Cook Time: 40 minutes
Total Time: 3 hours total, including rising (approximately 2 hours 40 minutes of hands-off rising time, then 20 minutes active prep/shaping, then 40 minutes baking)
Difficulty: Intermediate — This recipe requires basic shaping skills and attention to fermentation timing rather than exact clock times. You’ll need oven-safe bowls to mold the dough, and a Dutch oven or covered baking vessel to create steam in the oven. If you’ve made bread or shaped pizza dough before, you have all the skills needed here. First-time bread makers can absolutely succeed with patience and clear visual cues for when dough is ready.
Best Served: Immediately after baking while the crust is still warm and crispy. Bread bowls hold their quality for several hours at room temperature, but reheating (see storage section) restores optimal texture.
Complete Ingredient List
For the Dough:
- 3 cups (360g) all-purpose flour or bread flour
- 1¼ cups (300ml) warm water (around 75–80°F / 24–27°C)
- 1¾ teaspoons fine sea salt
- 1 teaspoon instant yeast (or active dry yeast)
- 1 teaspoon sugar or honey (optional, helps activate yeast if your water is cool)
For Shaping and Finishing:
- 1 tablespoon all-purpose flour (for dusting during shaping)
- 1 tablespoon cornmeal or additional flour (for dusting baking sheet)
- 2 tablespoons water mixed with a pinch of salt (for egg wash alternative, optional)
- Sesame seeds, coarse salt flakes, dried herbs, or seeds for topping (optional but recommended)
- Oil or softened butter for bowl interiors (to prevent sticking during proofing)
Step-by-Step Instructions
Mix and Develop the Dough:
-
Combine the warm water and yeast in a medium bowl or the bowl of a stand mixer. Stir gently and let it sit for 1 minute — the yeast will begin to rehydrate and activate. If you’re using very cool water, add the sugar or honey to give the yeast a quick food source and help it activate more vigorously.
-
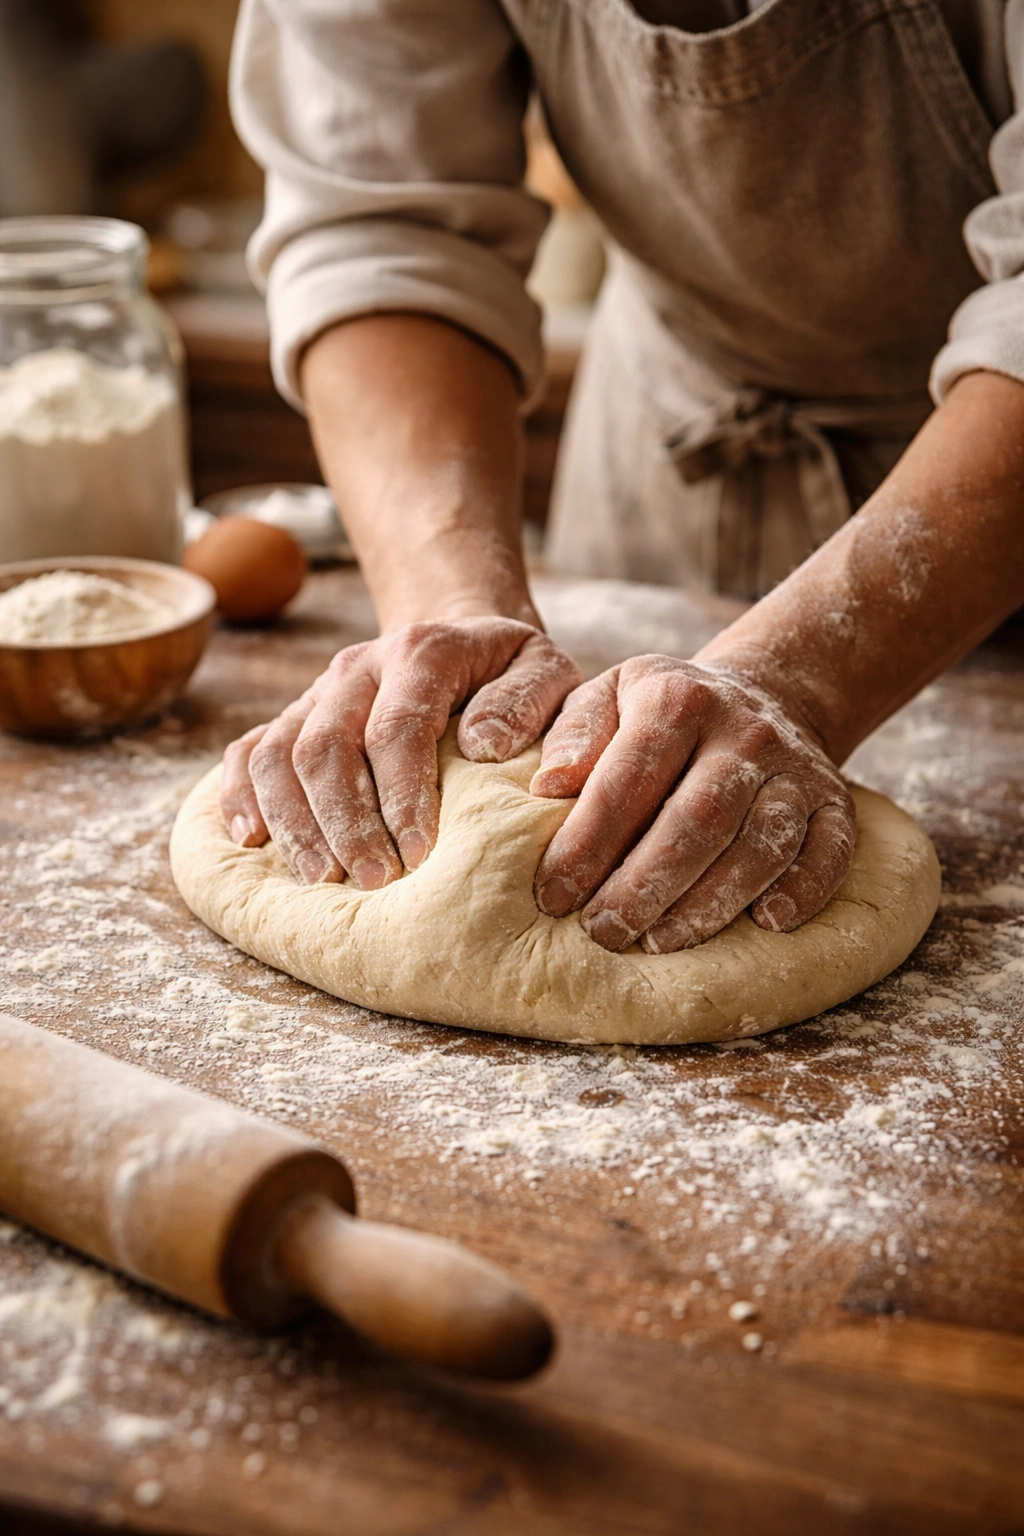
Add the flour and salt to the yeast mixture. Mix on low speed with a stand mixer fitted with a dough hook, or stir vigorously by hand with a wooden spoon, until all the flour is hydrated and no dry streaks remain. The dough will look shaggy and rough at this stage — that’s completely normal.
-
Continue mixing on low-medium speed for 6 to 8 minutes with the stand mixer (or knead by hand for 8 to 10 minutes), until the dough becomes smooth, elastic, and slightly tacky to the touch. It should pull away from the sides of the bowl and feel alive and springy. Do not add extra flour during mixing — this dough should feel slightly sticky. That hydration is what creates an open crumb structure and a tender interior.
-
Shape the dough into a loose ball by gathering the edges toward the center. The surface should feel slightly tacky but not overly wet. If the dough feels overly wet and sticks aggressively to your hands, dust with just a tiny pinch of flour, but resist over-flouring — a slightly tacky dough is preferable to a dry, tight one.
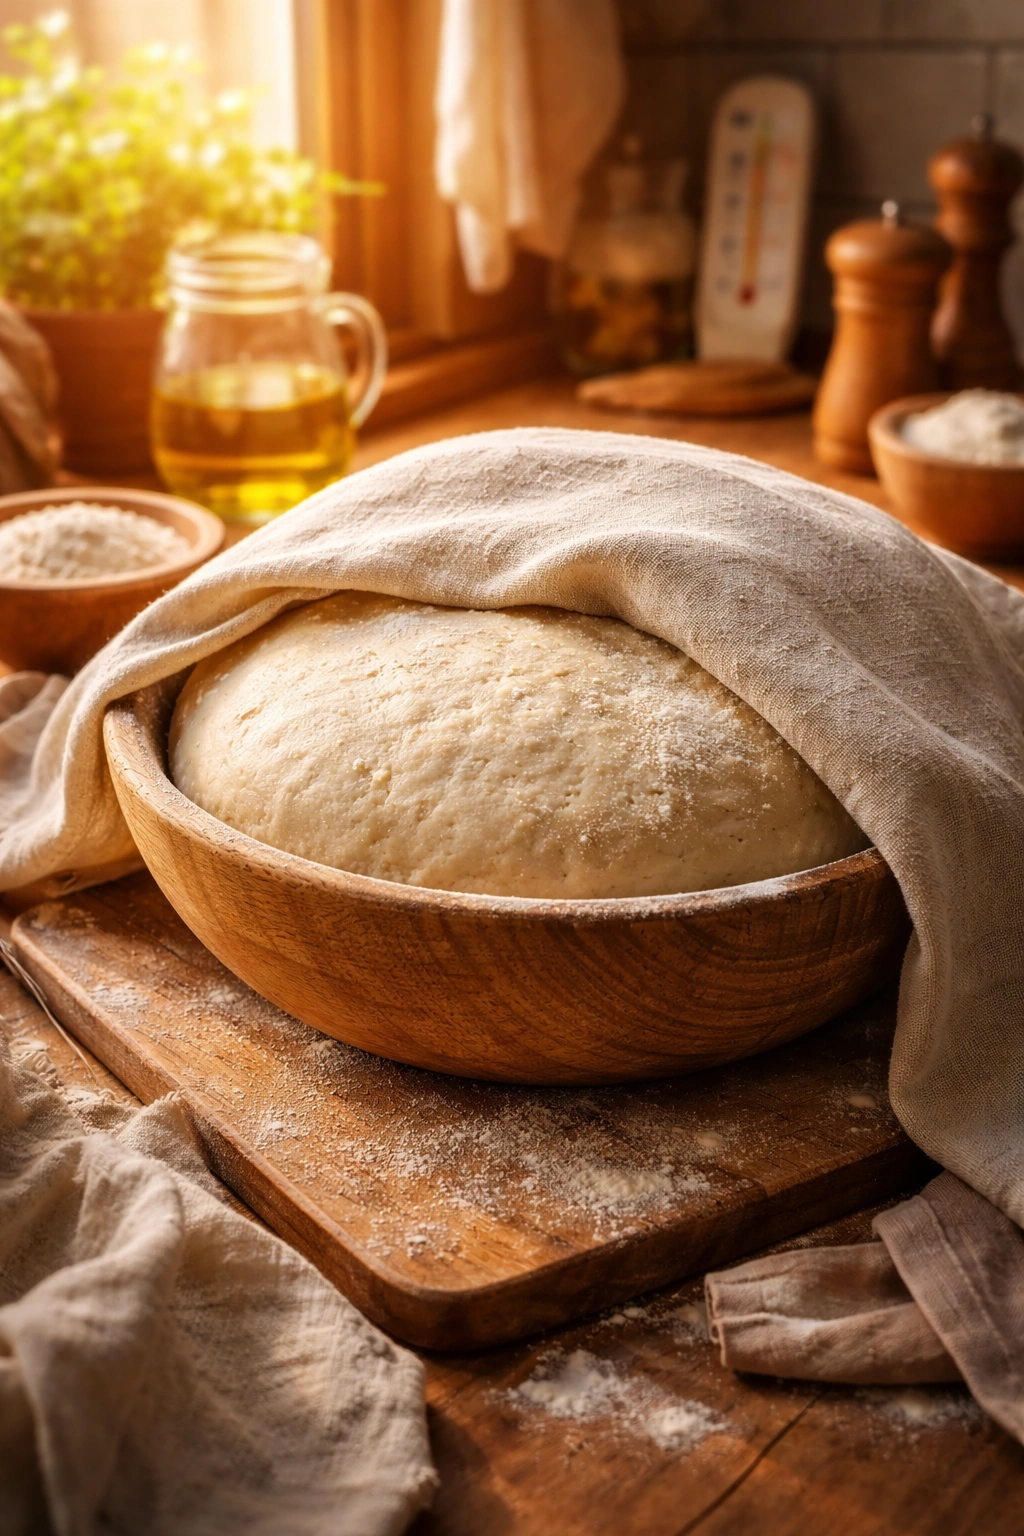
First Rise (Bulk Fermentation):
-
Lightly oil a large bowl (the same bowl you just mixed in works fine after a quick rinse). Place the dough ball seam-side down in the oiled bowl, then turn it once so the top is lightly coated with oil. This prevents a dry skin from forming on the surface.
-
Cover the bowl loosely with a damp kitchen towel or plastic wrap. Let it rise in a warm, draft-free spot for 45 to 90 minutes, depending on your kitchen temperature. The dough is ready when it has increased in volume by about 50 to 75% — it should look puffy but not completely doubled. Press gently on the surface with a floured fingertip; it should spring back slowly, leaving a slight indentation. If it springs back too quickly, it needs more time. If the indentation remains, you’ve gone slightly too far, but it’s still salvageable — just continue to shaping.
Divide and Pre-Shape:
-
Turn the dough out onto a lightly floured work surface. Use a bench scraper or sharp knife to divide it into 6 equal pieces (roughly 100g each). Divide carefully — uneven pieces will proof at different rates.
-
Gently pre-shape each piece into a tight round by gathering the edges toward the center and rotating it slightly on the work surface to create tension. Work gently; you don’t want to deflate all the air you worked hard to develop. Each pre-shaped piece should be a taut, smooth ball about 3 inches in diameter.
-
Let the pre-shaped pieces rest on the floured work surface for 10 to 15 minutes. This brief rest relaxes the gluten, making the final shaping easier and preventing the dough from springing back aggressively.
Shape Over Bowls:
-
While the dough rests, prepare your shaping vessels. You’ll need 6 oven-safe bowls (ceramic, metal, or stoneware), each roughly 5 to 6 inches in diameter. Flip them upside down on a baking sheet. Do not skip this step — the bowls must be placed upside down so the dough stretches over the rounded bottom. Lightly oil the outsides of the bowls and dust them with cornmeal or flour to prevent the dough from sticking.
-
Take one rested dough piece and place it smooth-side down on top of an upside-down oiled bowl. Begin at the center and gently stretch the dough down and around the sides of the bowl using your fingertips. Work from the center outward and downward, stretching gradually — do not pull aggressively or you’ll tear the dough. The dough should eventually cover the entire bowl, with the excess hanging down the sides. Don’t worry if the coverage isn’t perfectly even; slight imperfections look rustic and natural.
-
Gently fold the overhanging dough under itself and tuck it underneath the bowl, creating a neat, tucked edge that won’t unfold during proofing and baking. The seam should be on the bottom and mostly hidden so it doesn’t tear open during the oven spring.
-
Repeat with remaining dough pieces until all 6 bowls are wrapped and shaped. Space them evenly on the baking sheet so they have room to expand without touching each other.
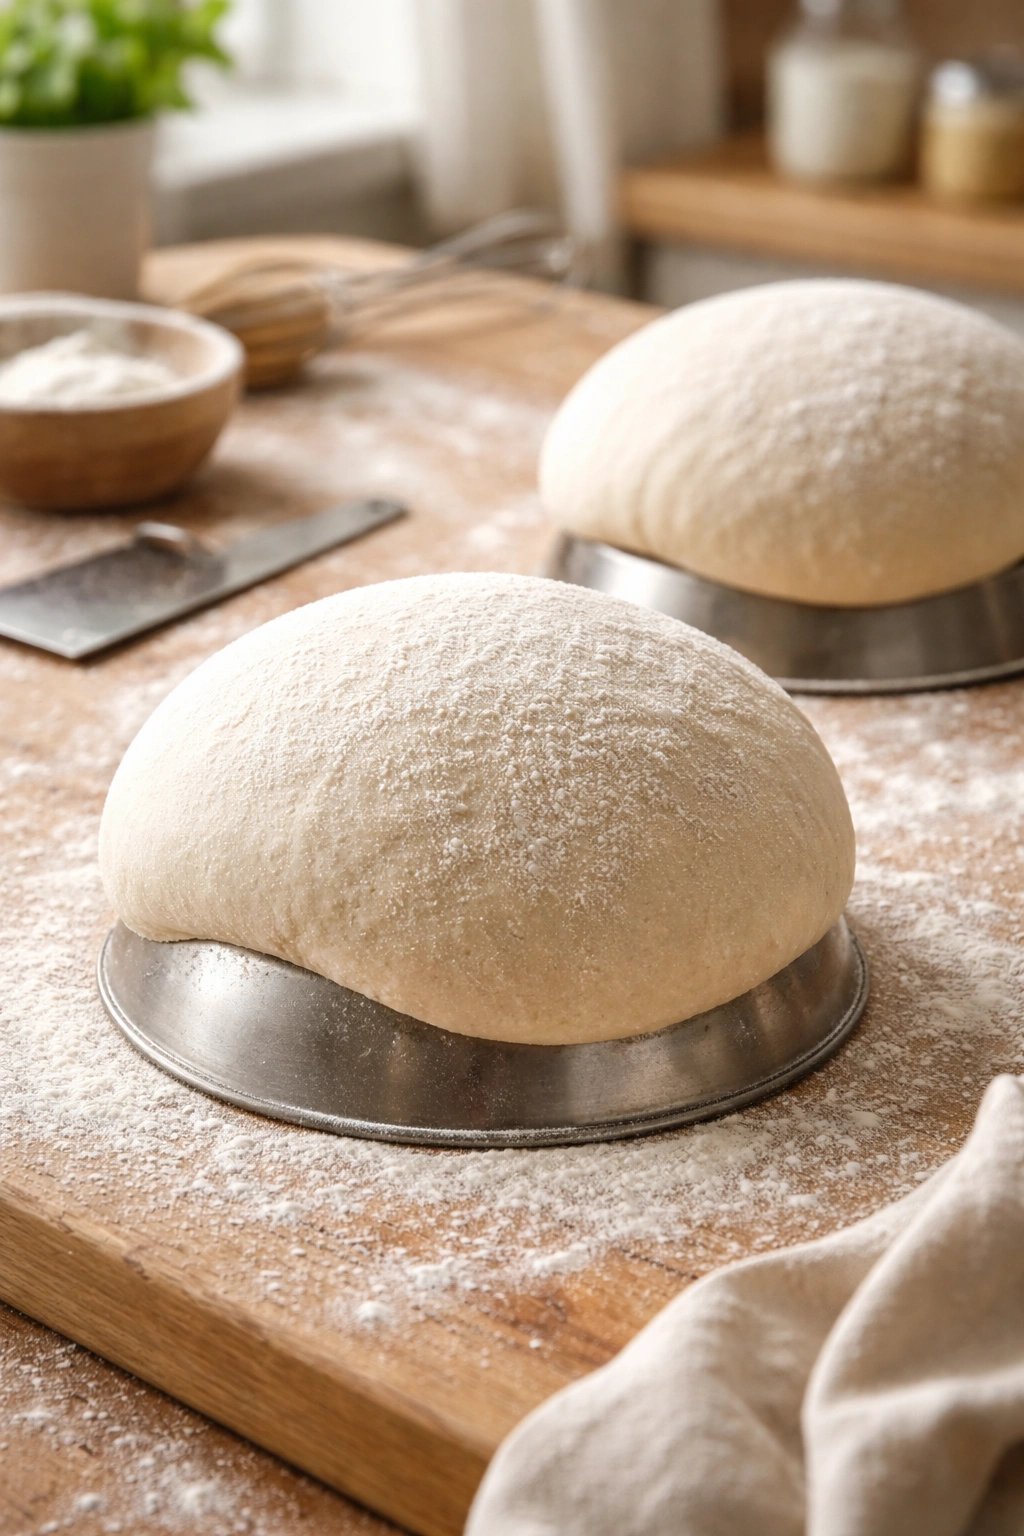
Second Rise (Final Proofing):
-
Cover the shaped bowls loosely with a damp kitchen towel or plastic wrap. Let them rise for 30 to 45 minutes, until they look slightly puffed and the dough feels airy when you tap it gently with a floured finger. The dough should be noticeably puffy but not overly inflated — you want it pillowed, not balloon-like. If it over-proofs, the dough weakens and may lose its structure during baking.
Advertisements -
While the dough proofs, preheat your oven to 475°F (245°C). Place a Dutch oven or covered baking vessel inside so it preheats along with the oven. Steam in the first part of baking is what creates that beautiful, crispy crust.
Score and Finish:
- When the dough has finished proofing, carefully score each bread bowl. Using a sharp knife or lame (bread lame), make a shallow cross-hatch pattern or a single deep slash across the top of each bowl. The scoring should be about ¼ inch deep — deep enough to guide the oven spring but not so deep that it compromises structure. If using toppings, brush the tops lightly with water or a salt-water wash and sprinkle with sesame seeds, coarse salt, dried herbs, or seeds.
Bake (First Phase – with Steam):
-
Carefully place the baking sheet with the shaped bowls into the preheated Dutch oven. (Alternatively, if you’re using a separate covered baking vessel, place the shaped bowls on the sheet, cover the sheet tightly with foil, and bake.) Immediately pour about ¼ cup of boiling water into the bottom of the Dutch oven to create steam — this step is crucial for developing crust. Close the lid.
-
Bake covered for 15 minutes. The steam will cling to the dough surface, allowing the gluten to relax and the dough to expand dramatically before the crust sets.
Bake (Second Phase – crust development):
-
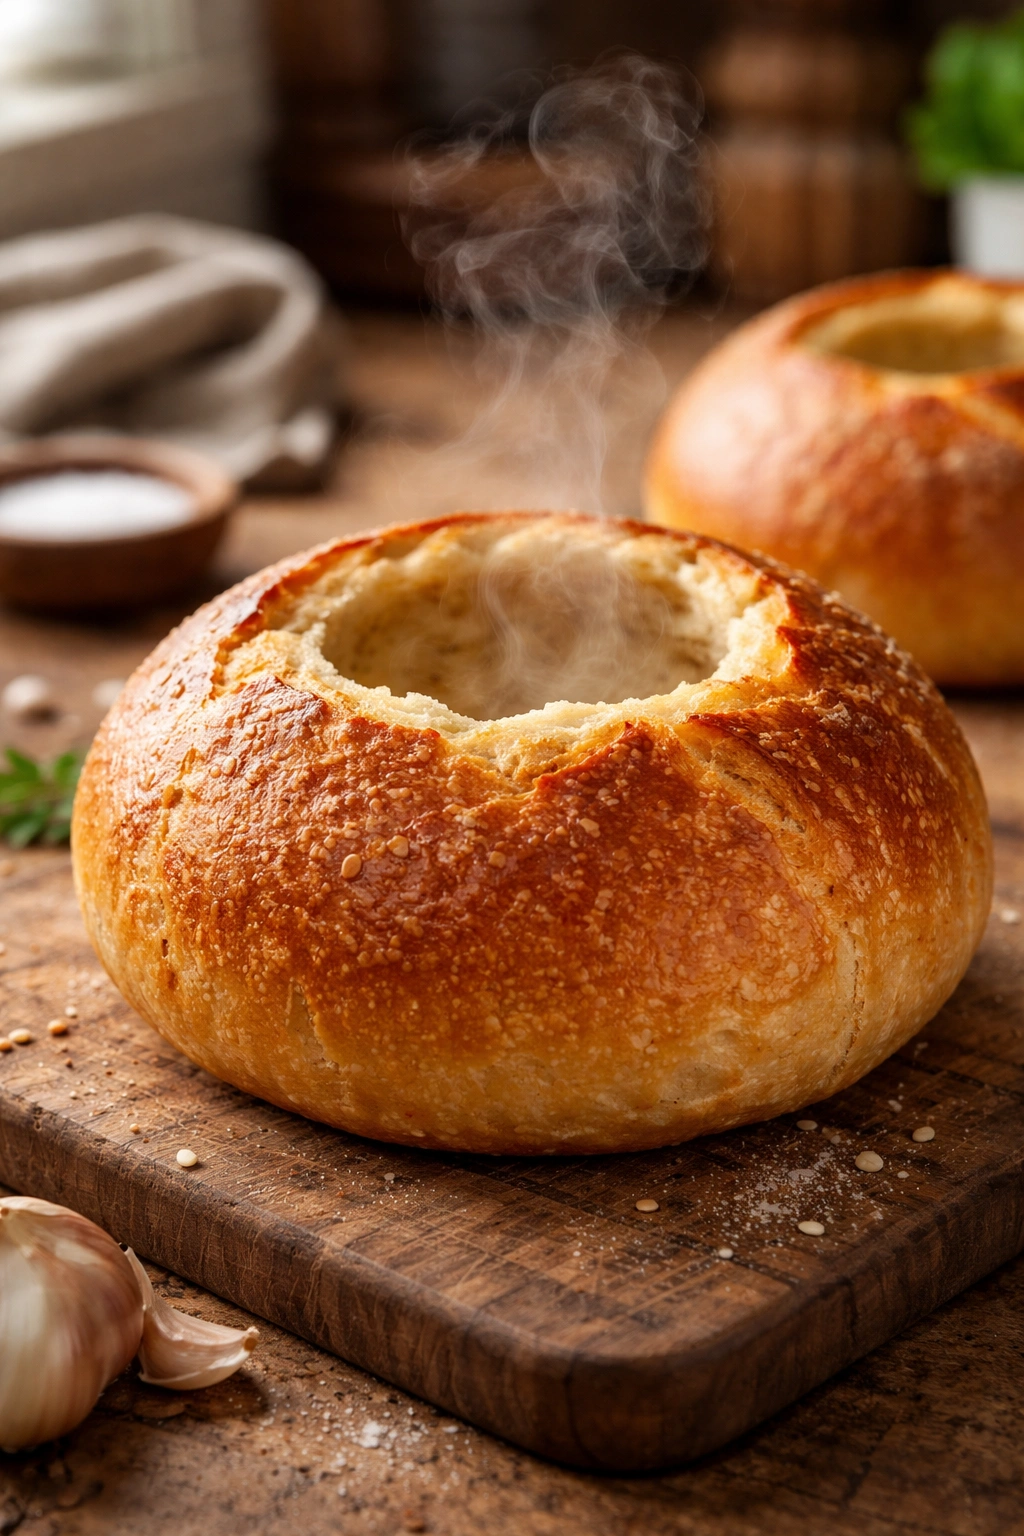
Carefully remove the Dutch oven lid (watch out for steam) and continue baking uncovered for 20 to 25 minutes longer, until the bread bowls are deeply golden brown on top and the sides are crispy and dry. The total baking time is approximately 35 to 40 minutes.
-
Tap the bottom of one bread bowl with your knuckle — it should sound hollow and feel hard, not soft or doughy. If it sounds hollow, the bowls are finished. If it still feels soft, bake for another 2 to 3 minutes and test again.
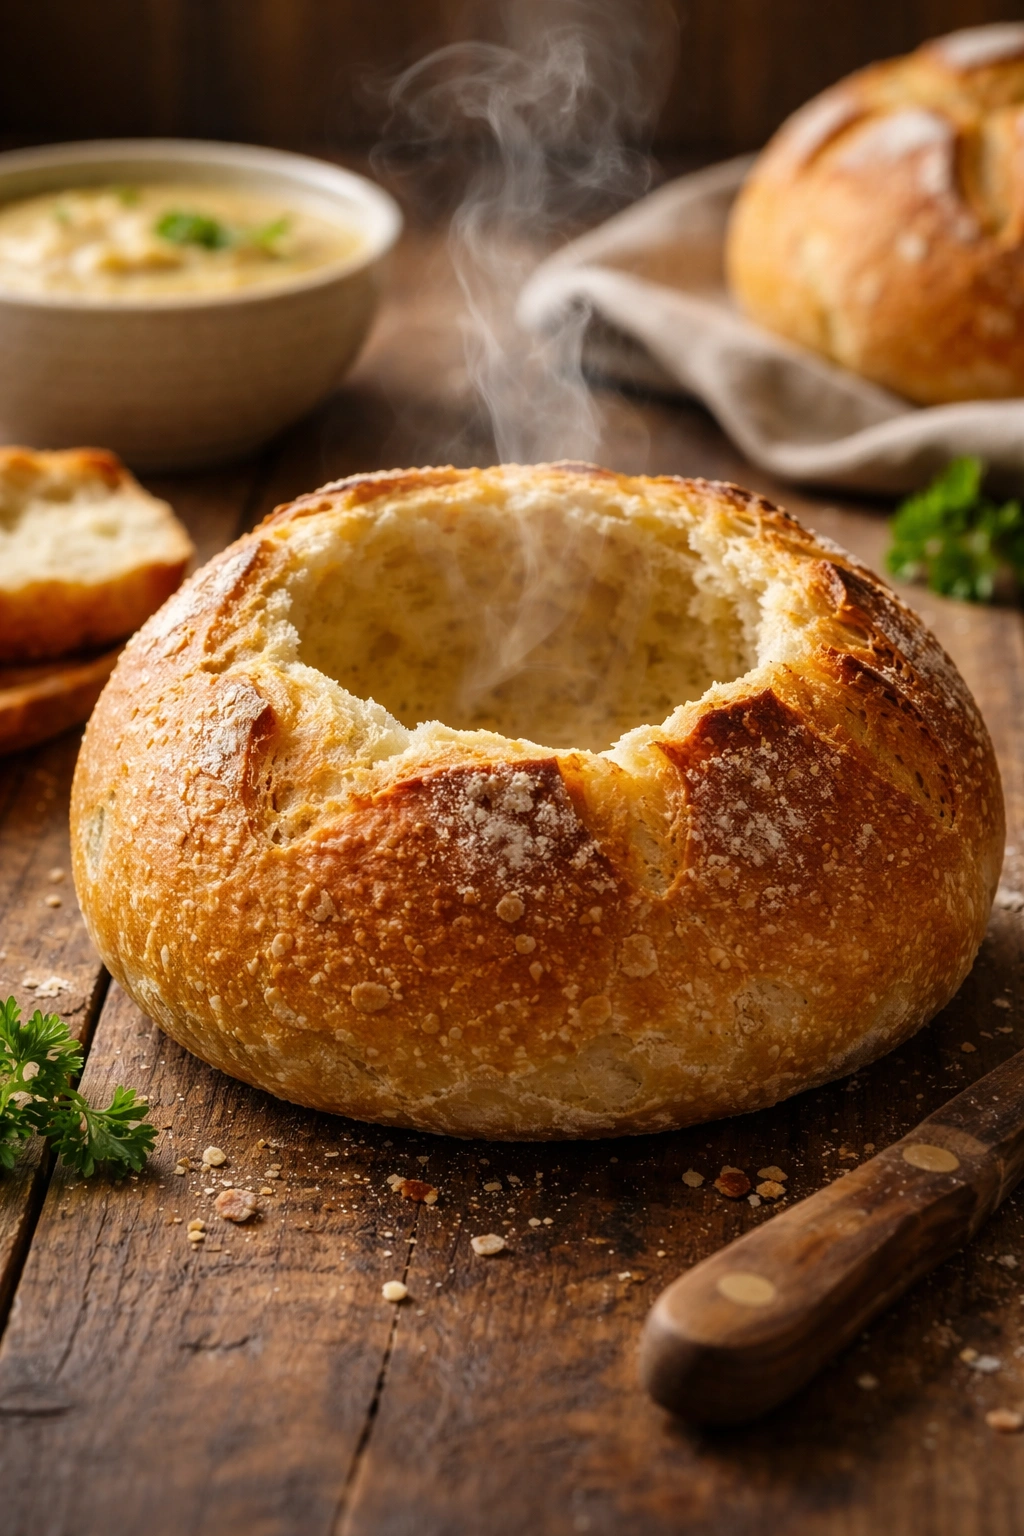
Cool:
-
Transfer the baking sheet to a wire cooling rack. Let the bread bowls cool on the sheet for 5 minutes, then carefully remove them from the upside-down bowls (they’ll still be warm — use a kitchen towel if needed). Place them upright on the cooling rack.
Advertisements -
Allow them to cool completely — at least 20 to 30 minutes — before filling with soup. If you fill them while they’re still very hot, condensation will make the interior steam and turn soggy. Once fully cooled, the structure sets and the crumb stabilizes, and they can handle hot soup without deteriorating.
Tips for Getting Perfectly Baked Bread Bowls
The single most common mistake home bakers make with bread bowls is over-proofing the dough during the second rise. It’s tempting to let them rise until they look dramatically puffy, but that actually weakens the gluten structure. The dough over-expands and can’t contain the oven spring, resulting in bread bowls that split unevenly or collapse slightly during baking. Watch for a subtle puffiness rather than obvious inflation—the dough should look maybe 30 to 40% larger than when you started the final proof, not doubled.
Dough temperature control is more important here than in other bread recipes because you’re baking in a relatively short timeframe. If your dough is too cold, it won’t rise enough during the second proof and you’ll end up with dense bread bowls. If it’s too warm, fermentation races ahead and you’ll miss the sweet spot. Aim for dough that’s around 75 to 78°F (24 to 26°C) after mixing. If your kitchen is cold, mix with slightly warmer water. If it’s hot, use cooler water to compensate.
Steam is non-negotiable for achieving that crispy, golden crust. Without steam, the outside of the dough sets immediately, which prevents the bread from expanding properly and creates a pale, thick crust instead of a thin, crispy one. The Dutch oven or covered baking vessel traps steam, and adding boiling water to the bottom amplifies it. Even if you’ve made bread before, don’t skip this step for bread bowls.
Shaping requires a delicate balance. You need to stretch the dough enough to cover the entire bowl, but not so aggressively that you create thin spots that might tear or bake unevenly. If the dough tears during shaping, simply pinch it closed; minor tears seal during proofing. If there’s a large hole, it’s worth starting over with that piece rather than baking a structurally compromised bowl.
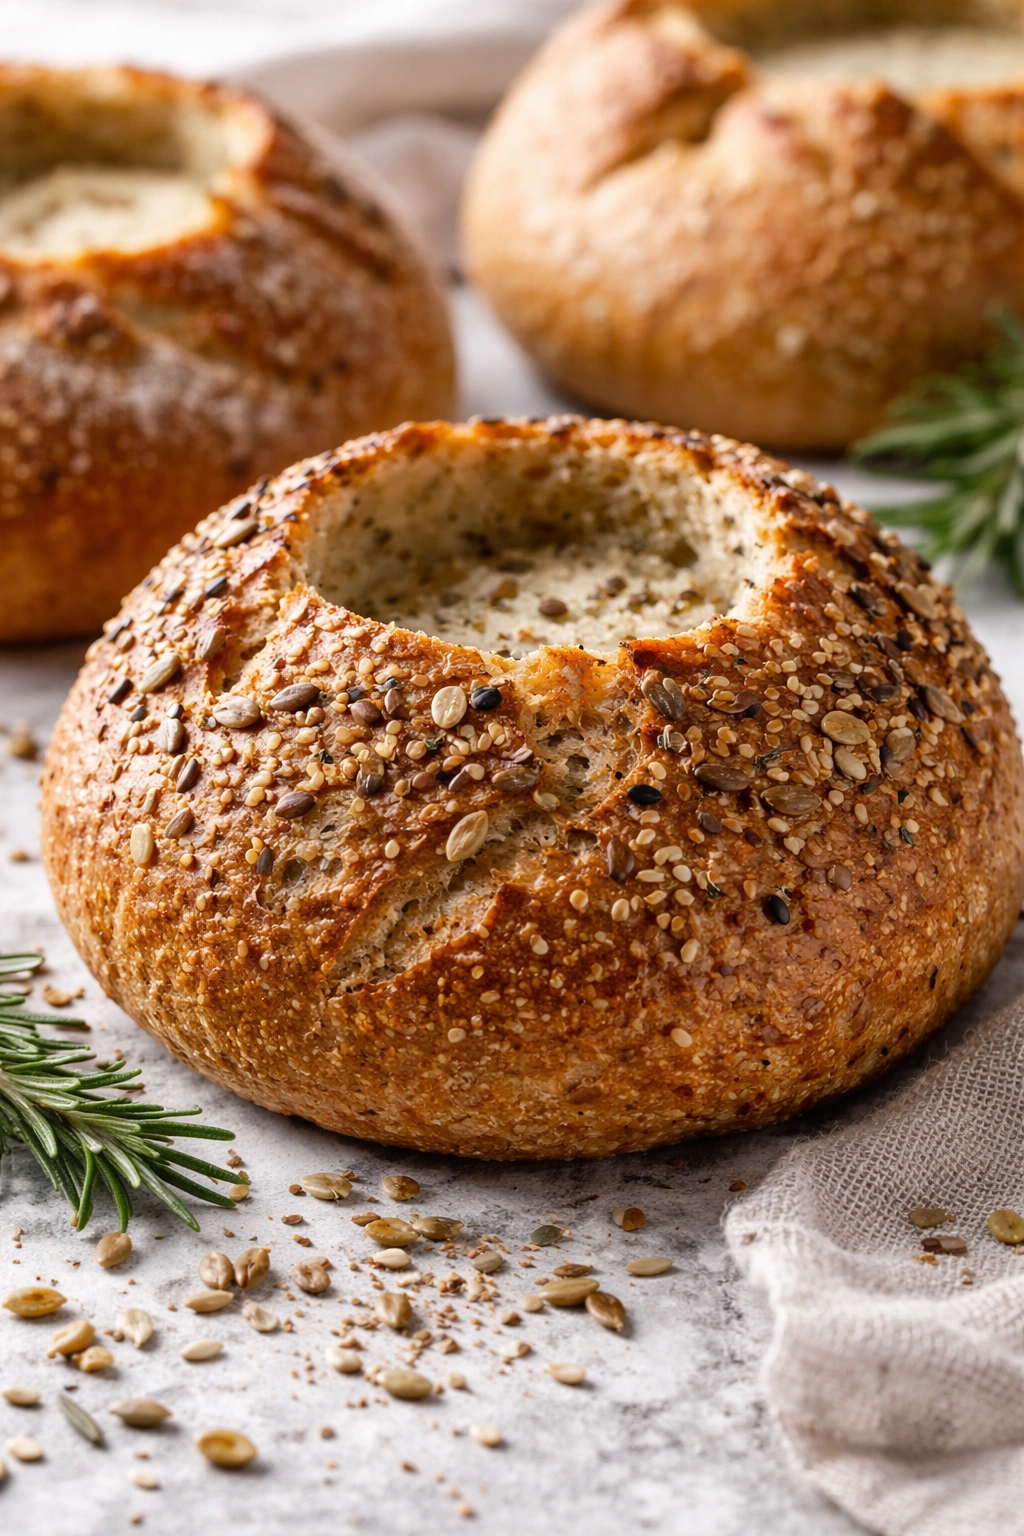
Don’t use bowls that are too large or too small. Bowls under 4 inches in diameter create bread bowls that are mostly crust with very little interior, which can be overly crunchy and hard to fill. Bowls over 7 inches in diameter are difficult for the dough to cover evenly and create a shape that’s awkward to hold. Standard 5 to 6-inch bowls work perfectly.
Shaping and Scoring Technique for Maximum Structure
The way you shape and score bread bowls directly affects how they rise and bake. Shaping over an upside-down bowl creates a naturally rounded top that mirrors what you’d get from a professional baker. The dough stretches evenly as you work it down the sides, and the rounded shape contains the oven spring in a way that flat tops can’t.
Start your stretch from the very center of the dough ball. Press gently with your fingertips, working from the middle outward and downward simultaneously. Think of it as coaxing the dough to thin and spread rather than forcefully pulling it. If you pull too hard, you’ll create tension that makes the dough snap back or tear. Gentle, patient stretching takes longer but creates a more even result.
The tuck underneath is what prevents the edges from unfurling during baking. When you have excess dough hanging down the sides of the bowl, fold it inward and tuck it under the bottom. You can use a little water on the surface to help the overlapping dough stick to itself. This creates a clean seam that’s essentially hidden from view during baking, and it prevents the edges from baking unevenly or drying out.
Scoring—making deliberate cuts on the surface—serves two purposes. Visually, it adds artisanal character and clearly indicates where the bowl will open during oven spring. Functionally, it guides the oven spring in a controlled direction, which improves crust development and prevents the bread from cracking unpredictably. A shallow cross-hatch or a single deep diagonal slash both work beautifully. Make your cuts confident and swift; hesitant, slow scoring creates ragged tears instead of clean cuts.
How to Handle Dough Temperature and Rising
Temperature is the invisible hand that controls fermentation speed, and understanding it gives you genuine control over your bread. A dough that’s 70°F (21°C) ferments slowly and develops better flavor. The same dough at 80°F (27°C) ferments nearly twice as fast. Neither is objectively better—it’s about matching your schedule.
If your kitchen is cool and bulk fermentation is taking longer than expected, don’t panic. Slower fermentation actually builds flavor more effectively. You can let the dough rise for two or even three hours in a very cool kitchen, and it will taste noticeably better than a quick fermentation. What matters is visual readiness, not clock time.
To warm dough efficiently, place the bowl in a turned-off oven with the light on, or near (but not touching) a sunny window. Another trick: fill a large bowl with hot water, place your dough bowl on top, and cover loosely—the warm water beneath will gently warm the dough. Check the dough temperature with an instant-read thermometer after 15 to 20 minutes of warming, and you’ll know exactly where you are.
Overproofed dough can’t be salvaged by shaping differently. If your first rise got away from you and the dough has tripled or gone overly slack and puffy, you have two options: start over with a new mix, or proceed anyway and accept that the resulting bread bowls will be tender and possibly collapse slightly during baking. It’s not ideal, but bread made from overproofed dough is still edible—just not the sturdy vessel you’re aiming for.
Trust your senses more than the clock. Look at how much the dough has expanded. Gently press the surface and watch how it responds. When dough is properly proofed, it feels pillowy and springs back slowly. That visual and tactile feedback is more reliable than any timer.
Variations and Flavor Adaptations
Whole wheat flour creates deeper, nuttier bread bowls with more complex flavor. Substitute up to 30% of the all-purpose flour with whole wheat flour. Whole wheat absorbs water differently, so start with the same hydration but be prepared to add an extra tablespoon or two of water if the dough feels overly stiff.
Herb-infused bowls are perfect for specific soups. Add 1 to 2 tablespoons of dried herbs (Italian seasoning, thyme, rosemary, or herbes de Provence) to the flour before mixing. Or brush the shaped bowls with herb-infused oil and sprinkle with coarse salt and dried herbs before baking. Garlic powder (1 to 2 teaspoons mixed into the dough) creates an aromatic version that pairs beautifully with creamy soups.
Seeded and topped bowls add nutrition and visual interest. After brushing with water, press the tops into sesame seeds, poppy seeds, caraway seeds, or a mix of seeds and coarse salt. Some bakers even press toasted breadcrumbs mixed with grated cheese onto the surface before baking, creating a crusty, savory top.
A sourdough version requires using fed sourdough starter instead of commercial yeast. Substitute 150g of active, bubbly sourdough starter for the yeast and sugar, and adjust the water down to about 1 cup. Fermentation will take longer—typically 4 to 6 hours for bulk rise—but the flavor depth is extraordinary. Sourdough bread bowls have a subtle tang and deeper color.
Higher hydration dough (using slightly more water) creates an airier crumb with larger irregular holes, which is perfect if you like bread bowls that really absorb broth. Add an extra 2 to 3 tablespoons of water and expect the dough to feel noticeably stickier—it’ll be harder to shape, but the result is worth the extra effort.
Smaller bread bowls (for appetizers or individual sides) can be made by dividing the dough into 8 or even 10 pieces and using smaller bowls (3 to 4 inches in diameter) as molds. Everything else stays the same—only the shaping is less work, and the baking time might shorten slightly (start checking at 30 minutes instead of 35).
Storage, Reheating, and Make-Ahead Strategy
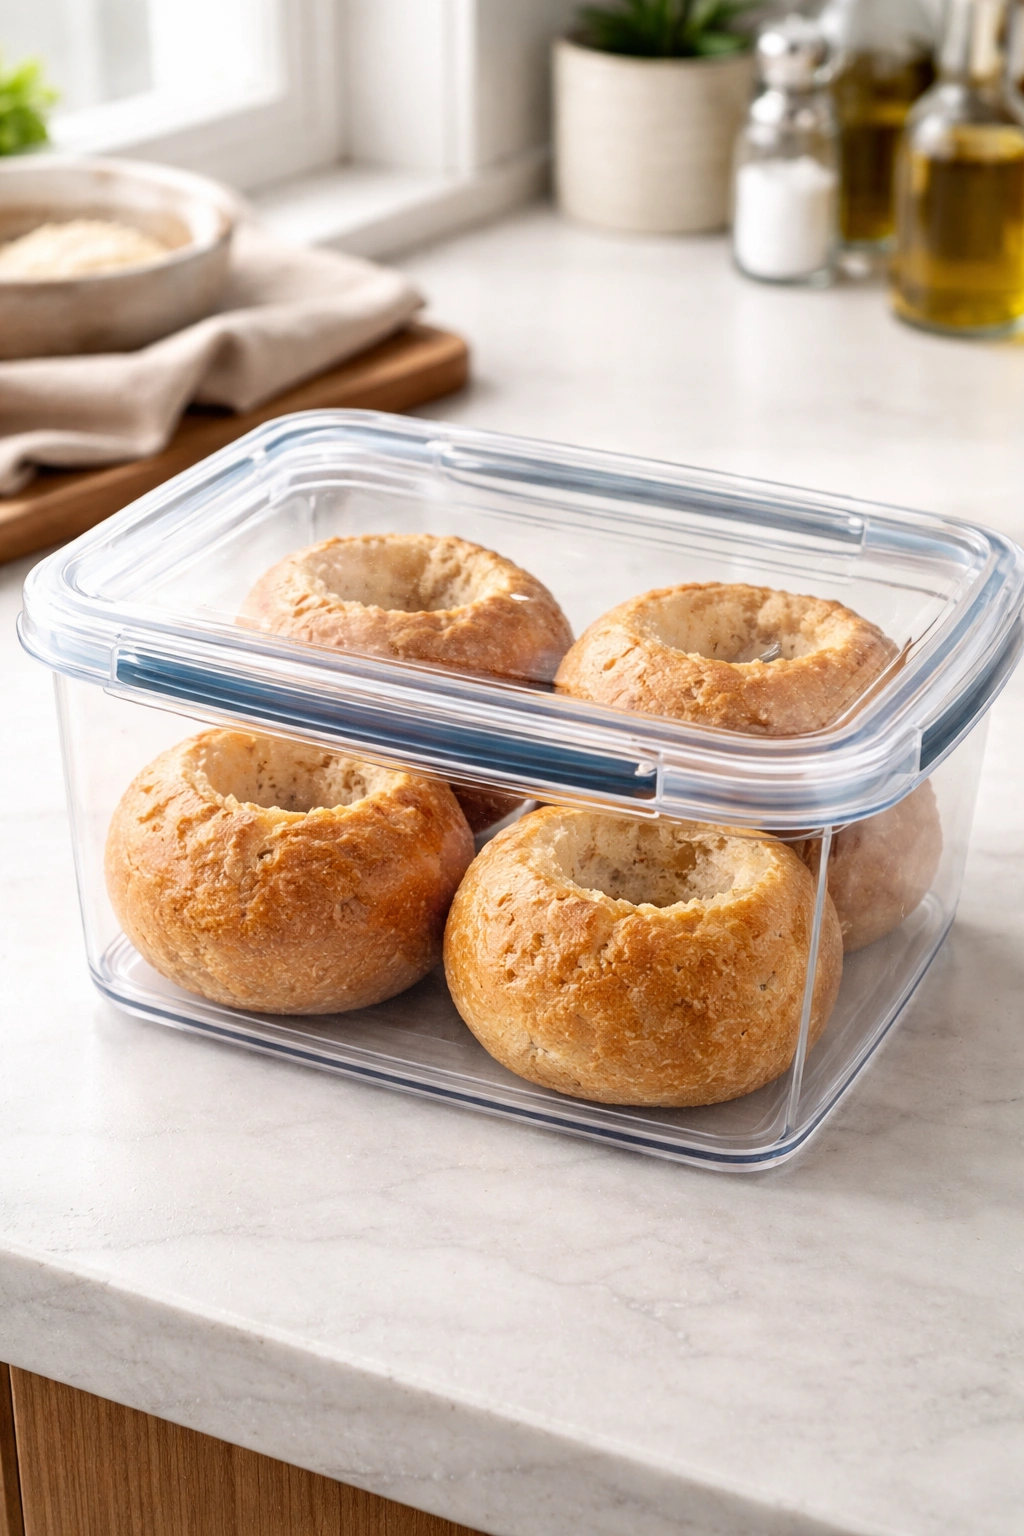
Fully cooled bread bowls keep at room temperature in an airtight container or wrapped in a plastic bag for up to 3 days. They’ll gradually firm up as they age, but they remain edible and actually become easier to handle on day two or three because the structure fully sets.
Frozen bread bowls keep beautifully for up to 3 months. Once they’re fully cooled, place them in a freezer bag or container and freeze. To reheat: thaw at room temperature for about an hour, then warm in a 325°F (160°C) oven for 8 to 10 minutes to restore crispness. Alternatively, you can reheat directly from frozen at 350°F (175°C) for 12 to 15 minutes—watch them carefully so they don’t over-brown.
Making the dough a day ahead is convenient. Mix the dough according to the recipe, let it rise for about 30 minutes at room temperature, then refrigerate overnight. The next day, let it come to room temperature for about an hour, then shape and continue with the second rise and baking. The cold fermentation actually improves flavor.
You can also shape the bowls, place them in the freezer on a baking sheet until solid (about 2 hours), then transfer them to a freezer bag. When you’re ready to bake, thaw them at room temperature for 30 to 45 minutes, then proceed directly to the final proof and baking. This approach gives you maximum flexibility—you could bake fresh bread bowls on any day with minimal planning.
Avoid refrigerating already-risen dough. The second rise happens at room temperature, not in the cold. If you try to refrigerate dough during the second proof, it’ll continue fermenting in the cold, and the timing becomes unpredictable.
Best Soups and Fillings for Bread Bowls
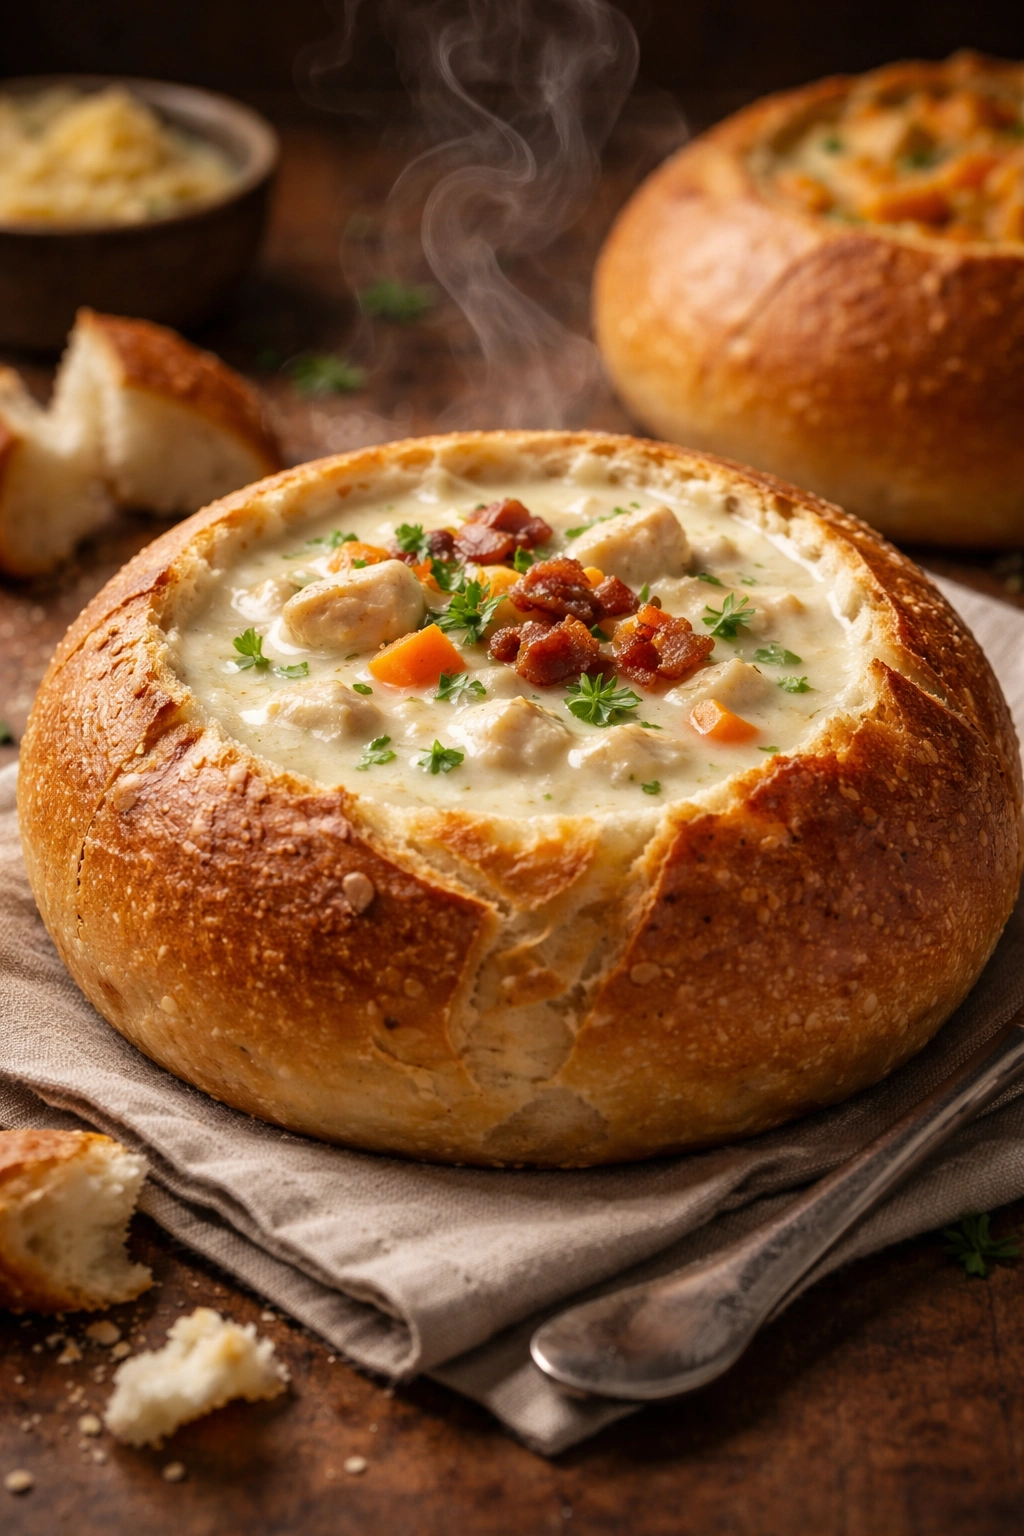
The beauty of bread bowls is that they work with any soup or stew. Creamy soups are the classic pairing—butternut squash, potato chowder, New England clam chowder, creamy mushroom, and broccoli cheddar all showcase the bread perfectly. The creaminess coats the interior crumb, and the bread absorbs richness without becoming soggy.
Tomato-based soups (minestrone, tortilla, Italian wedding) are equally delicious. The acidity of tomatoes actually complements the subtle sweetness of bread. The soup seeps into the soft interior crumb, and the crusty exterior provides textural contrast.
Hearty stews with chunky ingredients—beef stew, chicken and dumplings (yes, bread bowls work even for this), lentil stew—all benefit from the sturdy structure of a well-baked bread bowl. The dough needs to be strong enough to hold the weight of thick, chunky contents without disintegrating.
Broth-based soups like French onion, chicken noodle, or Asian-inspired broths work beautifully. The thinner liquid is absorbed more slowly, so the bread stays crispy longer. French onion soup in particular creates a stunning visual presentation—the bread softens slightly under the hot broth, and the melted cheese bridges the bread and soup.
Cold soups are possible but less common. Gazpacho or chilled cucumber soup in a bread bowl creates an interesting contrast, though the bread won’t have the same crispy quality that warm baking provides. If you’re serving cold soup, serve the bread bowl on the side for dunking rather than filling it.
Vegetarian creamy soups—cauliflower, carrot and ginger, pumpkin—are just as delicious as meat-based broths. The versatility of bread bowls means your options are essentially unlimited.
Serving Presentation and Plating Ideas
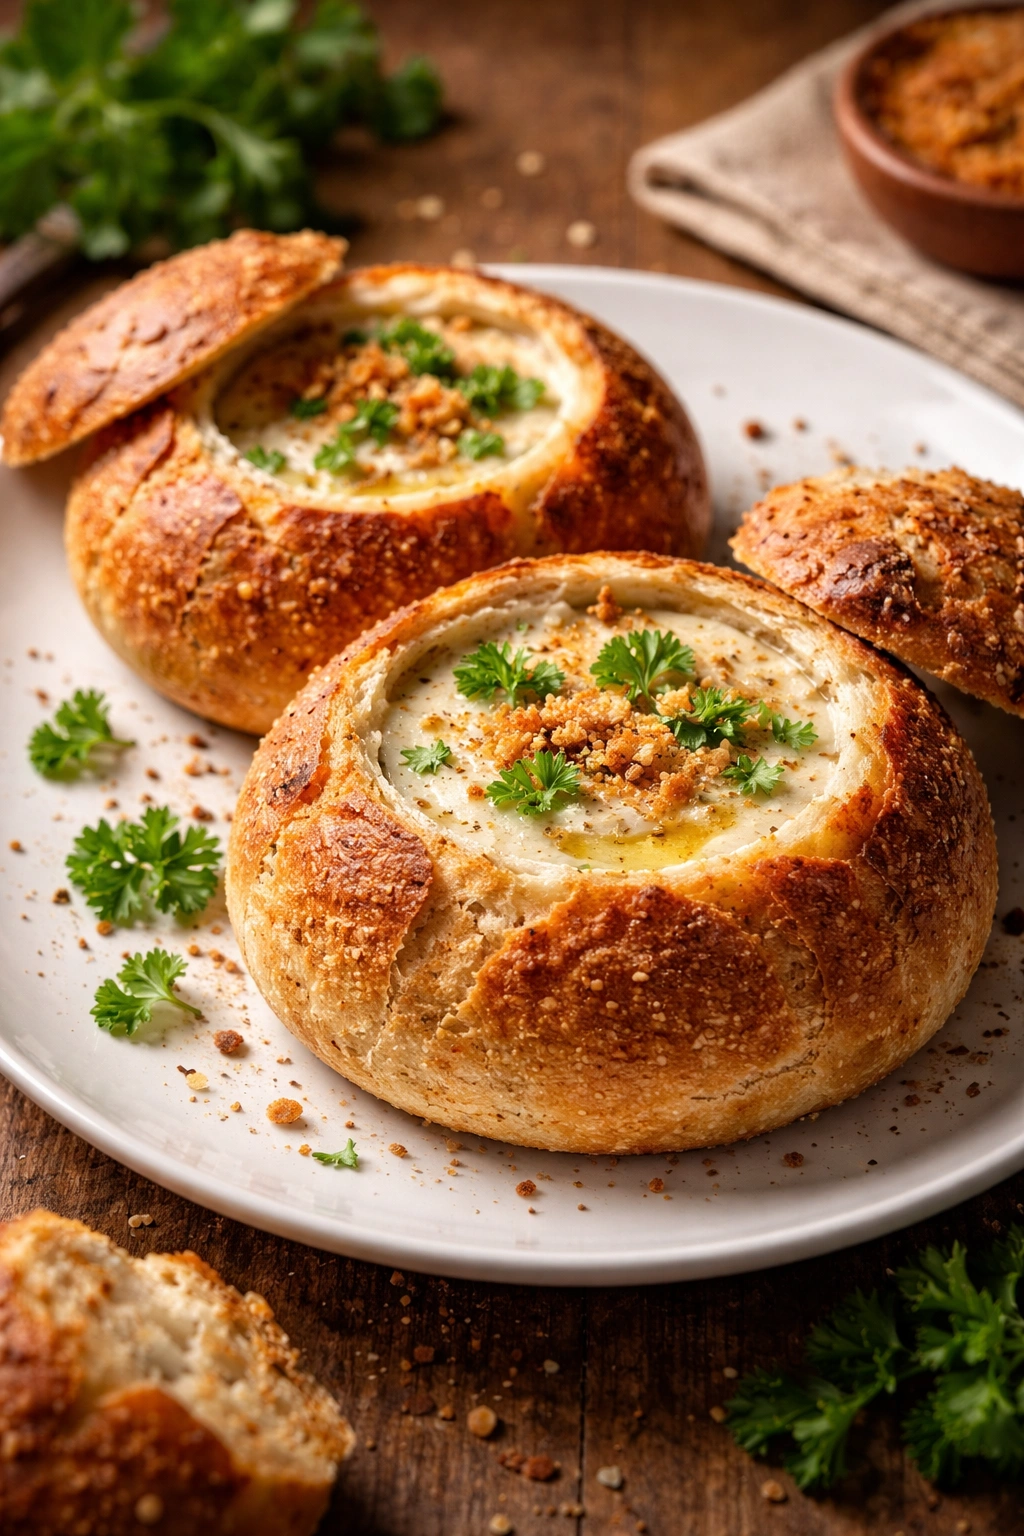
Bread bowls create an inherently beautiful plating opportunity. Serve them on a simple white plate or wooden board so the golden bread and colorful soup are clearly visible. The contrast between the rustic exterior and the vibrant soup inside is visually compelling and immediately communicates that something special is happening.
Garnish the top of the soup, not the bread. Fresh herbs (parsley, thyme, chives), cracked black pepper, a drizzle of oil, toasted breadcrumbs, or crispy bacon bits all draw the eye to the center. These garnishes also signal to the diner that they’re about to eat something intentional and thoughtfully prepared.
If you’re serving bread bowls at a dinner party, let guests ladle their own soup and fill their bowls at the table. The act of filling creates anticipation, and the aroma hits them all at once. This also gives everyone control over how much soup they want, since some may prefer more bread and less soup, while others want the reverse.
For a more casual presentation, you can partially tear away a circular section from the top of the bread bowl before serving, creating a lid or opening. This makes it easier to eat with a spoon (less fighting with crusty edges) and looks distinctly intentional. Save the torn-away piece to place on the side of the plate as a secondary dipping piece.
A soup cup or shallow bowl underneath the bread bowl catches any drips and prevents the diner from getting soup on their lap. This small detail communicates thoughtfulness and is genuinely helpful, especially if the soup is very hot or brothy.
Final Thoughts
Homemade bread bowls are achievable for any home baker willing to practice the technique once or twice. The first batch teaches you what properly proofed dough feels like, how long fermentation takes in your specific kitchen, and how satisfying it is to bake something this impressive. The second batch gets faster and more confident. By the third time, you’re not really following a recipe anymore—you’re making bread bowls from intuition and feel, which is when baking stops being a task and becomes genuine creative expression.
The investment is minimal: a few dollars in ingredients, a couple of hours of mostly hands-off rising time, and less than an hour of active work. What you get in return is a dinner experience that’s qualitatively different from a bowl of soup served in ordinary dishware. The bread bowl becomes part of the meal, not just the presentation. Your guests will notice, comment, and remember it long after the soup is finished.
Store extras in the freezer and pull them out whenever you want to transform an ordinary weeknight dinner into something that feels restaurant-quality. Make them with whole wheat, with herbs, with seeds, or plain and simple. Serve them with minestrone one night and clam chowder the next. Once you’ve baked bread bowls, you’ll find yourself looking for excuses to make them again, which is exactly how you know they’re worth mastering.