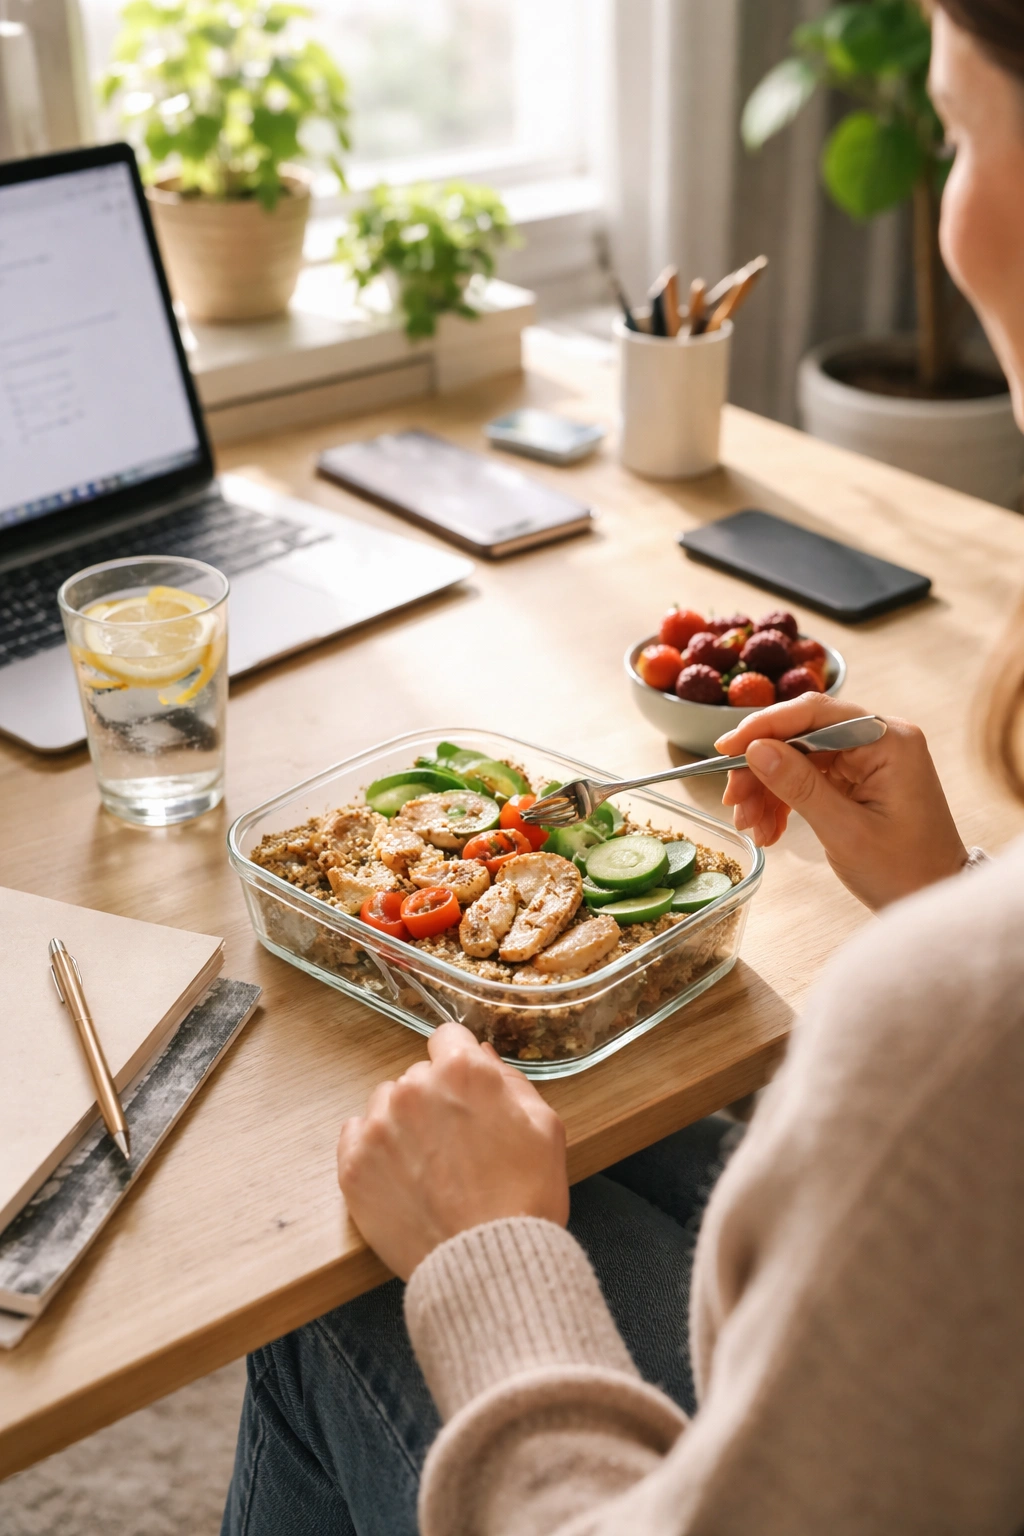
Working from home fundamentally changes how you approach lunch — you’re not rushing back from your desk or eating something cold that’s been sitting in a brown bag since morning. You have access to your full kitchen, you can actually enjoy what you eat without wolfing it down, and you get a genuine midday break that can reset your productivity for the afternoon ahead. The catch is that it’s easy to fall into the trap of eating the same sandwich every single day or reaching for takeout because you’re not thinking strategically about what to prepare.
The lunches that work best for work-from-home situations are ones that come together quickly (because your lunch break is still limited), taste genuinely satisfying enough that you don’t crave snacks two hours later, and don’t leave your kitchen looking like a disaster zone. You want meals that can be built from pantry staples and whatever fresh ingredients happen to be in your fridge, rather than requiring a special trip to the grocery store. Most importantly, they need to be meals you actually want to eat — not obligations you force down just because they’re nutritionally sound.
The five lunches below hit that sweet spot. Each one comes together in 15 minutes or less, uses simple, forgiving ingredients, can be scaled up for meal prep, and genuinely tastes good enough that you’ll look forward to midday rather than dreading it. Some can be made entirely fresh during your lunch break; others benefit from a few minutes of advance prep the night before. All of them keep you satisfied through the afternoon without making you feel sluggish when you need to power through that last block of work.
1. Mediterranean Chickpea Salad with Crispy Garlic Bread
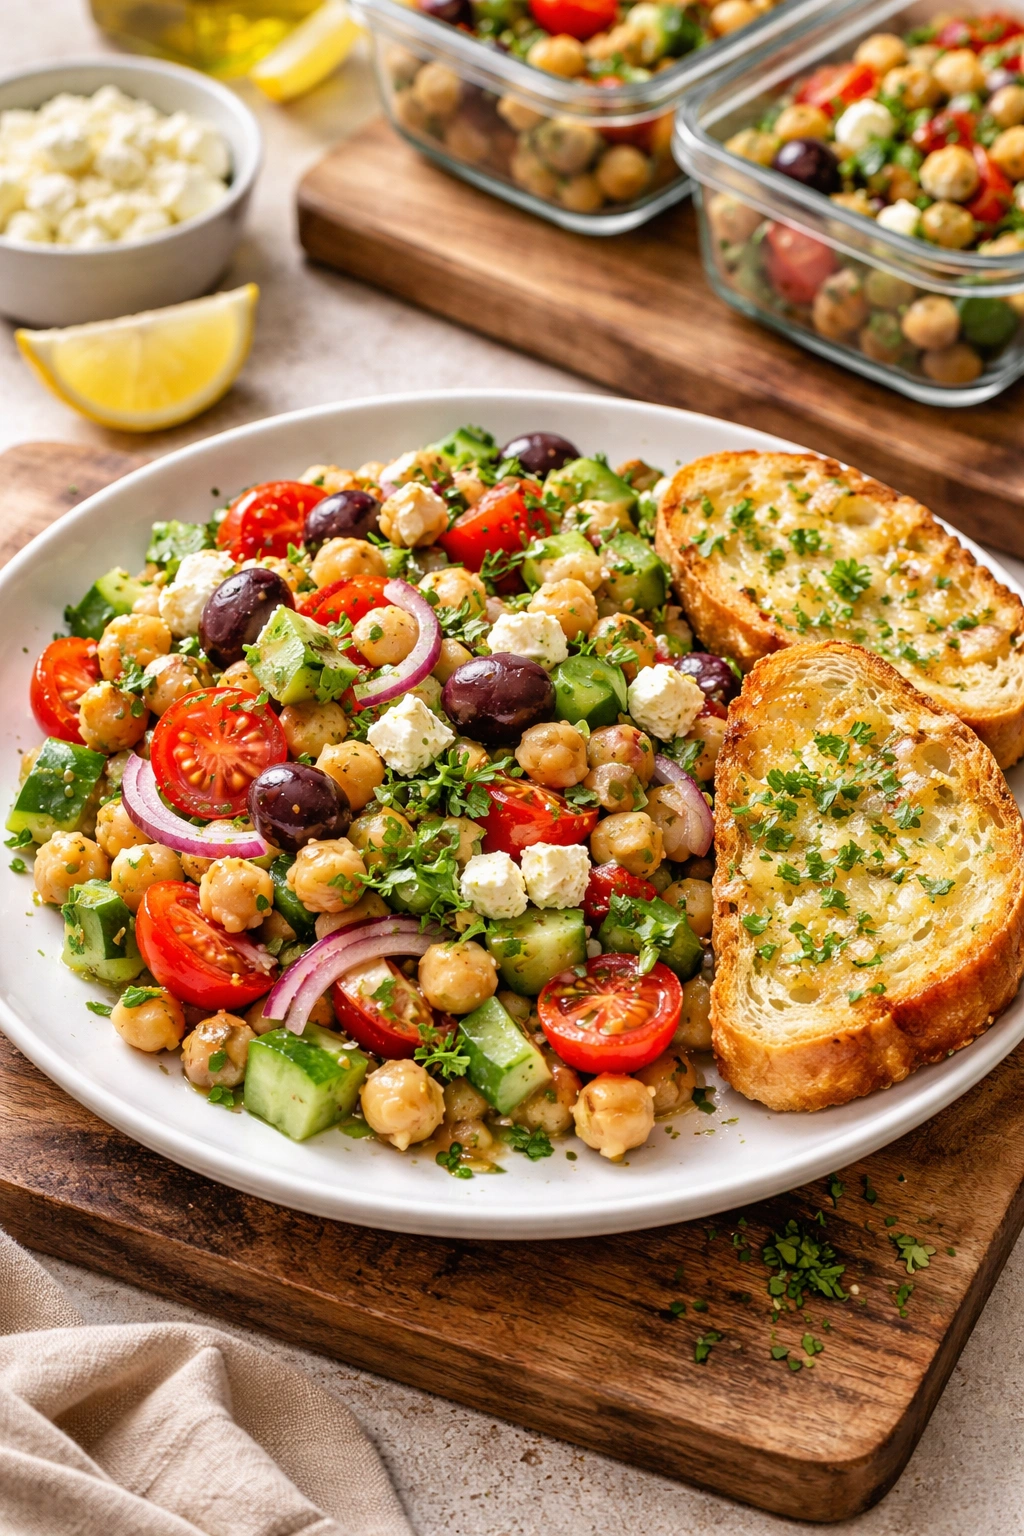
This is the kind of lunch that feels light enough to eat comfortably during a workday but substantial enough to actually fuel your afternoon. Chickpeas bring real protein and fiber; the vegetables add crunch and freshness; and the dressing ties everything together with bright, tart flavor that wakes up your palate. The genius of this recipe is that everything can be prepped ahead and kept in separate containers, then tossed together right before you eat so the bread stays crispy and the vegetables stay crunchy.
Yield: Serves 1 | Prep Time: 10 minutes | Cook Time: 8 minutes | Total Time: 18 minutes | Difficulty: Beginner — just chopping vegetables and toasting bread; no special technique required.
For the Salad:
- One 15-ounce can chickpeas, drained and rinsed (or about 1½ cups cooked chickpeas)
- 1 cup cherry tomatoes, halved
- ½ cucumber, diced into small bite-sized pieces
- ¼ red onion, thinly sliced
- ⅓ cup crumbled feta cheese
- ¼ cup fresh parsley, roughly chopped
- 2 tablespoons fresh mint, roughly chopped (optional but genuinely makes it better)
- ⅓ cup Kalamata olives, pitted and halved
- 3 tablespoons olive oil
- 1½ tablespoons red wine vinegar
- ½ teaspoon dried oregano
- ¼ teaspoon salt
- Cracked black pepper to taste
For the Garlic Bread:
- 2 slices crusty bread (sourdough, ciabatta, or Italian bread work best)
- 2 tablespoons unsalted butter, softened
- 2 cloves garlic, minced very finely
- Pinch of salt
- ½ teaspoon fresh parsley, finely chopped
Make the Salad:
-
In a large bowl, combine the drained chickpeas, cherry tomatoes, cucumber, red onion, feta cheese, parsley, mint, and Kalamata olives. Toss gently to combine without crushing anything.
-
In a small bowl or measuring cup, whisk together the olive oil, red wine vinegar, oregano, salt, and black pepper until combined.
Advertisements -
Pour the dressing over the chickpea mixture and toss until everything is evenly coated. Set aside while you make the garlic bread — or if you’re prepping ahead, transfer to a container and refrigerate for up to 2 days.
Make the Garlic Bread:
-
While the salad rests, combine the softened butter, minced garlic, salt, and parsley in a small bowl and stir until you have a smooth, fragrant paste.
-
Slice your bread in half horizontally (so you have two roughly equal pieces with the insides facing up). Spread the garlic butter generously on the inside of each piece, dividing it evenly.
-
Heat a skillet or toaster oven to medium-high heat. Toast the bread cut-side down for 3 to 4 minutes, rotating it occasionally, until the edges are golden brown and the garlic is fragrant. Watch it closely — the line between perfectly toasted and burnt is quick here.
-
Remove the bread from the skillet and let it cool for exactly 1 minute — it will continue crisping as it cools, and this brief rest makes it less likely to become soggy from the salad underneath.
Why It Works for Work-From-Home
You can make this lunch during your morning coffee run or the night before. The vegetables and chickpeas keep beautifully in the fridge for days, and the dressing actually makes the flavors better as they sit together overnight. In the morning, you’re not scrambling; you’re just assembling. The toast takes less than 5 minutes while you’re setting up at your desk, and the whole meal is finished by the time you sit down. You feel like you’ve had something special — fresh, Mediterranean, intentional — without ever leaving the kitchen.
Work-Lunch Pro Tips
Toast the bread right before eating, not in advance. Cold garlic bread is sad bread. If you’re making this ahead, keep the dressing separate from the salad until you’re ready to eat — the tomatoes will get soggy, and the bread will lose its crispiness if it sits in dressing for hours.
The beauty of this salad is that you can swap out almost any vegetable you have on hand. Bell peppers, radishes, celery, or thinly sliced cabbage all work. Fresh dill can replace the mint, and a squeeze of lemon juice can replace half the vinegar if you prefer a slightly brighter flavor.
2. Crispy Smashed Chickpea and Avocado Toast
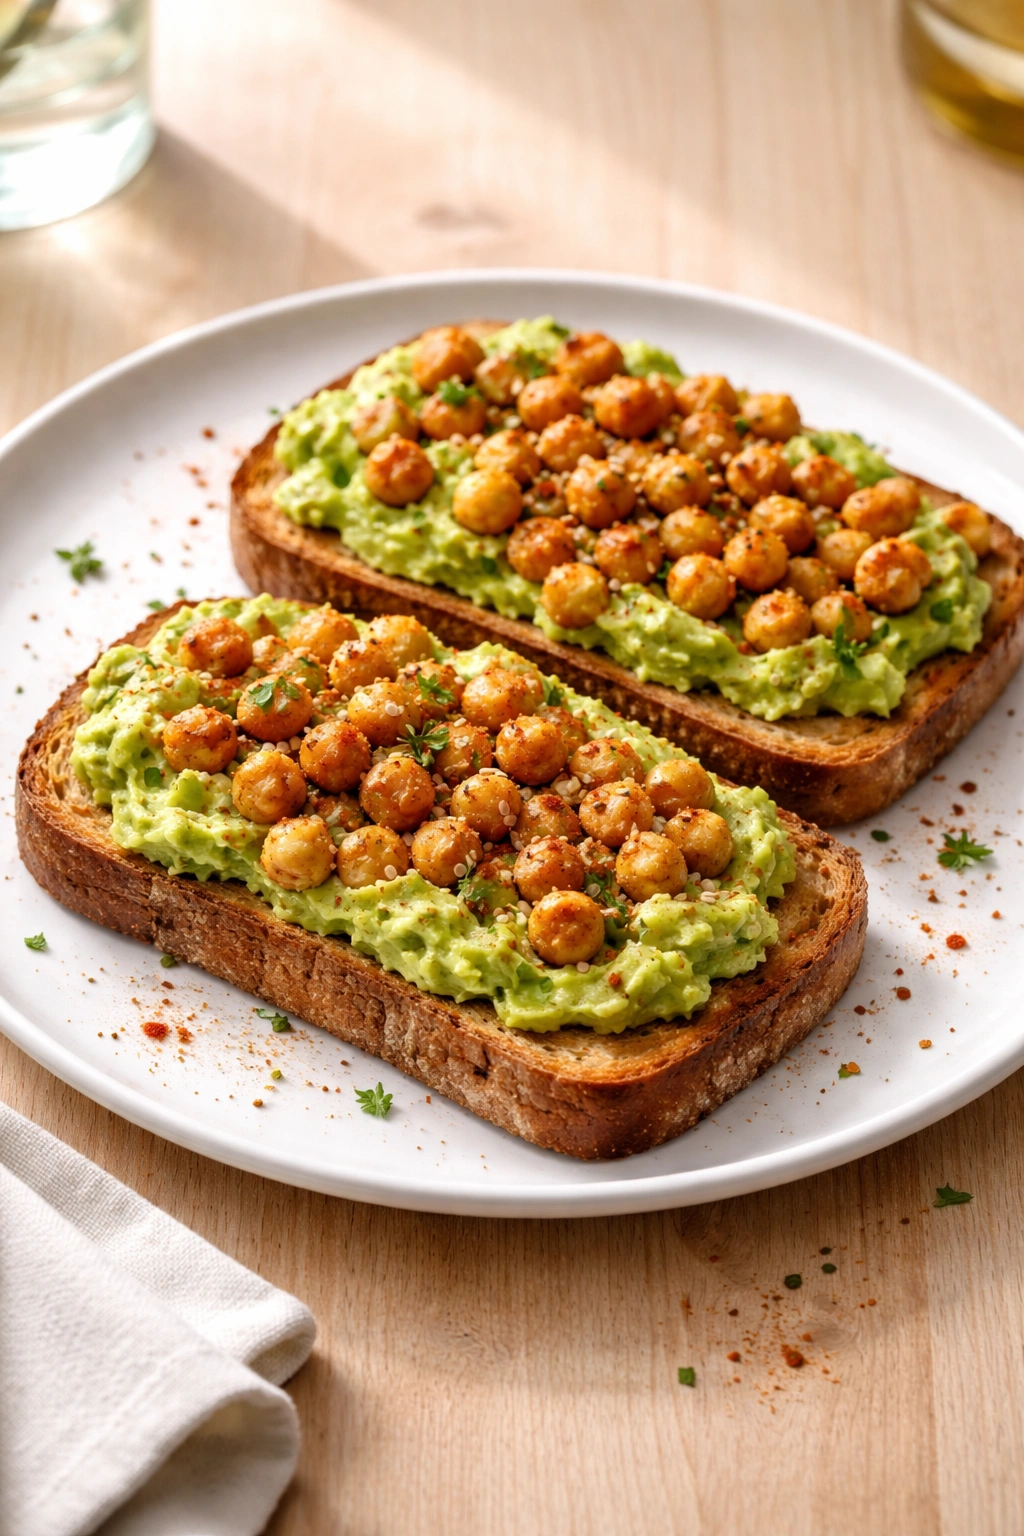
If you’re looking for something faster than the Mediterranean salad but equally satisfying, this is it. Mashing chickpeas with a fork creates a texture that sits somewhere between hummus and tuna salad — creamy, substantial, and genuinely addictive. Avocado adds richness and makes the whole thing feel luxurious, even though you’re eating lunch at your desk. The beauty is that this requires zero cooking skill and zero ingredients you don’t already have.
Yield: Serves 1 | Prep Time: 8 minutes | Cook Time: 4 minutes | Total Time: 12 minutes | Difficulty: Beginner — literally just mashing and toasting.
For the Spread:
- ¾ cup canned chickpeas, drained and rinsed (or about ¾ cup cooked chickpeas)
- ½ ripe avocado
- 1 tablespoon tahini (or Greek yogurt if you don’t have tahini)
- 1 tablespoon fresh lemon juice
- 1 small clove garlic, minced (optional, but it adds depth)
- ¼ teaspoon smoked paprika
- ⅛ teaspoon cayenne pepper (omit if you prefer no heat)
- Salt and black pepper to taste
- Red pepper flakes for garnish (optional)
For Assembly:
- 2 thick slices bread (sourdough, whole grain, or whatever you prefer)
- 1 tablespoon olive oil
- 2 to 3 handfuls of baby spinach or arugula (optional, but the greens add crunch and keep you full longer)
- Fleur de sel or coarse sea salt for finishing
- Cracked black pepper
Make the Spread:
-
Place the drained chickpeas in a medium bowl. Using the back of a fork, mash them vigorously until you reach your desired consistency — some people like it smooth and spreadable, others prefer chunky texture. There’s no wrong answer here; do what feels right to you.
-
Cut the avocado in half lengthwise, remove the pit, and scoop the flesh into the bowl with the mashed chickpeas.
-
Add the tahini (or Greek yogurt), lemon juice, minced garlic if using, smoked paprika, and cayenne pepper. Fold everything together gently, stirring just enough to combine without turning it into a uniform paste — you want some texture variation.
-
Taste the mixture and season generously with salt and black pepper. Remember that you’re spreading this on salted or toasted bread, so it needs to taste flavorful on its own.
Toast and Assemble:
-
Heat a skillet or toaster oven to medium-high heat. Brush or rub both slices of bread lightly with the olive oil.
Advertisements -
Toast the bread for 3 to 4 minutes until the surface is golden brown and the interior is still soft — you want crispy outside, chewy inside.
-
Spread the chickpea-avocado mixture generously onto both pieces of toast, dividing it evenly between them.
-
If using the greens, place a small handful on top of each toast slice and press down gently so they nestle into the spread.
-
Finish with a pinch of fleur de sel, cracked black pepper, and a tiny sprinkle of red pepper flakes if you like heat and garnish.
-
Transfer to a plate and eat immediately while the toast is still warm.
Why This Works for Work-From-Home
This is the fastest lunch on this list — genuinely start-to-finish in under 15 minutes, including toasting. You’re not chopping a dozen vegetables or standing over a stove. The ingredients are shelf-stable (chickpeas, tahini, olive oil, bread) plus produce that keeps for a week (avocado, lemon, garlic). If you’re running behind in the morning or didn’t plan ahead, this is your safety lunch that still tastes intentional and nourishing.
Smart Variations and Tweaks
Swap the tahini for Greek yogurt, ricotta, or even mashed white beans if you need something creamier. Add sun-dried tomatoes, sliced fresh tomato, or caramelized onions on top for extra flavor. If avocado is too expensive or not ripe, use a whole can of chickpeas and make it richer with an extra tablespoon of tahini and a touch more lemon juice — it’ll be a bit more like hummus and absolutely still delicious.
For meal prep, mash the chickpeas with the tahini, lemon juice, and spices the night before, keep it covered in the fridge, and fold in the avocado right before you eat. The lemon juice will slow the avocado’s browning, but avocado is best when it hasn’t had hours to oxidize, so eating it the same day you cut it is ideal.
3. Sheet Pan Roasted Vegetables with Crispy Tofu and Tahini Drizzle
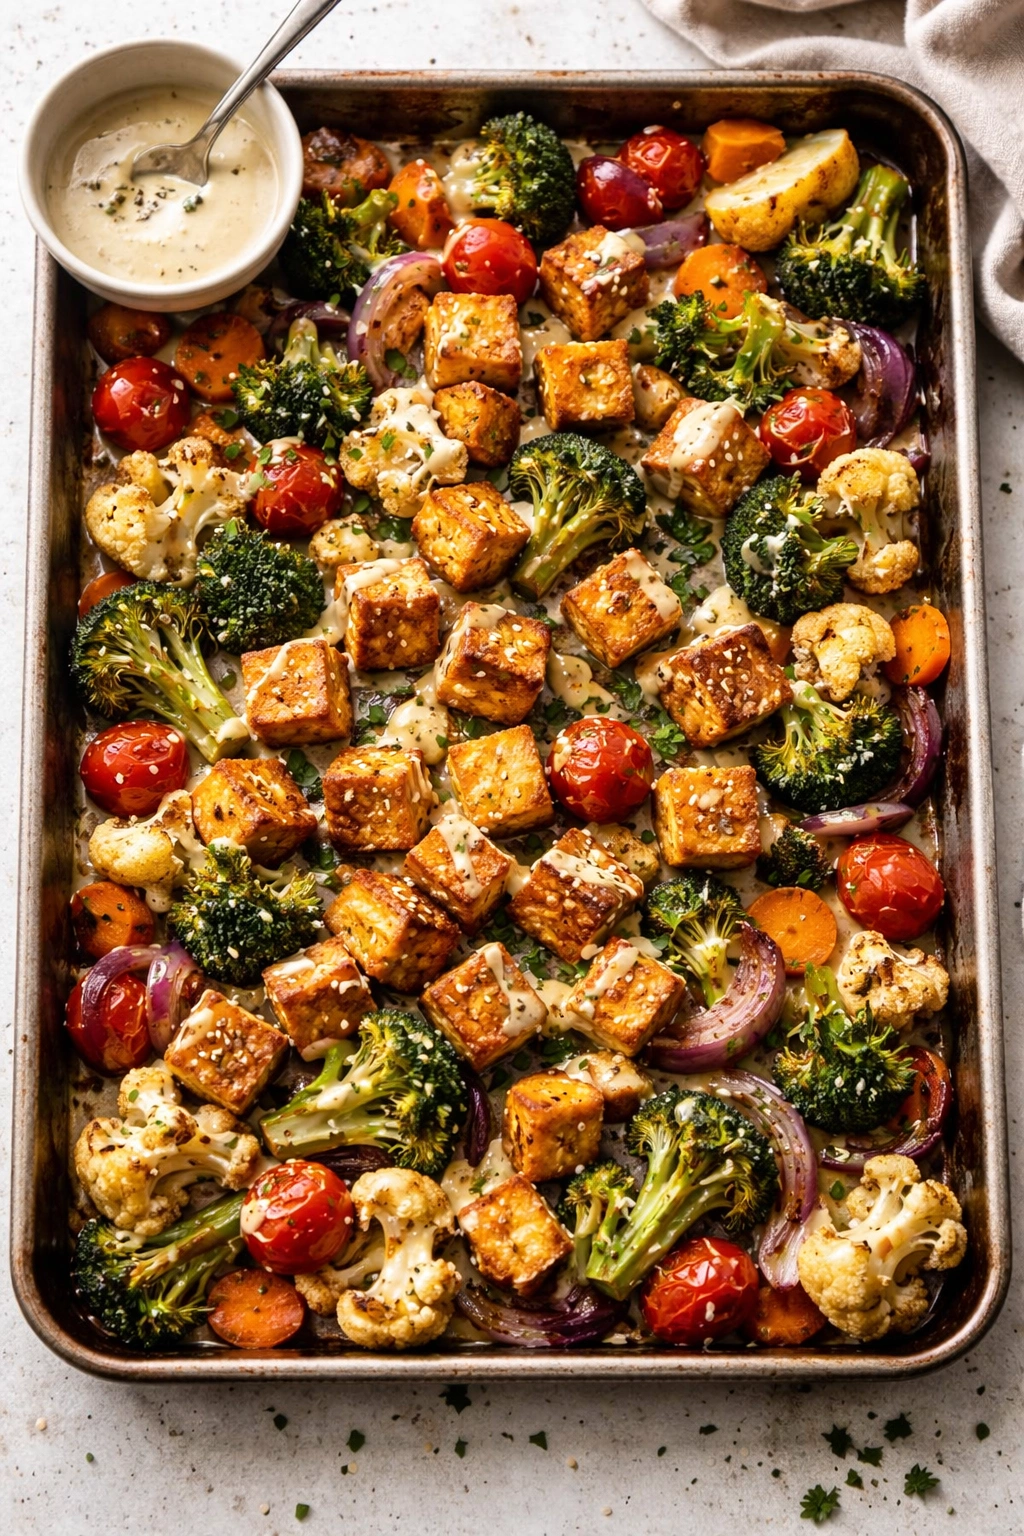
This lunch takes about 25 minutes total, but most of that is hands-off oven time while you’re checking emails or finishing up a morning task. The result is something warm, substantial, and deeply satisfying — vegetables that have actually caramelized and developed flavor, not steamed and pallid. Tofu gets aggressively seasoned and pressed to crisp it up, and a simple tahini sauce ties everything into something that tastes restaurant-quality but requires zero special technique.
Yield: Serves 1 (generously) | Prep Time: 12 minutes | Cook Time: 25 minutes | Total Time: 37 minutes | Difficulty: Intermediate — involves pressing tofu and managing oven temperature, but nothing complicated.
For the Roasted Vegetables and Tofu:
- 8 ounces extra-firm tofu, pressed to remove excess moisture (this is crucial — see tip below)
- 2 cups mixed vegetables cut into bite-sized pieces (I use a mix of 1 cup broccoli florets, ½ cup bell peppers, ½ cup red onion, and optional mushrooms or zucchini)
- 3 tablespoons olive oil, divided
- 1 teaspoon garlic powder
- ¾ teaspoon smoked paprika
- ½ teaspoon ground cumin
- ¼ teaspoon cayenne pepper (optional, for heat)
- Salt and black pepper to taste
- 1 tablespoon soy sauce or tamari
- ½ tablespoon rice vinegar
For the Tahini Sauce:
- 3 tablespoons tahini
- 2 tablespoons warm water (add more if needed for consistency)
- 1½ tablespoons fresh lemon juice
- 1 small clove garlic, minced
- Salt and black pepper to taste
- Pinch of cayenne (optional)
Prepare the Tofu:
-
Remove the tofu from its package and drain the liquid. Wrap the block in a clean kitchen towel and place it on a plate. Set a heavy skillet or cutting board on top, and leave it for 5 to 8 minutes — this presses out excess water so the tofu can actually crisp when it roasts rather than steam.
-
After pressing, cut the tofu into bite-sized cubes, roughly ¾ inch on each side. Pat them dry gently with paper towels.
-
In a small bowl, combine the garlic powder, smoked paprika, cumin, cayenne (if using), and a generous pinch of salt and black pepper.
-
Drizzle the tofu cubes with 1½ tablespoons of the olive oil and toss gently. Sprinkle the spice mixture over the tofu and toss again until every piece is coated. Drizzle with the soy sauce and rice vinegar, toss once more, and set aside.
Roast Everything:
-
Preheat your oven to 425°F (220°C) and line a large sheet pan with parchment paper.
-
Spread the cut vegetables across the sheet pan in a single layer. Drizzle with the remaining 1½ tablespoons of olive oil, season with salt and pepper, and toss until everything is coated.
Advertisements -
Create a space in the center or scatter the seasoned tofu pieces evenly among the vegetables.
-
Roast for 20 to 25 minutes, stirring everything halfway through the cooking time. You’re looking for the vegetables to be tender and slightly caramelized at the edges, and the tofu to be golden brown and crispy on the outside.
Make the Tahini Sauce:
-
While everything is roasting, whisk together the tahini, warm water, lemon juice, minced garlic, salt, pepper, and cayenne (if using). Start with 2 tablespoons of water and add more a teaspoon at a time until you reach a pourable consistency — it should be thinner than peanut butter but thicker than water.
-
Taste and adjust the seasoning. If it’s too thick, thin it with a tiny bit more water. If it needs more flavor, add a squeeze more lemon juice.
Assemble and Serve:
-
Once everything comes out of the oven, transfer the roasted vegetables and tofu to a bowl or plate.
-
Drizzle the tahini sauce generously over the top, add any fresh herbs you have on hand (cilantro, parsley, or green onions are all wonderful), and eat while it’s still warm.
Why This Works for Work-From-Home
The oven does the heavy lifting here. You spend 10 minutes prepping and seasoning, then just walk away. While everything roasts, you’re working, answering emails, or taking a real break — not hovering over a stove. The result is warm food that actually satisfies, not a cold salad you picked at all afternoon. You can make double or triple this on a weekend and eat it all week — it reheats beautifully in a 350°F oven for 10 minutes or a microwave for 2-3 minutes.
Critical Tofu Pressing Tip
Pressing tofu isn’t optional if you want it crispy. Water is the enemy of browning. If you don’t have a tofu press, wrapping it in a towel and letting it sit under weight in the fridge for 20 to 30 minutes works even better than 5 minutes on the counter. The drier your tofu, the crispier it will get in the oven.
Vegetable Swaps and Variations
Use whatever vegetables you have. Carrots, Brussels sprouts, cauliflower, green beans, or sweet potatoes all roast beautifully at 425°F. Aim for pieces roughly the same size so everything cooks evenly in about 25 minutes.
If tofu isn’t your thing, substitute chickpeas tossed in the same spice mixture, or chunk up some firm white fish if you eat seafood. The real magic is in the roasting and the tahini sauce, so swap the protein however makes sense for your diet.
4. Creamy Pasta with White Beans, Spinach, and Lemon
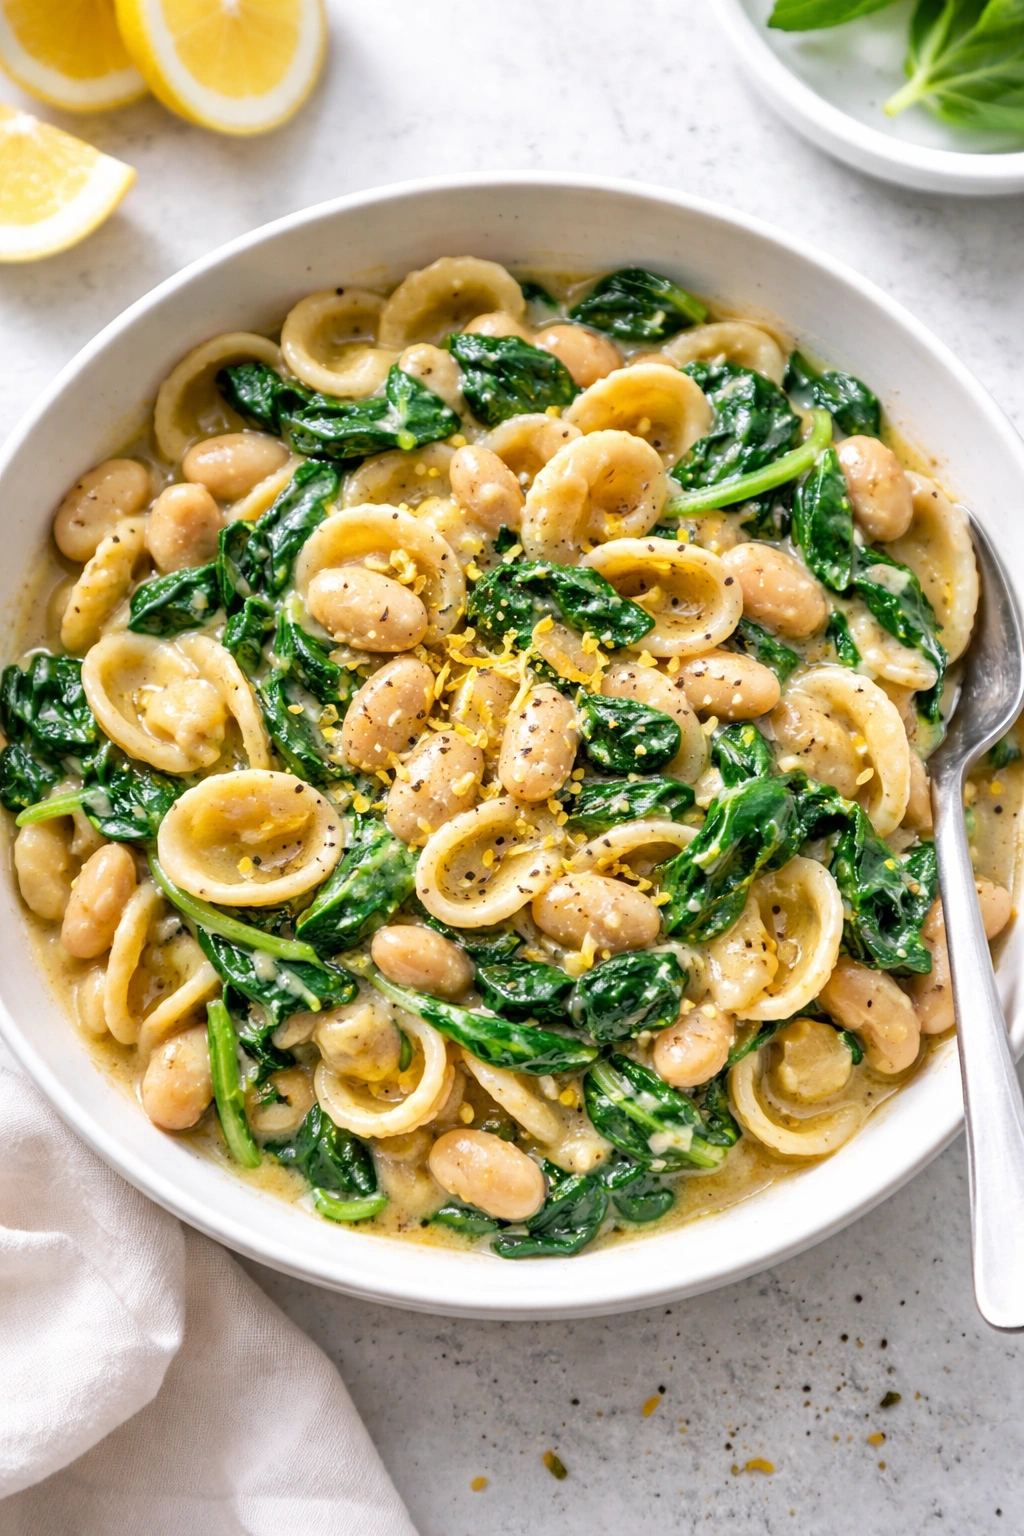
This is comfort food that doesn’t make you feel sluggish. Pasta delivers satisfaction; white beans add protein and creaminess without any cream; fresh spinach adds nutrients and color; and lemon prevents the whole thing from feeling heavy. You can use canned beans and pre-cooked pasta if you’ve made some earlier in the week, which means this lunch can come together in about 12 minutes total. Even if you’re cooking pasta from scratch, it’s still closer to 20 minutes.
Yield: Serves 1 | Prep Time: 5 minutes | Cook Time: 12 minutes | Total Time: 17 minutes | Difficulty: Beginner — just boiling pasta and heating ingredients.
Ingredients:
- 2 ounces dried pasta (about 1 cup cooked) — use whatever shape you like; small shapes like ditalini or penne work especially well
- 1 tablespoon olive oil
- 3 cloves garlic, thinly sliced
- ¾ cup canned white beans (cannellini or great northern), drained and rinsed
- 2 generous handfuls of fresh baby spinach (about 1½ to 2 cups loosely packed)
- ⅓ cup vegetable or chicken broth
- 2 tablespoons heavy cream or Greek yogurt (or skip entirely if you want it lighter)
- Zest of ½ lemon
- 1 tablespoon fresh lemon juice
- ¼ teaspoon red pepper flakes (optional, but adds nice warmth)
- Salt and black pepper to taste
- Freshly grated Parmesan cheese for serving
- Fresh basil or parsley for garnish (optional)
Cook the Pasta:
-
Bring a pot of salted water to a boil and add the pasta. Cook for about 1 minute less than the package directions suggest — you want it slightly al dente since it’ll cook a bit more when you mix it with the warm sauce.
-
Reserve ¼ cup of the pasta cooking water before you drain it. This starchy water is liquid gold for loosening and binding the sauce.
-
Drain the pasta and set aside.
Make the Sauce:
-
While the pasta cooks, heat the olive oil in a large skillet over medium heat. Add the sliced garlic and cook for about 1 minute, stirring occasionally, until fragrant but not browned — burned garlic is bitter.
-
Add the white beans and broth to the skillet. Stir and let everything heat through for about 2 minutes.
-
Add the spinach by the handful, stirring after each addition until it wilts into the pan. This takes about 2 to 3 minutes total.
-
Reduce the heat to low. Stir in the cream or Greek yogurt (if using), lemon zest, lemon juice, and red pepper flakes. Taste and season generously with salt and black pepper. Remember that you’ll be adding salty Parmesan at the end, so don’t oversalt, but make sure you can taste the lemon and garlic.
Combine:
-
Add the cooked pasta to the skillet and toss everything together. If the sauce looks too thick, add a splash of the reserved pasta water — a little at a time — until you reach a consistency you like. The sauce should coat the pasta, not be swimming in liquid.
-
Transfer to a bowl, top with fresh Parmesan, a crack of black pepper, and fresh herbs if you have them.
-
Eat while it’s warm, straight from your bowl. No fancy plating required.
Why This Works for Work-From-Home
This is genuinely fast, and the whole process is low-stress. There’s no precise timing or finicky technique. If your pasta is a minute too long, it’s still delicious. If you forget about the garlic for 30 seconds and it smells a bit darker, the dish is still good. You can use frozen spinach if fresh isn’t around — just thaw it and squeeze out excess water first. You can use any white beans you like. This is forgiving food that comes together quickly and tastes like you put effort in, when actually you didn’t.
Make-Ahead Strategy
Cook the pasta the night before and store it in the fridge with a light drizzle of olive oil to prevent sticking. In the morning, you’re literally just heating the beans, wilting spinach, and combining — that takes maybe 8 minutes. You can even prep the garlic the night before if you want.
Flavor Variations That Work
Add sun-dried tomatoes, caramelized onions, or roasted red peppers for complexity. A small splash of white wine vinegar at the very end adds brightness. Fresh thyme, oregano, or sage all pair beautifully with this base. If you eat seafood, a handful of shrimp or canned tuna mixed in at the end turns it into a more substantial protein dish.
5. Grain Bowl with Roasted Chickpeas, Soft-Cooked Egg, and Quick-Pickled Vegetables
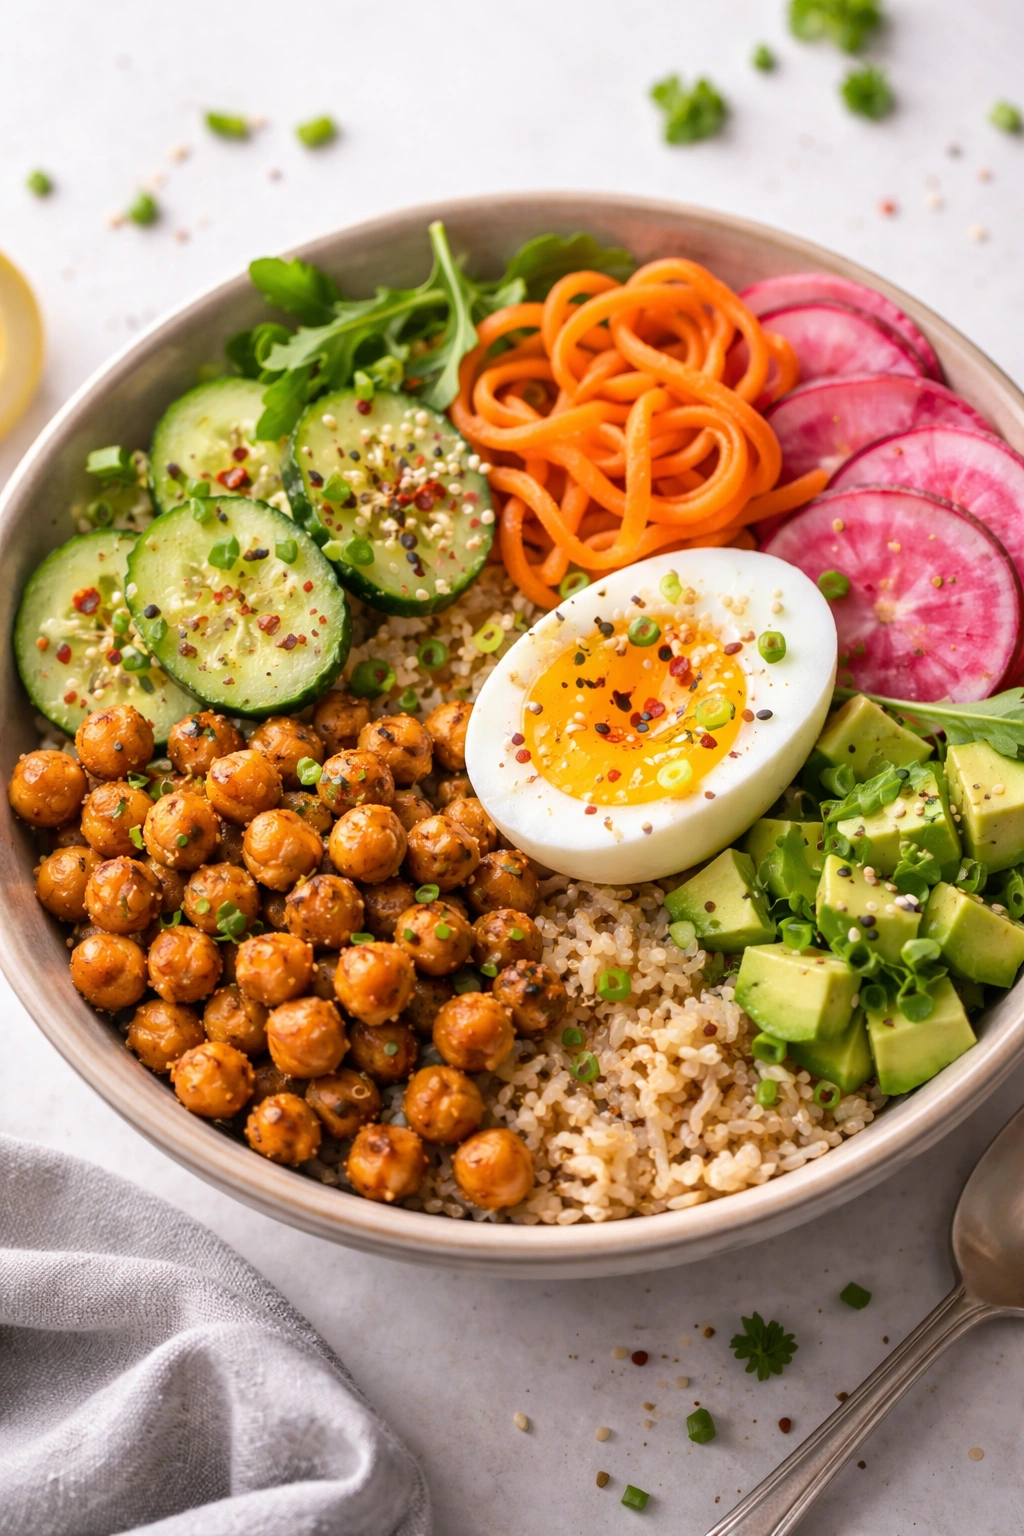
This is the lunch that looks like you spent hours on it but honestly took about 20 minutes, most of which is hands-off waiting. Grain bowls are infinitely customizable based on whatever you have around — use any grain, any roasted vegetable, any source of protein. This version uses crispy roasted chickpeas for crunch and sustained energy, a soft-cooked egg for richness, and quick-pickled vegetables for brightness and tang. It comes together beautifully and tastes genuinely restaurant-quality.
Yield: Serves 1 | Prep Time: 10 minutes | Cook Time: 20 minutes | Total Time: 30 minutes | Difficulty: Intermediate — involves roasting chickpeas and managing egg timing, but both are forgiving.
For the Quick-Pickled Vegetables:
- ¼ cup red onion, very thinly sliced
- ⅓ cup shredded carrot (pre-shredded is fine)
- ¼ cup rice vinegar
- ¼ cup water
- ½ tablespoon granulated sugar
- ¼ teaspoon salt
For the Roasted Chickpeas:
- ¾ cup canned chickpeas, drained and rinsed thoroughly, then patted very dry with a towel
- 1 tablespoon olive oil
- ½ teaspoon smoked paprika
- ¼ teaspoon garlic powder
- ¼ teaspoon cumin
- ¼ teaspoon salt
- Cracked black pepper
For the Bowl:
- ½ cup cooked grain (brown rice, quinoa, farro, barley, or millet all work beautifully)
- 1 generous handful of fresh greens (spinach, arugula, mixed greens, or whatever you have)
- 1 large egg
- 2 to 3 tablespoons tahini or other creamy sauce (hummus, yogurt-based dressing, or creamy ginger dressing all work)
- Optional toppings: fresh herbs, sliced avocado, toasted seeds, or additional vegetables
- Salt and pepper to taste
Make the Quick Pickle:
-
Place the thinly sliced red onion and shredded carrot in a small bowl or jar.
-
In a separate small bowl, whisk together the rice vinegar, water, sugar, and salt until the sugar and salt dissolve.
-
Pour the pickling liquid over the vegetables, stir, and set aside. These will be ready to eat in about 10 minutes, but they actually taste better if you let them sit for 30 minutes to an hour. You can make these the night before and store them in the fridge for up to a week.
Advertisements
Roast the Chickpeas:
-
Preheat your oven to 400°F (200°C) and line a sheet pan with parchment paper.
-
Pat the drained chickpeas completely dry with paper towels — any residual moisture prevents them from crisping. This step matters. Don’t skip it.
-
Toss the dried chickpeas with the olive oil, smoked paprika, garlic powder, cumin, salt, and black pepper until every chickpea is lightly coated.
-
Spread them in a single layer on the prepared sheet pan and roast for 18 to 22 minutes, shaking the pan halfway through. You’re looking for them to be golden brown and crispy on the outside. They’ll firm up more as they cool, so even if they seem slightly soft coming out of the oven, they’ll crisp up.
Cook the Egg:
-
While the chickpeas roast, bring a small pot of water to a boil. Gently lower the egg into the boiling water and set a timer for exactly 6 minutes and 30 seconds for a jammy, runny yolk with a set white. (If you prefer a harder yolk, go for 8 to 9 minutes. If you want it softer and runnier, go for 5 to 6 minutes.)
-
When the timer goes off, immediately transfer the egg to a bowl of ice water to stop the cooking. Let it cool for about 2 minutes, then gently peel under cool running water, starting at the wider end where there’s usually a small air pocket.
Assemble the Bowl:
-
If your grain is cold, warm it briefly — either in the microwave for 1 minute or by adding it to the warm roasted chickpeas for a minute. You want it warm but not piping hot.
Advertisements -
Place the grain in a bowl and top it with the fresh greens, creating a bed.
-
Arrange the roasted chickpeas around the bowl, add a generous dollop of the quick-pickled vegetables (drain them slightly so excess liquid doesn’t make everything soggy), and place the halved soft-cooked egg in the center.
-
Drizzle the tahini or sauce all over, season everything lightly with salt and pepper, and add any optional garnishes you have on hand.
Why This Works for Work-From-Home
Grain bowls are the ultimate customizable lunch. You can make the roasted chickpeas in advance and store them in an airtight container for up to 5 days. The pickled vegetables last even longer — up to a week in the fridge. If you keep cooked grains on hand (most grains keep beautifully for 4 to 5 days refrigerated), you can literally assemble this bowl in 5 minutes by just pulling things from your fridge, cracking a soft-cooked egg from yesterday’s batch, and drizzling sauce. It’s practical meal prep that doesn’t feel rigid.
Make-Ahead and Batch Cooking Strategy
Cook a large batch of grain on Sunday and portion it into containers for the week. Roast a big tray of chickpeas and store them dry in a container — they’ll last through Friday. Make a jar of quick-pickled vegetables and let them sit in the fridge, ready to use whenever. Soft-cooked eggs keep beautifully for 3 to 4 days — boil half a dozen at the start of the week. Then every day, you’re just assembling from prepped components. This isn’t really cooking; it’s strategic assembly.
Endless Variation Possibilities
The beauty of a grain bowl is that it accommodates whatever you have. Use any cooked grain, any vegetables raw or roasted, any protein source (tofu, beans, fish, chicken, or just the egg), any sauce or dressing, and any fresh herbs or garnishes. One day it’s Mediterranean with feta and olives. The next day it’s Asian-inspired with ginger-soy sauce and sesame seeds. The day after that it’s Mexican-flavored with cilantro and lime. The formula stays the same; the flavors change completely.
Planning Your Work-From-Home Lunch Week
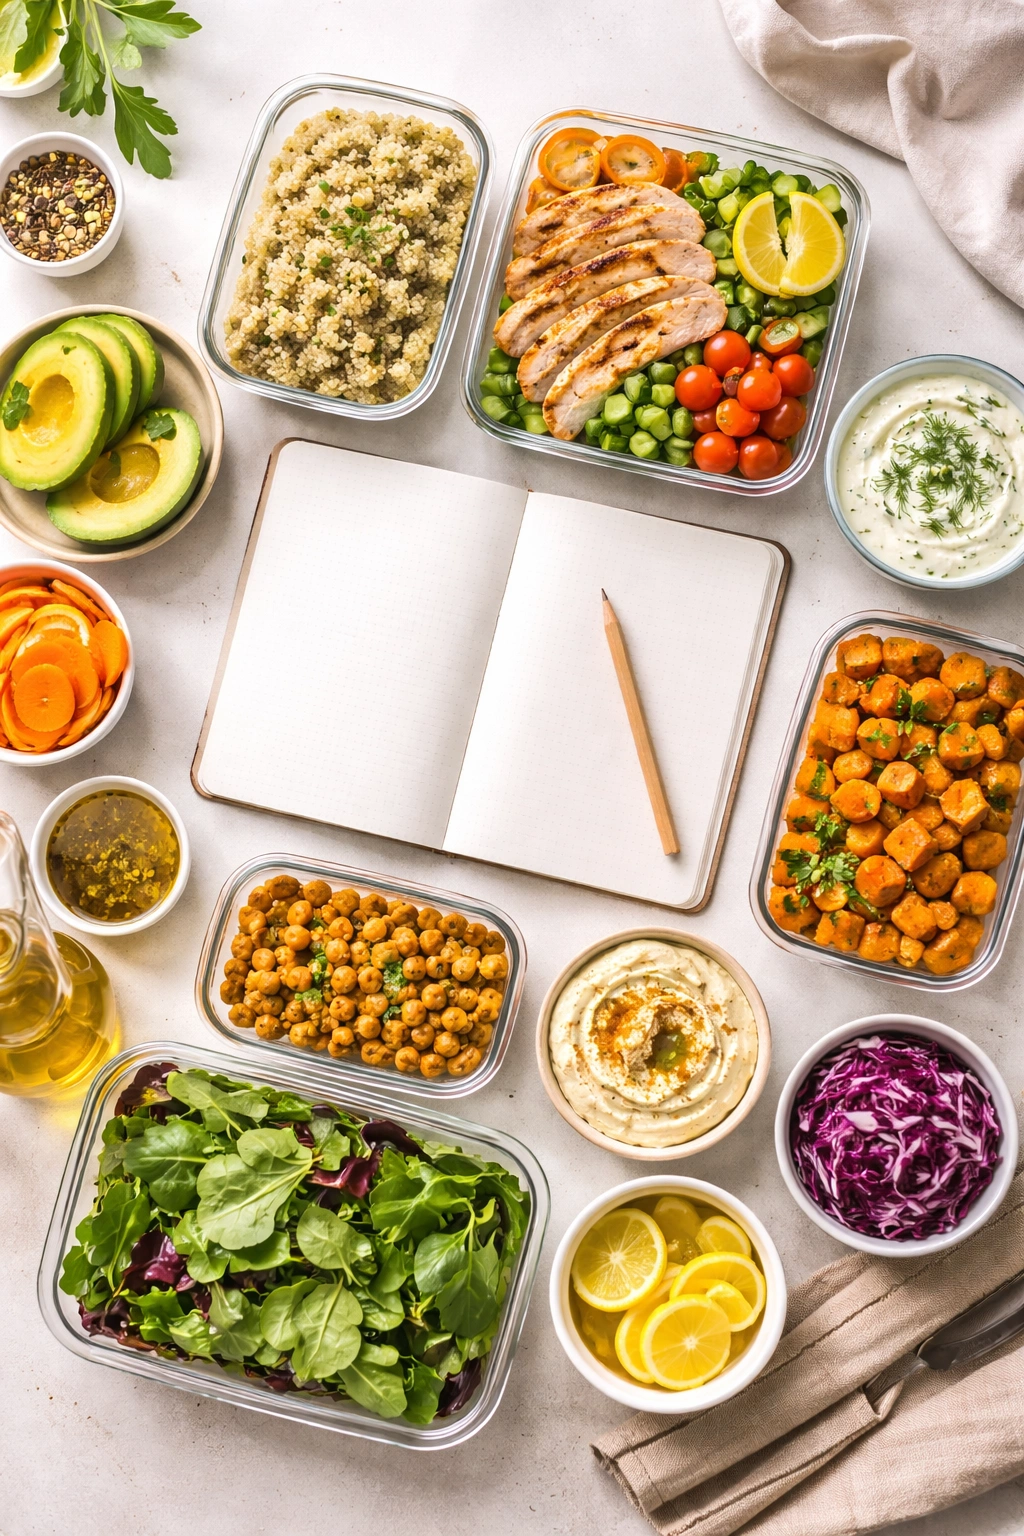
The real secret to never getting bored with these five lunches is thinking about meal prep strategically. You don’t need to spend your entire Sunday cooking — just 30 minutes of smart prep work makes the whole week effortless.
On Sunday evening (or whenever works for you), cook a big batch of grains. Brown rice, quinoa, or farro all take about 25 to 35 minutes and store beautifully. While that’s cooking, roast a large sheet pan of chickpeas using the method from the grain bowl recipe — roast enough to use throughout the week. If you eat eggs, boil half a dozen soft-cooked eggs and store them in the fridge.
Chop your vegetables the night before or morning of — most vegetables keep perfectly well for a few days when stored properly in sealed containers. Dress your greens right before eating, not hours ahead, so they stay crisp and don’t get soggy.
Make the quick-pickled vegetables and let them sit in the fridge all week. They actually taste better the longer they sit. This is something you can literally make once and forget about until Friday.
For the Mediterranean chickpea salad, keep everything separate until you’re ready to eat — dressing in one container, chickpeas and vegetables in another, bread separate. Toast the bread right before you eat so it stays crispy.
Storage and Freshness Guidelines
Cooked grains stay fresh in the refrigerator for 4 to 5 days in sealed containers. Keep them plain without dressing so they don’t get soggy. Roasted chickpeas keep for up to a week in an airtight container at room temperature — they’ll even stay crispy. Quick-pickled vegetables last a full week or more in the fridge. Soft-cooked eggs keep for 3 to 4 days. Raw vegetables last 3 to 5 days depending on the vegetable — store them in sealed containers or wrapped loosely in damp paper towels.
Fresh greens are the one component that doesn’t keep well, so buy them closer to when you’ll eat them. Store them in sealed containers with a paper towel to absorb excess moisture.
The Real Benefit of Having Five Options
The psychological impact of having five different lunch options throughout the week is huge. You’re not eating the same thing five days in a row, so you don’t get sick of it. If you’re craving something light, you have the chickpea salad or pasta. If you want something warm and substantial, you have the sheet pan roasted vegetables or the grain bowl. If you want something that takes almost no time, you have the smashed chickpea toast.
This variety keeps lunch interesting without requiring you to cook five completely different meals. You’re using the same pantry staples — chickpeas, grains, olive oil, garlic, lemon — across all of them. You’re building muscle memory with the techniques. By the end of the week, you could make any of these with your eyes closed.
Final Thoughts
The lunches that work best for work-from-home situations aren’t the ones that require the most prep or the fanciest ingredients. They’re the ones you actually want to eat, that come together without stress, and that genuinely fuel your afternoon without leaving you in an energy slump by 3 p.m.
All five of these lunches check those boxes. They’re flexible enough to work with whatever you have in your pantry and fridge. They’re fast enough that you’re not spending half your lunch break cooking. They taste good enough that you’re genuinely excited to eat them, not just forcing down something nutritionally sound because you should.
Pick one or two to start with. Make them a few times until they feel easy. Then rotate in another. Once you’ve built that foundation of recipes you can make without thinking, you’ll find that work-from-home lunches become something you actually look forward to rather than something you stress about. That shift — from lunch being a problem to solve to lunch being a genuine midday highlight — is worth the small amount of planning upfront.